|
|
|
Porsche, and the Porsche crest are registered trademarks of Dr. Ing. h.c. F. Porsche AG.
This site is not affiliated with Porsche in any way. Its only purpose is to provide an online forum for car enthusiasts. All other trademarks are property of their respective owners. |
|
|


| Aaron Cox |
 Oct 14 2007, 08:58 PM Oct 14 2007, 08:58 PM
Post
#21
|
|
Professional Tinkerer  Group: Retired Admin Posts: 24,548 Joined: 1-February 03 From: Corona, CA Member No.: 219 Region Association: Southern California |
hmm... lots of people in that boat.
going to later 3.5" struts means, you A ) have to pony up for them (IMG:style_emoticons/default/tongue.gif) B ) use inserts for a heavier 911, or have your 911 units revalved for 914 weight characteristics. So myself and craig downs sat down and did some thinking. We wanted to achieve the sleeper look of 15" wheels, but something more modern than M calipers, A calipers, and less expensive than S calipers, AND something you can get parts for (tried getting 951/944 turbo caliper parts lately????) so we came up with boxsters.... (NON S) *Fairly Cost effective *light weight *pads are double the size *use readily available 911 carrera rotors *parts are cheap and available. *the calipers can be as new as 2003.... So how do you achieve this? pretty simple. Several mockup sessions behind our favorite mexican food place on lunch breaks.... having the parts... and having a mill. unlike 3.5" struts, a bolt on solution could not be made to fit under 15" wheels. The 3" ears interfere with the brake pads on the calipers, and spacing them out to clear would require a bigger rotor (951?) and makes 16" wheels mandatory. Here is what we came up with The unsuspecting victims.... (fronts and rears.... (rears are going on soon)) Cheap. Light. Newer. Gooder 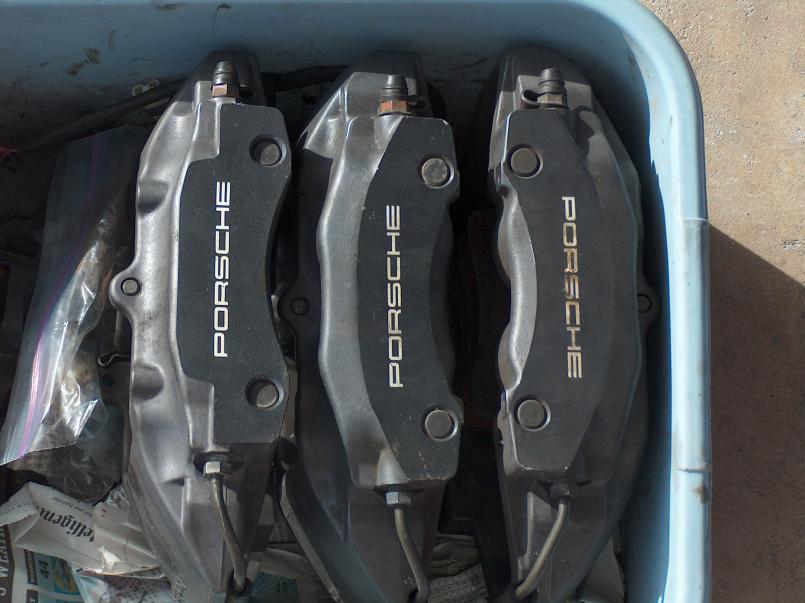 one of the jigs, ready to put a step into the strut. 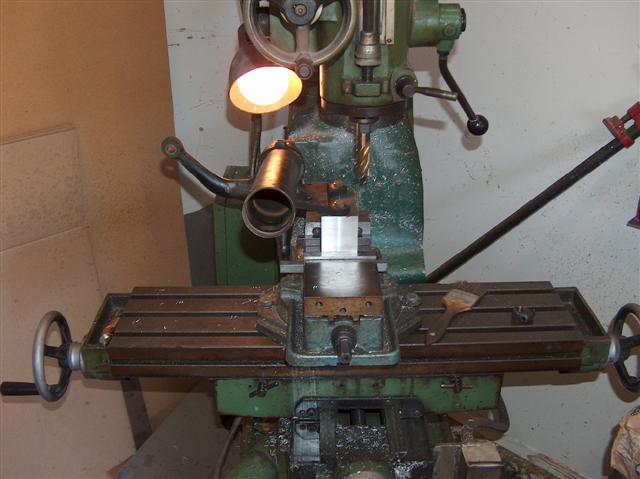 making a level 'step' for the adapter to lock into and a nice level/true support. 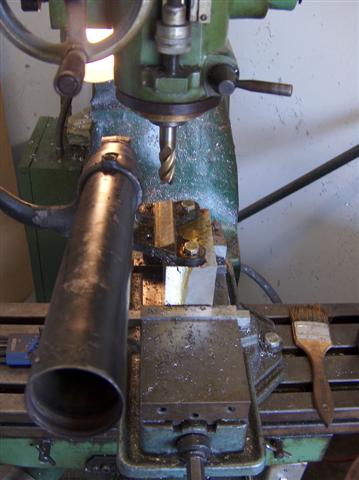 The finished products, after removing a certain amount of material. Nice and flat and true, lots of surface area (IMG:style_emoticons/default/smile.gif) 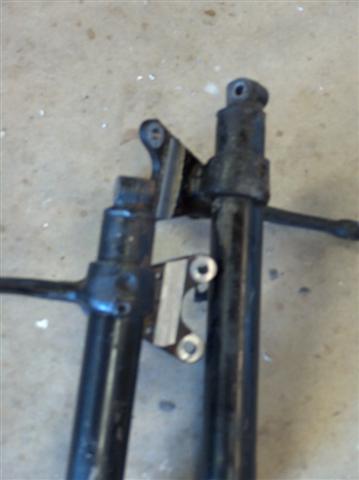 The corresponding step about to be cut into the adapter blocks. 6061 T6 Aluminum. 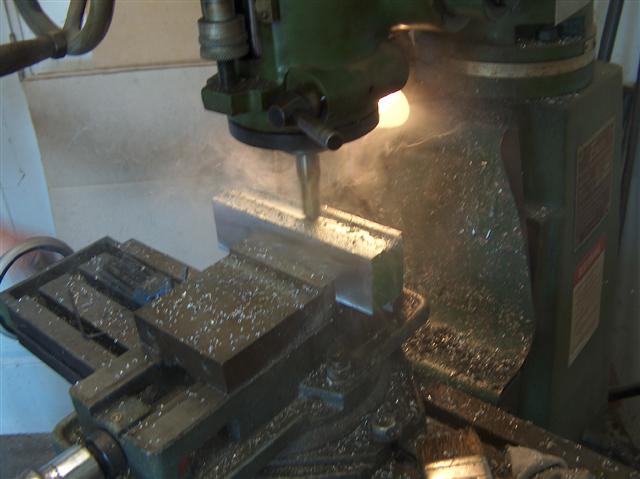 fast forward a few to the final products 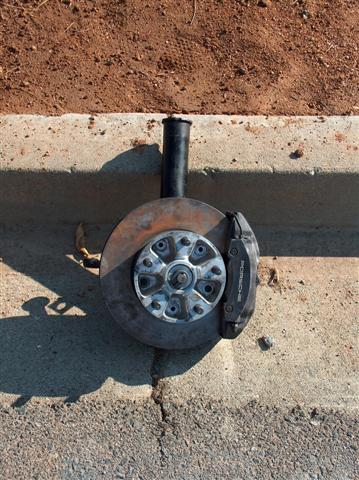 Attached image(s) 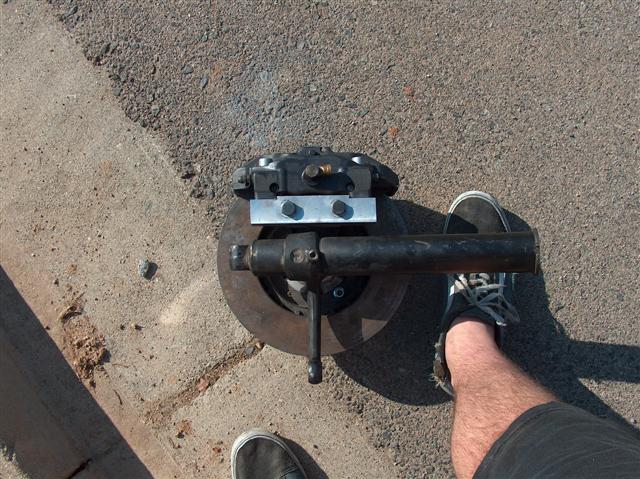 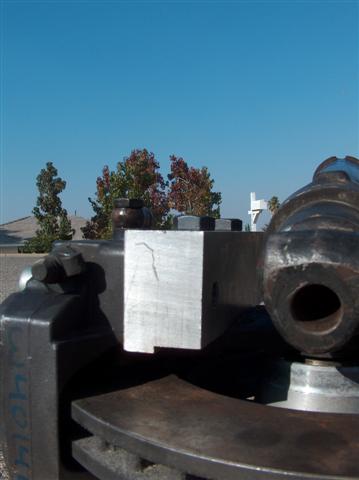 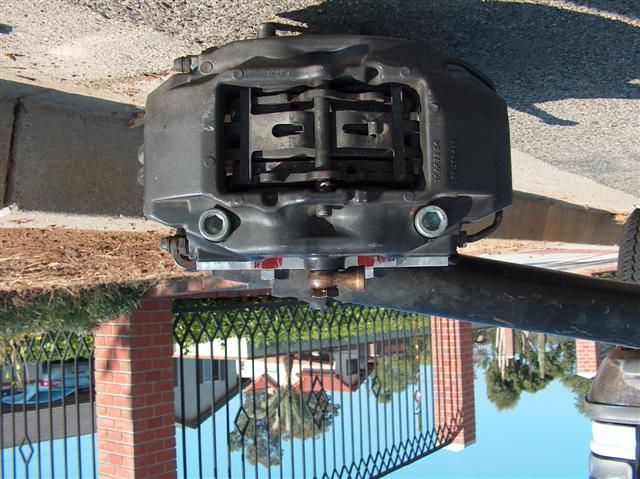  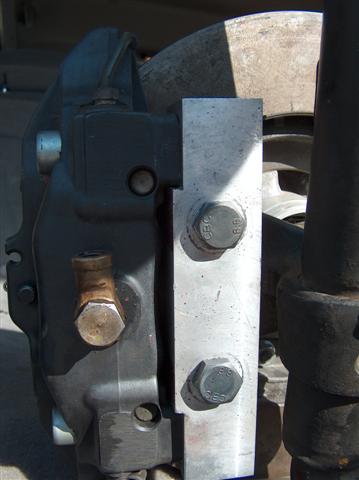
|
   |

 
|
Posts in this topic
Aaron Cox So, You want Boxster Calipers, under 15" wheels... Oct 14 2007, 08:58 PM Dan (Almaden Valley) any plans on giving out the specifics..?
or is th... Oct 14 2007, 09:07 PM sixnotfour Are those really your shoes?
Nice , patent pendin... Oct 14 2007, 09:15 PM
Dan (Almaden Valley) any plans on giving out the specifics..?
or is th... Oct 14 2007, 09:07 PM sixnotfour Are those really your shoes?
Nice , patent pendin... Oct 14 2007, 09:15 PM KaptKaos
Are those really your shoes?
For years, we hav... Oct 14 2007, 09:21 PM
KaptKaos
Are those really your shoes?
For years, we hav... Oct 14 2007, 09:21 PM davesprinkle
Are those really your shoes?
Nice , patent pendi... Oct 16 2007, 09:43 AM Krieger914 Very nice work, but I have to be a shit stirrer. ... Oct 14 2007, 09:39 PM Aaron Cox to answer a few questions...
-914 struts do NOT fi... Oct 14 2007, 10:08 PM Aaron Cox Wheel fitment:
We have tested the fit of
15x6... Oct 14 2007, 10:10 PM rhodyguy are you building a track car? Oct 14 2007, 10:50 PM Aaron Cox just overkill, and engineering excercises :P
goin ... Oct 14 2007, 10:58 PM Travis Neff That freakin rocks! Oct 14 2007, 10:59 PM rhodyguy i see. party on. what does a set of 4 calipers and... Oct 14 2007, 11:00 PM Aaron Cox
i see. party on. what does a set of 4 calipers an... Oct 14 2007, 11:05 PM rhodyguy cool stuff, but too rich for my blood. Oct 14 2007, 11:11 PM jd74914 Nice Aaron, I like it.
Will there really be much... Oct 14 2007, 11:59 PM Twystd1 Awww Hell,
I did the same thing with JB weld and ... Oct 15 2007, 12:14 AM Brando Holy shnap, that shit came out good bro :clap:
Ma... Oct 15 2007, 04:03 AM woobn8r Nice Job,
They look almost like the Boxter brake ... Oct 15 2007, 08:50 AM siverson Great work! Oct 15 2007, 10:03 AM brer Nice! but ugly.
;) Oct 15 2007, 11:17 AM Brian Mifsud
Nice! but ugly.
;)
:agree: so, skippin... Oct 15 2007, 11:42 AM Aaron Cox
Nice! but ugly.
;)
we can finish the ed... Oct 15 2007, 12:23 PM brer I'm a crusader for beauty.
Like Everett Rues... Oct 15 2007, 12:35 PM Brando Uhhh... just noticed. I think you got the wrong ca... Oct 15 2007, 02:25 PM Aaron Cox
Uhhh... just noticed. I think you got the wrong c... Oct 16 2007, 12:14 AM Dr Evil Great, just what I need, something else to want af... Oct 15 2007, 09:22 PM brer I'd like a set of those some day.
maybe we can... Oct 16 2007, 12:45 AM Brando "Teasers" they were indeed!
They... Oct 16 2007, 07:22 AM thesey914 How do the Boxster callipers compare to my 4pot Br... Oct 16 2007, 08:37 AM Aaron Cox
How do the Boxster callipers compare to my 4pot B... Oct 16 2007, 10:34 AM BKLA Aaron -
Show us the rear (not yours. fool! :... Oct 16 2007, 08:49 AM craig downs I have just finished Aaron's struts and I will... Oct 25 2007, 01:28 AM craig downs Holes drilled
Oct 25 2007, 01:30 AM craig downs Since the mounting holes are into the step I had t... Oct 25 2007, 01:36 AM craig downs Using a transfer punch to mark the mounting holes ... Oct 25 2007, 01:41 AM craig downs Tapping holes in the struts and checking multiple ... Oct 25 2007, 01:51 AM craig downs All for now will add more later Oct 25 2007, 01:54 AM Aaron Cox Here is a complete pic :)
Install went great - no... Oct 27 2007, 11:35 PM craig downs Here is the rest of the machining
The block drill... Oct 28 2007, 04:07 PM craig downs Oops on the photo above the caliper is centered on... Oct 28 2007, 04:14 PM craig downs Getting ready to drill the mounting holes showing ... Oct 28 2007, 04:17 PM TeenerTim How about an update?
Any idea of cost?
Would it be... Jan 11 2008, 08:36 AM craig downs Drilling the holes
Tapping the holes making sure... Oct 28 2007, 04:20 PM craig downs Caliper mounted to the strut
Oct 28 2007, 04:22 PM TVRLOTUSTR3
The brake line fittings on the caliper (Banjo) a... Jan 12 2008, 12:59 PM craig downs Cutting off a little of the old mounting ears so t... Oct 28 2007, 04:27 PM craig downs Sorry messed up again this is the 1st time I have ... Oct 28 2007, 04:34 PM craig downs Here it is installed in the car
Oct 28 2007, 04:37 PM Aaron Cox waiting on a tie rod end, and a pair of bolts - an... Oct 29 2007, 12:49 PM andys
waiting on a tie rod end, and a pair of bolts - a... Oct 29 2007, 12:54 PM Aaron Cox between 1 and 2x as big :)
i dont actually know, ... Oct 29 2007, 01:05 PM john rogers Would it be possible to not mill the strut mount w... Oct 29 2007, 01:32 PM Aaron Cox we havent looked at a 4cyl strut....
the ears mus... Oct 29 2007, 03:48 PM Aaron Cox here are more facts about the swap of calipers vs ... Oct 29 2007, 05:32 PM Brando What do Boxster calipers usually run for a set of ... Oct 30 2007, 01:31 PM Aaron Cox rich johnson makes a simple bolt on adapter for th... Oct 30 2007, 04:15 PM neo914-6 Rich's fine work:
He repainted the calipers... Oct 30 2007, 05:24 PM Brando What stopped you from using Boxster S calipers? Si... Oct 30 2007, 06:08 PM neo914-6
What stopped you from using Boxster S calipers? S... Oct 30 2007, 06:38 PM Aaron Cox They stop on a dime and give ya change :)
cost? m... Jan 11 2008, 03:27 PM So.Cal.914 Nice Aaron. :) Jan 11 2008, 03:34 PM spunone WOW Aaron had shoes on ...... Jan 11 2008, 07:29 PM craig downs Boy do they work. We got them mounted and went for... Jan 11 2008, 07:40 PM craig downs Oh the rears are a lot easier. They just require a... Jan 11 2008, 07:48 PM McMark Cool, cool, cool! Jan 11 2008, 07:52 PM craig downs The banjo fitting is from a 911 M caliper Jan 12 2008, 02:48 PM TVRLOTUSTR3
The banjo fitting is from a 911 M caliper
I have... Jan 12 2008, 06:13 PM TVRLOTUSTR3 I take it all back, I have A calipers 3.5". I... Jan 12 2008, 06:30 PM daveyboybadion So did you guys just post these on Ebay for sale?.... Jan 17 2008, 03:43 AM Aaron Cox nope..... alot of work.
with these pictures, and a... Jan 17 2008, 11:03 AM
davesprinkle
Are those really your shoes?
Nice , patent pendi... Oct 16 2007, 09:43 AM Krieger914 Very nice work, but I have to be a shit stirrer. ... Oct 14 2007, 09:39 PM Aaron Cox to answer a few questions...
-914 struts do NOT fi... Oct 14 2007, 10:08 PM Aaron Cox Wheel fitment:
We have tested the fit of
15x6... Oct 14 2007, 10:10 PM rhodyguy are you building a track car? Oct 14 2007, 10:50 PM Aaron Cox just overkill, and engineering excercises :P
goin ... Oct 14 2007, 10:58 PM Travis Neff That freakin rocks! Oct 14 2007, 10:59 PM rhodyguy i see. party on. what does a set of 4 calipers and... Oct 14 2007, 11:00 PM Aaron Cox
i see. party on. what does a set of 4 calipers an... Oct 14 2007, 11:05 PM rhodyguy cool stuff, but too rich for my blood. Oct 14 2007, 11:11 PM jd74914 Nice Aaron, I like it.
Will there really be much... Oct 14 2007, 11:59 PM Twystd1 Awww Hell,
I did the same thing with JB weld and ... Oct 15 2007, 12:14 AM Brando Holy shnap, that shit came out good bro :clap:
Ma... Oct 15 2007, 04:03 AM woobn8r Nice Job,
They look almost like the Boxter brake ... Oct 15 2007, 08:50 AM siverson Great work! Oct 15 2007, 10:03 AM brer Nice! but ugly.
;) Oct 15 2007, 11:17 AM Brian Mifsud
Nice! but ugly.
;)
:agree: so, skippin... Oct 15 2007, 11:42 AM Aaron Cox
Nice! but ugly.
;)
we can finish the ed... Oct 15 2007, 12:23 PM brer I'm a crusader for beauty.
Like Everett Rues... Oct 15 2007, 12:35 PM Brando Uhhh... just noticed. I think you got the wrong ca... Oct 15 2007, 02:25 PM Aaron Cox
Uhhh... just noticed. I think you got the wrong c... Oct 16 2007, 12:14 AM Dr Evil Great, just what I need, something else to want af... Oct 15 2007, 09:22 PM brer I'd like a set of those some day.
maybe we can... Oct 16 2007, 12:45 AM Brando "Teasers" they were indeed!
They... Oct 16 2007, 07:22 AM thesey914 How do the Boxster callipers compare to my 4pot Br... Oct 16 2007, 08:37 AM Aaron Cox
How do the Boxster callipers compare to my 4pot B... Oct 16 2007, 10:34 AM BKLA Aaron -
Show us the rear (not yours. fool! :... Oct 16 2007, 08:49 AM craig downs I have just finished Aaron's struts and I will... Oct 25 2007, 01:28 AM craig downs Holes drilled
Oct 25 2007, 01:30 AM craig downs Since the mounting holes are into the step I had t... Oct 25 2007, 01:36 AM craig downs Using a transfer punch to mark the mounting holes ... Oct 25 2007, 01:41 AM craig downs Tapping holes in the struts and checking multiple ... Oct 25 2007, 01:51 AM craig downs All for now will add more later Oct 25 2007, 01:54 AM Aaron Cox Here is a complete pic :)
Install went great - no... Oct 27 2007, 11:35 PM craig downs Here is the rest of the machining
The block drill... Oct 28 2007, 04:07 PM craig downs Oops on the photo above the caliper is centered on... Oct 28 2007, 04:14 PM craig downs Getting ready to drill the mounting holes showing ... Oct 28 2007, 04:17 PM TeenerTim How about an update?
Any idea of cost?
Would it be... Jan 11 2008, 08:36 AM craig downs Drilling the holes
Tapping the holes making sure... Oct 28 2007, 04:20 PM craig downs Caliper mounted to the strut
Oct 28 2007, 04:22 PM TVRLOTUSTR3
The brake line fittings on the caliper (Banjo) a... Jan 12 2008, 12:59 PM craig downs Cutting off a little of the old mounting ears so t... Oct 28 2007, 04:27 PM craig downs Sorry messed up again this is the 1st time I have ... Oct 28 2007, 04:34 PM craig downs Here it is installed in the car
Oct 28 2007, 04:37 PM Aaron Cox waiting on a tie rod end, and a pair of bolts - an... Oct 29 2007, 12:49 PM andys
waiting on a tie rod end, and a pair of bolts - a... Oct 29 2007, 12:54 PM Aaron Cox between 1 and 2x as big :)
i dont actually know, ... Oct 29 2007, 01:05 PM john rogers Would it be possible to not mill the strut mount w... Oct 29 2007, 01:32 PM Aaron Cox we havent looked at a 4cyl strut....
the ears mus... Oct 29 2007, 03:48 PM Aaron Cox here are more facts about the swap of calipers vs ... Oct 29 2007, 05:32 PM Brando What do Boxster calipers usually run for a set of ... Oct 30 2007, 01:31 PM Aaron Cox rich johnson makes a simple bolt on adapter for th... Oct 30 2007, 04:15 PM neo914-6 Rich's fine work:
He repainted the calipers... Oct 30 2007, 05:24 PM Brando What stopped you from using Boxster S calipers? Si... Oct 30 2007, 06:08 PM neo914-6
What stopped you from using Boxster S calipers? S... Oct 30 2007, 06:38 PM Aaron Cox They stop on a dime and give ya change :)
cost? m... Jan 11 2008, 03:27 PM So.Cal.914 Nice Aaron. :) Jan 11 2008, 03:34 PM spunone WOW Aaron had shoes on ...... Jan 11 2008, 07:29 PM craig downs Boy do they work. We got them mounted and went for... Jan 11 2008, 07:40 PM craig downs Oh the rears are a lot easier. They just require a... Jan 11 2008, 07:48 PM McMark Cool, cool, cool! Jan 11 2008, 07:52 PM craig downs The banjo fitting is from a 911 M caliper Jan 12 2008, 02:48 PM TVRLOTUSTR3
The banjo fitting is from a 911 M caliper
I have... Jan 12 2008, 06:13 PM TVRLOTUSTR3 I take it all back, I have A calipers 3.5". I... Jan 12 2008, 06:30 PM daveyboybadion So did you guys just post these on Ebay for sale?.... Jan 17 2008, 03:43 AM Aaron Cox nope..... alot of work.
with these pictures, and a... Jan 17 2008, 11:03 AM  |
2 User(s) are reading this topic (2 Guests and 0 Anonymous Users)
0 Members:

|
Lo-Fi Version | Time is now: 8th July 2026 - 04:17 PM |
Invision Power Board
v9.1.4 © 2026 IPS, Inc.