|
|
|
Porsche, and the Porsche crest are registered trademarks of Dr. Ing. h.c. F. Porsche AG.
This site is not affiliated with Porsche in any way. Its only purpose is to provide an online forum for car enthusiasts. All other trademarks are property of their respective owners. |
|
|

  |

| 3d914 |
 Feb 4 2012, 07:08 PM Feb 4 2012, 07:08 PM
Post
#161
|
|
Senior Member  Group: Members Posts: 1,275 Joined: 24-September 03 From: Benson, AZ Member No.: 1,191 Region Association: Southwest Region |
Well got to work on the engine a little while electrician was here hooking up the compressor. Had to move stuff to the middle to run conduit along the wall - so garage is a mess.
Thanks to some used parts from Sierra Vista I now have the pieces to put together sufficient exhaust system for the bench test. Started off by welding a fitting to the muffler section. 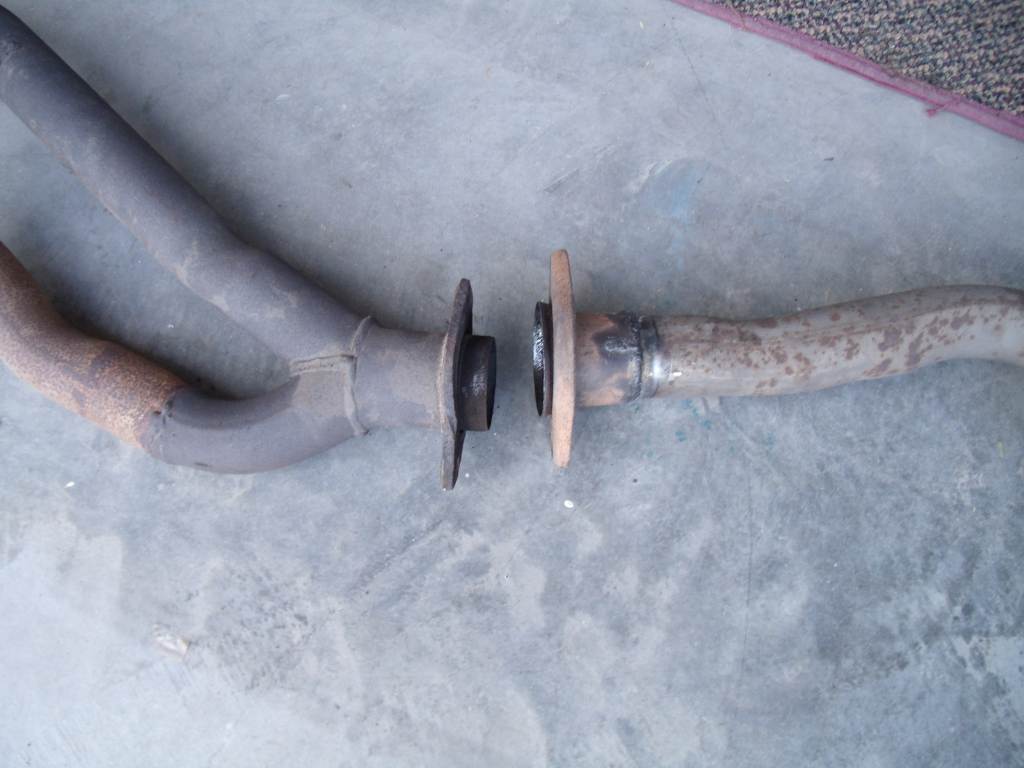 Now I've got the makings of a short, but complete, system. 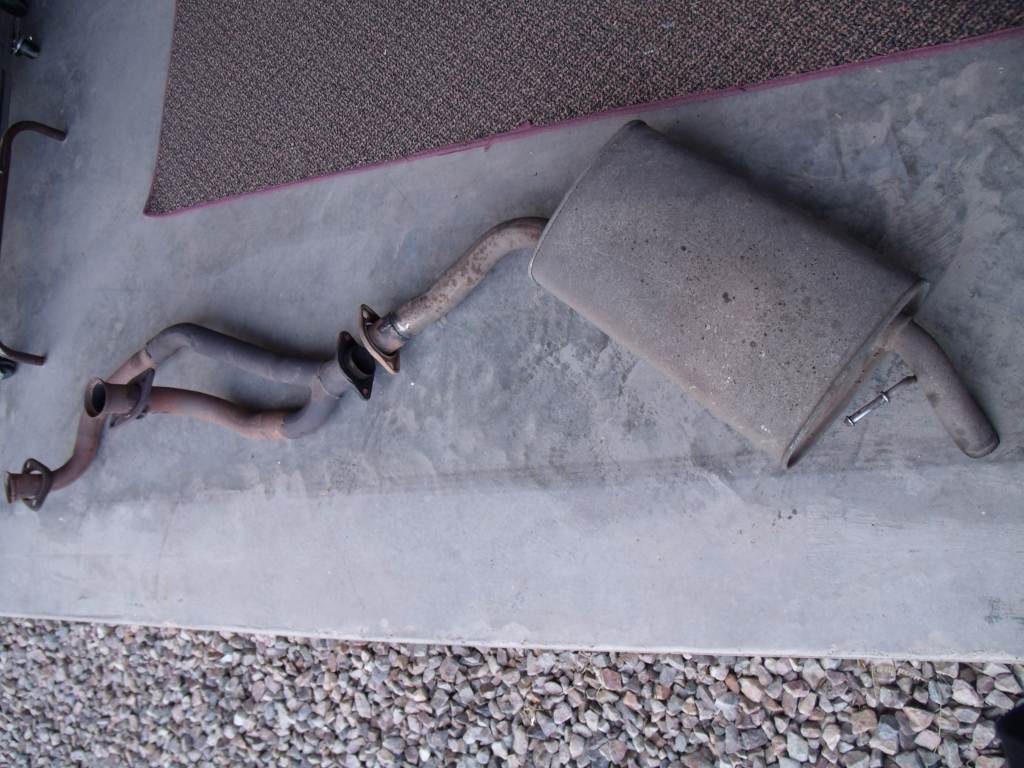 |
   |

 
|
| 3d914 |
Feb 19 2012, 05:40 PM
Post
#162
|
|
Senior Member Group: Members Posts: 1,275 Joined: 24-September 03 From: Benson, AZ Member No.: 1,191 Region Association: Southwest Region |
Been a decent weekend. Aside from getting the tires rotated on my wife's mini, I also made my first exhaust mockup for the final exhaust. Posted results over here.
|
|
|
|
| 3d914 |
Feb 19 2012, 05:48 PM
Post
#163
|
|
Senior Member Group: Members Posts: 1,275 Joined: 24-September 03 From: Benson, AZ Member No.: 1,191 Region Association: Southwest Region |
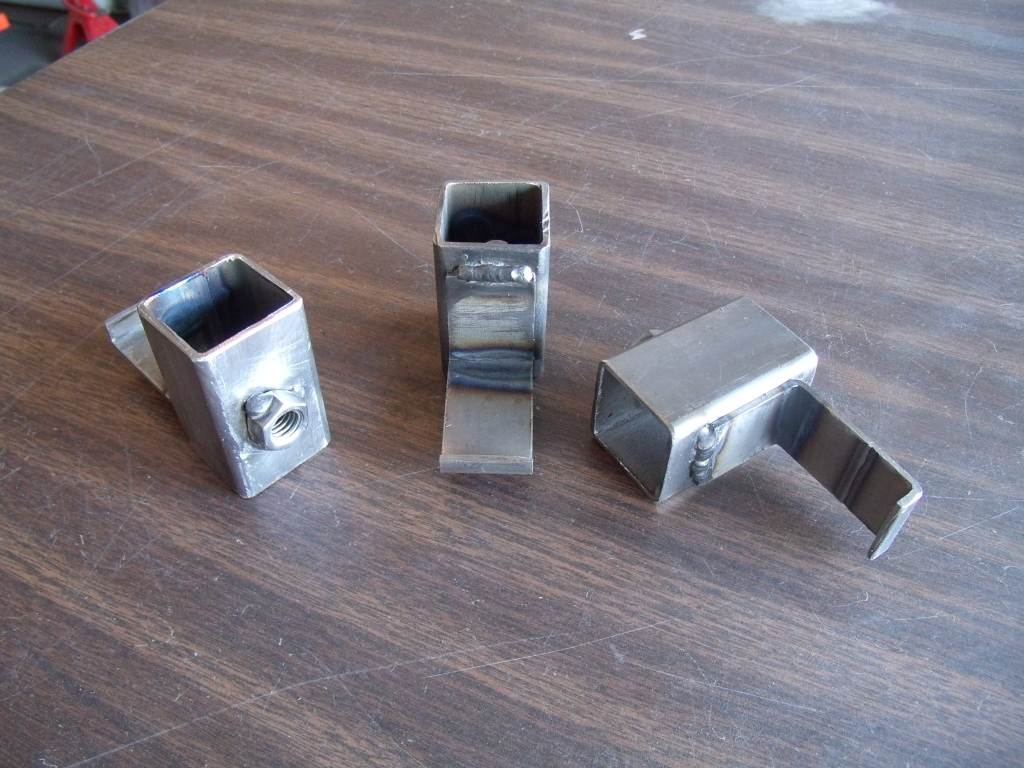
Also had to take a couple steps backward since mocking up the exhaust. I now have to raise the engine support posts on the cradle at least three inches. I've only got a 10.5" section of this rectangular tubing left - so decided to cut it in half and add to each post.
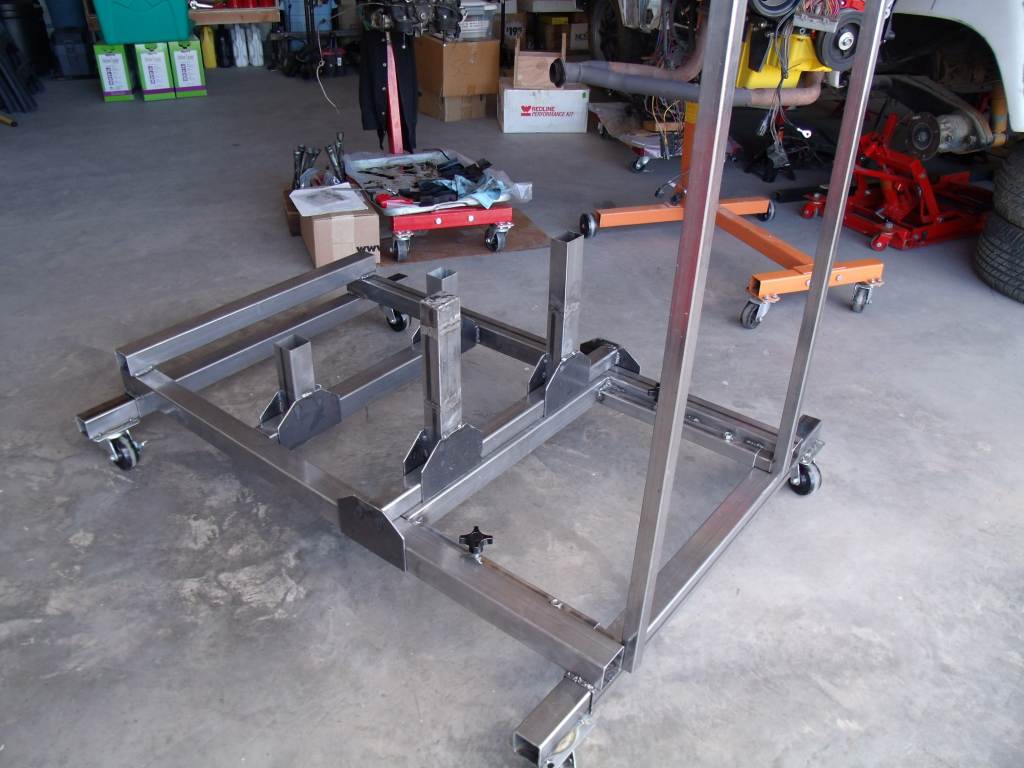 Turned out to be a good welding exercise. Got a chance to see how the metal pulls in the direction of the first weld. See if you can tell which support I did first. On the second one I alternated sides and only welded a small section to see if I could manage the pull. Seemed to work as it came out nice and straight. Since the left side is capped I cut it first and inserted the new piece between - more welding practice that way.  |
|
|
|
| 3d914 |
Mar 24 2012, 03:07 PM
Post
#164
|
|
Senior Member Group: Members Posts: 1,275 Joined: 24-September 03 From: Benson, AZ Member No.: 1,191 Region Association: Southwest Region |
HooRa! Finally got the SHO-914 adapter kit. This guy on the SHO forum had a kit he purchased back in 93' and never used. Now I can get the flywheel, clutch, and tranny assembled with the engine so I can get this puppy on the test stand.
 |
|
|
|
| 3d914 |
Mar 25 2012, 06:41 PM
Post
#165
|
|
Senior Member Group: Members Posts: 1,275 Joined: 24-September 03 From: Benson, AZ Member No.: 1,191 Region Association: Southwest Region |
Worked on my sons 914 today - had three gallery plugs to put in. Went with the 3/8 NPT plugs.
Also got to finish up the front supports for the SHO motor. Will get to the rears this week, and hope to put it on the engine test stand next weekend. 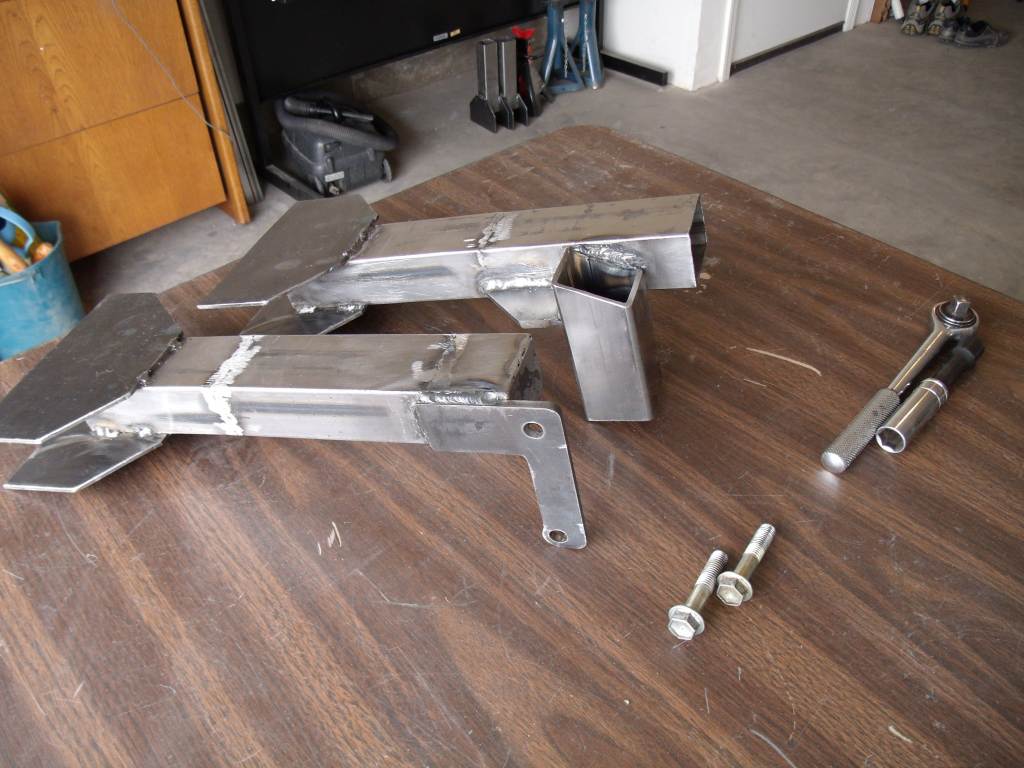 |
|
|
|
| 70_914 |
Mar 26 2012, 01:41 PM
Post
#166
|
|
Member Group: Members Posts: 395 Joined: 4-December 09 From: Roy, WA Member No.: 11,096 Region Association: Pacific Northwest |
After a ton of research on oil filters and rod bearing failures on these SHO engines I found that the K&N filter has the best results for not restricting flow. The oil return holes are much larger than on cheaper filters. 2 engine failures prompted lots of research...
I mention this because I see your Carquest by Wix filter. |
|
|
|
| 3d914 |
Mar 27 2012, 10:50 PM
Post
#167
|
|
Senior Member Group: Members Posts: 1,275 Joined: 24-September 03 From: Benson, AZ Member No.: 1,191 Region Association: Southwest Region |
Thanks Kevin. It's temporary - just for the bench test and FI wiring shakedown. When the engine is installed it will get a remote dual-filter setup. I'll check out your filter suggestion.
|
|
|
|
| 3d914 |
Mar 31 2012, 03:23 PM
Post
#168
|
|
Senior Member Group: Members Posts: 1,275 Joined: 24-September 03 From: Benson, AZ Member No.: 1,191 Region Association: Southwest Region |
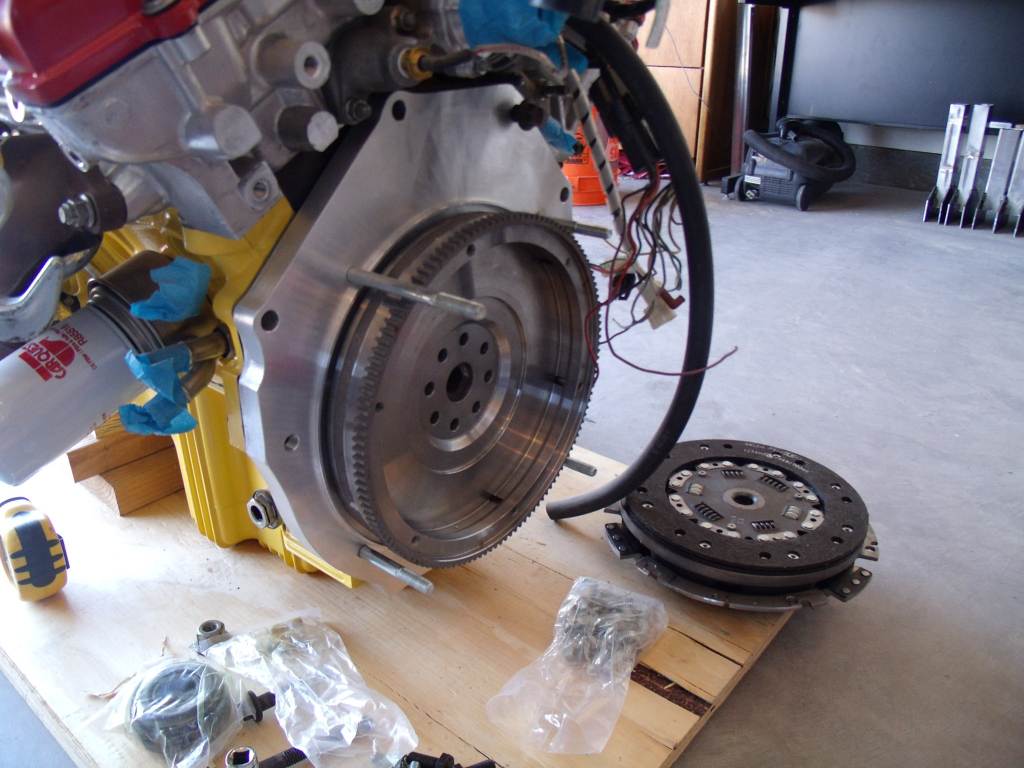
Well got the adapter, flywheel, clutch & disk assembled. Tranny went on like a breeze once I got the spline lined up correctly.
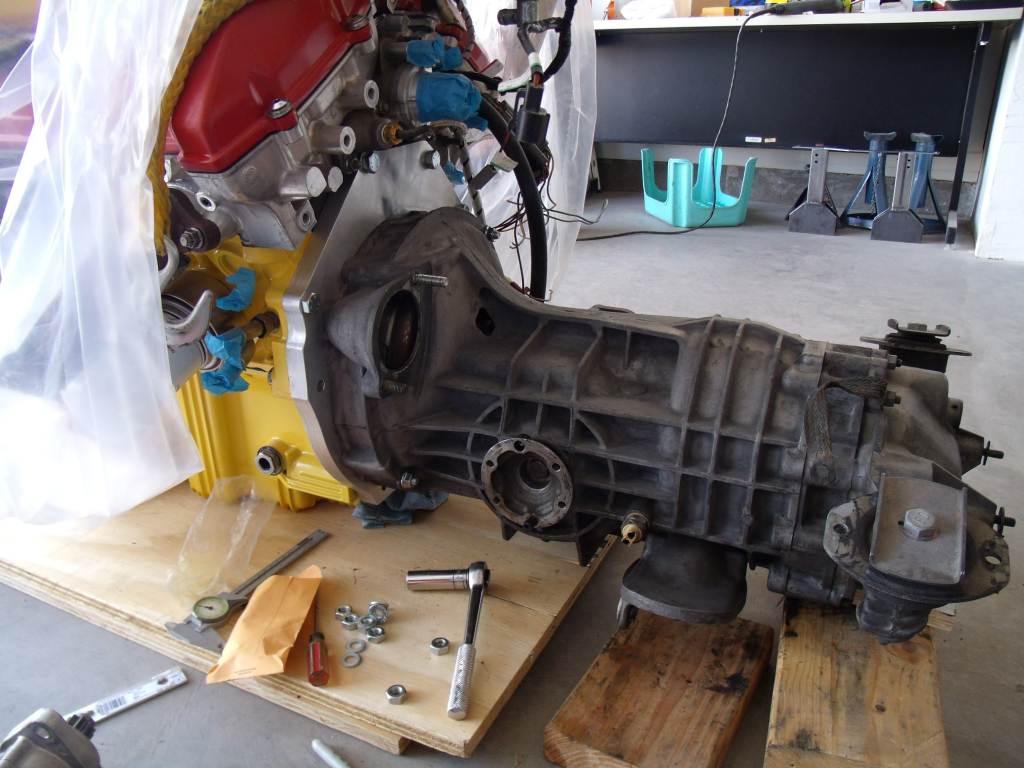 Now just need to verify the starter. I already checked that the teeth mesh properly with the flywheel. The distance from the mounting face on the starter to the top of the teeth is 35mm and on the tranny mounting face to the rear face of the flywheel is 37mm - so I've got 2mm clearance. Now just need to verify the amount of throw-out the starter has when engaged. 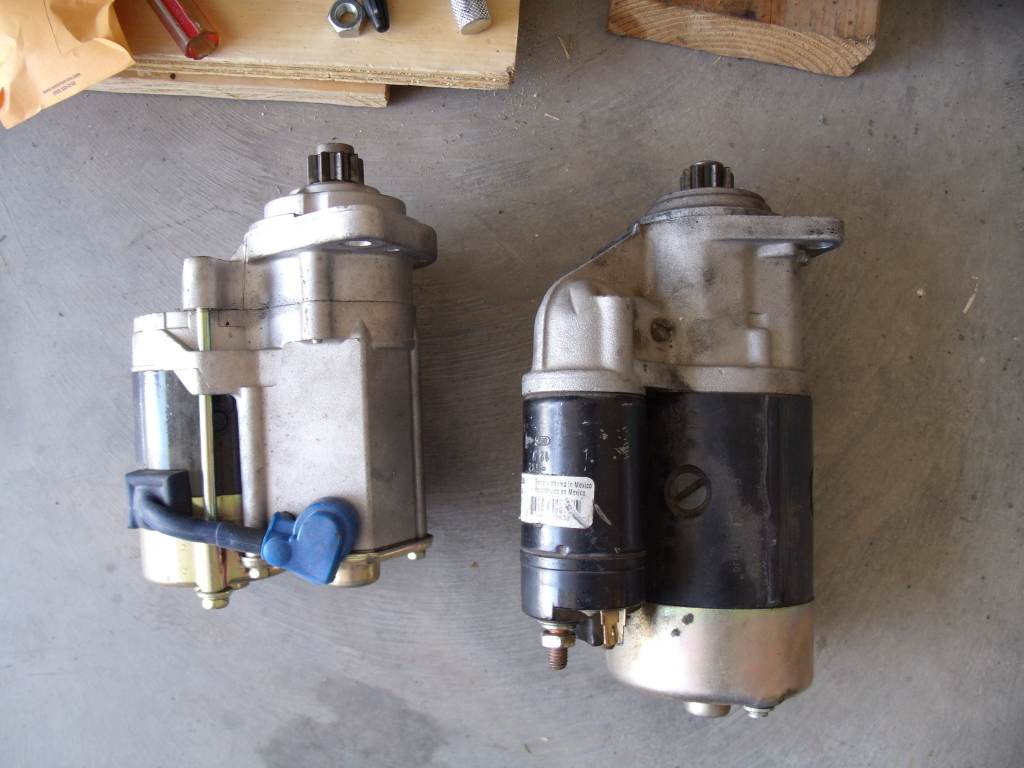 |
|
|
|
| bandjoey |
Mar 31 2012, 05:52 PM
Post
#169
|
|
bandjoey Group: Members Posts: 4,935 Joined: 26-September 07 From: Bedford Tx Member No.: 8,156 Region Association: Southwest Region |
WOW Just found this thread..don't know how I missed it in the past. And now for some (IMG:style_emoticons/default/happy11.gif) fun. Should it be a 3.0 or a 3.5? The Ecoboost SHO is 3.5ltr and 365 lbs torque ! This is the same motor used in the F-150 re-engineered for the SHO. I've said here many times on other threads.....wait until one of these motors hits the 914!
This is a great build and I'm enjoying the pictures. http://www.ford.com/cars/taurus/ |
|
|
|
| 3d914 |
Apr 13 2012, 10:53 PM
Post
#170
|
|
Senior Member Group: Members Posts: 1,275 Joined: 24-September 03 From: Benson, AZ Member No.: 1,191 Region Association: Southwest Region |
Thanks Bill, and the fun continues.
Got some time to test-fit the supports and drill their holes. Been looking forward to getting to this point. Next step is to drill all the holes for the extending legs and install the pins. 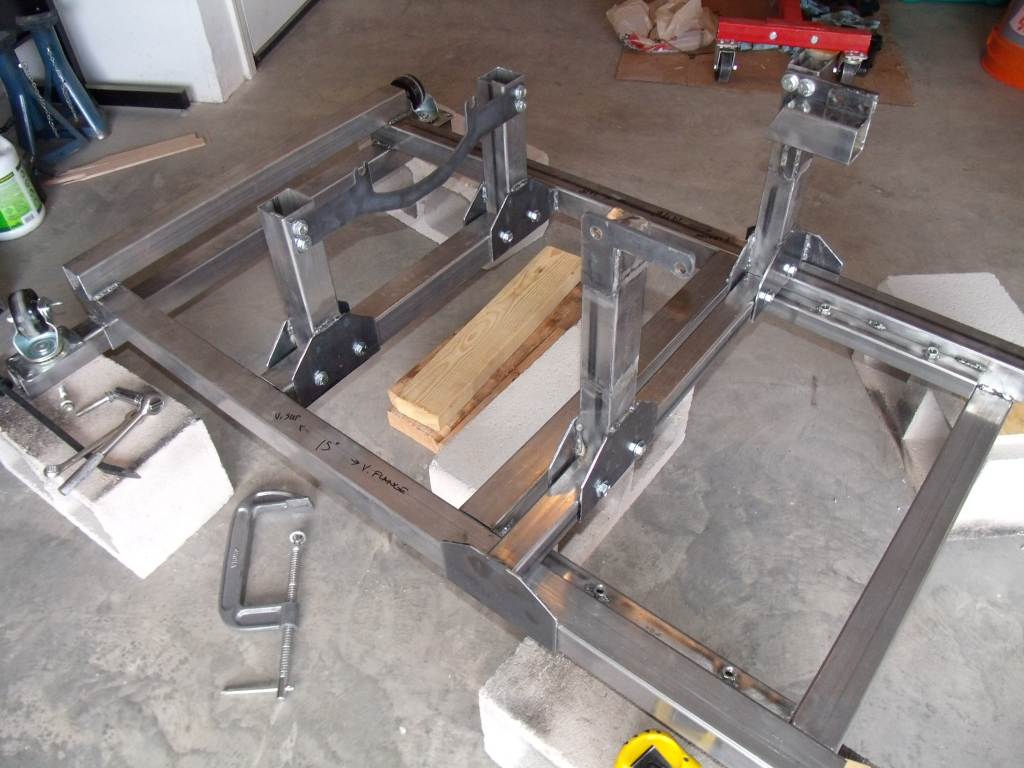 |
|
|
|
| 3d914 |
Apr 14 2012, 10:55 AM
Post
#171
|
|
Senior Member Group: Members Posts: 1,275 Joined: 24-September 03 From: Benson, AZ Member No.: 1,191 Region Association: Southwest Region |
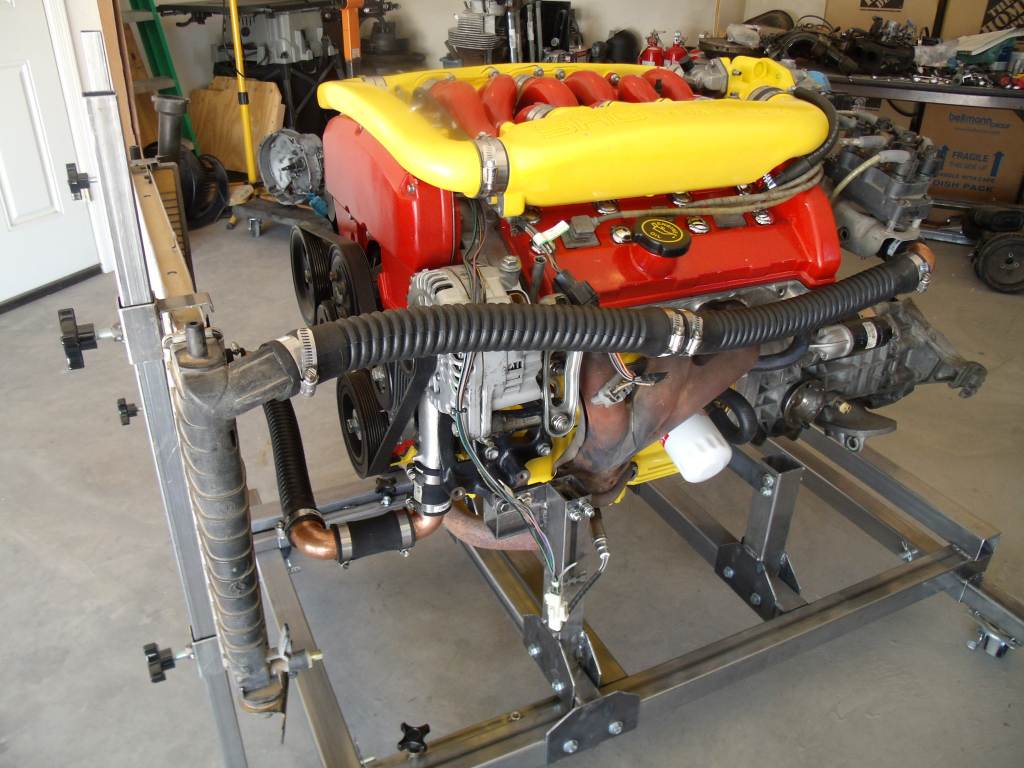
Got the engine transferred to the cradle. Hoo-Ra!
Had to put the cradle on blocks so the engine lift would fit underneath - needed 8" of clearance. 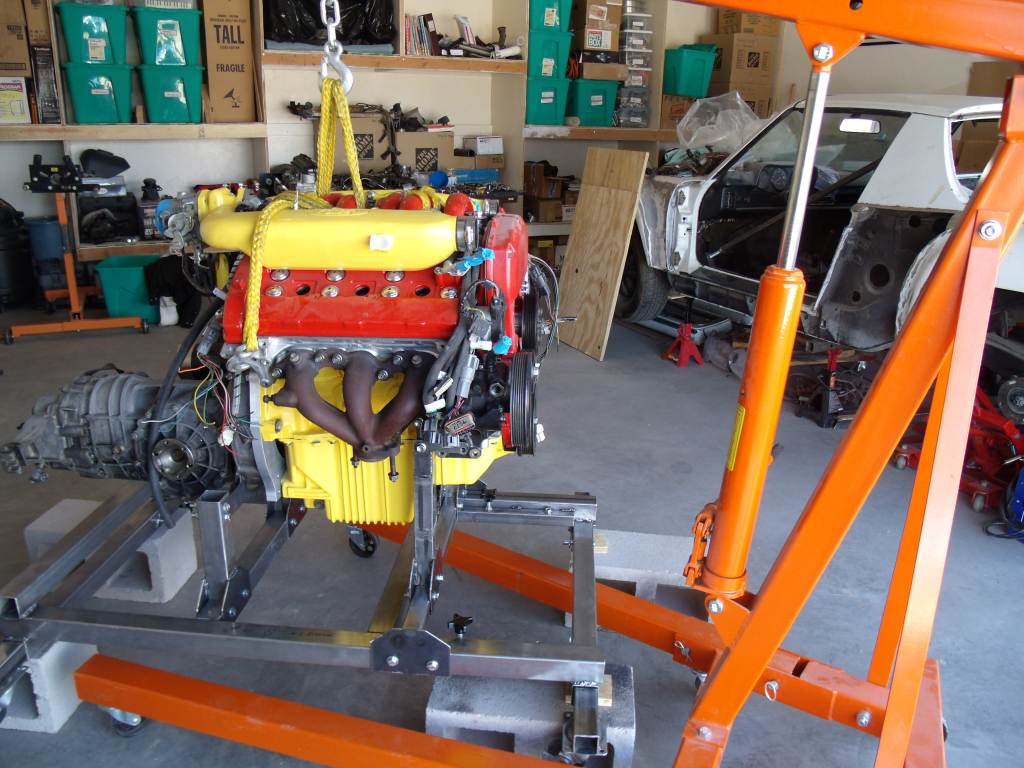 |
|
|
|
| 3d914 |
Apr 15 2012, 11:29 AM
Post
#172
|
|
Senior Member Group: Members Posts: 1,275 Joined: 24-September 03 From: Benson, AZ Member No.: 1,191 Region Association: Southwest Region |
Pins are in the leg extensions and we're ready to roll.
Now need to refit and adjust Y-Pipe for test run and ID any other clearance/fitment issues. 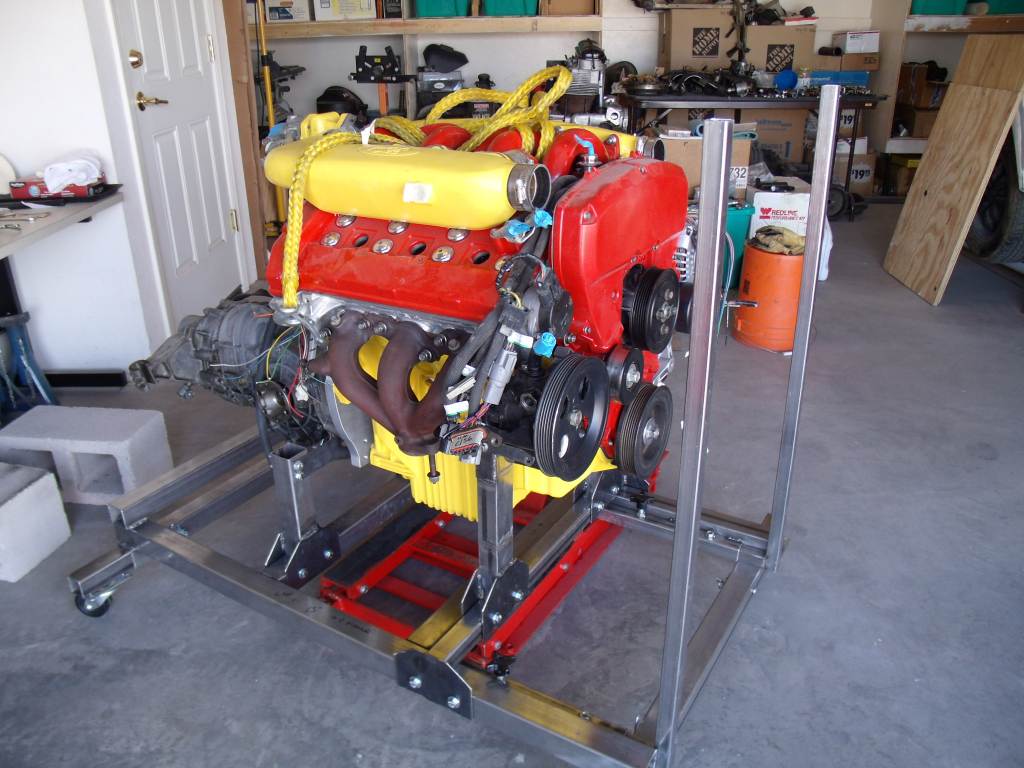 |
|
|
|
| 3d914 |
Apr 15 2012, 04:10 PM
Post
#173
|
|
Senior Member Group: Members Posts: 1,275 Joined: 24-September 03 From: Benson, AZ Member No.: 1,191 Region Association: Southwest Region |
Found an issue on the left with the Y-Pipe flange - interfering with the vertical support. It'll have to come off and get trimmed.
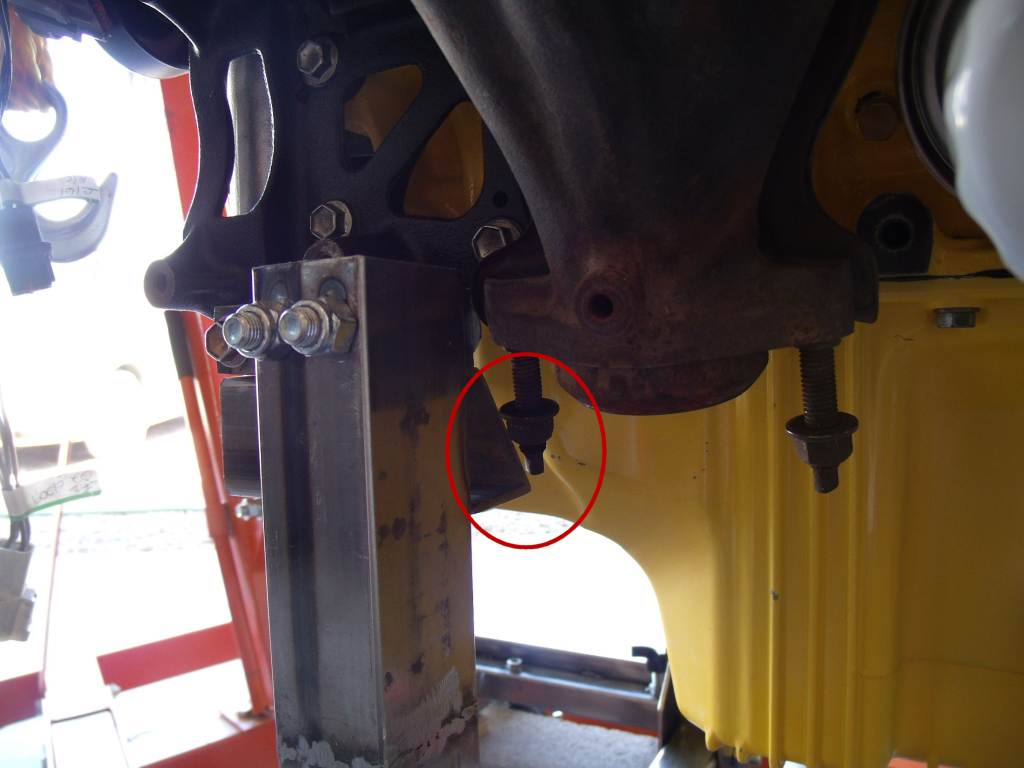 Had to trim the back corner off to get the Y-pipe flange on. All connected up and ready to go. Even got the O2 sensors installed, and starting to mock-up bracket for the radiator. 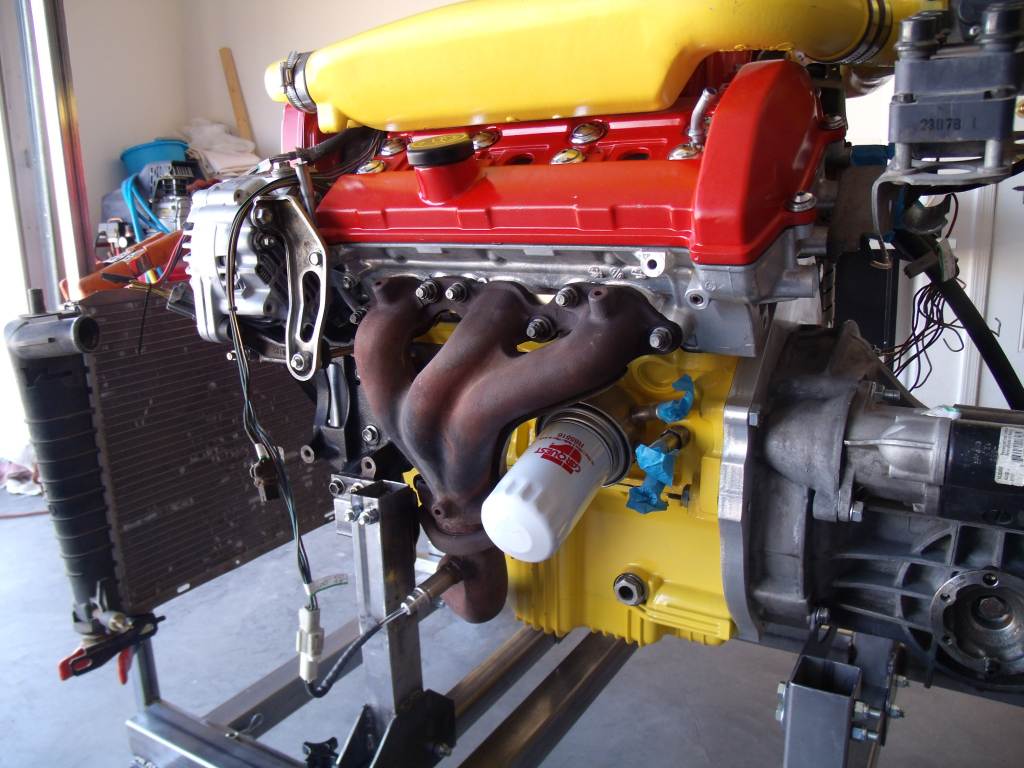 |
|
|
|
| 3d914 |
Apr 23 2012, 08:50 PM
Post
#174
|
|
Senior Member Group: Members Posts: 1,275 Joined: 24-September 03 From: Benson, AZ Member No.: 1,191 Region Association: Southwest Region |
Not much done this last weekend. Managed to sort out all the various coolant and vacuum hoses needed for the SHO motor, so I'll be adding those over the next week or so.
Need to take time and get some gutters on the house before the serious rains come. I don't call them monsoons. Arizonians don't know what monsoons are! |
|
|
|
| 3d914 |
May 31 2012, 10:34 PM
Post
#175
|
|
Senior Member Group: Members Posts: 1,275 Joined: 24-September 03 From: Benson, AZ Member No.: 1,191 Region Association: Southwest Region |
Still working on gutters, but did get a chance to play with this Flash visualizer tool someone built for the 914. I posted to get some input on different color combos.
This looks to be my current choice - Nepal Orange over dark red. 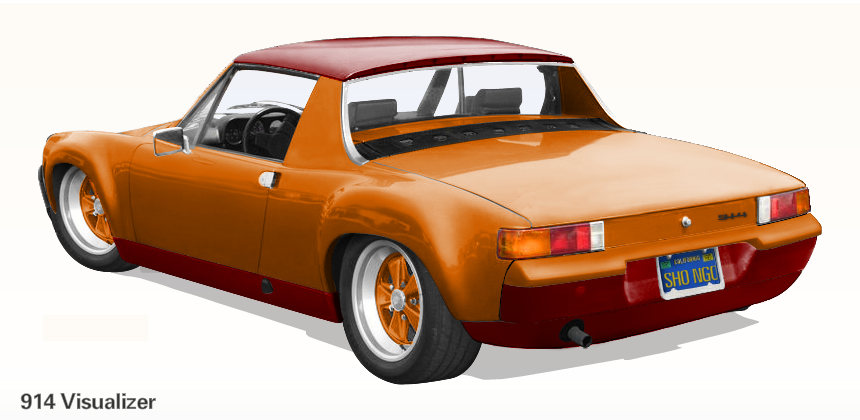 |
|
|
|
| 3d914 |
May 31 2012, 10:37 PM
Post
#176
|
|
Senior Member Group: Members Posts: 1,275 Joined: 24-September 03 From: Benson, AZ Member No.: 1,191 Region Association: Southwest Region |
Also spent some time this week working on my son's tranny. Needed cleaning really bad and new seals.
Looking better . . . 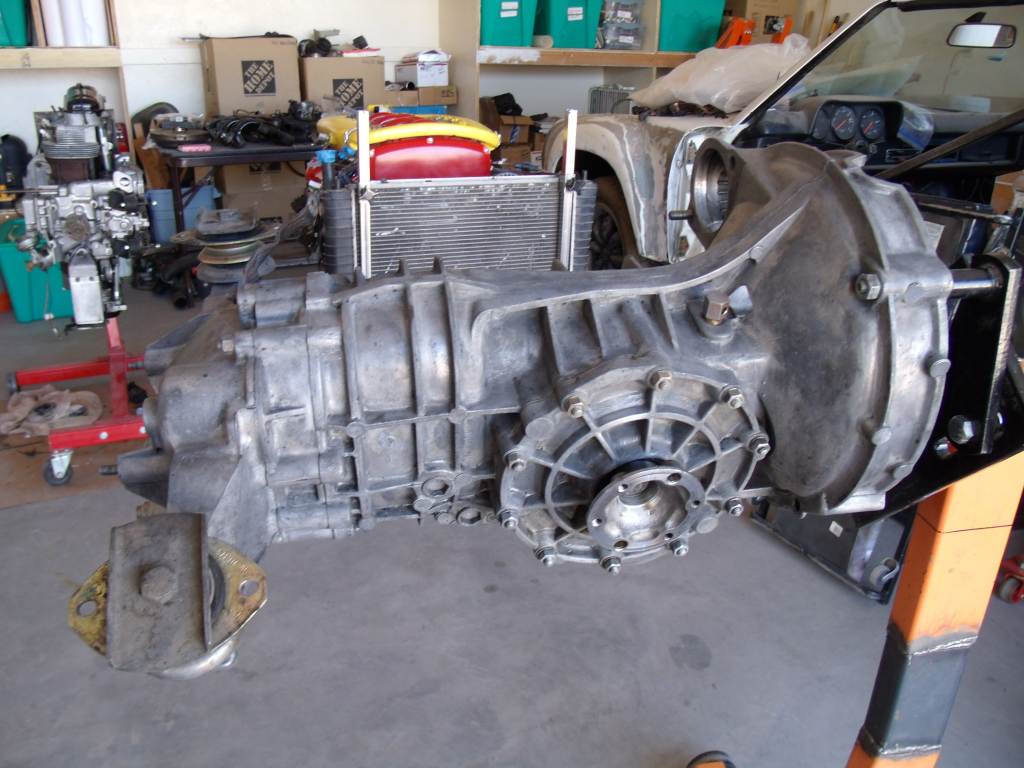 |
|
|
|
| 3d914 |
Jun 1 2012, 05:29 PM
Post
#177
|
|
Senior Member Group: Members Posts: 1,275 Joined: 24-September 03 From: Benson, AZ Member No.: 1,191 Region Association: Southwest Region |
Finished my radiator supports, got the radiator mounted, hoses on and ready for fluids.
  |
|
|
|
| 3d914 |
Jun 8 2012, 05:44 PM
Post
#178
|
|
Senior Member Group: Members Posts: 1,275 Joined: 24-September 03 From: Benson, AZ Member No.: 1,191 Region Association: Southwest Region |
Took a break from the engine for a while and went back to body work. I have a 6" x 8" section of the longitudinal to patch on the right side. I'm basically replacing the jack point on this side as I never use them and they just attract rust.
The small triangular-looking piece with welds is to finish off the first of two layers of metal. Notice all the holes from drilling out spot welds. 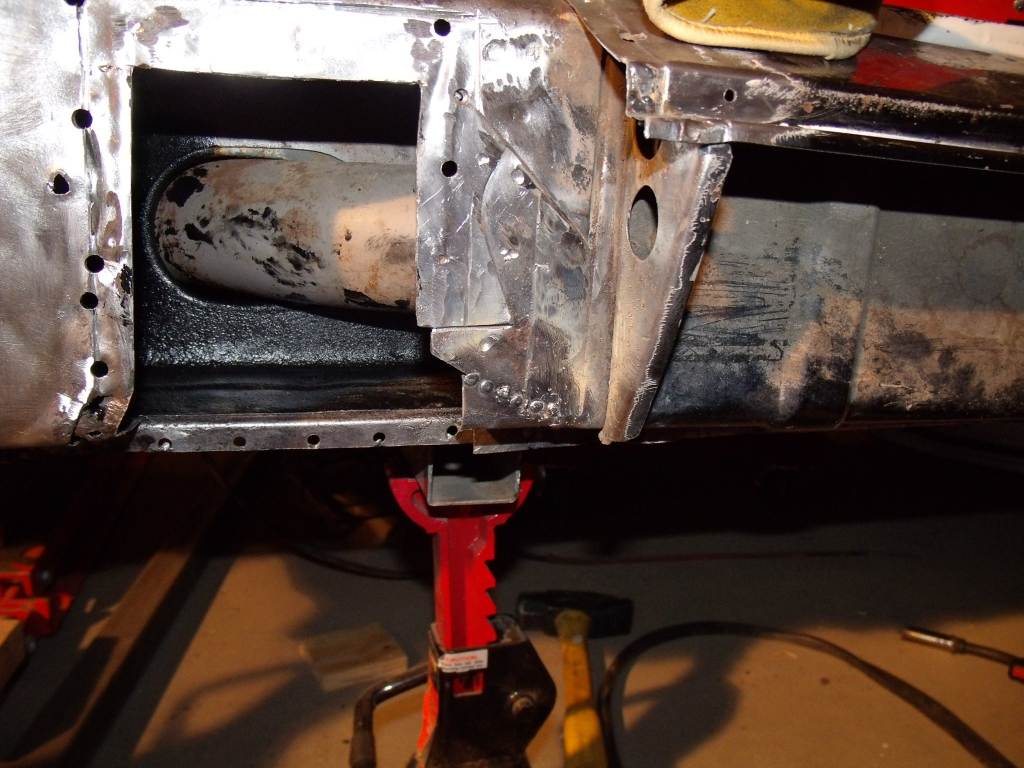 Then I needed to go back and fill the holes left from drilling out spot welds. Since my welder doesn't have much control (Low, Off, High) I needed a way to fill-in the holes. I came up with a unique method. I found some steel nails with heads very near the diameter of the holes. I then place the nail pointing out with the head in the hole and use a magnet to suspend the nail in place. I can then weld around the base of the nail and it fills in nicely - then just grind off the nail that sticking out. Seems to work pretty good.  |
|
|
|
| 3d914 |
Jun 9 2012, 03:20 PM
Post
#179
|
|
Senior Member Group: Members Posts: 1,275 Joined: 24-September 03 From: Benson, AZ Member No.: 1,191 Region Association: Southwest Region |
OK, now the patch for the inner piece. I wanted a good fit, so I'm doing a butt-weld, without clamps, using a wire core welder - they said it couldn't be done.
Little bit of splatter, but I'm pleased with the results. 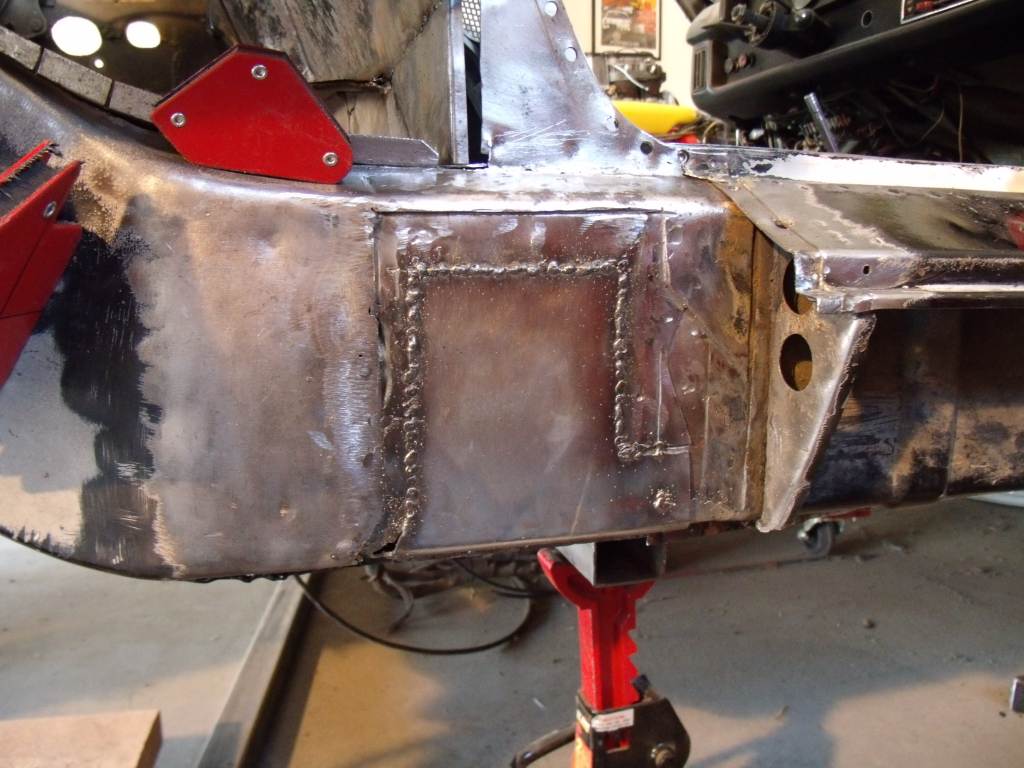 Note the blow-out in the lower-left corner. Trying to fix its tough because of the tight fit against the outer long. I can't trim the outer long back farther because the inner has a large stamped hole to the left. It patched pretty good though. Now the grindings done and ready to fit & bend the outer long patch. 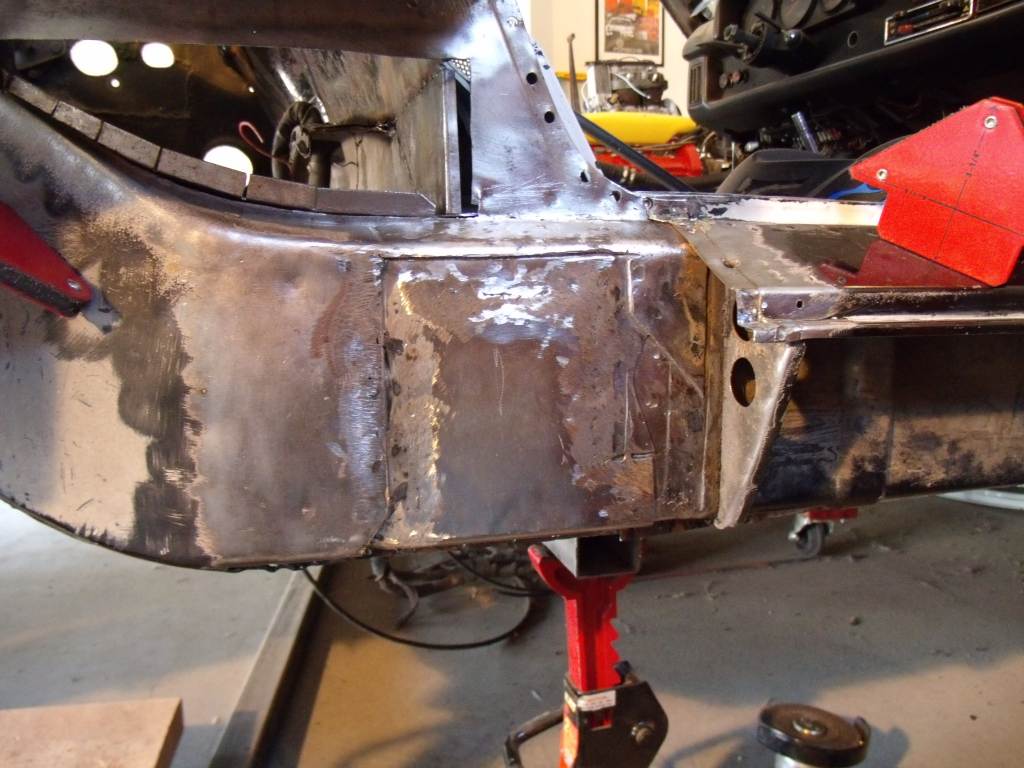 |
|
|
|
| 3d914 |
Jun 9 2012, 06:06 PM
Post
#180
|
|
Senior Member Group: Members Posts: 1,275 Joined: 24-September 03 From: Benson, AZ Member No.: 1,191 Region Association: Southwest Region |
Making good progress today. Been at it for almost seven hours now. Got the outer long patch bent, fitted, and ready to weld in.
 Got a pic after I tacked it in, then went ahead and finished welding it. I'm done for the day. I'll finish it off tomorrow. 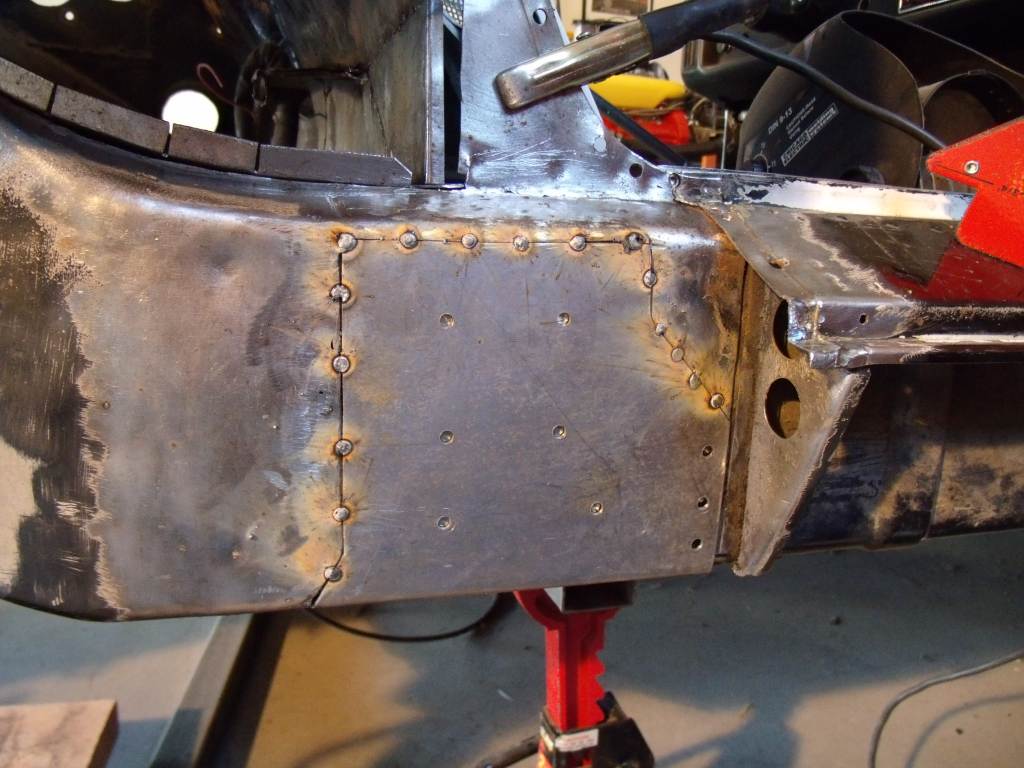 |
|
|
|
|
1 User(s) are reading this topic (1 Guests and 0 Anonymous Users)
0 Members:

|
Lo-Fi Version | Time is now: 24th June 2026 - 02:43 PM |
Invision Power Board
v9.1.4 © 2026 IPS, Inc.