|
|
|
Porsche, and the Porsche crest are registered trademarks of Dr. Ing. h.c. F. Porsche AG.
This site is not affiliated with Porsche in any way. Its only purpose is to provide an online forum for car enthusiasts. All other trademarks are property of their respective owners. |
|
|

  |

| 3d914 |
 Feb 12 2014, 10:31 PM Feb 12 2014, 10:31 PM
Post
#341
|
|
Senior Member  Group: Members Posts: 1,275 Joined: 24-September 03 From: Benson, AZ Member No.: 1,191 Region Association: Southwest Region |
Thanks, John. Looks like you've got a few screamin projects going on. Got all the cool tools too!
|
   |

 
|
| MecGen |
Feb 13 2014, 04:50 PM
Post
#342
|
|
8 Easy Steps Group: Members Posts: 848 Joined: 8-January 05 From: Laval, Canada Member No.: 3,421 |
Hello 3d914
I just wanted to say how much I appreciate your conviction to this project. I am no longer active in the 914 scene as I finally sold my 914 after 24 years a few years back, but every now and then I come back here for a peek. I was a Ford tech when the first SHOs rolled off the trucks, and I was sent to a factory training course for this motor. This is hands down the best motor I have every worked on, and in 88 I just knew I would own one, and I did (IMG:style_emoticons/default/cheer.gif) I almost did this conversion in 07, I bought a 914 that already had a reinforced rockers, complete SHO motor (harness ecm etc....) out of my own car, and another intake in case I needed to modify it. The project fell from grace and regret to this day that I did not have the balls to see it through.... Glad you did it, when I get more time I will read through this thred in entirety and maybe I will come back now and then and have a peek at what up in your world. Regards |
|
|
|
| 3d914 |
Feb 13 2014, 05:24 PM
Post
#343
|
|
Senior Member Group: Members Posts: 1,275 Joined: 24-September 03 From: Benson, AZ Member No.: 1,191 Region Association: Southwest Region |
QUOTE(MecGen @ Feb 13 2014, 03:50 PM)  Hello 3d914 I just wanted to say how much I appreciate your conviction to this project. I am no longer active in the 914 scene as I finally sold my 914 after 24 years a few years back, but every now and then I come back here for a peek. I was a Ford tech when the first SHOs rolled off the trucks, and I was sent to a factory training course for this motor. This is hands down the best motor I have every worked on, and in 88 I just knew I would own one, and I did (IMG:style_emoticons/default/cheer.gif) I almost did this conversion in 07, I bought a 914 that already had a reinforced rockers, complete SHO motor (harness ecm etc....) out of my own car, and another intake in case I needed to modify it. The project fell from grace and regret to this day that I did not have the balls to see it through.... Glad you did it, when I get more time I will read through this thred in entirety and maybe I will come back now and then and have a peek at what up in your world. Regards Frank, thanks for checking in. I'd be curious to know how you were going to approach it. I've seen at least two other unfinished projects - but they were both transverse and using the stock 5-speed. Not even sure that could work from the numbers I calc'd - but its one way to get it done. Feel free to chime in with any insight on the motor as well. I keep a similar thread over on the SHOforum site. I've learned a lot from the guys that own and customize the stock cars. |
|
|
|
| MecGen |
Feb 13 2014, 07:29 PM
Post
#344
|
|
8 Easy Steps Group: Members Posts: 848 Joined: 8-January 05 From: Laval, Canada Member No.: 3,421 |
Hi
I just had a look at the page before this and have to say its almost exactly how I was supposed to do it, this thred caught my attention immediately. I remember calculating that some of the firewall had to go as well. I was not going for the Ford tranny, but granted it would have been easier, but I wanted to keep the orientation of the motor north south, and IIRC there was an issue with the Ford half shafts as well. Back in the day there was a smart guy on this board that dropped a V8 Porsche motor in a teener, that was similar type of swap and he did it a year before I was planning to so it really peaked my interest. I remember finding plans for a cable shifter that I was going to try, and at the time there was a successful Audi trans swap that was done somewhere, I was looking into that as a possibility. Nice idea with your exhaust but I was going true duels but in honesty I never got that far in the plans. I would think about your air cleaner placement, the mass air flow sensor is sensitive to air vibrations, and the new "china" rebuilt units are even more so, I remember thinking about tucking the air cleaner up and to the right, this gives more intake tube length to help dampen the air pulses and stabilizes the mass signal, putting it in the direct path of the rear trunk scoop well...idonno but one things for sure...you gotta love the sound of a motor breathing behind your head targa off. Maybe check with the SHO forum (I'm a member also) to see if air turbulence is still an issue, but it definitely was when I was working on them. IMHO this motor is as good as it gets, I can tell you from talking to engineers that built these motors, its a one off. Did you know it was supposed to be an 8 cyl? Apart from a slight tune to lower the secondary venturies start up rpm, I would leave it as is, not too much can be gained from messing with it. Ford tested this motor on a oval track only stopping to gas and change drivers, they set the rev limiter to 11000 rpm and turned on the track in fourth gear at 11000 rpm. After 8 hours the motor blew, rod bearing. They stripped it apart and concluded that the oil was sloshed to the side of the pan starving the motor for oil, do to the track angle and g forces. They welded some baffles in the new pan, then ran for...wait for it...wait for it...32 hours at 11000 rpm - and they called it quits not the motor. I heard this from a staff member in the Windsor (Canadian Detroit) office. Nice huh? I'm going to read the whole thred later I think it was 05 when I tried to do this swap, my join date looks a little off, maybe because of the change of ownership of these forums back when. Who owns it now? Regards . |
|
|
|
| 3d914 |
Feb 14 2014, 10:22 PM
Post
#345
|
|
Senior Member Group: Members Posts: 1,275 Joined: 24-September 03 From: Benson, AZ Member No.: 1,191 Region Association: Southwest Region |
Frank, thanks for sharing your ideas and the cool stories. You're right on about the MAF sensor and air flow. The SHO guys say that if you can keep the radius above 3 inches you should be OK. They also suggest rotating the MAF so the sensor window is on the outside radius. However, I'm not sure I can find a 3.5 in ID hose at a 22.5 deg angle and at least a 3 inch inside radius - so I just redesigned the box to eliminate the radius all together. (See pic below)
One of the SHO guys suggested this (IMG:http://www.914world.com/bbs2/uploads_offsite/www.xbitlabs.com-1191-1392438176.1.jpg) or this (IMG:http://www.914world.com/bbs2/uploads_offsite/kyspeed.com-1191-1392438177.2.jpg) Its good to hear that Ford did such thorough testing on this Yamaha designed motor. There are a few guys who have boosted these motors and can make 400-500hp. What a wild dragster that would make - eh! I like your idea about dual exhaust. The one drawback on the 914 is finding room for a cross-over tube - which would be necessary to eliminate drone. With the stock setup the front (left) crosses over to the back (right) just ahead of the oil pan. There's a large notch in the front of the pan just for this. In my case it will sit right beneath the engine bar. Once I get all the sheet metal squared away I plan to spend some serious time on both the cooling system and exhaust mockups. Maybe I'll find the space I need to go dual. Here's the revised filter box and air feed into MAF 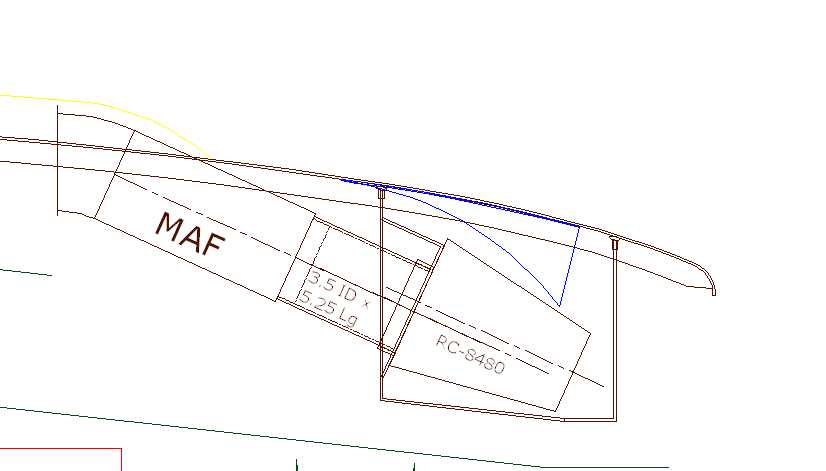 |
|
|
|
| 3d914 |
Feb 15 2014, 06:24 PM
Post
#346
|
|
Senior Member Group: Members Posts: 1,275 Joined: 24-September 03 From: Benson, AZ Member No.: 1,191 Region Association: Southwest Region |
Spent a solid six hours today working on closing up the main firewall. Had a lot of little areas to fill on the left, and one in the middle. Also had to correct a few areas that had warped slightly by reheating, reshaping and cooling - much better now.
Also took couple of hours just to get the upper edge of the two openings right so that I can put a flat piece in. Thought I had some 20g but I must have used it elsewhere. I'm going to scavange some from the engine lid I'm mocking up - but that means spending some time calculating my cuts. Also decided to close off the two-layer support channel that runs along the top of the firewall. Cut and tacked both pieces in, but not real sure how I'm going to weld these seams. Maybe do some more tests with lower arc-volts to see if that will work. It's getting there. Hope to have firewall closed off this weekend.  |
|
|
|
| 3d914 |
Feb 16 2014, 10:02 PM
Post
#347
|
|
Senior Member Group: Members Posts: 1,275 Joined: 24-September 03 From: Benson, AZ Member No.: 1,191 Region Association: Southwest Region |
Well didn't get as far as I planned. Not having the 20g sheet on hand slowed me down. Had to work on my engine lid mockup to get the pieces to use for the firewall. Here's what I've decided on the engine lid. David M did a nice write up on one of the 914 forums about how he built his own GT style engine lid - and it gave me some ideas.
Instead of doing the whole lid in mesh material - like the GT, I decided to just install mesh where the intake will feed directly to the radiators. So I cut a 7x11 inch area out on each side and will make a 1/2 inch 90 deg bend at the dotted lines. This is where I will attach the mesh material. The main support ribs will get a bunch of 1 inch holes to aid air flow as well. The large area left in the middle will be mostly sheet metal as will the transition piece to each side where the mesh will be fastened. 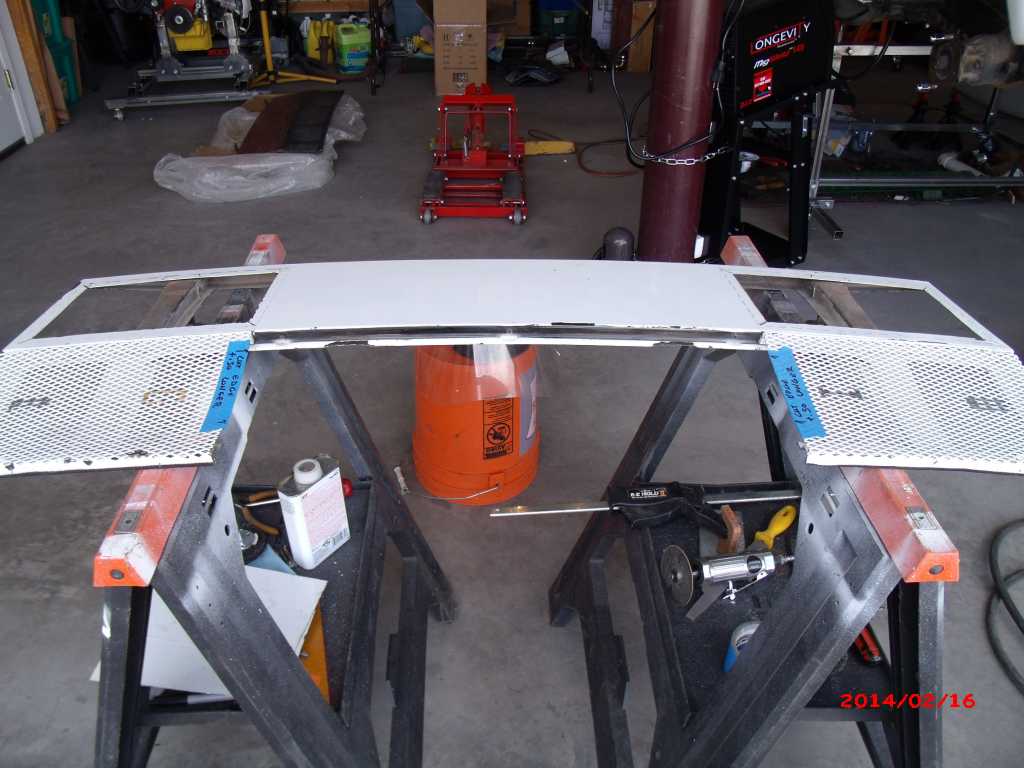 These cutout pieces are what I needed for the firewall. First had to strip all the layers of paint off both sides. Managed to get one marked and rough cut, but still have the other side to do. 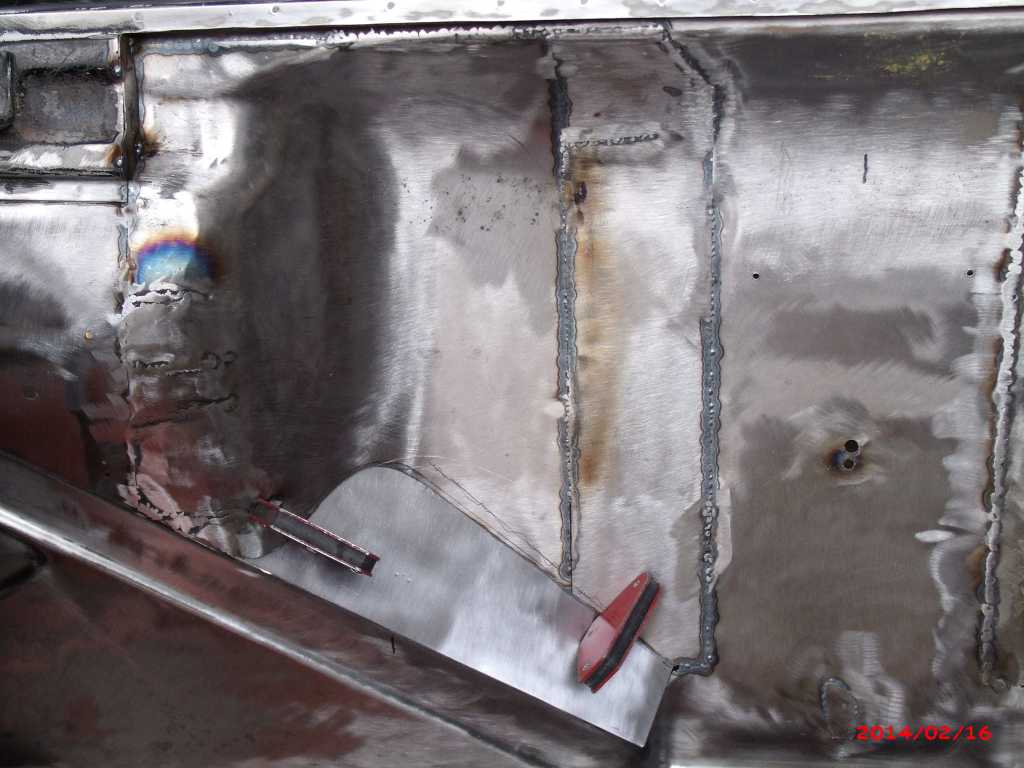 |
|
|
|
| 3d914 |
Feb 23 2014, 09:43 PM
Post
#348
|
|
Senior Member Group: Members Posts: 1,275 Joined: 24-September 03 From: Benson, AZ Member No.: 1,191 Region Association: Southwest Region |
A lot of other things going on this weekend so I still didn't get everything done I wanted. That leaves me one three-day weekend left this month - I gotta finish this firewall!!!
Did manage to get the other side cut, fitted and tack welded. I also had two smaller pieces near the center to cut, bend, and fit. They got welded in completely. Now all that's left is welding the lower edges on the back side and the upper edges on the front side. Can't wait till its finished.  |
|
|
|
| 3d914 |
Mar 1 2014, 03:26 PM
Post
#349
|
|
Senior Member Group: Members Posts: 1,275 Joined: 24-September 03 From: Benson, AZ Member No.: 1,191 Region Association: Southwest Region |
Well a few hours of welding and grinding finishes up the front firewall - Hoo Ra! Now I can move on to something else - like maybe the rear firewall.
Here's a shot from the back 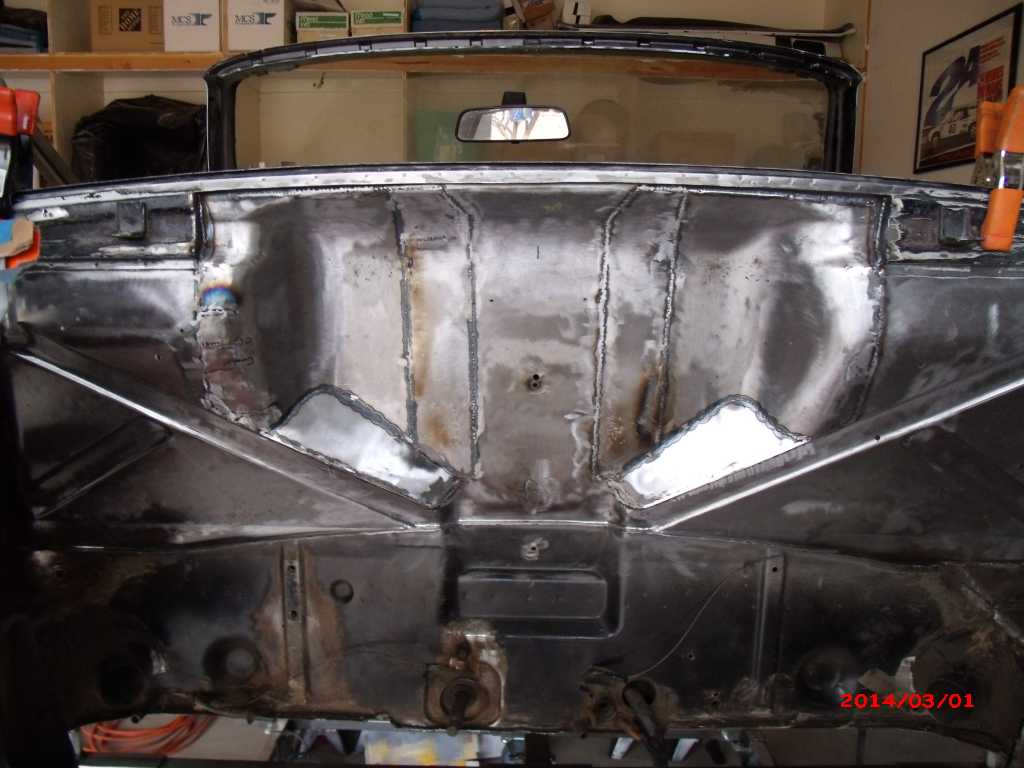 And from the front 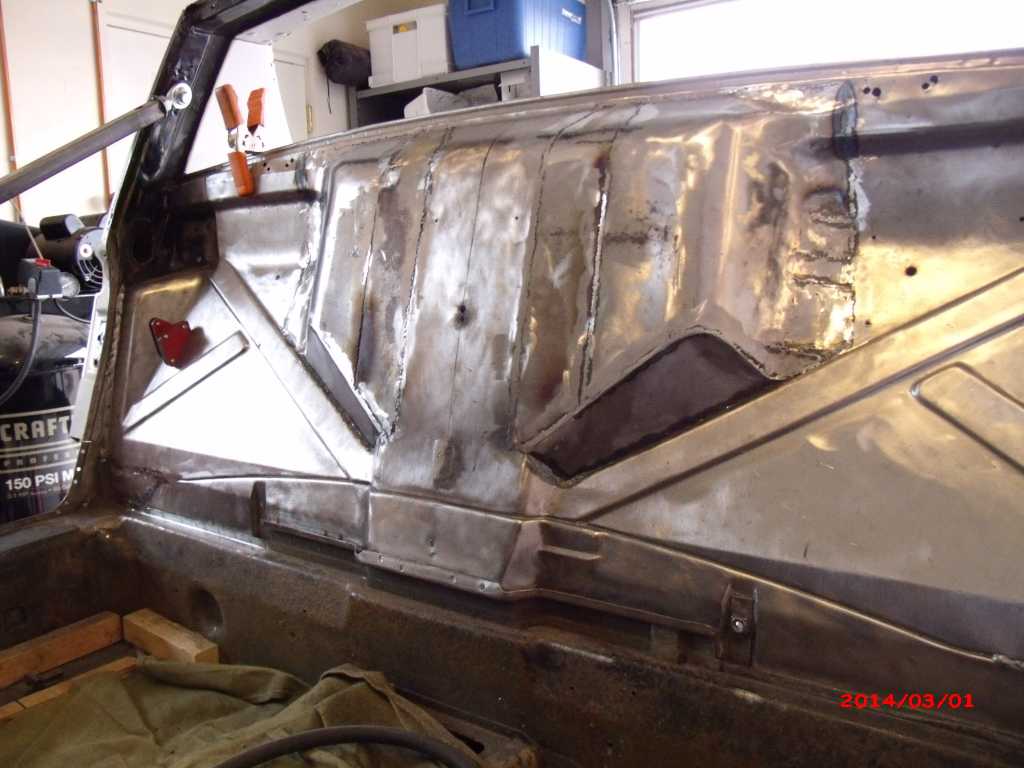 |
|
|
|
| 3d914 |
Mar 9 2014, 09:49 PM
Post
#350
|
|
Senior Member Group: Members Posts: 1,275 Joined: 24-September 03 From: Benson, AZ Member No.: 1,191 Region Association: Southwest Region |
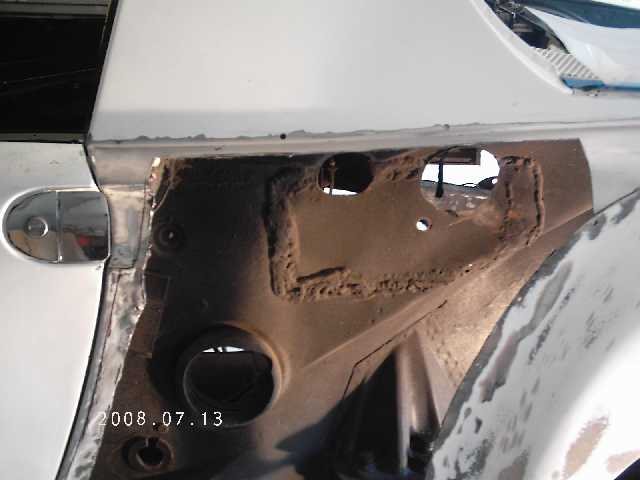
Got some more time in on the project. Even though I was working all weekend, I managed to get afternoons/evenings free to take care of the left inner quarter panel. Someone did a real hack job - layers of welding that wasn't finished off, holes poorly cut, etc. Here's a pic from way back. You can see the carnage. The outer panel had to be removed also because, I'm guessing the same someone, had it filled with 1/2" thick of bondo.
 So out came the crap. It was interesting trying to cut this out with all the odd shapes. There's also some double-layering of the panel in spots. 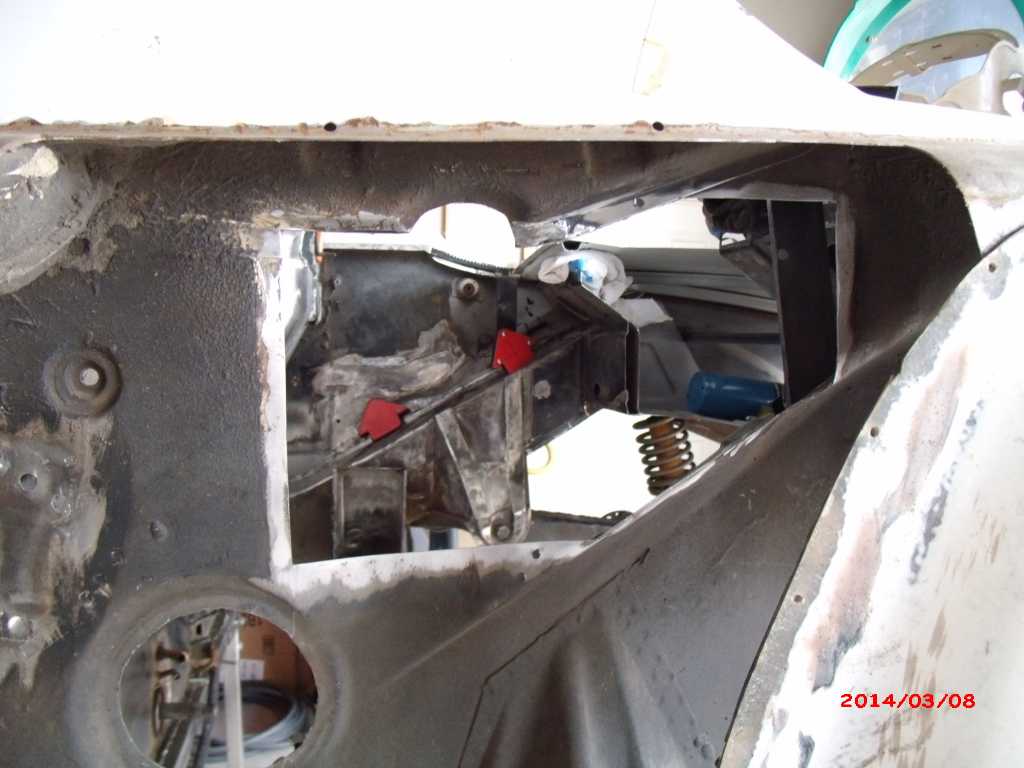 The real work was trying to get the replacement piece cut and fit correctly. It's still not ready for welding, but I decided to call it a night. 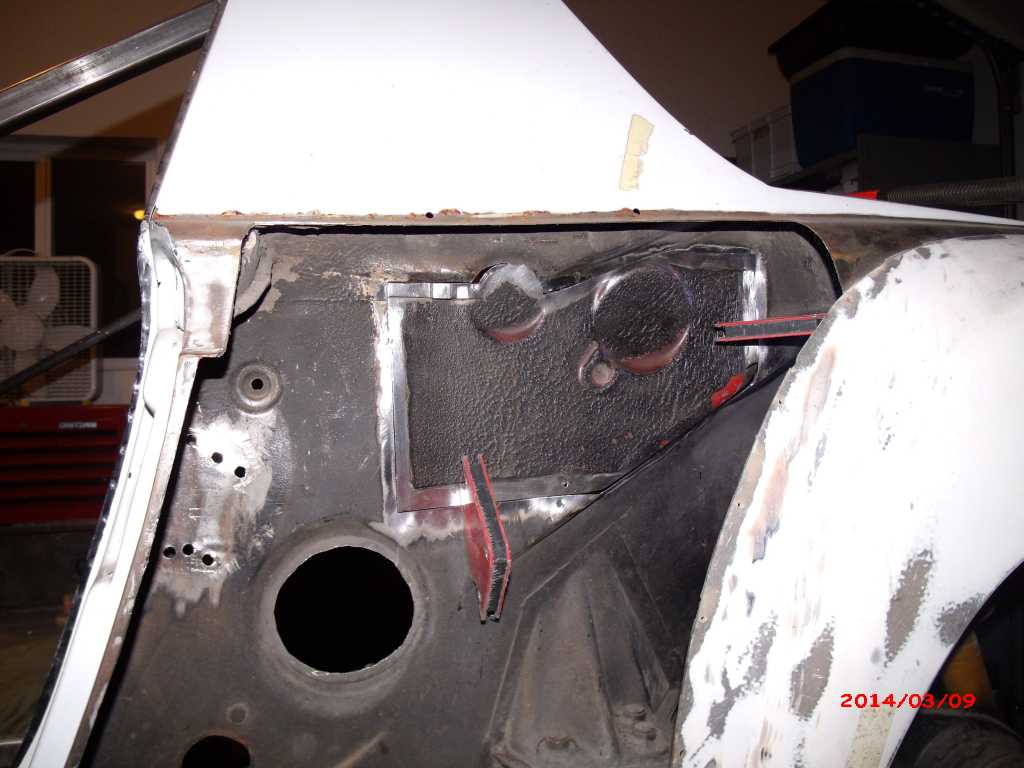 |
|
|
|
| 3d914 |
Mar 22 2014, 06:15 PM
Post
#351
|
|
Senior Member Group: Members Posts: 1,275 Joined: 24-September 03 From: Benson, AZ Member No.: 1,191 Region Association: Southwest Region |
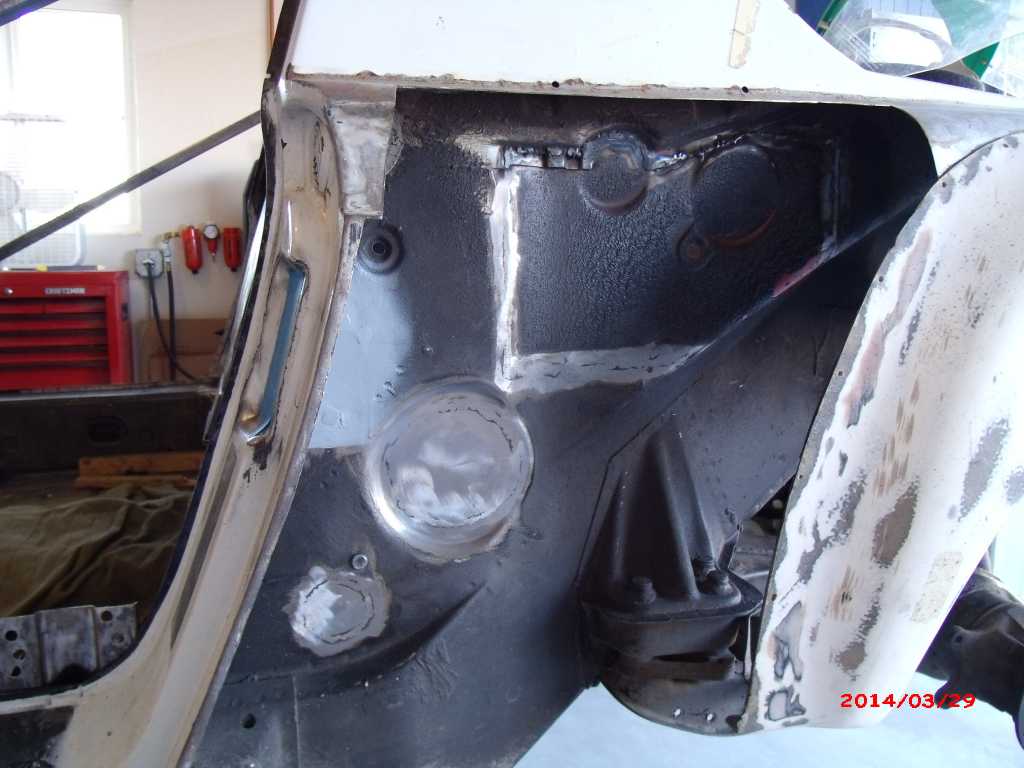
Have a bunch of hours to put in this weekend for work - but thanks to mobile computing and waking up at 3 am I was able to get stuff for today done early. That left me with time to work on the teener.
Had a lot of fitting to do, but finally got the outer part of that replacement inner panel welded. Still have a small section I'll weld from inside the engine bay. Here's both views. 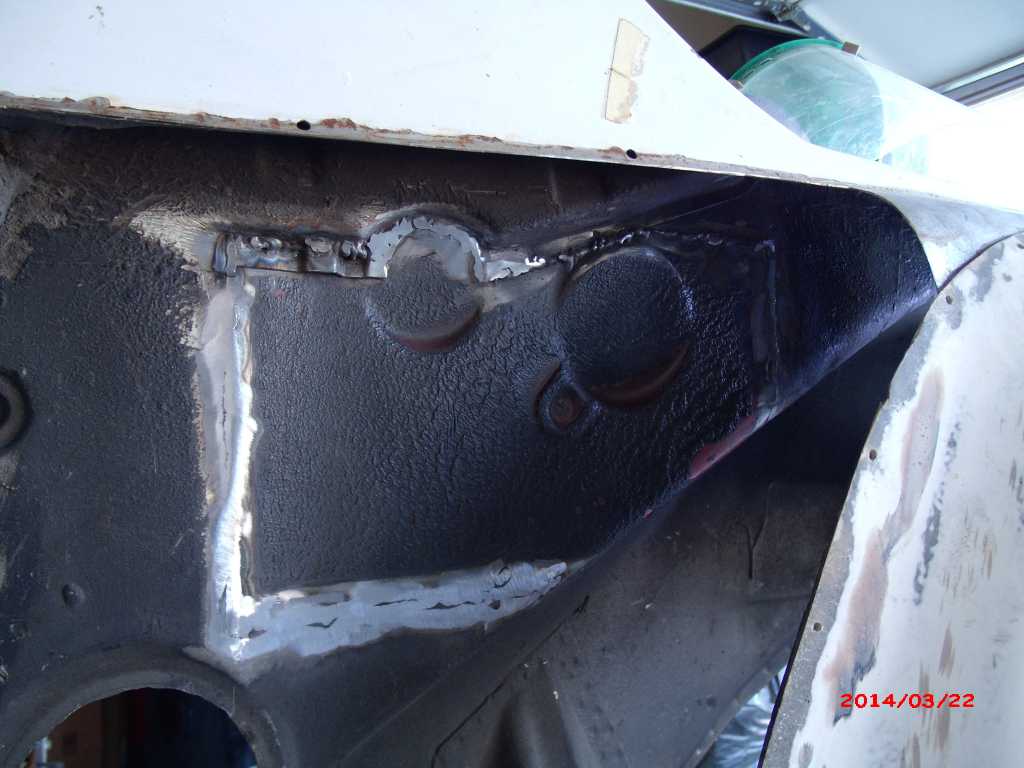 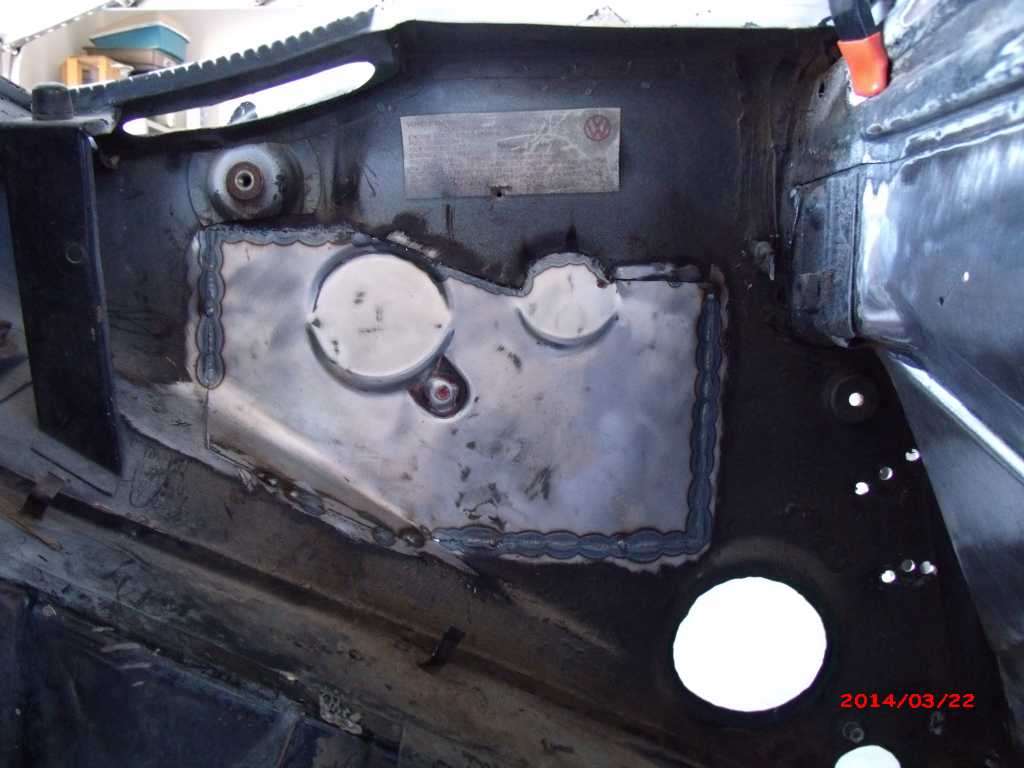 |
|
|
|
| 3d914 |
Mar 29 2014, 06:50 PM
Post
#352
|
|
Senior Member Group: Members Posts: 1,275 Joined: 24-September 03 From: Benson, AZ Member No.: 1,191 Region Association: Southwest Region |
Got a good six hours in today. Finished grinding welds on the main patch panel and got two other holes welded up - along with filling some holes where I had to drill out spot-welds. Should be able to finish this side up tomorrow & be ready for rear firewall.
 |
|
|
|
| 3d914 |
Mar 30 2014, 06:17 PM
Post
#353
|
|
Senior Member Group: Members Posts: 1,275 Joined: 24-September 03 From: Benson, AZ Member No.: 1,191 Region Association: Southwest Region |
Got started on the rear firewall. Had to tear down the used section I bought and make sure its going to work for what I need before cutting out what remains of mine. Has a lot of spot welds and a couple of layers - so a time consuming job.
I'll add a nice pic once I get it prepped and ready for primer. |
|
|
|
| 3d914 |
Apr 13 2014, 10:06 PM
Post
#354
|
|
Senior Member Group: Members Posts: 1,275 Joined: 24-September 03 From: Benson, AZ Member No.: 1,191 Region Association: Southwest Region |
Spent numerous hours this weekend getting one of the two layered panels of the rear firewall (to the trunk) removed. Required drilling out lots of spot welds - so very tedious job.
 Then used Andy's idea of welding angle iron in the corner to reinforce the connection between the shock tower and the upper part of the longs. New welder made the job a breeze. Still had to do it in 1-inch or so sections, but I'm happy with the results. 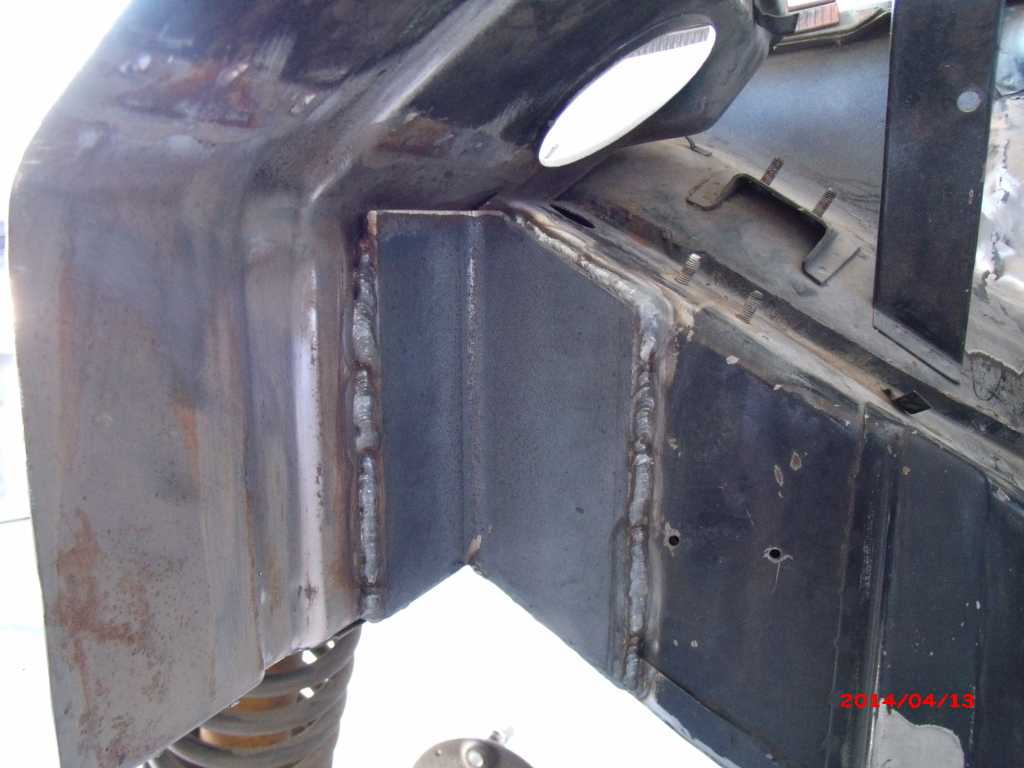 |
|
|
|
| Elliot Cannon |
Apr 14 2014, 12:17 PM
Post
#355
|
|
914 Guru Group: Retired Members Posts: 8,487 Joined: 29-December 06 From: Paso Robles Ca. (Central coast) Member No.: 7,407 Region Association: None |
I haven't gone through this whole thread and it may have already been discussed but will this engine cause the CG to be a bit higher? Any idea how this will change handling qualities? Like many others, I am looking forward to see how all the hard (and excellent) work will turn out.
|
|
|
|
| 3d914 |
Apr 29 2014, 10:22 PM
Post
#356
|
|
Senior Member Group: Members Posts: 1,275 Joined: 24-September 03 From: Benson, AZ Member No.: 1,191 Region Association: Southwest Region |
Elliot, I'm sure it will get shifted some with the cast iron block of the 60deg V6. But the crank is right on the centerline of the tranny, and everything above the block is aluminum - so it shouldn't be terrible.
Also ,I'm not building a track car, and with proper suspension setup and wider track it should handle well enough for my driving skills to improve some. |
|
|
|
| Mblizzard |
Apr 30 2014, 12:53 PM
Post
#357
|
|
Advanced Member Group: Members Posts: 3,033 Joined: 28-January 13 From: Knoxville Tn Member No.: 15,438 Region Association: South East States |
That is one AWESOME build!
|
|
|
|
| 3d914 |
May 3 2014, 07:48 PM
Post
#358
|
|
Senior Member Group: Members Posts: 1,275 Joined: 24-September 03 From: Benson, AZ Member No.: 1,191 Region Association: Southwest Region |
Thanks Mike. Been distracted finishing up on some projects in the house for the last couple of weekends. Withdrawal startin to kick in.
|
|
|
|
| 3d914 |
May 10 2014, 09:12 AM
Post
#359
|
|
Senior Member Group: Members Posts: 1,275 Joined: 24-September 03 From: Benson, AZ Member No.: 1,191 Region Association: Southwest Region |
Still working on "the Wall", wife's Mini, and sons RSX. May be a couple weeks before I get back to the 914.
|
|
|
|
| 3d914 |
Jul 25 2014, 08:13 AM
Post
#360
|
|
Senior Member Group: Members Posts: 1,275 Joined: 24-September 03 From: Benson, AZ Member No.: 1,191 Region Association: Southwest Region |
Well the wall construction is done - except for the shelving trim. My wife will finish up the priming and painting, and I'll get all the component wiring routed.
So next weekend its back to the 914 project - and welding. Hope I can remember how. 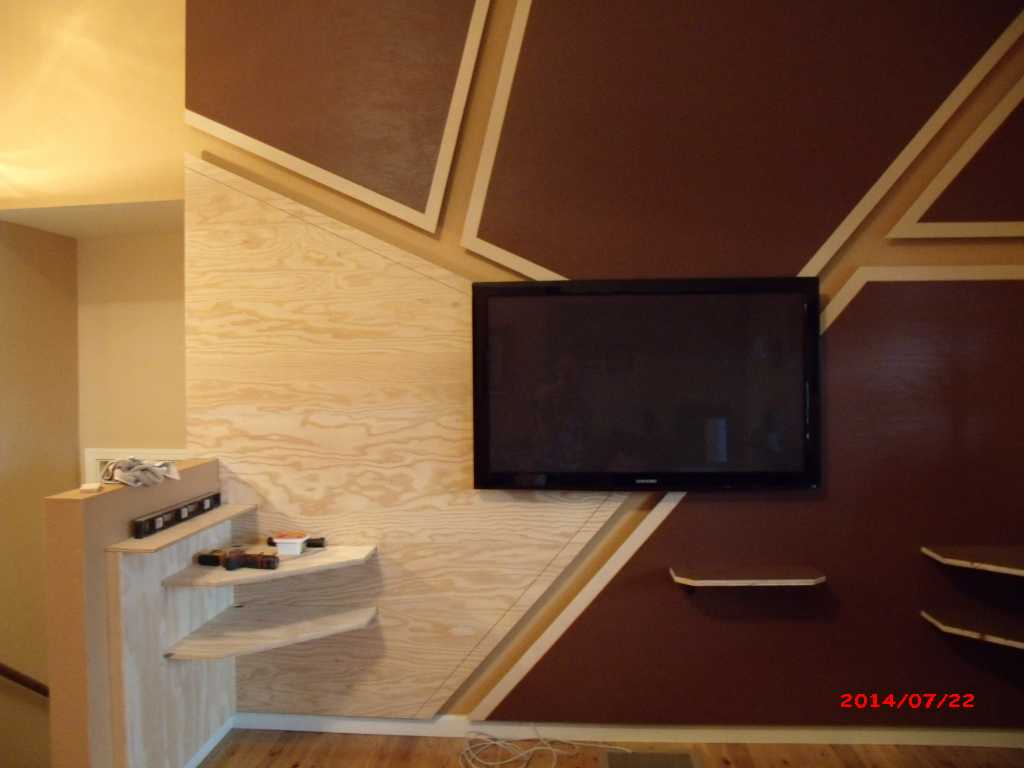 |
|
|
|
|
2 User(s) are reading this topic (2 Guests and 0 Anonymous Users)
0 Members:

|
Lo-Fi Version | Time is now: 22nd June 2026 - 09:15 AM |
Invision Power Board
v9.1.4 © 2026 IPS, Inc.