|
|
|
Porsche, and the Porsche crest are registered trademarks of Dr. Ing. h.c. F. Porsche AG.
This site is not affiliated with Porsche in any way. Its only purpose is to provide an online forum for car enthusiasts. All other trademarks are property of their respective owners. |
|
|

  |

| plymouth37 |
 Aug 19 2019, 10:30 AM Aug 19 2019, 10:30 AM
Post
#1421
|
|
Senior Member  Group: Members Posts: 1,825 Joined: 24-May 05 From: Snoqualmie, WA Member No.: 4,138 Region Association: Pacific Northwest |
We attended the annual Snoqualmie Railroad Days car show, it is only a block from my house so it is a pretty easy drive over there!
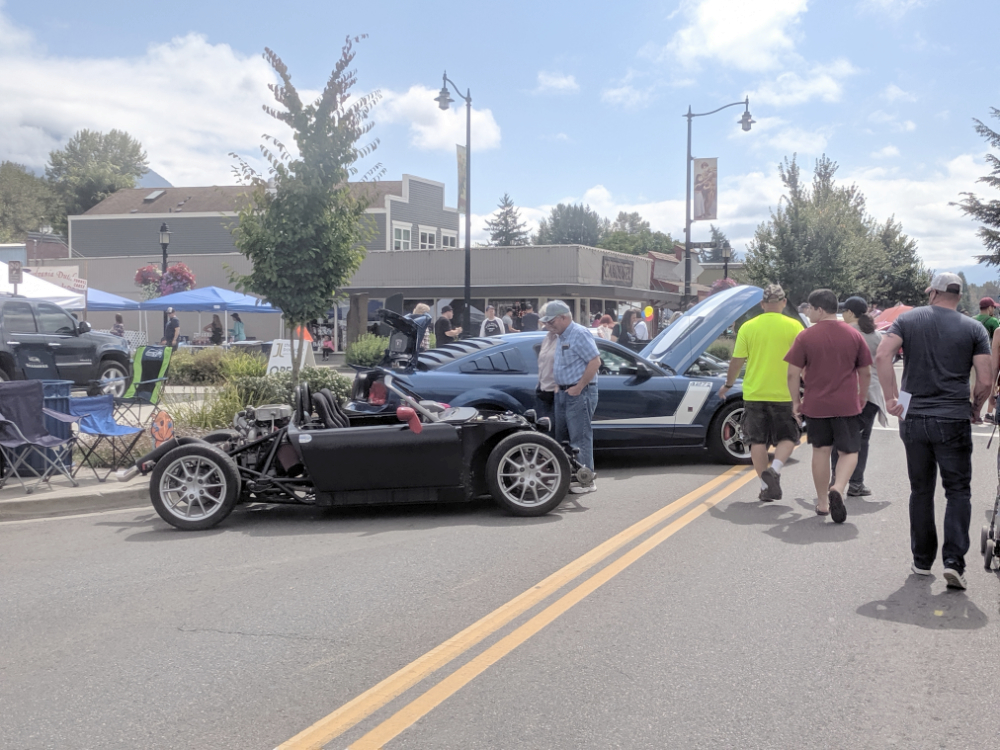 As usall there were a ton of questions, "where is the rest of it" "is that a miata' etc... 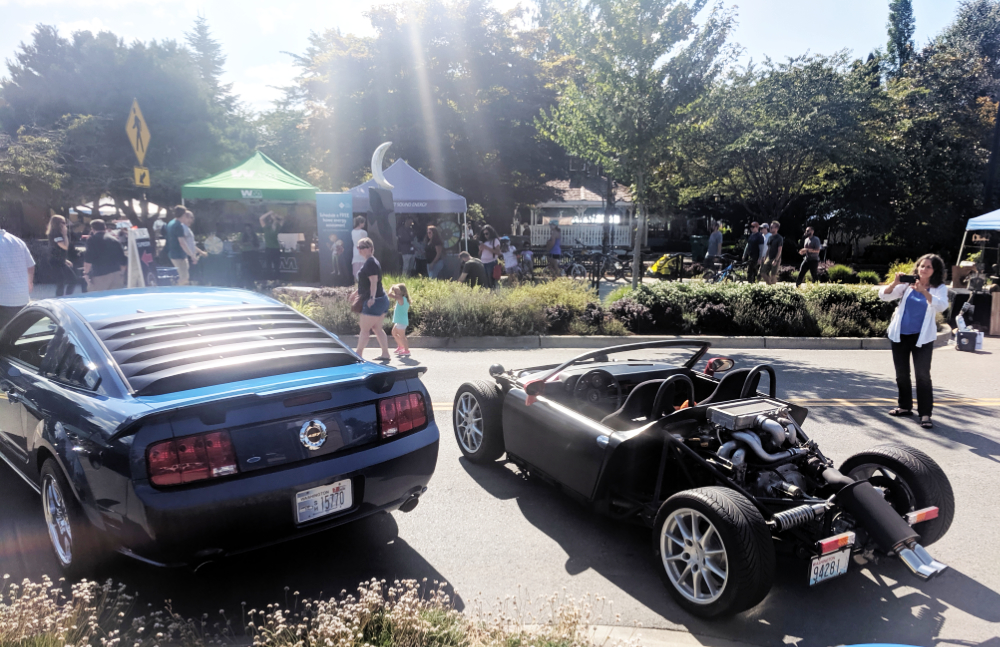 My kiddo always has a blast showing the car to people, she even corrected a few people that were saying Porsche wrong which was hilarious, good kid! 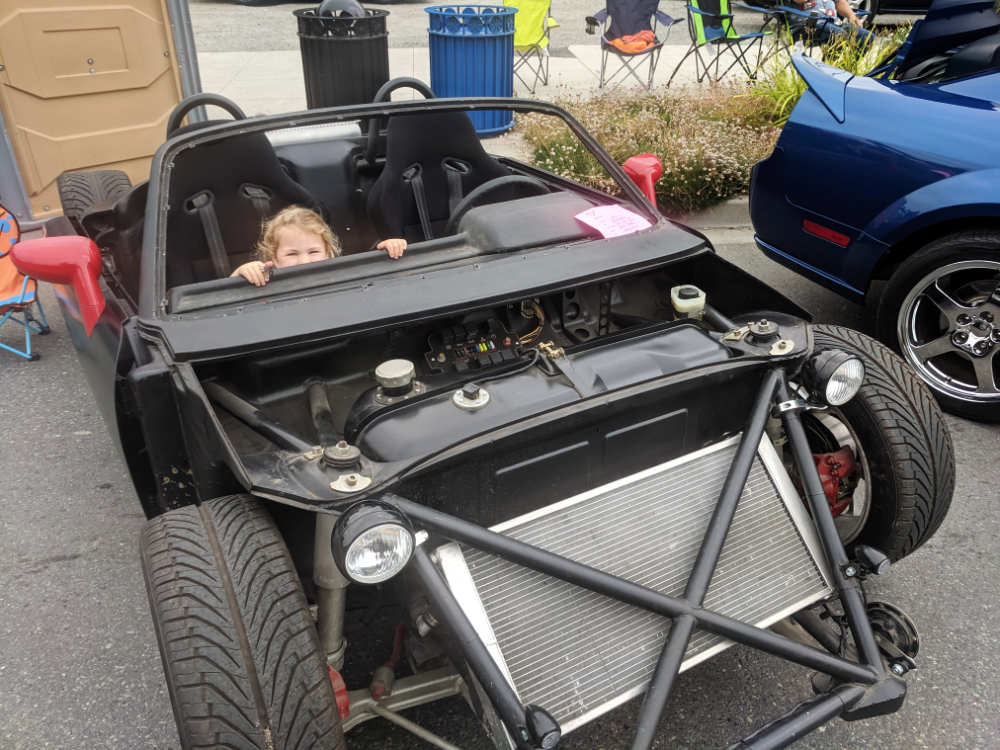 |
   |

 
|
| AZBanks |
Aug 19 2019, 12:40 PM
Post
#1422
|
|
Senior Member Group: Members Posts: 1,079 Joined: 7-December 05 From: New River, AZ Member No.: 5,245 Region Association: Southwest Region |
Parenting done right!
|
|
|
|
| plymouth37 |
Aug 21 2019, 06:04 PM
Post
#1423
|
|
Senior Member Group: Members Posts: 1,825 Joined: 24-May 05 From: Snoqualmie, WA Member No.: 4,138 Region Association: Pacific Northwest |
I got the windshield frame temporarily installed, I used 1/8" spacers around the perimeter to ensure a uniform gap around the perimeter.
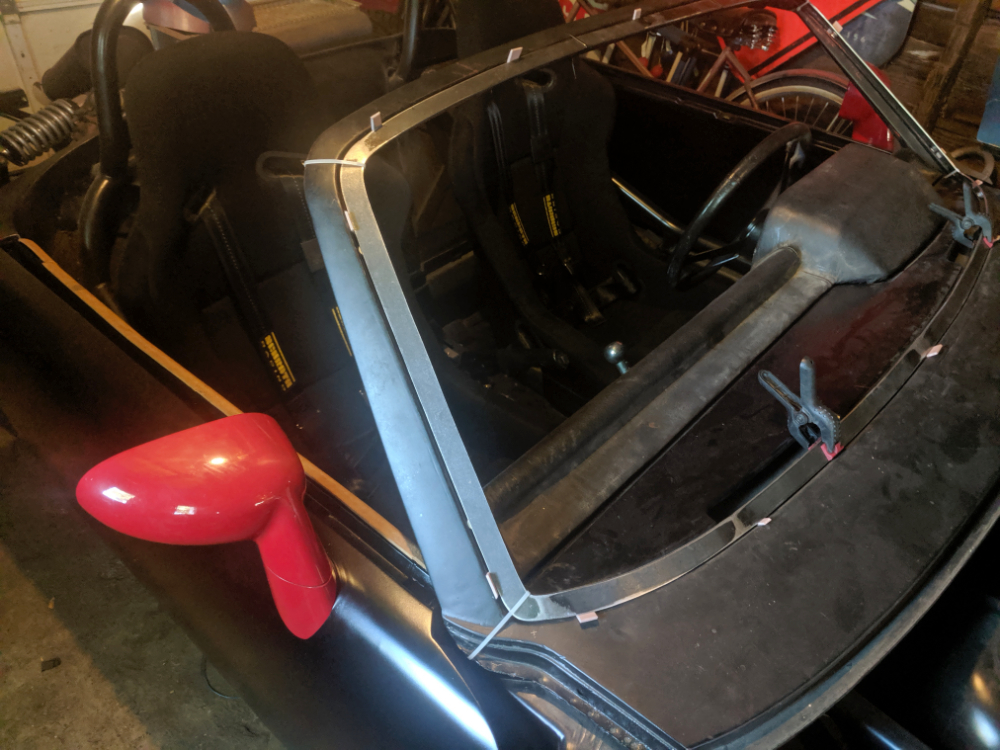 Initially I wanted to weld studs to the back of this frame to hide the fasteners but the complexity of having to install that system was inevitably going to lead to a lot of heartache and probably a broken polycarbonate windshield during installation. Instead I am countersinking flat head allen fasteners into the frame to sit flush, I started this process by marking out and drilling holes around the frame. 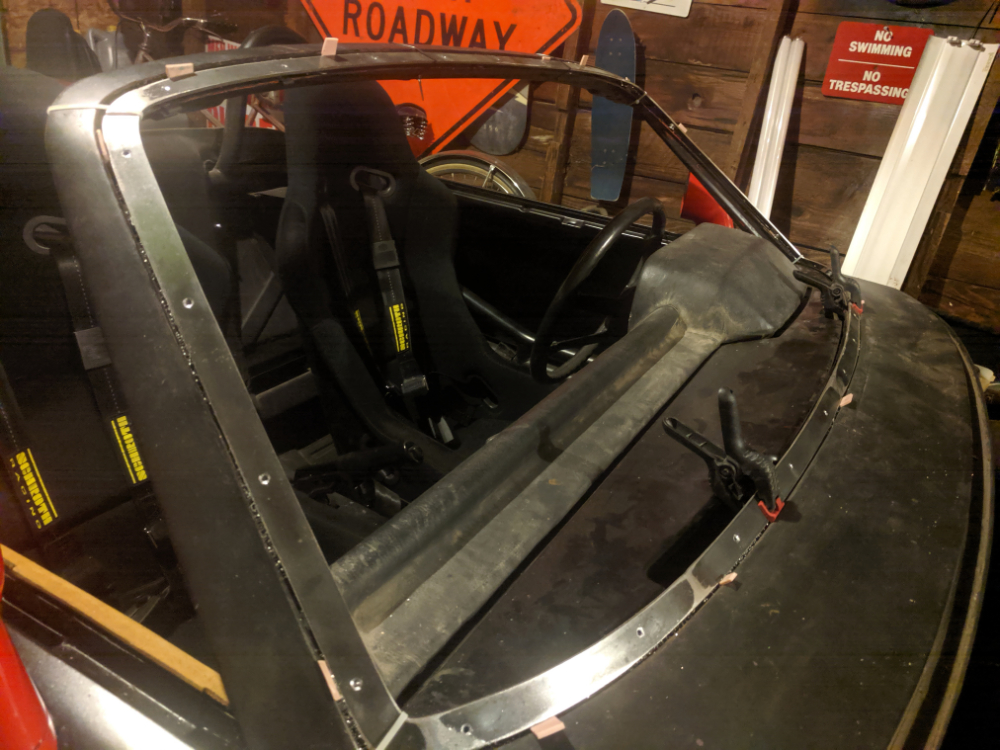 I pulled the frame and got a big chunk of MDF for a template. 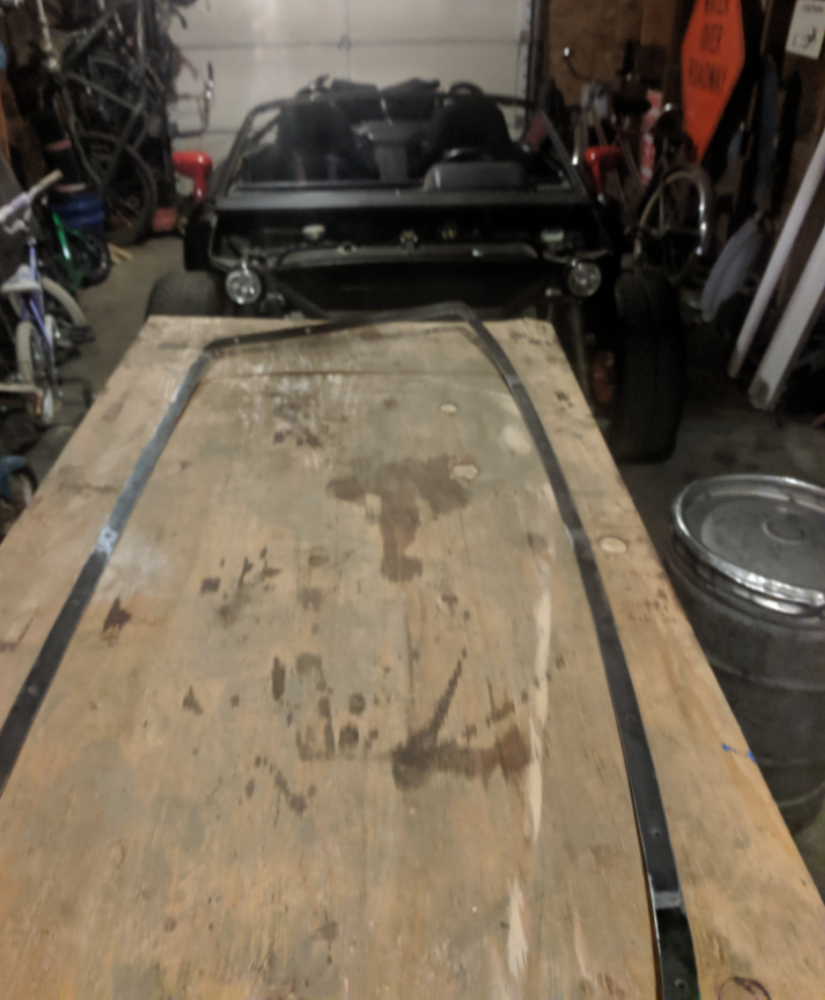 Then using my newly drilled holes, I bolted the frame to the MDF. 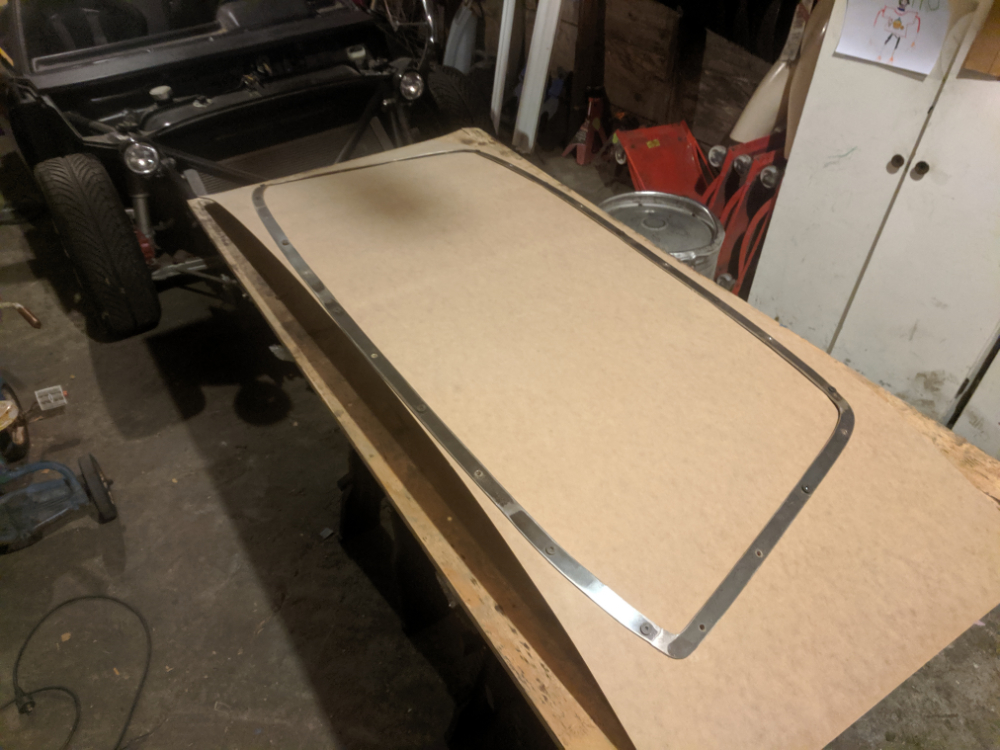 Then cut off the excess material, time to throw this in and see what happens! 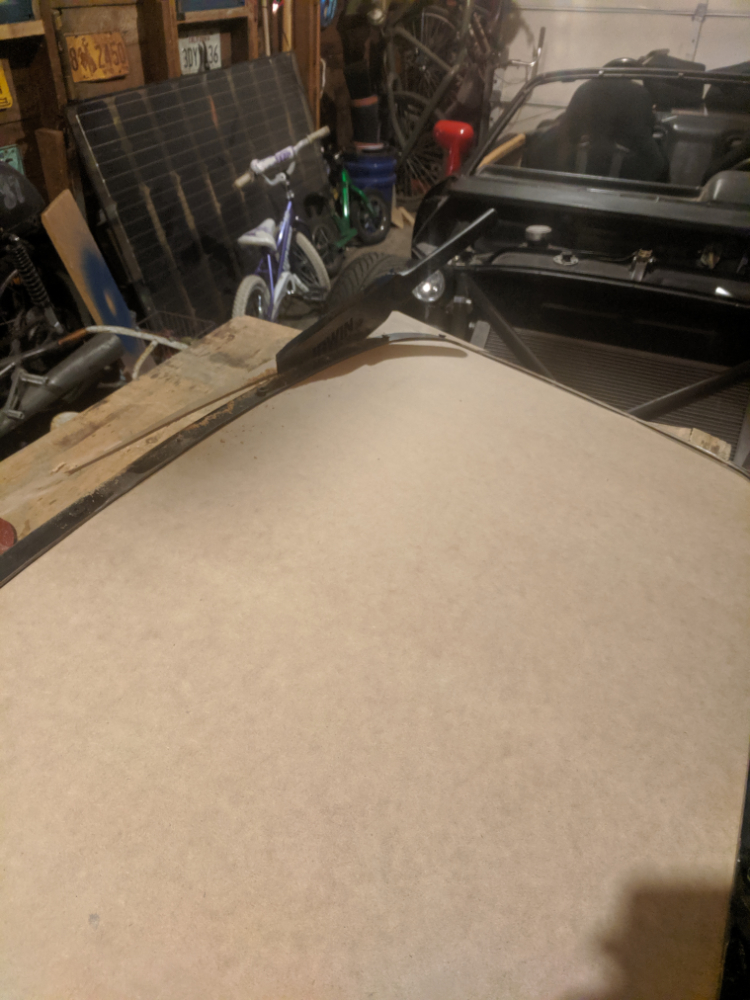 |
|
|
|
| plymouth37 |
Aug 21 2019, 06:35 PM
Post
#1424
|
|
Senior Member Group: Members Posts: 1,825 Joined: 24-May 05 From: Snoqualmie, WA Member No.: 4,138 Region Association: Pacific Northwest |
Well I only have half the bolts in and no gasket material but this sure looks promising.
 Having the frame to clamp the material in with is really helpful and should make it look a little cleaner than the usual polycarb windshield install process. 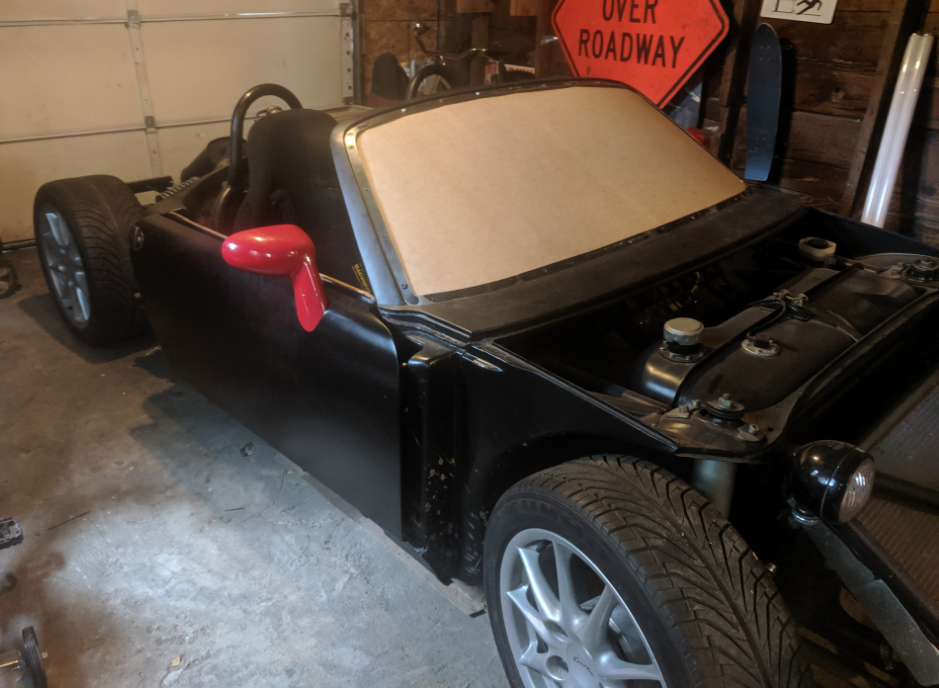 This is good enough to move forward and buy a big ol' hunk of Poly, Woohoo! 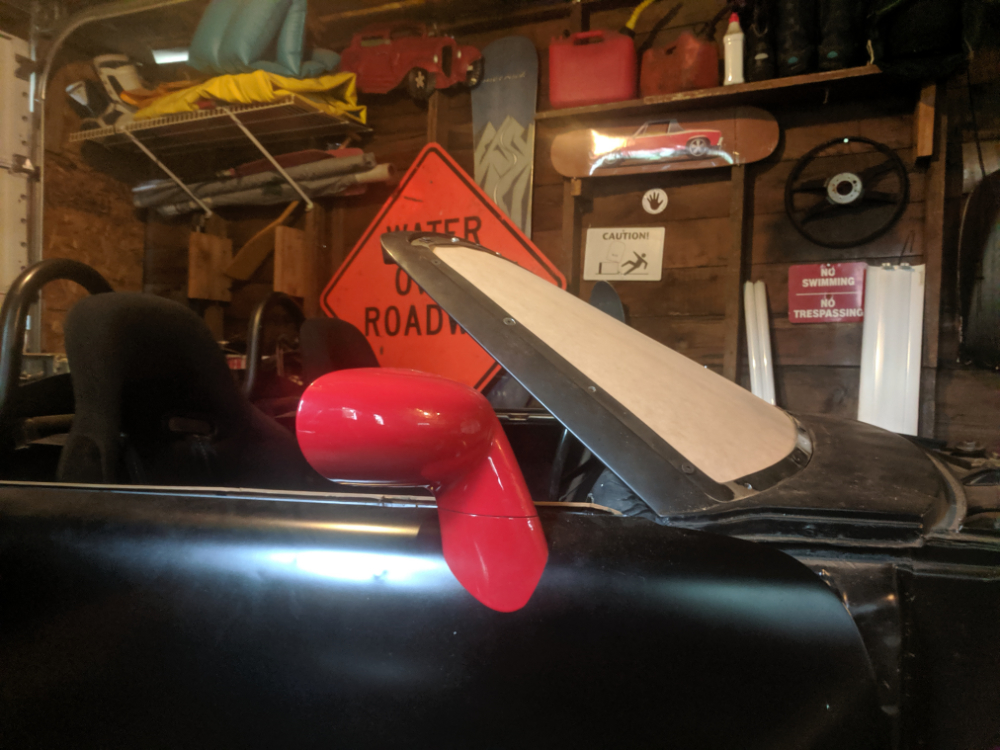 |
|
|
|
| sixnotfour |
Aug 21 2019, 06:50 PM
Post
#1425
|
|
914 Wizard Group: Members Posts: 11,244 Joined: 12-September 04 Member No.: 2,744 Region Association: NineFourteenerVille |
add the hump at the top like 70-71 ..= aero
|
|
|
|
| worn |
Aug 21 2019, 09:33 PM
Post
#1426
|
|
Winner of the Utah Twisted Joint Award Group: Members Posts: 3,582 Joined: 3-June 11 From: Madison, WI and North Bend WA Member No.: 13,152 Region Association: Upper MidWest |
Did my sister Ann find you? She had a booth of artwork. I asked her to look for you. Last year i missed you by a week. My wife grew up in the valley, and we visit often.
Warren |
|
|
|
| plymouth37 |
Aug 22 2019, 08:19 AM
Post
#1427
|
|
Senior Member Group: Members Posts: 1,825 Joined: 24-May 05 From: Snoqualmie, WA Member No.: 4,138 Region Association: Pacific Northwest |
QUOTE(worn @ Aug 21 2019, 09:33 PM)  Did my sister Ann find you? She had a booth of artwork. I asked her to look for you. Last year i missed you by a week. My wife grew up in the valley, and we visit often. Warren Was it the car artwork that the teenager was doing or another one? Shoot didn't connect, I will totally find them next year! |
|
|
|
| 76-914 |
Aug 22 2019, 08:45 AM
Post
#1428
|
|
Repeat Offender & Resident Subaru Antagonist Group: Members Posts: 13,883 Joined: 23-January 09 From: Temecula, CA Member No.: 9,964 Region Association: Southern California |
Do you pre-form the polycarbonate before trimming to size?
|
|
|
|
| plymouth37 |
Aug 22 2019, 09:23 AM
Post
#1429
|
|
Senior Member Group: Members Posts: 1,825 Joined: 24-May 05 From: Snoqualmie, WA Member No.: 4,138 Region Association: Pacific Northwest |
QUOTE(76-914 @ Aug 22 2019, 08:45 AM) Do you pre-form the polycarbonate before trimming to size? I think I can just bend it in there, the MDF formed in there pretty well and it is pretty brittle itself. I did stretch the frame opening vertically a bit when I bolted it to the mdf to make the template so it will naturally be somewhat convex. At the very least I will try to jam it in there on a hot day in the sun with a hairdryer. I actually have access to a large thermo-forming oven but then I would have to make a mold and that seems a lot harder than just trying to jam it in there. After the first one explodes on installation I will probably explore pre-forming (IMG:style_emoticons/default/biggrin.gif) |
|
|
|
| rhodyguy |
Aug 22 2019, 01:49 PM
Post
#1430
|
|
Chimp Sanctuary NW. Check it out. Group: Members Posts: 22,252 Joined: 2-March 03 From: Orion's Bell. The BELL! Member No.: 378 Region Association: Galt's Gulch |
If you were to place the poly on a piece of black plastic out in the sun (when it comes back) the plastic would heat uniformally.
|
|
|
|
| plymouth37 |
Aug 22 2019, 04:06 PM
Post
#1431
|
|
Senior Member Group: Members Posts: 1,825 Joined: 24-May 05 From: Snoqualmie, WA Member No.: 4,138 Region Association: Pacific Northwest |
QUOTE(rhodyguy @ Aug 22 2019, 01:49 PM) If you were to place the poly on a piece of black plastic out in the sun (when it comes back) the plastic would heat uniformally. Yeah that is a good idea, I think the sun is about as extreme as I want to get at first, even a heat gun can create bubbles if you aren't careful. The shape is pretty mild, not going all George Barris on it, should be a good experiment! |
|
|
|
| wndsrfr |
Aug 22 2019, 07:09 PM
Post
#1432
|
|
Senior Member Group: Members Posts: 1,462 Joined: 30-April 09 From: Rescue, Virginia Member No.: 10,318 Region Association: MidAtlantic Region |
QUOTE(plymouth37 @ Aug 21 2019, 04:35 PM) This is good enough to move forward and buy a big ol' hunk of Poly, Woohoo! Take the MDF template to a glass place that has the polycarbonate for the local circle track guys....they'll use the template and cut it for you right there.... Local indy shop "Danny's Glass" here was easy to find as they sponsored a circle track car at Langley Speedway. $100 for a cut out lexan windshield... |
|
|
|
| plymouth37 |
Aug 29 2019, 12:33 PM
Post
#1433
|
|
Senior Member Group: Members Posts: 1,825 Joined: 24-May 05 From: Snoqualmie, WA Member No.: 4,138 Region Association: Pacific Northwest |
Okay, time to conquer the task that has been hanging over my head for about a decade, the windshield. I am not really tackling body work yet but my cowl was looking pretty tired, and when I filled the cowl years ago I didn't get everything as smooth as I would have liked. So as part of the windshield install I am doing a light cowl freshening.
 Skim coat of bondo to smooth out the lumps. 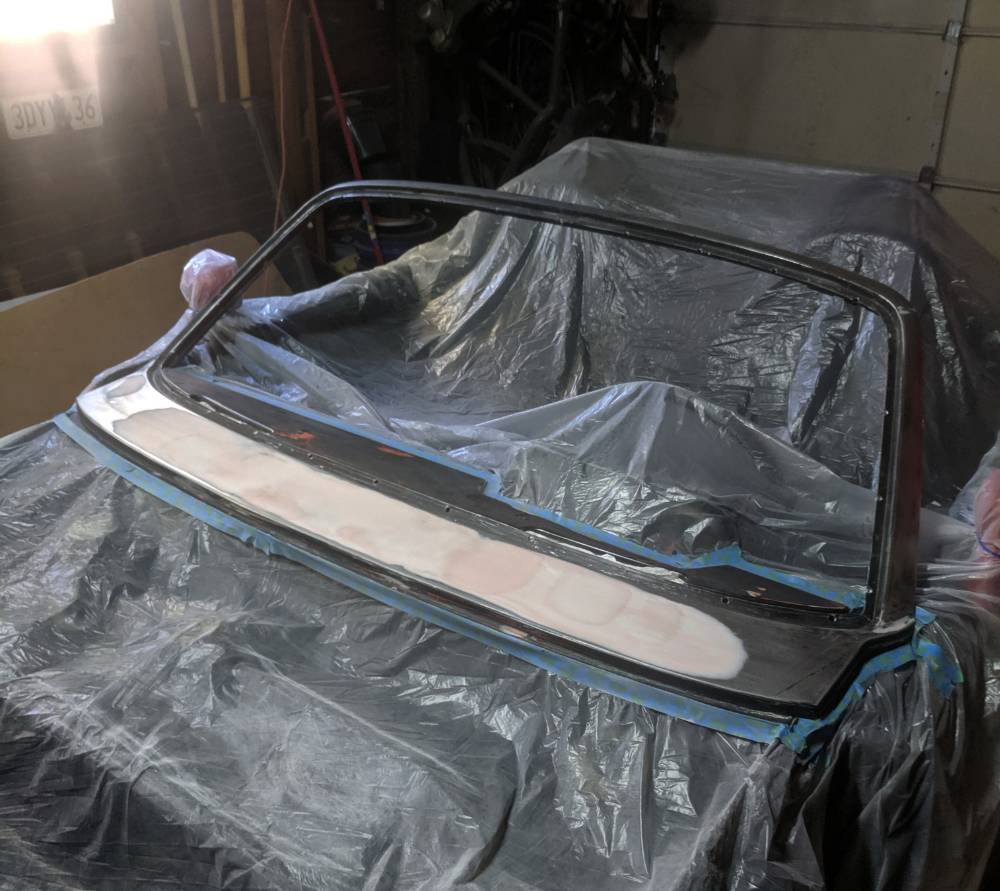 ohh, fresh paint: 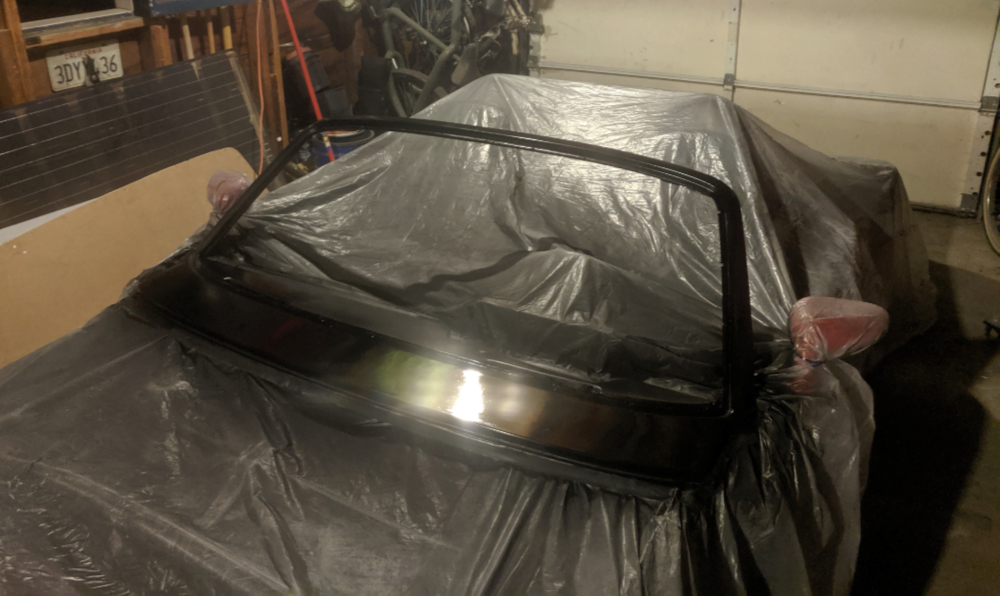 I also filled, primered and painted the windshield frame in a flat black.  |
|
|
|
| plymouth37 |
Aug 29 2019, 12:34 PM
Post
#1434
|
|
Senior Member Group: Members Posts: 1,825 Joined: 24-May 05 From: Snoqualmie, WA Member No.: 4,138 Region Association: Pacific Northwest |
After the paint dried I installed the attachment clips, I went with these because they introduce a nice amount of slop in the system which should help in installation.
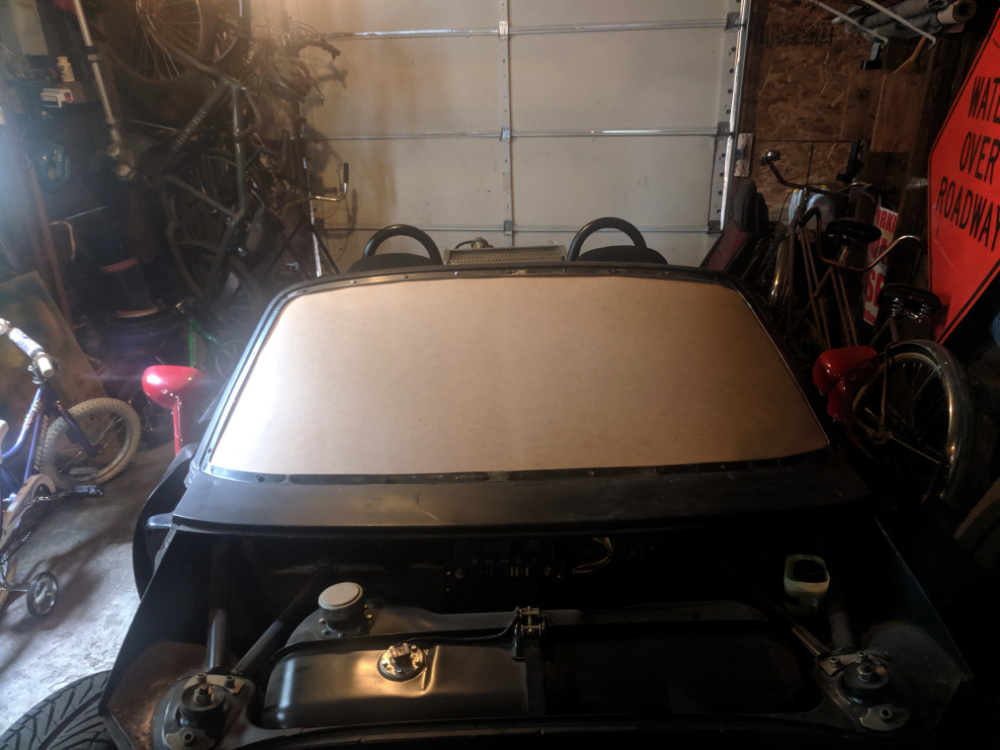
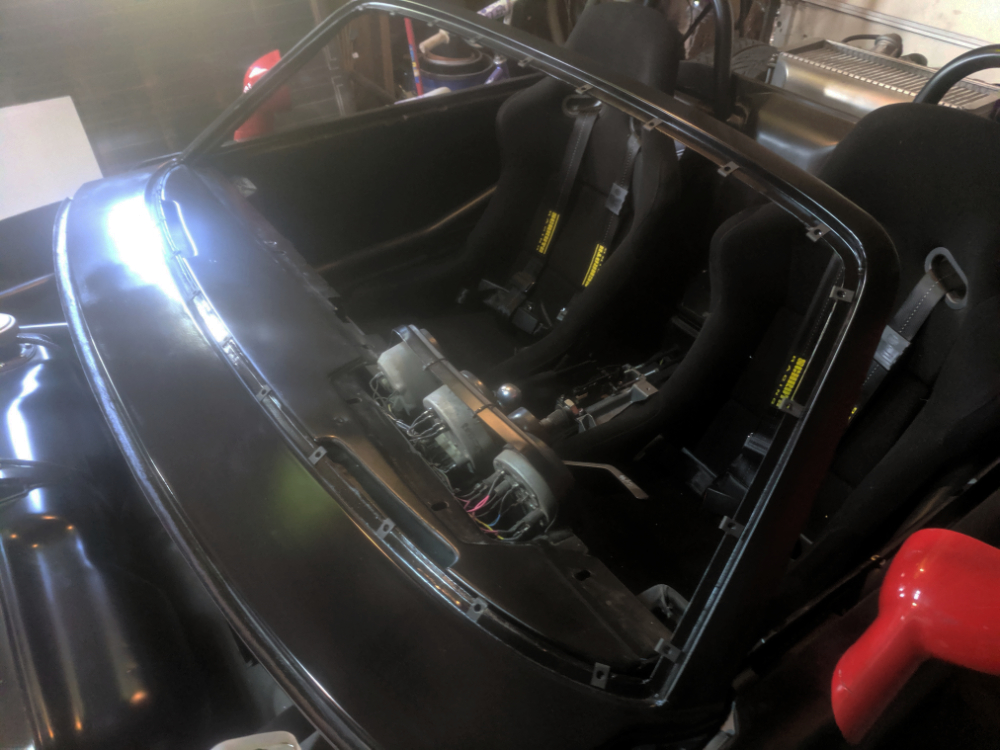 I ran some poly foam weather stripping around the frame opening. this is just generic hardware store weather stripping, not sure if this is the right stuff but I am rolling with it for now. 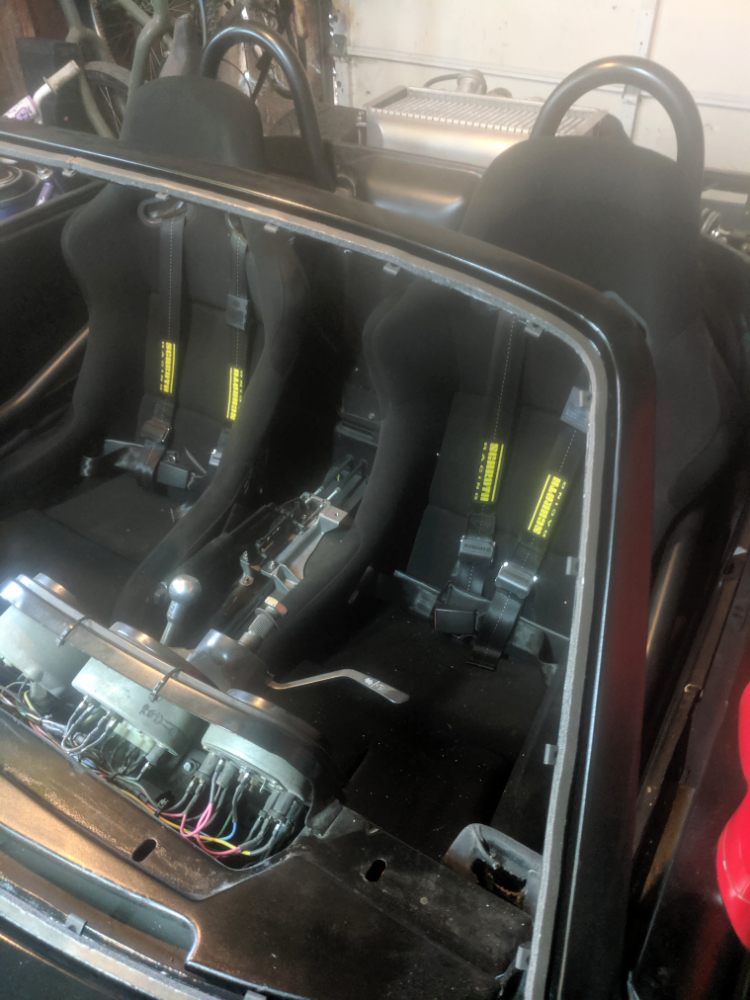 Also ran a few strips around the back of the outer frame, leaving a channel down the middle for hardware. 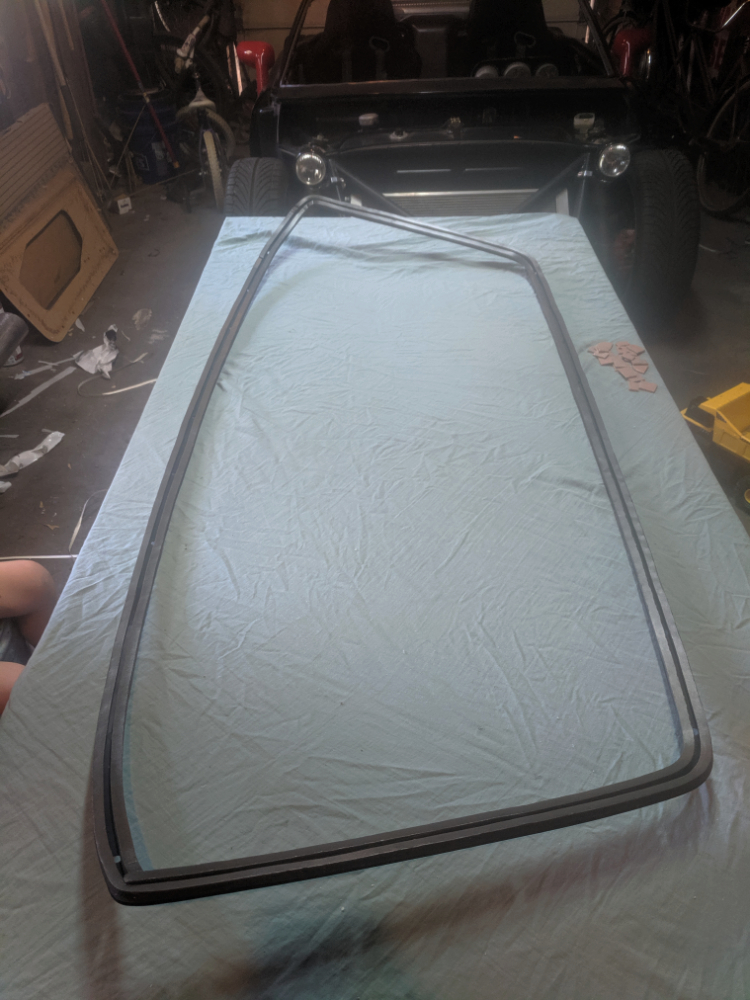 I also brought my windshield template to TAP plastics and they kindly cut some abrasion resistant 3/16" polycarb to shape. 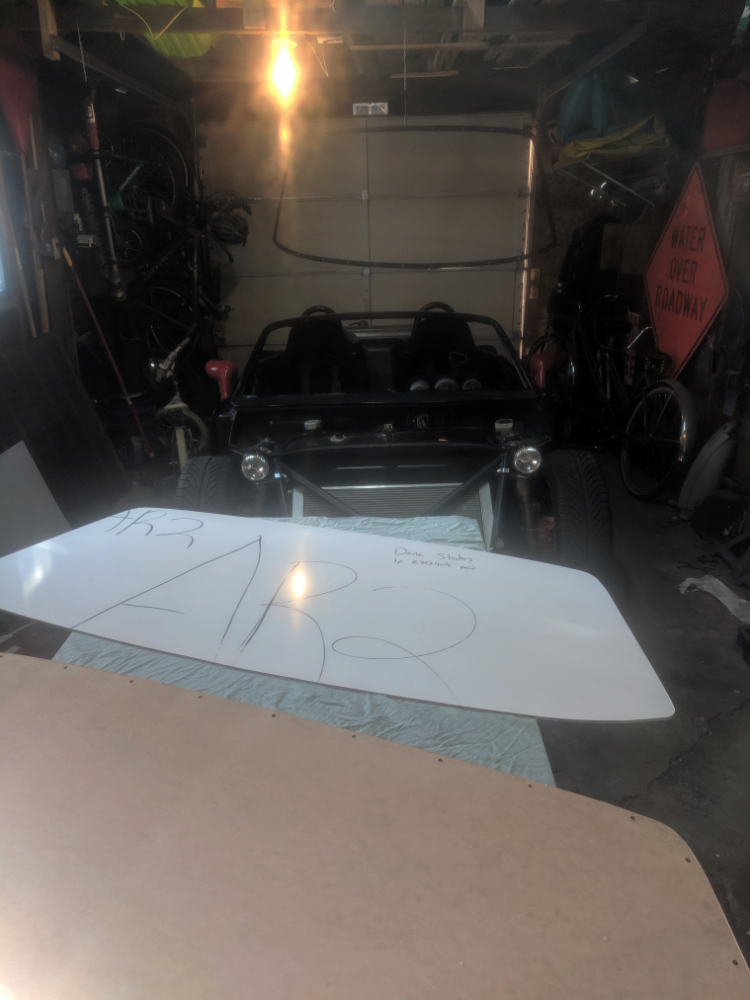 I taped the template to the poly and drilled the mounting holes around the perimeter. 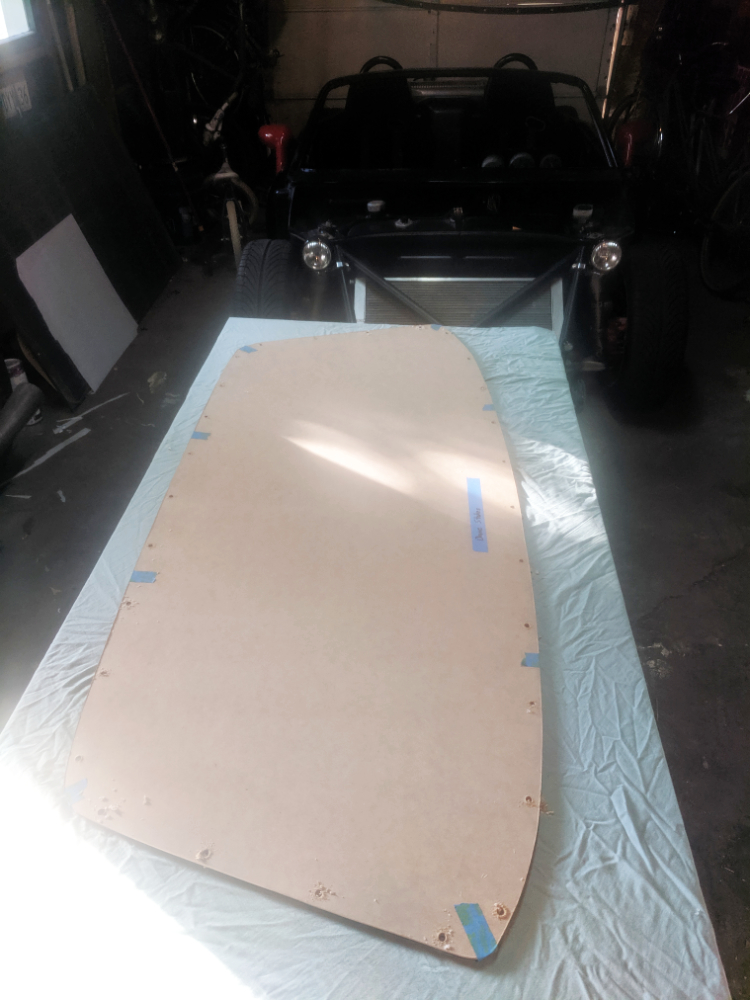 I don't know if this helped or not but it was in the 90's yesterday so I dragged an old solarpanel I haven't had the time to mount up out into the sun and baked the polycarbonate in the sun for an hour or so. 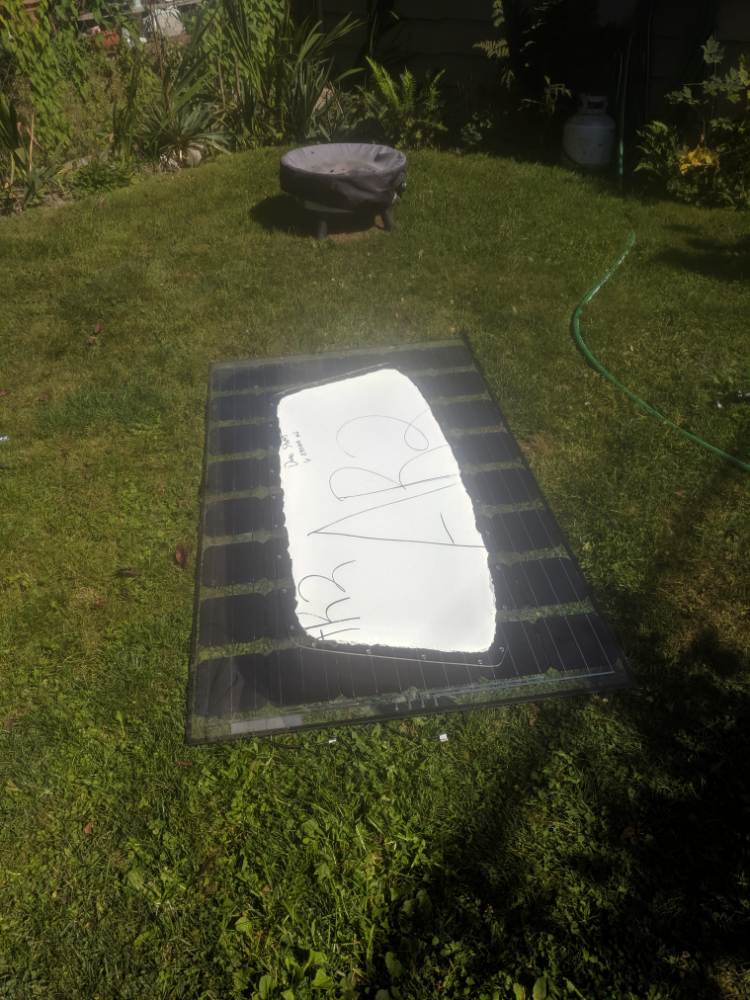 |
|
|
|
| plymouth37 |
Aug 29 2019, 12:34 PM
Post
#1435
|
|
Senior Member Group: Members Posts: 1,825 Joined: 24-May 05 From: Snoqualmie, WA Member No.: 4,138 Region Association: Pacific Northwest |
Oh hell yes! (IMG:style_emoticons/default/aktion035.gif) I can't believe this worked.
It took me 3 tries to get this bolted in correctly, the order the bolts are inserted definitely matters, I finally figured that starting at the sides and then bolting around the perimeter towards the center got it to take the shape well. 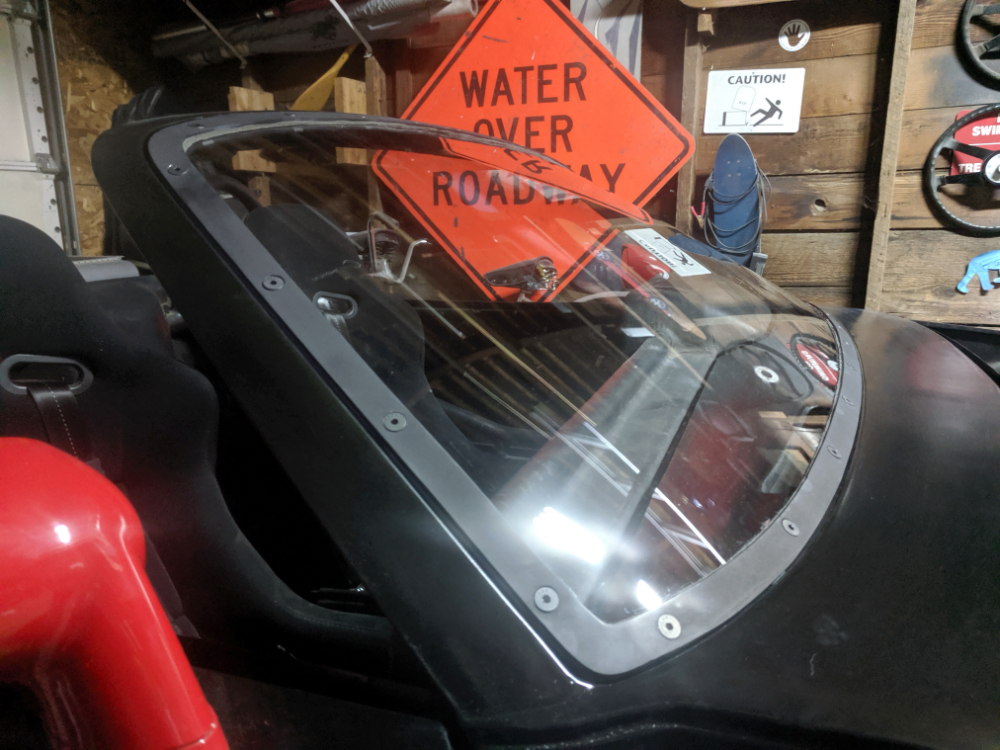 I just gradually put a turn into each screw and worked my way around until it slowly clamped down into the frame. This thing looks beautiful, can't wait to take it out for a spin. 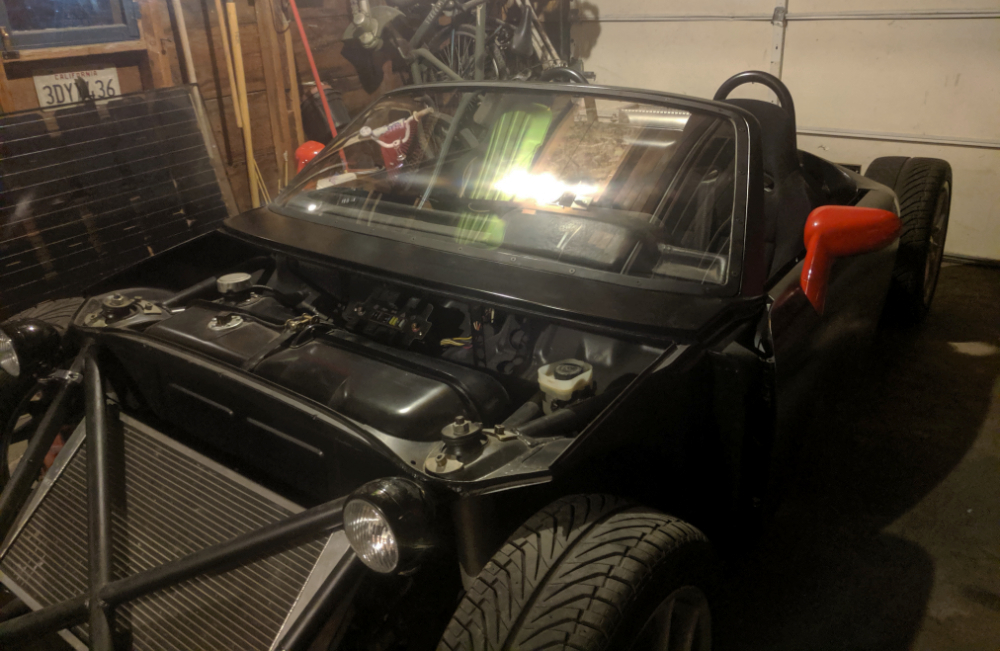 I am going to take it out this weekend to get some better shots for you all, this is a big milestone, one step closer to completion! 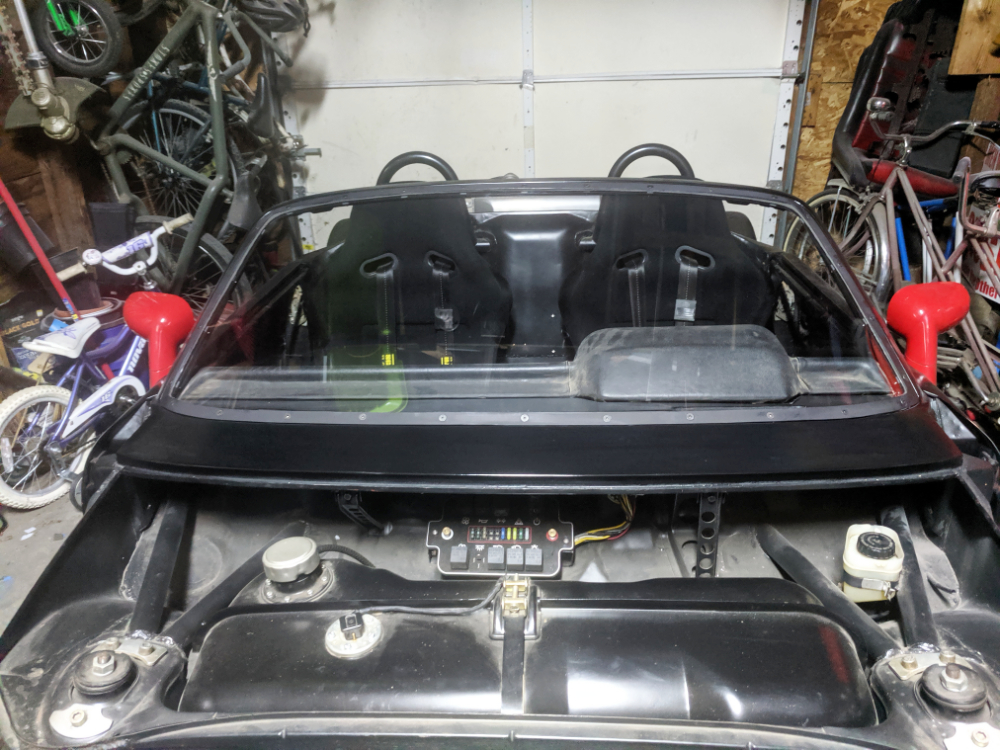 |
|
|
|
| rhodyguy |
Aug 29 2019, 12:42 PM
Post
#1436
|
|
Chimp Sanctuary NW. Check it out. Group: Members Posts: 22,252 Joined: 2-March 03 From: Orion's Bell. The BELL! Member No.: 378 Region Association: Galt's Gulch |
Everyone enjoys a success story. Nice work.
|
|
|
|
| falcor75 |
Aug 29 2019, 01:33 PM
Post
#1437
|
|
Senior Member Group: Members Posts: 1,579 Joined: 22-November 12 From: Sweden Member No.: 15,176 Region Association: Scandinavia |
Nicely done, congratulations (IMG:style_emoticons/default/smile.gif)
|
|
|
|
| tygaboy |
Aug 29 2019, 03:58 PM
Post
#1438
|
|
914 Guru Group: Members Posts: 5,824 Joined: 6-October 15 From: Petaluma, CA Member No.: 19,241 Region Association: Northern California |
Dude! Big congrats. I love when folks just jump in and give things a go.
And I know what you mean about those tasks that loom over you. But man, way to knock it out of the park! It turned out great and looks FABRICATIONULOUS! (IMG:style_emoticons/default/aktion035.gif) (IMG:style_emoticons/default/smilie_pokal.gif) |
|
|
|
| Krieger |
Aug 29 2019, 05:47 PM
Post
#1439
|
|
Advanced Member Group: Members Posts: 4,855 Joined: 24-May 04 From: Santa Rosa CA Member No.: 2,104 Region Association: None |
That looks really good! (IMG:style_emoticons/default/smilie_pokal.gif)
|
|
|
|
| 914 Ranch |
Aug 30 2019, 01:29 AM
Post
#1440
|
|
Team Sharp where the 914 grow wings Group: Members Posts: 1,530 Joined: 29-January 16 From: TheNorth Shore Retreat. Deland Member No.: 19,611 Region Association: South East States |
NICE…
|
|
|
|
|
5 User(s) are reading this topic (5 Guests and 0 Anonymous Users)
0 Members:

|
Lo-Fi Version | Time is now: 14th May 2026 - 04:09 AM |
Invision Power Board
v9.1.4 © 2026 IPS, Inc.