|
|
|
Porsche, and the Porsche crest are registered trademarks of Dr. Ing. h.c. F. Porsche AG.
This site is not affiliated with Porsche in any way. Its only purpose is to provide an online forum for car enthusiasts. All other trademarks are property of their respective owners. |
|
|

  |

| plymouth37 |
 Apr 17 2012, 09:02 PM Apr 17 2012, 09:02 PM
Post
#921
|
|
Senior Member  Group: Members Posts: 1,825 Joined: 24-May 05 From: Snoqualmie, WA Member No.: 4,138 Region Association: Pacific Northwest |
QUOTE(malcolm2 @ Apr 17 2012, 08:56 PM)  Hey... PM sent. I can certainly use that trunk floor. Thnks, Clark It is all yours, give me a day or two to box it up! |
   |

 
|
| KELTY360 |
Apr 17 2012, 10:22 PM
Post
#922
|
|
914 Neferati Group: Members Posts: 5,189 Joined: 31-December 05 From: Pt. Townsend, WA Member No.: 5,344 Region Association: Pacific Northwest |
QUOTE(plymouth37 @ Apr 17 2012, 07:02 PM) QUOTE(malcolm2 @ Apr 17 2012, 08:56 PM) Hey... PM sent. I can certainly use that trunk floor. Thnks, Clark It is all yours, give me a day or two to box it up! @malcolm2 - have Dana autograph that piece from the world famous Anklebiter - it will be worth big bucks some day! |
|
|
|
| PeeGreen 914 |
Apr 18 2012, 09:04 AM
Post
#923
|
|
Just when you think you're done...wait, there is more..lol Group: Members Posts: 10,219 Joined: 21-September 06 From: Seattle, WA... actually Everett Member No.: 6,884 Region Association: Pacific Northwest |
QUOTE(KELTY360 @ Apr 17 2012, 09:22 PM) QUOTE(plymouth37 @ Apr 17 2012, 07:02 PM) QUOTE(malcolm2 @ Apr 17 2012, 08:56 PM) Hey... PM sent. I can certainly use that trunk floor. Thnks, Clark It is all yours, give me a day or two to box it up! @malcolm2 - have Dana autograph that piece from the world famous Anklebiter - it will be worth big bucks some day! Yeah, Once my CF rear lid is painted you will have to sign it for me Dana (IMG:style_emoticons/default/biggrin.gif) |
|
|
|
| malcolm2 |
Apr 18 2012, 07:56 PM
Post
#924
|
|
Advanced Member Group: Members Posts: 2,749 Joined: 31-May 11 From: Nashville Member No.: 13,139 Region Association: South East States |
QUOTE(plymouth37 @ Apr 17 2012, 10:02 PM) QUOTE(malcolm2 @ Apr 17 2012, 08:56 PM) Hey... PM sent. I can certainly use that trunk floor. Thnks, Clark It is all yours, give me a day or two to box it up! Awesome, Autograph is welcome. I'll do my best to keep it whole. I PM'd my number, just call and let's work out the details. Clark |
|
|
|
| Mr. 5150 |
Apr 18 2012, 08:45 PM
Post
#925
|
|
Newbie Group: Members Posts: 15 Joined: 5-April 12 From: Oxnard, Ca Member No.: 14,338 Region Association: Southern California |
Flip'n sweet I can see your not afriad to start from scratch! I love builders who believe limits are for the limited.
|
|
|
|
| plymouth37 |
Apr 22 2012, 04:59 PM
Post
#926
|
|
Senior Member Group: Members Posts: 1,825 Joined: 24-May 05 From: Snoqualmie, WA Member No.: 4,138 Region Association: Pacific Northwest |
I finished hooking up the coolant hoses, it took a 1991 Nissan Sentra hose, half a 2001 Suburban hose and an un-identified hose I found at AutoZone to get everything connected. I am almost done hooking up all of the connections needed for the car to run. Both coolant hoses will be heat wrapped to keep heat from effecting the fuel system once I get to final assembly. Once I am done with the mechanicals I will pull the chassis apart and go into paint.
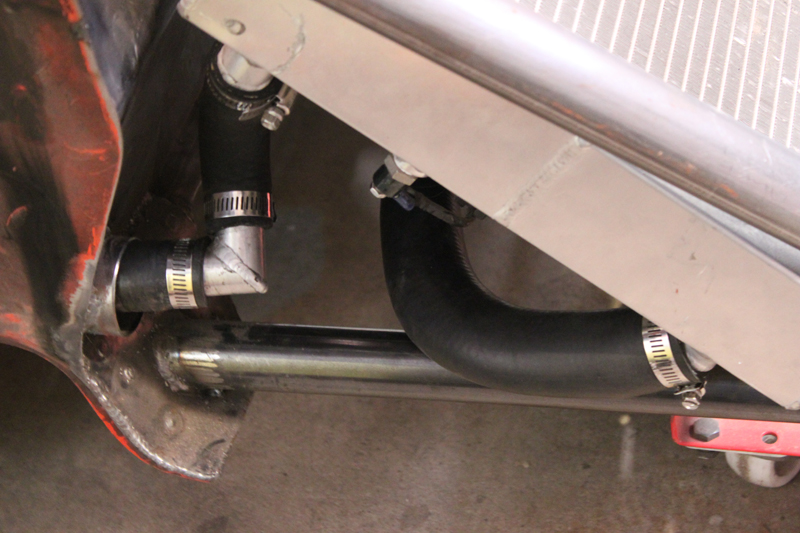   I also worked on fitting the pieces of the front nose. 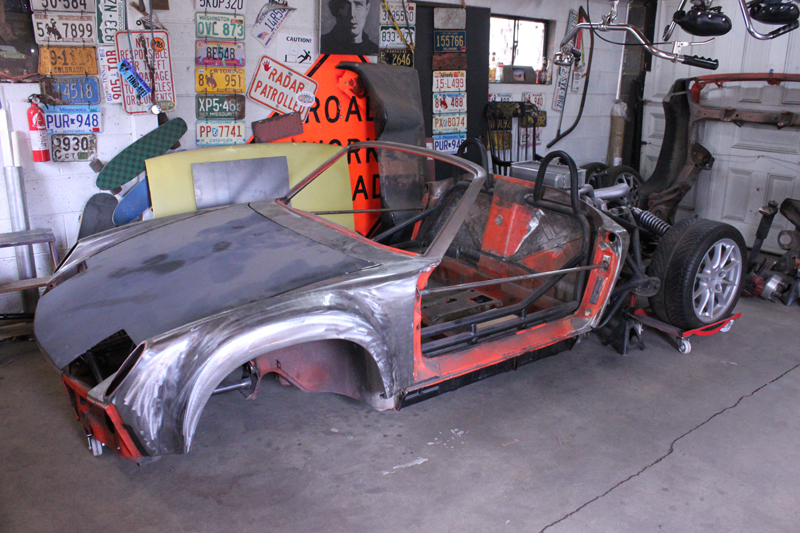 |
|
|
|
| majkos |
Apr 22 2012, 06:22 PM
Post
#927
|
|
Senior Member Group: Members Posts: 1,370 Joined: 29-February 04 From: Mile High 914 Member No.: 1,729 Region Association: Rocky Mountains |
|
|
|
|
| nein14 |
May 15 2012, 01:18 PM
Post
#928
|
|
Senior Member Group: Members Posts: 839 Joined: 6-February 03 From: USA Member No.: 262 |
Fantastic work when will you be in Pa?
|
|
|
|
| plymouth37 |
May 15 2012, 06:00 PM
Post
#929
|
|
Senior Member Group: Members Posts: 1,825 Joined: 24-May 05 From: Snoqualmie, WA Member No.: 4,138 Region Association: Pacific Northwest |
QUOTE(nein14 @ May 15 2012, 01:18 PM) Fantastic work when will you be in Pa? We are moving out at the end of July, classes start in the middle of August. Glad to have the site back, thanks Andy! |
|
|
|
| plymouth37 |
May 16 2012, 07:32 PM
Post
#930
|
|
Senior Member Group: Members Posts: 1,825 Joined: 24-May 05 From: Snoqualmie, WA Member No.: 4,138 Region Association: Pacific Northwest |
I got a little bit of work done last weekend, I am trying to finish up the handful of welding jobs left on the tub.
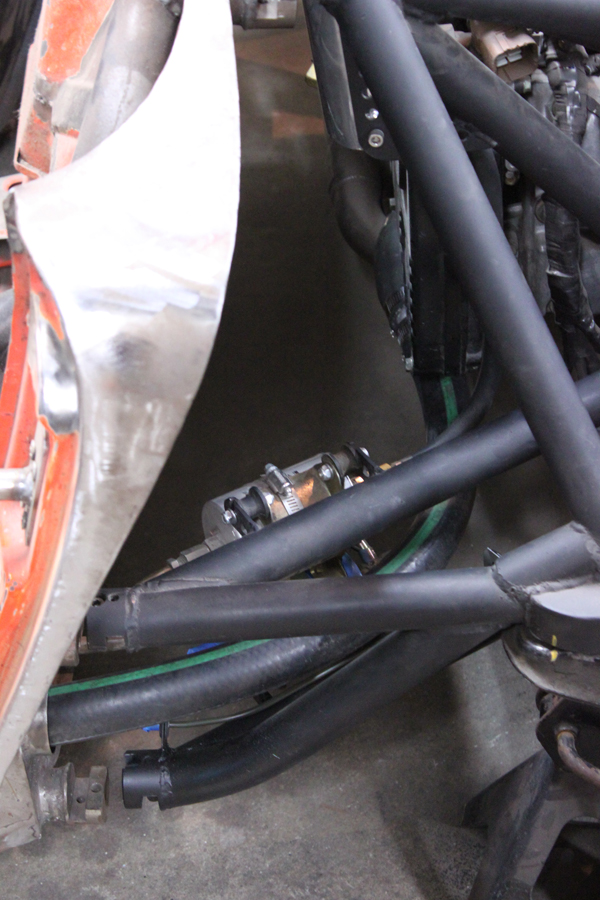
I focused my efforts on the tunnel, I started by bracing the clutch tube. There wasn't anything wrong with it but it is the kind of job you have to do if you have the shifter out and the welder handy. 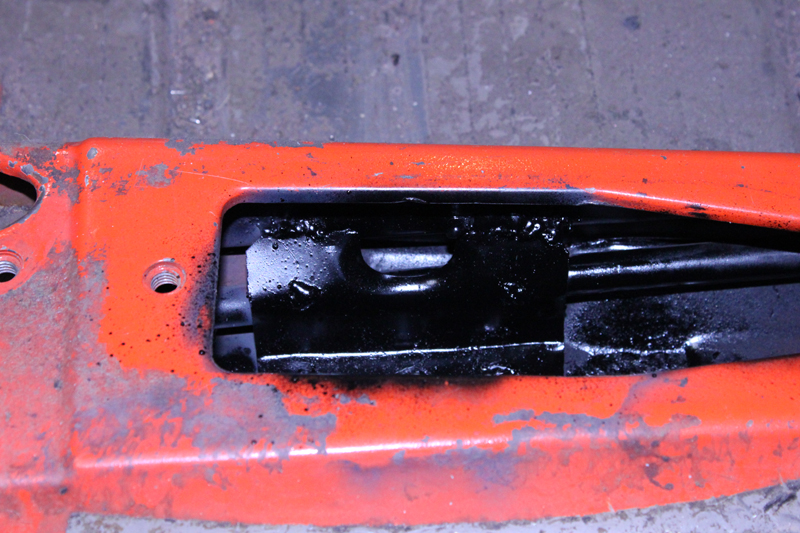 Next I welded in a bracket to hold the Wilwood brake proportioning valve I bought from JWest. I figure a little adjustability in the brake bias will probably be nice once the test driving portion of the build comes around. It will also make dialing in future brake upgrades a snap. 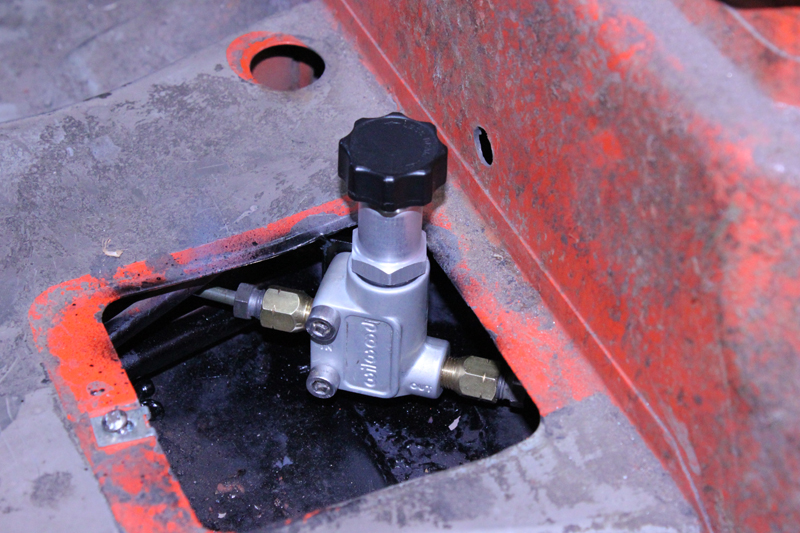 Finally I mounted the JWest brake tee to the firewall with a little bracket, making it possible to eliminate the stock brake regulating unit. 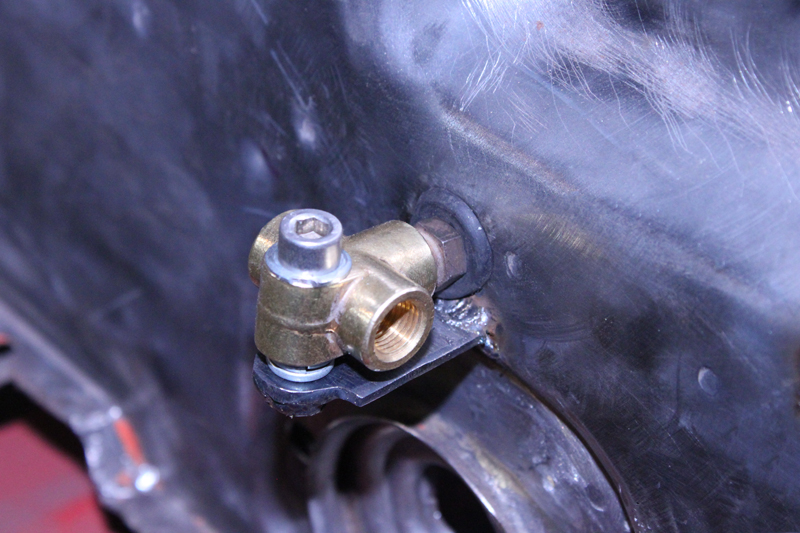 |
|
|
|
| plymouth37 |
May 18 2012, 10:28 PM
Post
#931
|
|
Senior Member Group: Members Posts: 1,825 Joined: 24-May 05 From: Snoqualmie, WA Member No.: 4,138 Region Association: Pacific Northwest |
I cut the stock shifter end off of the original shift linkage then welded it to the JWest shift rod.
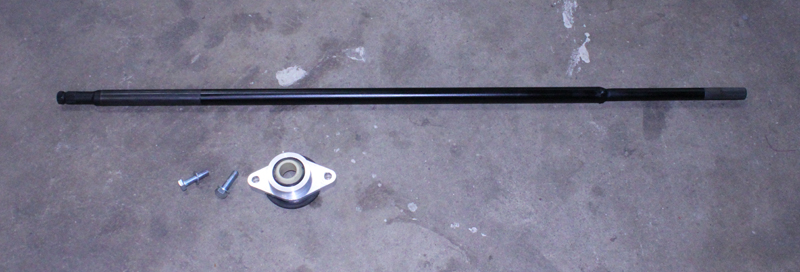 Then I mocked up the shift rod bushing on the firewall. 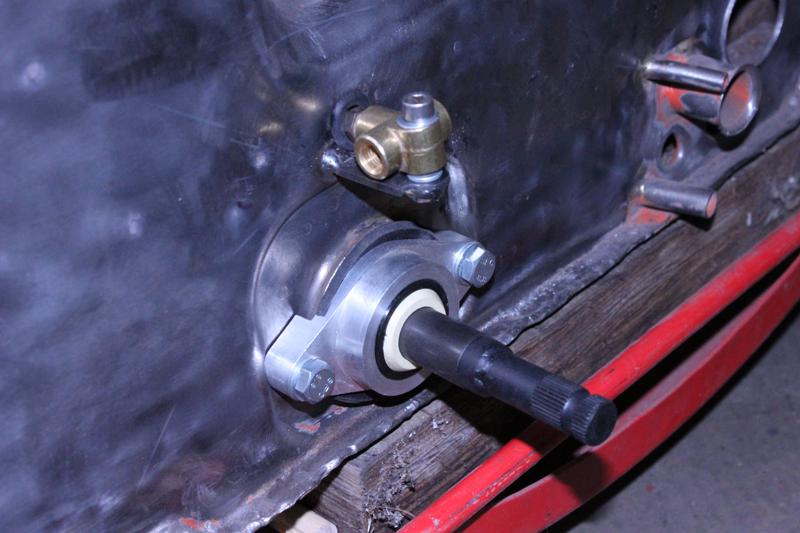 Next I mounted the Rennshift shifter with a custom shift knob I rigged up. 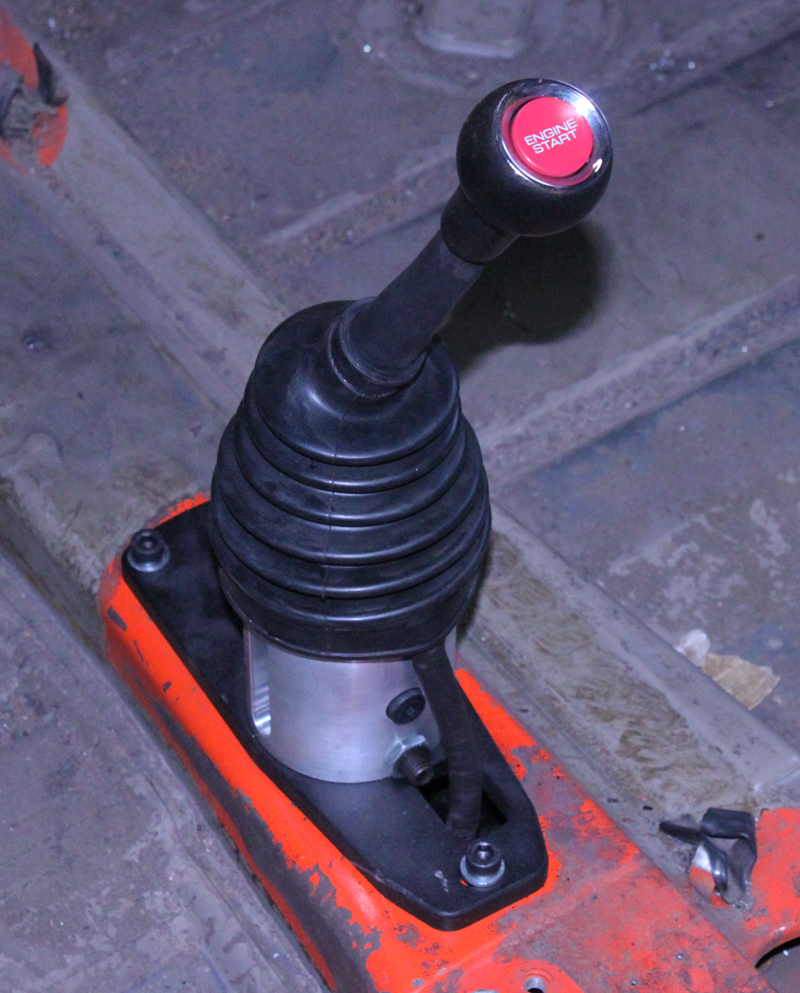 My stock shift knob was in really rough shape so I mounted the starter button from a Honda S2000 into it. The button will be functional and the lettering lights up when it is armed. 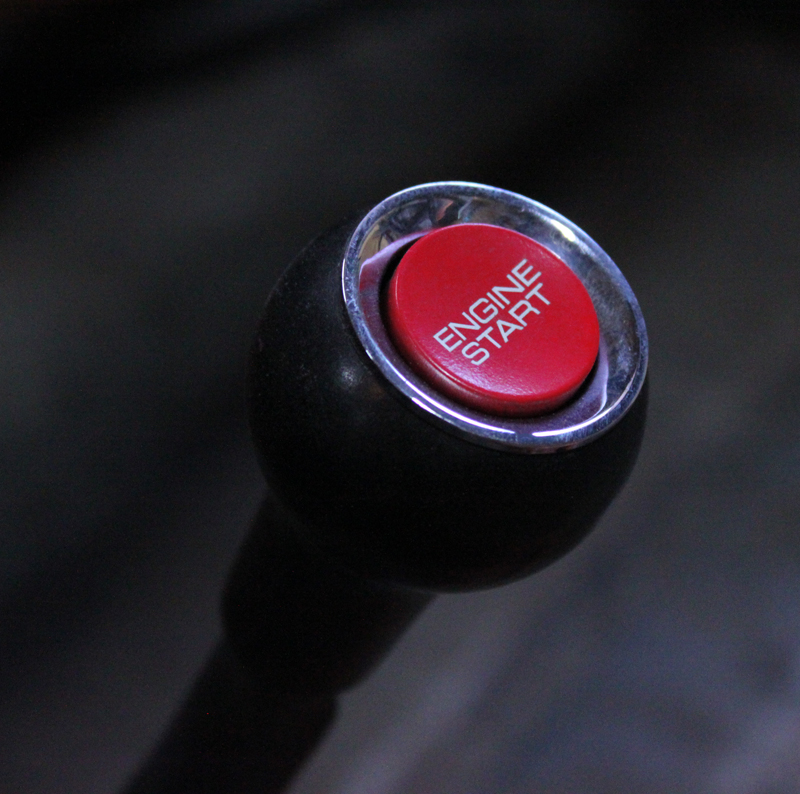 |
|
|
|
| poorsche914 |
May 19 2012, 07:12 AM
Post
#932
|
|
9fourteen Group: Members Posts: 3,151 Joined: 28-May 09 From: Smoky Mountains Member No.: 10,419 Region Association: South East States |
QUOTE(plymouth37 @ May 19 2012, 12:28 AM) The button will be functional and the lettering lights up when it is armed. That is cool (IMG:style_emoticons/default/aktion035.gif) |
|
|
|
| Ferg |
May 19 2012, 07:56 AM
Post
#933
|
|
914 Guru Group: Members Posts: 5,948 Joined: 8-January 03 From: Boulder CO Member No.: 116 Region Association: None |
I thought the button was going to flip up and you were going to have an ejector seat (IMG:style_emoticons/default/w00t.gif)
|
|
|
|
| plymouth37 |
May 29 2012, 10:28 PM
Post
#934
|
|
Senior Member Group: Members Posts: 1,825 Joined: 24-May 05 From: Snoqualmie, WA Member No.: 4,138 Region Association: Pacific Northwest |
I was up at our cabin over the holiday weekend so no hands on work got done.
I did manage to design a hinge system that allows the nose to clear the doors as it opens though. Here is an illustration of how it will operate. Hopefully I can get it built this weekend. 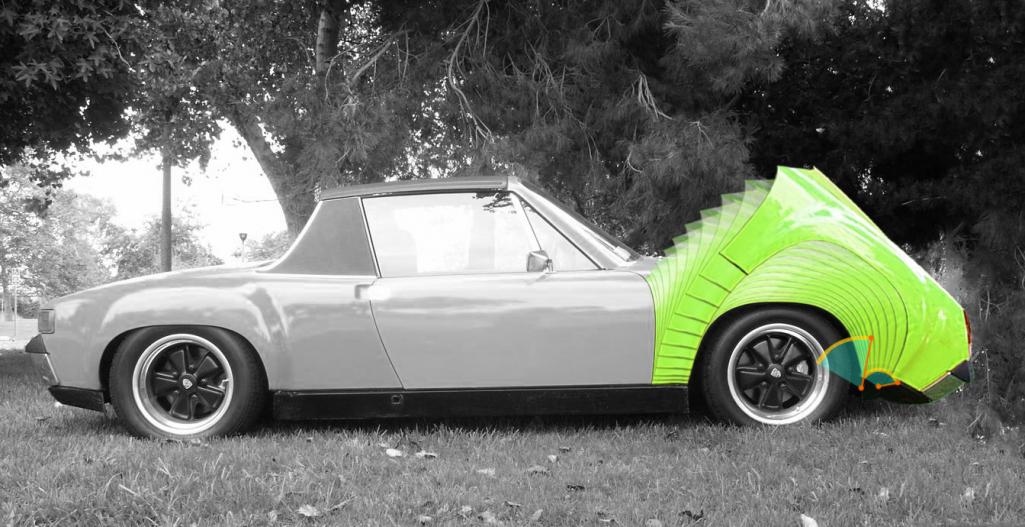 |
|
|
|
| nomore9one4 |
May 30 2012, 08:00 AM
Post
#935
|
|
Member of the Eastcoast Thread Killers Club Group: Members Posts: 2,666 Joined: 26-December 02 From: Pittsburgh,Pa.15237 Member No.: 14 Region Association: None |
QUOTE(plymouth37 @ May 29 2012, 09:28 PM) I was up at our cabin over the holiday weekend so no hands on work got done. I did manage to design a hinge system that allows the nose to clear the doors as it opens though. Here is an illustration of how it will operate. Hopefully I can get it built this weekend. Built this weekend? lol..I could have a team of engineers and not build that in six months! You've got some mad skills (IMG:style_emoticons/default/smile.gif) |
|
|
|
| Scott S |
May 30 2012, 10:30 AM
Post
#936
|
|
Small Member Group: Members Posts: 1,698 Joined: 30-April 03 From: Colorado Member No.: 633 |
QUOTE Built this weekend? lol..I could have a team of engineers and not build that in six months! You've got some mad skills (IMG:style_emoticons/default/smile.gif) (IMG:style_emoticons/default/agree.gif) I am pretty sure Dana could have finished my -6 conversion (that I am into right at 2 years) in an afternoon..... Fantastic project sir! (IMG:style_emoticons/default/beerchug.gif) |
|
|
|
| plymouth37 |
Jun 3 2012, 08:24 PM
Post
#937
|
|
Senior Member Group: Members Posts: 1,825 Joined: 24-May 05 From: Snoqualmie, WA Member No.: 4,138 Region Association: Pacific Northwest |
I got the major elements of the nose hinge done today.
I started out by fabricating the components needed to build the hinges I designed last weekend. I used nylon spacers to serve as a bearing, I also drilled out the centers of them to adapt the standard tubing to the metric hardware. The cotter pins allow the entire nose to be removed in a couple minutes at most.  Here is a shot of the nose closed, notice the perfect door gap, my biggest concern with this project was properly aligning the nose and I think I pulled it off. 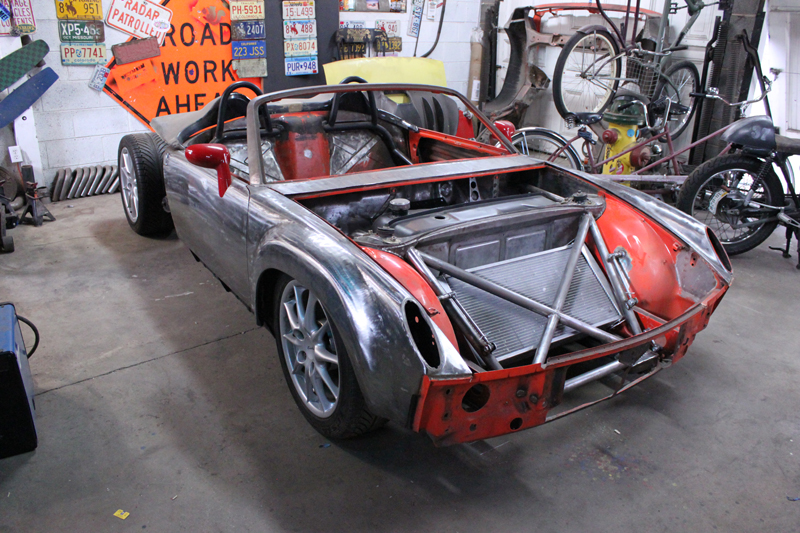 Here is the hinge system with the nose closed, I will be adding hydraulic struts to the system next. Ultimately you will never see this view because the hood will be welded to the fenders. 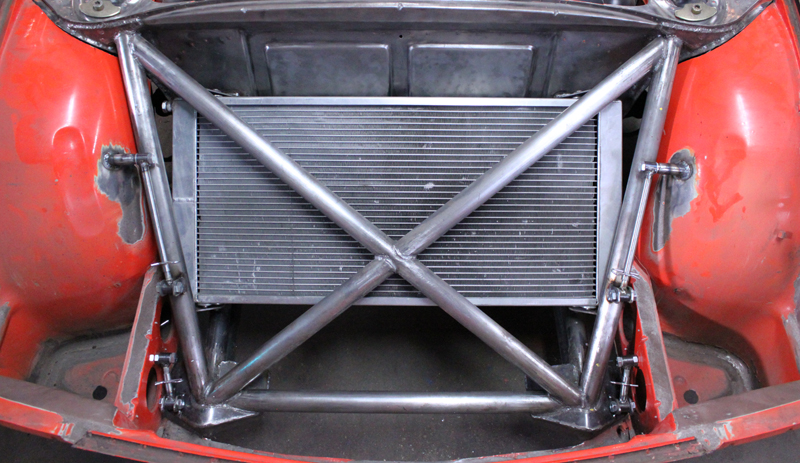 The nose partially open. 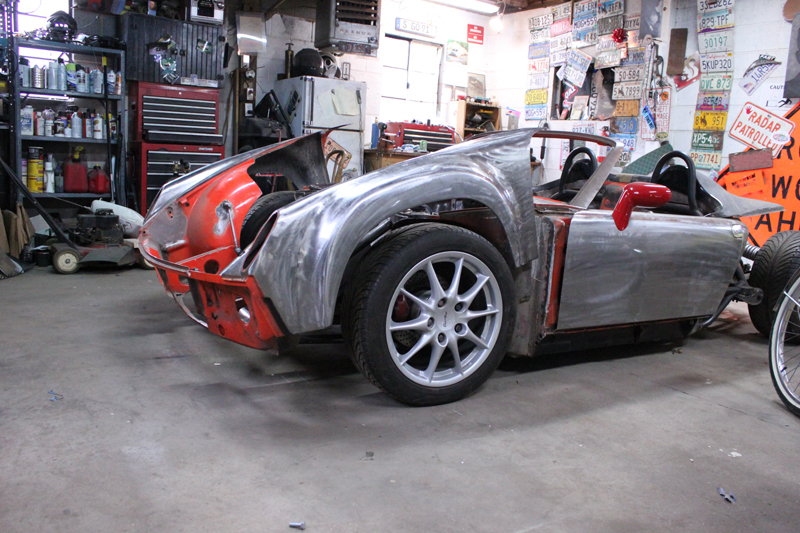 The nose fully open. 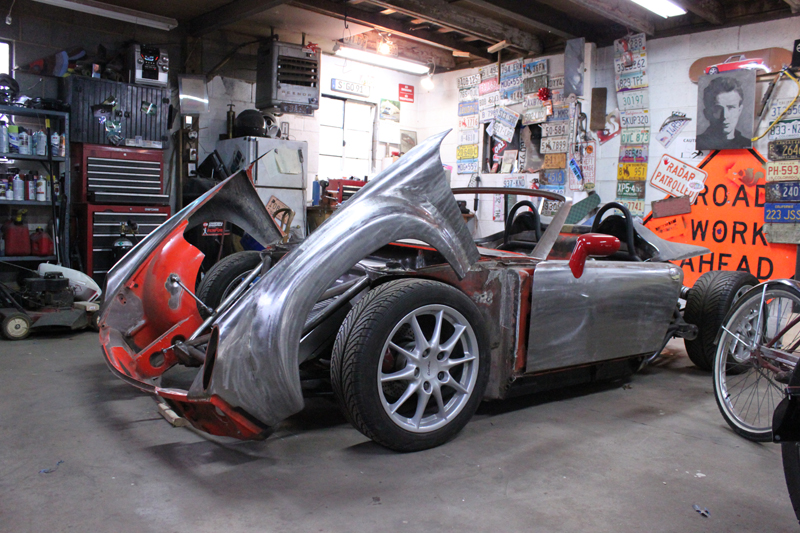 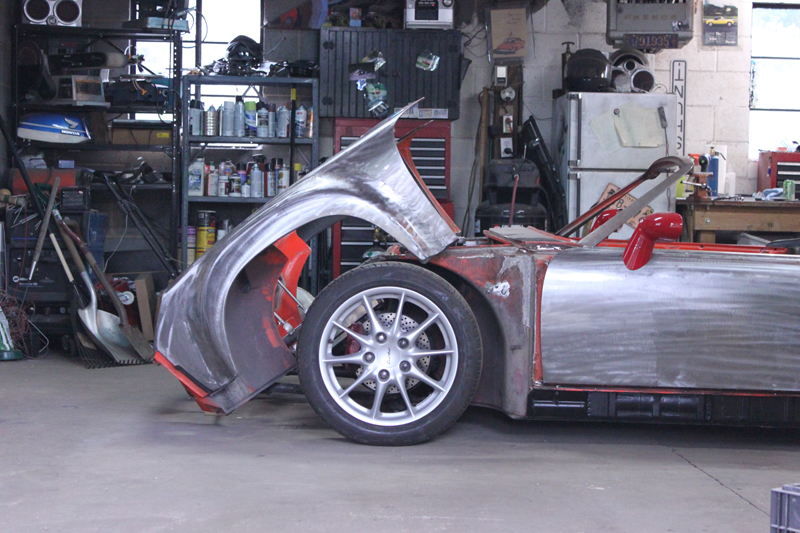 |
|
|
|
| wingnut86 |
Jun 3 2012, 09:00 PM
Post
#938
|
|
...boola la boo boola boo... Group: Members Posts: 1,054 Joined: 22-April 10 From: South Carolina Member No.: 11,645 Region Association: South East States |
Wow.
OK, I'm officially jealous... (IMG:style_emoticons/default/hissyfit.gif) What a Hot Ride (IMG:style_emoticons/default/beer.gif) |
|
|
|
| Dasnowman |
Jun 3 2012, 11:24 PM
Post
#939
|
|
You miss 100% of shots you don't take! Group: Members Posts: 265 Joined: 24-May 12 From: Tricities, B.C./ Lake Whatcom Member No.: 14,477 Region Association: Canada |
QUOTE(Zundfolge @ Jun 12 2008, 01:53 PM) For color, I'd love to see you just polish up the metal a bit and remove some of the tooling marks, then just clear coat it ... kind of like the Renegade Hybrids Subie (would be very 550 spyder-esque). Then paint all the fiberglass parts a nice metallic silver ... or black. QUOTE(plymouth37 @ Jun 12 2008, 02:04 PM) QUOTE(Zundfolge @ Jun 12 2008, 12:53 PM) For color, I'd love to see you just polish up the metal a bit and remove some of the tooling marks, then just clear coat it ... kind of like the Renegade Hybrids Subie. This is the Renegade Hybrids Subie! (IMG:style_emoticons/default/biggrin.gif) QUOTE(Zundfolge @ Jun 12 2008, 02:05 PM) QUOTE(ericread @ Jun 12 2008, 02:09 PM) QUOTE(plymouth37 @ Jun 12 2008, 02:04 PM) QUOTE(Zundfolge @ Jun 12 2008, 12:53 PM) For color, I'd love to see you just polish up the metal a bit and remove some of the tooling marks, then just clear coat it ... kind of like the Renegade Hybrids Subie. This is the Renegade Hybrids Subie! (IMG:style_emoticons/default/biggrin.gif) No, I don't think that's the same one... QUOTE(plymouth37 @ Jun 12 2008, 02:14 PM) QUOTE(ericread @ Jun 12 2008, 01:09 PM) QUOTE(plymouth37 @ Jun 12 2008, 02:04 PM) QUOTE(Zundfolge @ Jun 12 2008, 12:53 PM) For color, I'd love to see you just polish up the metal a bit and remove some of the tooling marks, then just clear coat it ... kind of like the Renegade Hybrids Subie. This is the Renegade Hybrids Subie! (IMG:style_emoticons/default/biggrin.gif) No, I don't think that's the same one... My bad, sorry. (IMG:style_emoticons/default/biggrin.gif) OMG I know this was old but I just spit out my vodka and coke out my nose! |
|
|
|
| sixnotfour |
Jun 4 2012, 12:27 AM
Post
#940
|
|
914 Wizard Group: Members Posts: 11,213 Joined: 12-September 04 Member No.: 2,744 Region Association: NineFourteenerVille |
Looks great (IMG:style_emoticons/default/beerchug.gif) how about these remote operated ?
http://www.firgelliauto.com/default.php?cPath=110 |
 |
|
|
17 User(s) are reading this topic (17 Guests and 0 Anonymous Users)
0 Members:

|
Lo-Fi Version | Time is now: 29th April 2026 - 09:24 PM |
Invision Power Board
v9.1.4 © 2026 IPS, Inc.