Okay, for my project I have been working on a concept to build a custom set of gauges to keep every thing in the dash. And I am thinking about building some kits so you can build a set yourself.
First off is a Tach with a fuel gauge at the bottom, in reality it could be anything with a 90 degree sweep. So Turbo boast ala 930, but my is getting a fuel gauge. It is setup to use the Sun Tach update and the mounts have been moved to make it work. It will look something like this when its done. The tach needle will be the proper length once done, I need some pin drills.
Click to view attachment
It was setup to use a VDO fuel gauge, but the stock unit will also work though the face would need to be redone.
The quad gauges I setup for Oil pressure and temp, water temp, and volts.
Click to view attachment
I need to clean up some of the line widths on this one call it an alfa as I used it to prototype with. Even though CAD said it would work, and it did, I liked hold a down and dirty physical version in my hands. Nothing like a laser printer and a few pieces of cardboard.
$ lights are for generator, oil pressure, brake, and a check engine for us OBDI or II groups.
This is the prototype with the gauges I had, the oil temp needle is from a different line in the VDO gauges, so its hight and needle are different.
In case you need to know, I did the original metal work nd plating for the triple gauge sets from way back when that Pelican sold. I did all the back and front machine work, laser cut. And the silver CAD plating on the rears. I don't know if I will make these together but if the interest is there, I'll do a run to help my project along.
So would people be interested in these, once I get the final setup done
I have no idea on pricing just yet, I still need to get costs on face printing, and finalizing the design, and the costs for all the machine work and metal. Of course I will show the progress I make once I get into metal prototypes, instructions, printing faces and all that stuff.
Full Version: Gauging interest
Awesome, getting back into gauges again huh. Its very well needed because no body but John is during any gauge options, unless you go to Hollywood but their expensive.
Nice! It's weird the sunpro tachs are non linear
QUOTE(timothy_nd28 @ Jan 31 2014, 11:24 PM) 
Nice! It's weird the sunpro tachs are non linear
Yes I had to scan the faces, drop them in CAD, expand them out, set the vectors. This one is setup for my engine combo, which red lines at 7800 RPM so thats why the 8000 RPM mark is off grey with its read in the design. But they can be setup with any red line wanted. Some of the VDOs are also non-linear, which made the process harder also. These us standard VDO steppers and it amazes me how little their design has changed over the years. Including the gauge connectors they came out in the early 70s with the round connector, and it has keep on till this day.
BTW, thanks for doing the Sunpro How to, the stock tach does not allow for the fitting of another gauge in its face. No room in the can.
Craig Yes I am, If I where to do the tri faces again, I would press the faces out. Im still trying to decide if Im going to do that for this gauge also, making look more stock. I don't think I want to for my set. We will see where it goes and if the winter drives me nuts. As even in my shop this super cold weather makes it hard for me to go out and work.
Very interested.
Glad it was useful and stoked that you're taking this to the next level. I recently had more tach adapter plates made up, if you need any let me know. I'm curious about the printing aspect. Is it silk screening process?
If you could think about the fonts and see if the could be made to match, it might draw more interest.
There certainly is a market for a quad gauge, but it would need to look period correct.
There certainly is a market for a quad gauge, but it would need to look period correct.
QUOTE(r_towle @ Feb 1 2014, 12:01 AM)
If you could think about the fonts and see if the could be made to match, it might draw more interest.
There certainly is a market for a quad gauge, but it would need to look period correct.
Okay if you can tell me the font, I will use that font. Its not a big deal, takes seconds to change it. I am not a calligrapher, so I have no idea. I tried the "914" Font, it is for the emblems draws the letters and numbers out. Does not look correct on a gauge.
For the prototype I did it in multiple fonts, and also line weights. To see what looked best to my eye. It will be my gauge after all. I am also a minimalist. So the extra face ( cover) what ever to make it look period correct is extra weight, more time for tooling etc..... It drives up cost etc...
Example: the original set was built for a $150 1993 dollar price point. We lost money on that run. In todays dollars thats $245. Advantage is today these can be produced at a higher quality and keep at the same price. Look at John's kit. It is a copy of our kit, and I have no problem with that. The idea has no patent on it, he made it better the world continues to go around.
As far as printing, I'll be using sign maker technology. You can lay these up now on a piece of printed vinyl and do what ever you want. Same technology used for car / truck wraps. Since they are under glass, they will last for my lifetime. I figure 25+ years with ease. Thats longer than the gauges will stay in my car. Since 1996 this car has had 5 different combination of gauges and dash styles. It lived its first 22 years with just one.
VDO is using a printed gauge faces on some of their products. The last set of vision gauges I got where printed and then places onto a plexiglass face. Thats why the oil temp gauge is higher. Make up for the thickness of the plex. The older cockpit style gauges use a piece of Aluminum about 24 ga. Easily press and formed. These faces are laid up, in silkscreen or printed on fashion. My plan is to use AL, and then lay a piece of vinyl over the face, and backs. Even the insides you can lay white vinyl in there to get a consistent reflective surface. It is easier than painting everything.
No idea, but there are people around who do know....some other build gauges, not certain I recall the names, one of them had a gauge shop that did a run, then stopped all together.
Okay so I messed with the fonts today, this is as close as I could come to the real things. Since I am redoing all my gauges, exact match well doesn't matter. But these are the proper look to them that they should work with a stock dash setup.
First up Tach and Fuel Combo Gauge.
Click to view attachment
Even added the little arrow to remind me the fuel filler is on the right side. LOL just incase I forget that in my old age.
And the Quad Gauge, these are still flat faced, still trying to decide if I want to add a overlay like the originals or not. Its extra tooling, printing, and just more fuss.
Click to view attachment
Files have been sent to a couple of printers to get cost and start the prototype process. Now to figure out if I am going to build the face backing out of polycarbonate or Aluminum. Right no thin poly is when the battle, but Aluminum will probably be my choice in the end. I can get that stuff laser cut, never worked with poly except as one off items.
Send the rendering to white gauges.net. They will print off a vinyl decal for you
Any thought to "White Face" Gauges? I'm a newbie when it comes to this...? Would they use the stock senders? I'm doing a V8 car so I'm assuming I would need something else for senders...?
Thanks,
Steve
Thanks,
Steve
This set I am using VDO gauges the cockpit series for the steppers. So yes they use VDO gauges senders.
I'll check out white gauges.net thanks.
I'll check out white gauges.net thanks.
Sorry about the highjack but have either of you taken apart a autometer monster tach?
I like the monster except it has crappy lighting and I was wondering if the was room on the unused side for anything?
I saw these faces below on the web so you must be abal to re-face them, but I couldn't find a pic of the guts.
http://www.buickgn.com/tachoverlays.htm
Also I'd be interested in the quad kit, would you do one for a /6?
Say head temp instead of water temp....
My monster is like this one
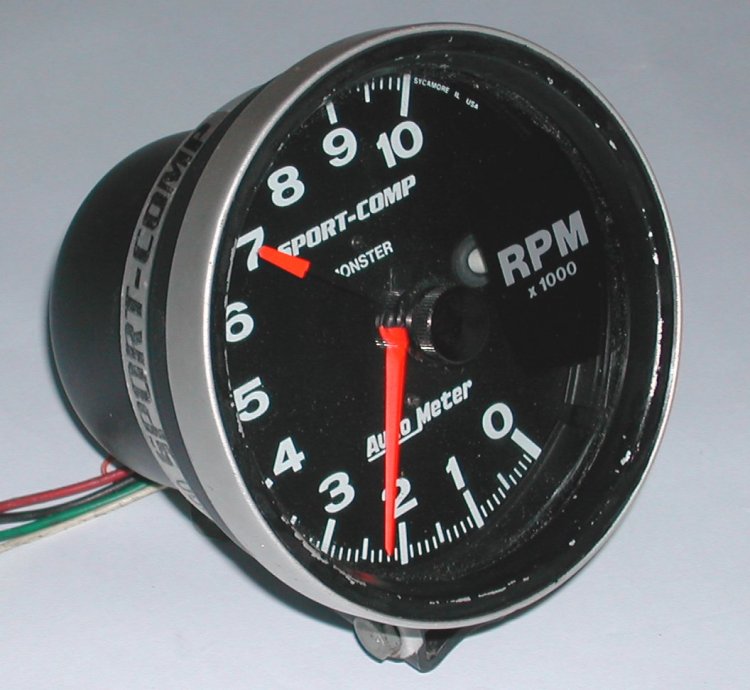
The multi gauge is very nice! Think all the pointer buttons should be the same size?
one little thing I noticed is that the most important gauge (oil pressure) in my eyes goes the wrong way....should be pointing upwards at full pressure.... and of course being a pesky metric european I'd want Bar instead of PSI.... 
QUOTE(914forme @ Feb 17 2014, 05:08 PM)
To me, that font looks a little thin. The font isn't as thick as the ticks, which makes my eyes double-focus to read them. Just a nit-pick, but those look like they'd be a real cool project.
Like this? (NOT looking to hijack, just a suggestion.)
QUOTE(CptTripps @ Feb 18 2014, 08:42 AM)
QUOTE(914forme @ Feb 17 2014, 05:08 PM)
To me, that font looks a little thin. The font isn't as thick as the ticks, which makes my eyes double-focus to read them. Just a nit-pick, but those look like they'd be a real cool project.
Like this? (NOT looking to hijack, just a suggestion.)
Not hijacking that looks way better,
 Im not a designer, I am an engineer.
Okay Doug, what program did you use to do that?
QUOTE(falcor75 @ Feb 18 2014, 08:30 AM)
one little thing I noticed is that the most important gauge (oil pressure) in my eyes goes the wrong way....should be pointing upwards at full pressure.... and of course being a pesky metric european I'd want Bar instead of PSI....
I am using off the shelf VDO gauges so I have not messed with the finding different steppers etc.... They all rotate clockwise so thats how it is done. If it bugs you, just swap the sides. Thats easily done with a photo editing program. Have the faces reprinted. Also can be done with the bar scale, though it requires some math. Easily done with the super computer you probably carry in your pocket.
That being said, the files are here, That is a full size drawing unless the web messed up the scale. We as a community can make them better as an open source project. Like Doug did by fatting up the lettering.
 I suck at graphics design. Kinda like spelling not my strong suite. Yet I am sure there are a bunch of people who did not think these things would all fit into the 3rd gauge. Just like the Tach, you can add any gauge you want down there once you use the SunPro internals as they free up a ton of space in the gauge. Don't get me wrong they are still a tight fit, but it does fit.
So you can use any 90 degree sweep gauge from VDO, they all fit, just get the same series gauge. I had a bunch of VDO cockpit units around so thats what I used. The Oil Temp gauge is from the Vision line, and it uses polycarbonate as the gauge face with a overlay. That product was designed for this and the shaft on the stepper is taller because of this. I have replace the oil temp gauge from the cockpit line, just have not disassembled yet. If VDO has changed their production runs to use the polycarbonate faces then its an easy fix, Just change to a Sheet of polycarbonate that is the same thickness. Once you start using polycarbonate you can do some awesome effects like through face lighting.
So choices as of last time I looked they must be 90 degree sweeps.
Oil temperature
Oil Pressure
Fuel Level
Volt, and Amps
Water Temp
Cylinder Head Temperature Gauge
I am also starting to realize this might not be commercially feasible.
If you don't have the gauges they are about $25 ~ $30 a piece so that $100 in raw material no senders. New LED pieces are about $5 for lighting a sold color, not the fancy RBG stuff Timothy is doing. The face its self is $15 for machining. Printing will be $10, lights new tubes, etc..... $50, don't forget the Molex connectors and harness so I at $15. Then my time, lol you all don't want to pay my billed rate.. I'm not a cheap date.
Total with out labor estimated is $195, senders make it $295 as a kit or more depending on how and where you source the donor gauges. Thats straight approximate costs. At that price you really need to start thinking about a manufactured solution like SpeedHut or NewVintage. Speedhuts are $295 for a Quad with Oil Pressure, Water Temperature, Fuel, and Volts.
The advantage to this idea is you can make it your own. So if you want dual CHTs, one for each bank, oil pressure, and oil temp, you can do that. Thats the combo I ran when my car was air-cooled. You can do what you want in the space given. Now as far as steppers go, these things could go to the extreme and be built with a small microcontroler, and add functions like playback, peak and hold, etc... Once that happens then rotation becomes a none issue as its just a software function. These things could go on for ever and ever.
I am doing these because I can, its been a fun way to try something new and different. I haven't even shown what I am doing with the my speedo yet. The true cost conservative model would have been to goto Speedhut and buy the gauges I wanted.
QUOTE(Mark Henry @ Feb 18 2014, 07:16 AM)
Sorry about the highjack but have either of you taken apart a autometer monster tach?
I like the monster except it has crappy lighting and I was wondering if the was room on the unused side for anything?
I saw these faces below on the web so you must be abal to re-face them, but I couldn't find a pic of the guts.
http://www.buickgn.com/tachoverlays.htm
Also I'd be interested in the quad kit, would you do one for a /6?
Say head temp instead of water temp....
My monster is like this one
Mark, I have never done one. Most gauges of this style have a crimped on bezel that can be expanded and recrimped with a set of screw drivers or other thin flat blade type device. The movements might be held in place via few screws on the back. Then they normally just fall apart., you will have to push that wires up through the grommets. If you have rebuilt an engine you can do these.
 I know you have rebuilt a ton of engines.
The sun pros you just pry off the bezel, they are snapped in place. If you want drop some pictures of the backside of the bezel, and the back of the tach up here I'll look at it and see if I can figure a non destructive way in.

Or use this guys aproach, not recommending it, but it is a way in.
QUOTE(914forme @ Feb 18 2014, 10:52 AM)
Okay Doug, what program did you use to do that?
Adobe Illustrator. Only took a min.
Why don't you email me the files you have, and let me work on cleaning them up a little bit? Happy to help.
You should have my email addy...
QUOTE(914forme @ Feb 18 2014, 12:39 PM)
QUOTE(Mark Henry @ Feb 18 2014, 07:16 AM)
Sorry about the highjack but have either of you taken apart a autometer monster tach?
I like the monster except it has crappy lighting and I was wondering if the was room on the unused side for anything?
I saw these faces below on the web so you must be abal to re-face them, but I couldn't find a pic of the guts.
http://www.buickgn.com/tachoverlays.htm
Also I'd be interested in the quad kit, would you do one for a /6?
Say head temp instead of water temp....
My monster is like this one
Mark, I have never done one. Most gauges of this style have a crimped on bezel that can be expanded and recrimped with a set of screw drivers or other thin flat blade type device. The movements might be held in place via few screws on the back. Then they normally just fall apart., you will have to push that wires up through the grommets. If you have rebuilt an engine you can do these.
I know you have rebuilt a ton of engines.The sun pros you just pry off the bezel, they are snapped in place. If you want drop some pictures of the backside of the bezel, and the back of the tach up here I'll look at it and see if I can figure a non destructive way in.
Or use this guys aproach, not recommending it, but it is a way in.
Yes I saw that one....
 I think I would try to uncrimp the bezel first.
I was trying to find a pic of the guts to see if there's room for a gauge in the unused "RPM" section.
I would be interested in a kit, I have 911, 914 and VDO cockpit gauges to choose from as donors and yes I can solder and do it myself.
I have a nice console but because I'm a big guy I don't like it much. IMHO the console is too far down out of line of sight anyways.
So I sent up all the gauge faces to Doug, thank you for your offer. I will post Doug's cleaned up version, no rush take your time. Heres what I sent him in all its crappy glory.
Tach and Fuel Combo
Click to view attachment
The Quad Gauge
Click to view attachment
And last but not least the face for my Speedo, it is a smaller VDO cockpit version I needed to match the fonts on.
Click to view attachment
Now we let Doug work his magic, thank you once again sir.
I will post Doug's cleaned up version, no rush take your time. Heres what I sent him in all its crappy glory.Tach and Fuel Combo
Click to view attachment
The Quad Gauge
Click to view attachment
And last but not least the face for my Speedo, it is a smaller VDO cockpit version I needed to match the fonts on.
Click to view attachment
Now we let Doug work his magic, thank you once again sir.
That is odd, my export to JPG changed the ratios of the gauges,  I'm resending the faces to Doug in original full size detail. Dang, do I feel stupid.
I'm resending the faces to Doug in original full size detail. Dang, do I feel stupid.
I disassembled my VDO Cockpit oil temp gauge yesterday. And did a few pictures so you could see how you get into these. I need an camera assistant, some of my picture skills are no better than Sir Andy's
Click to view attachment
So here we go.
Tools needed:
A pocket knife, locking blade is nice I use a Gerber. The point makes it easy to get into the lip.
Varius flat blade screwdrivers.
A set of micro-screw drivers, to fit the small gauge face screws.
needle Nose pliers - to get the nut off the screw that holds the ground lug on the gauge.
Set of flush cutting pliers or similar to remove the pointer stop from the gauge face.
First I pull all the items off the back of the gauge I can. this just mass it easier. Lighting is the first to go.
Click to view attachment
Click to view attachment
I then take off the front trim ring. I start with a knife and bend the brass ring away from the side of the gauge. I found a knife does a great job just be careful not to slice your self wide open. I then use a larger screw drivers to open it up even more.
Click to view attachment
Next you pull the trim off, the glass will fall out, and you can pull the inner trim ring out. Sorry no pictures.
After that you remove the nut holding the ground lug onto the back of the gauge. This also holds the gauge into the body of the gauge and makes sure the contacts are into their appropriate lugs, interesting design, nut unlike the Porsche VDO gauges.
Click to view attachment
Looks like this once done.
Click to view attachment
Now you can remove the gauge from the housing. It might take some force, I place the nut back onto the threads and give it a few taps with my needle nose pliers. The nut will keep you from buggering up the threads and also from launching the gauge assembly across the room.
You get this once done.
Click to view attachment
The whole reason I wanted to take this apart.
Click to view attachment
Yes its still using the .020 inch thick face, so it matches all the other units.
Next remove the needle, I simply pull it off easier said and done. You can also use two spoons to pry them up off the shaft.
And yes my needles are the same across the Cockpit gauge line.
Click to view attachment
Remove the gauge face next.
Click to view attachment
This is what the ring ill look like when done. For this production I don't care much, but the shows you the carnage.
Click to view attachment
If I left anything out lt me know, or if you have a question feel free to ask. I have done so many of these I just do them, so I might have left out a few items just out of shear familiarity.
Click to view attachment
So here we go.
Tools needed:
A pocket knife, locking blade is nice I use a Gerber. The point makes it easy to get into the lip.
Varius flat blade screwdrivers.
A set of micro-screw drivers, to fit the small gauge face screws.
needle Nose pliers - to get the nut off the screw that holds the ground lug on the gauge.
Set of flush cutting pliers or similar to remove the pointer stop from the gauge face.
First I pull all the items off the back of the gauge I can. this just mass it easier. Lighting is the first to go.
Click to view attachment
Click to view attachment
I then take off the front trim ring. I start with a knife and bend the brass ring away from the side of the gauge. I found a knife does a great job just be careful not to slice your self wide open. I then use a larger screw drivers to open it up even more.
Click to view attachment
Next you pull the trim off, the glass will fall out, and you can pull the inner trim ring out. Sorry no pictures.
After that you remove the nut holding the ground lug onto the back of the gauge. This also holds the gauge into the body of the gauge and makes sure the contacts are into their appropriate lugs, interesting design, nut unlike the Porsche VDO gauges.
Click to view attachment
Looks like this once done.
Click to view attachment
Now you can remove the gauge from the housing. It might take some force, I place the nut back onto the threads and give it a few taps with my needle nose pliers. The nut will keep you from buggering up the threads and also from launching the gauge assembly across the room.
You get this once done.
Click to view attachment
The whole reason I wanted to take this apart.
Click to view attachment
Yes its still using the .020 inch thick face, so it matches all the other units.
Next remove the needle, I simply pull it off easier said and done. You can also use two spoons to pry them up off the shaft.
And yes my needles are the same across the Cockpit gauge line.
Click to view attachment
Remove the gauge face next.
Click to view attachment
This is what the ring ill look like when done. For this production I don't care much, but the shows you the carnage.
Click to view attachment
If I left anything out lt me know, or if you have a question feel free to ask. I have done so many of these I just do them, so I might have left out a few items just out of shear familiarity.
This is a "lo-fi" version of our main content. To view the full version with more information, formatting and images, please click here.