Hey all,
My one (and only) complaint with my 914 is that the dash lights are very faint and very hard to see at night (speedometer, etc.).
Someone told me that brighter LED bulbs are available. Is that correct? If so, can someone provide me with:
1. What bulbs?
2. What source to buy them?
3. How many do I need?
4. Are they direct replacements (i.e. no other modifications need to install them)
5. To replace them, do I take out the 5 or so screws on the dash faceplate to access them?
Thanks, guys!
Full Version: Improving dash light brightness?
QUOTE(Cuda911 @ Aug 21 2014, 11:21 PM) 
Hey all,
My one (and only) complaint with my 914 is that the dash lights are very faint and very hard to see at night (speedometer, etc.).
Someone told me that brighter LED bulbs are available. Is that correct? If so, can someone provide me with:
1. What bulbs?
2. What source to buy them?
3. How many do I need?
4. Are they direct replacements (i.e. no other modifications need to install them)
5. To replace them, do I take out the 5 or so screws on the dash faceplate to access them?
Thanks, guys!
The bulbs, designation BA7s-W, can be obtained from superbrightleds.com http://www.superbrightleds.com/cat/ba9s-ba7s/
I bought a pack of 15, which is plenty to replace all of the incandescent bulbs in the
instrument cluster. They are direct plug-ins. Their is no need to remove any screws. Just pull the gauges directly out from the instrument cluster, remove the light receptacles from the rear of the gauges, remove the incandescent bulbs and replace with the LEDs.
It makes a huge difference in illumination.
No direct replacements that I know of. You can take the gauges apart and put LED strips inside. You can build a timer circuit to flicker them to make them seem dimer or brighter.
Or, you can:
- Clean all ground connections for the gauge lights
- Clean all power connections from the battery, to the ignition switch, to the headlight switch, to the dimmer, to the lights
- Replace the bulbs with new ones
- Clean the glass in the gauge
- Re-paint the inside of the gauge to reflect the light around better
Each of the above should help a bit. When all done together, you'll have lights that are OK but not super bright.
--DD
Interesting... two completely opposite replies regarding the bulbs.
So, to get the gauges out I just pry them?
So, to get the gauges out I just pry them?
QUOTE(Cuda911 @ Aug 21 2014, 11:56 PM)
Interesting... two completely opposite replies regarding the bulbs.
So, to get the gauges out I just pry them?
Correct, just pry them out.
Wow, never would have guessed that. One of my biggest concerns on fixing up this car is that I will take a perfectly good part and screw it up by taking it off incorrectly.
Bluhun, I didn't see a 15-pack option in the link, but those look great!
Cool white or warm white?
Bluhun, I didn't see a 15-pack option in the link, but those look great!
Cool white or warm white?
QUOTE(Cuda911 @ Aug 22 2014, 12:05 AM)
Wow, never would have guessed that. One of my biggest concerns on fixing up this car is that I will take a perfectly good part and screw it up by taking it off incorrectly.
Bluhun, I didn't see a 15-pack option in the link, but those look great!
Cool white or warm white?
Cool white. Just be careful with the gauges. Use your fingernails or a flat-bladed screwdriver to get between the rubber O-ring surrounding the gauge and the instrument cluster. Very gently start prying and then wiggle the gauge out of the cluster.
Will do, thanks again!!!
 pry out the gages? Why, it only takes 4 screws to remove the whole instrument cluster and keep the wiring from being stretched too much.
Tom
Ah, interesting, Tom. I was wondering the same thing. Lots of time the gaskets get stiff with age, so I'm a bit worried that when I press them back in that they won't seal as tightly.
So, if I just take out the four screws, the whole panel will come out and give me access to the bulbs?
So, if I just take out the four screws, the whole panel will come out and give me access to the bulbs?
The easiest, and BEST solution is to PM Tim (timothy_nd28). Have him do your gauges - you will not be disappointed.
Check out his awesome work here:
http://www.914world.com/bbs2/index.php?sho...5&hl=gauges
Check out his awesome work here:
http://www.914world.com/bbs2/index.php?sho...5&hl=gauges
You will need to disconnect the speedo cable to get the cluster out.
be very careful of the trip odometer reset cable that goes down to the bottom of the dash.
here is the CSOB style, will require several hours of your time
http://www.914world.com/bbs2/index.php?showtopic=219852
http://www.914world.com/bbs2/index.php?showtopic=219852
QUOTE(bluhun @ Aug 21 2014, 10:46 PM)
The bulbs, designation BA7s-W, can be obtained from superbrightleds.com http://www.superbrightleds.com/cat/ba9s-ba7s/
The website only shows BA7s-x - is that the same thing? Don't see a -W.
Edit: NEVERMIND. X represents color and changes when you select the white.
DO NOT !!! Replace the alternator bulb with led. Your alternator will quit charging. Has something to do with how the current gies through the bulb.
I bought the stock led bulbs in blue as a direct plug into the existing sockets. Speedo and Tach have a 50% immediate improvement. Gas gauge is. 25% improvement due to fewer bulbs.
Tim's overhaul is the 150% improvement.
I bought the stock led bulbs in blue as a direct plug into the existing sockets. Speedo and Tach have a 50% immediate improvement. Gas gauge is. 25% improvement due to fewer bulbs.
Tim's overhaul is the 150% improvement.
The late All Garcia did mine and turned out nice. He installed the strips. Similar to what Timothy is doing.
This would be a better picture if I took it at night.
This would be a better picture if I took it at night.
Wow, some great additional info... thanks, guys!
OK, I will be sure to leave the alternator bulb alone.
I assume that the various red and green lights are just red and green glass or plastic over the bulbs, and the all bulbs are actually clear?
The ones with the whole strip installation thing look fantastic!
The multicolor system in the link to Timothy's thread is absolutely outstanding!!!
I think for now, I will go the cheapest and easiest route, and order some of the bulbs as per bluhun's post.
So, how many bulbs should I expect to find back there?
I just copycatted ALs work, just because his method was the only one that seemed to brighten these gauges up the most.
Do a search with the LED bulb replacements, many people have mixed feelings with the results.
I have a few threads explaining how to install these LED strips inside the gauges, it's really not that bad of a project just time consuming.
If you take on this project, be sure to paint the inside of the gauge cans flat white, this is the best color to reflect the light. Also, with the tachometer, paint the back end of the bezel that holds the glass flat white. The gauge seems to be the dimmest due to the solid face dial.
I used this method.
Uses your existing headlight dimmer and no need to open the gauges. Not as bright as a whole strip of LEDs but a vast improvement.
Uses your existing headlight dimmer and no need to open the gauges. Not as bright as a whole strip of LEDs but a vast improvement.
I read through the thread in your link, Chris... great work!!!!!! You and Timothy are to be highly commended for these excellent write-ups.
QUOTE(Cuda911 @ Aug 22 2014, 12:58 PM)
Wow, some great additional info... thanks, guys!
OK, I will be sure to leave the alternator bulb alone.
I assume that the various red and green lights are just red and green glass or plastic over the bulbs, and the all bulbs are actually clear?
The ones with the whole strip installation thing look fantastic!
The multicolor system in the link to Timothy's thread is absolutely outstanding!!!
I think for now, I will go the cheapest and easiest route, and order some of the bulbs as per bluhun's post.
So, how many bulbs should I expect to find back there?
Count on two or three bulbs per gauge for gauge-face illumination. I did not replace any of instrument function bulbs such as for charging, oil pressure or brake function.
Remember, if you pull the entire instrument cluster you'll have to unplug the speedo and odometer reset cables.
QUOTE(Cuda911 @ Aug 22 2014, 12:58 PM)
Wow, some great additional info... thanks, guys!
OK, I will be sure to leave the alternator bulb alone.
I assume that the various red and green lights are just red and green glass or plastic over the bulbs, and the all bulbs are actually clear?
The ones with the whole strip installation thing look fantastic!
The multicolor system in the link to Timothy's thread is absolutely outstanding!!!
I think for now, I will go the cheapest and easiest route, and order some of the bulbs as per bluhun's post.
So, how many bulbs should I expect to find back there?
I just had Palo Alto Speedo repair my odo, and that gage takes three, iirc. They are plenty bright for me at night. And the green "lights are on" light is very bright even in day light.
I now need to address the tach and in particular the blue "hi beam head light" light, which is very dim, even on the darkest night.
I plan to do them all soon, and probably will order 10 and gave a couple extra. PA Speedo would know the quantity of the tach and tank gages.
For your high beam indicator, replace the blue gel. They do get darker over time.
--DD
--DD
"Blue gel"? What's that?
QUOTE(Cuda911 @ Aug 23 2014, 04:55 PM)
"Blue gel"? What's that?
the little blue window over the high beam bulb
QUOTE(mepstein @ Aug 23 2014, 02:36 PM)
QUOTE(Cuda911 @ Aug 23 2014, 04:55 PM)
"Blue gel"? What's that?
the little blue window over the high beam bulb
Where would I get such a blue gel/window?
You think Palo Alto Speedo might have such a thing?
Thx
Buy a file folder with a clear blue tab. Cut it off and tape it in place on the guage.
I have been using this
Click to view attachment
Many colors and you can't beat the price: http://www.adorama.com/ROSB.html
Click to view attachment
Many colors and you can't beat the price: http://www.adorama.com/ROSB.html
QUOTE(Cuda911 @ Aug 22 2014, 03:05 AM)
Wow, never would have guessed that. One of my biggest concerns on fixing up this car is that I will take a perfectly good part and screw it up by taking it off incorrectly.
Bluhun, I didn't see a 15-pack option in the link, but those look great!
Cool white or warm white?
If you haven't ordered from superbrightleds.com yet, check out their dome light LED replacement:
LED dome light
I installed mine today, and it is a real improvement, and only $4.74. I also got some of the instrument lights as mentioned above, and installed the two for the speedo (removing only the gauge, not the panel), and they do improve the lighting of the gauge. Very easy to install.
Great idea^^^^^ going to order a dome light tomorrow!
I placed my order for some of the LED bulbs for the dash, but I think I'll order that dome one too. The link in your post brings up a couple bulbs... which one is best?
Thanks!
Thanks!
QUOTE(Cuda911 @ Aug 27 2014, 02:06 AM)
I placed my order for some of the LED bulbs for the dash, but I think I'll order that dome one too. The link in your post brings up a couple bulbs... which one is best?
Thanks!
914 LED Dome Light
I selected the Natural White color, part no. 4410-NW9.
^^^ Thanks! Just placed my order.
Click to view attachment
Ordered some new bulbs today.
Ordered some new bulbs today.
If anyone's interested, got this in an email from SuperBright LED's:
My bulbs just showed up in the mail a few minutes ago. I'm headed off to the garage now to put them in.
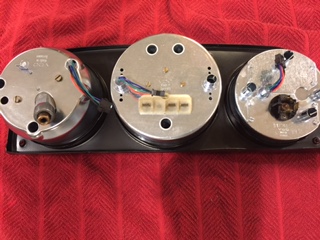
OK, I pulled the gauge plate off a bit so I could push the gauges out from behind... they were in tight and I didn't want to scratch the front trying to wedge something under the gasket to pry them.
So, before I screw something up, two questions:
1. How do I access the bulbs? Do I need to take the gauge all the way out and open it up?
2. What are the two bare leads for? (see photo below).
Thanks!
.
Bumping up, so it doesn't fall from view. Thanks!
![popcorn[1].gif](http://www.914world.com/bbs2/style_emoticons/default/popcorn[1].gif) We're going to need pics
We're going to need pics 
Bulb holders pull right out. The unused spades are grounding terminals, they short to the gauge case, which is ground.
Thanks, Timothy.
Errghhh...
OK, so I pulled out the bulb holder, but it's a completely different type of bulb. I ordered the ones that were linked by someone above.
So, now what?
Original bulb is a small type that has no base (at left in pic below):
.
Errghhh...
OK, so I pulled out the bulb holder, but it's a completely different type of bulb. I ordered the ones that were linked by someone above.
So, now what?
Original bulb is a small type that has no base (at left in pic below):
.
I looked again... I guess the little bulb I pulled out is a turn signal bulb (see arrow below).
So, should I be pulling out the larger rounded post things (I assume the illumination bulb holders) circled below? I gave one of 'em a tug, and it didn't budge, but I don't want to break anything.
.
So, should I be pulling out the larger rounded post things (I assume the illumination bulb holders) circled below? I gave one of 'em a tug, and it didn't budge, but I don't want to break anything.
.
Yup, just pull those. You may want to twist them slightly back and forth to kind of break the seal, if you will. If you look at the wires running behind the gauges, you can identify them as the illumination circuit because they all have the same wiring color if I remember correctly.
I did the cool white bulbs and was less than impressed myself. I'll be hitting up Tim here shortly to convert mine.
I did the cool white bulbs and was less than impressed myself. I'll be hitting up Tim here shortly to convert mine.
Yep, only pull the lamp holders that are attached to a black/blue striped wire. Some pop out easy, while others are a PITA
OK, thanks! I figured it was safest to ask here first, rather than breaking something and asking later.
Even if the LED's are just a bit brighter than the current bulbs, that will be good.
Even if the LED's are just a bit brighter than the current bulbs, that will be good.
OK, finally got around to doing the bulbs today.
A few tips for other newbies:
1. Take out the screws that hold the cluster face plate and pull out the plate. But, you won't be able to pull it out far enough because of the speedometer cable. So, lift the cable off of the clip in the footwell. This will give enough "play" in the cable to let you pull out the face plate far enough to access the back of the gauges.
2. Push each gauge out of the faceplate from behind.
3. OK, a total newbie error, but might as well pass it on... to get the old bulb out, push in and turn. Sheesh, busted the first bulb trying to pull it straight out. Duh!
4. The metal bulb housings ground to the gauge cases, so once you replace a bulb you need to hold the bulb housing against the gauge case to test it.
5. Do not drop a bulb into the housing by accident, or you will have to disconnect everything to get it back out. (Ask how I know)
6. Those spade connectors are brittle. One of them broke, so I had to splice in a new female side
Went for a drive tonight to see what difference it made. For the speedometer, makes a very significant improvement. Definitely worth it. For the tachometer, the left side is much brighter. Right side is still pretty dark. I'm wondering if one of the LEDs isn't working, so will take it apart again and check. Left gauge... parking brake warning light is much brighter. Fuel guage is still nearly unreadable at night (I think that has one of the tiny bulbs that is not the type that can be replaced with LED... I forgot..
Here's some pics and two videos. The first shows the OEM turn signal bulb, and the second shows it replaced with an LED.
https://www.youtube.com/watch?v=fSvEb_r7BXo
https://www.youtube.com/watch?v=5IphOdeOVTc
QUOTE(Cuda911 @ Sep 14 2014, 09:00 PM)
OK, finally got around to doing the bulbs today.
A few tips for other newbies:
1. Take out the screws that hold the cluster face plate and pull out the plate. But, you won't be able to pull it out far enough because of the speedometer cable. So, lift the cable off of the clip in the footwell. This will give enough "play" in the cable to let you pull out the face plate far enough to access the back of the gauges.
2. Push each gauge out of the faceplate from behind.
3. OK, a total newbie error, but might as well pass it on... to get the old bulb out, push in and turn. Sheesh, busted the first bulb trying to pull it straight out. Duh!
4. The metal bulb housings ground to the gauge cases, so once you replace a bulb you need to hold the bulb housing against the gauge case to test it.
5. Do not drop a bulb into the housing by accident, or you will have to disconnect everything to get it back out.
6. Those spade connectors are brittle. One of them broke, so I had to splice in a new female side
Went for a drive tonight to see what difference it made. For the speedometer, makes a very significant improvement. Definitely worth it. For the tachometer, the left side is much brighter. Right side is still pretty dark. I'm wondering if one of the LEDs isn't working, so will take it apart again and check. Left gauge... parking brake warning light is much brighter. Fuel guage is still nearly unreadable at night (I think that has one of the tiny bulbs that is not the type that can be replaced with LED... I forgot..
Here's some pics and two videos. The first shows the OEM turn signal bulb, and the second shows it replaced with an LED.
https://www.youtube.com/watch?v=fSvEb_r7BXo
https://www.youtube.com/watch?v=5IphOdeOVTc
The instrument control functions such as turn signal, etc. are illuminated by 1.2 watt bulbs manufactured by Osram. The bulb holders for gauge illumination can be purchased from AirCooled.net http://vwparts.aircooled.net/SearchResults.asp?Search=VDO
For the tachometer I would replace the bulb and/or holder. I had the same problem when I replaced my incandescent bulbs with LEDs.
QUOTE(timothy_nd28 @ Aug 22 2014, 08:17 PM)
I just copycatted ALs work, just because his method was the only one that seemed to brighten these gauges up the most.
Do a search with the LED bulb replacements, many people have mixed feelings with the results.
I have a few threads explaining how to install these LED strips inside the gauges, it's really not that bad of a project just time consuming.
If you take on this project, be sure to paint the inside of the gauge cans flat white, this is the best color to reflect the light. Also, with the tachometer, paint the back end of the bezel that holds the glass flat white. The gauge seems to be the dimmest due to the solid face dial.
Timothy
It's been 5 years since you posted on here in this thread so i am hoping that just maybe i might be able to get the response i need.
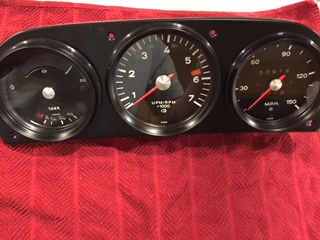
I am using the following 914 Gauge Cluster on my 1964 Titled Meyers Manx Dune Buggy...
I am curious as to the varios plastic covered glass lenses for the various lights on the instrument cluster such as Generator , Turn signals and such. Instead of going with the LED strips i have opted to replace the bulbs with BA7s LED bulbs
I also see two sets of Blue receptacles and wonder which one is the high beam on the tachometer or the one on the speedometer ????
Should i use colored LED bulbs in the already corresponding plastic colored lens receptacle or just use the cool white LEDs
It's been 5 years since you posted on here in this thread so i am hoping that just maybe i might be able to get the response i need.
I am using the following 914 Gauge Cluster on my 1964 Titled Meyers Manx Dune Buggy...
I am curious as to the varios plastic covered glass lenses for the various lights on the instrument cluster such as Generator , Turn signals and such. Instead of going with the LED strips i have opted to replace the bulbs with BA7s LED bulbs
I also see two sets of Blue receptacles and wonder which one is the high beam on the tachometer or the one on the speedometer ????
Should i use colored LED bulbs in the already corresponding plastic colored lens receptacle or just use the cool white LEDs
[/quote]
You will need to use the same color LED as the plastic. White LED's don't have the full color spectrum. The color will look washed out.
Use colored lights where they are going thru colored lenses. Red LEDs for Red lenses, etc.
HOWEVER - make sure to keep an incandescent bulb in the GEN position or it won't operate correctly. All others can be replaced with LED.
HOWEVER - make sure to keep an incandescent bulb in the GEN position or it won't operate correctly. All others can be replaced with LED.
This is a "lo-fi" version of our main content. To view the full version with more information, formatting and images, please click here.