This engine is for my Michigan Build, 2016 Build-Off Challenge. Needed to come to the "Garage" for some help.
Fresh rebuilt on start up, my first oil filter inflated, then leaked at the seal. Second try, filter massive leak blew the seal out. I have a flow probem. Looking for help. I must be building pressure, just won't leave the filter.
Click to view attachment
Click to view attachment
Full Version: Oil filter bulge, Jiffy Pop NEW concern
First thought is you have a seized oil control piston.
That much pressure you may have also blown out the cooler seals.
Did you modify the oil control? heavy spring? do you have the correct piston, not one out of a T1?
At any rate you have to remove the oil control piston and make sure it's moving smoothly.
I've also seen cheap FLAPS filters do that.
That much pressure you may have also blown out the cooler seals.
Did you modify the oil control? heavy spring? do you have the correct piston, not one out of a T1?
At any rate you have to remove the oil control piston and make sure it's moving smoothly.
I've also seen cheap FLAPS filters do that.
Mark,
Thank you I have contacted the member I got the engine from for more info. I used Mahle filters. This engine has been sitting for 10 years since the rebuild. I check the piston, and look at the seals.
Thank you I have contacted the member I got the engine from for more info. I used Mahle filters. This engine has been sitting for 10 years since the rebuild. I check the piston, and look at the seals.
Something must be seriously wrong, and I dont know if the piston being stuck all the way up in the bore can do that.
Based on this diagram: (ignore the remote cooler sandwich plate)
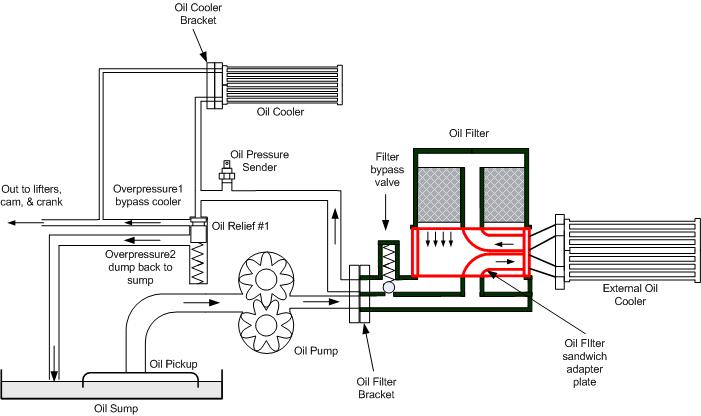
, downstream of the oil filter bracket is:
Oil pressure sender
A "tee" where the oil can either go to the "Oil Relief" piston pressure regulator
OR
the oil cooler.
If the piston were stuck, the oil would still flow through the cooler.
Unscrew the oil pressure sender and see if oil is pumping out there.
I think something is blocking the final oil galley right before the bearings (in diagram where it says out to lifters cam and crank), or before the oil pressure port.
Based on this diagram: (ignore the remote cooler sandwich plate)
, downstream of the oil filter bracket is:
Oil pressure sender
A "tee" where the oil can either go to the "Oil Relief" piston pressure regulator
OR
the oil cooler.
If the piston were stuck, the oil would still flow through the cooler.
Unscrew the oil pressure sender and see if oil is pumping out there.
I think something is blocking the final oil galley right before the bearings (in diagram where it says out to lifters cam and crank), or before the oil pressure port.
I'd look at the piston first, my bet is it's stuck.
dp
QUOTE(stugray @ Aug 6 2016, 06:23 PM) 
Something must be seriously wrong, and I dont know if the piston being stuck all the way up in the bore can do that.
If the piston were stuck, the oil would still flow through the cooler.
Unscrew the oil pressure sender and see if oil is pumping out there.
I think something is blocking the final oil galley right before the bearings (in diagram where it says out to lifters cam and crank), or before the oil pressure port.
I've seen a sitting engine with a stuck piston blow the cooler seals right out.
Was the filter and console on it when you got it?
I've also seen mud daubers (type of wasp) clog open holes.
I've also seen mud daubers (type of wasp) clog open holes.
Here we go... Filter was with engine, no bugs  Piston first.
Click to view attachment
Click to view attachment
Piston first. Click to view attachment
Click to view attachment
.....Dirt daubers(in USA) ![popcorn[1].gif](http://www.914world.com/bbs2/style_emoticons/default/popcorn[1].gif)

Garland, please check your pm,s.
Rich, check your E-mail.
Thanks,
John
Can't get the slotted cover to move, any tricks?
Here is a file photo, not my engine.
Click to view attachment
Thanks,
John
Can't get the slotted cover to move, any tricks?
Here is a file photo, not my engine.
Click to view attachment
Big screwdriver, hold it at an angle and to one side of the slot so it will go CCW and then hit it with a hammer.

I'd go with a hand impact.
About a $20 tool at Sears , get the right bit too.
One hit with a hammer...done.
Use to reinstall too.
About a $20 tool at Sears , get the right bit too.
One hit with a hammer...done.
Use to reinstall too.
not working!
Impact seems a bit aggressive, but at this point after re filing the slot, and giving it a second try I'm ready for aggressive.
QUOTE(Garland @ Aug 7 2016, 10:55 AM)
not working!Harder, good sharp whack.
You are hitting it just the one side of the slot at an angle right? At least a 45* or more.
You want it to go CCW.
If you mess up the slot a bit it doesn't matter.
It's moving, 1/4 turn so far. I had to cut two, more slots and hit away. Done this procedure before, just this thing did not want to move, and the softness of the brass didn't , and did help.
Tools
Click to view attachment
Results
Click to view attachment
Tools
Click to view attachment
Results
Click to view attachment
QUOTE(Garland @ Aug 7 2016, 10:48 AM)
It's moving, 1/4 turn so far. I had to cut two, more slots and hit away. Done this procedure before, just this thing did not want to move, and the softness of the brass didn't , and did help.
Results
Click to view attachment
Not a good sign!
Once I get it to move at all, I can thread it in/out with two fingers.
If it is that stuck I am afraid to see what is behind it.
Wow that is one of the worst I've seen...??? 
I expect that from an engine that was used for a boat anchor.
Surprised that it's still not turning easy, once you crack it the first bit it usually turns right out.
I expect that from an engine that was used for a boat anchor.
Surprised that it's still not turning easy, once you crack it the first bit it usually turns right out.
QUOTE(stugray @ Aug 7 2016, 01:21 PM)
QUOTE(Garland @ Aug 7 2016, 10:48 AM)
It's moving, 1/4 turn so far. I had to cut two, more slots and hit away. Done this procedure before, just this thing did not want to move, and the softness of the brass didn't , and did help.
Results
Click to view attachment
Not a good sign!
Once I get it to move at all, I can thread it in/out with two fingers.
If it is that stuck I am afraid to see what is behind it.
Well that's different.
Is there evidence of JB weld on the seal (and also ?) the threads ?
Me to, here it is!
Used a home made slide hammer, after taping the piston. Washed out and Cleaned up the passage , and going to replace the piston, spring and cap.
Click to view attachment
Click to view attachment
Click to view attachment
Click to view attachment
Click to view attachment
Used a home made slide hammer, after taping the piston. Washed out and Cleaned up the passage , and going to replace the piston, spring and cap.
Click to view attachment
Click to view attachment
Click to view attachment
Click to view attachment
Click to view attachment
QUOTE(Garland @ Aug 7 2016, 11:56 AM)
Me to, here it is!
Used a home made slide hammer, after taping the piston. Washed out and Cleaned up the passage , and going to replace the piston, spring and cap.
I would go directly to tangerine racing, do not pass go, do not collect $200.
http://www.tangerineracing.com/oilpressurerelief.htm
I would not trust that bore ever again.
QUOTE(Mark Henry @ Aug 7 2016, 11:28 AM)
Wow that is one of the worst I've seen...???
I expect that from an engine that was used for a boat anchor.
Surprised that it's still not turning easy, once you crack it the first bit it usually turns right out.
Mark, I have a boat anchor motor, been sitting just as you see it behind the barn for 10 years. Pulled from a rusted out car, when pulled the intakes were off and valves rusted.
So down to the barn, 2 hits, spin it out by hand, and need to pull the piston. 3 minutes!
Click to view attachment
Click to view attachment
Click to view attachment
Click to view attachment
"I would go directly to tangerine racing, do not pass go, do not collect $200."
Thank you, I may just do that
Opinions?
2015Pressure Relief
Our pressure relief valve replaces the stock assembly located in the bottom of the Type 4 engine crankcase. It eliminates the oil cooler bypass in the stock oil circuit and raises the peak operating pressure to 70psi.The crankcase bore for the pressure relief assembly is well worn after 40 years of operation and often bypasses a significant amount of oil, lowering available pressure to the bearings. Our assembly uses a chrome-moly steel sleeve with close tolerance stainless steel piston for many years of troublefree performance. It will cure many high oil temp/low oil pressure issues and is essential for modified engines with external oil coolers - to achieve optimal oil temperature control. A perfect complement to our remote oil cooler kits.
Click to view attachment
Prototype World post.
QUOTE(Garland @ Aug 7 2016, 12:30 PM)
"I would go directly to tangerine racing, do not pass go, do not collect $200."
Thank you, I may just do that
Opinions?
2015Pressure Relief
Our pressure relief valve replaces the stock assembly located in the bottom of the Type 4 engine crankcase. It eliminates the oil cooler bypass in the stock oil circuit and raises the peak operating pressure to 70psi.The crankcase bore for the pressure relief assembly is well worn after 40 years of operation and often bypasses a significant amount of oil, lowering available pressure to the bearings. Our assembly uses a chrome-moly steel sleeve with close tolerance stainless steel piston for many years of troublefree performance. It will cure many high oil temp/low oil pressure issues and is essential for modified engines with external oil coolers - to achieve optimal oil temperature control. A perfect complement to our remote oil cooler kits.
Click to view attachment
I have one in my car. Works as advertised so far.
I do cringe a bit when I fire up the car cold and the oil pressure gets to almost 80 PSI since I have dual front oil coolers (hoping to not hear that POP sound...)
I think it will still work. I cleaned up the bore and the piston, but just a bit. Using the cap, washer, and piston from the boat anchor.
Click to view attachment
Click to view attachment
Click to view attachment
Click to view attachment
QUOTE(Garland @ Aug 7 2016, 01:21 PM)
I think it will still work. I cleaned up the bore and the piston, but just a bit. Using the cap, washer, and piston from the boat anchor.
Can you feel a ridge inside the bore with your finger?
One problem with these is a ridge develops over time and the piston can get stuck on it.
Looks like yours was from corrosion, but I would still check.
Some have cleaned out the bore with fancy tools or even a dowel with sandpaper glued to it.
QUOTE(stugray @ Aug 7 2016, 11:15 AM)
QUOTE(Garland @ Aug 7 2016, 11:56 AM)
Me to, here it is!
Used a home made slide hammer, after taping the piston. Washed out and Cleaned up the passage , and going to replace the piston, spring and cap.
I would go directly to tangerine racing, do not pass go, do not collect $200.
http://www.tangerineracing.com/oilpressurerelief.htm
I would not trust that bore ever again.
Sorry to hear of your concerns...
Now that you know that is has all that corrosion in there, maybe you should split the case and check if the rest of the motor is not in the same state of health. Proactive vs having the possibility of it blowing up down the road.
Just a thought.
QUOTE(396 @ Aug 7 2016, 01:41 PM)
Sorry to hear of your concerns...
Now that you know that is has all that corrosion in there, maybe you should split the case and check if the rest of the motor is not in the same state of health. Proactive vs having the possibility of it blowing up down the road.
Just a thought.
I agree:
QUOTE(stugray @ Aug 6 2016, 04:23 PM)
I think something is blocking the final oil galley right before the bearings (in diagram where it says out to lifters cam and crank), or before the oil pressure port.
to pressurize the oil filter like that I dont believe he is getting ANY flow to the bearings.
I still dont believe a stuck piston could block ALL the flow.
I think the passages in the engine are all going to look like what he found in the bore of the pressure relief valve.
What is the length of the spring supposed to be ? Mine is 60mm out of (EB) 1973 block.Click to view attachment
I had high oil pressure too on initial start-up (65psi) after complete rebuild . No filter failure but a small leak developed at the pressure sensor threads ( no sealant, no crush washer installed)
I had high oil pressure too on initial start-up (65psi) after complete rebuild . No filter failure but a small leak developed at the pressure sensor threads ( no sealant, no crush washer installed)
QUOTE(pgollender @ Aug 7 2016, 05:37 PM)
I had high oil pressure too on initial start-up (65psi) after complete rebuild .
That's pretty well normal for a cold start anytime. On a real cold day you can see over 150lbs on start-up with thick oil.
Once full hot you should see 10lbs per 1000rpm
BTW I've done the same as the OP on a new engine when I once tried to cheap out and use an econo filter for break in.
Took me a day to clean up the three cars I hosed. Most expensive $5 I ever saved.
That's why you don't cheap out with oil filters.
Each start was 5 sec or less, started now, 3 times. 3 rd times, the charm.
Back together and 3 rd start, no leeks pressures holding, so far.
I did add oil to the cylinders, a few times over the years. This could be that residue.
I'll know more after I crank it, and change the oil. Then may start breakin.
Click to view attachment
Click to view attachment
Back together and 3 rd start, no leeks pressures holding, so far.
I did add oil to the cylinders, a few times over the years. This could be that residue.
I'll know more after I crank it, and change the oil. Then may start breakin.
Click to view attachment
Click to view attachment
What does the oil pressure read at the pressure sender port?
Im a little confused. Is this a "used" engine? If it was a newly built engine, why is all that crud in the oil pressure valve, did they not clean the case? As for the possibility of oil from the cylinder migrating to the oil valve...that scares me. If its clean oil, and say it does migrate down...my thoughts are, the internal components must be pretty dirty to...
Just my thoughts. Good luck
Just my thoughts. Good luck
This was purchased 10 years ago as a rebuilt motor. I'm thinking that the builder simply overlooked this passage and piston. I should find that out shortly.
QUOTE(396 @ Aug 8 2016, 11:09 AM)
Im a little confused. Is this a "used" engine? If it was a newly built engine, why is all that crud in the oil pressure valve, did they not clean the case? As for the possibility of oil from the cylinder migrating to the oil valve...that scares me. If its clean oil, and say it does migrate down...my thoughts are, the internal components must be pretty dirty to...
Just my thoughts. Good luck
I'm confused too...
Aside from the fact that the cap was rusted in place the piston was rusted in place too.
That moisture is probably not just there, you have to assume it's everywhere.
The rim that the cap seals against is totaled.
How will that seal ?
It is a,
1.7 balanced, 260 x 396 cam .006
96mm B/B kit. Looks like the heads were cleaned up, There also 1.7
I took a closer look and can't find any other "crap" in the engine. Strainer is clean. Oil changed after lots of rotations, looks clean. I parley cleaned up the surface of the block were the plug goes, but no real damage. Fished around with the bore scope, and things look ok.
The plug had no markings at all when I started. I don't think it was removed when the rebuild was done. This may be why it was so hard to remove, and all the crud only there?? If the case was washed, with the plug left in?
With piston still in.
Click to view attachment
Piston removed, before cleanup, notice the shine at the top of the bore.
Click to view attachment
After cleanup, piston surface looks ok,
Click to view attachment
This is what I have added to the block, over the last 10 years.
Mallory unlimited distributor, Ordered from Jake.
Weber 40 DCNF air jet 1.80, main 1.25 rebuilt, and set up, true old carb guy.
2.0 SS exchangers
2.0 Triad exhaust
I've started it 3 times, each time for 5 seconds. Twice with out oil flow, except from the filter gasket!
So, I think I'm ok to start the breakin, break-in!
Camara pictures of the laptop screen.
Click to view attachment
Click to view attachment
Click to view attachment
Click to view attachment
QUOTE(396 @ Aug 9 2016, 03:09 AM)
Im a little confused. Is this a "used" engine? If it was a newly built engine, why is all that crud in the oil pressure valve, did they not clean the case? As for the possibility of oil from the cylinder migrating to the oil valve...that scares me. If its clean oil, and say it does migrate down...my thoughts are, the internal components must be pretty dirty to...
Just my thoughts. Good luck
Good comments
 that's a lot of crap/rust for a rebuilt motor ,I would suggest a short run and an oil change ASAP???.
Good luck.
Edit,sounds like you have sorted it excellent,those DCNF's are really good carbs and very hard to find now.
I love the DCNF, infact I have a set of Gene Berg 42 specials on my '67 bus...but you won't like them on a 914.
DCNF are the ultimate cruiser carb in a straight line, for highway use.
In a 914, as soon as you hit the twisties, every hard corner you will have one carb cut out from fuel starvation. Turn left and one carb cuts out, turn right and it's the other.
Berg did several things to help this issue in his 42 specials, but it didn't eliminate the problem.
I had a set of non -berg 42mm DCNF's in my old VW squareback and just going around a cloverleaf my carbs would cut out.
In a Ferrari or the Maserati (with the Ferrari engine) this isn't an issue, as the carb is turned 90* and the fuel starvation fault is under deceleration/braking. It's how Weber designed the fuel bowl and float to get around this issue.
Mark, I am aware of that but I have read a number of articles that gives some possible and creative solutions.
QUOTE(Garland @ Aug 9 2016, 01:58 PM)
Mark, I am aware of that but I have read a number of articles that gives some possible and creative solutions.
Link?
Not saying something new hasn't been figured out, but a local member told me the same thing 10 years ago, while rolling his eyes implying I was a debbie downer and didn't know jack shit. He did every trick and battled the issue for 2 years before he gave up and bought IDF's.
Gene berg was a DCNF tuning master and although he did make thing better even he could never fix the issue. Other VW guys have also been using this carb since the early 70's...and they couldn't fix it.
Spirited 914 cornering abilities, which is what the 914 is all about is just too much for the DCNF bowl design.
I love the DCNF's I have used them for 25+ years, I had to buy a whole Gene Berg engine kit to get my 42 specials.
For a highway there's no better carb, I just know and accept their limitations.
QUOTE(Mark Henry @ Aug 9 2016, 01:23 PM)
QUOTE(Garland @ Aug 9 2016, 01:58 PM)
Mark, I am aware of that but I have read a number of articles that gives some possible and creative solutions.
Link?
Not saying something new hasn't been figured out, but a local member told me the same thing 10 years ago, while rolling his eyes implying I was a debbie downer and didn't know jack shit. He did every trick and battled the issue for 2 years before he gave up and bought IDF's.
Gene berg was a DCNF tuning master and although he did make thing better even he could never fix the issue. Other VW guys have also been using this carb since the early 70's...and they couldn't fix it.
Spirited 914 cornering abilities, which is what the 914 is all about is just too much for the DCNF bowl design.
I love the DCNF's I have used them for 25+ years, I had to buy a whole Gene Berg engine kit to get my 42 specials.
For a highway there's no better carb, I just know and accept their limitations.
A guy at the track was telling me about a setup in 914s and how he configured the floatbowls, etc. What he was saying didn't make any sense for IDFs, so maybe he was talking about these carbs?
I thought he was remembering the wrong car.
He said that he had a pair setup with no floats, and no float valve.
He said that the float bowls would fill up and overflow into a capture bowl of some sort and be recycled back to the tank.
With that setup there was no float to get stuck or affected by cornering or braking G-force.

Here's is the track I was following, and it didn't end well. Sound familial?
"Weber DCNF experiences ?
Postby Stufenheck » Mon Feb 17, 2003 8:57 pm
If you decide to use DCNF's, the change that makes the most inprovement is the needle valves from Gene Berg, I only wish I had done that right of the back I would have been done by now.
Back in 1999 when I taught it would be neat idea to install a 2L 914 engine in my Notchback, after scrapping a 74 that was damaged beyond repair, kept the engine and wheels. I had intially taught of using the F/I set up that was in the 914.
A year later I found the short intakes for the 40 DCNF that bolted up to the 914 engine in England. So with limited choices I went with the 40 DCNF's. I had purchased the DCNF's in 1999 for $40 at a swap meet for possible use on a type 3 motor.
3 years and $600+ in carburator parts and linkage later, I've been driving a 1965 Notchback with 2L engine for the past 2 year. It has been a challenge to figure these carbs out.
Dan Zink told me about the STF and it has been helpful in understanding the endevour we each take on when doing this type of engine conversion.
I have experience the fuel boiling/perculating in the bowl when the car stops even in the winter. Sounds like an old coffee maker.
To try and combat this problem I have contacted a vendor that I saw in ad in HVW who makes phenolic spaces for carbs. I'm waiting for a reply. He may not even get back to me due to limited quantity only asked him for two sets. I have a 1/2" thick piece of Phenolic in the garage, I may try to make my own.
Another idea is to get cold air to the carbs. I have some 4" high temperature duct hose that I got from a friend at work. The idea is to get cold air from the interior and plumb the hose from the rear shelf to the top of the engine cover near the carburetors.
So I battle on with my conversion making small improvements along the way.
But this idea I like, have to work on that, a bit later.
"He said that he had a pair setup with no floats, and no float valve.
He said that the float bowls would fill up and overflow into a capture bowl of some sort and be recycled back to the tank.
With that setup there was no float to get stuck or affected by cornering or braking G-force."
QUOTE(Garland @ Aug 9 2016, 10:45 PM)
But this idea I like, have to work on that, a bit later.
"He said that he had a pair setup with no floats, and no float valve.
He said that the float bowls would fill up and overflow into a capture bowl of some sort and be recycled back to the tank.
With that setup there was no float to get stuck or affected by cornering or braking G-force."
I don't know how you would do this, the top of the carb isn't fully sealed and would overflow the top. It can't be sealed as it requires a vent.
Thing is to me is you could trade or sell the DCNF's on the samba easy and get a set of mint italian IDF's. Then you won't have all the fuching around to do.
DCNF's sell easy, some series are sought after by the Ferrari guys, as they need 6 of them in the same series and the bug guy bought up all the spares. DCNF carbs have many different series, as the tooling wore weber would start a different series. Type one guys also search out these carbs.
Once you modify, drill holes, baffles, etc the carbs can quickly become worthless.
Good luck
Mark, I like your idea I do not plan on trying to modify these after some thought. The thing is I just had them rebuilt and completely gone through so I will just hate to part with such a nice looking pair of carbs
Everything buttoned up and ran for 30 minutes at around 2000 rpm. All good. No leaks, and sounding strong. Doing an oil change, and carb adjust I'll be ready to install in the "build " car. Here the link to Michigan Build / Build-Off Challenge 2015/16
Click to view attachment
Click to view attachment
QUOTE(Garland @ Aug 13 2016, 10:12 AM)
Everything buttoned up and ran for 30 minutes at around 2000 rpm. All good. No leaks, and sounding strong.
QUOTE(stugray @ Aug 7 2016, 10:06 PM)
What does the oil pressure read at the pressure sender port?
QUOTE(Garland @ Aug 14 2016, 04:12 AM)
Everything buttoned up and ran for 30 minutes at around 2000 rpm. All good. No leaks, and sounding strong. Doing an oil change, and carb adjust I'll be ready to install in the "build " car. Here the link to Michigan Build / Build-Off Challenge 2015/16
Click to view attachment
Nice linkage set up and looking good,funny I took Marks info in about these carbs to be accurate but I have not had issues with these on my 75 1.8 carb T4 (bus motor) powered speedster replica,it has been driven on the road in anger (not legal) and had excellent power out of the corners.
My carbs are different however they are off a European 80's car called the Talbot Alpine and are stamped 36DNVA ,they look like the DCNF maybe they changed the design I really don't know.
This is a "lo-fi" version of our main content. To view the full version with more information, formatting and images, please click here.