
Full Version: Pploco Sti-defiling a 914
So question for y'all - I'm planning to weld in a long reinforcement kit with the inside firewall piece. I have a small spot of rust at the bottom of the firewall. Should I weld a patch in prior to the chassis stiffening kit, or just prep and weld in the kit?
QUOTE(pploco @ Sep 17 2019, 09:09 AM) 
So question for y'all - I'm planning to weld in a long reinforcement kit with the inside firewall piece. I have a small spot of rust at the bottom of the firewall. Should I weld a patch in prior to the chassis stiffening kit, or just prep and weld in the kit?
It's thin. I would cut it out and weld in a patch. Difficult area as well.
So even with this kit from Maddog, I should still patch the firewall?
https://maddogsmotorsports.com/914-chassis-stiffening
https://maddogsmotorsports.com/914-chassis-stiffening
I agree with Andyrew.
Clean up the metal and patch the floor prior to adding the Mad dog kit,
or those holes will continue to grow.
Additionally, the floor in proper repair will add to the chassis rigidity,
especially once the kit is installed.
Clean up the metal and patch the floor prior to adding the Mad dog kit,
or those holes will continue to grow.
Additionally, the floor in proper repair will add to the chassis rigidity,
especially once the kit is installed.

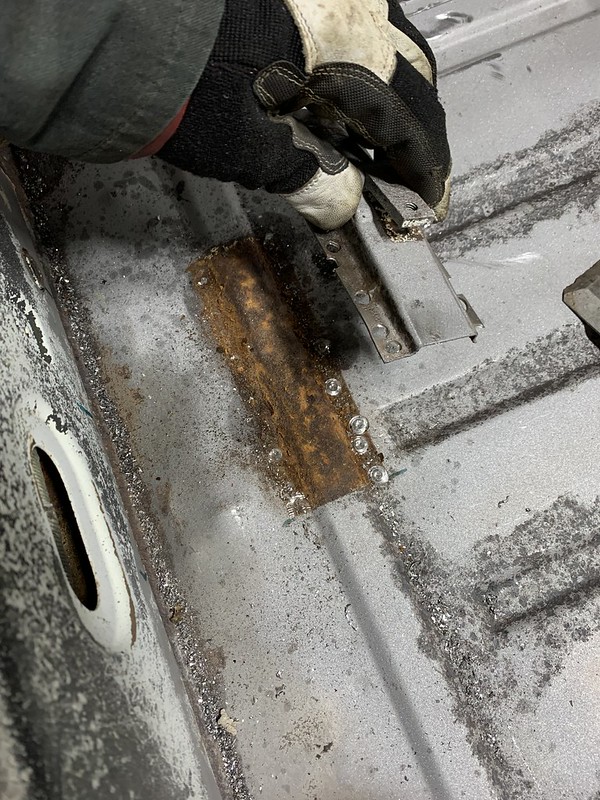
I decided to spend some time cleaning up some of the rust in the interior. I got out the wire wheel and started cleaning up some of the metal around the passenger footwell. Cut out the rusted bit, and welded in a patch.

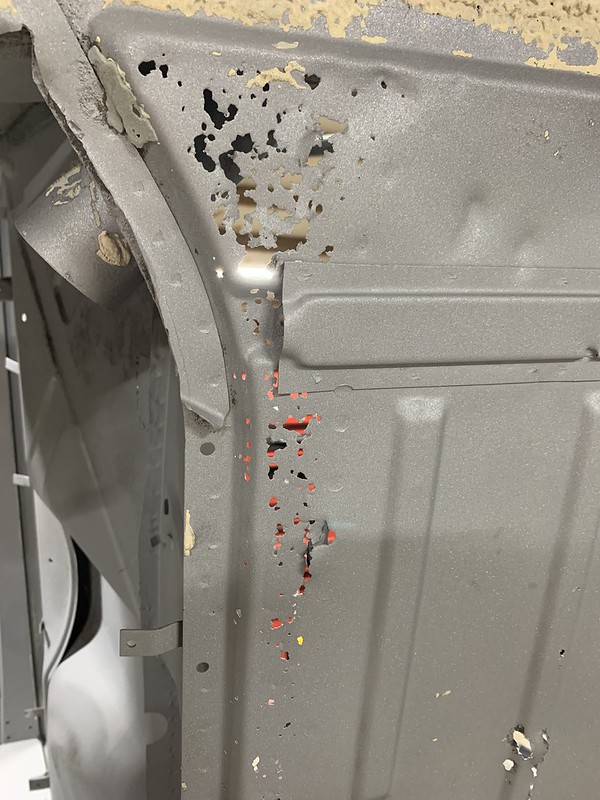
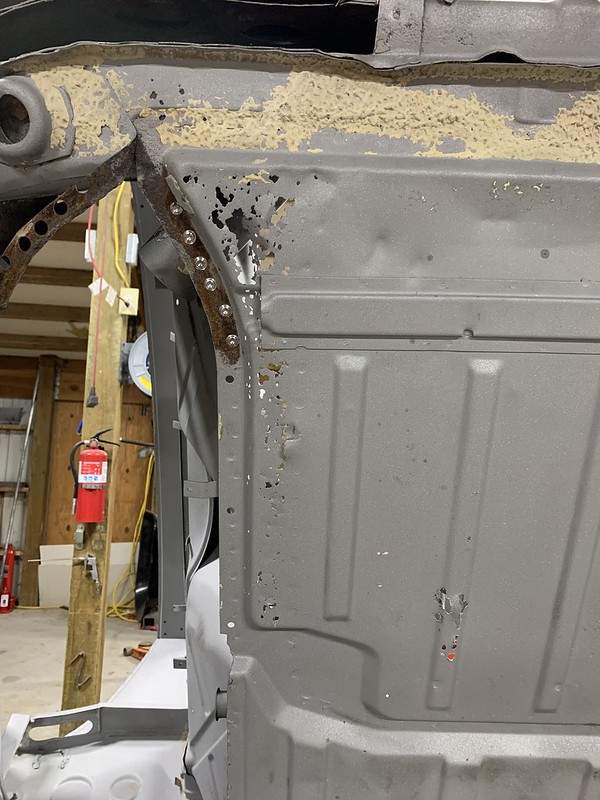
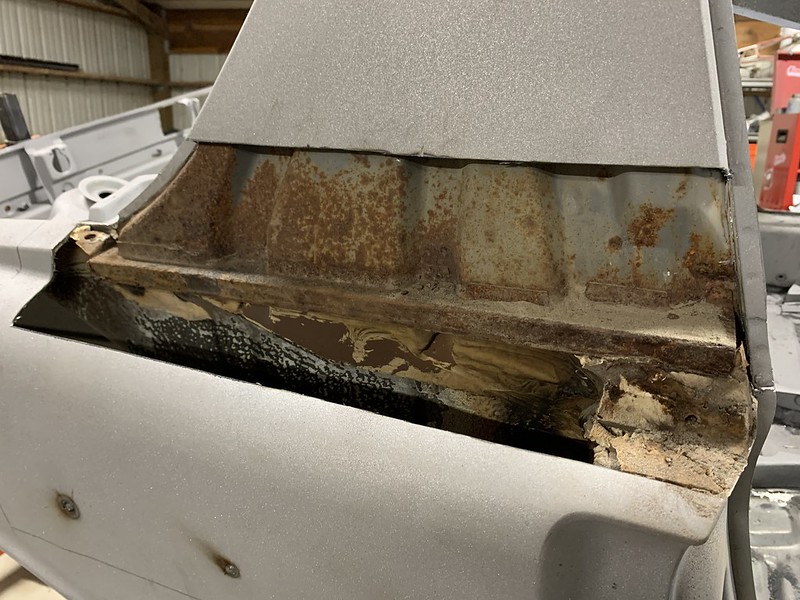
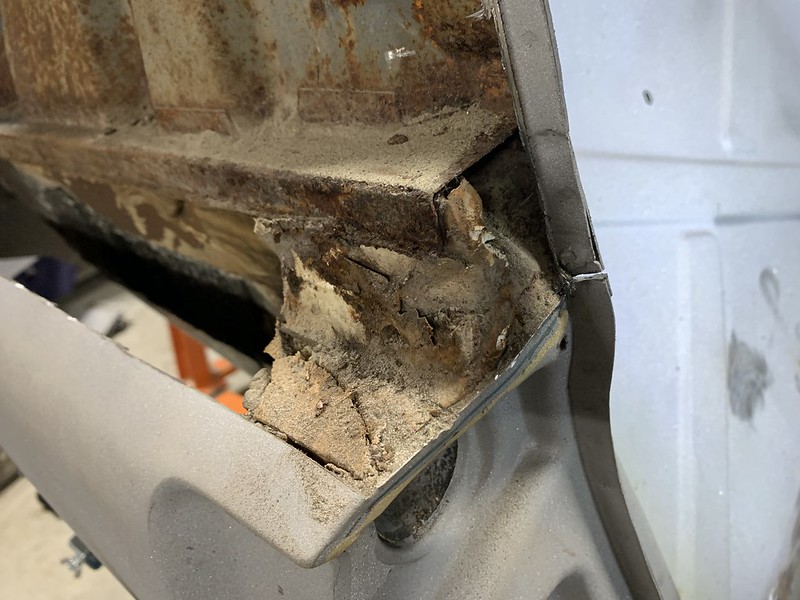
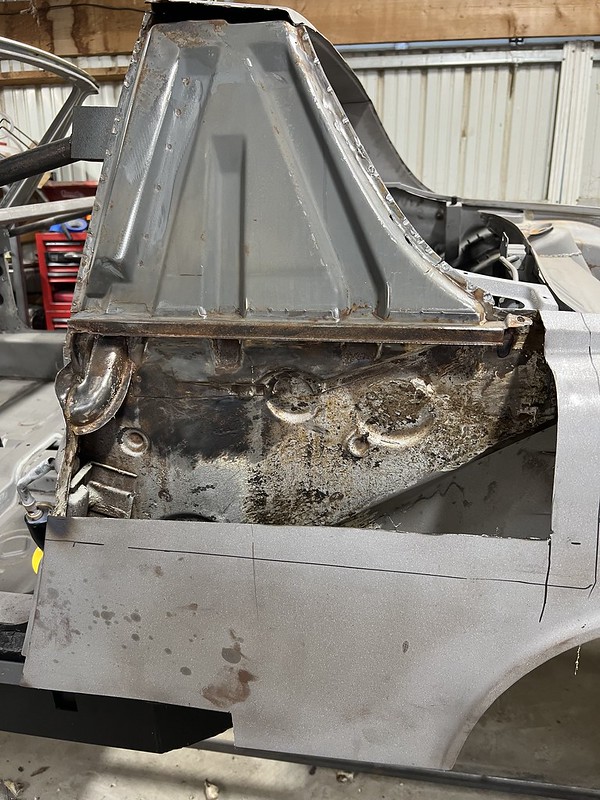
Feeling pretty good about myself, I worked my way back stripping the floor down and really digging into the pitted spots. With the exception of one small spot under the passenger seat, there were no pinholes or spots needing repair. Overall it looked pretty good. That is until I saw what was peeking out from behind the firewall
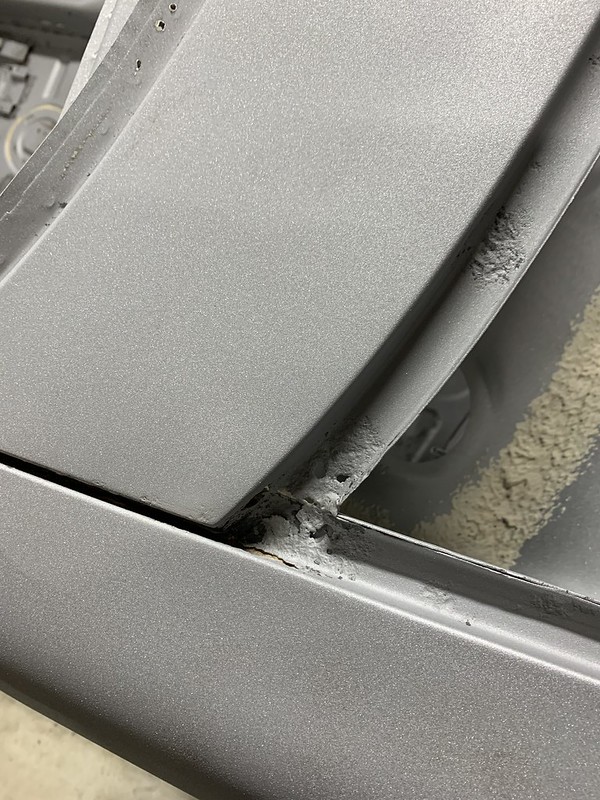
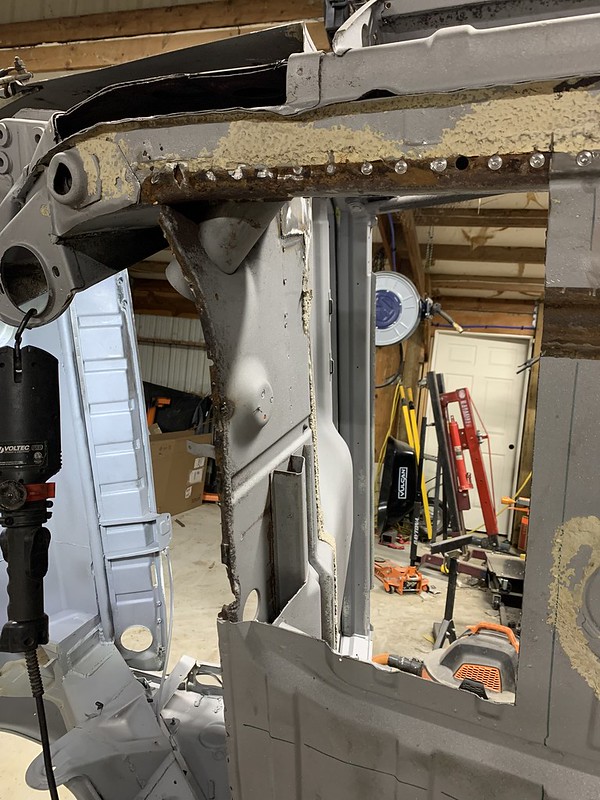
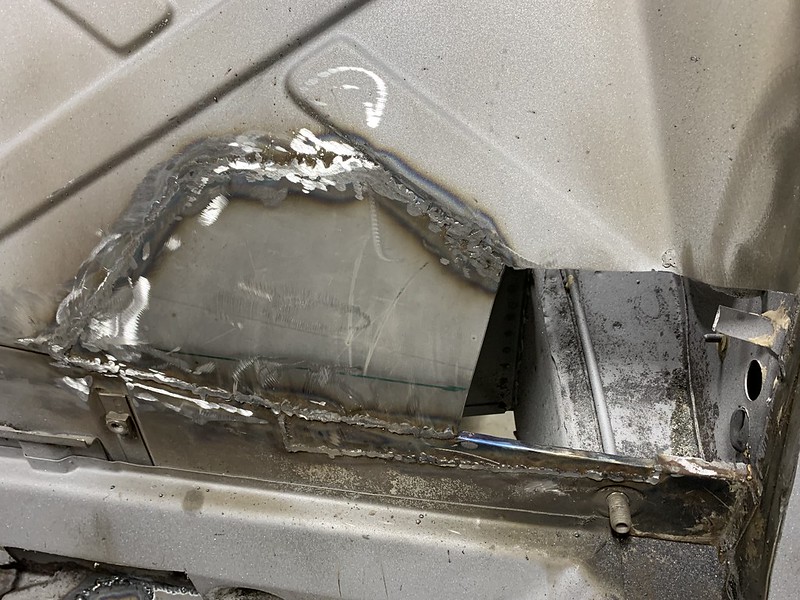
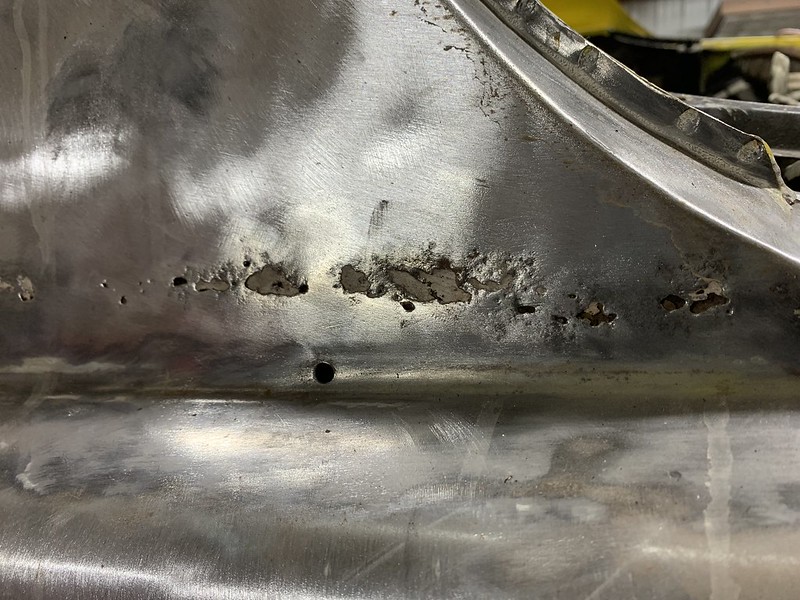
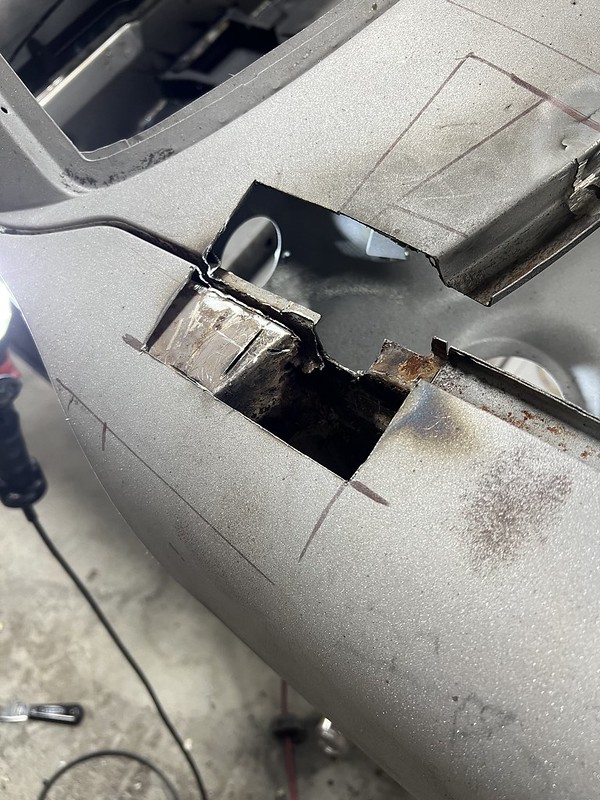
I found a few spots on the passenger firewall that I started poking and digging out with a screwdriver. Before too long, the cutter came out and I ended up with this:
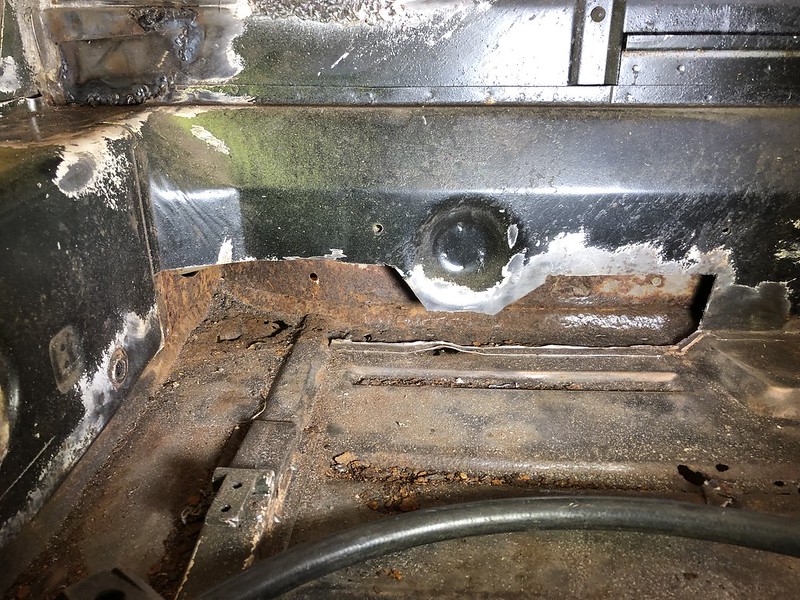
Now I'm afraid to see what the driver's side has hiding. What a friggin setback... Oh well. I think to do this right, I'm going to have to get it up on a rotisserie to fix the rear pan, and I'm super tempted to have the whole tub media blasted. I hope (fingers crossed) that the longs are still okay. I know there's a small spot under the hell hole, but everything else looks pretty solid.
I've heard it said here many times - its never the rust you can see in these cars, its what you can't see. Well, here's proof to that.
Feeling pretty good about myself, I worked my way back stripping the floor down and really digging into the pitted spots. With the exception of one small spot under the passenger seat, there were no pinholes or spots needing repair. Overall it looked pretty good. That is until I saw what was peeking out from behind the firewall
I found a few spots on the passenger firewall that I started poking and digging out with a screwdriver. Before too long, the cutter came out and I ended up with this:
Now I'm afraid to see what the driver's side has hiding. What a friggin setback... Oh well. I think to do this right, I'm going to have to get it up on a rotisserie to fix the rear pan, and I'm super tempted to have the whole tub media blasted. I hope (fingers crossed) that the longs are still okay. I know there's a small spot under the hell hole, but everything else looks pretty solid.
I've heard it said here many times - its never the rust you can see in these cars, its what you can't see. Well, here's proof to that.
Also the radiator setup looks REALLY good!
I wouldnt hesitate to cut holes in the wheel wells. You need less than you think. In the end its just a 4 cylinder.
Go low with your holes, about 2" from the corners and drill a 1" pilot hole, on each inside and outside lower corner, Move up about 8" and drill two more 1" holes then connect the dots. Thats all you should end up needing.
Sometime down the road you can add a sheet metal ducting and get back some trunk space.
Dont get discouraged with the rust your finding. Thats much better than some I've seen! Brace the car well and go for it. You dont need to do a rotisserie.
QUOTE(Andyrew @ Sep 23 2019, 09:54 AM)
Also the radiator setup looks REALLY good!
Thank you.
On the rust discovery, I think I just need time for it to settle ha ha..
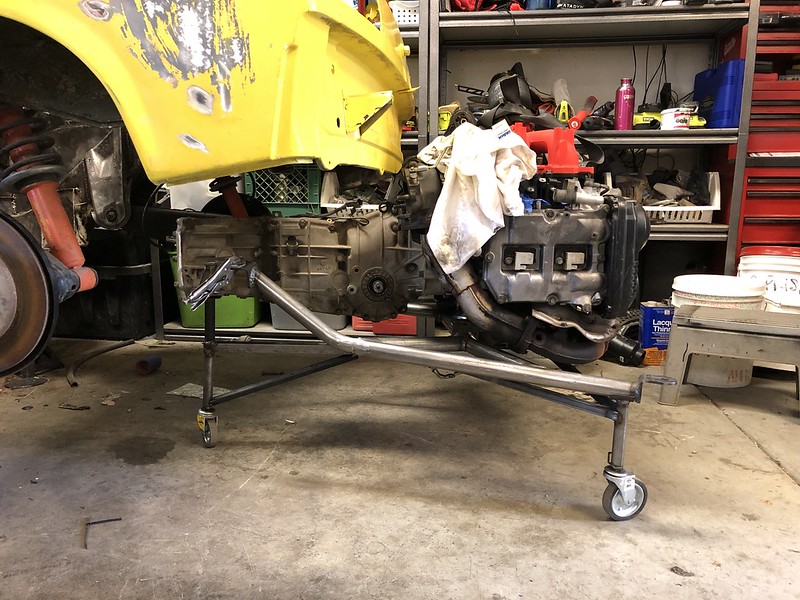
I finally tackled something I've been putting off for a while. The Coldwater cradle sits the drivetrain just a little too far forward - causing the axles to not quite line up. I've been thinking for months on how I could pull everything back about 2 inches to get the axles to line up better. I decided to man up and finish it so I could do some fab work in the engine compartment.
Here's what I started with:
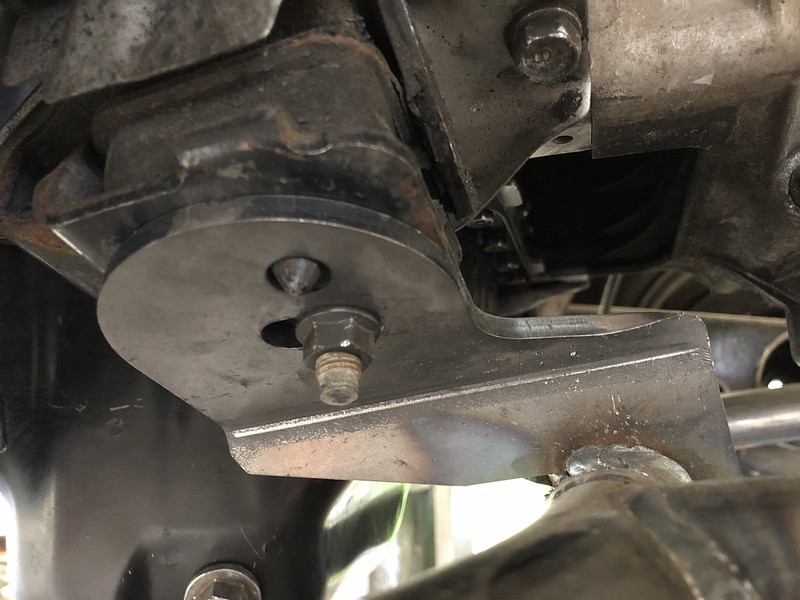
I got a strap around the motor and one on the trans, then used the hoist to support the motor, dropped the cradle off and sliced the mount along the bend. Then I flipped the cut flanges and put them back on the motor - pulled the drive train back a bit. I used a super long screwdriver pushed through the hub - which worked perfectly because the rubber grip centered in the splines. Then I positioned the trans axle outputs to line up. I measured the distance between axle output and hubs to ensure I was square, then I tacked the motor mount flanges back to the cradle. Checked my measurements again, and welded them up.

I'm not sure why Ian didn't do this in the first place. I'm no engineer, but having the motor weight centered on top of the crossbar seems a lot better. It was actually a much easier fix than I was anticipating. I have a tendency to overthink things like this and obsess on all the different ways to go about it. The hardest part was reworking the trans mounts. I forgot to take pictures after finishing, but they turned out pretty nice. I did have my chopsaw blade bind and explode on me - that sucked.
I also had some time to make a better cart for the motor so I can wheel it around the garage and it sits high enough to clear the engine hoist.
Here's what I started with:
I got a strap around the motor and one on the trans, then used the hoist to support the motor, dropped the cradle off and sliced the mount along the bend. Then I flipped the cut flanges and put them back on the motor - pulled the drive train back a bit. I used a super long screwdriver pushed through the hub - which worked perfectly because the rubber grip centered in the splines. Then I positioned the trans axle outputs to line up. I measured the distance between axle output and hubs to ensure I was square, then I tacked the motor mount flanges back to the cradle. Checked my measurements again, and welded them up.
I'm not sure why Ian didn't do this in the first place. I'm no engineer, but having the motor weight centered on top of the crossbar seems a lot better. It was actually a much easier fix than I was anticipating. I have a tendency to overthink things like this and obsess on all the different ways to go about it. The hardest part was reworking the trans mounts. I forgot to take pictures after finishing, but they turned out pretty nice. I did have my chopsaw blade bind and explode on me - that sucked.
I also had some time to make a better cart for the motor so I can wheel it around the garage and it sits high enough to clear the engine hoist.
I was cruising the local metal recycler on Friday looking for some scraps for my son, and I found a pile of what looked like Home Depot shelving. Before I could talk some sense into myself, I had two of these thrown together in my garage:
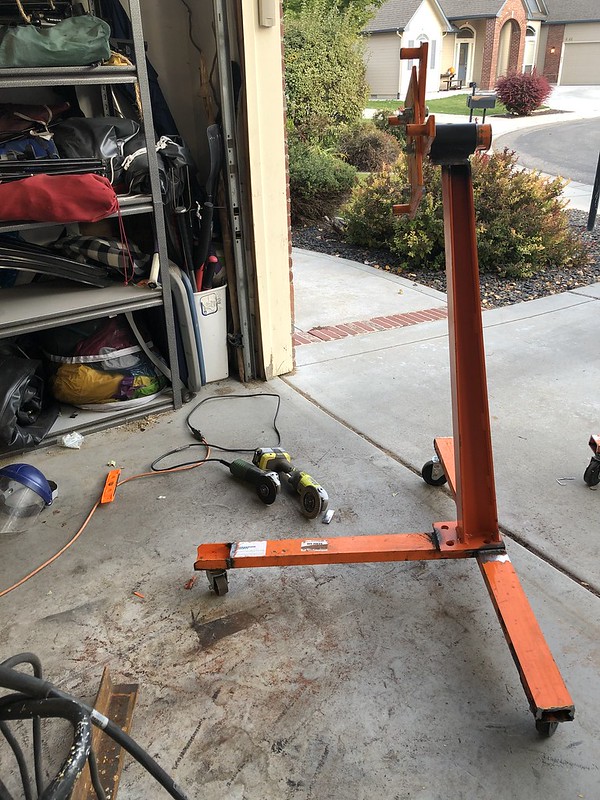
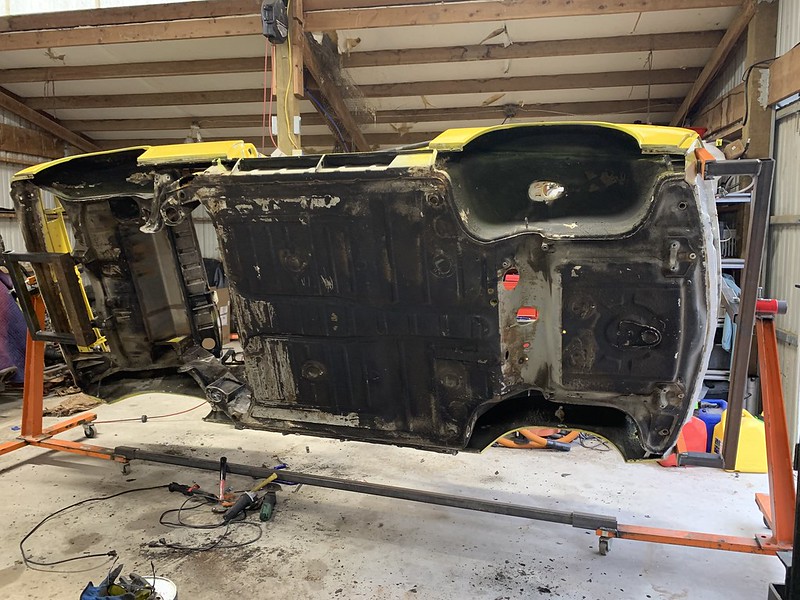
For less than 50 bucks and an afternoon with the cutter and welder, I've ruined my two engine stands to build a rotisserie. I'm too committed now on this project, and really want to fix the holes in the rear floor properly. I also want to strip the inner fender and under coating without having to lay on my back on the cold garage floor.
For less than 50 bucks and an afternoon with the cutter and welder, I've ruined my two engine stands to build a rotisserie. I'm too committed now on this project, and really want to fix the holes in the rear floor properly. I also want to strip the inner fender and under coating without having to lay on my back on the cold garage floor.
I would agree with Andy based on the bottom photo.
In the case on this photo, I'd clean that up with ospho, neutralize the ospho,
coat it with about 4 coats of Zero Rust, and put in good patches and then the Mad Dog kit.
You wont be able to weld through the Zero Rust, so keep that in mind.
I know you want to have the best car you can,
but also remind yourself that this is not going to be a $100K original six.
Its your car - The only other thing I would say is,
whatever your decision to proceed is - enjoy it.
I decided to spend some time cleaning up some of the rust in the interior. I got out the wire wheel and started cleaning up some of the metal around the passenger footwell. Cut out the rusted bit, and welded in a patch.
Feeling pretty good about myself, I worked my way back stripping the floor down and really digging into the pitted spots. With the exception of one small spot under the passenger seat, there were no pinholes or spots needing repair. Overall it looked pretty good. That is until I saw what was peeking out from behind the firewall
I found a few spots on the passenger firewall that I started poking and digging out with a screwdriver. Before too long, the cutter came out and I ended up with this:
Now I'm afraid to see what the driver's side has hiding. What a friggin setback... Oh well. I think to do this right, I'm going to have to get it up on a rotisserie to fix the rear pan, and I'm super tempted to have the whole tub media blasted. I hope (fingers crossed) that the longs are still okay. I know there's a small spot under the hell hole, but everything else looks pretty solid.
I've heard it said here many times - its never the rust you can see in these cars, its what you can't see. Well, here's proof to that.
In the case on this photo, I'd clean that up with ospho, neutralize the ospho,
coat it with about 4 coats of Zero Rust, and put in good patches and then the Mad Dog kit.
You wont be able to weld through the Zero Rust, so keep that in mind.
I know you want to have the best car you can,
but also remind yourself that this is not going to be a $100K original six.
Its your car - The only other thing I would say is,
whatever your decision to proceed is - enjoy it.
QUOTE(pploco @ Sep 23 2019, 09:40 AM)
I decided to spend some time cleaning up some of the rust in the interior. I got out the wire wheel and started cleaning up some of the metal around the passenger footwell. Cut out the rusted bit, and welded in a patch.
Feeling pretty good about myself, I worked my way back stripping the floor down and really digging into the pitted spots. With the exception of one small spot under the passenger seat, there were no pinholes or spots needing repair. Overall it looked pretty good. That is until I saw what was peeking out from behind the firewall
I found a few spots on the passenger firewall that I started poking and digging out with a screwdriver. Before too long, the cutter came out and I ended up with this:
Now I'm afraid to see what the driver's side has hiding. What a friggin setback... Oh well. I think to do this right, I'm going to have to get it up on a rotisserie to fix the rear pan, and I'm super tempted to have the whole tub media blasted. I hope (fingers crossed) that the longs are still okay. I know there's a small spot under the hell hole, but everything else looks pretty solid.
I've heard it said here many times - its never the rust you can see in these cars, its what you can't see. Well, here's proof to that.
Nice job!! Totally get the ‘overthinking things’ when it comes to certain tasks, especially cutting bad metal out and replacing with good.
I remember agonizing over cutting out 1/4th of the floor pan for days. When I finally decided there weren’t any shortcuts to be had and dove in, the entire job- cutting out and replacing with new metal took only a couple hours.
Keep up the great work!!
I remember agonizing over cutting out 1/4th of the floor pan for days. When I finally decided there weren’t any shortcuts to be had and dove in, the entire job- cutting out and replacing with new metal took only a couple hours.
Keep up the great work!!
Well, it's been a while since I've updated this conversion thread. But, I have a good excuse. I've been hating my current garage workspace for a while. Its been a huge source of fighting between my wife and me over the years. She gets tired of my "crap" crowding her parking spot in the garage. And, now that my son has the welding and fabrication bug, the problem has compounded. So, back in October I started a search and found a solution to the problem:
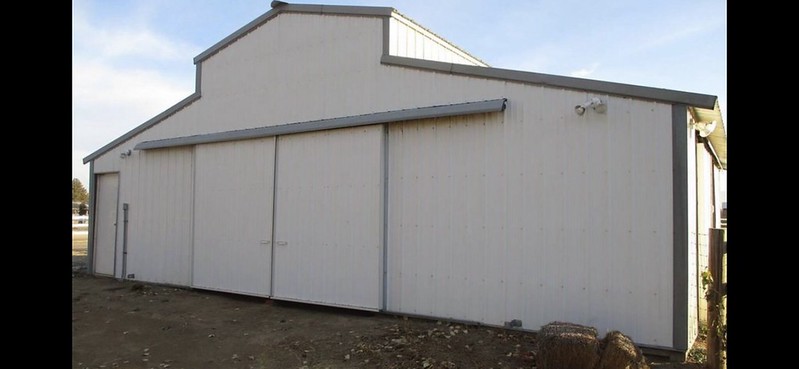
I found a barn. Sure there was this annoyance of it sitting on a 2.4 acre lot, and it required selling and buying a house. But these are just small details right? After lots and lots of begging (and a commitment to install a new kitchen and flooring in the process), my wife agreed.
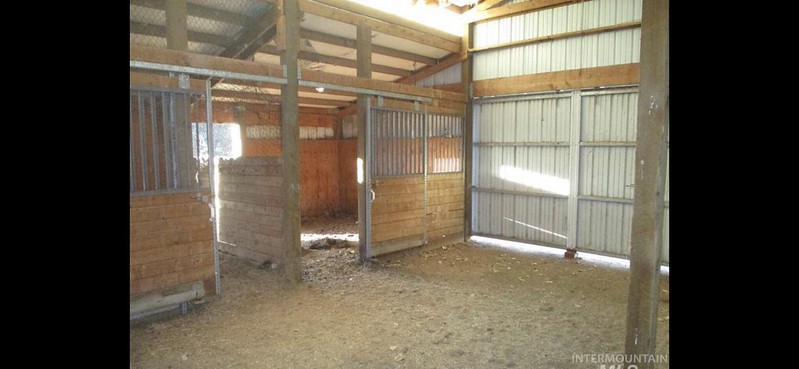
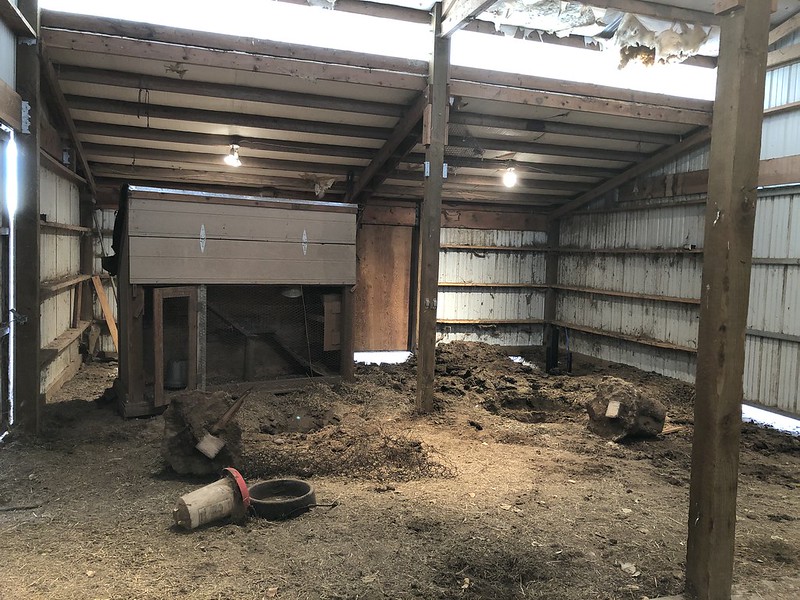
So in between house projects, I've gutted the barn, roughed in some plumbing for a sink and toilet, and had a concrete floor put in. It should be a MUCH better space for these types of projects. The problem is that all work on the 914 has come to a screeching halt. BUT, hopefully soon I'll have things put back together in the new place.
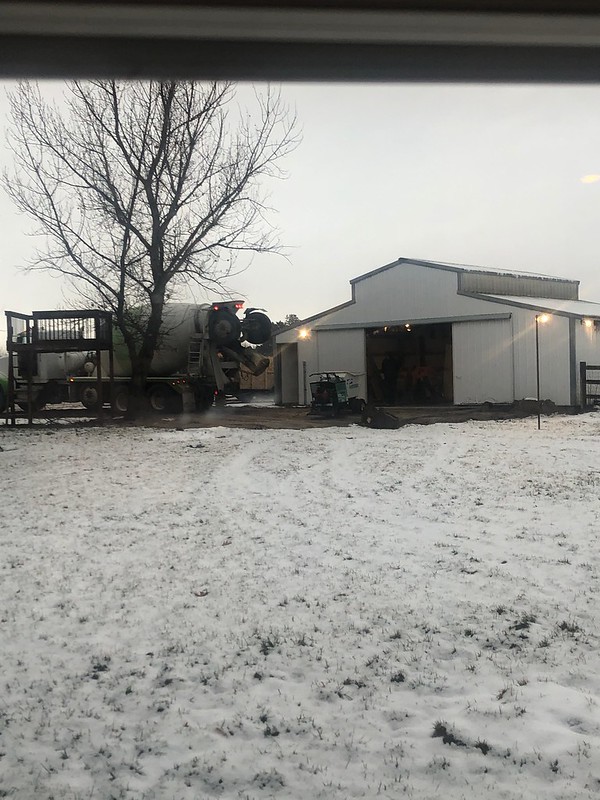
It's wired for 220, but needs a little insulation and heat before its ready to see any action. I'm still debating on whether to run gas from the house (about 100 feet) or just get a pellet stove with a thermostat. Either way, I'm super excited and have serious motivation to finish my home remodel projects.
I found a barn. Sure there was this annoyance of it sitting on a 2.4 acre lot, and it required selling and buying a house. But these are just small details right? After lots and lots of begging (and a commitment to install a new kitchen and flooring in the process), my wife agreed.
So in between house projects, I've gutted the barn, roughed in some plumbing for a sink and toilet, and had a concrete floor put in. It should be a MUCH better space for these types of projects. The problem is that all work on the 914 has come to a screeching halt. BUT, hopefully soon I'll have things put back together in the new place.
It's wired for 220, but needs a little insulation and heat before its ready to see any action. I'm still debating on whether to run gas from the house (about 100 feet) or just get a pellet stove with a thermostat. Either way, I'm super excited and have serious motivation to finish my home remodel projects.
Run gas! Pellet stoves are a pain in the rear.
My father-in-law had a barn like that for the horses. We had to dig up every pole and replace the lower portion, because of rot. The horses piss and it runs down the pole. Horses produce alot of liquid. Hope that's not am issue for you
My father-in-law had a barn like that for the horses. We had to dig up every pole and replace the lower portion, because of rot. The horses piss and it runs down the pole. Horses produce alot of liquid. Hope that's not am issue for you
A barn almost exactly like that is what I pulled my 914 out of before I ended up STI-defiling it as well!
She was rough lookin' at the time.
I mean, she still is...
She was rough lookin' at the time.
I mean, she still is...
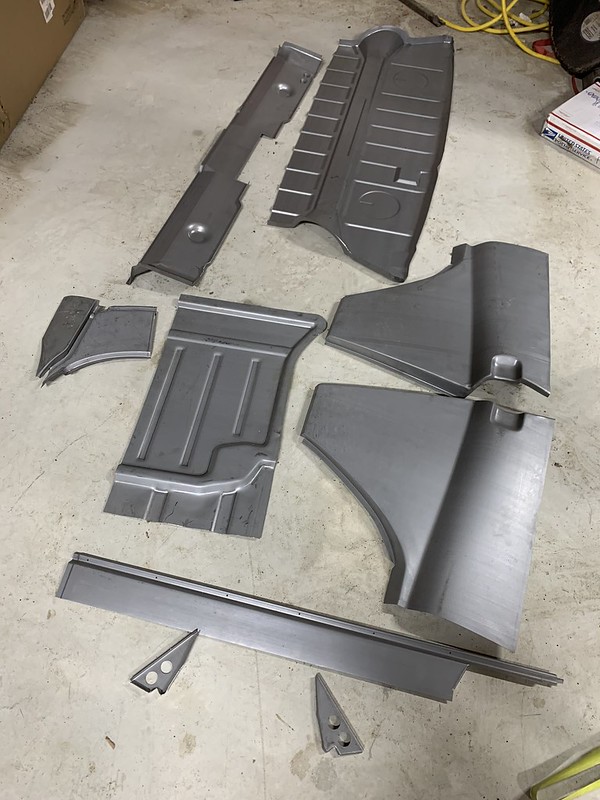
After two years of renovating a new house and barn, I'm finally finding the time (and space) to work on my project. After discovering all the rust spots, I built a rotisserie from some old home depot shelving at the local metal scrap, stripped the car down, and got it up on the skewer, and as I write this am having the tub bead blasted. I also got my RD order with most of the body repair pieces I think I'm going to need.
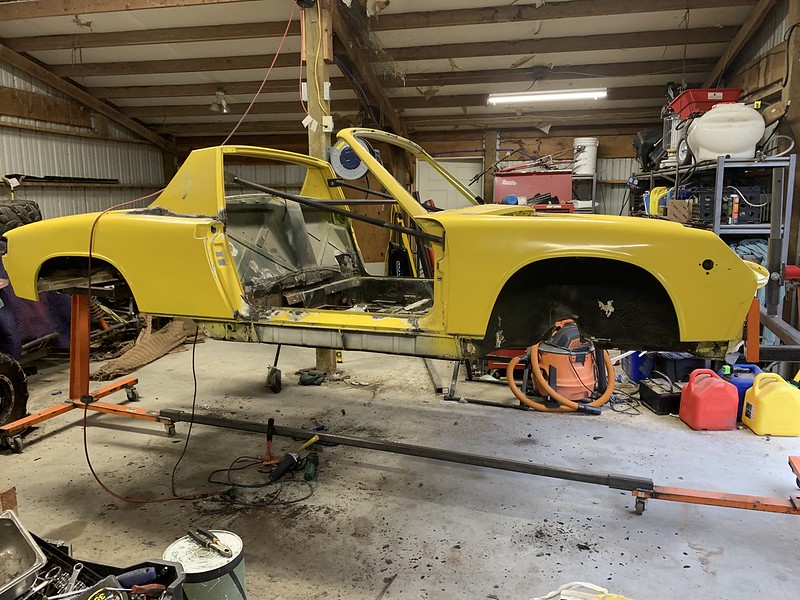
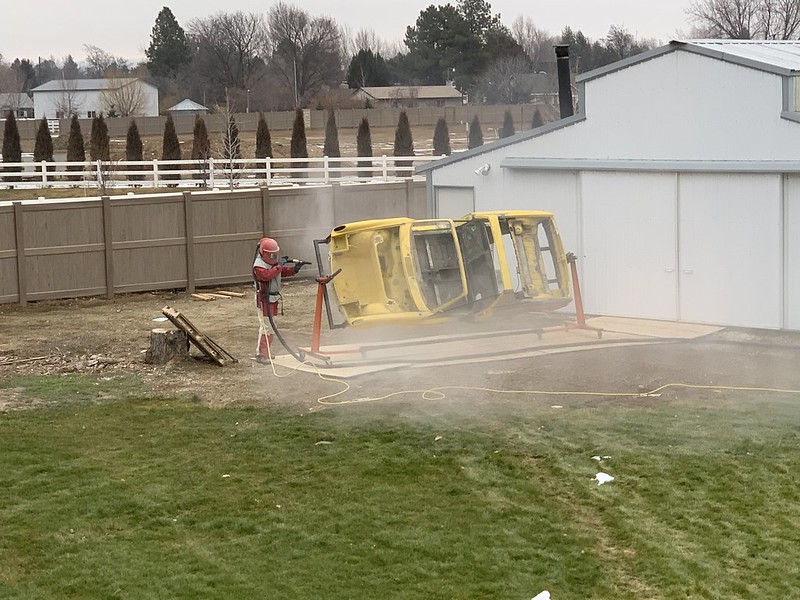
The sandblasting is finished and wow, what a difference. Being able to see everything gives me renewed excitement. There were a couple of surprises - like the tapdance someone had performed and then covered with filler on the targa roll bar. WTF!! Also, the seal trim in the front is a bit worse than I thought. But otherwise, nothing that I didn't suspect.
So after a few well-spent bucks, a huge mess in front of my shop, and an hour with the leafblower - here's what we're looking at...

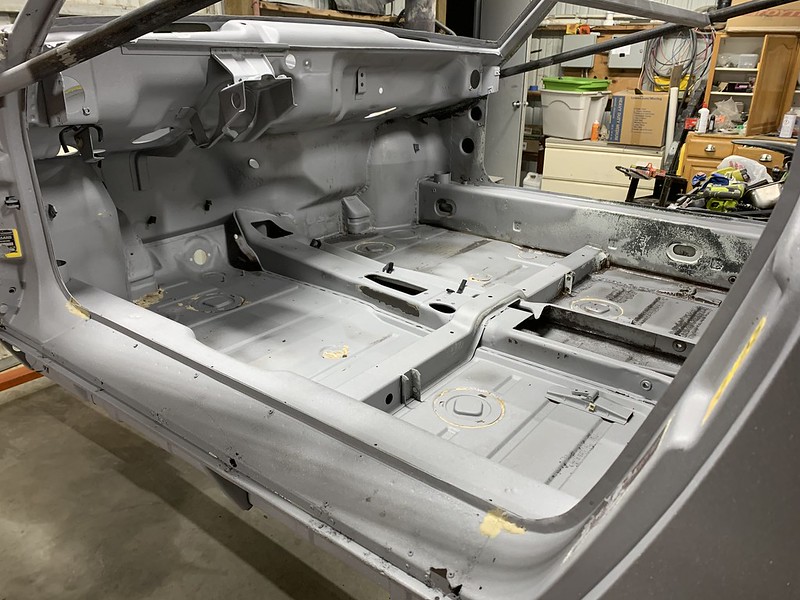
Here's the money shot. This made sandblasting worth every penny:

So after a few well-spent bucks, a huge mess in front of my shop, and an hour with the leafblower - here's what we're looking at...
Here's the money shot. This made sandblasting worth every penny:
One surprise was finding what I assume are trim holes along the sides (plugged with filler). Was there an option for trim pieces down the fenders on 914s? I've never seen a 914 with trim.
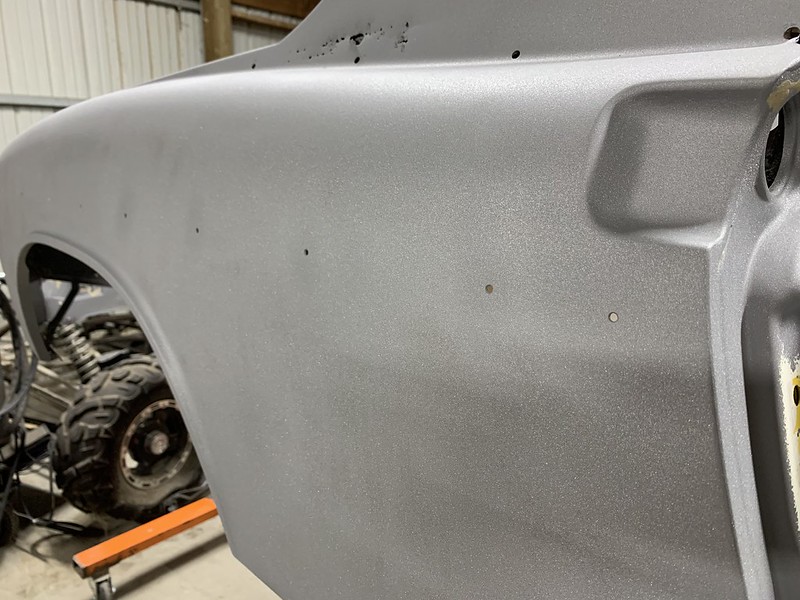
Also, this is a total headscratcher. How the hell does this happen?
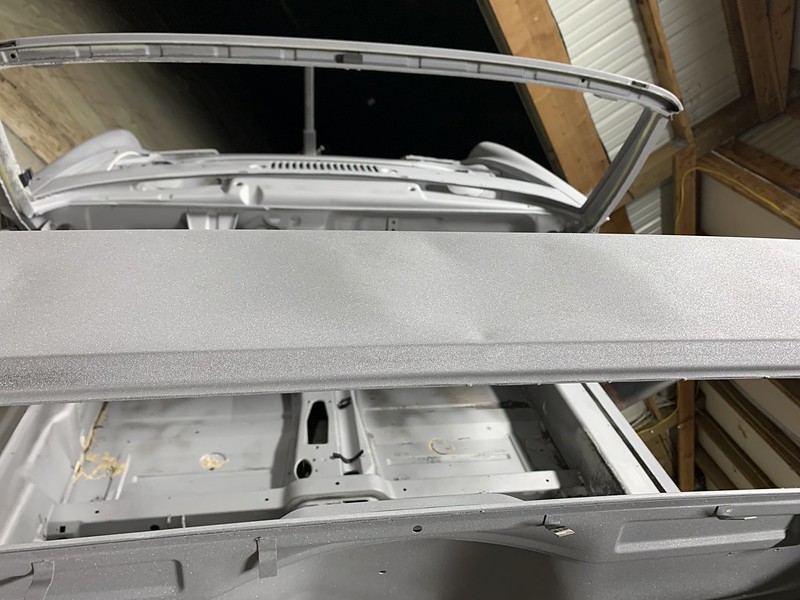
Also, this is a total headscratcher. How the hell does this happen?
The side trim was an aftermarket thing.
Barbaric
Barbaric
Beltine trim was a dealer option. Ruins the lines of the car, but was a popular thing in the 70s.
No idea about the targa bar.
Zach
No idea about the targa bar.
Zach
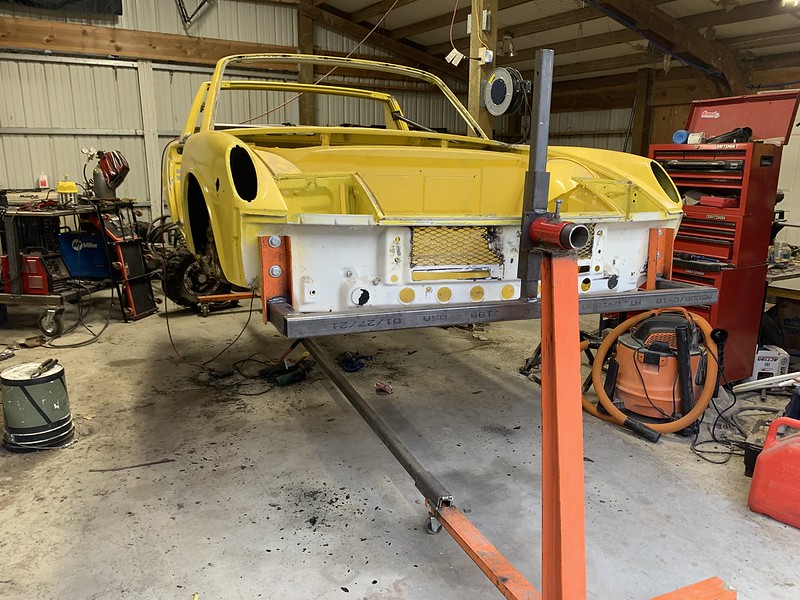
I'm glad to see you back on it. Centering your output flanges with your wheel centers was a good idea. You'll never have the axle separate from a CV since they're now centered. I built my first cradle with that in mind and I've never lost an axle or CV yet. I used Ian's cradle on the 2nd conversion and popped the axle loose from the Subaru (inboard) CV when I punched through a turn. Interestingly enough I spoke with Steve Williams last week (he is in Idaho also) and his popped out of the Subaru CV after punching it in a turn.  I think I'll modify this cradle to center up as well. None of my business but you don't need that (Renegade V8) large cutout in the front. My 70 came with that huge opening and I welded it back up because I felt the area had been compromised structurally. I cut out the 5 centermost factory holes and that is all I need to cool the Suby 6's. I can't speak to the 4 cylinder turbos and maybe you need a larger inlet with those. Looking forward to seeing your 914 at one of the upcoming events.
I think I'll modify this cradle to center up as well. None of my business but you don't need that (Renegade V8) large cutout in the front. My 70 came with that huge opening and I welded it back up because I felt the area had been compromised structurally. I cut out the 5 centermost factory holes and that is all I need to cool the Suby 6's. I can't speak to the 4 cylinder turbos and maybe you need a larger inlet with those. Looking forward to seeing your 914 at one of the upcoming events.
QUOTE(pploco @ Jan 19 2022, 12:48 PM)
One surprise was finding what I assume are trim holes along the sides (plugged with filler). Was there an option for trim pieces down the fenders on 914s? I've never seen a 914 with trim.
Also, this is a total headscratcher. How the hell does this happen?
The roll bar damage is caused by a careless drop of the roof when installing or
someone standing on the flat surface.
I'm surprised it's not seen more often.
The roof can be a struggle for a small person.
FWIW, my Targa bar had all kinds of dings & dents in it. One rather large on the driver's side. Mine had never been filled until I took the effort to do it. All the dark areas are lower/dents... 
Click to view attachment
Click to view attachment
When I worked at the Porsche shop, we had a Ferrari Testarossa with dents in the roof and all over the body. Guy said his kids used to drop things on the car in the garage.
how much did they charge you for the sand blasting if you dont mind me asking?
QUOTE(tazz9924 @ Jan 20 2022, 03:20 PM)
how much did they charge you for the sand blasting if you dont mind me asking?
It was $450 total - took him about 3 hours to do.
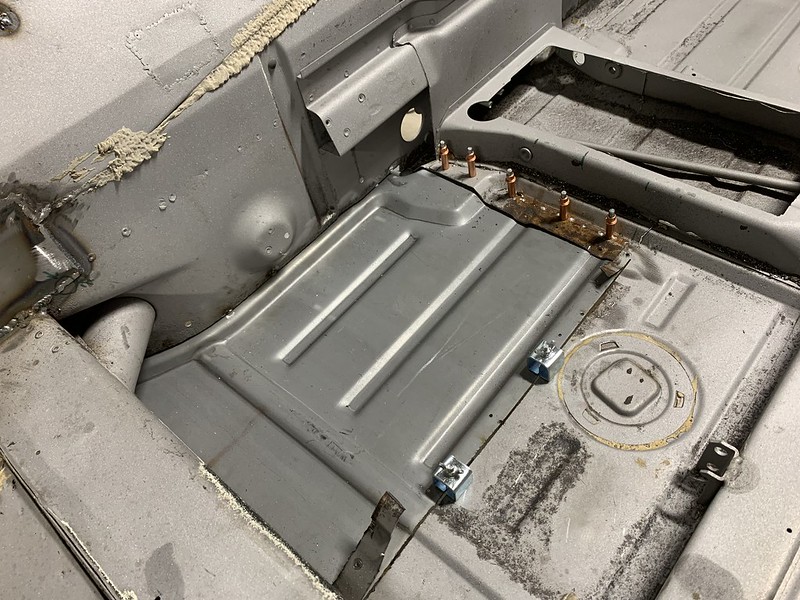
I've been picking away at the rust repair. This is definitely a "slow and steady wins the race" type of effort. It's been super cold in Boise, so I'm not able to do any priming as I go. With that in mind, I've been working on the areas that are open so I can prime once things warm up. Feels like a bit of a puzzle.
The passenger floor plan was swiss cheese.
The seat hinge mount looked to be in good shape. I'll clean it up and reuse it.
The floor pan has lots of spot welds. After drilling out about 10 of them, I realized that I didn't need to save the old pan section. Out came the grinder.
now I have to fix a small section on the drivers side just under the inner firewall, and fix a couple small sections of the outer firewall. Overall the metal under the tunnel is good, there are a couple of small pinhole areas that I think I can fill. I'm debating if I should open the tunnel up. I really want to clean things up and pull the old tubing out.
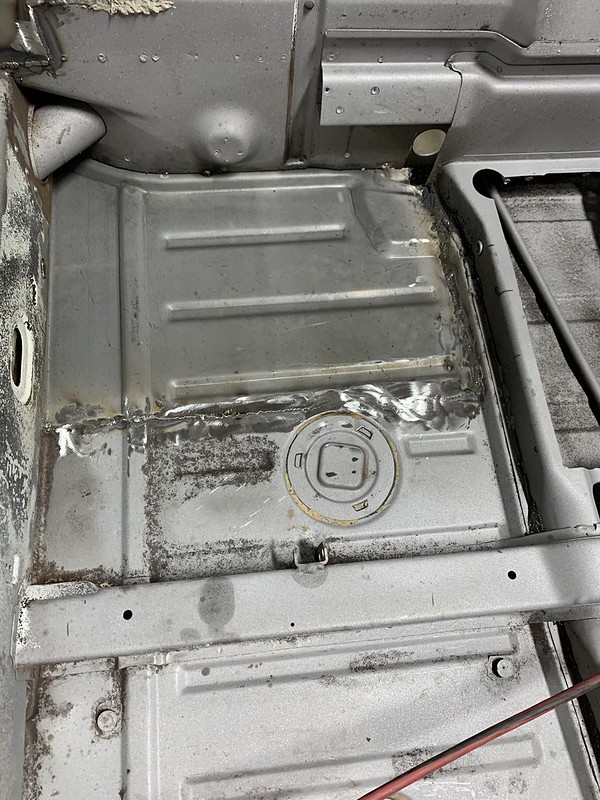
I cut the old section out leaving about 2 inches overlap. I lined up the new section and used clecos to hold it in place. I then cut through both layers. As I went, I'd pull the cleco, peel back the old metal, and add a butt clamp. Once it was flush, I tacked it in place.
Still need to do a bit more clean up, but it turned out pretty nice. Keeping the heat down with a copper backing and small stitch welds was definitely the way to go.
The passenger floor plan was swiss cheese.
The seat hinge mount looked to be in good shape. I'll clean it up and reuse it.
The floor pan has lots of spot welds. After drilling out about 10 of them, I realized that I didn't need to save the old pan section. Out came the grinder.
now I have to fix a small section on the drivers side just under the inner firewall, and fix a couple small sections of the outer firewall. Overall the metal under the tunnel is good, there are a couple of small pinhole areas that I think I can fill. I'm debating if I should open the tunnel up. I really want to clean things up and pull the old tubing out.
I cut the old section out leaving about 2 inches overlap. I lined up the new section and used clecos to hold it in place. I then cut through both layers. As I went, I'd pull the cleco, peel back the old metal, and add a butt clamp. Once it was flush, I tacked it in place.
Still need to do a bit more clean up, but it turned out pretty nice. Keeping the heat down with a copper backing and small stitch welds was definitely the way to go.
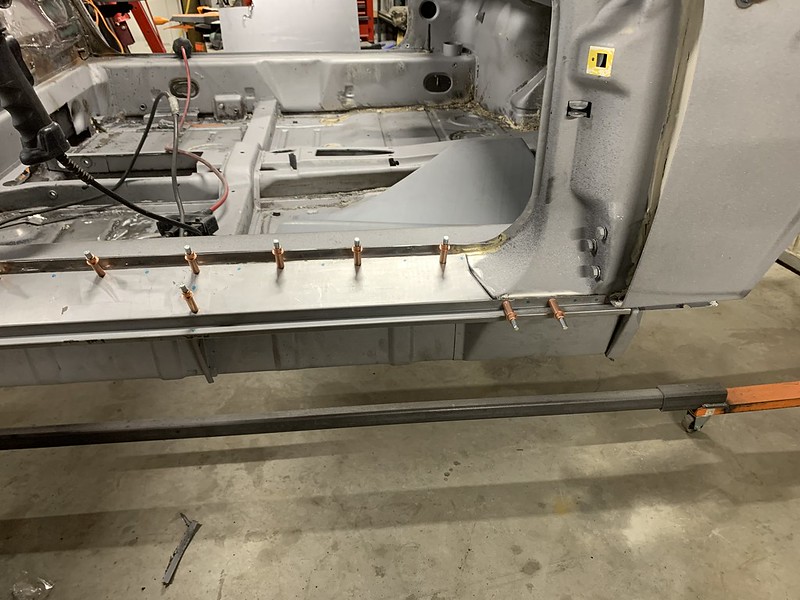
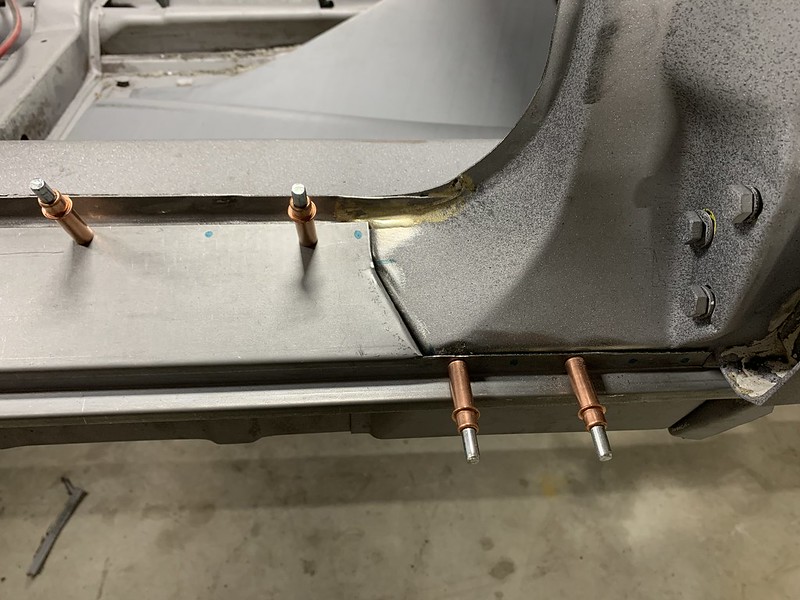
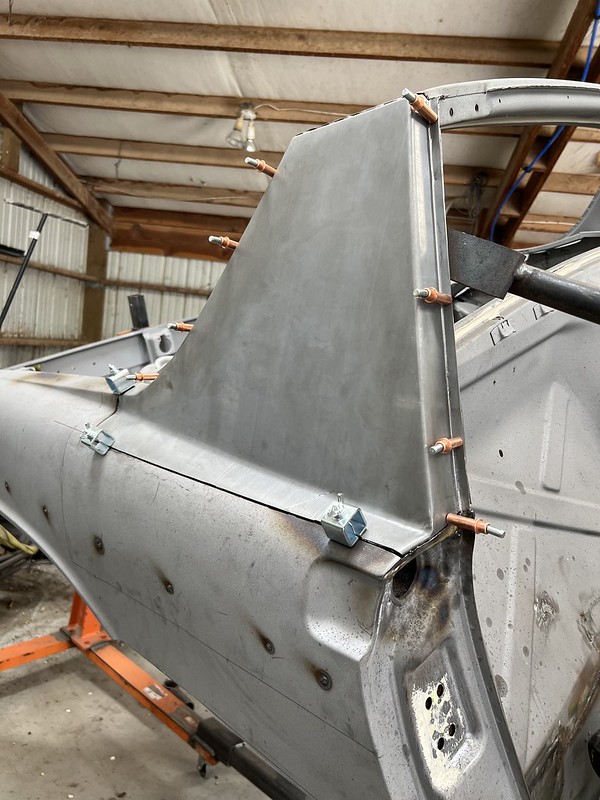
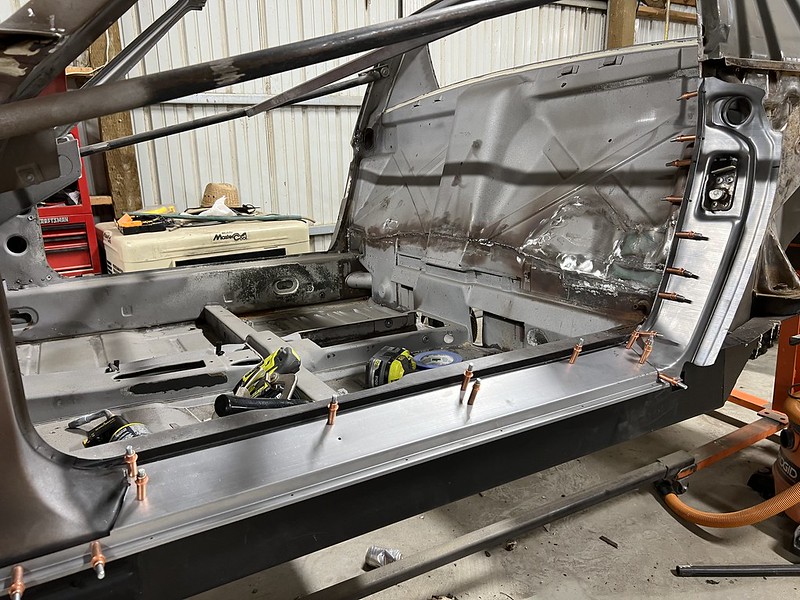
I've been making steady progress on the rust repair. I finished up all the outer firewall patches, and decided to replace the passenger door sill. I debated on it, because it wasn't terrible, just pitted in several spots where the rockers attach. I decided to just pull it - I'm glad I did. Besides shaping the front, it wasn't bad and I was able to clean up the rust underneath. It's still too cold to shoot primer, so I've got it mocked in with Clecos for now; I'll pull it all apart to spray once things get a bit warmer.
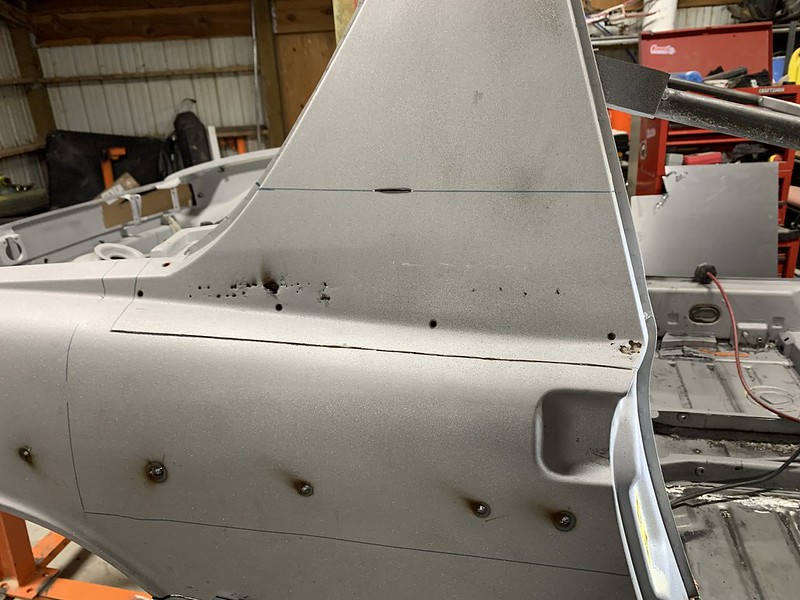
I decided to tackle the passenger sail. Partly so I could open up the top of the quarter panel and dig out the seam sealer. What a mess. Fritz got slap happy with the seam sealer gun - I had to dig a brick of that shit out of the space between the door jamb and the sail panel.
I'm sure there was a good reason for it, but why would a big chunk of sealer be sprayed up inside the panel. Is it for sound deadening, or to keep rigidity? Either way the stuff sucks!
I'm pretty conservative when I do cuts like these, but it looks like I'm going to have to pull the sail panel all the way to the top of the targa bar to clean up all the rust.
I'm definitely tainted now when it comes to rust in these cars. Whenever I see an ad for a 914 that says "little to no rust" I vomit a little in my mouth.
I've been making progress on the rust repair. My schedule only allows me a few hours here and there; but this project began as a mental oasis for me. I've settled into a place where I find a few hours to steal away into the shop, put on some tunes, and decompress. Its been a therapeutic project, but slow.
I've got the passenger sail panel ready to be primed and welded, I've cleaned all the tar, seam sealer, and foam from inside the passenger rear quarter. That was a junk-punch journey for sure.
The best method I settled on was to have a putty knife in one hand, torch in the other, and a long flat screwdriver in my back pocket. Having the car on a rotisserie helps a ton - I have no idea how peeps clean all that shit out lying on their backs or up on a lift. Being able to stand and move the car around makes it much much easier. Also, if helpful, I'll pass along a few lessons I've learned.
1. Seam sealer comes off much easier when its molten - keep a fire extinguisher handy
2. Farm words help while digging the foam out of the rear fender well corners
3. Flaming seam sealer globs burn like hell if they fall in between your shoe and ankle
I digress....

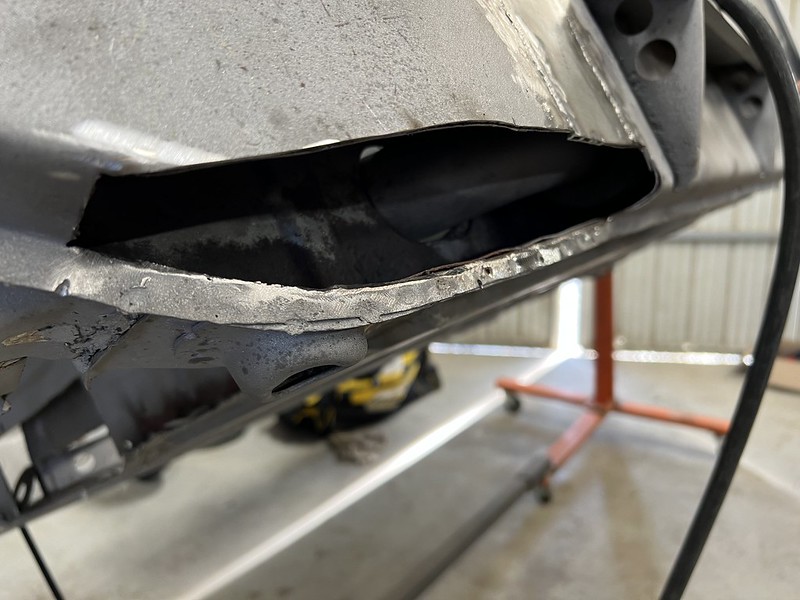
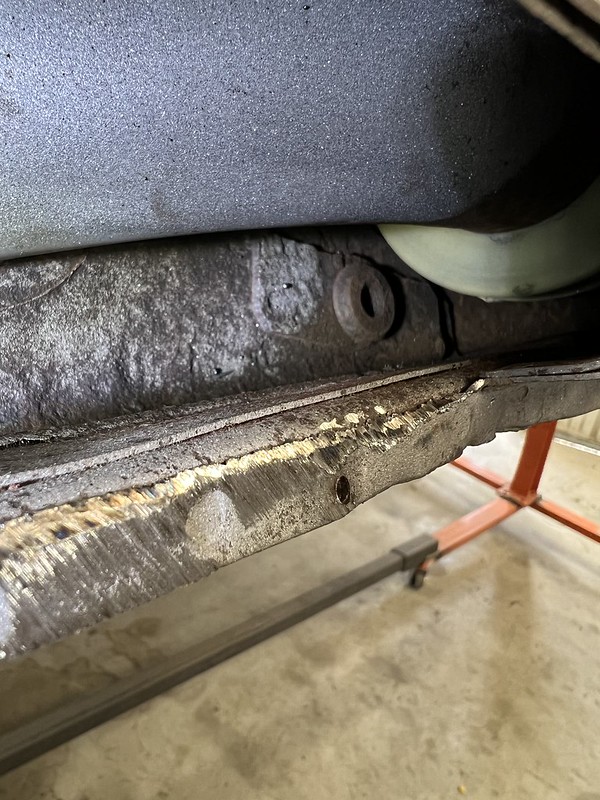
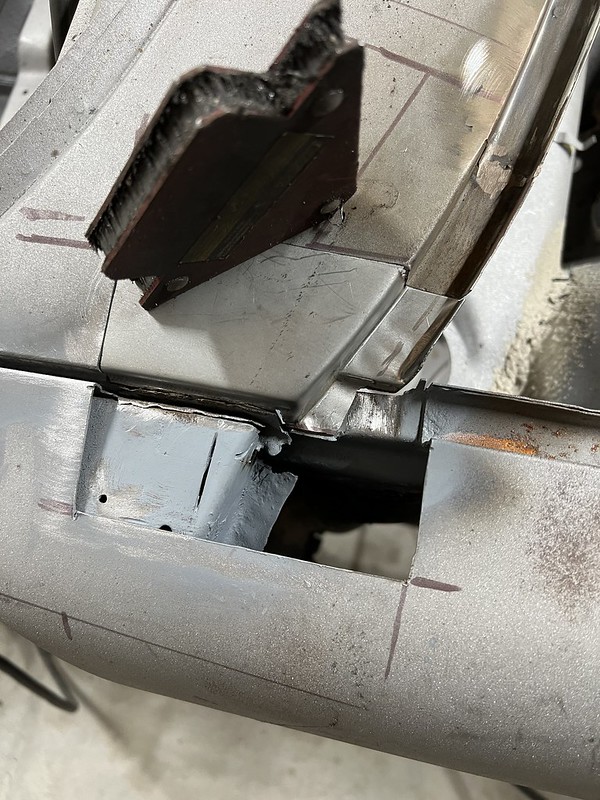
I've been dreading the small long repair. Once I cut all the rust back to solid metal I was left with a hole that was on multiple angles. I decided to sack up and finish it. I have a long stiffener kit from Brad, so the repair doesn't need to look pretty, but I want it to be done right. The inside of the long looks pretty good. Before I weld everything up, I'll treat it and coat it with either POR or or a thick coat of epoxy primer.

I've got the passenger sail panel ready to be primed and welded, I've cleaned all the tar, seam sealer, and foam from inside the passenger rear quarter. That was a junk-punch journey for sure.
The best method I settled on was to have a putty knife in one hand, torch in the other, and a long flat screwdriver in my back pocket. Having the car on a rotisserie helps a ton - I have no idea how peeps clean all that shit out lying on their backs or up on a lift. Being able to stand and move the car around makes it much much easier. Also, if helpful, I'll pass along a few lessons I've learned.
1. Seam sealer comes off much easier when its molten - keep a fire extinguisher handy
2. Farm words help while digging the foam out of the rear fender well corners
3. Flaming seam sealer globs burn like hell if they fall in between your shoe and ankle
I digress....
I've been dreading the small long repair. Once I cut all the rust back to solid metal I was left with a hole that was on multiple angles. I decided to sack up and finish it. I have a long stiffener kit from Brad, so the repair doesn't need to look pretty, but I want it to be done right. The inside of the long looks pretty good. Before I weld everything up, I'll treat it and coat it with either POR or or a thick coat of epoxy primer.
QUOTE(pploco @ May 20 2022, 08:55 AM)
I've been making progress on the rust repair. My schedule only allows me a few hours here and there; but this project began as a mental oasis for me. I've settled into a place where I find a few hours to steal away into the shop, put on some tunes, and decompress. Its been a therapeutic project, but slow.
I've got the passenger sail panel ready to be primed and welded, I've cleaned all the tar, seam sealer, and foam from inside the passenger rear quarter. That was a junk-punch journey for sure.
The best method I settled on was to have a putty knife in one hand, torch in the other, and a long flat screwdriver in my back pocket. Having the car on a rotisserie helps a ton - I have no idea how peeps clean all that shit out lying on their backs or up on a lift. Being able to stand and move the car around makes it much much easier. Also, if helpful, I'll pass along a few lessons I've learned.
1. Seam sealer comes off much easier when its molten - keep a fire extinguisher handy
2. Farm words help while digging the foam out of the rear fender well corners
3. Flaming seam sealer globs burn like hell if they fall in between your shoe and ankle
I digress....
I've been dreading the small long repair. Once I cut all the rust back to solid metal I was left with a hole that was on multiple angles. I decided to sack up and finish it. I have a long stiffener kit from Brad, so the repair doesn't need to look pretty, but I want it to be done right. The inside of the long looks pretty good. Before I weld everything up, I'll treat it and coat it with either POR or or a thick coat of epoxy primer.
OMG, I feel your pain. I know exactly what your describing as I've been through the same repairs except I needed only to replace a small strip on each sail panel. Imagine removing all of that sealer and foam on a lift with only a 2"x~15" opening on the sail panel. I'm pretty sure I invented a few new words. Have you had the pleasure of removing the sealer between the qtr panel the tail lamp openings?
 I too used a torch, putty knife, long screwdrivers, etc. I found that removing the handle on a plumbers copper fitting brush and chucking it into a drill will work well in crevices. When it stops cutting reverse and do it some more. Also, a body saw (miniature sawzall) works in tight spots to remove sealant. What gauge metal did you use for the long repair. I'm pretty sure OEM was 19ga on the outer layer but I used 14ga since I wouldn't be able to weld an 18ga piece to the inner support piece. Your work looks good. Stick with it.
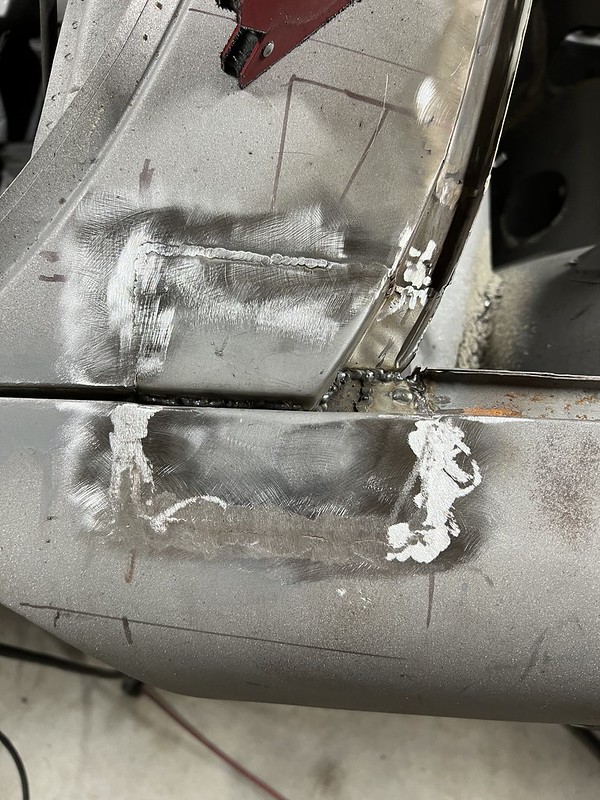
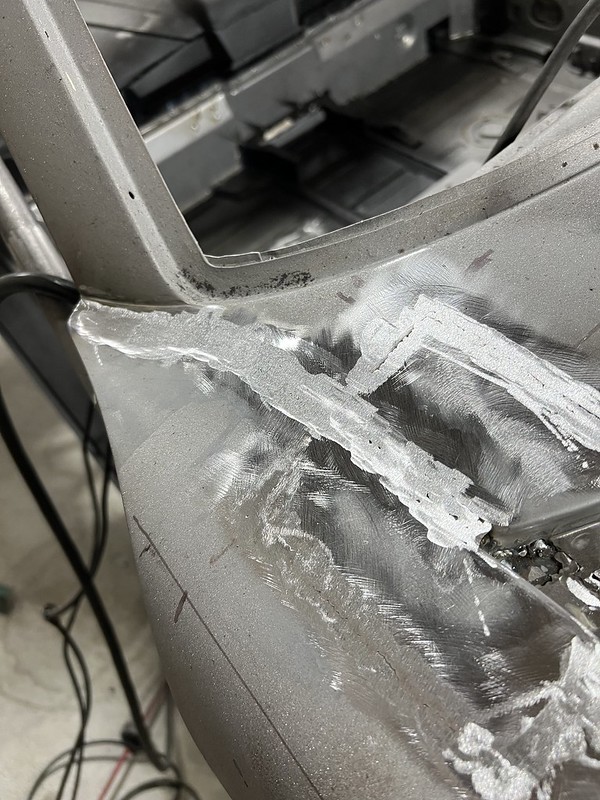
I had a few hours to work on the 914 this weekend. I prepped and treated the interior of the long and the sail panel with ZR. I attached a brush to a long stick and got as far up into the rear of the long as I could and did the same forward. Then let it cure for 24 hours.
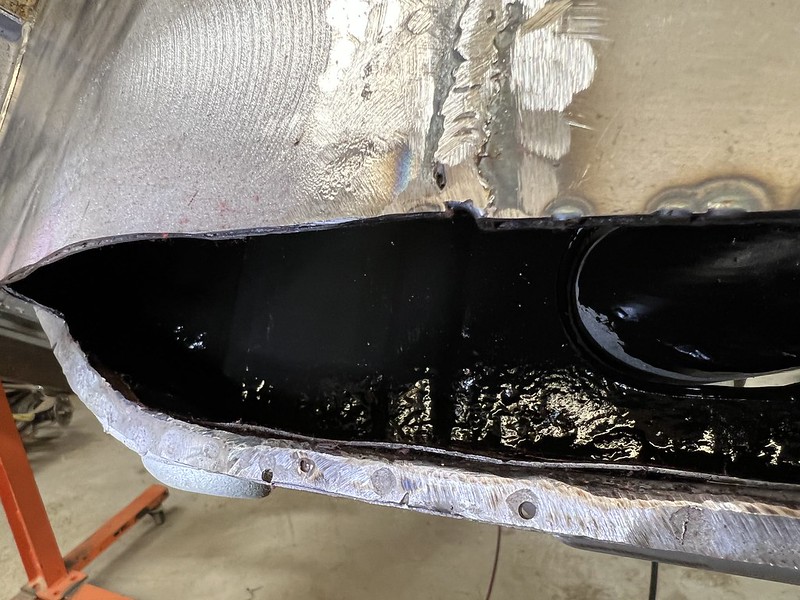
I also hit the spots I knew would be tough or impossible to reach once the sail panel was welded on. My plan is to use ZR in spots that I won't be able to get to with epoxy primer.
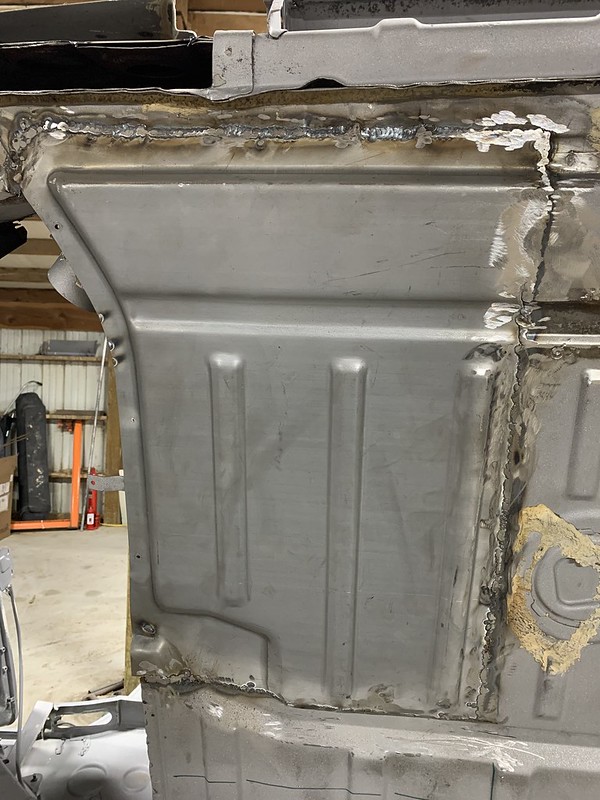
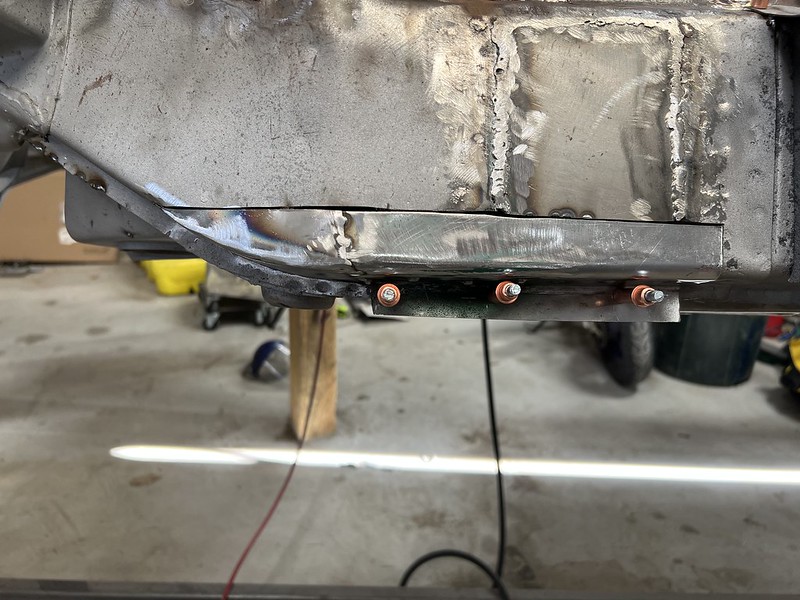
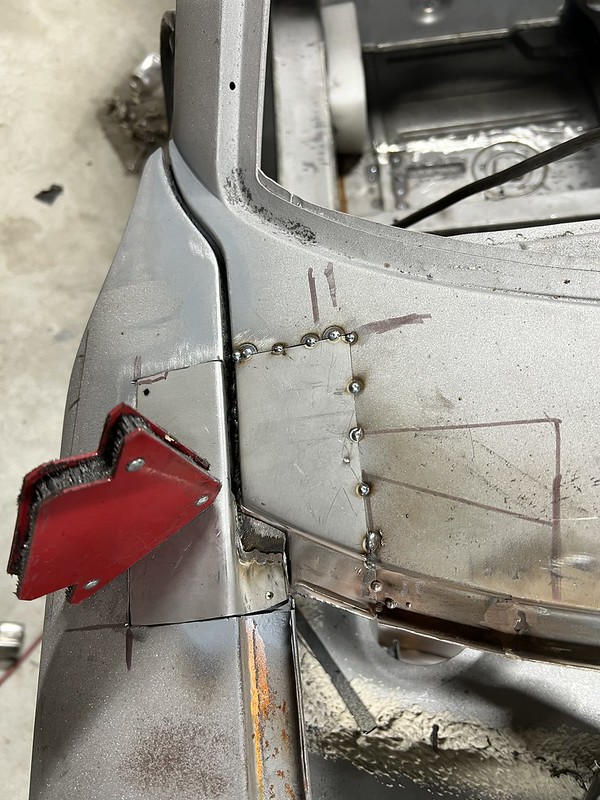
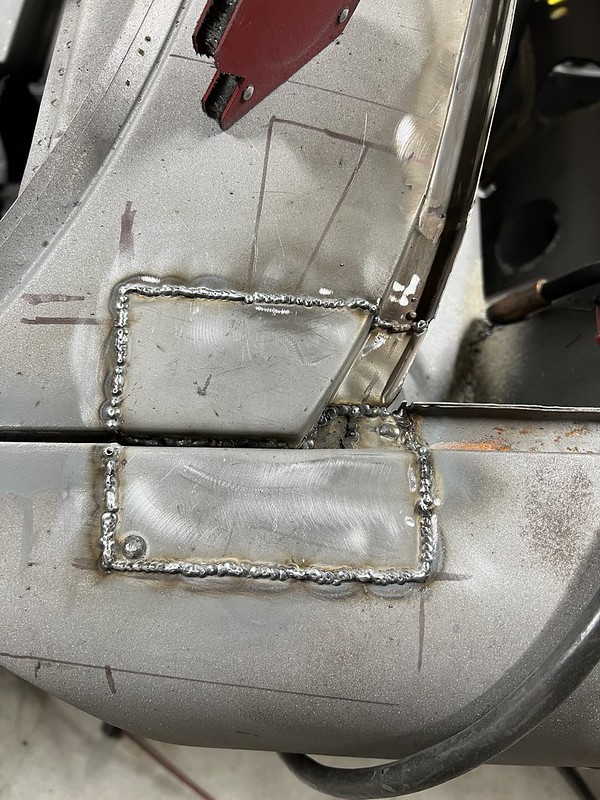
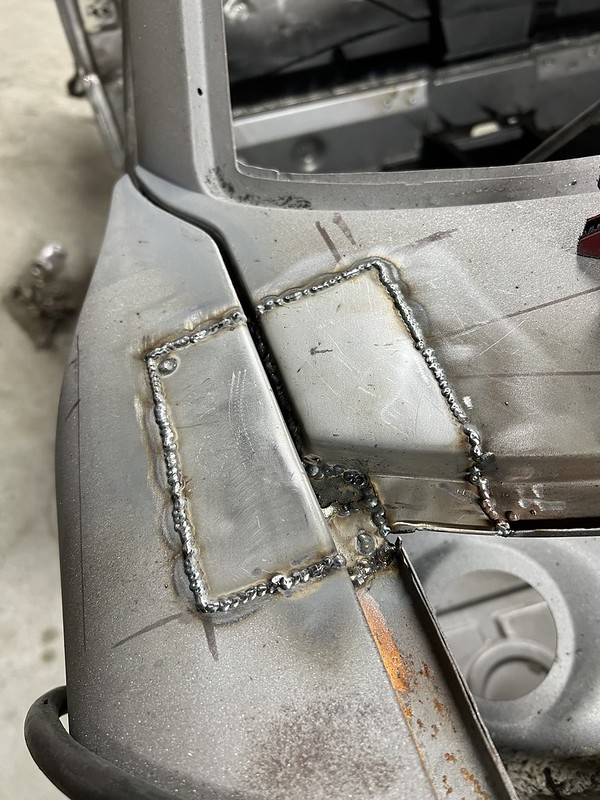
I made my patch for the lower rear long with two pieces of 16gauge to match the thickness and structure of the existing metal. This has added a few challenges in welding and fabbing the patches, but makes things much easier once the panel is fitted in matching thickness. I still have some cleanup to do, but it turned out better than I hoped.
The PO had done some serious hammering to the long - no idea what he was thinking. The top of the long towards the fender was smashed down in the corner. When I repaired the hell hold, I wrapped the top with a piece of 14 gauge and bent it around to reshape it. Its kinda ugly, but the long stiffener kit and fender should cover most of the dents.
Once cleaned up, I test fitted the long siffener kit rear piece and it fit perfectly. I was pretty happy until I stripped one of the bolts in the suspension mount taking the piece off. I think I can just run a chase through it, but makes me kinda mad.
Finally, I welded and cleaned up some of the sail panel replacement.
I still have a few spot welds and some cleanup and pinholes to fix, but I ran out of welding gas so I called it a night. Getting this phase completed felt like a milestone.
I also hit the spots I knew would be tough or impossible to reach once the sail panel was welded on. My plan is to use ZR in spots that I won't be able to get to with epoxy primer.
I made my patch for the lower rear long with two pieces of 16gauge to match the thickness and structure of the existing metal. This has added a few challenges in welding and fabbing the patches, but makes things much easier once the panel is fitted in matching thickness. I still have some cleanup to do, but it turned out better than I hoped.
The PO had done some serious hammering to the long - no idea what he was thinking. The top of the long towards the fender was smashed down in the corner. When I repaired the hell hold, I wrapped the top with a piece of 14 gauge and bent it around to reshape it. Its kinda ugly, but the long stiffener kit and fender should cover most of the dents.
Once cleaned up, I test fitted the long siffener kit rear piece and it fit perfectly. I was pretty happy until I stripped one of the bolts in the suspension mount taking the piece off.
I think I can just run a chase through it, but makes me kinda mad. Finally, I welded and cleaned up some of the sail panel replacement.
I still have a few spot welds and some cleanup and pinholes to fix, but I ran out of welding gas so I called it a night. Getting this phase completed felt like a milestone.
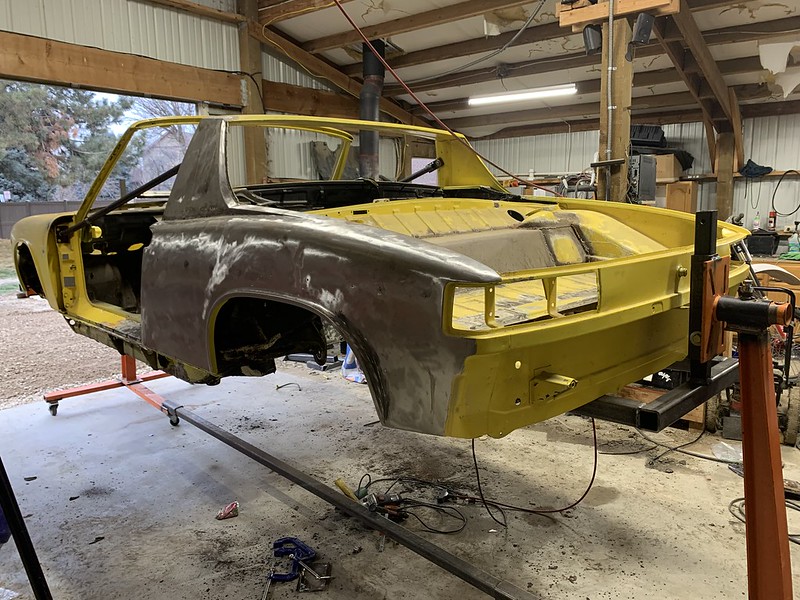
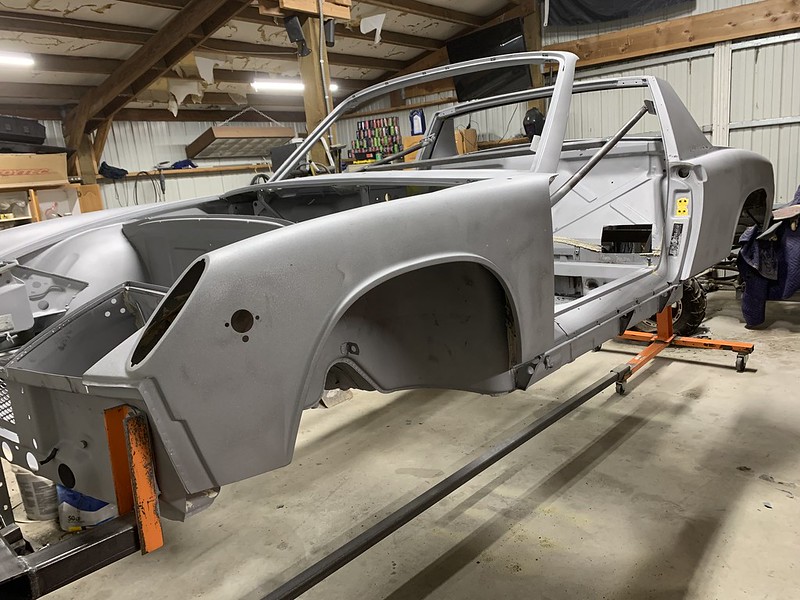
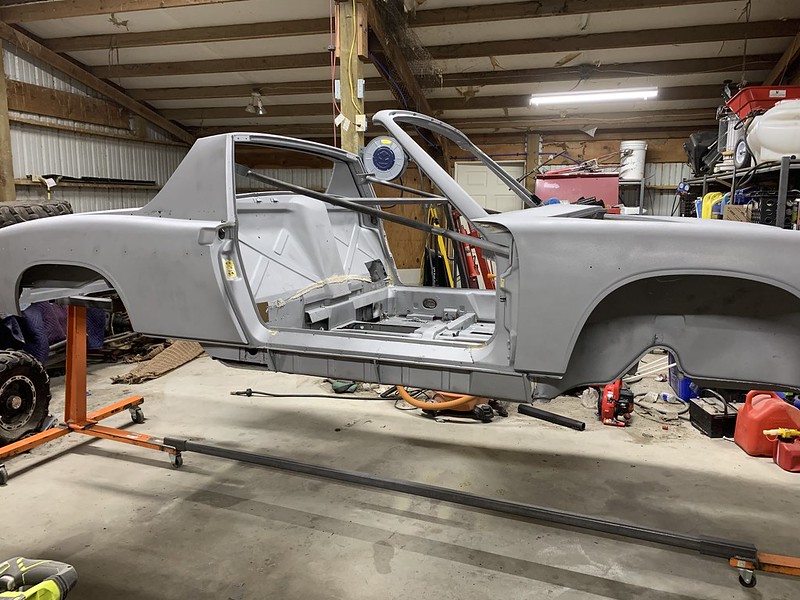
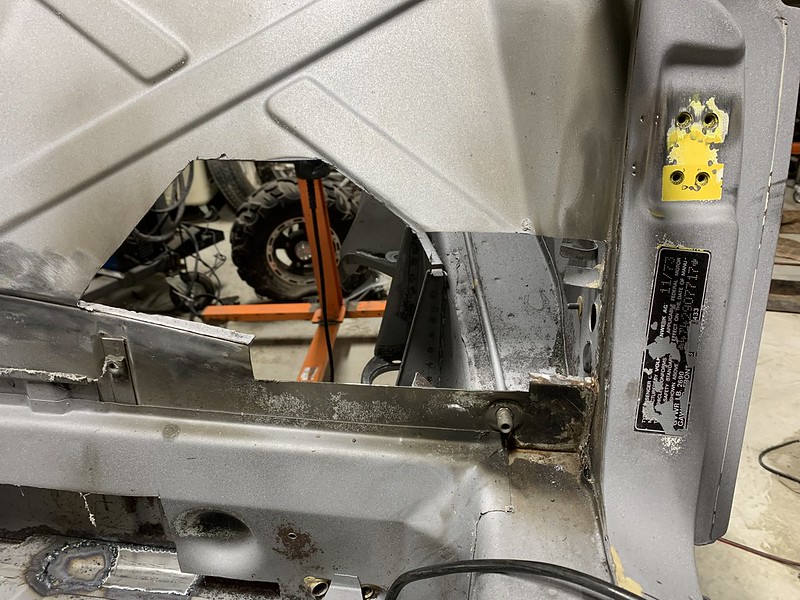
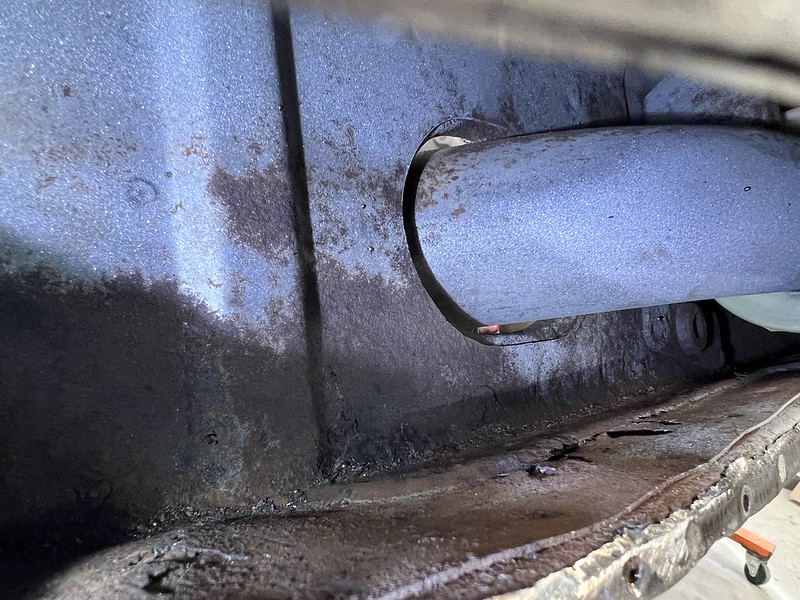
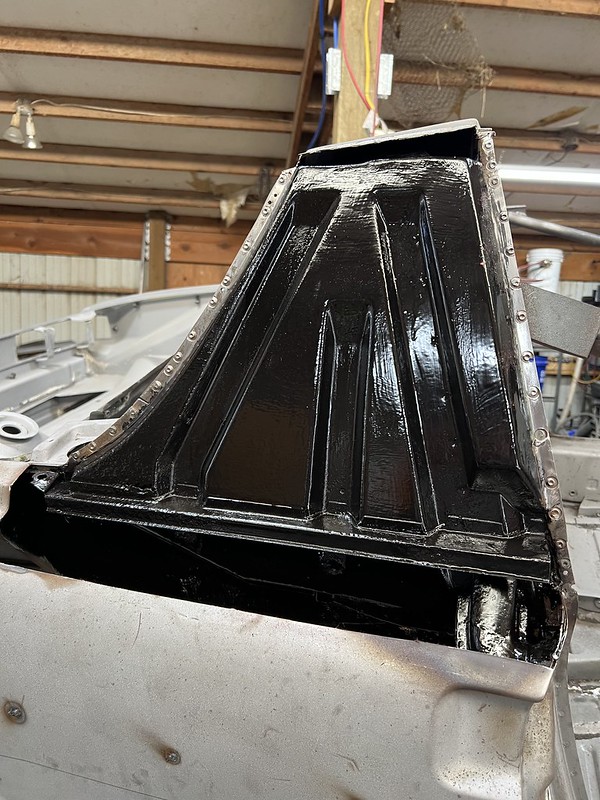
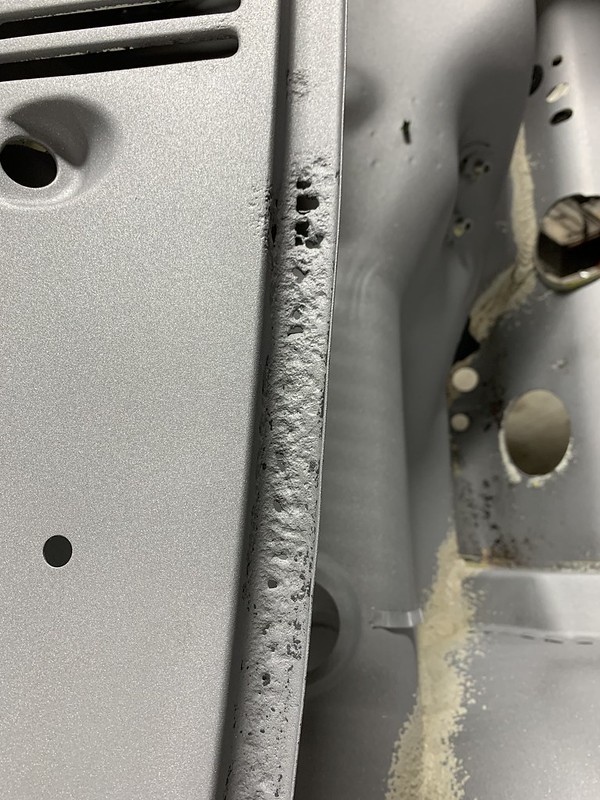
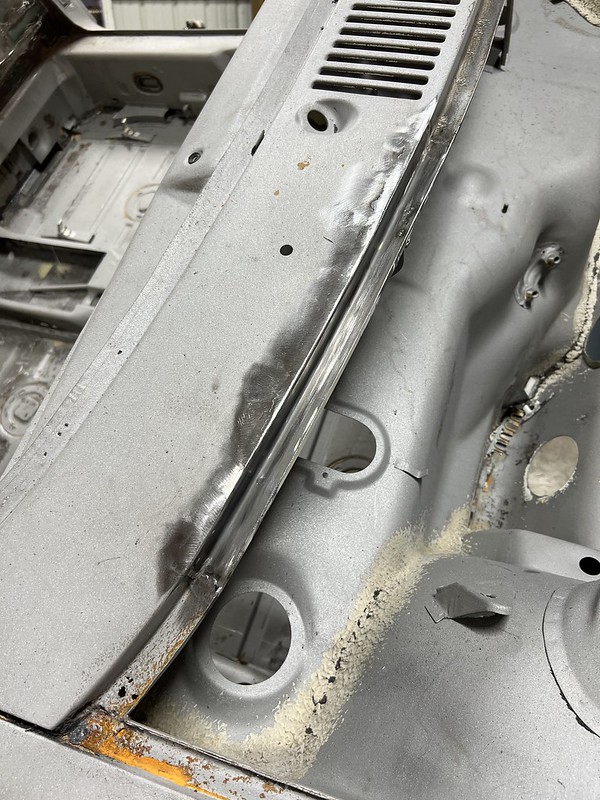
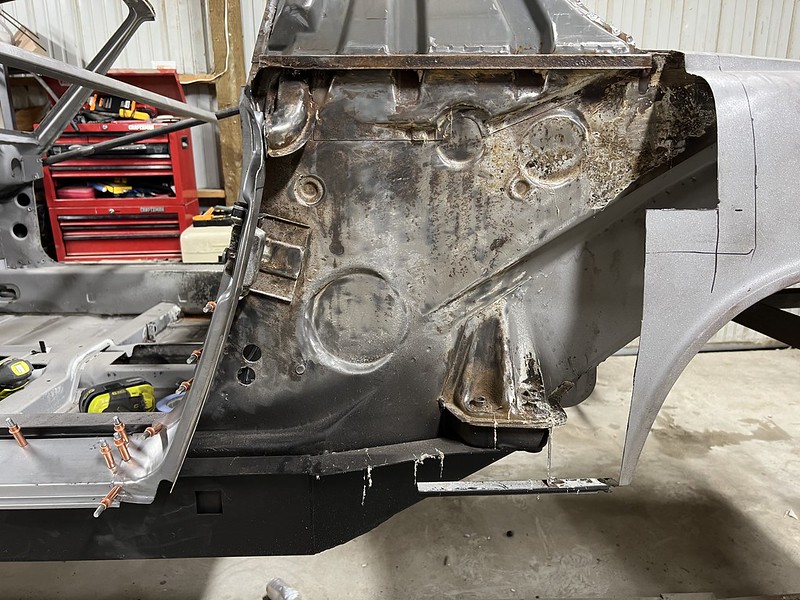
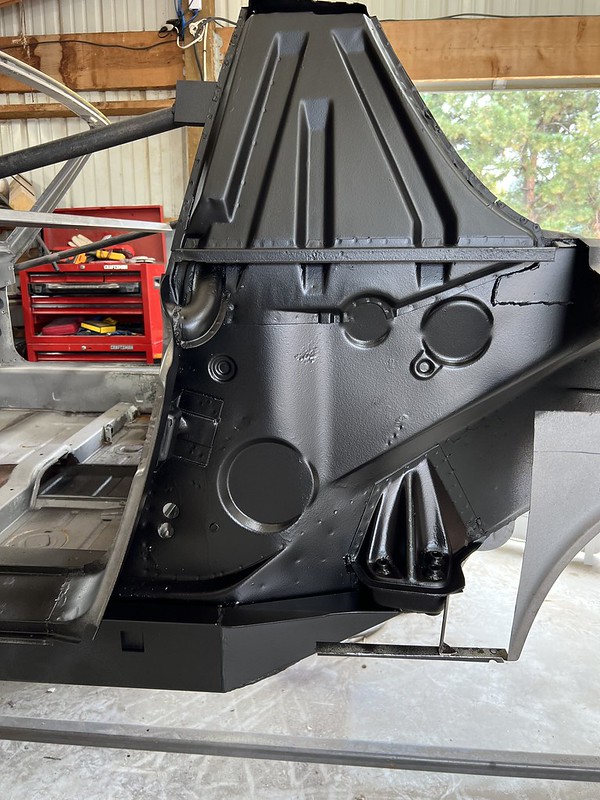
Update progress. I'm still in the fight and still working on the rust spots. I ran out of easy options so I began to tackle the tough spots. Thanks to the donor parts I pulled from the Renegade Hybrid parts car I fixed the frunk cowl. I don't know why I put it off for so long, it was actually pretty easy.
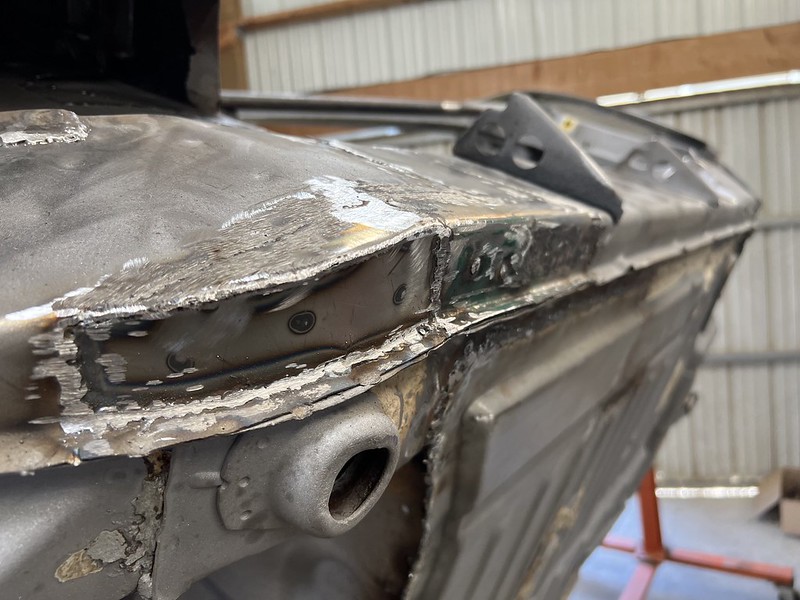
I also dug into the drivers door jam, rocker, sail panel, and rear quarter. The sail panel rust band extended into the door jam. I could have probably just cut the lower part of the sail panel, but once I opened it up I'm glad I had the space to clean and treat behind the panel and the fender.
I also dug into the drivers door jam, rocker, sail panel, and rear quarter. The sail panel rust band extended into the door jam. I could have probably just cut the lower part of the sail panel, but once I opened it up I'm glad I had the space to clean and treat behind the panel and the fender.
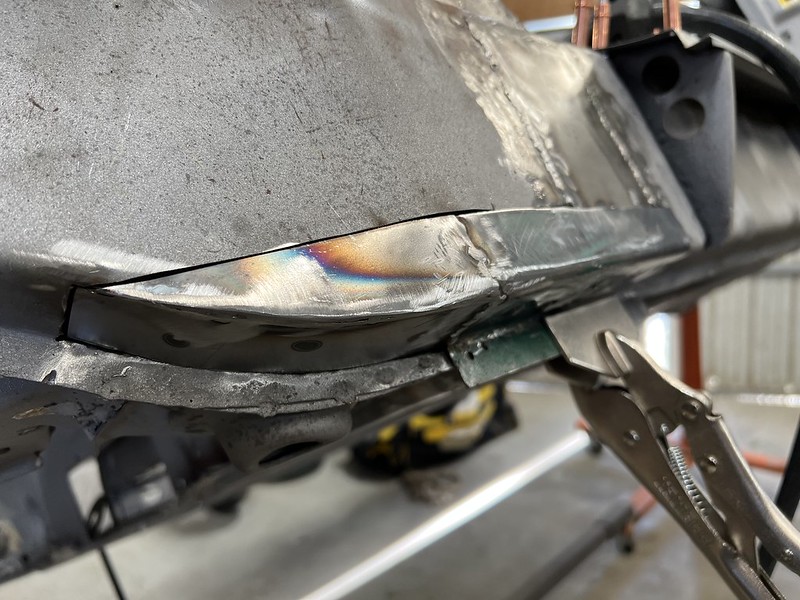
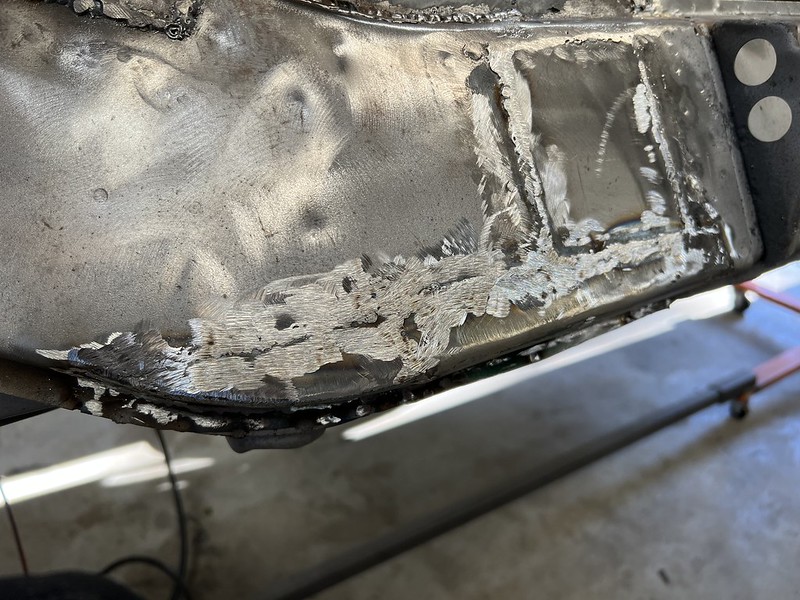
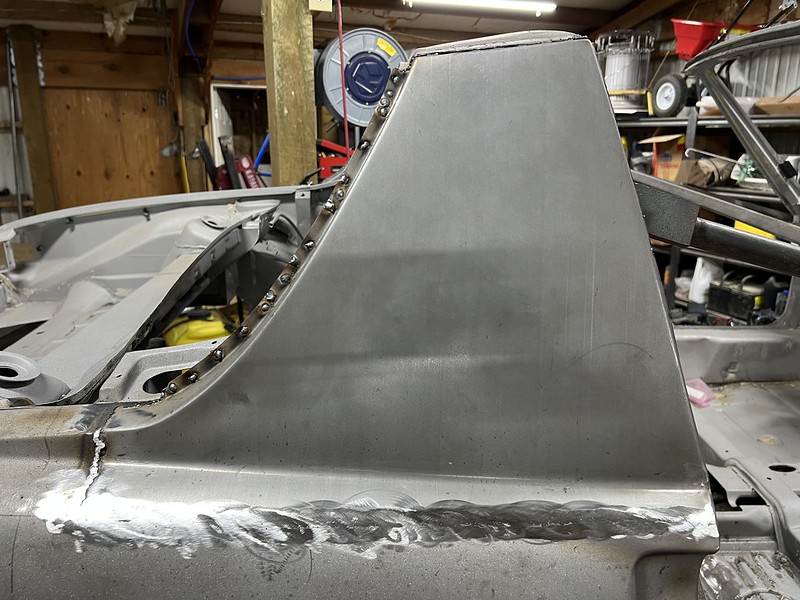
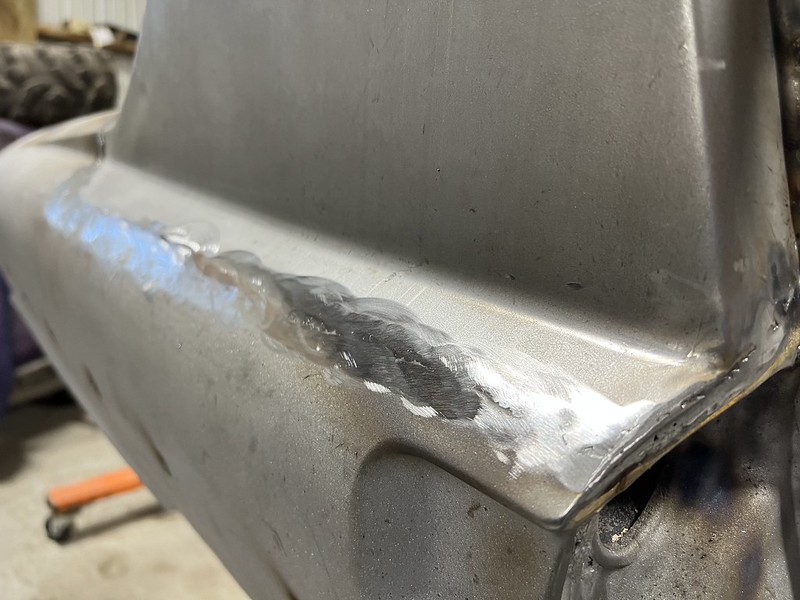
I thought I'd post a few pictures of the front passenger fender/cowl repair. Warning: seam welding happened as a final step :-)

I have a few pin holes to fix and some cleanup, but I'm glad with how it turned out. It feels good to have most of the major rust repair metal work done.
I have a few pin holes to fix and some cleanup, but I'm glad with how it turned out. It feels good to have most of the major rust repair metal work done.
Wow, amazing work!
This is a "lo-fi" version of our main content. To view the full version with more information, formatting and images, please click here.