Full Version: Ugly Duckling to a Blue Bird
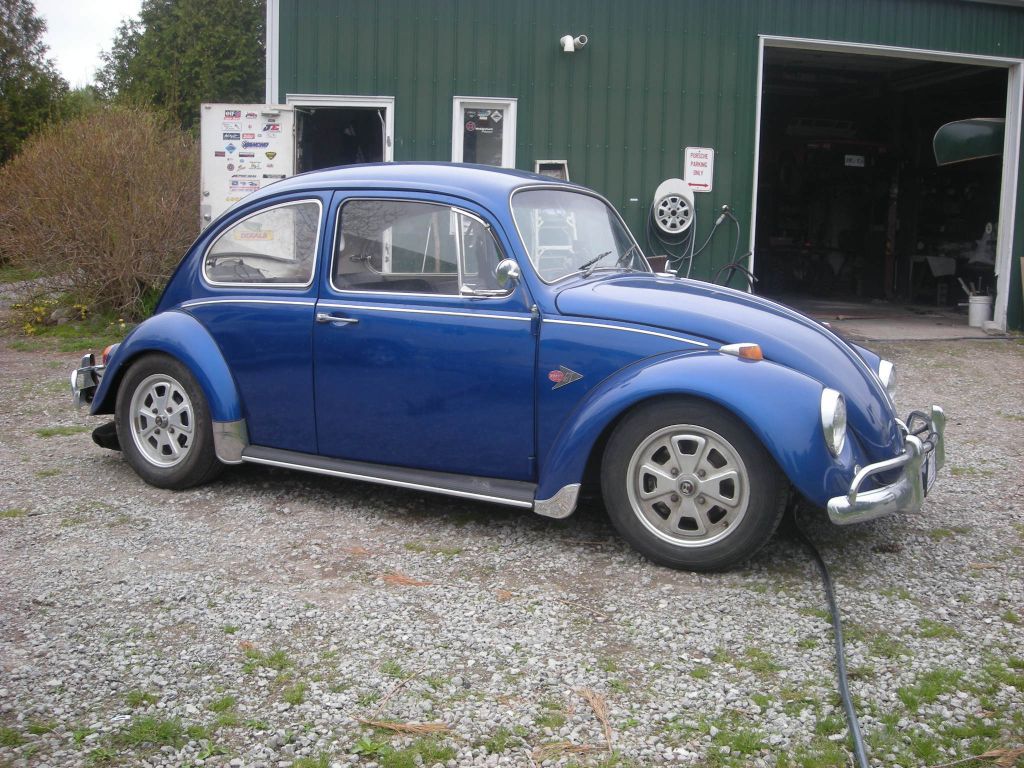
gorgeous blue!
Electric! 
Great color choice. Way to keep it in the family!
Thanks for the comments...couple more assembly updates.
I thought about color early on so when doing body work I decided to go with the sail trim. I thought the black vinyl with a touch of chrome would look good against the blue.
Also new rubber and seals from 914rubber; I have to say that is good stuff. I had no fitment or troubles installing any of the rubber. Window frame alignment took a bit but once dialed in everything looks great.
Click to view attachment
Click to view attachment
Click to view attachment
What am I missing in posting images so the preview is in the correct orientation?
They are correct if one clicks on the image but the preview is wrong. I've also opened in another program and tried saving in a different orientation to no avail.
I don't thing html coding works within the post either.
Sometimes it just makes sense to take a picture in portrait mode rather than landscape.
Impulse buy many many months ago...I thought the GT manual head lamps were cool so now it was time to figure out the install. Pretty straight forward in actuality.
Click to view attachment
One thing I remember on a really good thread somewhere and I thought to copy in my own way was to use the existing hood pull as the lamp release. I kept it fairly low brow and drilled through a bolt and then simply soldered the end of the line. Works...and now I can use the key and lock the headlights.
Click to view attachment
Click to view attachment
Click to view attachment
Click to view attachment
One thing I remember on a really good thread somewhere and I thought to copy in my own way was to use the existing hood pull as the lamp release. I kept it fairly low brow and drilled through a bolt and then simply soldered the end of the line. Works...and now I can use the key and lock the headlights.
Click to view attachment
Click to view attachment
Click to view attachment
Love the colour! 
Looks a similar blue to my '67 bug.
Looks a similar blue to my '67 bug.
Your car is looking great. Love the color staying true to the family. Keep up the great work and we love the pictures. 
Really liking the manual headlights!
Was going to say welcome to 914world, but it looks like you'll be done here shortly!
QUOTE(mbseto @ Jan 27 2020, 01:52 PM) 
Was going to say welcome to 914world, but it looks like you'll be done here shortly!
Haa, well not that easy...this is all the big stuff and looks the most impressive. I started a list of all the little items I still need, especially for the conversion portion that I've never done and it's a little daunting.
I figure a month or two and I'll be done the 'easy' stuff (it's all relative) then I'll be asking the real questions.
It's looking great!
Sway bar I invite you to join the FB Porsche 914 Canada group. Quite a few BC and Alberta members.
https://www.facebook.com/groups/29383151434.../?ref=bookmarks
https://www.facebook.com/groups/29383151434.../?ref=bookmarks
QUOTE(Mark Henry @ Jan 28 2020, 01:12 PM)
Sway bar I invite you to join the FB Porsche 914 Canada group. Quite a few BC and Alberta members.
https://www.facebook.com/groups/29383151434.../?ref=bookmarks
Thanks for the invite...maybe finally a reason to join FB?

Started some of the interior fit and finish. Dash was next up. Decided to keep the basket weave but wanted a radio delete so used a good portion from the existing door cards to refinish the front; new vinyl on top.
Click to view attachment
Click to view attachment
I had a friend give me what I believe is a 914-6 fuel tank gauge and I thought that would look good in the GT racing position. Not quite sure if I am happy with just the simple direct on the dash install. I may have to experiment with it partially behind the weave with only the gauge stock sticking through.
Click to view attachment
Click to view attachment
Click to view attachment
Click to view attachment
I had a friend give me what I believe is a 914-6 fuel tank gauge and I thought that would look good in the GT racing position. Not quite sure if I am happy with just the simple direct on the dash install. I may have to experiment with it partially behind the weave with only the gauge stock sticking through.
Click to view attachment
Click to view attachment
Winter came back with a vengeance so kinda cold in the garage to get much done; hit -29C/-20F. Brrrrr.
Could have been worse like the east coast of Canada which got 12-15 foot snow drifts.
Did manage to do a few simple things.
Click to view attachment
Click to view attachment
Buttoned up the oil cooler and installed front lines.
Click to view attachment
Could have been worse like the east coast of Canada which got 12-15 foot snow drifts.
Did manage to do a few simple things.
Click to view attachment
Click to view attachment
Buttoned up the oil cooler and installed front lines.
Click to view attachment
Been a while since I added at least some sort progress pic if any are interested. Life does sometime get in the way of these projects and they do become secondary, especially in these new unique times, but I still managed to get time in here and there.
Still making up things on the fly...decided to go with just the braided oil lines along the rocker for the oil cooler. I gather if eventually I wanted steel lines I could retro fit but this seems to do the trick. One thing this project has done is made my welding and fabrication skill improve. Needed some sort of covers and figure I could make something up. Rather pleased on how they turned out.
Click to view attachment
Click to view attachment
Click to view attachment
I think some sort of fiber glass cover may have been on the real GT's. Didn't really want any weather, rocks, or small critters flying into the inner rockers so this cover turned out pretty good. Eventually when I mix up some paint for touch ups I'll give this a once over.
Click to view attachment
Click to view attachment
Click to view attachment
Click to view attachment
Click to view attachment
Click to view attachment
wow less than 4 mos. and it already looks amazing! Surely by summer and if this crisis is done, that beautiful car will be nice to drive! Congratulations!
Used a couple of mounts to keep the lines in order and so they won't sag too much since they are not rigid lines. Now I just have to sort out what I need to do at the rear end. I probably just end up using a mocal thermostat since i have one on hand.
Click to view attachment
In the mean time this cocoon came and eventually turned into this butterfly (sorry for the cheese)
I knew his reputation proceeded him but Ben's craftsmanship is top notch. Such a great piece to hide away in the fender
Click to view attachment
Click to view attachment
Click to view attachment
In the mean time this cocoon came and eventually turned into this butterfly (sorry for the cheese)
I knew his reputation proceeded him but Ben's craftsmanship is top notch. Such a great piece to hide away in the fender
Click to view attachment
Click to view attachment
Great progress and work.
So, I drilled a big hole in the hood and need to put in the filler. The kits are great but man at my exchange rate it's a lot of cheddar to spend for just a fuel filler. I did my own home built filler and dog bowl ( I actually used a real dog bowl) on my 911 so I figure I could do the same on the teener. It's actually a lot simpler. I made a bolt on flange to bolt through the existing splash guard and then onto the tank. So, just an additional gasket is required in between.
Click to view attachment
Click to view attachment
The filler tube is left over from my last project and happens to be underground conduit that I found at a scrap yard and everything lines up great. I did buy the fuel cap and bung since those are the nice and shinny pieces. The bung needed to be welded on with a slight degree change in order to have the cap line up all properly and centered.
Click to view attachment
Click to view attachment
Welds are no where as nice as Ben's work or many others but does the job and I only found one pin hole once I was done.
Finally, bolted in and the rubber flange again is left over rubber from the previous build and happens to be some side or rear window rubber from a wrecked Ford Explorer. It's large enough to actually cushion and seal against the hood using the existing spill guard and has the right 'pinch seam?' to go around. To some it may be a bit ghetto, but I think it looks the part, does the job, and when the hood is down I think it looks good.
Click to view attachment
Click to view attachment
Click to view attachment
Click to view attachment
The filler tube is left over from my last project and happens to be underground conduit that I found at a scrap yard and everything lines up great. I did buy the fuel cap and bung since those are the nice and shinny pieces. The bung needed to be welded on with a slight degree change in order to have the cap line up all properly and centered.
Click to view attachment
Click to view attachment
Welds are no where as nice as Ben's work or many others but does the job and I only found one pin hole once I was done.
Finally, bolted in and the rubber flange again is left over rubber from the previous build and happens to be some side or rear window rubber from a wrecked Ford Explorer. It's large enough to actually cushion and seal against the hood using the existing spill guard and has the right 'pinch seam?' to go around. To some it may be a bit ghetto, but I think it looks the part, does the job, and when the hood is down I think it looks good.
Click to view attachment
Click to view attachment
Got a few other little items out of the way. Since this was a roller with a few loose parts, I found out I had 2 driver side seats mounts/tilts. I couldn't find one locally so decided to save a few bucks and kill 2 hours and converted one to a passenger side.
Click to view attachment
Click to view attachment
Continuing the saving money idea I made my own version of simple RS style door cards...made friends with a little lady at the fabric store and she used her 'membership' for a big discount on the vinyl. All in, the door cards cost about $45.00 in materials. That's like $12.95 USD
Click to view attachment
Click to view attachment
Click to view attachment
Click to view attachment
Click to view attachment
Click to view attachment
Continuing the saving money idea I made my own version of simple RS style door cards...made friends with a little lady at the fabric store and she used her 'membership' for a big discount on the vinyl. All in, the door cards cost about $45.00 in materials. That's like $12.95 USD
Click to view attachment
Click to view attachment
Click to view attachment
Click to view attachment
Decided to do something that shows big quick results to keep the steam going. I had ordered the lightweight carpet kit and since hopefully I'm done making too much dust I wanted to see some instant results.
Click to view attachment
Carpeted the oil line cover I made and then made a custom cut foot board to fit accordingly.
Click to view attachment
I over carpeted a few areas since I'm not putting in speakers or the covers/grills. Trying to leave a little of that bare racer feeling.
Click to view attachment
Click to view attachment
List of to do's is getting shorter but still oh so long.
Click to view attachment
Carpeted the oil line cover I made and then made a custom cut foot board to fit accordingly.
Click to view attachment
I over carpeted a few areas since I'm not putting in speakers or the covers/grills. Trying to leave a little of that bare racer feeling.
Click to view attachment
Click to view attachment
List of to do's is getting shorter but still oh so long.
Your list of "to do's" looks very well done.
QUOTE(Big Len @ Apr 22 2020, 04:49 PM)
Your list of "to do's" looks very well done.
Appreciate it...so far so good.
Now I'm getting into the final third of it. My helper decided to give me a hand with what's been under my work bench for the last 4 years.
Click to view attachment
Click to view attachment
This is what is left of of my 2.4L MFI motor.
Click to view attachment
I robbed the top end and induction to build a 3.0L MFI a few years ago. That motor is a riot and sounds awesome. For fun here it is finished before installation. It's the first motor I had ever built. The idea was to make it look exactly like the 2.4. One has to know what to look for or very closely to notice. Learned a lot about MFI and it's tuning.
Click to view attachment
Click to view attachment
I almost have enough MFI components to go that route again, but I think for simplicity and to stay 'close' to the original idea I'll probably use Carbs. Way easier and faster results for sure.
This is such an amazing build!

You have gotten so much done in a relatively short time.
Lots of cool custom touches.
John
Well I guess after a summer of 'the world changes' I can post a few updates. I spent more time on other cars, projects, driving or hiding from the general public etc. than working on the Blue Bird
Now that fall has officially hit and winter will be here the car is basically done ..... kinda got my timing wrong.
I did have to step away for a bit. It seemed like it was fighting me all the way with the last items on my list. Some of that was my fault as I engineered on the fly; who would have thought you need to install the bottom oil line before installing the oil tank, can't use Ben's great pressure side oil line with a PMS mount, why can't I use the 914 seat mounts for my custom seats, and why is the 914-6 specific PMS throttle cable 1.5 inches to long? just to name a few.
Anyway, everything is solvable with time (and money, which I was trying to limit to stay reasonably close to my original budget)
So, for those that may be interested in some pic's:
Took my 2.4 long block and scrounged some top item items to make it a running motor. I haven't driven it an inch yet and I'm thinking a 2.7L since it's a direct bolt in but lets get this done first.
Click to view attachment
Click to view attachment
Lego for adults...assembled some carbs
Click to view attachment
Click to view attachment
Stuck the motor and transmission together. I think carbs always looked so cool, regardless of how terrible they are to tune, run, keep running well and so forth...
Click to view attachment
Click to view attachment
Now that fall has officially hit and winter will be here the car is basically done
..... kinda got my timing wrong.I did have to step away for a bit. It seemed like it was fighting me all the way with the last items on my list. Some of that was my fault as I engineered on the fly; who would have thought you need to install the bottom oil line before installing the oil tank, can't use Ben's great pressure side oil line with a PMS mount, why can't I use the 914 seat mounts for my custom seats, and why is the 914-6 specific PMS throttle cable 1.5 inches to long? just to name a few.
Anyway, everything is solvable with time (and money, which I was trying to limit to stay reasonably close to my original budget)
So, for those that may be interested in some pic's:
Took my 2.4 long block and scrounged some top item items to make it a running motor. I haven't driven it an inch yet and I'm thinking a 2.7L since it's a direct bolt in but lets get this done first.
Click to view attachment
Click to view attachment
Lego for adults...assembled some carbs
Click to view attachment
Click to view attachment
Stuck the motor and transmission together. I think carbs always looked so cool, regardless of how terrible they are to tune, run, keep running well and so forth...
Click to view attachment
Click to view attachment
Couple of last motor compartment prep items before I installed the motor. I used a mocal thermostat so made a mount and tried to keep the lines tidy. Also since I had no relay panel I would have to figure out wiring etc. Went with a solid state external voltage regulator that I mounted in a up and out of the way area...used and existing bolt hole even 
And since I had headers, plugged the mouse holes and finished off some fuel lines. Now I was ready to install the motor.
Click to view attachment
Click to view attachment
Click to view attachment
And since I had headers, plugged the mouse holes and finished off some fuel lines. Now I was ready to install the motor.
Click to view attachment
Click to view attachment
Click to view attachment
QUOTE(Sway Bar @ Oct 7 2020, 02:22 PM)
I did have to step away for a bit.
I totally get that.
That looks seriously nice man.
Wow!!!! What a great build. Nicely done.
Oh man! So close now. Love this build.
Really nice build - looking good, very close now!
- Tony
- Tony
Wow - inspiring work. Thanks for all of the updates.
Really inspiring, thanks for sharing!
Antoine
Antoine
I really like this build. Shows what someone can do with time and motivation. Well done!
Thanks for the kind words and encouragement...it's become fun again after I stepped away for a few months. I like trying to make the little details that one doesn't necessarily notice right away, or really isn't that important but looks cool...it still has to be functional mind you.
I finished off the carpet detail for the interior. Staying with the minimalist idea and just put a layer of sound matting and did the straight Perlon carpet finish. Did the same to to service/inspection tunnel and gave it a finished edge.
Click to view attachment
Click to view attachment
Another item since I had one on the shelf was a fuel distribution block with a pressure gauge so figured since running carbs it's a handy little tool 'IF' one ever has to troubleshoot. Plus it looks neat when you can see it through the engine grill.
Click to view attachment
Before the motor went in I had to figure out the wiring. In my other builds almost everything was to spec but since this was a conversion with no relay panel I had to map and make my own engine harness and convert the plug and ends to mate with the 914 harness. Most of the color coding from the early 911's is the same but thanks to this forum I found all kinds of references to what wiring to what and to adapt the 911 gauges up front. With some donor wiring I unsoldered the plug ends and then soldered onto the simple engine harness.
Click to view attachment
Click to view attachment
I'm considering doing something similar with the interior rear bulkhead (perlon). What are your plans for finishing the top edge along the rear window? I've always hated that factory solution that looks like crappy electrical tape that does not age well.
QUOTE(Gint @ Oct 8 2020, 11:55 AM)
I'm considering doing something similar with the interior rear bulkhead (perlon). What are your plans for finishing the top edge along the rear window? I've always hated that factory solution that looks like crappy electrical tape that does not age well.
I left it as is...I tried to keep the cut to follow the ridge line on bulkhead/firewall to allow for some of the paint to show. Then I used a masking tape line and the good glue for a sharp edge. Once the seats are in etc. It doesn't stand out as much I think.
Of course if one has access to a good seamstress I think a nice finished edge could be stitched on at minimal effort.
So speaking of seats...here's my finished version.
I didn't have any belts or receivers with this roller and a good buddy had some belts that he wasn't going to use so I decided to try the racing style. If desired all the anchor points are their so 3 point belts can be added at any time. I just really liked the look and idea.
This of course led to an 'Over Budget' item and I had some seats made from GTS Classics to finish the look....I don't think that carpet edge stands out too much now
Click to view attachment
Click to view attachment
Click to view attachment
Click to view attachment
Mounting the seats was a challenge and the 914 racks/sliders couldn't be used but I ended up using some early 911 seat racks and rails that were more easily adapted so I don't have any tilt function but both seats can be slide forward/back. I find the current rake of the seat perfect and is almost the same as the default low setting of the stock seat rail.
Crazy nice build, great workmanship.
QUOTE(Sway Bar @ Oct 8 2020, 12:58 PM)
This of course led to an 'Over Budget' item and I had some seats made from GTS Classics to finish the look....I don't think that carpet edge stands out too much now
Ha! You might be right. and that was a good place to stretch the budget. Those are awesome.
I'm sure we've all seen these a few times and the process...Picked up a GT lid that was attempted by someone previous. Was a little rough and they used textured rubberized paint/cover to hid all the imperfections. What a pain to remove. Had to go the chemical route. Turned out Ok in the end and I still have an original deck if I want to attempt it again.
Click to view attachment
Click to view attachment
Click to view attachment
Click to view attachment
Click to view attachment
Click to view attachment
Click to view attachment
Click to view attachment
And to finish off before our long weekend....6 meet 4, 4 meet 6
The 4 post lift is great for most work and of course allows me to have more than 1 vehicle but not so great for motor install...It works, barely, but you have to add the engine tins and any exhaust systems after the fact.
Click to view attachment
Click to view attachment
Click to view attachment
My minimalist engine wiring, not that there was much to begin with back in the good ol' days.
Click to view attachment
Looks good from the top.
Click to view attachment
Click to view attachment
Finished most of the cosmetics...Bumpers and the tops are in fairly good condition so just went the painted black route. I tried my hand at my own cooler cut-out and bend. It's not perfect but painted it looks fine and when 10" off the ground one can't really see any deficiencies.
The GT valance came from GT-Racing and knowing that fiberglass pieces never fit that well and always need massaging I was pleasantly surprised that I could call this one good enough (one fender flare side could be stretched 1/2"-3/4" but at this stage not worth the effort).
Click to view attachment
A little Marque Bling added to further confuse those that are not in the know
Click to view attachment
Cibie Iodes....look the part. I have some 100W rally bulbs that I should try in those
Click to view attachment
Click to view attachment
Finally to cap it off I got the roof back together and fitted. Roof hasn't been affixed properly to this car forever. I guess it has been stored on edge for years so even when clamped it has a bit of a bow at the rear and doesn't fully seal at the rear. Hopefully after a winter of being attached (maybe with a little weight) it will flatten??
Click to view attachment
Nice work. Thanks for the updates.
Terrific- Your car looks great across the board. Very nice job.
Congratulations! wow 10 mos restoration and it was done properly and beautifully!
QUOTE(ndfrigi @ Oct 13 2020, 05:26 PM)
Congratulations! wow 10 mos restoration and it was done properly and beautifully!
To be fair it's closer to 18months but that includes what I thought was a slow 3months at a buddies for body work (Price was right vs. time).
Proceeding along...I ran into a few conversion hang-ups based on my inexperience and not trying to find answers before hand. 1) Ben's pressure line fits awesome...to a point if you are not using a stock motor mount. The PMS mount is easy and everything worked perfect without any pre fitting or measuring (motor and trans). However, the mounts interfere with the pressure line. So that needed to be retrofitted and shortened.
2) I tried to be 'cheap and quick' (we know that doesn't usually work well) and I left the oil cooler as is in case it ever goes back into a 911 and I was thinking I could adapt the simple 911 hose system. Nope; it fits but was touching/rubbing up against the control arm. So, needing to shorten the intake I might as well do it right and put on the adapter.
At least I knew good people to get these welded up and be leak proof since that surpasses my skill set.
Click to view attachment
Click to view attachment
914/6 headers of some sort. I got these 3rd hand from some parts swapping. I think they come form a Colorado member here? No idea what they are. Anybody know for interest sakes? Looks like they have seen some racing or at least a very low car/motor with the asphalt scraps on the lowest elbows.
Also, quickly made my own shift rod. It was a straight shot with no bend at all, so at least that was easy.
Click to view attachment
Amazing build. A lot of encouragement to get mine going! Love it!
IT STARTS!!...so after 8 years of sitting in a box I finally tried to start this motor. Of course I had my troubles. I had a small leak from a fitting at the front tank (arrgghh) and couldn't get proper ignition until I move the distributor over a tooth (thank goodness for the access panel)
Still a lot of tuning to do.
Anyway...(my first attempt at posting video and my first ever you tube)
https://www.youtube.com/watch?v=jqsYOJKghiA
Still a lot of tuning to do.
Anyway...(my first attempt at posting video and my first ever you tube)
https://www.youtube.com/watch?v=jqsYOJKghiA
This is a "lo-fi" version of our main content. To view the full version with more information, formatting and images, please click here.