yeah...no heat in my garage. I'm going to take a week off in October. Hopefully I'll get some work done then.
Hey Jerry...I finally found a rental space in Malvern. I'm at the corner of Bus. 30 and Planebrook Road...right behind the NAPA Autoparts Store. It's smaller than what we were looking for, but it was the best we could find. Thanks for your help.
Full Version: Its the final countdown
That's good news Dave. I'm glad to hear you found something. My neighbor used to have a tuner/machine shop right behind that NAPA. I wonder if it's the same space.
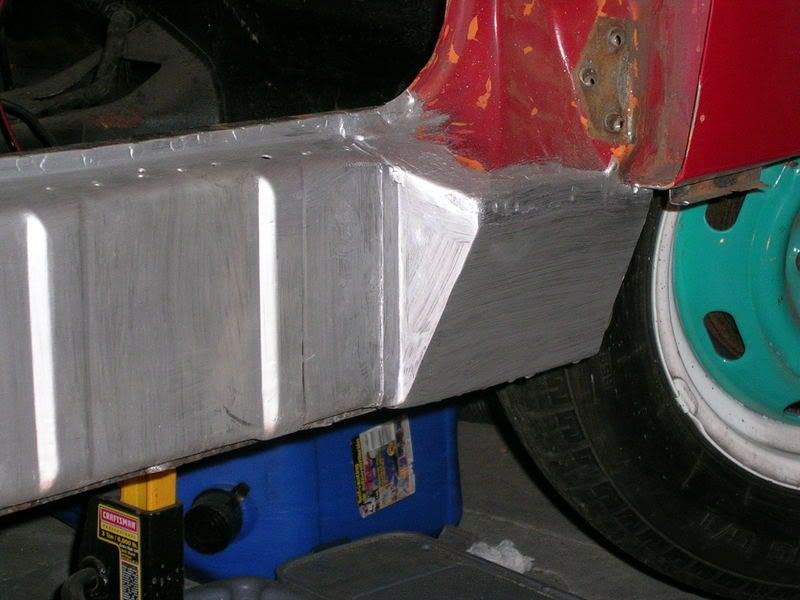
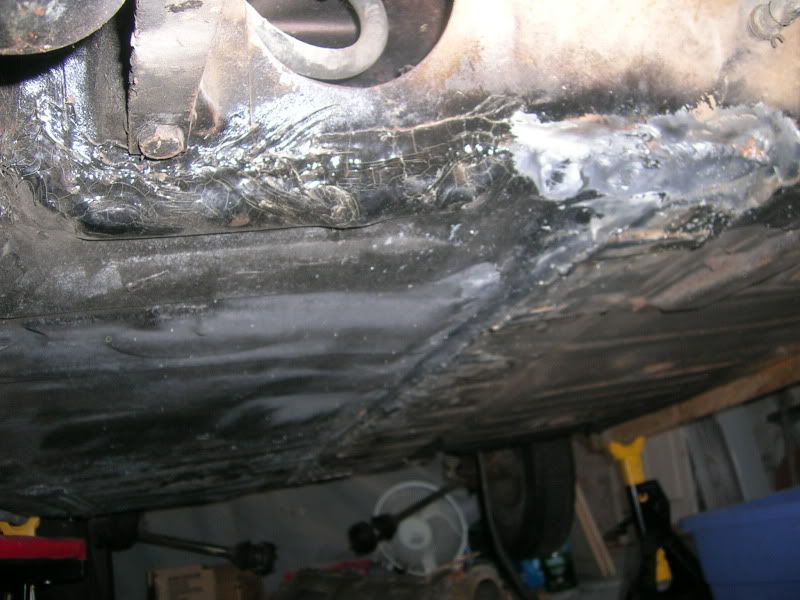
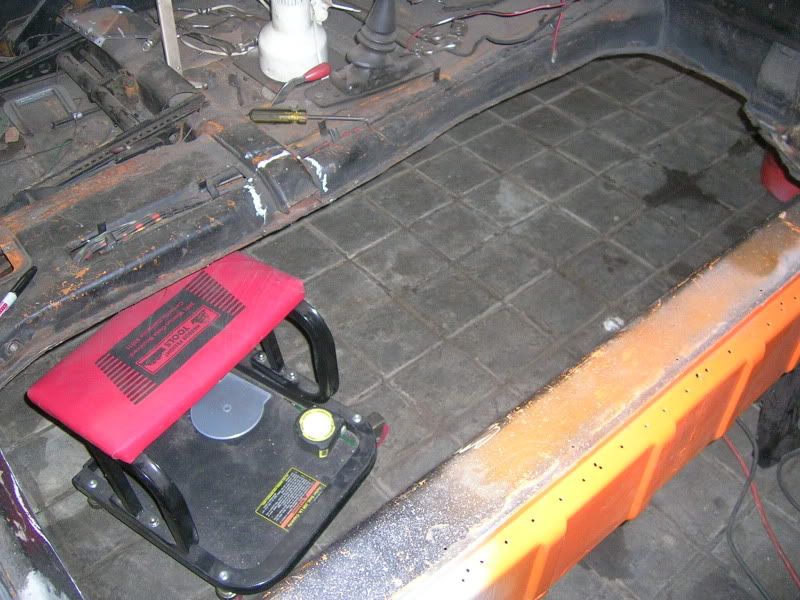
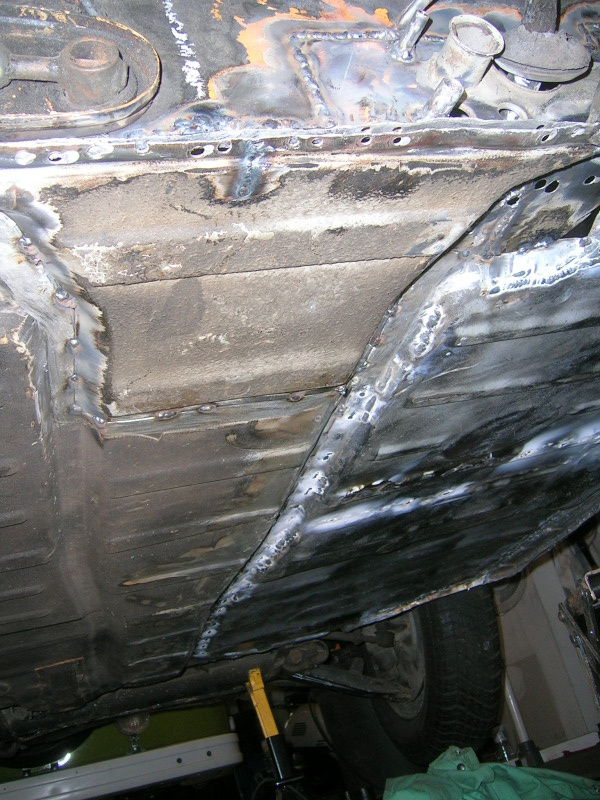
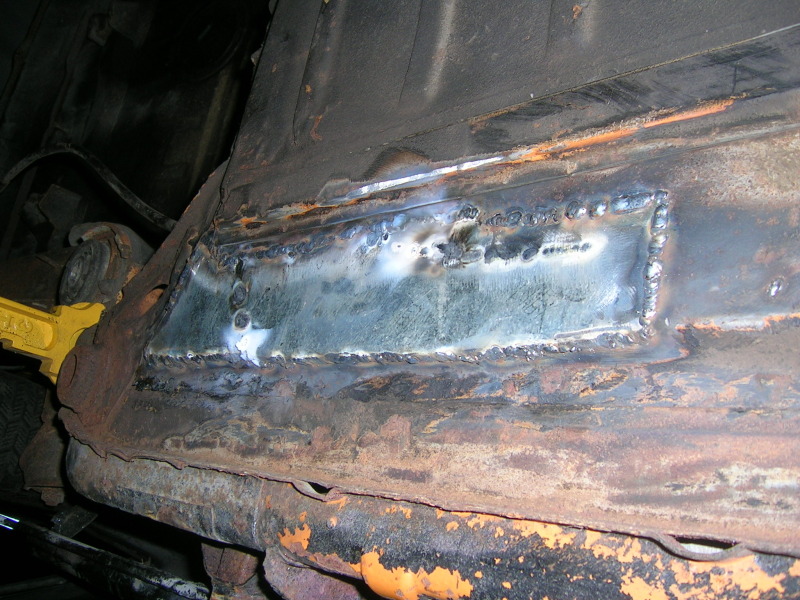
Some work completed today . . . Outer shell closed!
Chris,
You seem to keep truckin' along. You make me feel like a sack!
I finally did some work this weekend and so before you ask when I'll just show you where I am...
Your thread has me inspired to finish my engine before you rebuild your entire car.
You seem to keep truckin' along. You make me feel like a sack!
I finally did some work this weekend and so before you ask when I'll just show you where I am...
Your thread has me inspired to finish my engine before you rebuild your entire car.
Leo - Good to see you getting that engine together, looks great, I still want a lift once you get that thing moving. I gotta see if a 2073 is all I need or if I want to build it up more. Are those biral p+c's or just cast iron painted silver? Wait, have you pulled and tapped your galleys yet?
Too bad you missed the ECC and the AACG, dunno if you caught the other thread but Matt and Evil say hello. Well, Matt said hello and to pass on his best wishes, Evil Said something about passing along a hernia exam. I politely declined. For the good of the land.
Well, glad I could be an inspiration. It is tough staying motivated, I still have a shitload to do. Today I spent 2.5 hours doing some cleanup on that outer clamshell patch, cutting out the old engine shelf and grinding on rust. End result, nothing worth posting. Hopefully later in the week . . .
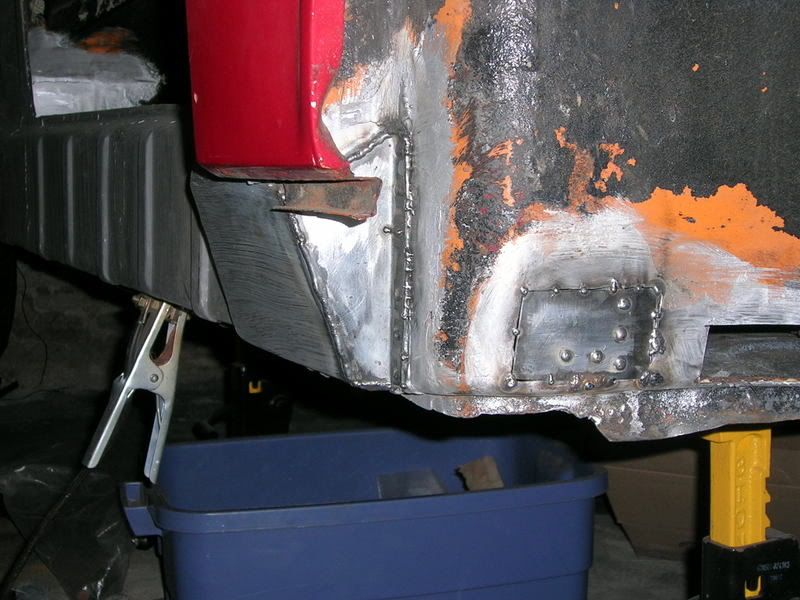
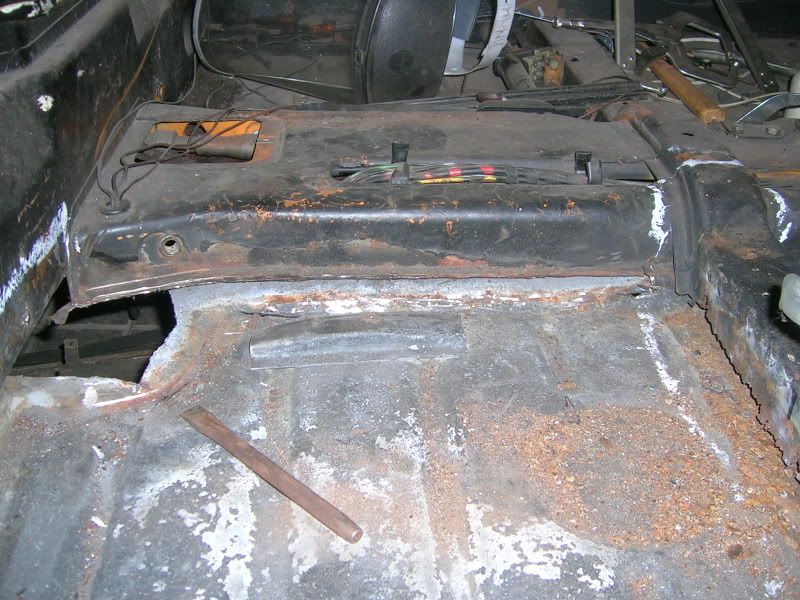
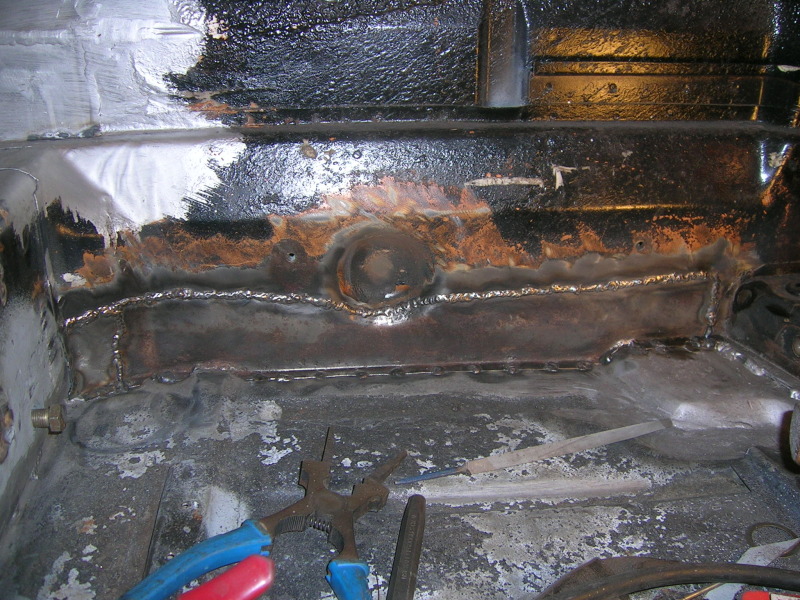
Hell hole? Hell no!
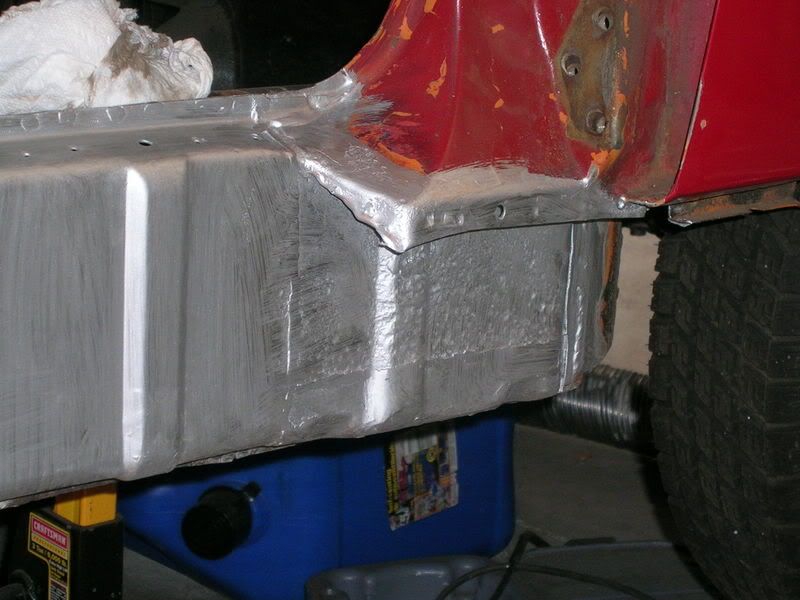
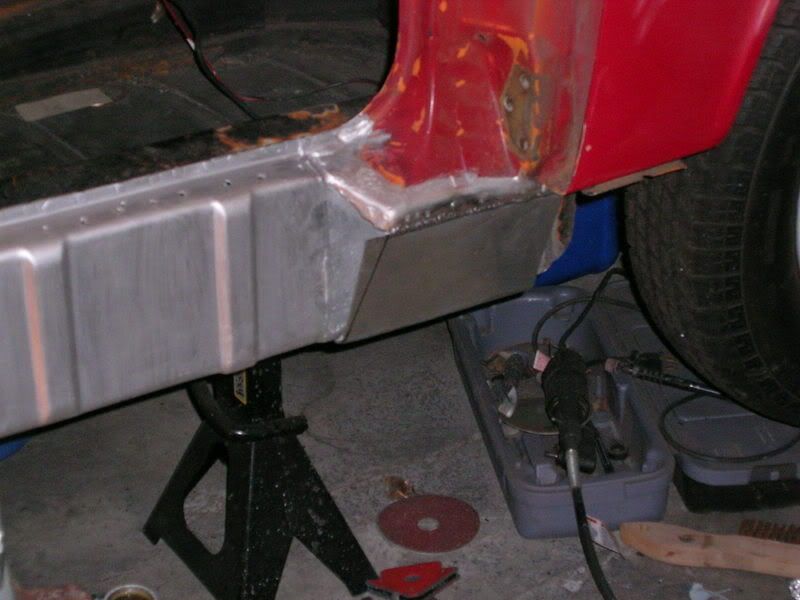
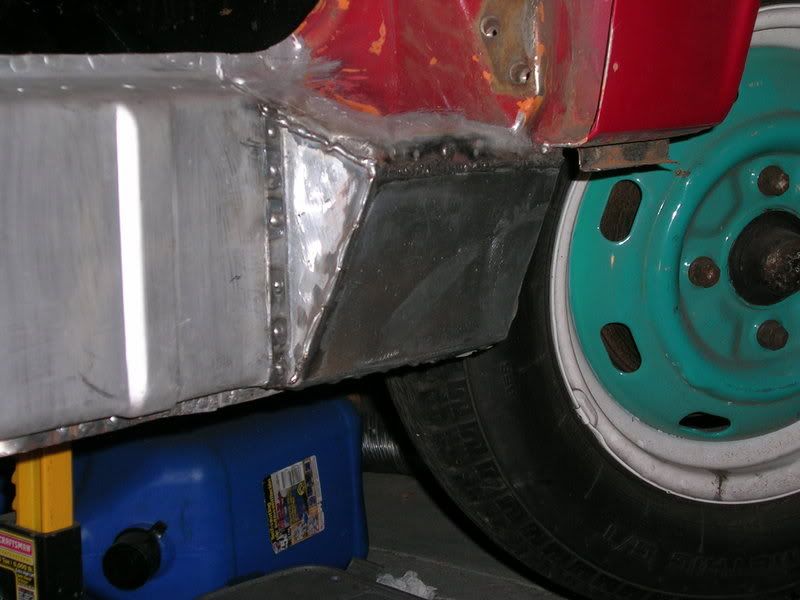
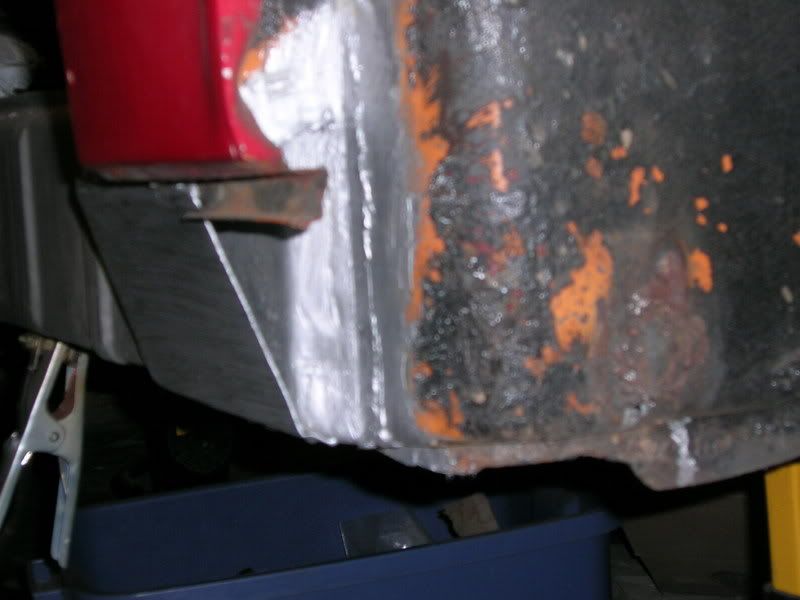
Also cut out rust due to the battery tray and welded a new chunk in:
Well damn, its been a long time since that long was whole, hopefully repairs start going faster now . . .
Also cut out rust due to the battery tray and welded a new chunk in:
Well damn, its been a long time since that long was whole, hopefully repairs start going faster now . . .
Wow, you're doing an awesome job. 
QUOTE(type11969 @ Jan 8 2007, 08:40 PM) 
Last for the night . . . 914 and garage on the move from my rents house to my own garage in Philly:
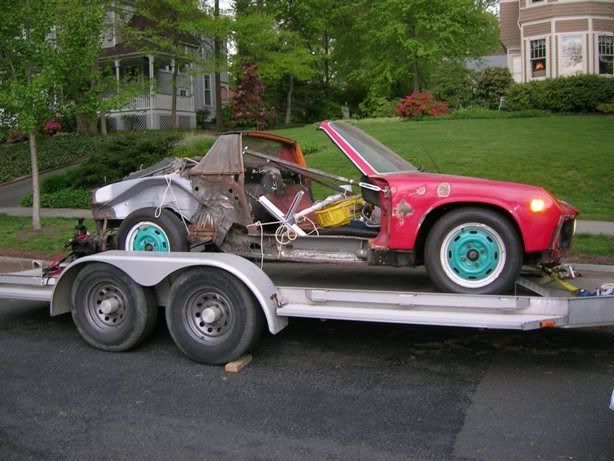
Open invite to whoever wants to come down to help with this thing, needs help on their 914, or just wants to BS. Grill is only a few steps away from the teener.
-Chris
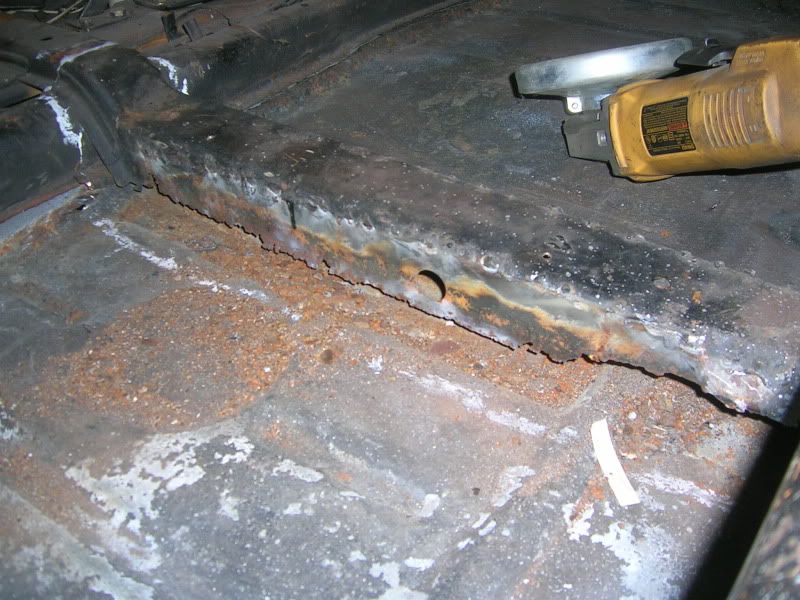
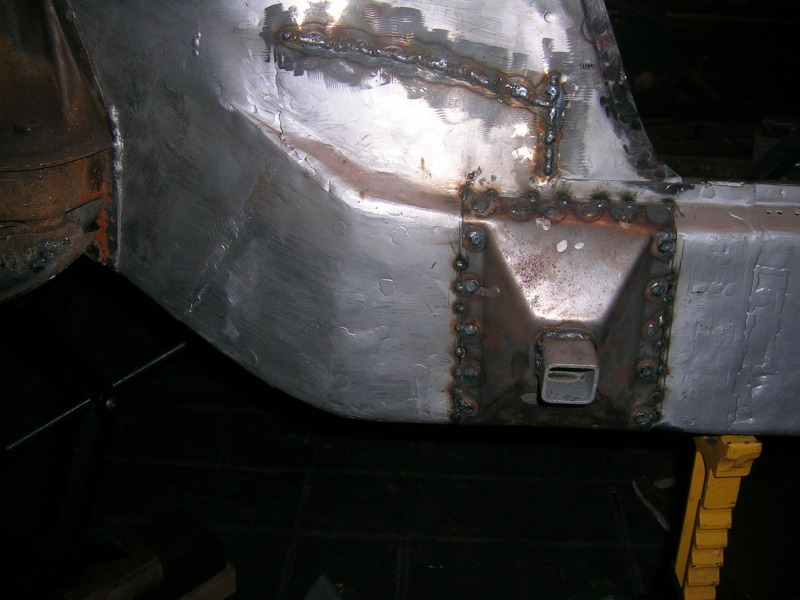
You have marched this far into hell so far- Heaven can't be far. I would pull the welds on the rear floor and open up to reinforce the longs on the inside or else you have just a reinforced hinge waiting to happen. Or add an Engman kit. I would also double up on the metal at the inner long to inner wheelhouse location. This is a high stress area and leafing new metal in is not very strong. Your welding skills look great and you on the right track.
Do not give up. You will regret it if you do....
Lou, thanks!
Jeff-
I have an engman kit, but I'm not following where you are suggesting to reinforce regardless. I don't think I can reinforce the longs anymore on the inside (nor do I think they can be opened up any more than I had them!), all rusty metal has been removed and at least the (if not more) than the factory thickness of material, doublers, etc was reinstalled. Inner long to inner wheelhouse section, are you speaking of the area where the heater tube passes from the engine bay into the long? That area was doubled, maybe the pics aren't clear. Please elaborate if you can!
Thanks,
Chris

Thanks for the updates Chris. It looks great.
You inspired me to finally bust out the welder again.....well, not on my car but on my dad's John Deere tractor deck. Ugliest welds you ever saw but they're holding strong and he's happy as can be so thanks again for the welding lesson. The car is next!
Nice, always good to find other uses for the welder too!
QUOTE(type11969 @ Oct 12 2007, 06:19 AM)
Lou, thanks!
Jeff-
I have an engman kit, but I'm not following where you are suggesting to reinforce regardless. I don't think I can reinforce the longs anymore on the inside (nor do I think they can be opened up any more than I had them!), all rusty metal has been removed and at least the (if not more) than the factory thickness of material, doublers, etc was reinstalled. Inner long to inner wheelhouse section, are you speaking of the area where the heater tube passes from the engine bay into the long? That area was doubled, maybe the pics aren't clear. Please elaborate if you can!
Thanks,
Chris
Chris,
This will teach me to open my mouth before I read the entire thread. I take everything back. I only saw page 1 and I will take foot out of mouth now.
You are doing great. Your car looks like mine.
What I was referring to and then the site went down about an hour ago as I was about to hit "add this" was this photo. I saw two tracks of plugs and nothing in the corner. That was my reinforced hinge comment (in red). Then after reading your progress and install of the Engman I ran for the hills. My bad.
The layering (leafing) was the next photo. Its hard to get the right shape of lower long and I thought you didnt have enough meat in there.
Then I inserted foot in mouth again when I saw the next progress photo which I thought was outstanding.
The lesson of my day was to keep quite and read the whole thread. I didnt realize were so many pages and jumped the gun. Your work is awesome. You have great fab and welding skills. You clearly have gone overkill which I always do. Your car will NEVER sag EVER and probably outlast us all.
When I update my thread I will let you take some payback shots for fun.
It's good to laugh at our own foibles.
Don't worry about it, the thread is long in both length and time, hopefully I will be able to end it soon . . .
Jeff - Didn't make the connection with the thread that I recently subscribed to that you were the owner of the thread, looks pretty similar and you are doing some killer work!
My progress for the weekend:

Seems like I am out of the woods but I still have a ways to go . . .
My progress for the weekend:
Seems like I am out of the woods but I still have a ways to go . . .
Work this weekend thus far:
You can see the patch vs the pitted metal . . . its kind of thin but with the built up section around it I'm not too worried.
First piece:
Next piece:
Cleaned up:
Other side (a PO "patched up holes with a stick welder . . . friends don't let friends patch holes in 914s with a stick welder like that):
Hmm, that pic kinda sucks but the rusty blob to the right of the section I am building up is a big pile of birdshit stick weld. In this next pic you can see the other side of the section welded in, plus a piece tacked in to replace the stick weld blob and a third hole where there was another stick weld pile:
-Chris
Way to go Chris!
Jeff
I've been reviewing welding and reconstruction threads. The talent and patience to rebuild a longitudinal?!?! That's incredible work. This thread deserves a 
No update in a while. How's it coming? And as long as I'm here, how's the grill?
No update in a while. How's it coming? And as long as I'm here, how's the grill?
Wow, funny this thread got bumped this weekend . . . today I go in for what will hopefully be the last bit of dental work remaining from the accident. Unfortunately the one tooth that took the most abuse, and that I had to have a root canal on, still is bothering me. So they have to do some work by going through the gum. Good times. Otherwise, caps look good and the scaring isn't noticeable unless I shave. Optional as a grad student. Even clean shaven it really isn't that obvious. So yeah, after today I will hopefully be able to bite into stuff again!
As for my 914, I did shift it around in my garage recently to make it more accessible, but shortly afterwards I discovered that the engine in my bus was about to eat a valve. So I've been spending most of my time messing with that and other "while you are in there" tasks on the bus. Hopefully this spring/summer I'll get back in to it . . .
-Chris
It took a year for my jaw to feel normal again.
Almost two years later since last working on my 914 . . . for shame. Started again on Monday night and managed to cut the middle knuckle on my left index finger open with a cutting wheel on an angle grinder. Didn't bleed, blade must have been hot enough to cauterize the wound but it was to the bone. Love Philly and all but going to a city hospital with a cut that can hide under a band aid does not get you to the front of the line. 10 hours later, couple of xrays, lot of cleaning and only 2 stitches and I'm whole again.
So hopefully I'll have some pictures soon of progress. And some pics of my other projects that have been keeping me from my 914.
-Chris
So hopefully I'll have some pictures soon of progress. And some pics of my other projects that have been keeping me from my 914.
-Chris
Other than grad school, which with 9-5 research and classwork is taking up way more time than when I had a full time job with a commute (silly me to think otherwise), this beast has taken up the majority of my time since nov. 07 when I got her:
I've got some other pictures elsewhere. She was a runner when I bought her, but was a death trap with incorrect fuel hoses and rubber brake lines from 1976. Almost all the mechanical bits have been replaced or reconditioned from the front to the rear. Also had to rebuild the engine this past winter after finding that the gex rebuild in her was starting to drop seats. I took the easy route and got a camper special kit. $$$ for sure but saved me a lot of time. Got lucky with that Porsche acquisition of VW stock fiasco a couple months back so it seems appropriate to spend the proceeds from the stock sale on a VW engine. I'm happy with the results, ~20mpg at 75mph isn't bad for a breadloaf on wheels. The increase in power is significant and overall I am pretty satisfied.
Now she is a good runner, overall pretty solid with one rustout in the rear and I'm sure some nastiness hiding under the front windshield. She also has a bunch of surface rust spots that I will someday take care of. But for now, they can wait until the 914 gets some love.
Are you done with grad school now?
I know how you feel with the 914. I have not touched my truck in about a year. Look forward to seeing some updates soon!
Zach
I know how you feel with the 914. I have not touched my truck in about a year. Look forward to seeing some updates soon!
Zach
Nope, not yet, I've got about another year to go I think.
Due to the layout of my garage the Beetle is languishing perpendicular to the length of it, probably won't see the light of day for another year or more. Too bad considering it runs pretty well now. Well at least used to 9 months ago . . .
I have too many cars. And my major form of transportation now is my bike! I've put close to 900 miles on it since the first of the year, ha. More than any one of my cars by itself.
-Chris
I still have access to the rear fender for ya. Well talk when I get back to PA after my tour. I need to get some fog/driving lights like you have.
Good thing you didnt cut the tendon on your knuckle.
Good thing you didnt cut the tendon on your knuckle.
Yeah, I was lucky.
I talked to Ray Mital a while back about buying the later doors/fenders off a parts car of his so assuming that works out I might not need the fenders you have access to. Heading up to check them out the 10th, I'll let you know.
I dig the look of the yellow fog lights with the chrome housings more but I had these sitting on a shelf for the past 8 years. They are bright.
I have that exact set (orange lens, chrome ring, a little bullet shaped) of lights from a MBZ of the 60s. I am not sure if I am going to use them or not as I may want the clear driving light style. But, I have upgraded my head lights to the H4 kits already.
How much were the H4 kits? Noticeable difference?
QUOTE(Dr Evil @ Sep 17 2009, 05:31 PM)
I have that exact set (orange lens, chrome ring, a little bullet shaped) of lights from a MBZ of the 60s. I am not sure if I am going to use them or not as I may want the clear driving light style. But, I have upgraded my head lights to the H4 kits already.
If you don't want them, I'd like to see them... I am planning on adding thru-grill fogs on my 911.
H4s have been evaluated on the samba and look great, but mine are still in a box They were about $50/pair with bulbs from Busdepot.
They were about $50/pair with bulbs from Busdepot.
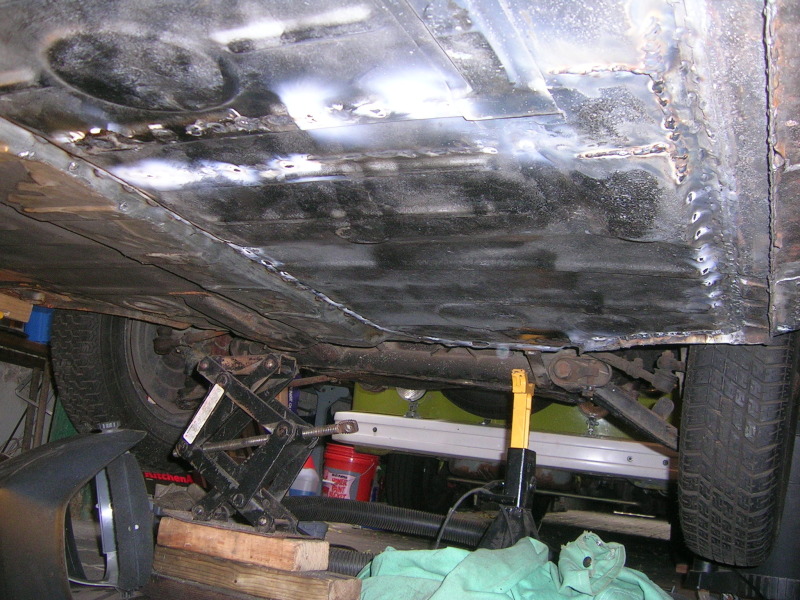
Progress, I guess, really just undoing some PO handiwork. Pass side floorpan was installed with a stick welder, poorly, and gratuitous amounts of seam sealer. Beyond that, it wasn't trimmed properly and was overall just a mess:
The PO also didn't trim the old floorpan out completely so there was this odd overlap where on the top side, the old floorpan met the new, and on the bottom side the new floorpan met the center tunnel with a nice cavity in between. Dropped the new floorpan about 1" lower than it should be on the left side. You can kind of see the gap between the pan flange and the installed pan here (old stuff cut out, also where I trimmed my index finger):
The center support was wasted, the PO made some crap bridge plates to span the rusted section and the weird height difference. I could pop the welds with a chisel and a hammer way too easily:
I drilled out the spotwelds and preped the "new" center support hoping to get it in today, no dice, unfortunately. It is not in the best shape in the world but it will do.
Biggest accomplishment was getting the new floorpan out, getting all the birdshit stick welds off the car without sacrificing too much metal so I can reuse the pan. Lots of time on my back with a grinder, thanks PO:
Here is my new hobby:
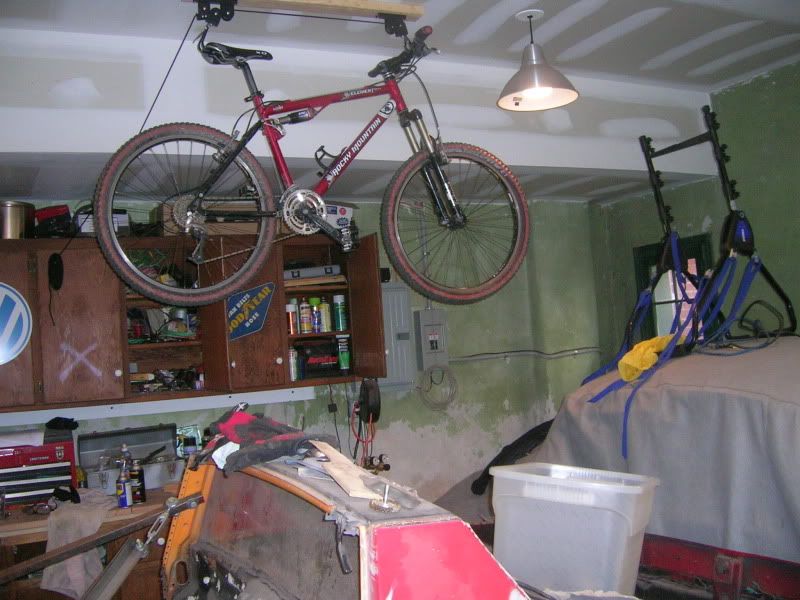
It is an 01 Rocky Mountain Element, kind of beat up but I got it for a great deal. Unfortunately my IT Band has been acting up so I haven't been able to hit the trails as much as I would like.
My "ladies":
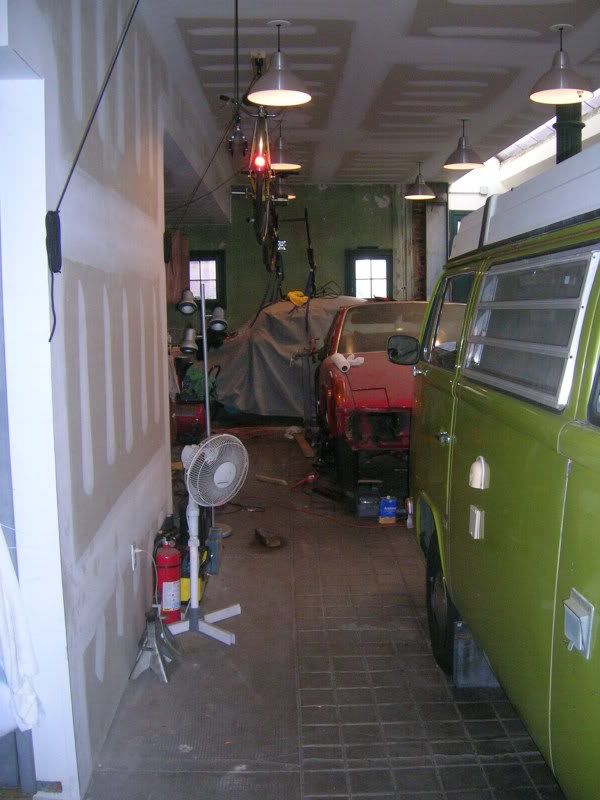
Beetle is hiding under a cover at the back. Class starts next week, I hope I can keep on working.
-Chris
The PO also didn't trim the old floorpan out completely so there was this odd overlap where on the top side, the old floorpan met the new, and on the bottom side the new floorpan met the center tunnel with a nice cavity in between. Dropped the new floorpan about 1" lower than it should be on the left side. You can kind of see the gap between the pan flange and the installed pan here (old stuff cut out, also where I trimmed my index finger):
The center support was wasted, the PO made some crap bridge plates to span the rusted section and the weird height difference. I could pop the welds with a chisel and a hammer way too easily:
I drilled out the spotwelds and preped the "new" center support hoping to get it in today, no dice, unfortunately. It is not in the best shape in the world but it will do.
Biggest accomplishment was getting the new floorpan out, getting all the birdshit stick welds off the car without sacrificing too much metal so I can reuse the pan. Lots of time on my back with a grinder, thanks PO:
Here is my new hobby:
It is an 01 Rocky Mountain Element, kind of beat up but I got it for a great deal. Unfortunately my IT Band has been acting up so I haven't been able to hit the trails as much as I would like.
My "ladies":
Beetle is hiding under a cover at the back. Class starts next week, I hope I can keep on working.
-Chris
Nice bike!
I put ~500 miles on my mountain bike over the summer of 2007, while I was training for the 100 mile bike race (that I did not compete in after Erin got pregnant).
This summer I have put about 100 miles on it. I am not riding it at all like I should.
Are you renting the garage seperate from your place in Philly, or is it part of your home?
Zach
We will have to hit the trails at some point. Ever ride in the Wiss here in Philly? Allegedly it is pretty good, I don't have much to compare to though. I have no skill yet, but I do enjoy cruising around in the woods.
Garage is the 1st floor of my place. Even crazier is that there is a full basement below it. Dunno if I will ever be able to leave, although renting does suck. Behind the bus you can actually fit one more car but my landlord keeps his vespa off to the left of the bus so he wants door access. My place actually used to be an ambulance way for a private hospital behind it (where my landlord lives). At some point, my guess in the 30s-40s, the first floor of what used to be a std rowhouse was blown out, the floor was dropped to street level, brick arches were built between the steel ibeams supporting the garage floor (neat to see in the basement), and then it was all concreted over. I actually tossed the tire chains for the ambulances when I moved in.
-Chris
I've spent very little time in Philly. Almost all of my trail riding has been the trials at Eaglesmere Lake (PA) and Patapsco State Park (Avalon, in Baltimore MD). When I am going for miles I usually ride either the MD or PA section of the old North Central Railroad trail. 80 miles if you do the whole thing, but pretty flat as it is an old rail road bed.
Zach
Zach
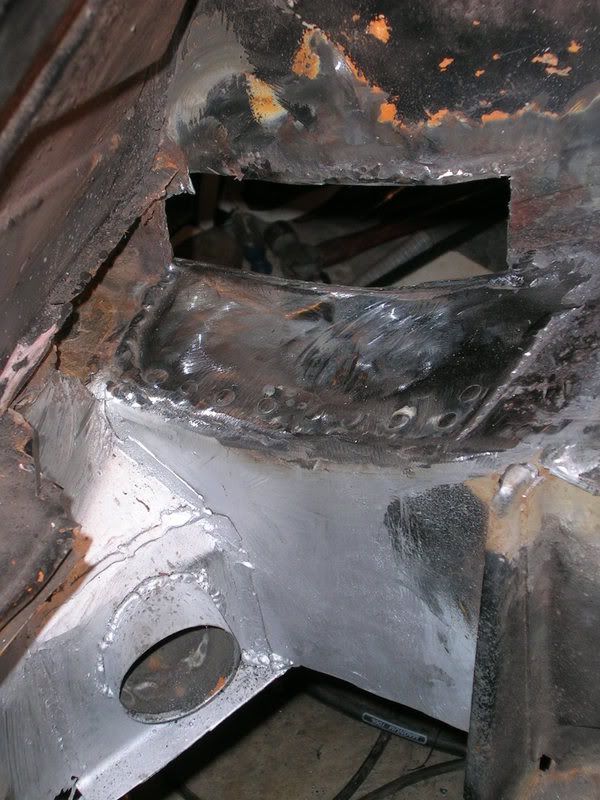
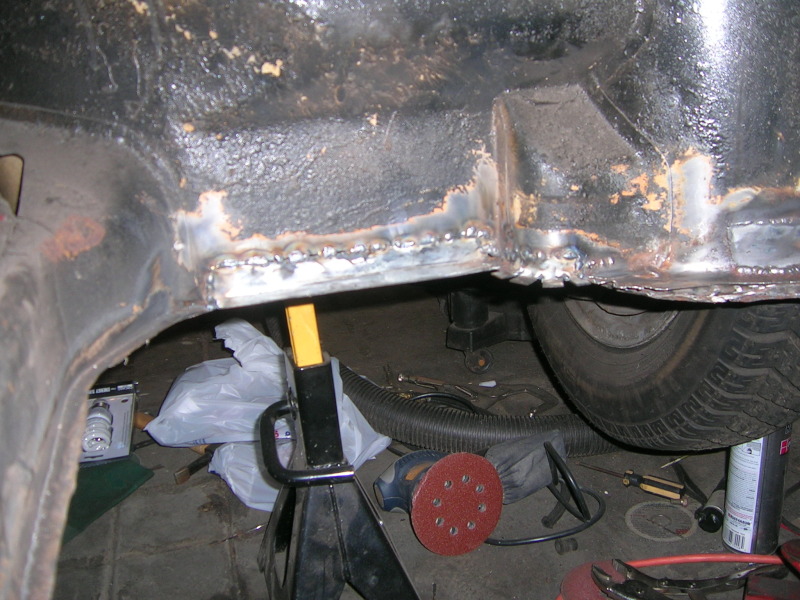
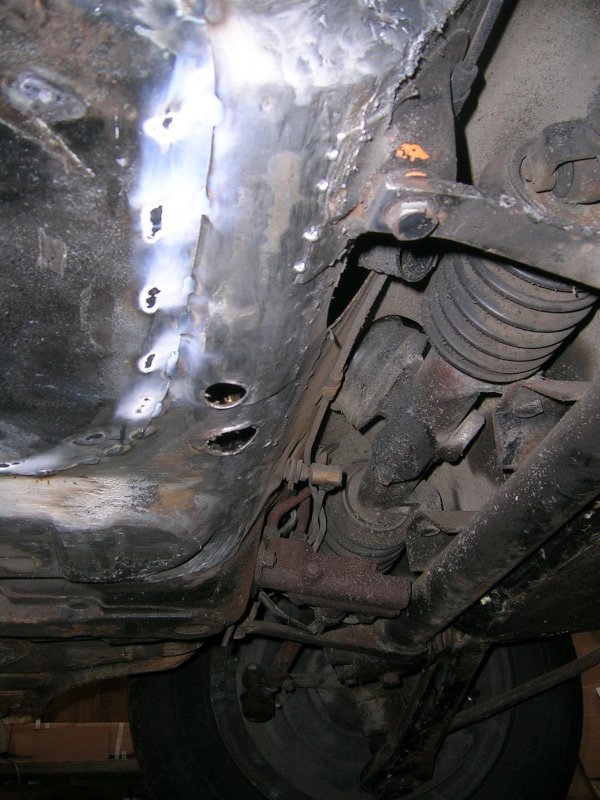
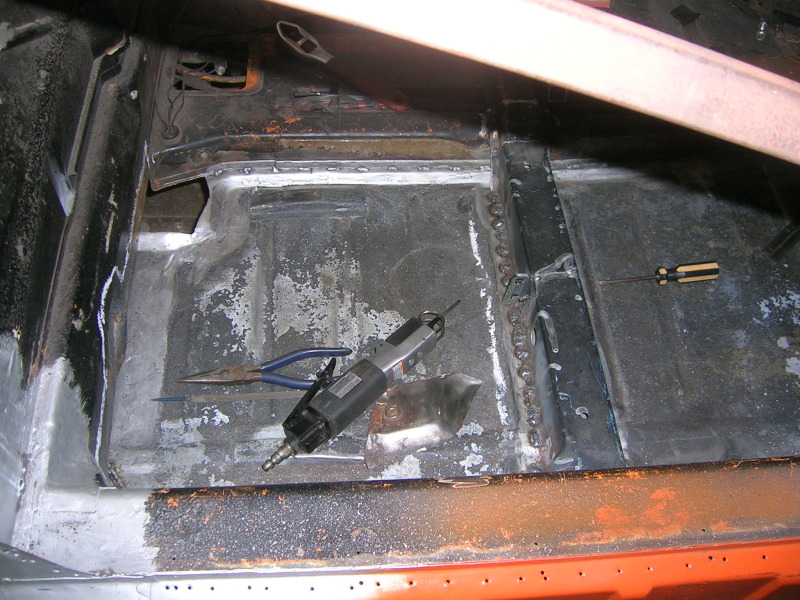
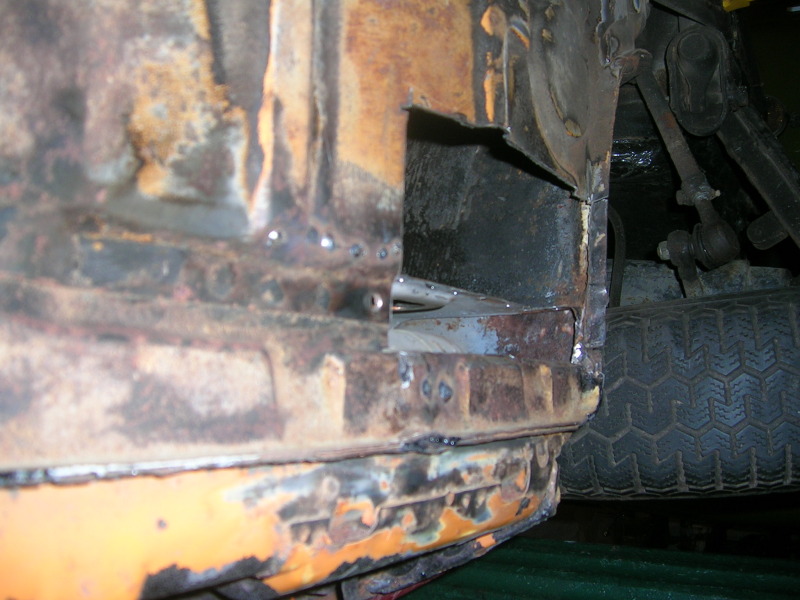
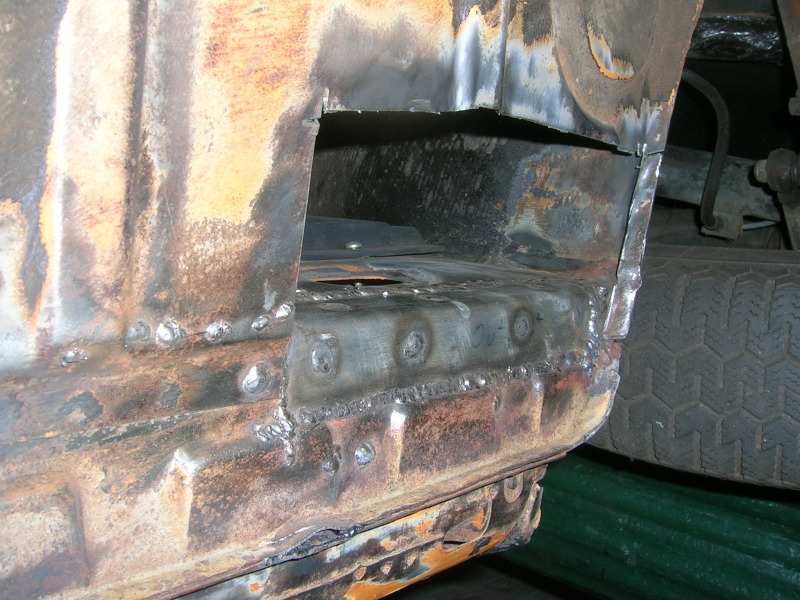
Progress, believe it or not. Worked on the outer bulkhead/firewall, pass side kick panel area, and the front clutch tube mount. A PO did a real crap repair on the clutch tube mount at the firewall:
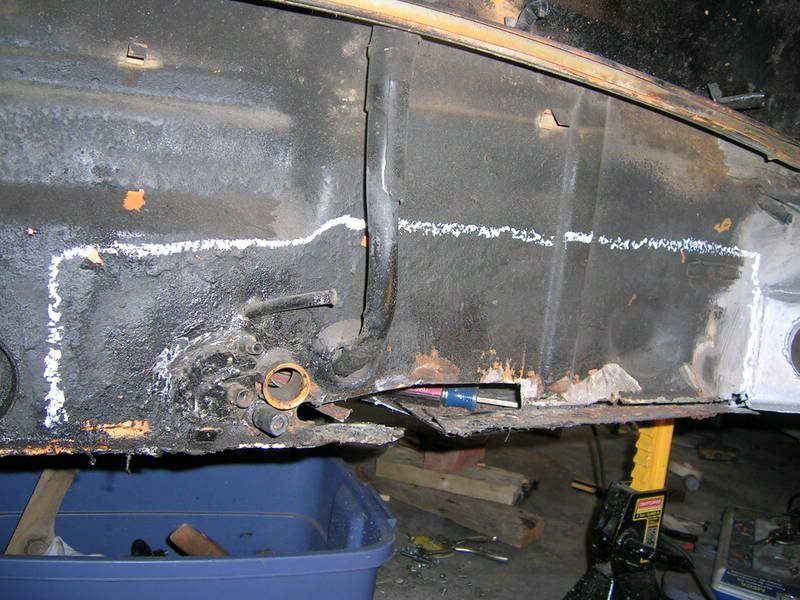
Lots of seam sealer hiding birdshit stick welds barely connecting the firewall sheet metal to a big ol chunk of metal barely connected to the clutch tube. Of course, they went to the trouble to do this crap repair, but didn't touch the front mount, which was flapping in the breeze. Middle mount, fine by some weird chance. So since my lower firewall was rusted, I just cut it out taking time around the tubes:
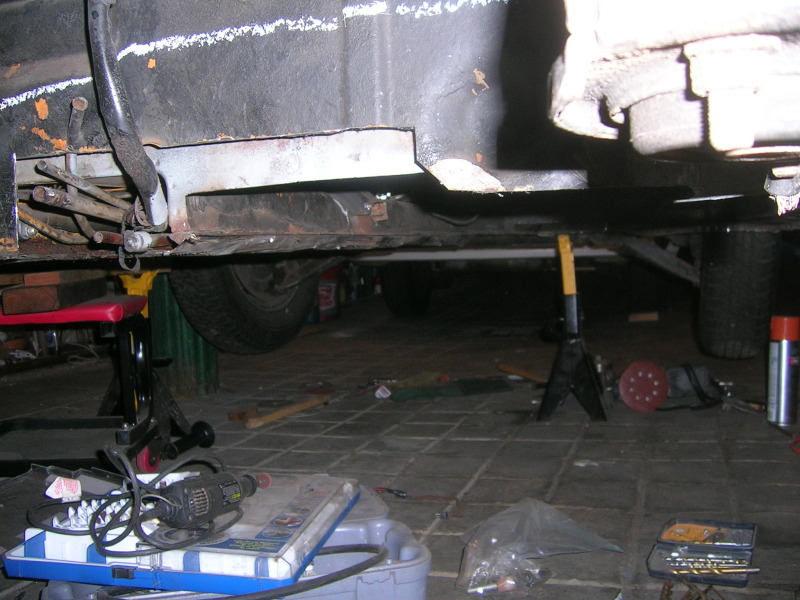
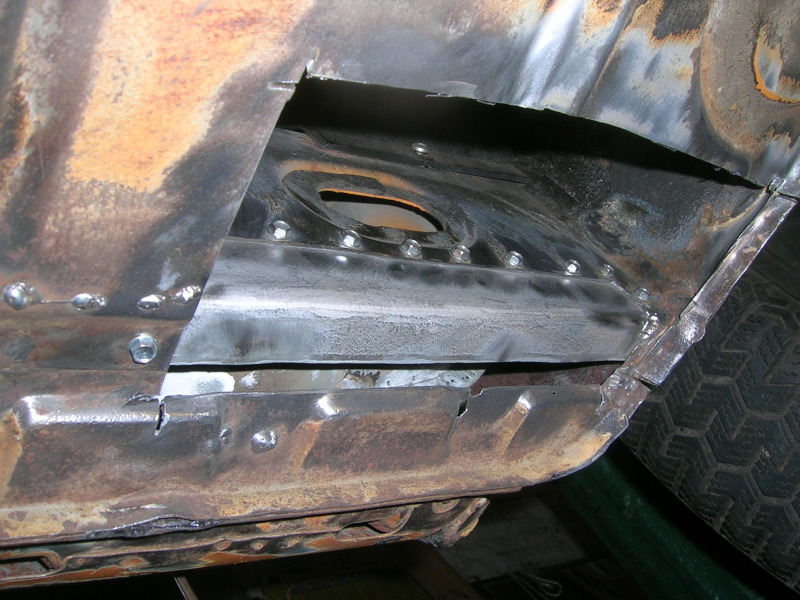
I used a crappy air body saw from HF for the long cuts that might be my new favorite tool. Much less mess than a cutoff wheel, way more accurate, doesn't heat up the metal as much, etc. Good stuff. Tacked/welded in firewall chunk:
Much better. Also took the opportunity to weld a washer on the inside of the firewall to support the clutch tube further:

Still need to weld the clutch tube to the firewall, I have some copper tubing to be used as a backup, but once that is done I don't think the clutch tube will be going anywhere anytime soon. No shots of the front repair but I just drilled some holes to get access to the broken mount, then welded it all together.
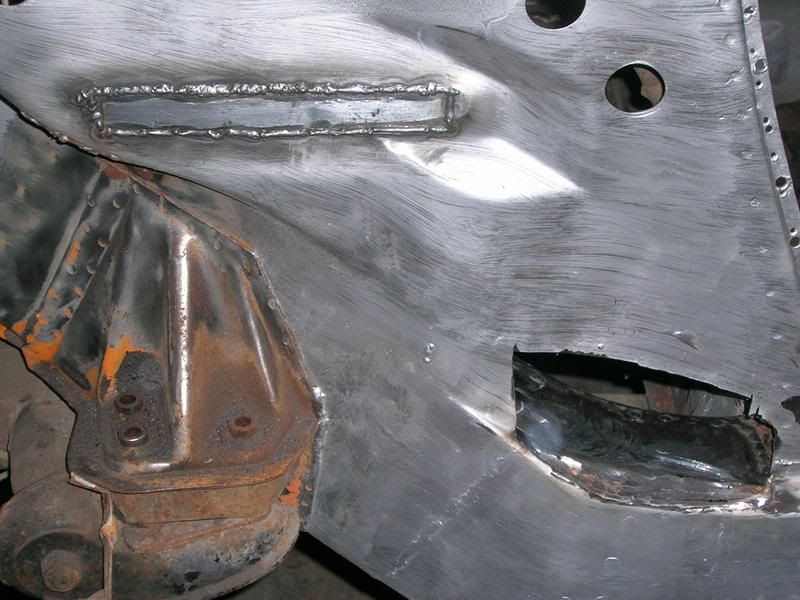
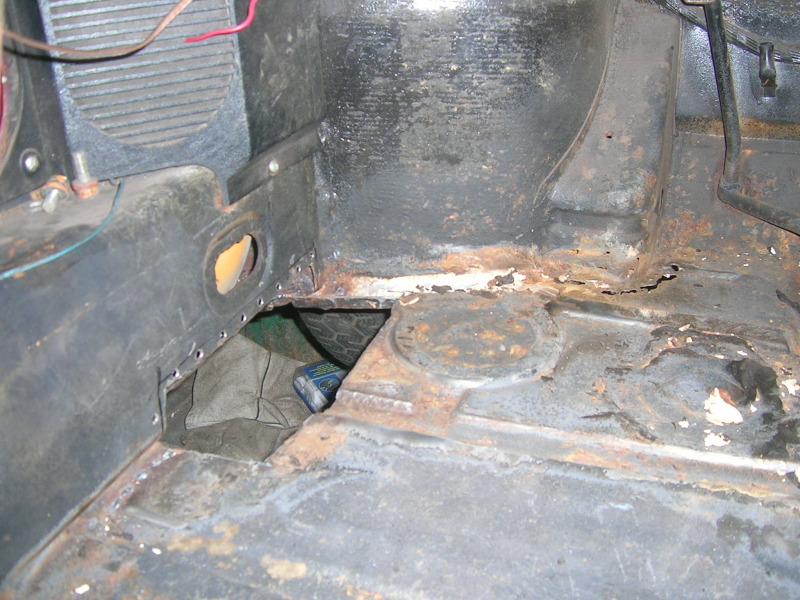
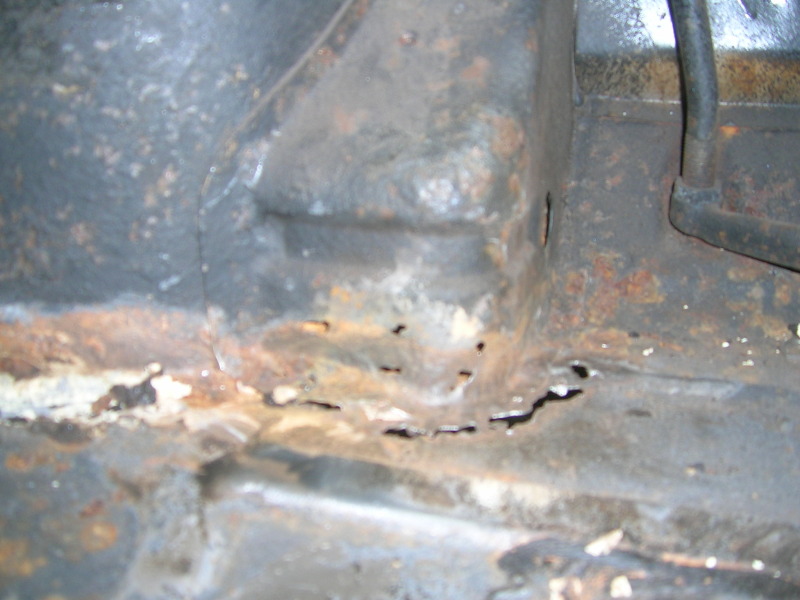
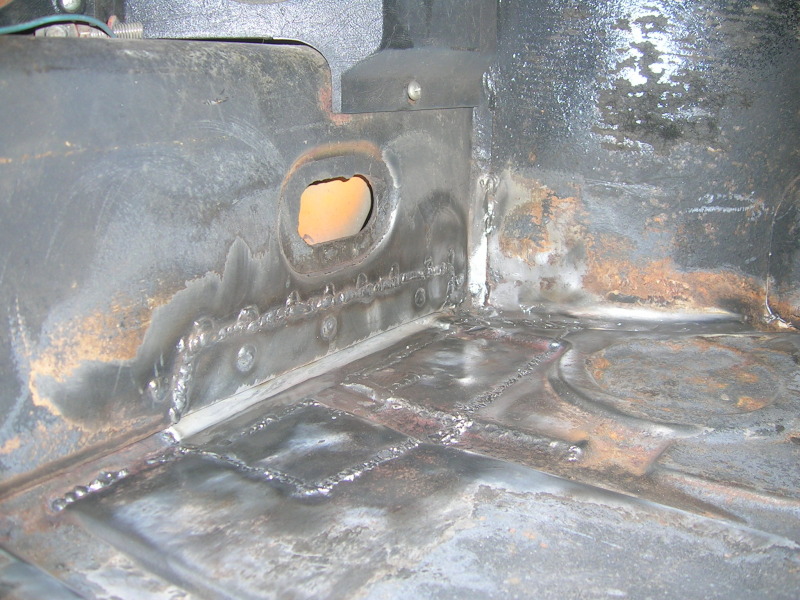
I'm also still dealing with the PO crap pass floor replacement. The footwell had a decent rustout that the PO ignored when the new floor was "installed":
Thick black paint and seam sealer does not make the rustout disappear. Fabbed/tacked:
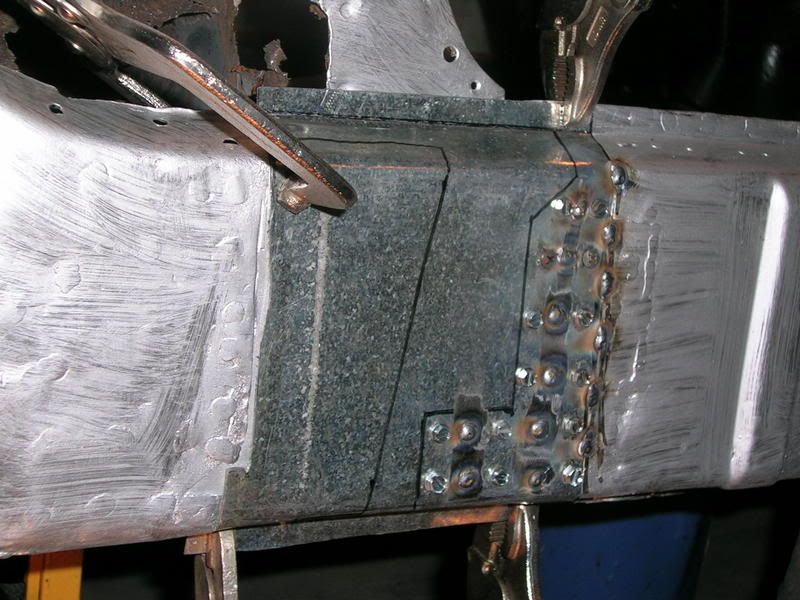
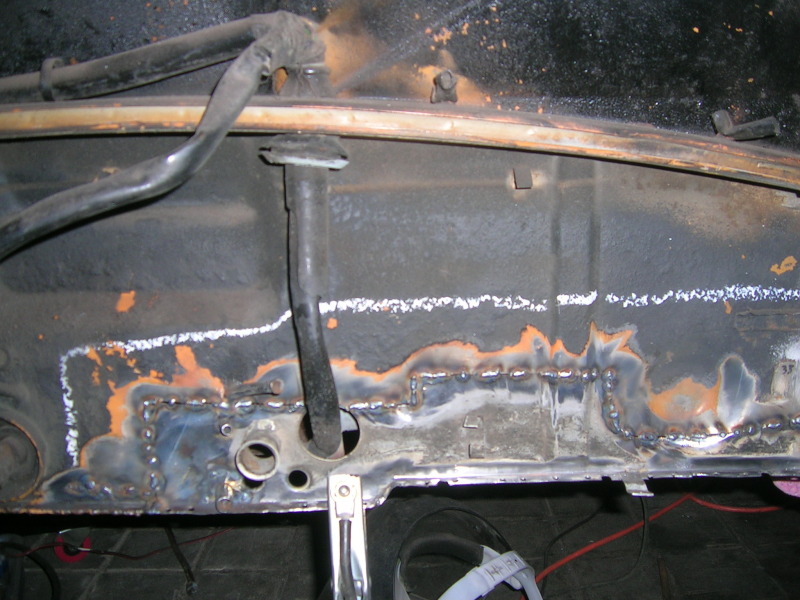
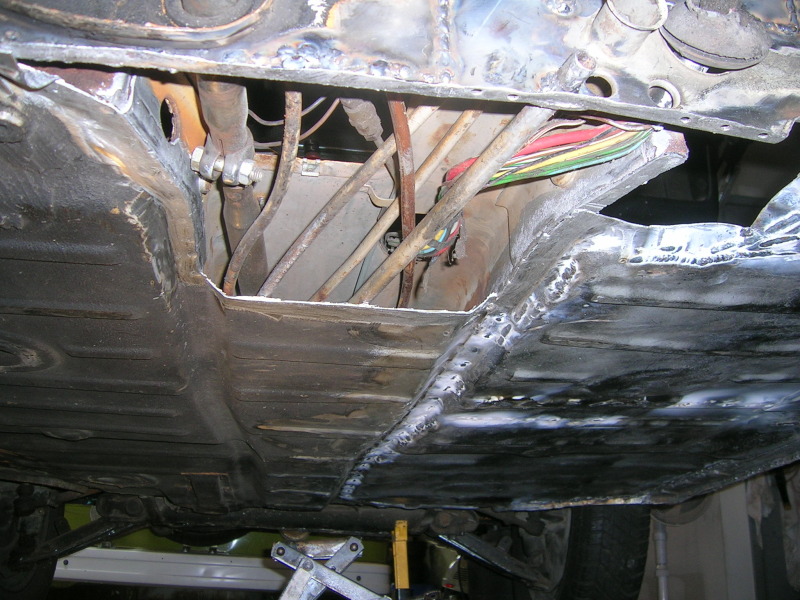
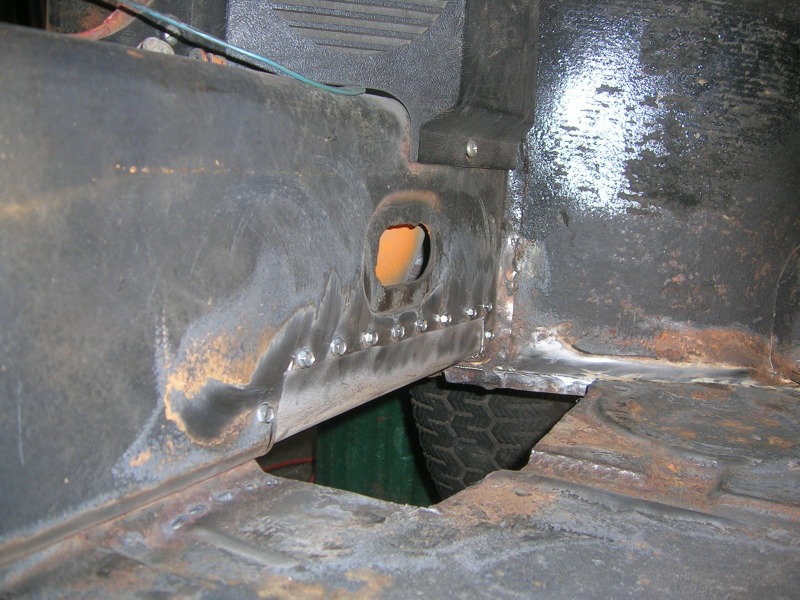
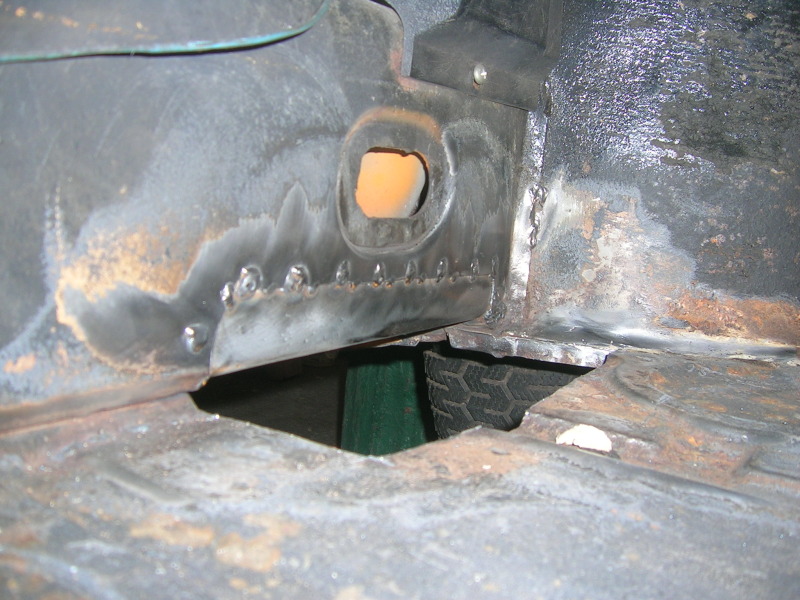
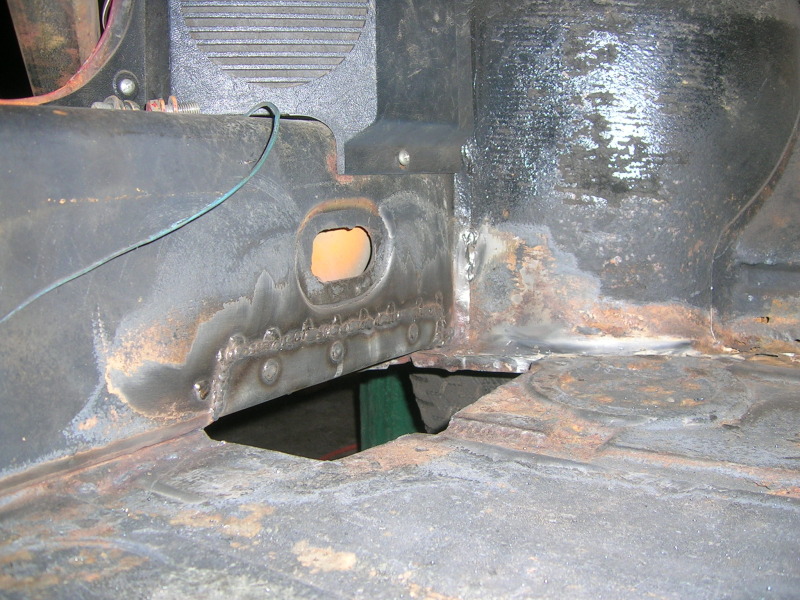
Question for everyone, what is the purpose of these two circular holes in the floor under the gas tank:
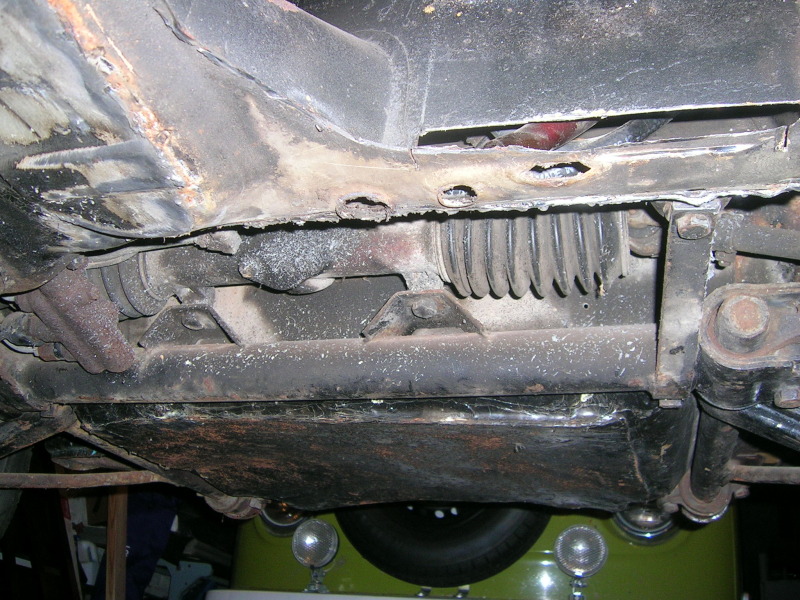
The one furthest to the right is a drain, but the two circular ones look like they might be from the factory, but might also not be. Any ideas? The PO actually wrapped the replacement floorpan over all of the ports . . . insane.
So yeah, that is what I've been up to. Missed Hershey, which was a bummer, but I figured that if I had the time to head out to it, it might be better spent working on my car so that someday I can go to it in a 914.
Also found a mouse nest in my driver's long last night from who knows when. Nabbed it through the front port in the driver's footwell by the heater tube. Nice and rusty on the bottom, found a spot where I could stick a screwdriver through the long there too. Great.
-Chris
Lots of seam sealer hiding birdshit stick welds barely connecting the firewall sheet metal to a big ol chunk of metal barely connected to the clutch tube. Of course, they went to the trouble to do this crap repair, but didn't touch the front mount, which was flapping in the breeze. Middle mount, fine by some weird chance. So since my lower firewall was rusted, I just cut it out taking time around the tubes:
I used a crappy air body saw from HF for the long cuts that might be my new favorite tool. Much less mess than a cutoff wheel, way more accurate, doesn't heat up the metal as much, etc. Good stuff. Tacked/welded in firewall chunk:
Much better. Also took the opportunity to weld a washer on the inside of the firewall to support the clutch tube further:
Still need to weld the clutch tube to the firewall, I have some copper tubing to be used as a backup, but once that is done I don't think the clutch tube will be going anywhere anytime soon. No shots of the front repair but I just drilled some holes to get access to the broken mount, then welded it all together.
I'm also still dealing with the PO crap pass floor replacement. The footwell had a decent rustout that the PO ignored when the new floor was "installed":
Thick black paint and seam sealer does not make the rustout disappear. Fabbed/tacked:
Question for everyone, what is the purpose of these two circular holes in the floor under the gas tank:
The one furthest to the right is a drain, but the two circular ones look like they might be from the factory, but might also not be. Any ideas? The PO actually wrapped the replacement floorpan over all of the ports . . . insane.
So yeah, that is what I've been up to. Missed Hershey, which was a bummer, but I figured that if I had the time to head out to it, it might be better spent working on my car so that someday I can go to it in a 914.
Also found a mouse nest in my driver's long last night from who knows when. Nabbed it through the front port in the driver's footwell by the heater tube. Nice and rusty on the bottom, found a spot where I could stick a screwdriver through the long there too. Great.
-Chris
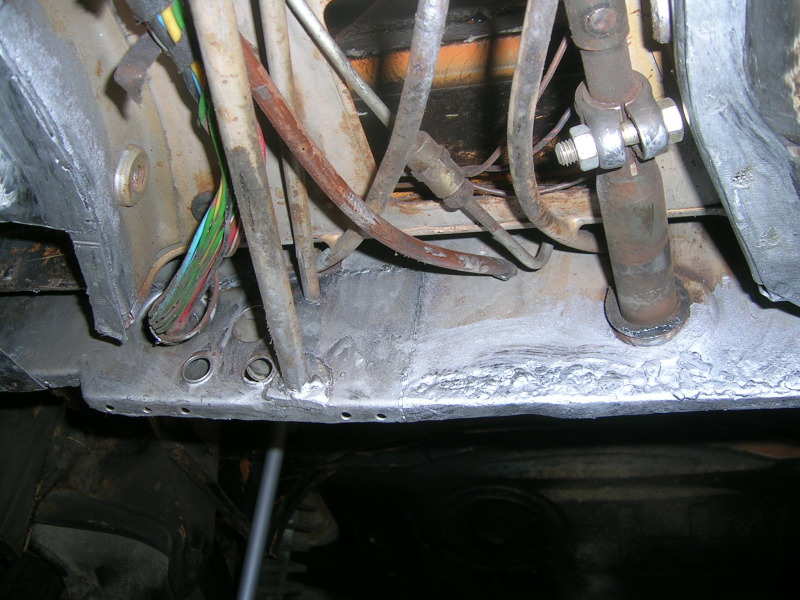
I think all three hoses are for drain tubes. There is one (maybe two?) from the fresh air box, there is one from the fuel filler neck, and there may be one from elsewhere in the area.
--DD
--DD
Great, thanks
I think all three hoses are for drain tubes. There is one (maybe two?) from the fresh air box, there is one from the fuel filler neck, and there may be one from elsewhere in the area.
--DD
QUOTE(Dave_Darling @ Apr 29 2010, 12:52 PM)
I think all three hoses are for drain tubes. There is one (maybe two?) from the fresh air box, there is one from the fuel filler neck, and there may be one from elsewhere in the area.
--DD
QUOTE(Dave_Darling @ Apr 29 2010, 01:52 PM)
I think all three hoses are for drain tubes. There is one (maybe two?) from the fresh air box, there is one from the fuel filler neck, and there may be one from elsewhere in the area.
--DD

That looks and sounds right.
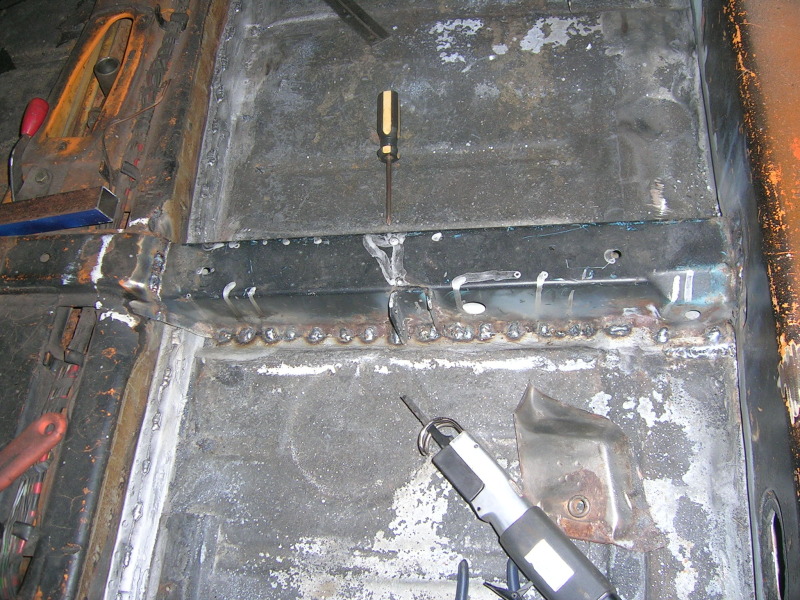
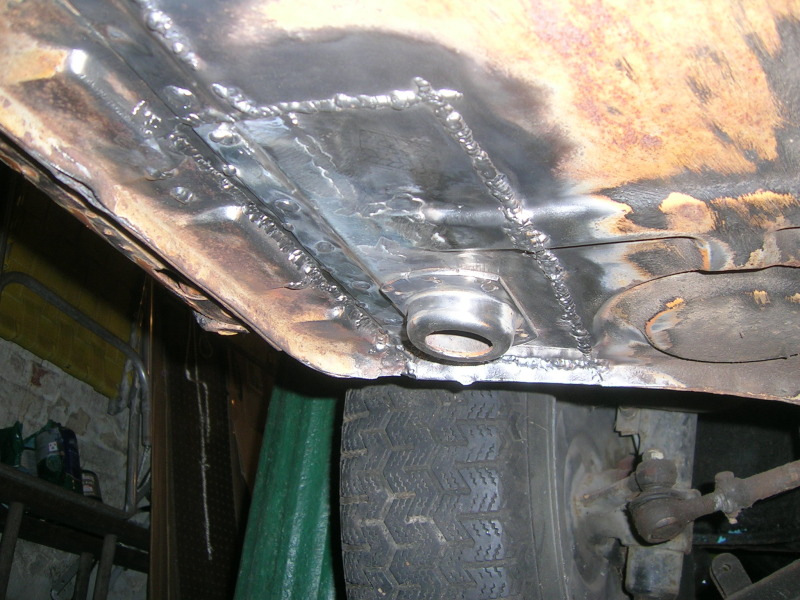
Pass floorpan is back in:
More welding than I really want up in that footwell but it will do. Someday I'll grind it all, but I am more interested in getting this car on the road at this point. I stitched the floorpan in, there wasn't enough of a flange to do large enough spots so I alternated 1" beads around the periphery on both the top and bottom side. The pan itself wasn't a great replication of the original pan, had to do some "editing" where the pan joined the crossmember at the long:
Much better than the job the PO did with excess from the pan half wrapping up and over these drain holes:
Crossmember in:
I deliberated for a long time about what to do with the rear part of the tunnel. It was pretty weak from rot, but I didn't really want to cut it out. Since I had a decent piece to use for replacement, I sucked it up:
Didn't realize that the firewall was in bad shape underneath where the shift rod passes through when I grafted in the "new" metal. Some tedious welding filled in the rustouts. Not my greatest work, but meh:
New tunnel floor tacked in:
-Chris
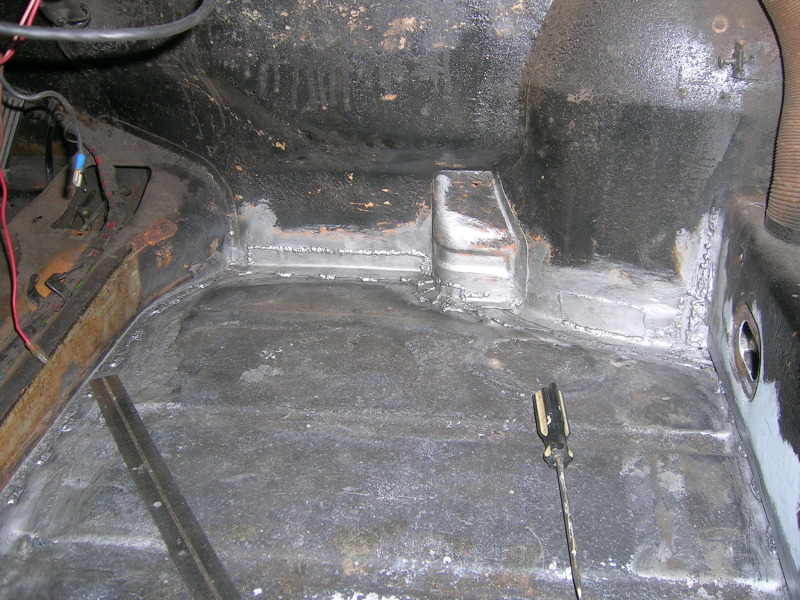
Been too long since I updated. Finished my masters degree and working now, got a job at a product design firm, and maybe now I have more time to work on my 914. Maybe. Got the inner bulkhead in:
Finished up the jack stand support:
Patched the hole in the driver's side floor under the parking brake handle (stretching to the engine compartment):
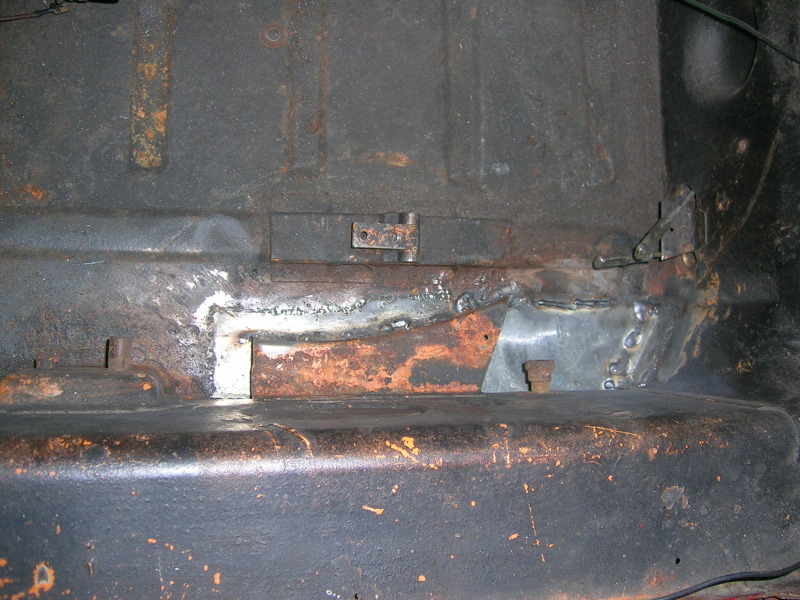
And started to tackle the swiss cheese in the driver's side long due to a mouse nest:
Backing in:
And where I have to go next:
-Chris
Finished up the jack stand support:
Patched the hole in the driver's side floor under the parking brake handle (stretching to the engine compartment):
And started to tackle the swiss cheese in the driver's side long due to a mouse nest:
Backing in:
And where I have to go next:
-Chris
Chris keep at it like you are and you'll get it on the road soon enough!
I do admire your patience...
I do admire your patience...

Looking good man!
John
Pretty amazing job so far. Keep up the good work.
Looks great Chris...and congrats on the masters and new job. 
Let me know if you need any parts or metal for your 914 as I still have the yellow car but have to get it out of my garage in the next couple months.
Let me know if you need any parts or metal for your 914 as I still have the yellow car but have to get it out of my garage in the next couple months.
Thanks guys. I can kind of see the light at the end of the tunnel, at least as far as the chassis work goes. Hoping to get her on the road this year, probably not as nice on the exterior as I would like, but I gotta drive this thing.
Jerry, I think I am good as far as metal goes, but I definitely still want that front valence if you still have it. What does the driver's side floor, up by the pedals, look like?
-Chris
Jerry, I think I am good as far as metal goes, but I definitely still want that front valence if you still have it. What does the driver's side floor, up by the pedals, look like?
-Chris
Great...getting that car sorted out is a real accomplishment. Looking forward to seeing it when it happens.
I still have the valence. It's yours. With another kid and a house remodel in progress, not much has changed in the garage except for a little work on the gemini blue car.
Aside from the longs and sail panel issues I never finished, it still seems pretty solid structurally. I'll check the pan underneath again to be sure but the driver side floor is fine. Trunks and firewalls are mint.
Cool, lemme know. I might just fab the small area that I need . . .
Congrats on the additional kid! Maybe we can meet up at some point this driving season . . .
Congrats on the additional kid! Maybe we can meet up at some point this driving season . . .
Second layer in on the long:
Hole in the floor patched:
Hole in the floor patched:
Nice work!
Absolutely fantastic thread! I just went through the whole thing and am impressed. looking forward to watching the rest of it come together. ![popcorn[1].gif](http://www.914world.com/bbs2/style_emoticons/default/popcorn[1].gif)
peace,
chuck
peace,
chuck
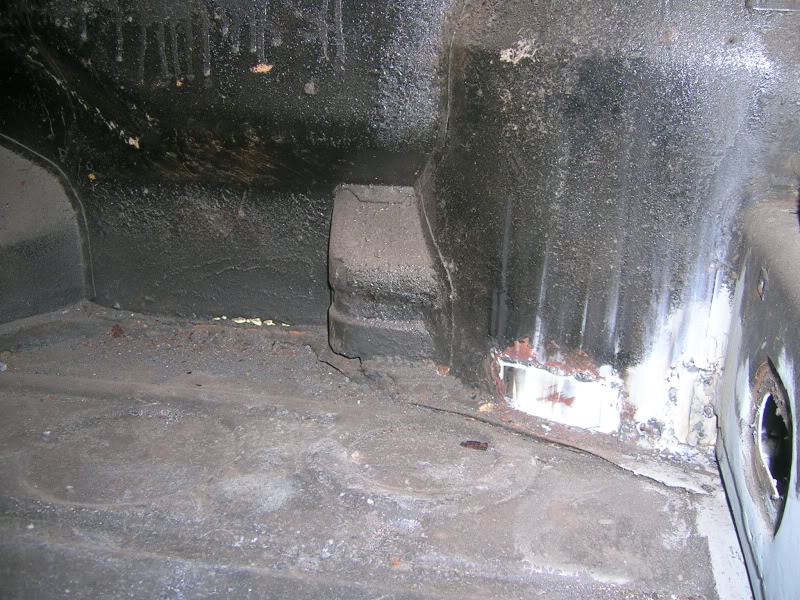
Got a special present from a PO:
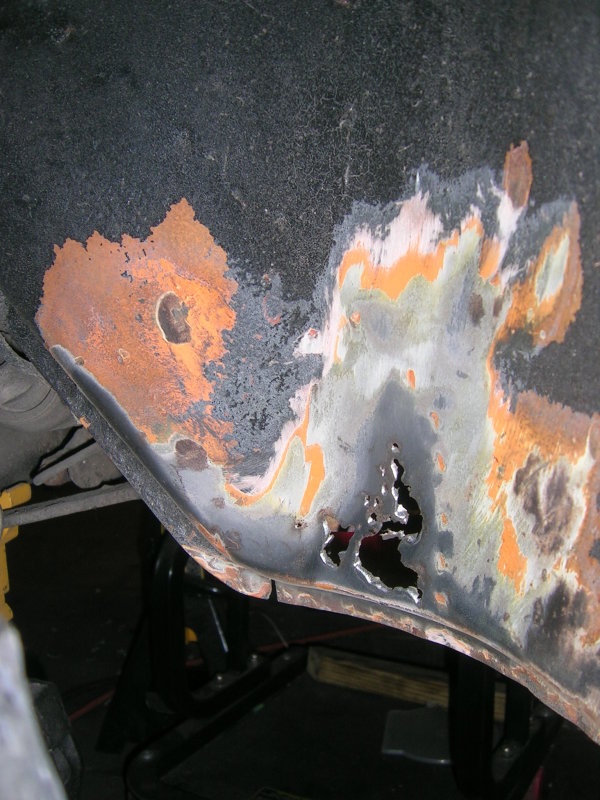
That rust out is in the driver's side wheel well, and was nicely hidden under some bondo. Lovely. It is (was) right behind the bump out in the driver's side foot well:

Now I know why that area needed so much work.
Looks like I didn't snap a pic of the wheel well patch, have to add that later, but got everything sealed up this weekend:
-Chris
That rust out is in the driver's side wheel well, and was nicely hidden under some bondo. Lovely. It is (was) right behind the bump out in the driver's side foot well:
Now I know why that area needed so much work.
Looks like I didn't snap a pic of the wheel well patch, have to add that later, but got everything sealed up this weekend:
-Chris
This is a "lo-fi" version of our main content. To view the full version with more information, formatting and images, please click here.