|
|
|
Porsche, and the Porsche crest are registered trademarks of Dr. Ing. h.c. F. Porsche AG.
This site is not affiliated with Porsche in any way. Its only purpose is to provide an online forum for car enthusiasts. All other trademarks are property of their respective owners. |
|
|


| Spoke |
 Apr 2 2014, 11:31 PM Apr 2 2014, 11:31 PM
Post
#1
|
|
Jerry  Group: Members Posts: 7,370 Joined: 29-October 04 From: Allentown, PA Member No.: 3,031 Region Association: None |
This is a group buy of what I have referred to as the 5mm LED rev 2 Brake/Taillight PCB.
These are hand assembled one by one, tested, and will be delivered as they are produced. I have made a list of folks who have shown interest in purchase from my other thread. That list is in the next post. No need to re-request purchase if you are on the list. I will PM each member in turn. I will not request payment until your PCBs are to be assembled. The list is in chronological order and purchase requests will be handled in order. Please be patient. If you requested boards in that thread but are not on the list, please PM me and your name will be inserted appropriately. If you haven't previously requested a purchase and are not on the list in the next post please respond to this thread. Many folks are familiar with work done to develop LED brake and turnsignal lights from the LED developmental thread. See the last few pages for current info as I've tried several different configurations before arriving at the 5mm rev 2 PCBs. LED Taillight Development Thread This 5mm rev 2 PCB is available in 3 different configurations: 1) Brake Light: RED LEDs: Price: $90/pair 2) Turnsignal: RED LEDs: Price: $90/pair 3) Turnsignal: AMBER LEDs: Price: $90/pair Shipping: CONUS: $10 Outside CONUS: Determined at purchase. Each pair includes: 2 PCBs with 56 rearward facing 5mm LEDs each. Turnsignal configuration has 8 extra side-facing LEDs to replace the small side running light. Side LEDs will be AMBER color to match your taillight lens. Brake: Pigtail with 1157 base to plug directly into existing bulb socket. Turnsignal: Pigtail with 1156 base (turnsignal) and 5007 base (small side light) 6 clips for each pair to mount the boards to existing taillight housing for plug-n-play installation. 1 year guarantee Electrical Characteristics: Brake/Turnsignal: 0.35A @ 14V (4.9Watt) each PCB Taillight: 0.06A @ 14V (0.8Watt) each PCB Brake Configuration:  RED Turnsignal Configuration:  Actual Boards and clips:  |
   |

 
|
  |
Replies
| Spoke |
Apr 4 2014, 10:50 PM
Post
#2
|
|
Jerry Group: Members Posts: 7,370 Joined: 29-October 04 From: Allentown, PA Member No.: 3,031 Region Association: None |
Installation of the Turnsignal lights.
Remove both bulbs and insert the bulb bases into the sockets.  The outside clip is a bit tricky. It will be inserted to the electrical connector for the small bulb. It may be easier to start with this clip. It will only insert about 3/16 inch or so into the connector but should have a good bit of friction. You may need to support the metal rail with one hand when inserting the clip. Hold the clip on the flat sides. The edges are sharp so don't grasp them by the edges. 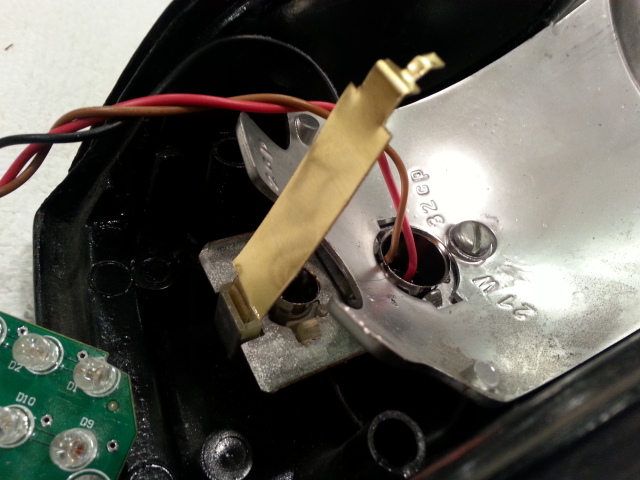 Angle the board down into the base of the reflector and insert the clip into the single board hole. Again be gentle with the clips. They won't break but may bend.  Outside clip inserted into board.  Insert the two clips on the other end of the board. Do not install on the divider yet. The outside clip needs to be bent into shape. 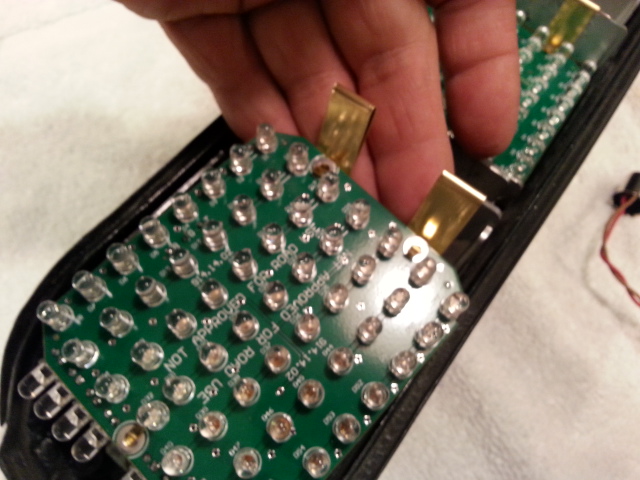 It is important that the board rest upon the divider so the outside clip needs to be bent into place. Gently bend the clip until the board rests upon the divider between the turnsignal and brake lights. The board needs to be close to this divider since the outside of the board barely clears the mounting studs of the lens.  Insert the inside clips onto the divider and fully seat the clips. The boards needed to be filed a bit on the edges to clear the reflector dividers. If yours doesn't fit, it may need a bit more filing. Each board will be filed before shipping.  The outside clip may open up a bit at the board so a little pressure with a screwdriver will tighten up the clip if loose.  Here's how the boards look when installed. The outside edges of the boards stick out a bit from the housing but fit under the lens. This angle is needed so the LEDs point directly to the rear of the car.   When installing the lens, start with the outside posts. The side LEDs are very close to the posts and every bit of clearance when installing the lens is needed. If the board isn't centered well enough the outside side LED may be bent. It can be easily straightened if it bends.  And done. If you have good dexterity, this job can be done with the housing on the car. Just take your time and get into a comfortable position when performing the installation.  |
|
|
|
Posts in this topic
 Spoke LED Brake/Taillight Group Buy Apr 2 2014, 11:31 PM
 Spoke This is the list of folks who have requested purch... Apr 2 2014, 11:37 PM zambezi You can add me to the list for a set of the red br... Apr 3 2014, 09:54 AM
 john77 Add me for a set of the brake lights and the amber... Apr 3 2014, 11:52 AM IanS I'm in for a set of brakes and red turn signal... Apr 3 2014, 11:49 AM r_towle I want my oompa loompa NOWWWWW
or at least at Her... Apr 3 2014, 01:37 PM jd74914 Those are awesome! Please add me to the list f... Apr 3 2014, 01:58 PM chads74 Can't wait for the PM. I am excited to get the... Apr 3 2014, 05:15 PM scottb if I could get in on this, pair of brake lights an... Apr 3 2014, 05:53 PM Spoke One set of Brake Lights and clips.
One set of T... Apr 4 2014, 10:12 PM Spoke Installation of the brake light.
Remove the bulb ... Apr 4 2014, 10:24 PM Rleog Should be no questions about this installation. N... Apr 4 2014, 11:40 PM CptTripps Well done! Apr 5 2014, 07:44 AM Chris H. Fantastic! I'll pay you today.
EDIT: Al... Apr 5 2014, 09:08 AM rmdinmd add me for one set of brake and red turn signal.
... Apr 5 2014, 09:13 AM Firstcar Please add me for a set of brake light and turn si... Apr 5 2014, 03:12 PM Seabird Please put me down for red brake lights. :Qarl: Apr 5 2014, 09:00 PM smarens I would like a set of brake lights and a set of am... Apr 5 2014, 09:47 PM jim dorociak Please put me in for brake lights and amber turn s... Apr 5 2014, 10:04 PM peteyd I will get a set of the brake and red turn signals... Apr 6 2014, 11:46 AM Gary A pair of brake and a pair of red turn signals ple... Apr 6 2014, 07:01 PM Spoke Guys thanks for all the support.
I will contact y... Apr 6 2014, 07:54 PM tomeric914 Well done Spoke! Can't wait! :cheer: Apr 6 2014, 08:08 PM lonewolfe These LED tail lights are awesome. Do you have pla... Apr 6 2014, 08:13 PM Spoke
These LED tail lights are awesome. Do you have pl... Apr 7 2014, 07:00 PM Spoke Experimenting with plastic clips. My colleague is ... Apr 7 2014, 06:56 PM monkeyboy
These LED tail lights are awesome. Do you have p... Apr 7 2014, 11:25 PM lonewolfe
[quote name='Spoke' post='2021995' date='Apr 7 20... Apr 8 2014, 12:57 AM monkeyboy Yes. They are one of the brands that just aren... Apr 8 2014, 08:46 AM 914forme Please add me to the list.
Red Brake lights - go ... Apr 20 2014, 06:59 PM lonewolfe I'd like to be added to the list for the red b... Apr 20 2014, 07:47 PM Vacca Rabite I just say this thread and WANT IN. Can I still g... Apr 20 2014, 07:55 PM Spoke
I just say this thread and WANT IN. Can I still ... Apr 20 2014, 08:56 PM Vacca Rabite
I just say this thread and WANT IN. Can I still... Apr 21 2014, 09:35 AM Spoke We're switching the clips from the brass clips... Apr 20 2014, 09:13 PM Spoke For the turnsignal boards, 2 long clips are used o... Apr 20 2014, 09:27 PM Steve Is it to late to get added to the list?
If not I w... Apr 20 2014, 09:46 PM palmer_md I'm in also. Love the new clips and the side ... Apr 21 2014, 12:39 AM MATTYLITE If this group buy is still being offered I'd l... Apr 21 2014, 01:05 AM JmuRiz Very cool, I'm in for red brakes and turns...b... Apr 21 2014, 08:35 AM chads74 Spoke can you add me for a set of the red turn sig... Apr 21 2014, 08:36 AM wes Very nice, I'd like to get in on the compleat ... Apr 21 2014, 09:56 AM Spoke Updated the clips again. The inside turnsignal cli... May 7 2014, 08:58 PM CptTripps Can I get a new set of clips? Those look a lot bet... May 7 2014, 09:05 PM Spoke
Can I get a new set of clips? Those look a lot be... May 7 2014, 09:44 PM dadaDaveed If the group buy is still open, I'm in for a p... May 7 2014, 10:37 PM Rleog I watched the development of these boards and was ... May 14 2014, 03:46 AM chads74 I received mine in the mail yesterday, I was so ex... May 14 2014, 06:21 AM tomeric914 Bumping this back up to the top. Just installed m... May 19 2014, 09:40 PM chads74 Drove at night again and felt very confident that ... May 20 2014, 11:21 AM Cupomeat If this group buy is still Open I want a full set ... May 20 2014, 02:46 PM tomeric914
Tomeric got his and told me i NEED to get them...... May 20 2014, 08:19 PM Spoke Glad to hear the good reports. Keep me posted if y... May 20 2014, 03:27 PM Spoke A couple of items about the turnsignal LEDs:
ITEM... Jun 1 2014, 08:35 PM CptTripps Only issue I have is the lights not blinking. This... Jun 2 2014, 05:46 AM SirAndy Finally got around to installing my set. :smash: ... Jun 5 2014, 09:39 PM Spoke
Finally got around to installing my set. :smash:... Jun 6 2014, 08:32 PM SirAndy Did you have any issues with the turnsignals not b... Jun 7 2014, 11:33 AM bulitt Apologize for slight hijack-
Looked into replacin... Jun 6 2014, 04:06 AM euro911 I remember seeing the development thread, but appa... Jun 6 2014, 04:54 AM smj Hey Spoke - panels arrived a while ago, finally go... Jun 9 2014, 01:55 AM Spoke
Hey Spoke - panels arrived a while ago, finally g... Jun 9 2014, 03:39 PM CptTripps Mine aren't blinking...just staying "on... Jun 9 2014, 06:19 AM SirAndy One more thing that was brought up in the other th... Jun 11 2014, 03:35 PM Spoke
One more thing that was brought up in the other t... Jun 11 2014, 08:39 PM zambezi Is there an "at home" remedy to cut the ... Jun 11 2014, 08:26 PM Spoke
Is there an "at home" remedy to cut the... Jun 11 2014, 09:01 PM SirAndy It is pretty simple to disable the amber LED array... Jun 12 2014, 11:19 AM zambezi Thanks, now I know how to disable it if I don... Jun 11 2014, 09:53 PM rmdinmd Installed mine yesterday. Took about one hour (ye... Jul 5 2014, 08:26 AM Spoke
Installed mine yesterday.
Everything thing seemed... Jul 5 2014, 10:03 PM Spoke I've now contacted everyone on this thread who... Jul 5 2014, 10:06 PM euro911 PM received and Paypal sent :D Jul 5 2014, 11:19 PM Rleog
I've now contacted everyone on this thread wh... Jul 6 2014, 01:22 PM john77 Finally my ladylike slender fingers come in handy.... Jul 11 2014, 11:11 PM eric9144 Interested in a set if you are still doing them, P... Jul 13 2014, 09:41 AM MATTYLITE I'd like a set of Red Driving Lights and a set... Jul 13 2014, 12:16 PM Spoke
I'd like a set of Red Driving Lights and a se... Jul 19 2014, 07:24 AM dadaDaveed Hey Spoke,
I installed my LED's this afternoon... Jul 28 2014, 04:25 PM euro911 The Postman delivered mine today :)
Hoping to g... Jul 28 2014, 05:01 PM Steve I also got mine today, but it will be a couple of ... Jul 28 2014, 06:55 PM 914Mike Just seeing this today. One thing you should consi... Aug 4 2014, 03:54 PM mikesmith Thanks for the R2 advice, just updated mine.
A c... Aug 4 2014, 11:45 PM Spoke
Thanks for the R2 advice, just updated mine.
A ... Aug 5 2014, 07:18 AM rdauenhauer I recall reading this at the start but forgot abou... Aug 5 2014, 09:05 AM RJMII hey Spoke,
are you still making these? Apr 16 2015, 11:03 AM Chris H.
hey Spoke,
are you still making these?
There... Apr 16 2015, 01:02 PM
john77 Add me for a set of the brake lights and the amber... Apr 3 2014, 11:52 AM IanS I'm in for a set of brakes and red turn signal... Apr 3 2014, 11:49 AM r_towle I want my oompa loompa NOWWWWW
or at least at Her... Apr 3 2014, 01:37 PM jd74914 Those are awesome! Please add me to the list f... Apr 3 2014, 01:58 PM chads74 Can't wait for the PM. I am excited to get the... Apr 3 2014, 05:15 PM scottb if I could get in on this, pair of brake lights an... Apr 3 2014, 05:53 PM Spoke One set of Brake Lights and clips.
One set of T... Apr 4 2014, 10:12 PM Spoke Installation of the brake light.
Remove the bulb ... Apr 4 2014, 10:24 PM Rleog Should be no questions about this installation. N... Apr 4 2014, 11:40 PM CptTripps Well done! Apr 5 2014, 07:44 AM Chris H. Fantastic! I'll pay you today.
EDIT: Al... Apr 5 2014, 09:08 AM rmdinmd add me for one set of brake and red turn signal.
... Apr 5 2014, 09:13 AM Firstcar Please add me for a set of brake light and turn si... Apr 5 2014, 03:12 PM Seabird Please put me down for red brake lights. :Qarl: Apr 5 2014, 09:00 PM smarens I would like a set of brake lights and a set of am... Apr 5 2014, 09:47 PM jim dorociak Please put me in for brake lights and amber turn s... Apr 5 2014, 10:04 PM peteyd I will get a set of the brake and red turn signals... Apr 6 2014, 11:46 AM Gary A pair of brake and a pair of red turn signals ple... Apr 6 2014, 07:01 PM Spoke Guys thanks for all the support.
I will contact y... Apr 6 2014, 07:54 PM tomeric914 Well done Spoke! Can't wait! :cheer: Apr 6 2014, 08:08 PM lonewolfe These LED tail lights are awesome. Do you have pla... Apr 6 2014, 08:13 PM Spoke
These LED tail lights are awesome. Do you have pl... Apr 7 2014, 07:00 PM Spoke Experimenting with plastic clips. My colleague is ... Apr 7 2014, 06:56 PM monkeyboy
These LED tail lights are awesome. Do you have p... Apr 7 2014, 11:25 PM lonewolfe
[quote name='Spoke' post='2021995' date='Apr 7 20... Apr 8 2014, 12:57 AM monkeyboy Yes. They are one of the brands that just aren... Apr 8 2014, 08:46 AM 914forme Please add me to the list.
Red Brake lights - go ... Apr 20 2014, 06:59 PM lonewolfe I'd like to be added to the list for the red b... Apr 20 2014, 07:47 PM Vacca Rabite I just say this thread and WANT IN. Can I still g... Apr 20 2014, 07:55 PM Spoke
I just say this thread and WANT IN. Can I still ... Apr 20 2014, 08:56 PM Vacca Rabite
I just say this thread and WANT IN. Can I still... Apr 21 2014, 09:35 AM Spoke We're switching the clips from the brass clips... Apr 20 2014, 09:13 PM Spoke For the turnsignal boards, 2 long clips are used o... Apr 20 2014, 09:27 PM Steve Is it to late to get added to the list?
If not I w... Apr 20 2014, 09:46 PM palmer_md I'm in also. Love the new clips and the side ... Apr 21 2014, 12:39 AM MATTYLITE If this group buy is still being offered I'd l... Apr 21 2014, 01:05 AM JmuRiz Very cool, I'm in for red brakes and turns...b... Apr 21 2014, 08:35 AM chads74 Spoke can you add me for a set of the red turn sig... Apr 21 2014, 08:36 AM wes Very nice, I'd like to get in on the compleat ... Apr 21 2014, 09:56 AM Spoke Updated the clips again. The inside turnsignal cli... May 7 2014, 08:58 PM CptTripps Can I get a new set of clips? Those look a lot bet... May 7 2014, 09:05 PM Spoke
Can I get a new set of clips? Those look a lot be... May 7 2014, 09:44 PM dadaDaveed If the group buy is still open, I'm in for a p... May 7 2014, 10:37 PM Rleog I watched the development of these boards and was ... May 14 2014, 03:46 AM chads74 I received mine in the mail yesterday, I was so ex... May 14 2014, 06:21 AM tomeric914 Bumping this back up to the top. Just installed m... May 19 2014, 09:40 PM chads74 Drove at night again and felt very confident that ... May 20 2014, 11:21 AM Cupomeat If this group buy is still Open I want a full set ... May 20 2014, 02:46 PM tomeric914
Tomeric got his and told me i NEED to get them...... May 20 2014, 08:19 PM Spoke Glad to hear the good reports. Keep me posted if y... May 20 2014, 03:27 PM Spoke A couple of items about the turnsignal LEDs:
ITEM... Jun 1 2014, 08:35 PM CptTripps Only issue I have is the lights not blinking. This... Jun 2 2014, 05:46 AM SirAndy Finally got around to installing my set. :smash: ... Jun 5 2014, 09:39 PM Spoke
Finally got around to installing my set. :smash:... Jun 6 2014, 08:32 PM SirAndy Did you have any issues with the turnsignals not b... Jun 7 2014, 11:33 AM bulitt Apologize for slight hijack-
Looked into replacin... Jun 6 2014, 04:06 AM euro911 I remember seeing the development thread, but appa... Jun 6 2014, 04:54 AM smj Hey Spoke - panels arrived a while ago, finally go... Jun 9 2014, 01:55 AM Spoke
Hey Spoke - panels arrived a while ago, finally g... Jun 9 2014, 03:39 PM CptTripps Mine aren't blinking...just staying "on... Jun 9 2014, 06:19 AM SirAndy One more thing that was brought up in the other th... Jun 11 2014, 03:35 PM Spoke
One more thing that was brought up in the other t... Jun 11 2014, 08:39 PM zambezi Is there an "at home" remedy to cut the ... Jun 11 2014, 08:26 PM Spoke
Is there an "at home" remedy to cut the... Jun 11 2014, 09:01 PM SirAndy It is pretty simple to disable the amber LED array... Jun 12 2014, 11:19 AM zambezi Thanks, now I know how to disable it if I don... Jun 11 2014, 09:53 PM rmdinmd Installed mine yesterday. Took about one hour (ye... Jul 5 2014, 08:26 AM Spoke
Installed mine yesterday.
Everything thing seemed... Jul 5 2014, 10:03 PM Spoke I've now contacted everyone on this thread who... Jul 5 2014, 10:06 PM euro911 PM received and Paypal sent :D Jul 5 2014, 11:19 PM Rleog
I've now contacted everyone on this thread wh... Jul 6 2014, 01:22 PM john77 Finally my ladylike slender fingers come in handy.... Jul 11 2014, 11:11 PM eric9144 Interested in a set if you are still doing them, P... Jul 13 2014, 09:41 AM MATTYLITE I'd like a set of Red Driving Lights and a set... Jul 13 2014, 12:16 PM Spoke
I'd like a set of Red Driving Lights and a se... Jul 19 2014, 07:24 AM dadaDaveed Hey Spoke,
I installed my LED's this afternoon... Jul 28 2014, 04:25 PM euro911 The Postman delivered mine today :)
Hoping to g... Jul 28 2014, 05:01 PM Steve I also got mine today, but it will be a couple of ... Jul 28 2014, 06:55 PM 914Mike Just seeing this today. One thing you should consi... Aug 4 2014, 03:54 PM mikesmith Thanks for the R2 advice, just updated mine.
A c... Aug 4 2014, 11:45 PM Spoke
Thanks for the R2 advice, just updated mine.
A ... Aug 5 2014, 07:18 AM rdauenhauer I recall reading this at the start but forgot abou... Aug 5 2014, 09:05 AM RJMII hey Spoke,
are you still making these? Apr 16 2015, 11:03 AM Chris H.
hey Spoke,
are you still making these?
There... Apr 16 2015, 01:02 PM |
1 User(s) are reading this topic (1 Guests and 0 Anonymous Users)
0 Members:

|
Lo-Fi Version | Time is now: 2nd April 2026 - 02:22 PM |
Invision Power Board
v9.1.4 © 2026 IPS, Inc.