|
|
|
Porsche, and the Porsche crest are registered trademarks of Dr. Ing. h.c. F. Porsche AG.
This site is not affiliated with Porsche in any way. Its only purpose is to provide an online forum for car enthusiasts. All other trademarks are property of their respective owners. |
|
|

  |

| amfab |
 Jan 6 2017, 06:47 PM Jan 6 2017, 06:47 PM
Post
#81
|
|
Member  Group: Members Posts: 401 Joined: 17-May 16 From: Los Angeles Member No.: 20,004 Region Association: None |
Can you recommend a good Sheetmetal forum?
|
   |

 
|
| tygaboy |
Jan 6 2017, 09:23 PM
Post
#82
|
|
914 Guru Group: Members Posts: 5,829 Joined: 6-October 15 From: Petaluma, CA Member No.: 19,241 Region Association: Northern California |
QUOTE(amfab @ Jan 6 2017, 04:47 PM)  Can you recommend a good Sheetmetal forum? Some cool stuff here: http://www.allmetalshaping.com/forumdisplay.php?f=20 |
|
|
|
| 914forme |
Jan 7 2017, 08:17 AM
Post
#83
|
|
Times a wastin', get wrenchin'! Group: Members Posts: 3,899 Joined: 24-July 04 From: Dayton, Ohio Member No.: 2,388 Region Association: None |
QUOTE(amfab @ Jan 6 2017, 07:47 PM) Can you recommend a good Sheetmetal forum? Not a Forum but this will lead you to things way deeper than you ever wanted Robert is a true craftsman and is now running a video series of his work also. And it is relevant to work on our cars. Just wish he did not have so many large tools at his disposal. Robert does such a good job. |
|
|
|
| mbseto |
Jan 7 2017, 10:41 AM
Post
#84
|
|
Senior Member Group: Members Posts: 1,257 Joined: 6-August 14 From: Cincy Member No.: 17,743 Region Association: North East States |
metalmeet.com is about my speed, there's guys there that know hammer-forming- I don't have any big sheet metal tools, have to make it work with hammers and dollys.
|
|
|
|
| Cupomeat |
Jan 7 2017, 11:23 AM
Post
#85
|
|
missing my NY 914 in VA Group: Members Posts: 1,349 Joined: 26-November 07 From: Oakton VA Member No.: 8,376 Region Association: MidAtlantic Region |
Wow, been a little lax on the 914world lately due to other life events, but this kind of thread really gets me excited!
Fantastic work here and I love that another 914 is getting a much longer life! (IMG:style_emoticons/default/beerchug.gif) |
|
|
|
| cary |
Jan 23 2017, 05:40 AM
Post
#86
|
|
Advanced Member Group: Members Posts: 3,900 Joined: 26-January 04 From: Sherwood Oregon Member No.: 1,608 Region Association: Pacific Northwest |
QUOTE(amfab @ Jan 4 2017, 08:18 PM) I am about a month behind you... http://www.914world.com/bbs2/index.php?showtopic=301894 I hope my fabrications look this good. Subscribed -Andrew I've been so busy with my projects that I haven't been keeping up with any other build/restoration threads. Both of you guys are doing some impressive work. I can feel the passion all way up here in PDX. mbseto, love the motor mount creation. Did you have the big hole die cut ? Looks like it was made with a dimple die. |
|
|
|
| Curbandgutter |
Feb 13 2017, 01:43 PM
Post
#87
|
|
Senior Member Group: Members Posts: 566 Joined: 8-March 13 From: Murrieta CA Member No.: 15,637 Region Association: Southern California |
MBSETO Man you are awesome. Love your work. (IMG:style_emoticons/default/smilie_pokal.gif) (IMG:style_emoticons/default/smilie_pokal.gif) (IMG:style_emoticons/default/cheer.gif)
|
|
|
|
| mbseto |
Jun 25 2017, 09:16 AM
Post
#88
|
|
Senior Member Group: Members Posts: 1,257 Joined: 6-August 14 From: Cincy Member No.: 17,743 Region Association: North East States |
Thanks for the encouragement, guys...
QUOTE(cary @ Jan 23 2017, 07:40 AM) mbseto, love the motor mount creation. Did you have the big hole die cut ? Looks like it was made with a dimple die. I roughed-sawed the hole, then turned the lip down with a hammer and T-dolly, then ground the edge flat. I was sitting over my dolly with a hammer in one hand and the rubber motor mount piece in the other to get that hole to a good fit. I scrapped one piece trying to get it right... |
|
|
|
| mbseto |
Jun 25 2017, 09:52 AM
Post
#89
|
|
Senior Member Group: Members Posts: 1,257 Joined: 6-August 14 From: Cincy Member No.: 17,743 Region Association: North East States |
Need an update, Spring got away from me- work, etc. Got some garage work done, but it just didn't feel like enough and I put off posting. Here's a little catch up...
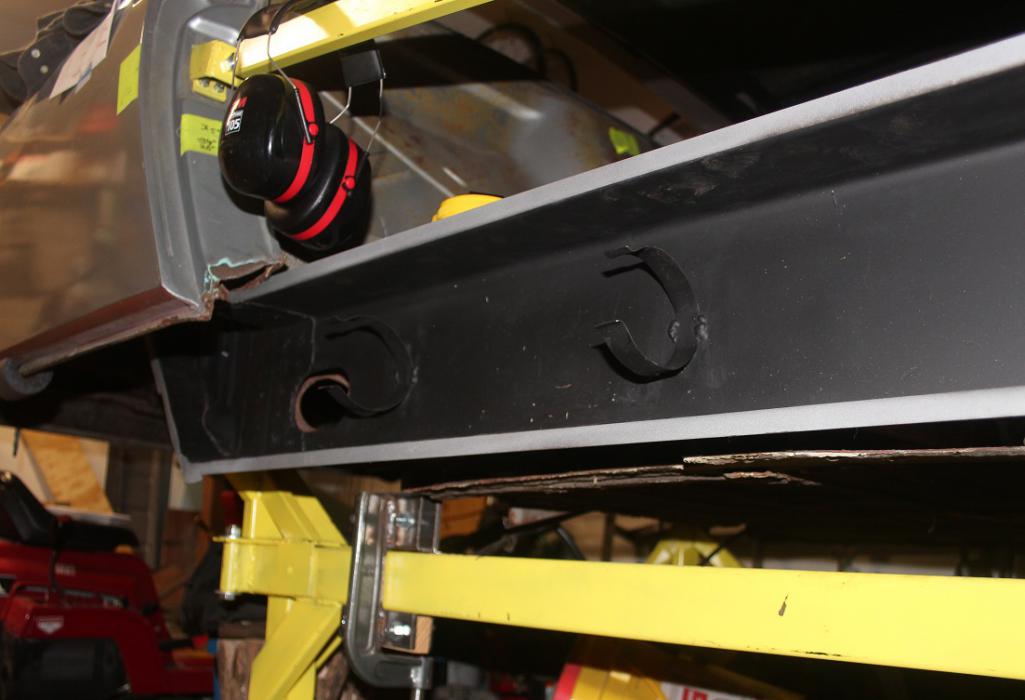
These dang spring clips... Someone suggested that I cut the ones out of my bad long and just weld them into the new long. Problem being that two of them were completely gone, rusted away entirely- just sad little stumps. They look like they would be easy to make, but as I'm checking out the one remaining one, I see it is spring tempered. I have a buddy with a forge and talked to him about making these... cave-man garage work. Made the pieces out of basic cold-rolled, there's the one remaining clip from what's left of the original long: 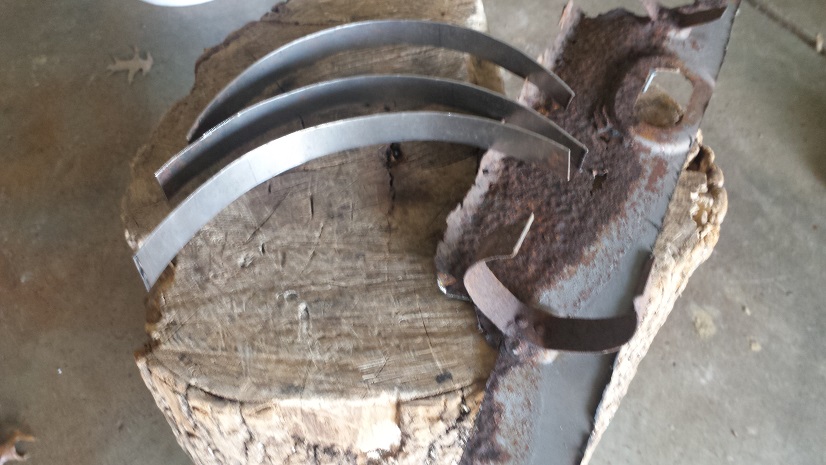 Here's the clips, cut and shaped but not yet tempered. If you squeeze them a little, they just stay bent, they are not springy at all. 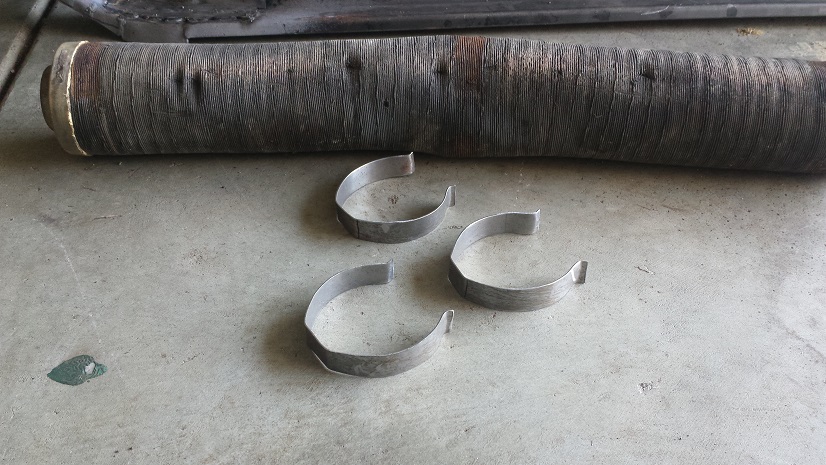 Into the forge they go. Heated to cherry, quenched in old motor oil: 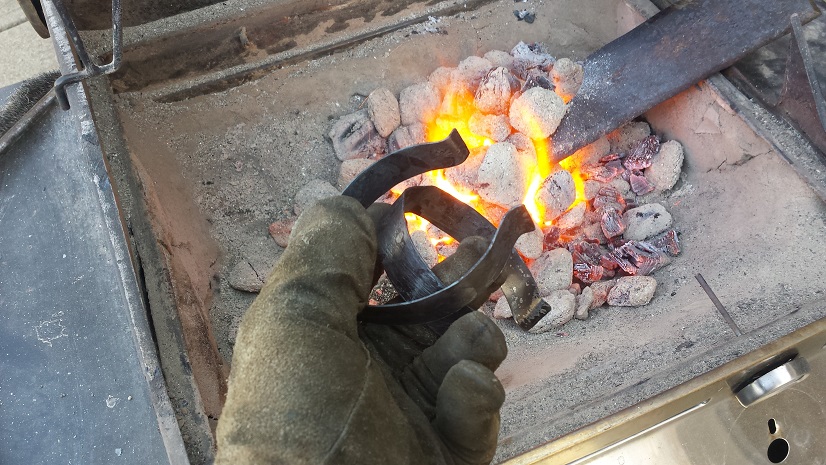 The annealing process, per an old book I have, says burn off the oil, then dip in oil again and burn it off again, then do that one more time and you have a spring temper. 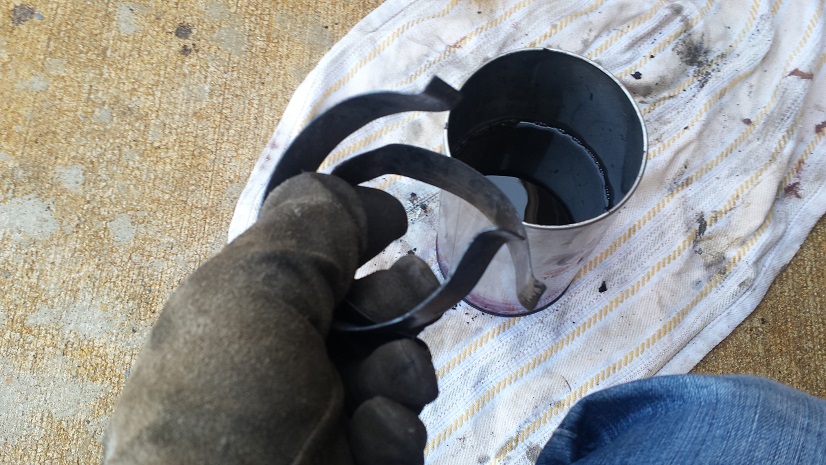 Worked like a charm, you can snap them and they vibrate like a tuning fork. Test fit everything with the tube, the long, and the elbows on either end. Hit them with a little weld-through primer and tacked them on. |
|
|
|
| mbseto |
Jun 25 2017, 10:03 AM
Post
#90
|
|
Senior Member Group: Members Posts: 1,257 Joined: 6-August 14 From: Cincy Member No.: 17,743 Region Association: North East States |
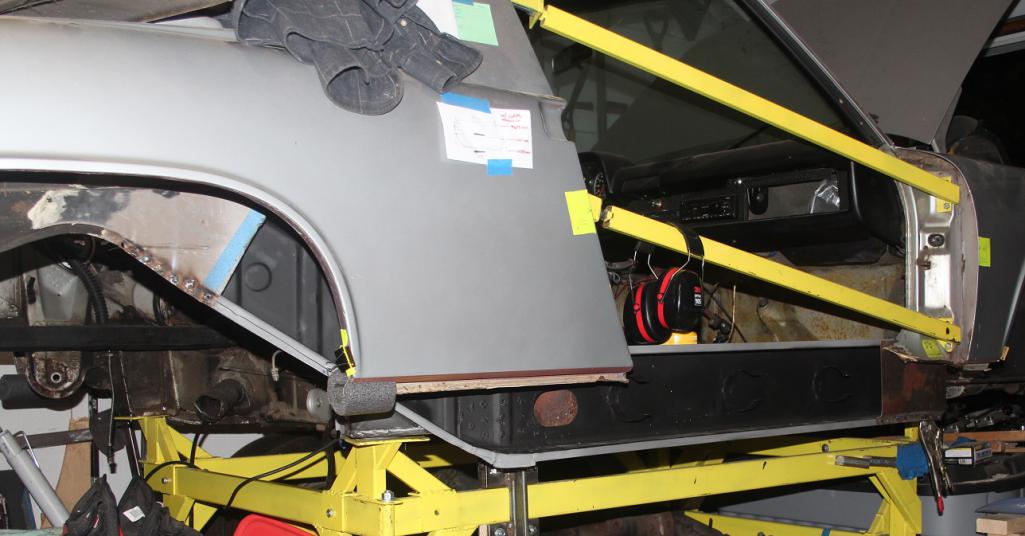
The new long is tacked in place. I keep measuring the door gaps over and over, I feel like a nervous mom. I'd be lying if I said I wasn't more than a little excited about this, it feels like a pretty big step forward. The next couple pieces from RD to close it up will go quick I think. Then we'll flip it around and do the other side. Less to do over there, but then it will have good bones again.
  |
|
|
|
| amfab |
Jun 25 2017, 12:21 PM
Post
#91
|
|
Member Group: Members Posts: 401 Joined: 17-May 16 From: Los Angeles Member No.: 20,004 Region Association: None |
QUOTE(mbseto @ Jun 25 2017, 09:03 AM) The new long is tacked in place. I keep measuring the door gaps over and over, I feel like a nervous mom. I'd be lying if I said I wasn't more than a little excited about this, it feels like a pretty big step forward. The next couple pieces from RD to close it up will go quick I think. Then we'll flip it around and do the other side. Less to do over there, but then it will have good bones again. Sweet, They look great, Im about* to rivet mine on one side, maybe I will just tack them like that. *"about" in 914 time means 2weeks—6 Months |
|
|
|
| Garland |
Jun 25 2017, 01:57 PM
Post
#92
|
|
Restoration Fanatic Group: Members Posts: 1,431 Joined: 8-January 04 From: ......Michigan...... Member No.: 1,535 Region Association: Upper MidWest |
I was not sure how this build was going to go in the very begining.
Now I know for sure. Great workmanship. |
|
|
|
| mbseto |
Oct 26 2017, 11:25 AM
Post
#93
|
|
Senior Member Group: Members Posts: 1,257 Joined: 6-August 14 From: Cincy Member No.: 17,743 Region Association: North East States |
Thank you for the encouragement. Being a part of the community really inspires my to up my game and try to maintain a quality of work...
OK, so need some brackets to hold the heater pipes in place. Made a pattern and clipped them out: 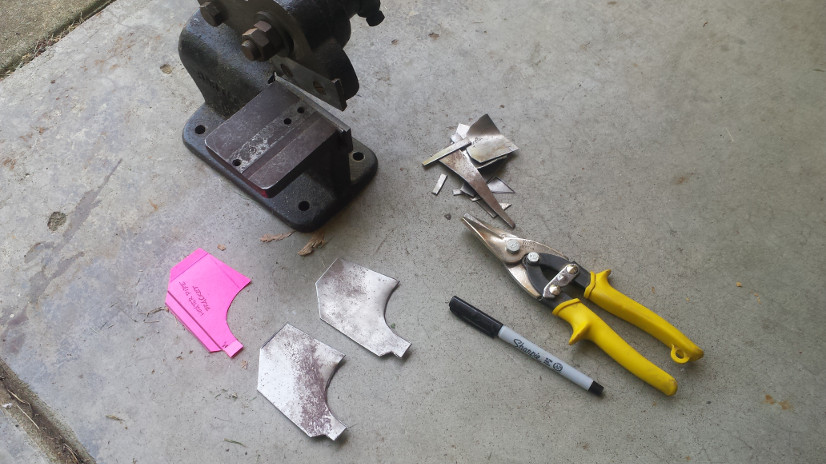 And here they are folded up: 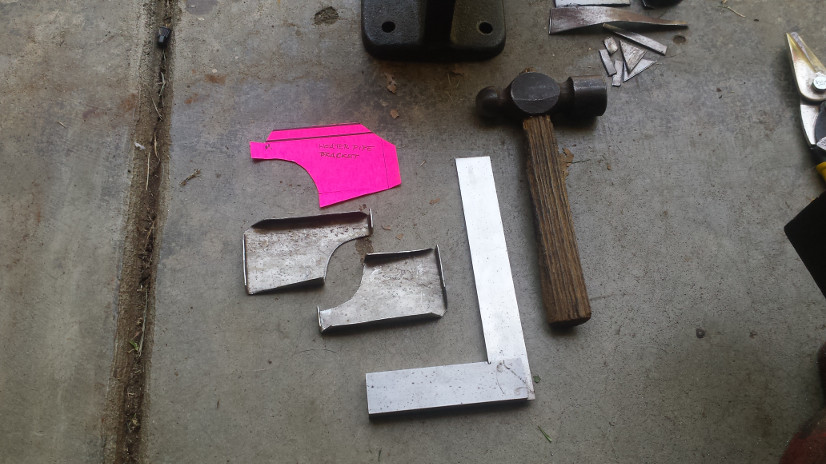 You know I got that extra-thick long welded in and then I was reading a thread about seat-belt bosses. Luckily it's not too late!! Ordered it from 914Rubber... It needs a fairly large hole in some 12g sheet to mount that thing; drill bit needs a 1/2" chuck. Can't use my hand drill, can't fit the 914 on the drill press. Called my vintage-tool-enthusiast buddy, he loaned me this wrist-breaker: 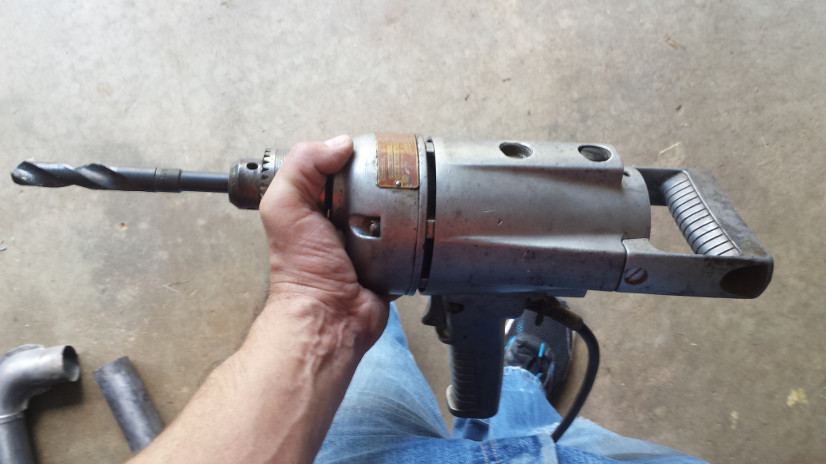 |
|
|
|
| mbseto |
Oct 26 2017, 11:36 AM
Post
#94
|
|
Senior Member Group: Members Posts: 1,257 Joined: 6-August 14 From: Cincy Member No.: 17,743 Region Association: North East States |
Another thread I was reading was talking about how much additional strength comes from the jack post. I was planning on leaving that off, and since my longs are well reinforced I thought it still might be OK. But in the end, I figured I'll take more strength wherever I can get it and since I still have the stock jack, might as well rebuild the jack posts.
Made a pattern from the old one, snipped out the metal: 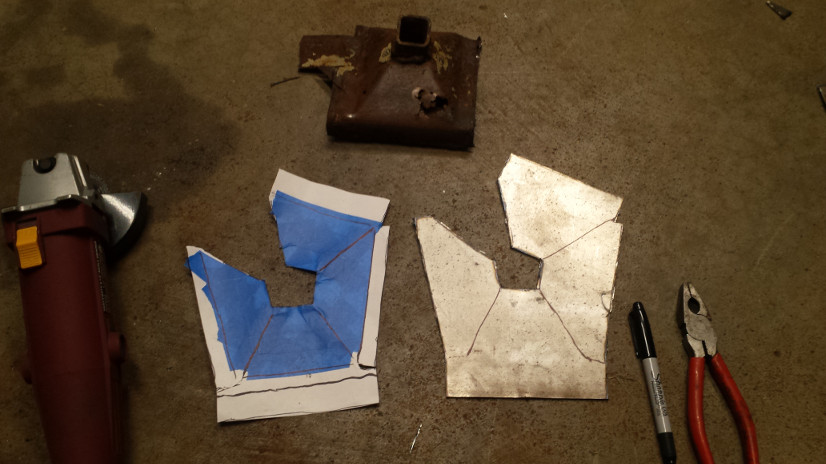 Hammer time: 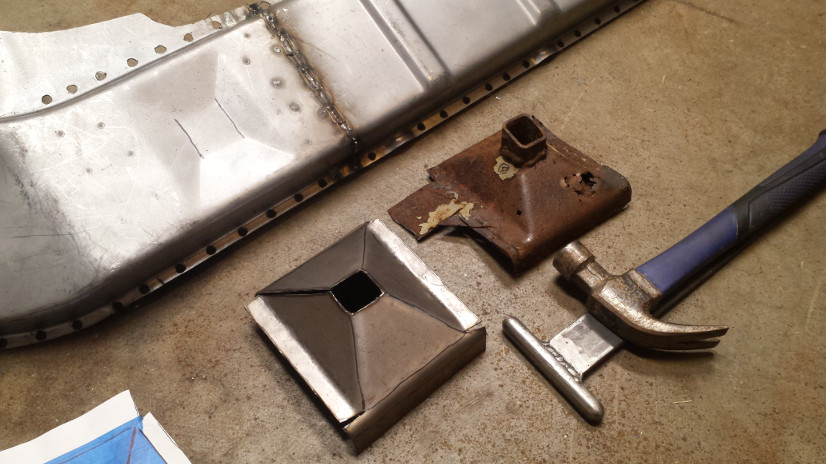 Got some square tube from the local metal supplier, kit needed some adjustment when all was said and done: 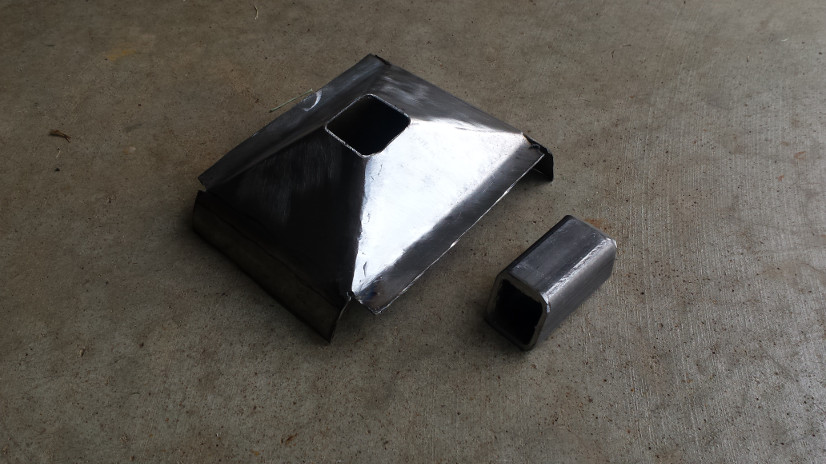 You don't see it here but I used the valance to position this guy: 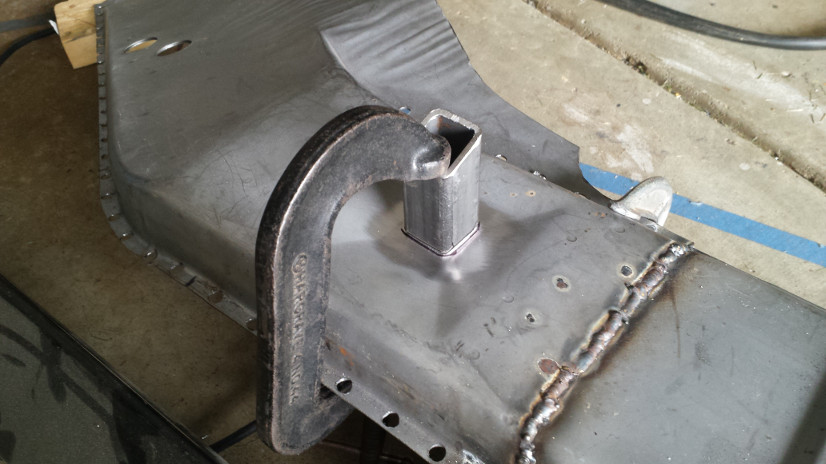 Needed to make some adjustments to the hole in the middle, ultimately a tiny bit of patch metal has to go in. I'll adjust the pattern before doing the other side. Some tapping with the hammer to get the flanges to conform to the long, then drilled for the rosette welds and primed- switched to the copper based weld-through, it does seem to weld easier: 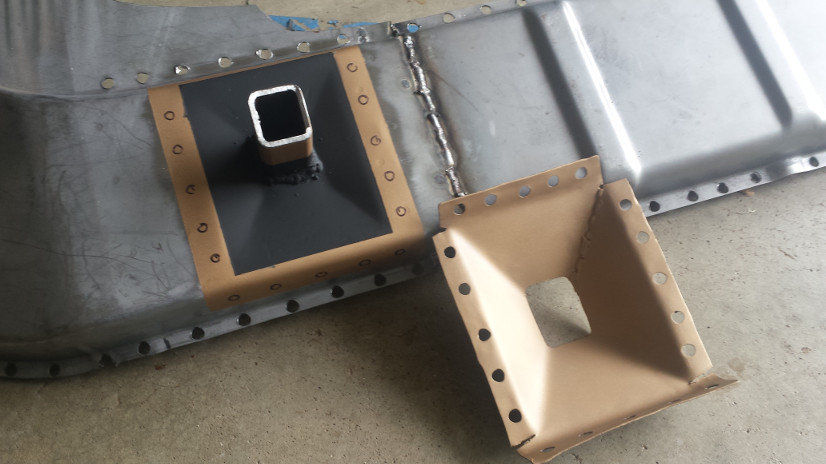 |
|
|
|
| bbrock |
Oct 26 2017, 11:47 AM
Post
#95
|
|
914 Guru Group: Members Posts: 5,269 Joined: 17-February 17 From: Montana Member No.: 20,845 Region Association: Rocky Mountains |
Man you do pretty work! (IMG:style_emoticons/default/thumb3d.gif)
|
|
|
|
| mbseto |
Feb 25 2018, 11:43 PM
Post
#96
|
|
Senior Member Group: Members Posts: 1,257 Joined: 6-August 14 From: Cincy Member No.: 17,743 Region Association: North East States |
These pics should have gone in with the last post, playing a little catch up here...
This is the heater tube in place: 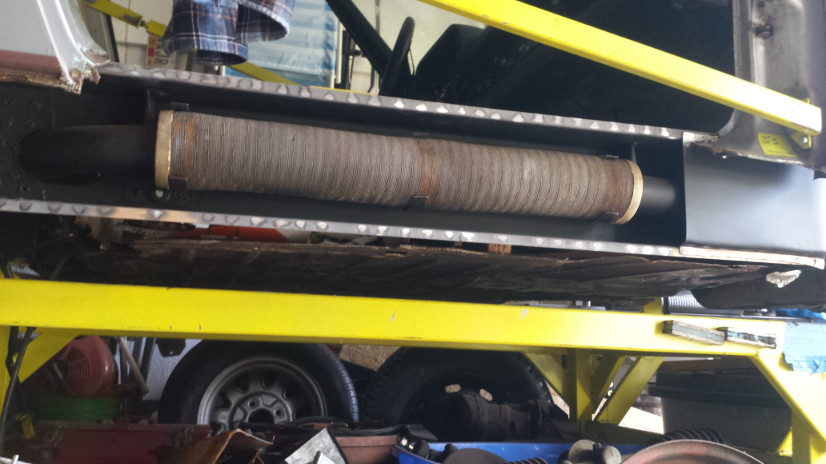 And the outer section of the long ready to go in: 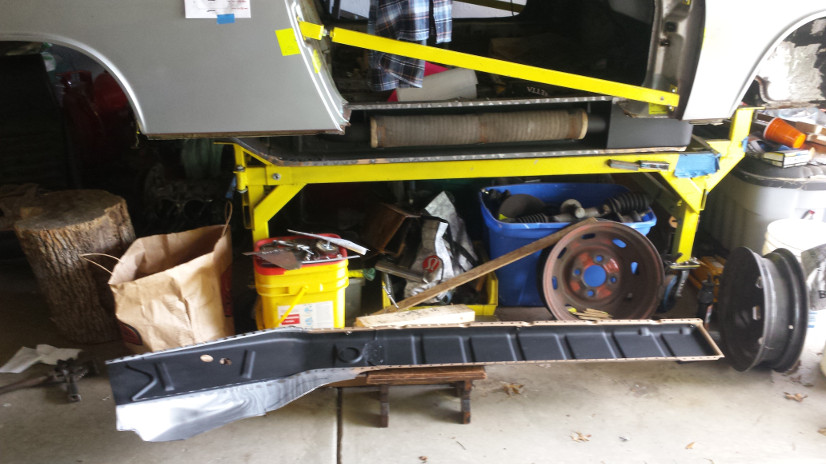 |
|
|
|
| defianty |
Feb 26 2018, 02:42 AM
Post
#97
|
|
Senior Member Group: Members Posts: 659 Joined: 9-August 06 From: Essex, UK Member No.: 6,621 Region Association: None |
Nice work you're doing there.
|
|
|
|
| mbseto |
Feb 26 2018, 10:46 PM
Post
#98
|
|
Senior Member Group: Members Posts: 1,257 Joined: 6-August 14 From: Cincy Member No.: 17,743 Region Association: North East States |
QUOTE(defianty @ Feb 26 2018, 03:42 AM) Nice work you're doing there. Thank you, I am having a ball doing it. But my desire to be able to drive it is getting stronger and stronger... Still doing a little retro posting... The wheelhouse had a rusty section above the long. Cut it out and fabricated a patch. Lots of tippy-taps with the hammer to get the edges matched up. 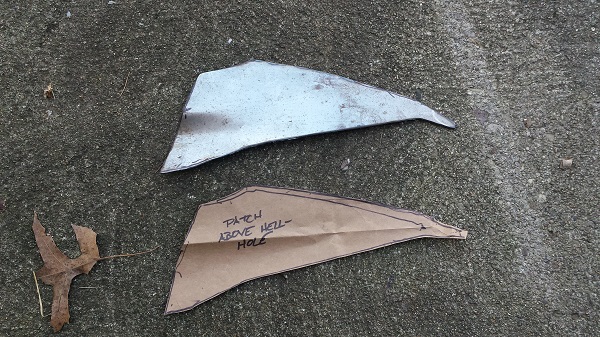 Here it is tacked in: 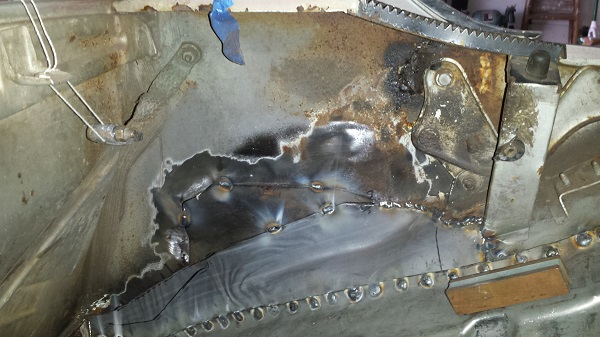 I should have detailed this part a little better, fitting the wheelhouse long at the back end. I cut out a layer of the "third" fire wall to get the long all the way up against the rear-most layer. 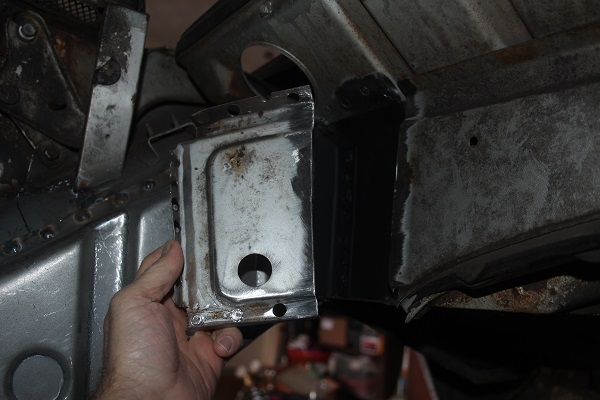 Made some tabs to connect the aft end of the long, then put the original piece back in place. There was a lot of head scratching here, a little bit of grinding off the welds and re-adjusting. Wasn't thinking much about taking pictures, but looking back on it, the thoughts in my head were a lot more complicated than what actually ended up happening. 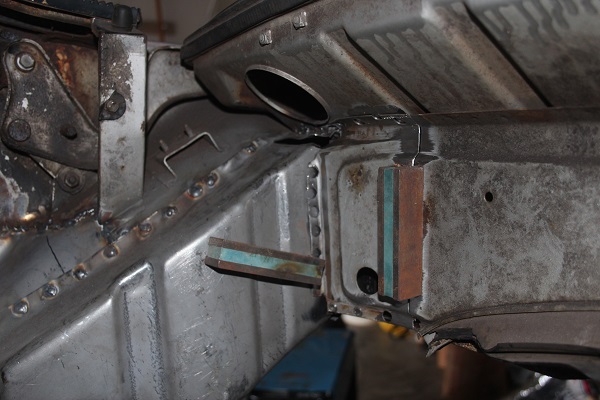 Attached image(s) 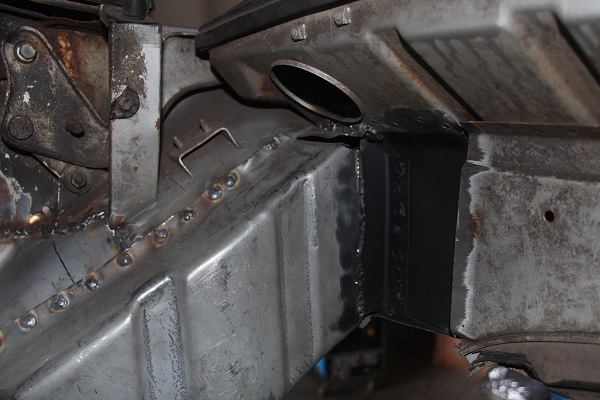
|
|
|
|
| mbseto |
Feb 26 2018, 11:15 PM
Post
#99
|
|
Senior Member Group: Members Posts: 1,257 Joined: 6-August 14 From: Cincy Member No.: 17,743 Region Association: North East States |
Took out a little of the door frame to get those rosettes in there. Wasn't really sure until this point whether I could get the long replaced without cutting the fender. Glad I took Rick's advice.
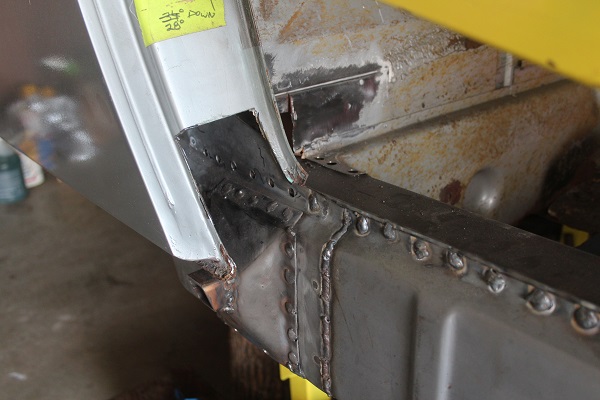 Need to replace the bottom of the door post. The PO just slapped a plate on there. I looked through several threads for this, everyone has a different name for it: door post, torque box, hinge post base... Whatever it is, cut a pattern: 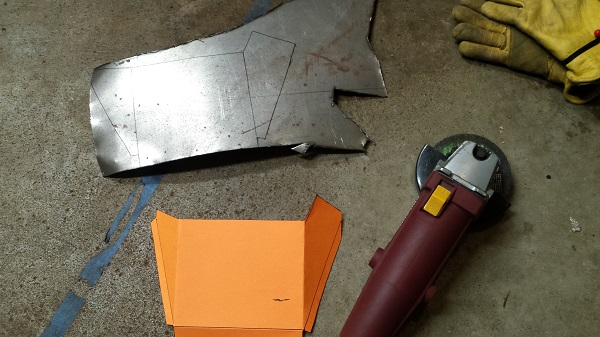 Here's another little piece that was cut away to access the rosettes at the front of the long:  Bent the hinge post base to shape and trimmed to fit: 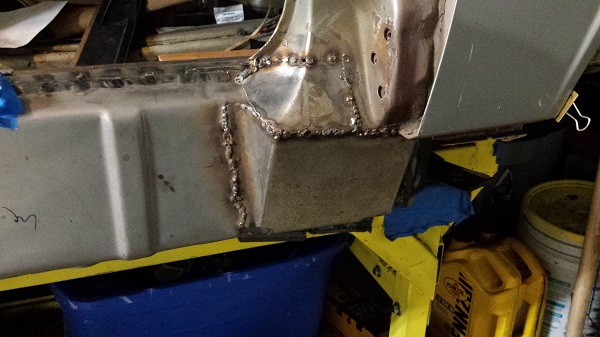 Blew some holes trying to mate the original metal to the new metal. Didn't really want to post this pic but sometimes your purpose is to serve as a warning to others I guess. 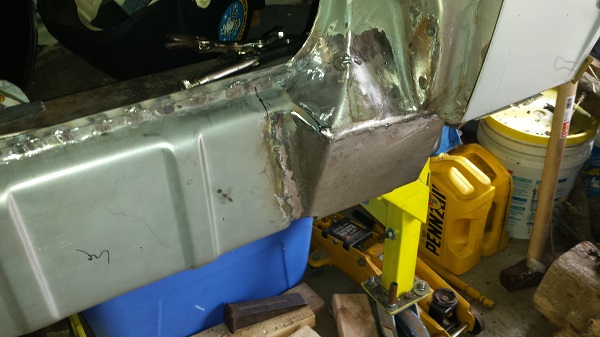 Pondered over that for a bit and decided that putting in a single piece with a little overhead welding is better than two tiny patches. 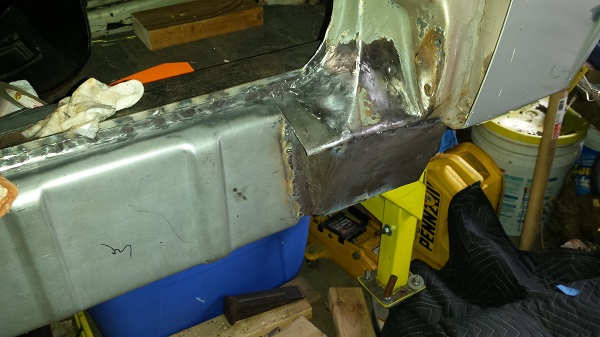 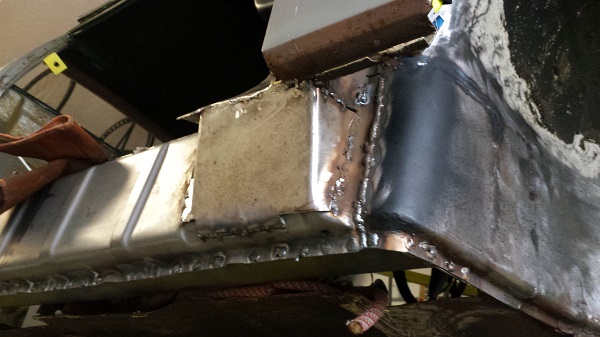 And finally the sill is tacked in place. This gets me up to today and I was surprised at how good it felt just to get the sill back on. You may notice the door braces are gone from this side. After getting the long completely welded in place, but before starting on the door port and sill, I took them up and brought the door up from the basement and held it in place. It looked about like I had hoped, no gross errors anyway. I know the car will settle once it is back on its feet, hopefully the gaps stay good.  |
|
|
|
| bbrock |
Feb 27 2018, 09:07 AM
Post
#100
|
|
914 Guru Group: Members Posts: 5,269 Joined: 17-February 17 From: Montana Member No.: 20,845 Region Association: Rocky Mountains |
I'm really impressed with your work. Keep 'em coming!
Nice work rebuilding that post bottom from scratch. Can't quite tell, but did you leave drainage holes at the bottom? |
|
|
|
|
29 User(s) are reading this topic (29 Guests and 0 Anonymous Users)
0 Members:

|
Lo-Fi Version | Time is now: 23rd June 2026 - 01:24 PM |
Invision Power Board
v9.1.4 © 2026 IPS, Inc.