|
|
|
Porsche, and the Porsche crest are registered trademarks of Dr. Ing. h.c. F. Porsche AG.
This site is not affiliated with Porsche in any way. Its only purpose is to provide an online forum for car enthusiasts. All other trademarks are property of their respective owners. |
|
|


| william harris |
 Mar 21 2005, 11:55 AM Mar 21 2005, 11:55 AM
Post
#201
|
|
914 Restorer  Group: Members Posts: 1,459 Joined: 9-January 04 From: Hamilton, MA Member No.: 1,539 |
OK, here we are almost two years later, and the car is in the shop for the body and paint work. Found a guy willing to do the detail body work - metal reshaping and almost no body filler. Here's the first few shots.
Attached image(s) 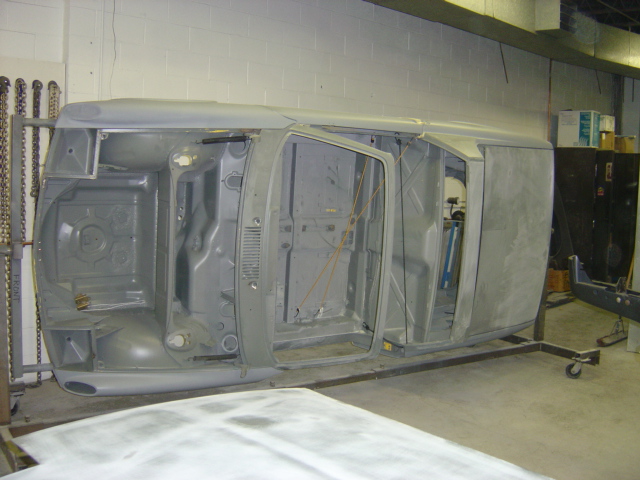
|
   |

 
|
Posts in this topic
 william harris Restoration Part Next! Mar 21 2005, 11:55 AM
 william harris A lot of time has been spent with the hood. It wa... Mar 21 2005, 11:56 AM william harris The doors will also require a lot of work. More p... Mar 21 2005, 11:59 AM rhodyguy do you own the rotisserie? one would sure prove ha... Mar 21 2005, 12:23 PM william harris Yes, the rotissiere is another of the fine product... Mar 21 2005, 12:39 PM william harris OPPS, wrong picture. Mar 21 2005, 12:41 PM 914GT Car matches color of the house. You may have just... Mar 21 2005, 01:49 PM william harris Well, it used to match. Going to be Lapis Blue me... Mar 21 2005, 01:59 PM Pudge Anyone have a dimensional drawing of a rotisserie? Mar 21 2005, 02:02 PM william harris There are plans available on the AA http://www.914world.com/bbs2... Mar 26 2005, 11:01 AM rhodyguy it's nice to sleep easy knowing the guys are d... Mar 26 2005, 11:56 AM Eric_Shea Amazing! http://www.914w... Mar 26 2005, 03:47 PM william harris Yeah, Jim (the owner) wanted to try and replace th... Mar 26 2005, 06:36 PM william harris Paint work has started. They shot the bottom of t... Mar 30 2005, 01:53 PM william harris The color is Lapis Blue metallic and in the sun li... Mar 30 2005, 01:55 PM william harris Over the next 4 or 5 days hopefully the new suspen... Mar 30 2005, 01:56 PM william harris These shots were made about 8:00 a.m. this morning... Mar 30 2005, 01:57 PM william harris It is really exciting to see the paint going on. <... Mar 30 2005, 02:00 PM william harris Next. Mar 30 2005, 02:01 PM william harris These pictures make the color look purple - which ... Mar 30 2005, 02:03 PM william harris Well, you are probably tired of seeing these pictu... Mar 30 2005, 02:04 PM william harris next Mar 30 2005, 02:04 PM william harris next to last Mar 30 2005, 02:05 PM william harris last one: so, what do you think? http://www.914world.com/bbs2... Mar 30 2005, 04:18 PM Doug Leggins Oh My.....
Love the color!!!
http://www.914world.com/bbs2... Apr 6 2005, 12:00 PM william harris Notice all the factory manuals on "top" of the car... Apr 6 2005, 12:01 PM william harris The front suspension is basically back on the car ... Apr 6 2005, 12:03 PM william harris Tommorow the rear suspension goes on and the front... Apr 6 2005, 12:08 PM markb
william harris A lot of time has been spent with the hood. It wa... Mar 21 2005, 11:56 AM william harris The doors will also require a lot of work. More p... Mar 21 2005, 11:59 AM rhodyguy do you own the rotisserie? one would sure prove ha... Mar 21 2005, 12:23 PM william harris Yes, the rotissiere is another of the fine product... Mar 21 2005, 12:39 PM william harris OPPS, wrong picture. Mar 21 2005, 12:41 PM 914GT Car matches color of the house. You may have just... Mar 21 2005, 01:49 PM william harris Well, it used to match. Going to be Lapis Blue me... Mar 21 2005, 01:59 PM Pudge Anyone have a dimensional drawing of a rotisserie? Mar 21 2005, 02:02 PM william harris There are plans available on the AA http://www.914world.com/bbs2... Mar 26 2005, 11:01 AM rhodyguy it's nice to sleep easy knowing the guys are d... Mar 26 2005, 11:56 AM Eric_Shea Amazing! http://www.914w... Mar 26 2005, 03:47 PM william harris Yeah, Jim (the owner) wanted to try and replace th... Mar 26 2005, 06:36 PM william harris Paint work has started. They shot the bottom of t... Mar 30 2005, 01:53 PM william harris The color is Lapis Blue metallic and in the sun li... Mar 30 2005, 01:55 PM william harris Over the next 4 or 5 days hopefully the new suspen... Mar 30 2005, 01:56 PM william harris These shots were made about 8:00 a.m. this morning... Mar 30 2005, 01:57 PM william harris It is really exciting to see the paint going on. <... Mar 30 2005, 02:00 PM william harris Next. Mar 30 2005, 02:01 PM william harris These pictures make the color look purple - which ... Mar 30 2005, 02:03 PM william harris Well, you are probably tired of seeing these pictu... Mar 30 2005, 02:04 PM william harris next Mar 30 2005, 02:04 PM william harris next to last Mar 30 2005, 02:05 PM william harris last one: so, what do you think? http://www.914world.com/bbs2... Mar 30 2005, 04:18 PM Doug Leggins Oh My.....
Love the color!!!
http://www.914world.com/bbs2... Apr 6 2005, 12:00 PM william harris Notice all the factory manuals on "top" of the car... Apr 6 2005, 12:01 PM william harris The front suspension is basically back on the car ... Apr 6 2005, 12:03 PM william harris Tommorow the rear suspension goes on and the front... Apr 6 2005, 12:08 PM markb   |
1 User(s) are reading this topic (1 Guests and 0 Anonymous Users)
0 Members:

|
Lo-Fi Version | Time is now: 15th April 2026 - 06:11 PM |
Invision Power Board
v9.1.4 © 2026 IPS, Inc.
| All rights reserved 914World.com © since 2002 |
|
914World.com is the fastest growing online 914 community! We have it all, classifieds, events, forums, vendors, parts, autocross, racing, technical articles, events calendar, newsletter, restoration, gallery, archives, history and more for your Porsche 914 ... |