|
|
|
Porsche, and the Porsche crest are registered trademarks of Dr. Ing. h.c. F. Porsche AG.
This site is not affiliated with Porsche in any way. Its only purpose is to provide an online forum for car enthusiasts. All other trademarks are property of their respective owners. |
|
|

  |

| McMark |
 May 30 2007, 01:42 AM May 30 2007, 01:42 AM
Post
#1
|
|
914 Freak!  Group: Retired Admin Posts: 20,180 Joined: 13-March 03 From: Grand Rapids, MI Member No.: 419 Region Association: None |
Okay folks, here it is. The pictorial installation of the JWest Shift Kit. Everything went pretty smooth and the setup is real quality. We made a few Original Customs ((IMG:style_emoticons/default/av-943.gif)) to it.
Here is the shifter, ready for modification. Isn't it just begging to be upgraded? (IMG:style_emoticons/default/happy11.gif) 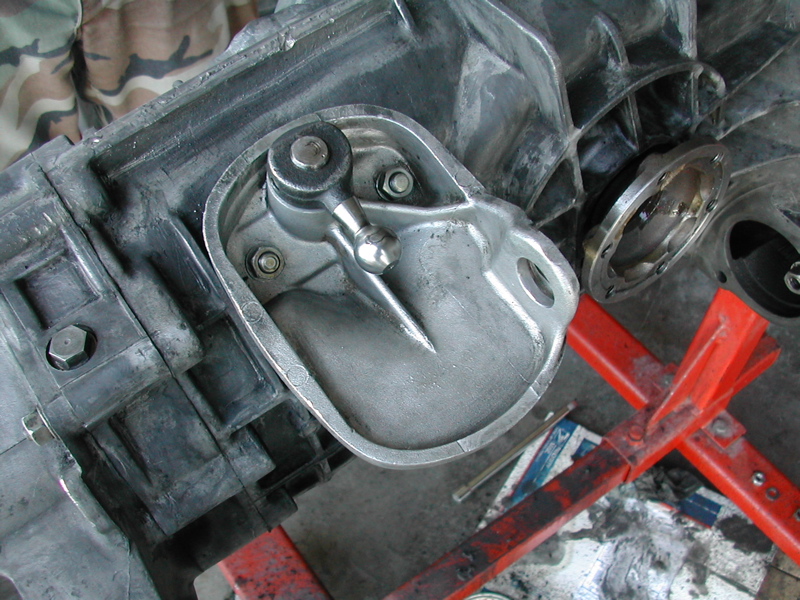 First we test fit. 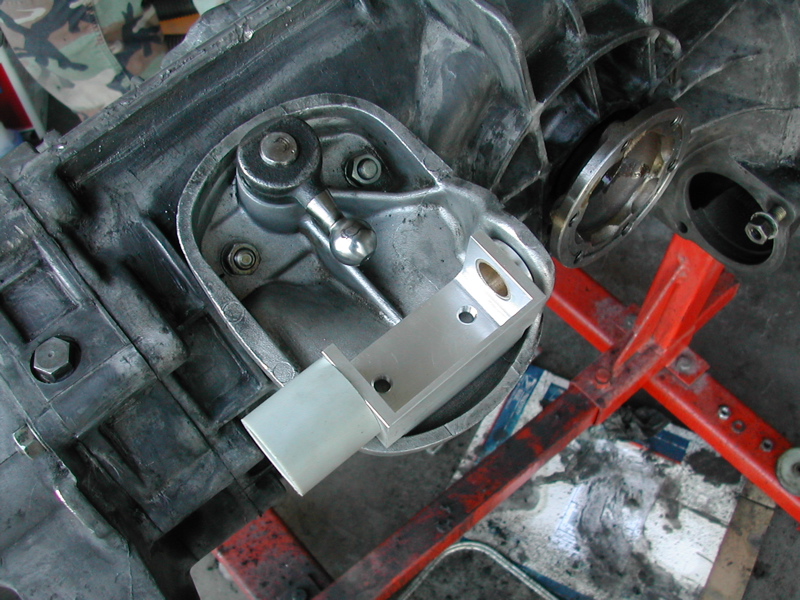 Andy marks the holes. 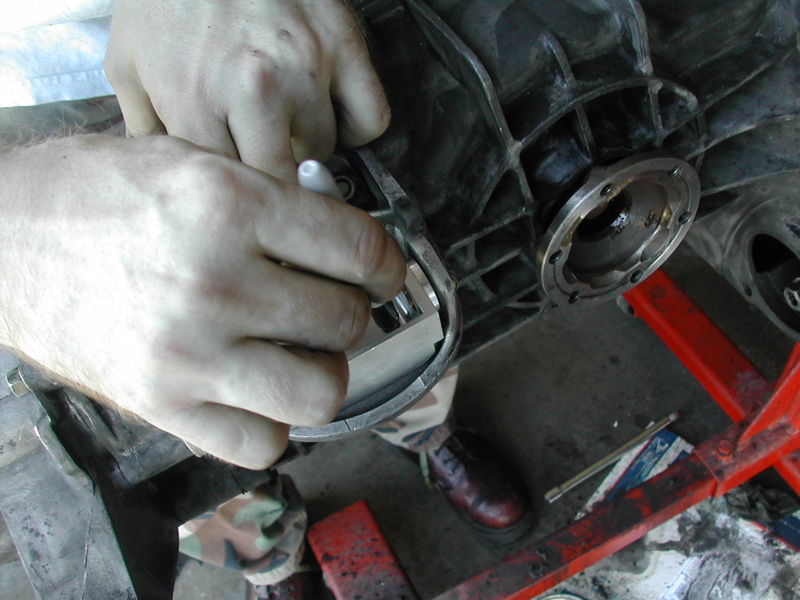 See the marking? 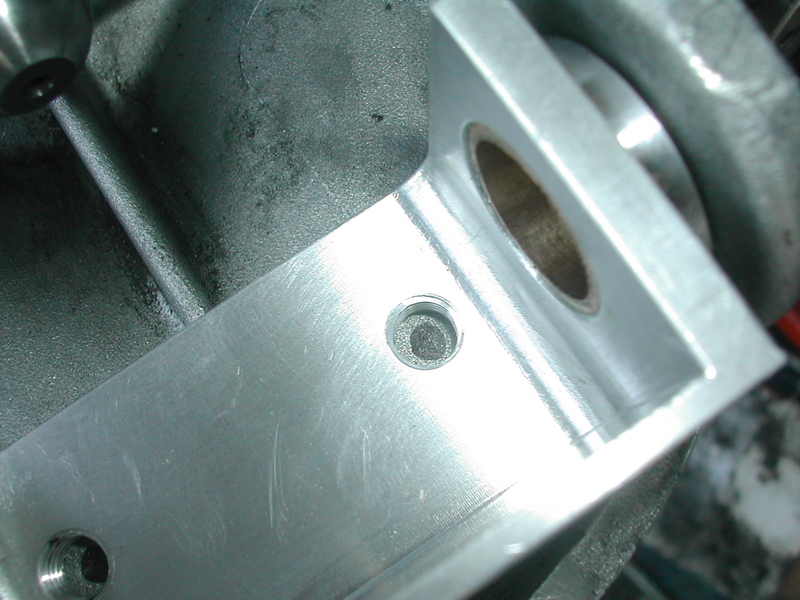 Here they are... 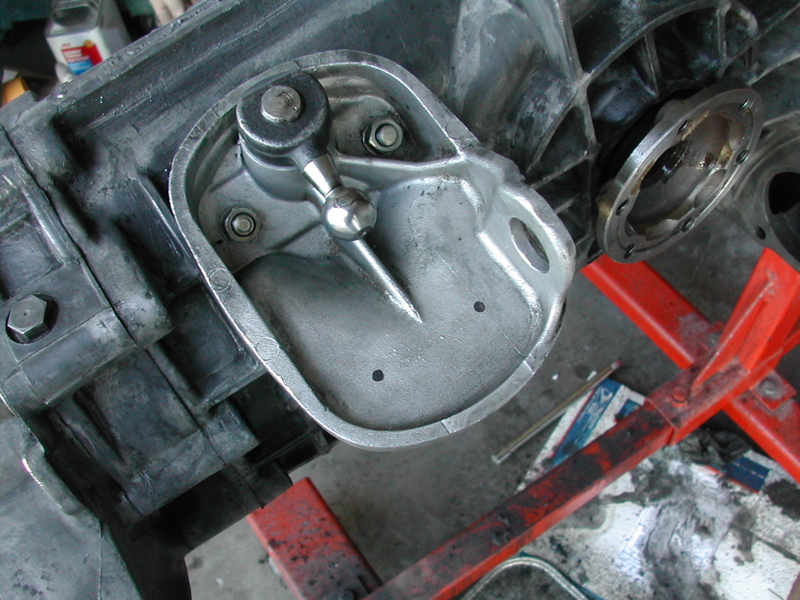 Time out to install the shifter bushing. Grease up the cup. 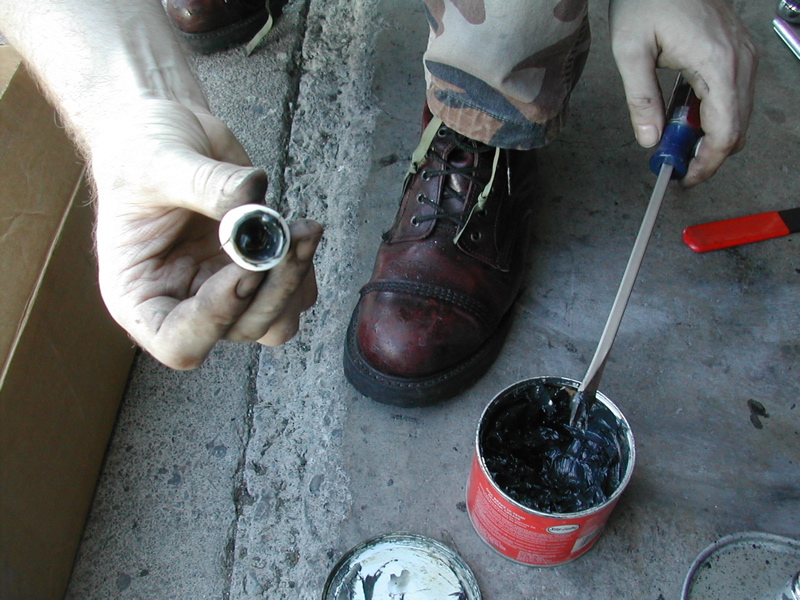 Grease up the shifter ball. 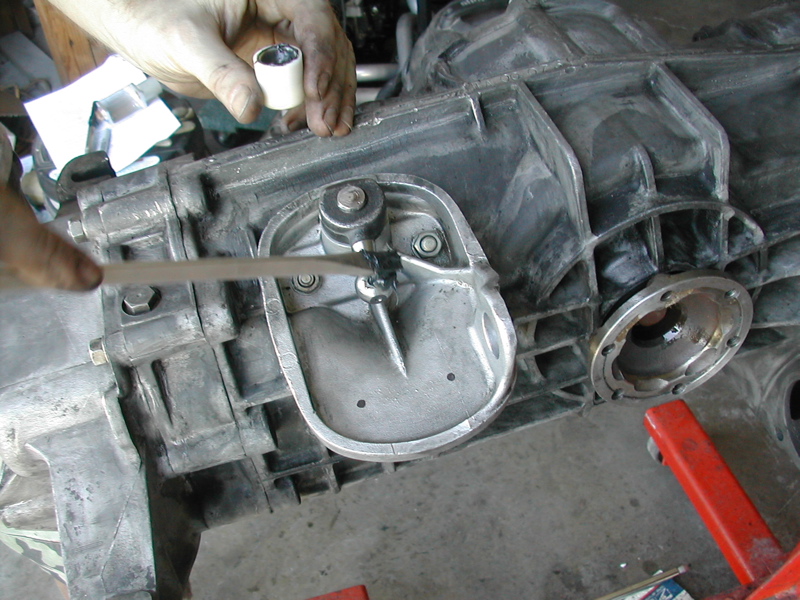 Push the bushing onto the ball. 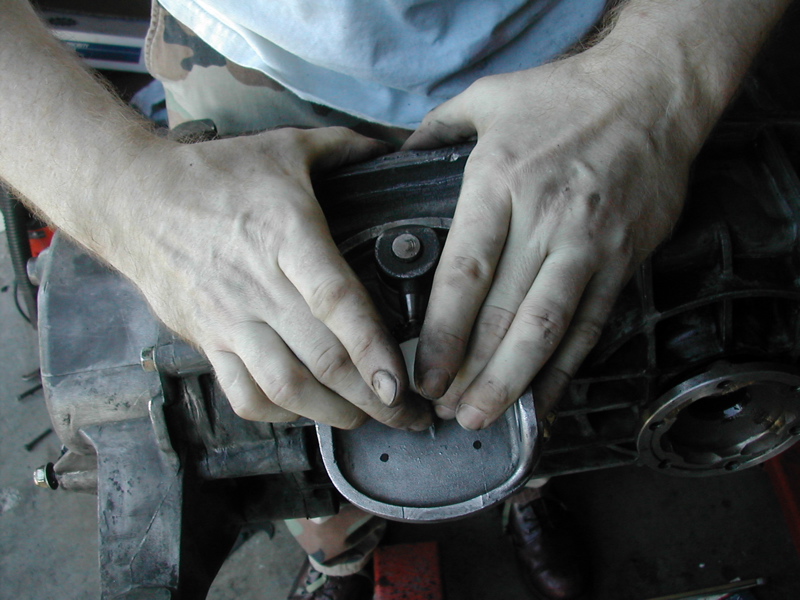 We drilled a hole in the bushing to let air escape. MUCH EASIER TO INSTALL! 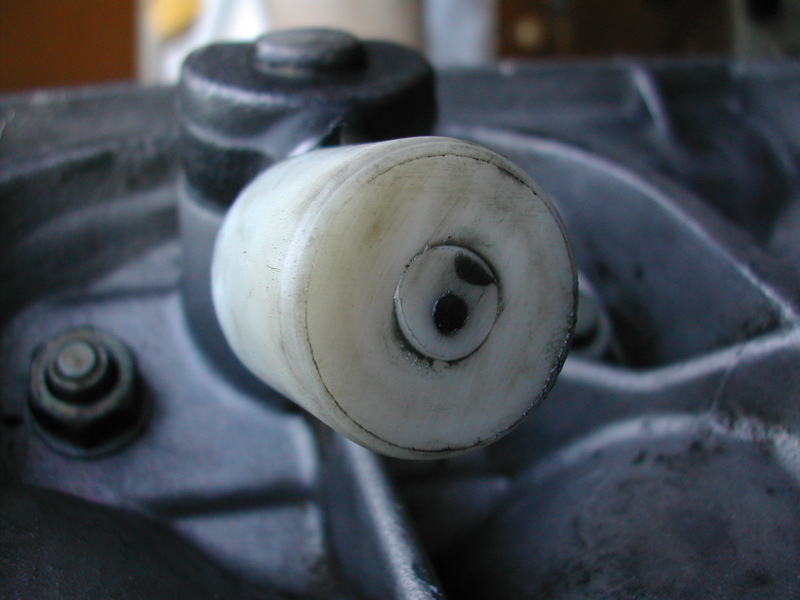 Center punch the markings to keep the drill bit from wandering. Then pre-drill with a small drill bit. The center punch markings are too small for the large drill bit. So make the punches a bit bigger with the small drill (you don't need to go all the way through). 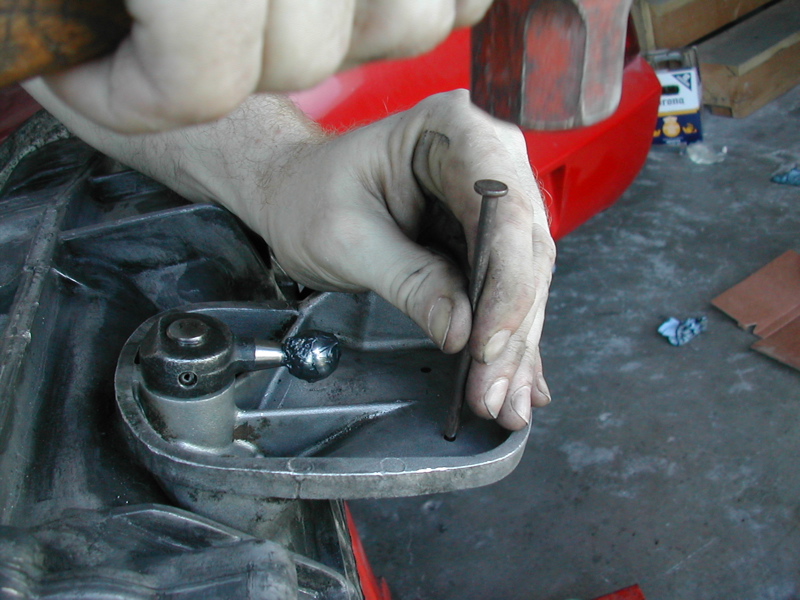 Center punches. 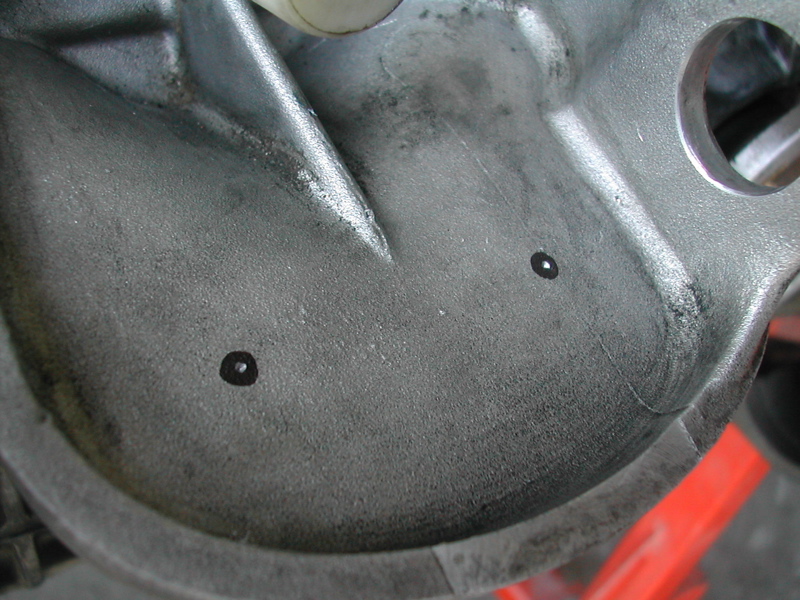 Start drilling! We used a letter P drill bit which was the Perfect size for a Porsche. (IMG:style_emoticons/default/av-943.gif) 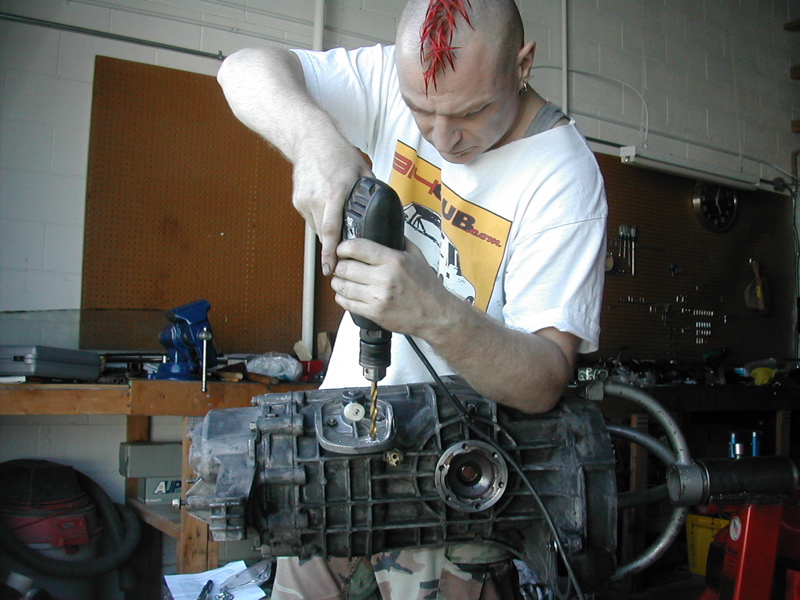 Your markings need to be pretty accurate or use a larger drill bit. We had to elongate one hole slightly. 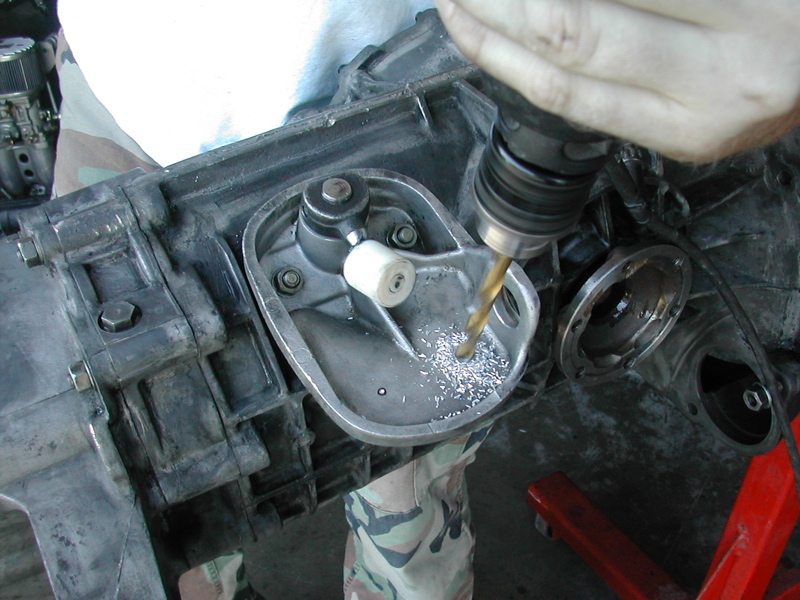 The bolts fit though great! 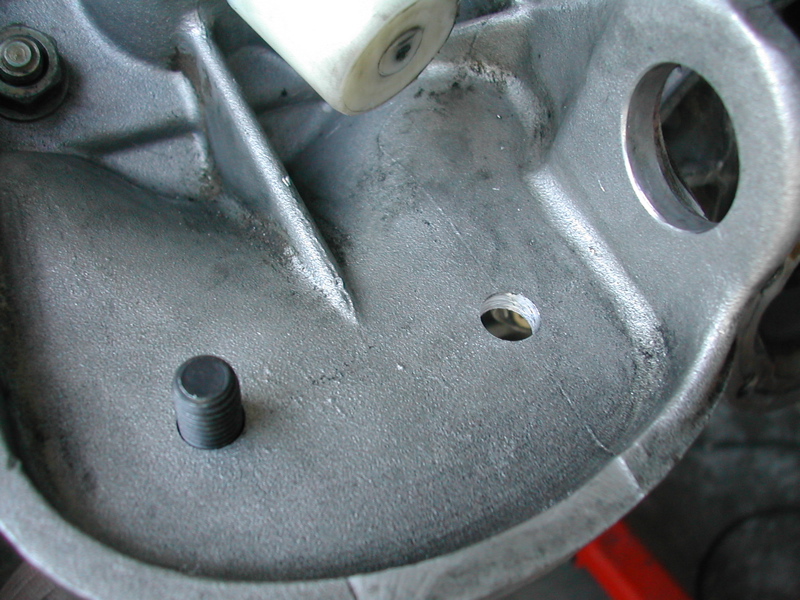 Start the bolts. 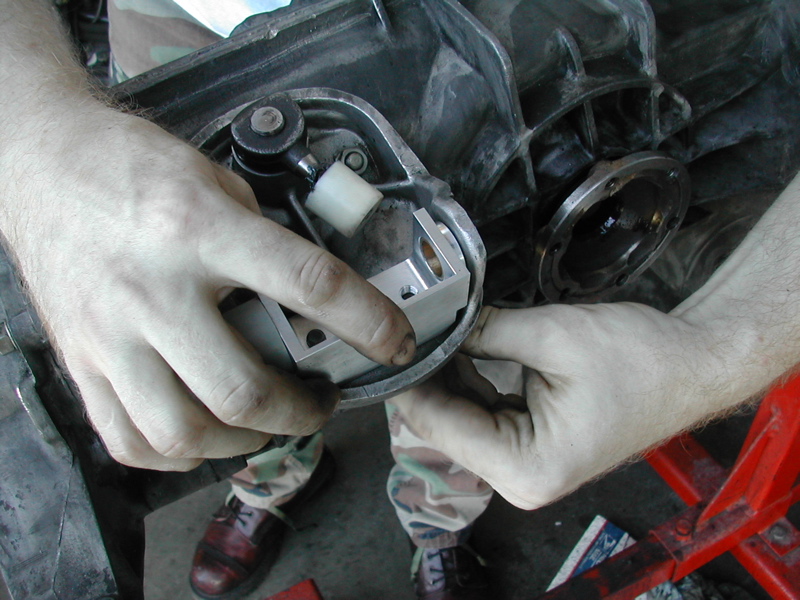 Then tighten with a wrench. 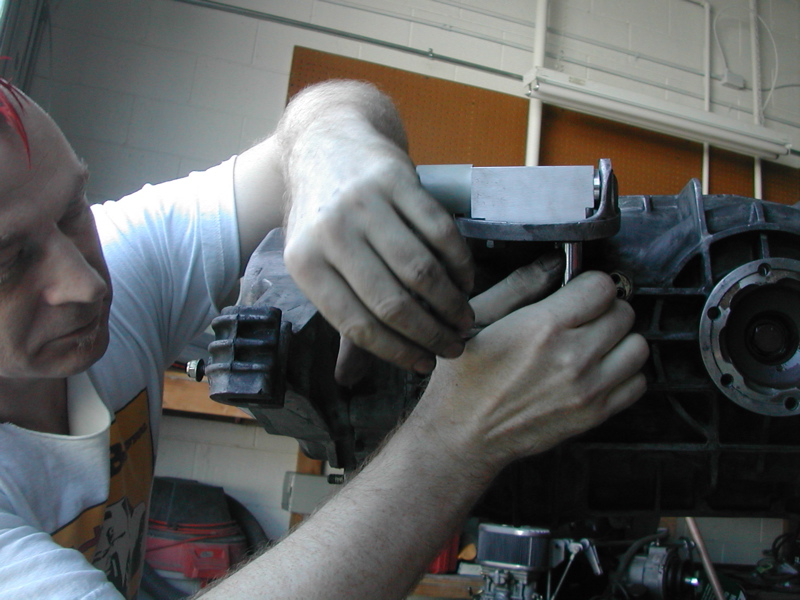 Test fit the shift rod through the stock shifter piece. 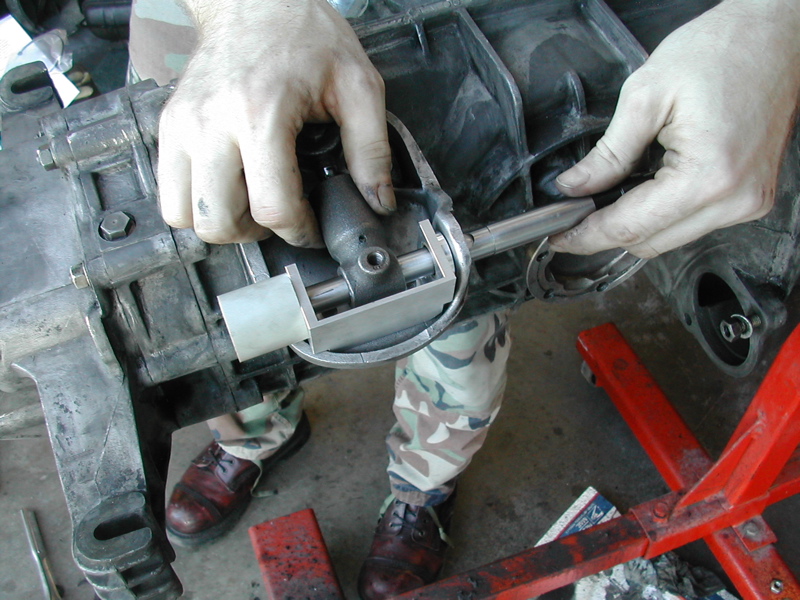 Here it is in place. 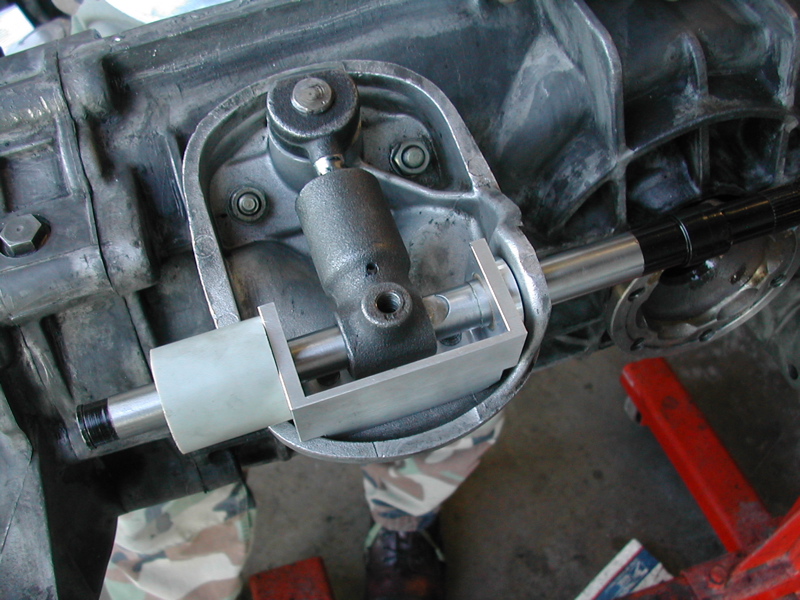 Custom #1: James supplies a bolt to hold things in place. Andy and I decided to grind a stock cone screw. For only one reason, it's more original. (IMG:style_emoticons/default/wink.gif) The bolt would work fine and doesn't use up an extra 15 minutes. 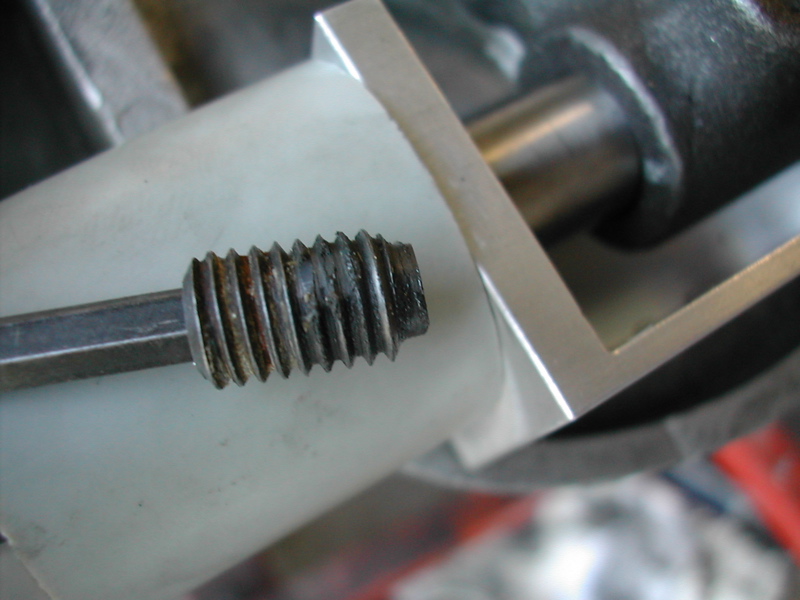 After grinding it threads all the way in and holds firm. 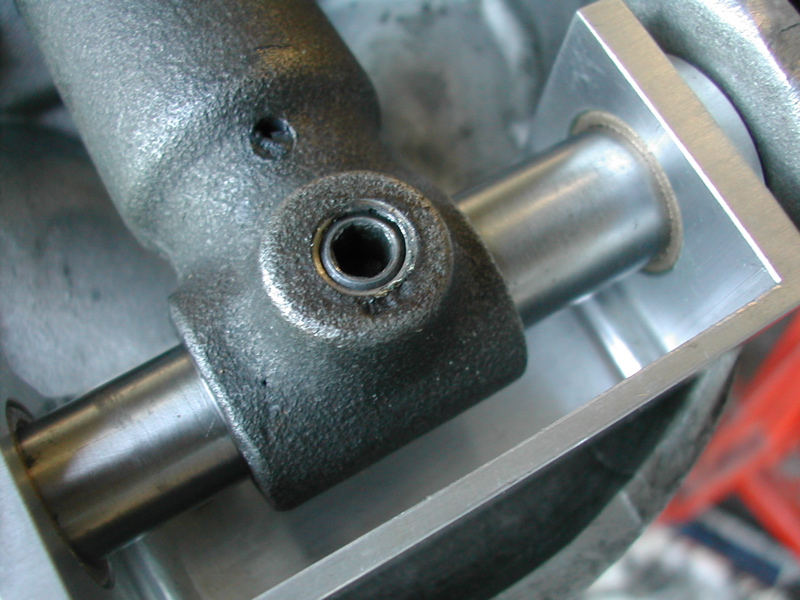 Remove the rod again and grease the bushings. 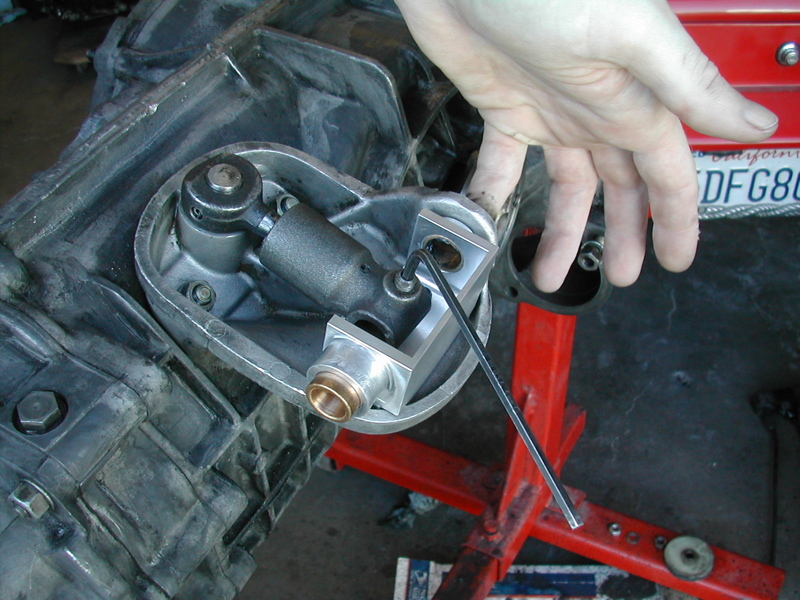 Custom #2: We decided to sacrifice Andy's old shifter cover and rivet the 'tube' on the other side of the new one. 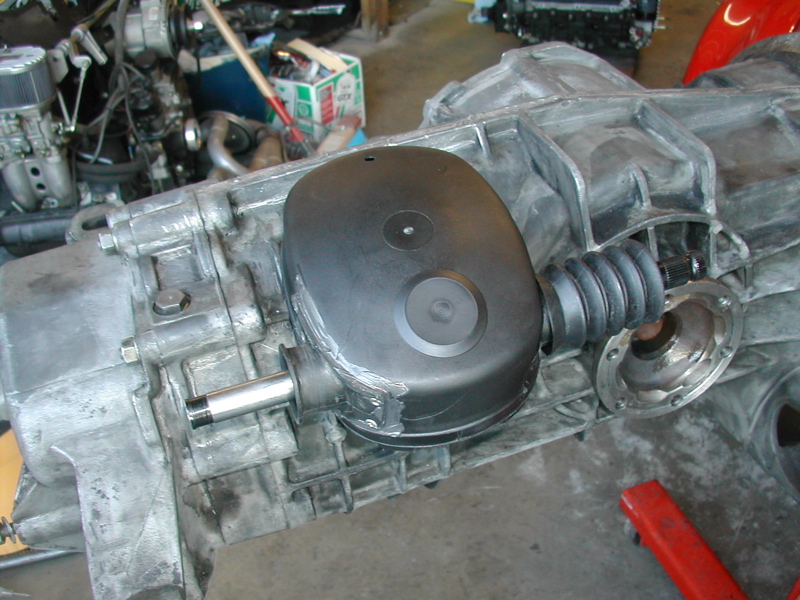 We sealed it up with RTV. 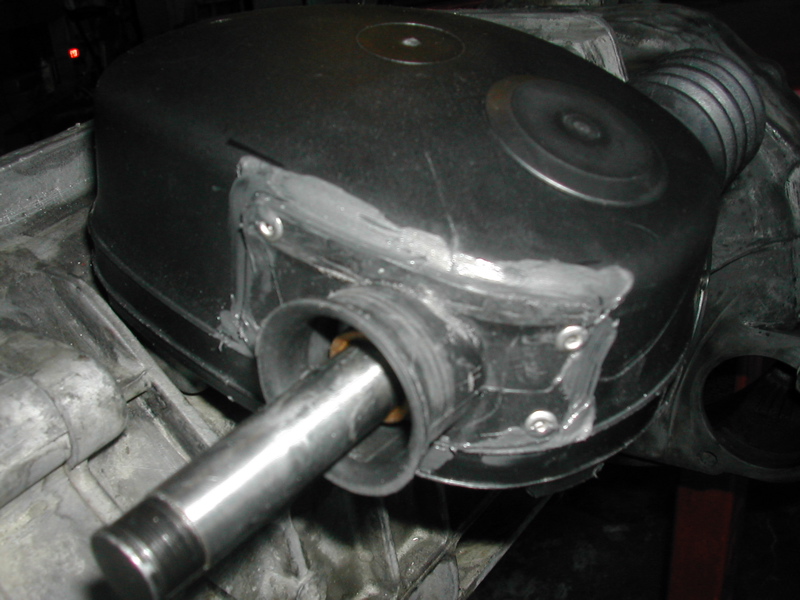 And finally cleaned up the excess once it dried. 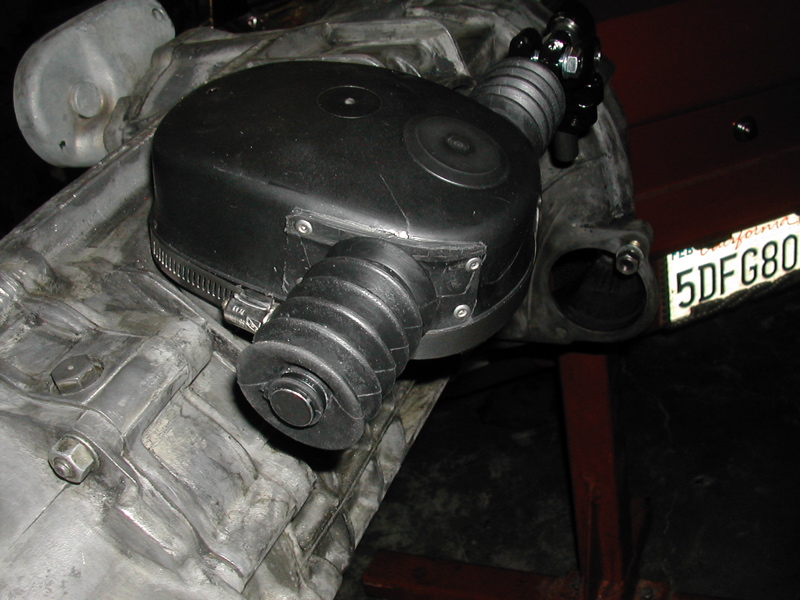 This is only the beginning: Click here for part 2 |
   |

 
|
| SirAndy |
May 30 2007, 02:04 AM
Post
#2
|
|
Resident German Group: Admin Posts: 42,485 Joined: 21-January 03 From: Oakland, Kalifornia Member No.: 179 Region Association: Northern California |
a few comments ....
- the supplied instructions refer to parts (with numbers) in a diagram but no diagram was supplied as reference. (IMG:style_emoticons/default/blink.gif) - the back hole in the shift cover was a bit off and had to be enlarged for the grey plastic piece to slide in. (IMG:style_emoticons/default/sawzall-smiley.gif) - the bottom "access" hole for the screw that holds the shift-cupler was a bit off. it was impossible to use the supplied 13mm bolt as you couldn't get a socket on it. we used a ground down stock cone-screw instead. (IMG:style_emoticons/default/smash.gif) - in the end, we decided *not* to use the supplied setup for the end-boot. the grey plastic piece that slides on the end of the shaft was too lose and when we put the boot on it, the boot would pull the grey plastic with it every time the shiftrod was moved backwards. plus, it was impossible to get a good seal on the shift-cover, especially on the top part, near the outer clamp. (IMG:style_emoticons/default/dry.gif) - there are three thin washers (or spacers?) that came with the kit that are not mentioned in the instructions. it was not obvious what they are for, so we didn't use them. (IMG:style_emoticons/default/confused24.gif) as you can see in the pics above, we ended up cutting up my old shift-cover, using the old input piece, flipped it over and riveted (is that a word?) it onto the cover. we omitted the grey plastic piece and mounted the end-boot the exact same way as the boot on the forward end. that worked out great! (IMG:style_emoticons/default/smilie_pokal.gif) then we went on to install the firewall bearing/bushing. more about that in part 2 ... besides the few little glitches, the kit is going to be schweet! (IMG:style_emoticons/default/thumb3d.gif) Andy |
|
|
|
| Dr Evil |
May 30 2007, 02:22 AM
Post
#3
|
|
Send me your transmission! Group: Members Posts: 23,044 Joined: 21-November 03 From: Loveland, OH 45140 Member No.: 1,372 Region Association: MidAtlantic Region |
Woh! Thats somthing new. I better get on my project before James designs a better one (IMG:style_emoticons/default/wink.gif)
|
|
|
|
| SirAndy |
May 30 2007, 02:48 AM
Post
#4
|
|
Resident German Group: Admin Posts: 42,485 Joined: 21-January 03 From: Oakland, Kalifornia Member No.: 179 Region Association: Northern California |
QUOTE(Dr Evil @ May 30 2007, 12:22 AM)  Woh! Thats somthing new. here's a pic of the kit ... (IMG:http://www.jwesteng.com/web_images/linkage_ss.jpg) (IMG:style_emoticons/default/bye1.gif) Andy |
|
|
|
| JWest |
May 30 2007, 01:14 PM
Post
#5
|
|
Senior Member Group: Members Posts: 1,666 Joined: 6-January 03 From: Fort Worth, TX Member No.: 97 Region Association: None |
QUOTE - the supplied instructions refer to parts (with numbers) in a diagram but no diagram was supplied as reference. (IMG:style_emoticons/default/blink.gif) Yes, the diagram is not done yet, sorry. QUOTE - the back hole in the shift cover was a bit off and had to be enlarged for the grey plastic piece to slide in. (IMG:style_emoticons/default/sawzall-smiley.gif) Each installation will put the rod support in a slightly different position. The cover will deform to allow rotation to line things up. Note that most cars do not have the cover hole lined up over the shift rod, and it is not impoartant as long as it clears. You were probably lining it up exactly on the front side since you had the advantage of doing it with the trans out. QUOTE - the bottom "access" hole for the screw that holds the shift-cupler was a bit off. it was impossible to use the supplied 13mm bolt as you couldn't get a socket on it. we used a ground down stock cone-screw instead. (IMG:style_emoticons/default/smash.gif) This may be an issue with having the trans upside-down. The bolt should be accessible if you rotate the linkage away from the trans. QUOTE - in the end, we decided *not* to use the supplied setup for the end-boot. the grey plastic piece that slides on the end of the shaft was too lose and when we put the boot on it, the boot would pull the grey plastic with it every time the shiftrod was moved backwards. plus, it was impossible to get a good seal on the shift-cover, especially on the top part, near the outer clamp. (IMG:style_emoticons/default/dry.gif) I can increase the interference on that a little bit. The gray plastic part is supposed to be sealed to the boot with silicone - this would hold it in place better and seal the gaps that will be there due to casting and installation differences. QUOTE - there are three thin washers (or spacers?) that came with the kit that are not mentioned in the instructions. it was not obvious what they are for, so we didn't use them. (IMG:style_emoticons/default/confused24.gif) The description was not in the version of instructions I sent you. Those are for shimming the support in case casting inconsistencies cause the shift rod to bind. It works without in most cases, but I included them since the castings are not all the same. The instructions have been updated. QUOTE as you can see in the pics above, we ended up cutting up my old shift-cover, using the old input piece, flipped it over and riveted (is that a word?) it onto the cover. we omitted the grey plastic piece and mounted the end-boot the exact same way as the boot on the forward end. that worked out great! (IMG:style_emoticons/default/smilie_pokal.gif) That's nice - good work! QUOTE besides the few little glitches, the kit is going to be schweet! (IMG:style_emoticons/default/thumb3d.gif) Andy Thanks for the write-up and the feedback! |
|
|
|
| Aaron Cox |
May 30 2007, 03:21 PM
Post
#6
|
|
Professional Tinkerer Group: Retired Admin Posts: 24,548 Joined: 1-February 03 From: Corona, CA Member No.: 219 Region Association: Southern California |
nice work!
when do we find out how good it shifts? |
|
|
|
| McMark |
May 30 2007, 04:15 PM
Post
#7
|
|
914 Freak! Group: Retired Admin Posts: 20,180 Joined: 13-March 03 From: Grand Rapids, MI Member No.: 419 Region Association: None |
The motor might go back in the car next week. It'll be a close call for the WCR. We're not going to rush it. But it might just work out... (IMG:style_emoticons/default/boldblue.gif)
|
|
|
|
| racerbvd |
May 30 2007, 06:34 PM
Post
#8
|
|
Advanced Member Group: Members Posts: 2,381 Joined: 3-February 03 From: Sunny FL. Member No.: 226 Region Association: None |
QUOTE(McMark @ May 30 2007, 02:15 PM) The motor might go back in the car next week. It'll be a close call for the WCR. We're not going to rush it. But it might just work out... (IMG:style_emoticons/default/boldblue.gif) will it work in a 6?? |
|
|
|
| SirAndy |
May 30 2007, 07:21 PM
Post
#9
|
|
Resident German Group: Admin Posts: 42,485 Joined: 21-January 03 From: Oakland, Kalifornia Member No.: 179 Region Association: Northern California |
QUOTE(racerbvd @ May 30 2007, 04:34 PM) will it work in a 6?? not sure about "a 6", but it better be working with my 3.6L /6 ... (IMG:style_emoticons/default/w00t.gif) Andy |
|
|
|
| URY914 |
May 30 2007, 08:25 PM
Post
#10
|
|
I built the lightest 914 in the history of mankind. Group: Members Posts: 133,770 Joined: 3-February 03 From: Jacksonville, FL Member No.: 222 Region Association: None |
Nice nail. (IMG:style_emoticons/default/smile.gif)
|
 |
|
| TimT |
May 30 2007, 09:28 PM
Post
#11
|
|
retired Group: Members Posts: 4,033 Joined: 18-February 03 From: Wantagh, NY Member No.: 313 |
QUOTE Nice nail. (IMG:style_emoticons/default/av-943.gif) well since somebody else picked up on that/mentioned it. I have suggestion for your box-o-tools. Get a set of "transfer punches" they will very accurateley mark the centers of the holes you want to drill. reducing the need to oval the or hog out the holes. Nice job otherwise Cheap set Expensive set |
|
|
|
| ConeDodger |
May 30 2007, 09:38 PM
Post
#12
|
|
Apex killer! Group: Members Posts: 24,488 Joined: 31-December 04 From: Tahoe Area Member No.: 3,380 Region Association: Northern California |
Mark splits tools between two shops right now. I bet he has had a few "oh that is at the other shop" moments lately.
Nice write up guys. I cannot wait for part two. |
|
|
|
| McMark |
May 30 2007, 11:22 PM
Post
#13
|
|
914 Freak! Group: Retired Admin Posts: 20,180 Joined: 13-March 03 From: Grand Rapids, MI Member No.: 419 Region Association: None |
I've been looking for a nice center punch (Why do they all come in a pack with 10 other things I don't need), but the nail was handy. (IMG:style_emoticons/default/biggrin.gif) I was wondering if I was gonna get razzed about that. (IMG:style_emoticons/default/av-943.gif)
Tim, that Snap-On set is nice. I'll have to grab one next time the truck comes around. Very handy!!! I never know about those, but I'm not surprised they exist. |
|
|
|
| Gint |
May 31 2007, 10:15 AM
Post
#14
|
|
Mike Ginter Group: Admin Posts: 16,108 Joined: 26-December 02 From: Denver CO. Member No.: 20 Region Association: Rocky Mountains |
Did Andy get new boots? Or are those the same old boots with brown polish on top?
|
|
|
|
| pete-stevers |
May 31 2007, 10:50 AM
Post
#15
|
|
Shinee Side Up Group: Members Posts: 2,674 Joined: 10-October 04 From: Abbotsford,BC, Canada Member No.: 2,914 Region Association: Pacific Northwest |
might of missed this detail..is there a new bushing for the engine firewall?
|
|
|
|
| SirAndy |
May 31 2007, 11:16 AM
Post
#16
|
|
Resident German Group: Admin Posts: 42,485 Joined: 21-January 03 From: Oakland, Kalifornia Member No.: 179 Region Association: Northern California |
QUOTE(pete-stevers @ May 31 2007, 08:50 AM) might of missed this detail..is there a new bushing for the engine firewall? that will be covered in part #2 of the install ... and yes, i got new boots! (IMG:style_emoticons/default/alfred.gif) Andy |
|
|
|
| drew365 |
May 31 2007, 11:37 AM
Post
#17
|
|
These are the good old days! Group: Members Posts: 2,004 Joined: 29-December 02 From: Sunny So. Cal. Member No.: 37 |
Good thread. I'm anxious to hear how much improvement you feel it makes.
|
|
|
|
| Air_Cooled_Nut |
May 31 2007, 11:56 AM
Post
#18
|
|
914 Ronin - 914 owner who lost his 914club.com Group: Members Posts: 1,748 Joined: 19-April 03 From: Beaverton, Oregon Member No.: 584 Region Association: None |
QUOTE(McMark @ May 30 2007, 12:42 AM) ... Time out to install the shifter bushing. Grease up the cup. ... If SirAndy is worried about messing up his manicure, I recommend Nitrile gloves. They make hand clean-up faster and no worries about getting/having latex allergies (IMG:style_emoticons/default/laugh.gif) |
|
|
|
| SirAndy |
May 31 2007, 12:03 PM
Post
#19
|
|
Resident German Group: Admin Posts: 42,485 Joined: 21-January 03 From: Oakland, Kalifornia Member No.: 179 Region Association: Northern California |
QUOTE(Air_Cooled_Nut @ May 31 2007, 09:56 AM) If SirAndy is worried about messing up his manicure, I recommend Nitrile gloves. They make hand clean-up faster and no worries about getting/having latex allergies (IMG:style_emoticons/default/laugh.gif) at least i don't bite my nails ... now that would be ugly ... (IMG:style_emoticons/default/biggrin.gif) Andy |
|
|
|
| Borderline |
May 31 2007, 07:32 PM
Post
#20
|
|
Senior Member Group: Members Posts: 720 Joined: 8-February 05 From: San Juan Bautista, CA Member No.: 3,577 Region Association: Northern California |
brown boots and Kamo after Easter!!! Major fau pau (IMG:style_emoticons/default/chairfall.gif) (IMG:style_emoticons/default/chairfall.gif)
|
|
|
|
|
1 User(s) are reading this topic (1 Guests and 0 Anonymous Users)
0 Members:

|
Lo-Fi Version | Time is now: 28th June 2026 - 05:38 AM |
Invision Power Board
v9.1.4 © 2026 IPS, Inc.