I am waiting for my exhaust to come back from the ceramic coater, so why not start the next project
I just recieved my shipment of second skin. I bought the damplifier, overkill and luxury liner. I am not sure if i will use it all but I want to see what works better where. I will post some pics once i get underway. I already have an aftermarket engine bay pad from evil bay. it works pretty good. this stuff i just got will go on the interior only. I also plan to reinstall the rear window with some new butyl tape when i begin. (just say NO to water)
i wonder how many projects i can start at one time
That spectrum sludge looks pretty interesting, with its rust inhibiting properties. Make sure and take pictures and give an honest opinion, I am quite interested in the results you have with the products that you did purchase.
VaccaRabite
Aug 15 2010, 04:48 PM
Funny! This Second Skin product JUST showed up on the Jeep board that I am on too. Let me know what you find out.
Zach
Gint
Aug 15 2010, 06:12 PM
I'm also interested in the results!
PanelBilly
Aug 16 2010, 09:26 AM
Me two
nsyr
Aug 16 2010, 10:03 AM
I just removed a product similar to spectrum sludge from my interior because it was causing rust. I don't remember the brand.
charliew
Aug 16 2010, 12:13 PM
Was it causing rust or had it been put on top of existing rust?
jsayre914
Aug 18 2010, 12:49 PM
I didnt get very far, but i started yesterday. I got the seats out, center console, carpets, backpad, and the rear trunk as much as i could remove in 2 hours. It dosnt look pretty, but i am not done yet
I still have the front trunk to do as well as door panels and targa bar. the pedal cluster needs to come out, its a little funky because of a leaky rear window glass.
I will have to replace the rear glass seal before anything eles.
jsayre914
Aug 18 2010, 12:52 PM
trunk pics
McMark
Aug 18 2010, 01:30 PM
I've used all those products. The Spectrum Sludge doesn't deaden a whole lot of mid/low frequency sounds, but does have an effect on high frequency sound. I have a video of tapping on metal before and after. The knocking isn't a whole lot quieter, but if you listen to the 'ring' of the metal between knocks you can hear how that gets reduced by quite a bit. It's a great first layer and you could even apply more Sludge after the Damplifier and before the Luxury Liner.
Attaching the Luxury Liner is a PITA. I used Gorilla Glue but holding it in place while the glue set up was challenging.
cool video, thanks. I will not be using spectrum on this project. Just the three layers, or 2 in some places.
How do i prep the metal. Should i use a chemical solvent, or wire brush everything. I thought a good coat of Por51 kinda paint should be applied first. then when it is dry add the dedner.
whacha think???
VaccaRabite
Aug 18 2010, 06:21 PM
When I did mine, this is how I did it.
I wire brushed all the surface rust out of the pan, and coated it with POR-15. Followed the POR instructions to the letter, using Marine Clean, then the Metal Ready, then fresh water rinse and the silver POR.
On the firewall, I used liquid decal remover to get all the gum off. Then I painted it (with the rest of my car)
With the cabin painted, I put the sound deadening right over top. I used RaaMaat, and it is seriously sticky stuff. I put 2 layers on the firewall, one on the floor, and one inside the doors.
On the engine side, its just metal.
It works pretty well, but my car is still loud.
Zach
scotty b
Aug 18 2010, 06:25 PM
IMHO you should remove the factory tar boards and be ready to do some clean up. Those things are the WORST " addition ": Porsche could have made. The areas that sit in the channels never bonded, and water creeps under there and just sits in the channels. A Mapp gas torch and a stiff putty knife gets the job done in about 2.5 hours Then solvent clean, wire brush the rusty spots and paint, then apply new deadening ONLY on the raised parts. That keeps the channels open to dry out in the future.
jsayre914
Aug 18 2010, 09:04 PM
QUOTE(scotty b @ Aug 18 2010, 08:25 PM)
IMHO you should remove the factory tar boards and be ready to do some clean up.
um, where in my picture is the factory tar boards.?? and explain about the channels. i dont speak english so well thanks
McMark
Aug 19 2010, 11:32 AM
The 'tar boards' are on the floor pan and the center tunnel. Poke with a screwdriver and you'll get the picture. The 'channels' are the ridges/valleys/lines you see in the floor pan.
SirAndy
Aug 19 2010, 11:44 AM
QUOTE(McMark @ Aug 19 2010, 10:32 AM)
The 'tar boards' are on the floor pan and the center tunnel. Poke with a screwdriver and you'll get the picture. The 'channels' are the ridges/valleys/lines you see in the floor pan.
Judging from the surface rust on your floor-pans, there will be more rust under the factory tar.
The factory painted over the tar, that's why you haven't noticed it yet. But after 40 years, the tar has cracked and water has made it's way underneath eating away on your floorboards ...
Andy
SirAndy
Aug 19 2010, 11:51 AM
Btw. the tar comes off in fairly large chunks if you heat it up with a heat gun and use a medium sized scraper ...
Andy
SirAndy
Aug 19 2010, 11:52 AM
After tar removal:
jsayre914
Aug 19 2010, 12:42 PM
so what you guys are telling me is that what i think is the floor is really not the floor, its like a parrelell dimension, and if i start at it with a putty knife i will discover the truth
whoa
thats deep
thanks for the info, now i got a bigger job
ellisor3
Aug 19 2010, 02:28 PM
QUOTE(jsayre914 @ Aug 19 2010, 02:42 PM)
so what you guys are telling me is that what i think is the floor is really not the floor, its like a parrelell dimension, and if i start at it with a putty knife i will discover the truth
whoa
thats deep
thanks for the info, now i got a bigger job
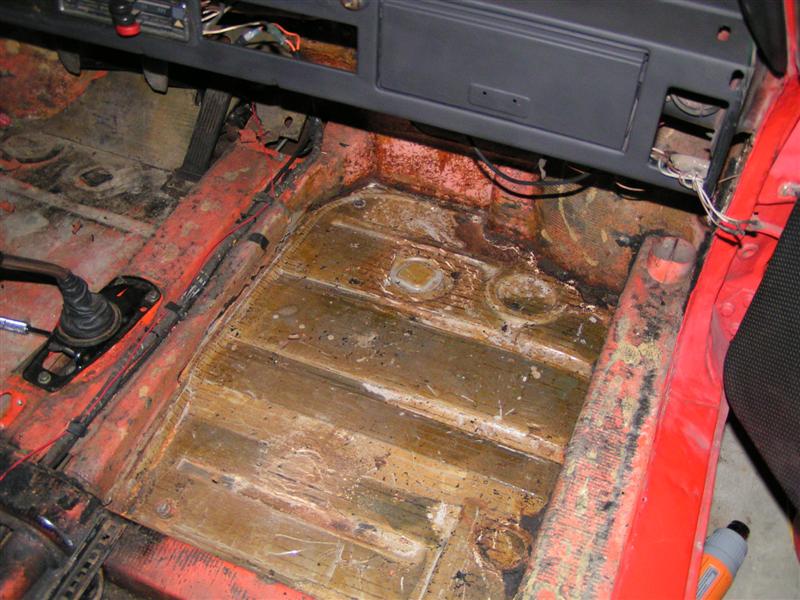
In looking at the pictures, it looks like the tar was previously removed and the bare floor was repainted. Tar does not rust.
LotusJoe
Aug 19 2010, 03:05 PM
QUOTE(ellisor3 @ Aug 19 2010, 01:28 PM)
QUOTE(jsayre914 @ Aug 19 2010, 02:42 PM)
so what you guys are telling me is that what i think is the floor is really not the floor, its like a parrelell dimension, and if i start at it with a putty knife i will discover the truth
whoa
thats deep
thanks for the info, now i got a bigger job
In looking at the pictures, it looks like the tar was previously removed and the bare floor was repainted. Tar does not rust.
Having recently gone through the whole removal process. I replaced the tar with Lizard Skin
So far I'm very happy with the results. I also had the paint shop spray the entire bottom and fender wells. Sprayed the fire wall with the ceramic coating. http://www.lizardskin.com/
SirAndy
Aug 19 2010, 04:21 PM
QUOTE(ellisor3 @ Aug 19 2010, 01:28 PM)
In looking at the pictures, it looks like the tar was previously removed and the bare floor was repainted. Tar does not rust.
Nope, still there. Looks like dirt and rusted water puddled around the edges, accounting for the rust color.
But the tar is still there in his picture ... Andy
jsayre914
Aug 25 2010, 02:36 PM
I have been really busy, recently, no time to work. I did get outside last night for a few hours, and BOY WAS IT FUN scraping tar with a torch in one hand and a citronella candle to chase off the mesquitos, with my shop light bringing every bug within 2 miles to come see my hard work.
but on the bright side i am halfway untarred and the fllors look a lot better than i was thinking they would look
jsayre914
Aug 25 2010, 02:38 PM
this is where i stopped..
jpnovak
Aug 25 2010, 02:43 PM
You are using the slow method.
Here is my method. Stripped the entire floors in about 1.5 hours.
Drop it on there, stand back & watch the undercoating come off the bottom of the car, and the tar break into pieces. sww914 did this with Cliff Braun's car & it worked great.
VaccaRabite
Aug 25 2010, 06:04 PM
I don't think Joe wants the undercoating off the bottom of his car. Otherwise, that sure beats the way I did it.
Zach
jsayre914
Aug 26 2010, 10:27 AM
Tar is gone
Now what is my next step. I guess i need to wire brush everything, then vacume, then i am ready for the por-15 ?? am i skipping any steps??
And i am having a problem removing the pedal cluster. I got the accelerator out no problem, then the 2 bottom nuts on the cluster no problem. BUT, the 2 bolts on the firewall are soooo rusted, they are no longer 13mm, in fact they arent even octagonal shaped anymore
how do i get it out of there, the bolts are also recessed with the lip of the cluster stopping any chance of getting a tool in there
jsayre914
Aug 26 2010, 10:29 AM
THE UGLY
VaccaRabite
Aug 26 2010, 10:52 AM
The bolts that point forwards are, I think, welded to the cluster. You take them off by getting under the car, removing the panel that keeps debris off your steering rack, and then removing the nuts off from under the car.
this will also unbolt your mastercylinder from the car. But it should have enough tension from the hard lbrake lines to stay in place and not fall on you.
Wire wheel out all the rust.
If you use the POR, use all three products (marine clean, metal ready, and then the POR) or else the POR will not stick right and eventually flake off. you CAN NOT simply paint it on rusted metal. next time you come over I will show you an experiment that I did simply painting on the POR.
When I painted on the POR for my floor pans, it was TOTALLY solid except for one little patch where it lifted. I just made sure to get extra paint in there when I painted the cabin. The rest of it was very hard, and very firmly attached.
Zach
jsayre914
Aug 26 2010, 11:00 AM
QUOTE(Vacca Rabite @ Aug 26 2010, 12:52 PM)
The bolts that point forwards are, I think, welded to the cluster. You take them off by getting under the car,
Thanks, that little info could of saved me 1/2 hour and scrapeed knuckles
Information is key
charliew
Aug 26 2010, 11:15 AM
If that car has been up north it's whole life it looks great in the floors. You can't get the floors too clean so do the best you can or the rust will be back. I would do the rear window first so it doesn't get wet after the new interior coating has been done.
I've used a lot of por15 and have decided even if I had to brush it on I would use epoxy two part primer and a good industrual enamel on it after cleaning it with the por 15 cleaning and rust curing products, I think it's a better coating. The por 15 almost seems as hard as powdercoat but it sometimes doesn't stick near as well as epoxy primer and nothing sticks to it good after its cured except the por light blue intercoat primer ( called tiecoat primer) and that makes it even more expensive. The shelf life of por 15 is not good so don't buy more than you need if you do go that way.
VaccaRabite
Aug 26 2010, 11:40 AM
QUOTE(jsayre914 @ Aug 26 2010, 12:00 PM)
QUOTE(Vacca Rabite @ Aug 26 2010, 12:52 PM)
The bolts that point forwards are, I think, welded to the cluster. You take them off by getting under the car,
Thanks, that little info could of saved me 1/2 hour and scrapeed knuckles
Information is key
Lol. Should have called me when you got stuck. I was actually home and might have even answered the phone if I could have hobbled over to where ever it was fast enough. :-) We have all been there.
jsayre914
Sep 4 2010, 12:30 PM
never enough time to work on the car but i will get it done. I started wire brushing the metal today, and it is almost as much fun as removing the tar
realred914
Sep 4 2010, 12:48 PM
ditch that POR 15 crap and invest in some good automotive two part epoxy primer. a nice two part epoxy is tougher than por 15 and can be top coated much eisier. you also need to replace the seam sealers that are along the perimter to teh floor (seals to the rockers0 else water will get in there and rust the edges of the floor out then teh floor falls out! 9unless the rocker fail first) seam sealer should be applied after the epoxy paint then top coated again with paint for best protection.
seal sealer is oft over looked, but highly important to use. make sure you use it, even if you settle for the inferior por 15 crap, at least use seal sealer, brush on or tube type, your choice
realred914
Sep 4 2010, 12:52 PM
QUOTE(charliew @ Aug 26 2010, 10:15 AM)
If that car has been up north it's whole life it looks great in the floors. You can't get the floors too clean so do the best you can or the rust will be back. I would do the rear window first so it doesn't get wet after the new interior coating has been done.
I've used a lot of por15 and have decided even if I had to brush it on I would use epoxy two part primer and a good industrual enamel on it after cleaning it with the por 15 cleaning and rust curing products, I think it's a better coating. The por 15 almost seems as hard as powdercoat but it sometimes doesn't stick near as well as epoxy primer and nothing sticks to it good after its cured except the por light blue intercoat primer ( called tiecoat primer) and that makes it even more expensive. The shelf life of por 15 is not good so don't buy more than you need if you do go that way.
ditto that on por 15, it can flack off specially smooth wire welled surfaces. the epoxy is superior in adhesion, top coatability even clean up is easier. por 15 just makes a mess. they have a good sales gimick, just paint over rust, but who really belives that is the right way? that is what sell their product to, folks that believe painting over rust is the way to go
get to know your local real autobody paint and supply store, look for Dupont or PPG brands, (and a few others) name brand real atuomotive finishing stuff.
your doing a nice complete job judging form teh photos,dont compromise thsi project with crappy hobby paint that only exists becuase they ahve been able to sell this paint over rust gimick
you will also want to scuff that shinny metal you brushed with some course sand paper to give the coating a better surface.
be very carefull with acid treatments some paint will NOT cure if there is an acid caot under them. some acid catings must be washed off, which may be difficult in side teh car (acidic rinse water may get into places you can clean out.
what ever you do do NOT buy any of Eastwoods paint products, they make the cheapest crap and sell it for high prices. here rust converter coating is a nightmare of rust, it actually rpomotes rust under the top coat, I have done tests, it is worst then bare metal exposed to salt water, no kindding, pure junk. one more reasont to shop at a real auto body shop supply store and also smart to look up Duponts or PPgs website call and talk to there tech guys they really know their stuff, real chemicals, real paints, real cars
Bleyseng
Sep 4 2010, 01:00 PM
QUOTE(realred914 @ Sep 4 2010, 03:52 PM)
QUOTE(charliew @ Aug 26 2010, 10:15 AM)
If that car has been up north it's whole life it looks great in the floors. You can't get the floors too clean so do the best you can or the rust will be back. I would do the rear window first so it doesn't get wet after the new interior coating has been done.
I've used a lot of por15 and have decided even if I had to brush it on I would use epoxy two part primer and a good industrual enamel on it after cleaning it with the por 15 cleaning and rust curing products, I think it's a better coating. The por 15 almost seems as hard as powdercoat but it sometimes doesn't stick near as well as epoxy primer and nothing sticks to it good after its cured except the por light blue intercoat primer ( called tiecoat primer) and that makes it even more expensive. The shelf life of por 15 is not good so don't buy more than you need if you do go that way.
ditto that on por 15, it can flack off specially smooth wire welled surfaces. the epoxy is superior in adhesion, top coatability even clean up is easier. por 15 just makes a mess. they have a good sales gimick, just paint over rust, but who really belives that is the right way? that is what sell their product to, folks that believe painting over rust is the way to go
get to know your local real autobody paint and supply store, look for Dupont or PPG brands, (and a few others) name brand real atuomotive finishing stuff.
your doing a nice complete job judging form teh photos,dont compromise thsi project with crappy hobby paint that only exists becuase they ahve been able to sell this paint over rust gimick
you will also want to scuff that shinny metal you brushed with some course sand paper to give the coating a better surface.
be very carefull with acid treatments some paint will NOT cure if there is an acid caot under them. some acid catings must be washed off, which may be difficult in side teh car (acidic rinse water may get into places you can clean out.
what ever you do do NOT buy any of Eastwoods paint products, they make the cheapest crap and sell it for high prices. here rust converter coating is a nightmare of rust, it actually rpomotes rust under the top coat, I have done tests, it is worst then bare metal exposed to salt water, no kindding, pure junk. one more reasont to shop at a real auto body shop supply store and also smart to look up Duponts or PPgs website call and talk to there tech guys they really know their stuff, real chemicals, real paints, real cars
I have been using epoxy primers and they work great and no moisture will go thru em...POR 15 has pealed off on me before..get the real stuff epoxy primer.
VaccaRabite
Sep 4 2010, 04:34 PM
If you want to get the epoxy, they sell the Nason branded paints at Broadway in Red Lion and will have what you need. There is another job shop closer to you on George St in York city that I have used. They have everything but are $$$. But, the epoxy ismeant to be shot through a gun, and I don't know if it can be brushed or rolled.
jsayre914
Sep 4 2010, 06:38 PM
dont be mad guys, i already got the por-15 crap. i spent my $$ and i want to learn the hard way. I plan to do all three steps, then i am putting second skin products on top. My fate is already sealed. I always learn the hard way.
i do believe it will be great. not perfect, but great!!
charliew
Sep 6 2010, 03:01 PM
The only way you will like the por15 with a top coat is to sand the por15 or bite the bullet and also buy the tiecoat blue primer to link the por 15 to the top coat. Believe me we have been there before. When the second skin comes up in sheets just remember this thread.
jsayre914
Sep 6 2010, 03:43 PM
QUOTE(charliew @ Sep 6 2010, 05:01 PM)
The only way you will like the por15 with a top coat is to sand the por15 or bite the bullet and also buy the tiecoat blue primer to link the por 15 to the top coat. Believe me we have been there before. When the second skin comes up in sheets just remember this thread.
stupid question:
do i have to top coat the por-15. every sq inch of surface will be coverd in second skin or carpet or both. there will be no visable por showing.
(obviously i have not yet read the instructions yet)
VaccaRabite
Sep 6 2010, 06:23 PM
No, you don't.
You an POR15 it and just put the sound deadening stuff right on top of it after it dries.
Follow the instructions on the P15 and it will be just fine.
Zach
scotty b
Sep 23 2010, 07:41 PM
VaccaRabite
Sep 24 2010, 06:16 AM
I stopped over at Joes the other day to drop off a can of seam sealer, and the car looked pretty good. Sad, sitting on ramps and all, but good. I drove my 914 over so that he could have a little inspiration, but the jerk was picking up his girls from school, so I missed him. The nerve! Putting family before old cars.
Zach
jsayre914
Sep 28 2010, 04:02 PM
No time for pics today, but i am ready for paint. Marine clean and metal ready done. Finally!!!
I will put first coat tonight if all goes well.
I REALLY miss driving
jsayre914
Sep 28 2010, 08:15 PM
progress
championgt1
Sep 28 2010, 09:19 PM
Man that looks really nice!
dlee6204
Sep 28 2010, 10:43 PM
It looks awesome.
silver74insocal
Sep 28 2010, 10:53 PM
pretty as a peach!! ya i used the damplifier pro and it made a huge difference. used brake cleaner on all the tar clean up...worked great..but kills a few brain cells..good luck bro
scotty b
Sep 29 2010, 07:01 AM
Now take your sound deadening pad and cut it into strips that fit in between the channels only. Leave the channels open, that is what f'ed up most of these floor pans. You get the amps together?
This is a "lo-fi" version of our main content. To view the full version with more information, formatting and images, please click here.


![popcorn[1].gif](http://www.914world.com/bbs2/style_emoticons/default/popcorn[1].gif) Andy
Andy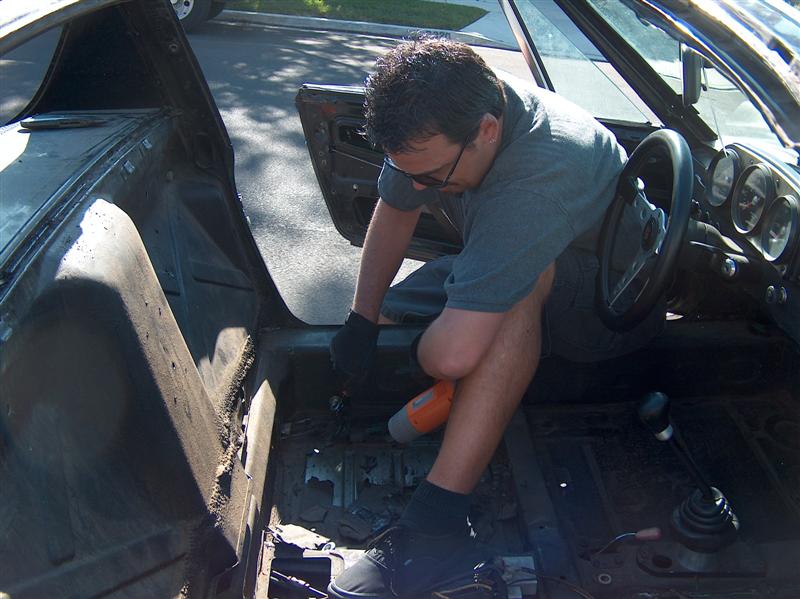
 so what you guys are telling me is that what i think is the floor is really not the floor, its like a parrelell dimension, and if i start at it with a putty knife i will discover the truth
 whoa
whoa
 and the fllors look a lot better than i was thinking they would look


 Thanks, that little info could of saved me 1/2 hour and scrapeed knuckles
 but i will get it done. I started wire brushing the metal today, and it is almost as much fun as removing the tar


