Before disassembly, I cleaned the case on top. I'll clean the rest later.
Full Version: My motor is headed back to Series9
I checked the cam timing on both sides so I could get an idea as to whether or not the chains are stretched out.
They both fell in the proper range.
Then I tore it down:
They both fell in the proper range.
Then I tore it down:
The heads are off to the machinist:
Thanks for the pictures. I learn so much from them. I spent quite some time looking at the inline four motor in the 968 and that 16v head while it was apart, visualizing how the motor works. But a flat six is obviously something different. It's helpful (for me) to see it apart like that.
Looks like your motor's well on its way to being smoke-free Mike!
Looks like your motor's well on its way to being smoke-free Mike!
Joe, first off, its great to see what you are working on....lots of fun to watch.
Given you are trying to get things done, your pictures are really appreciated.
On that note, would you please post pics of any "special" tools that you might need as you use them.
The valve timing stand is one..
The rocker arms need a special tool, or special setup to get them loose/tight?
Anything else that comes to mind would be great.
Rich
QUOTE(r_towle @ Jul 7 2011, 05:02 PM) 
Joe, first off, its great to see what you are working on....lots of fun to watch.
Given you are trying to get things done, your pictures are really appreciated.
On that note, would you please post pics of any "special" tools that you might need as you use them.
The valve timing stand is one..
The rocker arms need a special tool, or special setup to get them loose/tight?
Anything else that comes to mind would be great.
Rich
The 'Z block' for the dial indicator is very common in Porsche circles and is available on eBay every day.
http://cgi.ebay.com/ebaymotors/Valve-Tool-...#ht_5400wt_1167
Your ability to use it is an acquired skill.
The rockers only require Allen keys and a long drift for removal. Obviously, you need to unload the rocker before you can drive the rocker shaft out of its bore. By 'unload', I mean turn the cam until the valve is completely closed and there is no load on the rocker arm.
Removing the nut on the sprocket-end of the cam(or bolt, depending upon the year of the engine) requires a few special tools.
If your engine was built before 1981, you need these two:
http://cgi.ebay.com/ebaymotors/Cam-Camshaf...omotiveQ5fTools
If your engine was built after 1981, you need:
http://cgi.ebay.com/ebaymotors/911-Porsche...s#ht_683wt_1167
You can use a 1/4" drive 5 mm hex alen socket to get the rockers. Know as a "stuby". $13 from Snap-On.
QUOTE(SLITS @ Jul 7 2011, 09:53 PM)
You can use a 1/4" drive 5 mm hex alen socket to get the rockers. Know as a "stuby". $13 from Snap-On.
Or you can just use the regular fuckin' Allen keys in your regular tool box you stoned mother......

I can't wait to see you in CO....
This is the reason Mahle piston/cylinder sets cost so much.
I estimate this engine has about 100k miles.
The gauge is set for the new diameter of the cylinder. Each mark on the dial is half a thousandth (.0005"):
I estimate this engine has about 100k miles.
The gauge is set for the new diameter of the cylinder. Each mark on the dial is half a thousandth (.0005"):
Turd polishing.....
We've all done it.
Wills' engine mount is ugly. The open ends were driving me crazy:
We've all done it.
Wills' engine mount is ugly. The open ends were driving me crazy:
Clean parts. I've spent the last two days face-down in the parts cleaner.
I need to hire somebody to do this stuff:
I need to hire somebody to do this stuff:
QUOTE(Series9 @ Jul 14 2011, 05:02 PM)
Clean parts. I've spent the last two days face-down in the parts cleaner.
I need to hire somebody to do this stuff:
Send them to my Powder Coater.....
http://www.powdertechplus.com
Click to view attachment
Joe, looking great as always.
BTW thanks for the new signature quote
BTW thanks for the new signature quote
QUOTE(Ferg @ Jul 14 2011, 07:04 PM)
Joe, looking great as always.
BTW thanks for the new signature quote
 fuchin ferg!
QUOTE(Series9 @ Jul 7 2011, 11:51 PM)
QUOTE(SLITS @ Jul 7 2011, 09:53 PM)
You can use a 1/4" drive 5 mm hex alen socket to get the rockers. Know as a "stuby". $13 from Snap-On.
Or you can just use the regular fuckin' Allen keys in your regular tool box you stoned mother......
I can't wait to see you in CO....
More specific question.
Getting it out...that is simple.
What are you using to set the torque when you re-assemble them?
Just tight? (Which I can handle) or are you actually setting the torque on these?
RIch
QUOTE(Series9 @ Jul 7 2011, 08:51 PM)
QUOTE(SLITS @ Jul 7 2011, 09:53 PM)
You can use a 1/4" drive 5 mm hex alen socket to get the rockers. Know as a "stuby". $13 from Snap-On.
Or you can just use the regular fuckin' Allen keys in your regular tool box you stoned mother......
I can't wait to see you in CO....
Short or long arm?
 I like shiny things ... regular allen wrenches are just to dull.
  Oh shit, now I have to buy an assdragger.
QUOTE(r_towle @ Jul 15 2011, 08:49 AM)
QUOTE(Series9 @ Jul 7 2011, 11:51 PM)
QUOTE(SLITS @ Jul 7 2011, 09:53 PM)
You can use a 1/4" drive 5 mm hex alen socket to get the rockers. Know as a "stuby". $13 from Snap-On.
Or you can just use the regular fuckin' Allen keys in your regular tool box you stoned mother......
I can't wait to see you in CO....
More specific question.
Getting it out...that is simple.
What are you using to set the torque when you re-assemble them?
Just tight? (Which I can handle) or are you actually setting the torque on these?
I do those by feel. Good and tight will get it.
I'll take some pictures as I take Nelson's apart.
.....Back on topic: 
(btw , nice motor mr. byron.)
(btw , nice motor mr. byron.)
QUOTE
I do those by feel. Good and tight will get it.
= Gootentight
inch lb torque wrench with slits socket
.....Towle torque wrench with a Slits socket 
sounds cool! (has a ring to it) don't throw it!
sounds cool!
(has a ring to it) don't throw it!
I'm waiting to see a dial bore gauge. ![popcorn[1].gif](http://www.914world.com/bbs2/style_emoticons/default/popcorn[1].gif)
I do believe that on the ClubNARP thread, Joe actually has one in his hand, specing the barrel bores.
All I have are micrometers and telescopic gauges.
All I have are micrometers and telescopic gauges.
QUOTE(Series9 @ Jul 15 2011, 06:41 AM)
I do those by feel. Good and tight will get it.
I'll take some pictures as I take Nelson's apart.
Just a tad less than 14 ft/lbs is correct. A 1/4 drive in/lb torque wrench & proper allen end socket is a good tool. Also there is proper a sequence of tightening that will insure seal at the rocker ends ( the shaft ends do wear out). I also use RSR seals....but I'm not a "Pro".
QUOTE(J P Stein @ Jul 15 2011, 11:16 PM)
I'm waiting to see a dial bore gauge.
Here you go. This same picture was posted 15 posts ago.
I didn't recognize it. Those I use read in tenths (.0001) and are set with a super mic. The shop manal is quite specific as to where the readings on a cylinder are taken.....and max wear is not towards the top......tho your pic is not clear.
Personally, I have never seen a 100k mile cylinder that reads 0 when checking
taper & OR. Makes a nice picture tho.
I think I'll move along.
Personally, I have never seen a 100k mile cylinder that reads 0 when checking
taper & OR. Makes a nice picture tho.
I think I'll move along.
As a direct result of a little ribbing from Mr. Stein, I have purchased a Matco 1/4" drive 30-300in/lb torque wrench.
Expect ALL future rocker arms to be installed to the factory torque of "slightly less than 14 ft/lbs".
Do not even try to do it the way I earlier suggested.....
I'll take pictures to prove it. You know I will.
Expect ALL future rocker arms to be installed to the factory torque of "slightly less than 14 ft/lbs".
Do not even try to do it the way I earlier suggested.....
I'll take pictures to prove it. You know I will.
QUOTE(Series9 @ Jul 16 2011, 06:51 PM)
I'll take pictures to prove it. You know I will.
But even after you do, I will ask you to post them again.
woh, I mentioned the torque wrench.
[/quote]inch lb torque wrench with slits socket[quote]
[/quote]inch lb torque wrench with slits socket[quote]
QUOTE(J P Stein @ Jul 16 2011, 06:02 AM)
Just a tad less than 14 ft/lbs is correct.
And BTW, I meant to ask Mr. Stein to clarify "a tad less". I don't want my engine half-assed. I went to the local Porsche shop and they did confirm that the factory manuals said a "tad" but they didn't know exactly what that was. They actually referred me to Mr. Stein for the exact definition of a "tad".
A "Tad" is learned over many years of experience, but it is an Amerikan measurement. Your torque wrench calibrated in in\lbs is useless in this application.
For German cars it must be pronounced "sehr kleine menge" and be measured in newton meters.
For German cars it must be pronounced "sehr kleine menge" and be measured in newton meters.
I no longer have my books but as I recall the torque is 13.6 ft/lbs. Many folks take it higher than that.....15-20 is bandied about supposedly to stop leaks & creep.
The proper torque sequence is to hold the larger nut while bringing up torque on the 5mm(?) end. As the torque rises the held end should stop turning (the shaft is expanding) before max torque is reached. If the held end does not stop turning, the shaft is no good and needs to be replaced. I make sure to have a few *new* spares standing by (they're fairly cheep) and have used more than one. Never abrade the charp edges on the end chamfers.
They are ment to dig into the aluminum of the cam towers....but not to the point of permanently deforming the bores, IMO.
The above is right out of B. Anderson's book and I've never had a leaky or creeping rocker shaft using this method/torque.
The RSR seals are hella expensive from Pelican, however, if you go to that engine rebuild forum, guys find them much cheeper. Do a search. Normally I like to trade there (22 bucks for a rocker shaft) but 4.5 bucks each for an effin' O ring is just a bit much....24 needed. They come cast together in a "tree" of 12, IIRC.
Lot of BS for sumthin' that should be simple, eh?
BTW, Jeff brought up the torque wrench first. He knows his 911 motor stuff as well as anyone on this forum....prolly better than me. He's just quieter.
The heads should be on the way back any day now, so the reassembly has begun.
I started the day with cylinder deglazing. For being so high tech, Nikasil cylinders are deglazed in a very low tech way.
Get a maroon Scotch Brite pad (#7447) and some soapy water. Use a circular motion that approximates the cross-hatching of the cylinder wall:
I started the day with cylinder deglazing. For being so high tech, Nikasil cylinders are deglazed in a very low tech way.
Get a maroon Scotch Brite pad (#7447) and some soapy water. Use a circular motion that approximates the cross-hatching of the cylinder wall:
Then I cleaned up the pistons, reringed them and started the assembly:
The day did have a small snag.
One of the packs of rings had been previously opened. When I pulled out the top compression ring, I noticed right away that it wasn't right.
Check it out. The first picture shows the supposed "new" ring with a gap of .043". That's well in excess of the wear limit of .031".
The second picture shows one of the old rings for reference. Still in spec at .025", but that's still over twice the average new gap of .012".
A real new one is on the way.
Parts and head bling:
I expected stamps from the rebuilder, but how cool is this:
She'll be buttoned up by Saturday.
Paper weights any one?
Paper weights any one?
Dayum. Now THAT is beautiful.
Now THAT is beautiful.
Ooooooooo giggity! 
(swap the 2.4 for that... he'll never know)
QUOTE(Eric_Shea @ Aug 5 2011, 06:46 AM)
(swap the 2.4 for that... he'll never know)
I would know something was up if I could suddenly no longer outrun your car.
Suddenly? Keep it up... I'll spray my rock curtain on you to keep you at bay.
Sitting here eating lunch prior to band practice, and I caught Joe (Series9) hard at work on Wills' motor. Webcam fun.
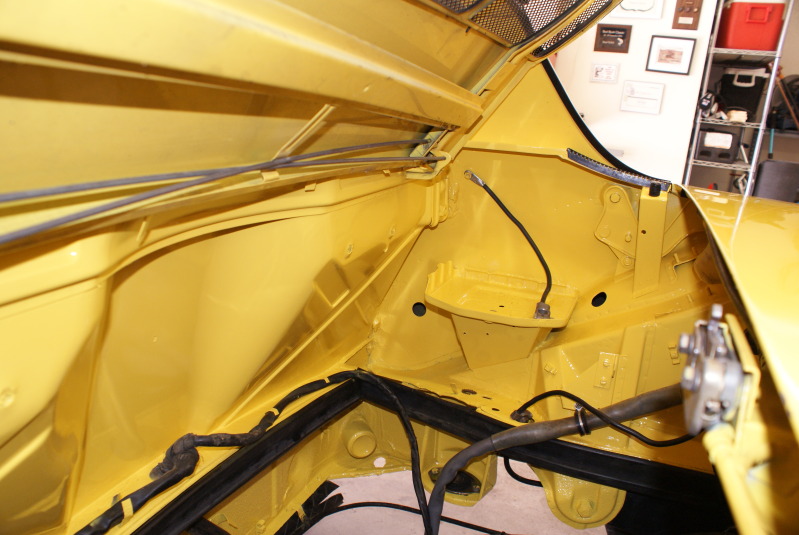
Got my parts back from powder coating and the engine bay with a fresh coat of paint. MUCH more clean without the insulation pad.  Gotta have a clean house for the engine to go back into when Joe comes out with my motor.

Gotta have a clean house for the engine to go back into when Joe comes out with my motor.
Nice! 
QUOTE(Series9 @ Aug 4 2011, 12:04 PM)
I expected stamps from the rebuilder, but how cool is this:
It's looking good so far, but...
Please don't put stamps on sealing surfaces. Anywhere else is fine.
I'm just saying.
QUOTE(John @ Aug 8 2011, 09:47 PM)
QUOTE(Series9 @ Aug 4 2011, 12:04 PM)
I expected stamps from the rebuilder, but how cool is this:
It's looking good so far, but...
Please don't put stamps on sealing surfaces. Anywhere else is fine.
I'm just saying.
My experience with Joe so far is that he generally chunks up all surfaces that are to be mated but then uses a really good silicone to seal it up.
Looking good!
QUOTE(John @ Aug 9 2011, 12:47 AM)
QUOTE(Series9 @ Aug 4 2011, 12:04 PM)
I expected stamps from the rebuilder, but how cool is this:
It's looking good so far, but...
Please don't put stamps on sealing surfaces. Anywhere else is fine.
I'm just saying.
The stamp is tiny and I'm sure that if it had caused problems in the past, the rebuilder wouldn't have done it.
I seal that flange with Threebond 1194. It's not going to leak.
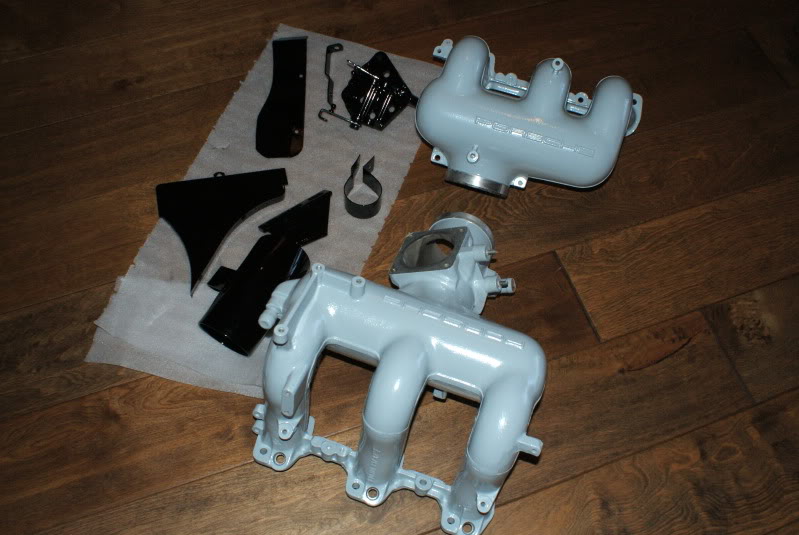
I'm waiting on a couple of pieces from the powder coater, but the engine is finished:
This is a "lo-fi" version of our main content. To view the full version with more information, formatting and images, please click here.