
Full Version: AKA- Wreck 2015 route 66- Fix is done! Picks page 12
Hard to get a proper color directly over the metal with no base primer
I did do a prime coat on it before painting my cutout. It was a quick job admittedly but I did give it a day to dry before painting. I will be sanding my cutout down & doing a proper job on it. That cutout has been sitting on my shelf for years. About time I put it to use. So it will get painted & hung in my shop. My paint job was a little uneven too. Couple darker spots than the rest. Good practice anyway 
Definitely good practice on laying it down. The problem with paint matching is that you can't.  Well, you can get close, and then you can blend the panel. But that takes a bit more skill. And laying down a metallic evenly takes skill as well. Practice enough and you'll be able to get it done. It's not magic, just takes practice and trial-and-error.
I've heard mention of inherent magnetism in the panels being a factor in metallic paints. Someone mentioned grounding the car while they sprayed metallic to make sure the charge in the car was relieved.
Well, you can get close, and then you can blend the panel. But that takes a bit more skill. And laying down a metallic evenly takes skill as well. Practice enough and you'll be able to get it done. It's not magic, just takes practice and trial-and-error.I've heard mention of inherent magnetism in the panels being a factor in metallic paints. Someone mentioned grounding the car while they sprayed metallic to make sure the charge in the car was relieved.
^I've heard about grounding as well.
Here is an interesting video. One thing he noted was to spray the last coat light so the flakes can stand up.
https://www.youtube.com/watch?v=efVr_JsIclQ
Here is an interesting video. One thing he noted was to spray the last coat light so the flakes can stand up.
https://www.youtube.com/watch?v=efVr_JsIclQ
Finally got around to adding some filler to the rear flare. Note to self. Don't go to thick on your coat. Spent a couple hours sanding today. Added a second coat but was much smarter & did a nice light coat. Going to be sore tomorrow after all that sanding though. Oh well it's a learning experience right. I'll post some pics tomorrow
What grit are you using to sand and what type of filler are you using right now?
I typically start with 80 or less, and I'll hit it really gently when its fresh and still hardening to knock off the main excess leaving 1/8 or so left to sand. Then I wait for it to fully harden and go 80 till its about right and 120 or up to whatever step of filler I am at.
If your at the glaze point, double the grits I just said.
QUOTE(Andyrew @ May 24 2015, 07:06 PM) 
What grit are you using to sand and what type of filler are you using right now?
I typically start with 80 or less, and I'll hit it really gently when its fresh and still hardening to knock off the main excess leaving 1/8 or so left to sand. Then I wait for it to fully harden and go 80 till its about right and 120 or up to whatever step of filler I am at.
If your at the glaze point, double the grits I just said.
Just plain body filler. I didn't know there was different grades. I'm sanding with 80 grit now. It's going fine. After the first thick coat. The second is going much better & faster. Just getting the rear corner to blend takes some doing. Should have it squared away tomorrow. I've got to work on my kids Subaru tomorrow too. Probably do some sanding then finish the sons car. Then back to the 914
Well there is your typical body filler like Bondo. There is thinner stuff like Featherfill which has smaller particles and less pinholes (I use this exclusively) then there is glazing compound.
QUOTE(Andyrew @ May 24 2015, 09:38 PM)
Well there is your typical body filler like Bondo. There is thinner stuff like Featherfill which has smaller particles and less pinholes (I use this exclusively) then there is glazing compound.
I'm sure I have the regular (bondo) stuff. I'll try to find some of the feather fill if you recommend it. I need to get some glaze anyway. Plus going to get some base coat & clear too. I'll shoot some to see if it matches better than the single stage I had put into cans.
My bad, I used my terms wrong....
http://www.tcpglobal.com/UPO-745.html#.VWLGqkap2-4
This is what I meant when I said featherfill, ... Basically its super lightweight smooth filler. Like I said you can thin it down with acetone and use it as a glaze if you dont have very many pinholes or your bodywork is fairly close and you dont want to spend $30 bucks on glaze (Or you run out). I typically mix this and glaze to get to the consistency I need one a specific spot... But its probably redundant at that point most times.
Actual "Featherfill" is thick primer used for adding to low spots (And shouldnt be shot in less than a 1.8 tip) You should be using this after the glazing compound, then guide coat, sand, and use this again for low spots. There are many different types of primer filler(And most can be used as a primer sealer)...
QUOTE(montoya 73 2.0 @ Apr 6 2015, 09:50 PM)
Wouldnt be the first time Jamie brought his Teener for some collective love!
Click to view attachment
I remember seeing everyone that could work on the creamsickle, as far as I remember it didn't get started that weekend. Correct?
Who has it now?
Click to view attachment
Dave
The last guy on the left is Lennie, which is appropriate that shown ghosted. Never see him on the world anymore. 
Dave
Dave
QUOTE(arkitect @ May 25 2015, 07:53 AM)
I remember seeing everyone that could work on the creamsickle, as far as I remember it didn't get started that weekend. Correct?
Who has it now?
Dave
Solt it to Tommy in Florida. No we didn't get it started that weekend. Distributor was out 180 & my fuel lines were backwards
 . Was rushing to get it together for WCR & made a mistake or two

QUOTE(arkitect @ May 25 2015, 06:02 AM)
The last guy on the left is Lennie, which is appropriate that shown ghosted. Never see him on the world anymore.
Dave
I see him on Facebook. The usual. Getting in to the kids and grandkids.
Okay here is after a few hours today. Couple skim coats/ sanding & a quick prime coat. Pics are just after prime coat so is a little wet. Probably won't show much detail but is coming along nicely. Think I am ready for the real prime & glaze action. Then fine sanding out the glaze. Definately some skill needed for this. Nothing like learning as you go though
Looks good, try and throw some more prime coats on as filler once you get to guide coat step.
Looking good! Can't even tell it was damaged.
Back at it last night & today. Man this is time consuming. Thought I was pretty close but need to get it blended a little better. The bottom rear of the flare needs some more filler to be smooth. I just need a little more on the actual bottom corner. Then I need one coat of filler on the front flare. It will take the least amount of work. It's just the transition from what we ground off that needs to be blended a bit. I'll post some more pics tonight. Wish me luck
Okay didn't get to much farther this weekend. As usual to many things came up that kept me from the shop  . Front fender just needs a little more filler on the bottom. The top edge blended great.
The rear quarter I seem to be chasing my tail a bit. It's close but again the bottom corner needs more filler & sanding. It really takes time to get that area blended right. The transition from the flare has been tricky. I am close but still not quite there . I hope to get an hour out there tonight
. Front fender just needs a little more filler on the bottom. The top edge blended great. The rear quarter I seem to be chasing my tail a bit. It's close but again the bottom corner needs more filler & sanding. It really takes time to get that area blended right. The transition from the flare has been tricky. I am close but still not quite there
. I hope to get an hour out there tonight
Looks good! I like to guide coat/primer it a couple times just to make sure, especially on the smaller jobs.
I think when I was doing the final shape of my flares I hit them with primer 5x a side..
Take your time and you'll thank yourself later.
Besides this is the fun/easy part. Are you planning on spraying the fenders?
I think when I was doing the final shape of my flares I hit them with primer 5x a side..
Take your time and you'll thank yourself later.
Besides this is the fun/easy part. Are you planning on spraying the fenders?
QUOTE(Andyrew @ Jun 1 2015, 02:41 PM)
Besides this is the fun/easy part. Are you planning on spraying the fenders?
I think I may give it a whirl. I plan to get some base coat & clear coat. The paint isn't ridiculously expensive. I do have buddy with a booth even. Well I need to see if he still has it setup. If so then I'll give it a try up there. Otherwise I'll be trying to find someone fairly local to do the paint.
If your buddy has a booth chances are he could spray?
Nice progress.
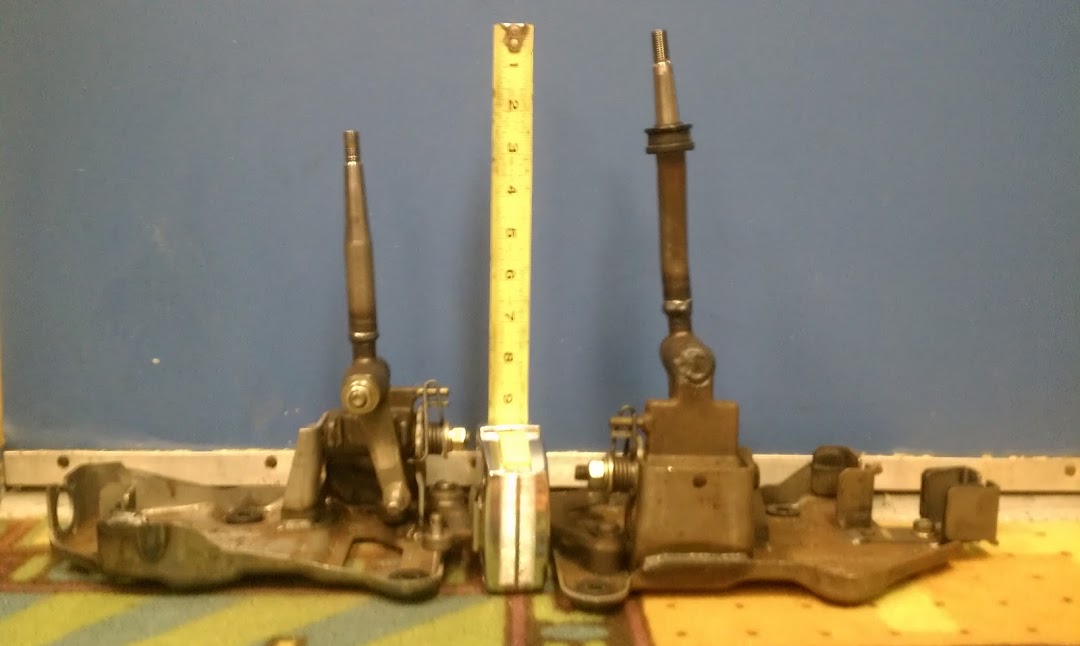
Cable shifters that I was talking about.
1G Mitsubishi Eclipse 1st gen left. 3000GT/Stealth right.
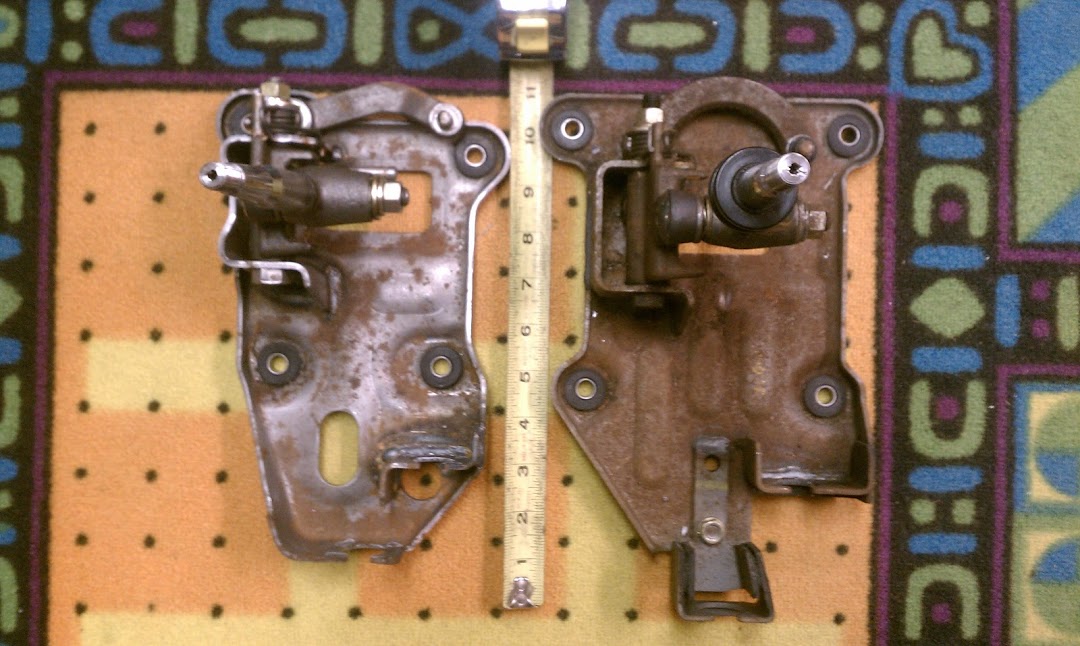
Eclipse - 6" wide
2 1/2" shorter
$26 short shifter on ebay
~ 5 ft cables
3000gt - 7" wide
13" tall
$65 short shifter on ebay
~ 5 ft cables
The 3/S stick will fit on the 1G. Lever ratios are the same. Mounting base is flat. Solid bushings are available. Standard asian knob threads.
The only drawback besides the large mounting bases is the stick leans forward, but can be cut and rewelded.
The Eclipse 2G and 3G are not well liked. The 4G resembles the Boxster.
1G Mitsubishi Eclipse 1st gen left. 3000GT/Stealth right.
Eclipse - 6" wide
2 1/2" shorter
$26 short shifter on ebay
~ 5 ft cables
3000gt - 7" wide
13" tall
$65 short shifter on ebay
~ 5 ft cables
The 3/S stick will fit on the 1G. Lever ratios are the same. Mounting base is flat. Solid bushings are available. Standard asian knob threads.
The only drawback besides the large mounting bases is the stick leans forward, but can be cut and rewelded.
The Eclipse 2G and 3G are not well liked. The 4G resembles the Boxster.
I got my custom cable finally. Installed it tonight. Going to do another prime coat on the passenger side tomorrow. Then throw the rear bumper on. I may just drive it to work on wednesday. Been to damn long
QUOTE(JRust @ Jul 6 2015, 10:53 PM)
I got my custom cable finally. Installed it tonight. Going to do another prime coat on the passenger side tomorrow. Then throw the rear bumper on. I may just drive it to work on wednesday. Been to damn long

So after installing my new fore aft cable that broke at WCR. I had failed to zip tie my clutch cable with the rest. It melted on my header & snapped. So I ordered another cable & installed it tonight. Took it for a quick drive down the road. All went well so I took it into town to get an ice cream cone to celebrate. Car got over 200 in town while I was sitting in the DQ drive through. My radiator fans didn't kick on like they are supposed to. Hit 210 before I got it back on the road & it cooled right down. So I need to see why my fans aren't working. Still was great to drive my car again. Shifting was nice & clutch felt great too. So all that is adjusted right.
QUOTE(JRust @ Jul 27 2015, 10:14 PM)
So after installing my new fore aft cable that broke at WCR. I had failed to zip tie my clutch cable with the rest. It melted on my header & snapped. So I ordered another cable & installed it tonight. Took it for a quick drive down the road. All went well so I took it into town to get an ice cream cone to celebrate. Car got over 200 in town while I was sitting in the DQ drive through. My radiator fans didn't kick on like they are supposed to. Hit 210 before I got it back on the road & it cooled right down. So I need to see why my fans aren't working. Still was great to drive my car again. Shifting was nice & clutch felt great too. So all that is adjusted right.
Yay you! Nothing like getting the 914 back on the road ( I just parked after another 550 mile jaunt).
Be sure and zip-tie that new cable!
Yeah all cables are definitely zip tied so that won't happen again. Definitely good to drive it again. Been way to long
Awesome!
I'm glad that you got your Baby back and proud of you for hanging tough while the 914 Gods crapped on you. 
Okay just made my appointment to get my passenger side painted. I'll be dropping it off on the 24th. He'll have it 2 weeks so it will be back to tip top shape for RRC next month
Nice - It will be nice to see all done again and looking sharp.
As it sits today
Looks good! Is he painting the entire pass side? or is he tapering it out to match?

QUOTE(Andyrew @ Aug 6 2015, 02:34 PM)
Looks good! Is he painting the entire pass side? or is he tapering it out to match?
Whole side
QUOTE(JRust @ Apr 23 2015, 10:39 AM)
Yeah the 914 community is the best! I've got parts coming in this week galore. Kinda last minute but what would WCR be like without the last minute fixes. I'll get some pics up as I did get that back corner pushed back close to the right place. Still not perfect by any means. I think it is still destined for some shop time & a Cellete
. My door gap on the passenger side is a little bigger . I do have it on the lift but with the longitude stiffening kit on it. It shouldn't flex I wouldn't think with the top on. I'll do what I can do for now. Then makes some decisions after Rick & all the guys smarter than me get a look .sorry didn't notice clearly but that trailing arm didn't look to have been reinforced...maybe a good thing if not in your case
,get that car back on the black stuff soon,good luck.
Glad to see it is getting back to finished again but,,,,,, I have a new mantra for you,
I WILL NEVER DRIVE IN THE RAIN
I WILL NEVER DRIVE IN THE RAIN
I WILL NEVER DRIVE IN THE RAIN
I WILL NEVER DRIVE IN THE RAIN
I WILL NEVER DRIVE IN THE RAIN
I WILL NEVER DRIVE IN THE RAIN
I WILL NEVER DRIVE IN THE RAIN
I WILL NEVER DRIVE IN THE RAIN
I WILL NEVER DRIVE IN THE RAIN
I WILL NEVER DRIVE IN THE RAIN
I WILL NEVER DRIVE IN THE RAIN
I WILL NEVER DRIVE IN THE RAIN
I WILL NEVER DRIVE IN THE RAIN
I WILL NEVER DRIVE IN THE RAIN
QUOTE(warpig @ Aug 7 2015, 03:15 AM)
Glad to see it is getting back to finished again but,,,,,, I have a new mantra for you,
I WILL NEVER DRIVE IN THE RAIN
I WILL NEVER DRIVE IN THE RAIN
I WILL NEVER DRIVE IN THE RAIN
I WILL NEVER DRIVE IN THE RAIN
I WILL NEVER DRIVE IN THE RAIN
I WILL NEVER DRIVE IN THE RAIN
I WILL NEVER DRIVE IN THE RAIN
Glad also to see it back to the awesome-ness it was before.
Regarding the rain, given my driving patterns I can see weather that is clear and 90s in KFalls, heavy rain and 65 in Weed, CA (yes, there is a place named that), and then back over 100 and clear in Redding, all within a couple of hours.
So rain happens. And so does hydro planing. I can't change the weather or my choice of vehicle.
My question:
What is a good choice for tires for occasional rain?
Too wide, and they will float on the puddles.
Too narrow, and they look, well, like the skinny 165s that they are.
I'm thinking 195s as a happy medium for my Fuchs 2.0 and narrow body.
QUOTE(warpig @ Aug 7 2015, 03:15 AM)
I WILL NEVER DRIVE IN THE RAIN
I was driving to Route 66. So in that case given the choice between bailing because it is raining outside. Or driving it to enjoy my time with my fellow Teeners
 . I'll make the trip 9 times out of 10. I will however not drive in a Monsoon again
Hey, great to see the repair work nearly done!!!!
QUOTE(Hank914 @ Aug 7 2015, 02:52 PM)
QUOTE(warpig @ Aug 7 2015, 03:15 AM)
Glad to see it is getting back to finished again but,,,,,, I have a new mantra for you,
I WILL NEVER DRIVE IN THE RAIN
I WILL NEVER DRIVE IN THE RAIN
I WILL NEVER DRIVE IN THE RAIN
I WILL NEVER DRIVE IN THE RAIN
I WILL NEVER DRIVE IN THE RAIN
I WILL NEVER DRIVE IN THE RAIN
I WILL NEVER DRIVE IN THE RAIN
Glad also to see it back to the awesome-ness it was before.
Regarding the rain, given my driving patterns I can see weather that is clear and 90s in KFalls, heavy rain and 65 in Weed, CA (yes, there is a place named that), and then back over 100 and clear in Redding, all within a couple of hours.
So rain happens. And so does hydro planing. I can't change the weather or my choice of vehicle.
My question:
What is a good choice for tires for occasional rain?
Too wide, and they will float on the puddles.
Too narrow, and they look, well, like the skinny 165s that they are.
I'm thinking 195s as a happy medium for my Fuchs 2.0 and narrow body.
You should be able to go wider than that if they fit under your fenders or if you're flared like Jamie, just go with a tire that's rated for all weather or check with the tire suppliers for superior wet traction then go carefully, avoid big puddles of standing water, etc. Even some really wide tires do quite well in the rain if you choose carefully and drive the same. May have been the rain mixed with other slickery substances that got Jamie along with a few other factors- it happens, just watch out and drive on!
Driving in the 'wet' should be no problem. Driving 'FAST' in the wet is more problematic.
Car is going in tomorrow for paint. Pulled the bumper, lights & trim from passenger side. Dropping it off in the morning on my way to work. Flat towing it there of course.

Looking forward to seeing it done. Beautiful car!
Damn dropped it off & forgot to take pics. Oh well I've had enough pics of it not looking right. I'll wait to post the pics of it after its painted 
Just got a picture from my painter! He just finished with the clear. Not sure when I'm picking it up yet. Just hoping the match is close enough it isn't obvious the one side was done. Won't know until later this week. Still good to see
QUOTE(JRust @ Sep 8 2015, 03:49 PM)
Just got a picture from my painter! He just finished with the clear. Not sure when I'm picking it up yet. Just hoping the match is close enough it isn't obvious the one side was done. Won't know until later this week. Still good to see
"Looking good in the Hood" my man.  Kent
Kent
Kent
This is a "lo-fi" version of our main content. To view the full version with more information, formatting and images, please click here.