Help - Search - Members - Calendar
Full Version: Orange 75 project
914World.com > The 914 Forums > 914World Garage
Pages: 1, 2, 3, 4, 5, 6, 7
my928s4
QUOTE(Lennies914 @ Jan 7 2012, 07:55 PM) *

The one mystery connector in the trunk was for the 02 sensor.


That makes sense and then the interior connector was for the O2 counter.
my928s4
QUOTE(OllieG @ Jan 12 2012, 01:30 AM) *

This is a great thread...really useful for novices like me, thanks alot! I'm in the early stages of a 6cyl resto/conversion, about to strip the underside, and will also be welding flares on shortly.

The epoxy primer you used for the underside - is that a 2pk epoxy? If so, what breathing mask did you use? I've read for 2pk paints you really need an air fed respirator..what do you think?

You said in an earlier post that you made a mistake with one of the flares by fixing the bottoms first and working up from both sides - what went wrong when you did it this way? How did you do it in the end so it worked out...?

Cheers.


welcome.png

Glad you found the thread useful, there is a lot of data here which has proved invaluable to me and if I can do my bit to help others then that is great.

Yes Epoxy is 2K, the one from Eastwood which I used on the underside contained no iscyanates but even so I used a respirator although not an air fed.

By starting welding at the bottom of the flares I ended up with excess material at the top, not a good situation. You should check out other posts on flare installation also, lots of good info out there.
my928s4
I have been scouring my storage bins for parts not seen for a couple of years, I want to get as much of the electrical components hooked up for testing even if this is temporary. Anyway dug out the fresh air fan assembly, full of old crud and was stiff to turn by hand, thought the motor spindle was bent ....

Click to view attachment

but turned out this plastic part is trashed, looks like I need to look for a new assembly.

Click to view attachment

Put the instruments back in, most of the bulbs were toast, found most locally but will need to order some. Intend to get these rebuilt but they will do for now.

Click to view attachment

Got my Jwest fuse panel!!, despite the post office bet attempt to lose it. Wires are tight in this area and took some manipulation to get it all in order. I only needed one piggy back connector for the rear defog.

Click to view attachment

What eventually held up the panel from going in was this relay, it is not the right one and sits upright. Needs to lie on its side.

Click to view attachment

All in and looking good.


Click to view attachment


sawtooth
Wow Chris, nice project. Not sure how I missed this one, fantastic work. Love your decisions to go flared and suby, doesn't get any better.
OU8AVW
Just got my stoke on.....
Thanks
Mike-
my928s4
Got the undertray back from the powder coaters, managed to re-use my old seals for now with some extra added around the cut out for the coolant pipes.

Click to view attachment

Click to view attachment

Decided to tidy up the wiring in the front trunk and be done with it, I bought these tie-wraps to hold the loom where the old metal clips had broken off. Worked well, will use these in the engine bay also.

Click to view attachment

Had to remove the radiator (again) but hopefully it can stay in for a while now. Pretty pleased with how the wiring turned out, just need to add a connector for the radiator fans.

Click to view attachment

Click to view attachment

Added this just to show the wiring for the driving lights.

Click to view attachment

Well this is where I went backwards, have not been happy with the brackets I added for the hood shocks for a while and with my head in the trunk recently I finally had enough. They really were not up to the task, so drilled out the welds and removed, will need to touch up the paint at some point but not today.

Here you can see my first attempt at a replacement, thicker metal but equally not up to the task. Served as a good template for the next candidate though.

Click to view attachment

Well this angle iron ought to do the job then, you can see my original wimpy brackets next to it.

Click to view attachment

And fitted to the car, worked a treat and then did the same for the other side.

Click to view attachment

my928s4
Friday this came on the delivery truck:

Click to view attachment

I also ordered the welded support tray, it will get powder coated and then bolted to the trunk floor but this was good enough to start playing.

So I spent the rest of the weekend debugging all of the electrics, remembering this was a roller so this is the first time it has seen voltage in my hands. I got the headlight motors adjusted but despite tracking all the wires they remained up in the off position and down when turned on so I reversed the wires at the 3 way connector and left it at that.

The Headlight dimmer relay is toast and the brake warning light comes on when the handbrake is off. I am pretty sure that is related to the brake warning switch on the master cylinder but why that should be activated as it is new I have not figured out.

There are two components I have not tested, the wiper and blower motors, something for next week when I get some used parts delivered.

My fuel level sender was stuck, removing it showed why:

Click to view attachment

Rust on the shaft, cleaned it all up and works great.

OK, some of you might get a laugh out of this, so here is the starter motor that came with the car.

Click to view attachment

Thought it might be fun to dismantle and rebuild, well once I took it apart and looked at the cost of replacement parts ... yep forget it, just buy a new one. It had a rebuilt sticker on it anyway so it had a good life.

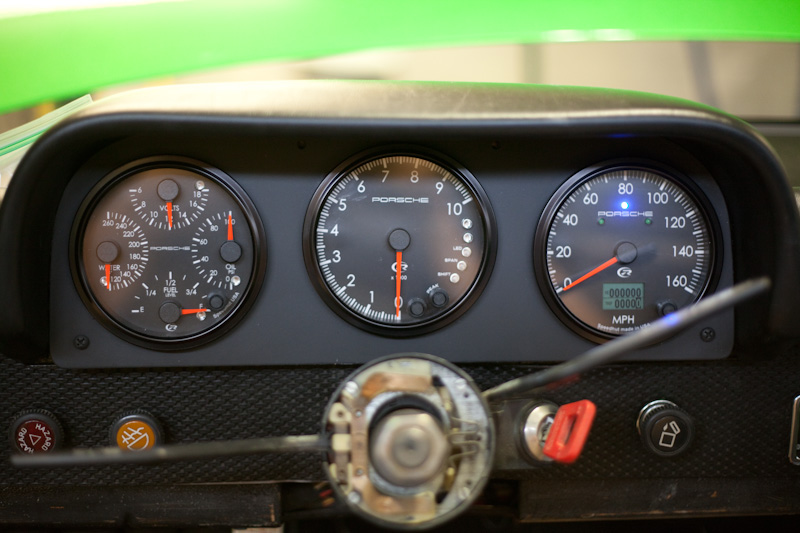
Last thing I did today was put on the new basket weave dash face, reason for doing this was so can put all the electrical in, hopefully for good. New material (thanks Morph) covers way more than you need and when the dash top goes on should look pretty smart.

Click to view attachment

rohar
Hey Chris, I've got a couple of working starters over here that I'll never use. Yours if you want them smile.gif
rwilner
You gotta put a rennshift in that thing, and also Chris Foley's shift linkage!
my928s4
QUOTE(rohar @ Jan 23 2012, 07:18 AM) *

Hey Chris, I've got a couple of working starters over here that I'll never use. Yours if you want them smile.gif


Perfect, thanks Rob I will give you a call.
my928s4
Ok so just more odds and ends, I put a remote fuse block in the trunk to feed the 12V sources for everything but the engine. I ran out of heatshrink otherwise I would have finished the routing for those power feeds.

Click to view attachment

I wanted to get the blower motor hooked up and the fan controls installed in the dash, got some used parts in the mail including a blower assembly with a bad motor. Found the broken plastic part and swapped it over, otherwise everything else in my old assembly seemed to be in better shape. Looks presentable after a good clean.

Click to view attachment

I cleaned the fan control assembly and was about to put it back in the car but could not do it.

Click to view attachment

I disassembled and sand blasted off the corrosion, sure plating it would have been the best but I don't have a large batch of parts to take down so decided to paint instead. Used some etch primer and stain black.

Click to view attachment

All back together, with some new grease the sliders work pretty good too.

Click to view attachment

This flapper looked past its best too.

Click to view attachment

Same treatment and I made some new gaskets with some foam from the local hobby shop.

Click to view attachment

Blower motor all back together and with the controls hooked up in the dash it works just fine. Can now put away for later.

Click to view attachment

Also re-sprayed the glove box door and covered with new material.

Click to view attachment

Click to view attachment
my928s4
So last week I found an engine, decent WRX motors are hard to come by these days. 3 years ago they were everywhere, anyway hopefully be delivered next week which got me motivated to get going on other tasks.

I have had the gas tank stripped of parts and was waiting to get it cleaned at a local radiator company, however, only one place now carries out that work near me and they are a pain to get to and only open weekdays. So decided to pick up some Marine Clean and got rid of all the varnish on the inside, there is some surface rust here and there but decided not to seal the inside.

Onto the outside, sanded down some rust spots and cleaned up the outside. Worst rust was where the tank rested on one of those carpet pads.

Click to view attachment

Good coat of etching primer.

Click to view attachment

Was going to get out the paint gun but decided to rattle it, took two cans and some flattening out but came out pretty good.

Click to view attachment

Click to view attachment

Need to order a fuel pump, hose etc ... and then this baby can go in. One less item cluttering up garage space .....

my928s4
Nothing like a big package of car parts, just like Christmas. So here it is, a 2006 EJ205 JDM AVCS motor from a Forester. 26,000 miler.

Good news is that it has a cable not electronic throttle, less hassle.

Need to get a harness and then figure out the wiring, now waiting on that cradle from Ian and we can make some serious progress!

Click to view attachment

Click to view attachment

Click to view attachment
OllieG
Very cool...what sort of horsepower do you get out of that engine? It's the same engine as the Impreza WRX right?

I was driving a 350hp Impreza on a rally track last weekend, great fun but very front heavy and lots of understeer. Should be beautifully balanced in the 914...and ofcourse will go like an absolute rocket!

Nice one....

Ollie.
my928s4
Seeing as Ian's Subaru Engine Cradle will be delayed sad.gif I started work on the harness, I bought a US 2003 WRX bulkhead harness which has most of what you need except for the fuel pump controller and pigtail harness. Unfortunately when I bought the controller I forgot to ask for the pigtail ...aaaaghhhh. Learn as you go.

If you need the two main connectors to the engine harness, well they are located on the 'Front' harness. Luckily when the Japanese cut the cables removing the engine harness they cut leaving me a few inch's of cable I can use to hook up to the bulkhead harness.

Also as this engine has AVCS I need to modify to support that, good new is others have been here before me and instructions are out there on the web.

I am going to get the sensor board from small car performance also, however decided against their wiring diagram package although it would have come in handy. The harness is big and has lots of crap you do not need, however, removing what you don't need is a BIG frickin job. I have put way more hours in this than I thought I would need to.

Here is the pile of stuff you do not need:

Click to view attachment

This is what I am left with, bar a couple of wires everything is labelled, now I can separate it all and start mocking up how I want it laid out, how to hook up to the 914 harness, power etc ... I am hoping this is half way there ....

Click to view attachment

Zaney
Nice job! beerchug.gif

I feel your pain about pairing down the Suby wiring harness! I had to troubleshoot mine a few times to get it smoothed out. But, very satisfying after it is finished!

Awesome car BTW! driving.gif

Cheers! beer.gif
Nate
abnrdo
Just plain awesome!! More motivation to get working on mine when I get home.

I am way far behind!

Before you know it you will be driving.gif

Great work!!

Cheers,
Jim
my928s4
Well looks like the engine cradle may make an appearance this month so got me motivated to digging in again inbetween other summer activities.

So I knew I needed to modify my gauges and always liked the Quad setup (see below) and other mods that NewVintage advertise, so was already to dump some wonga and get them on order.

Click to view attachment

Well was told pretty promptly that they are too busy for this kind of work sad.gif I know it can be hard to tie down body shops but in this day and age pretty surprised to hear that from others. Well good luck to them.

So looked into doing the same mods myself and it would a) be a bunch of work and b) would cost about the same. While searching for parts to do this I came across another option, these gauges from Speedhut. Sure you lose some of the Porsche originality but I am already way down that path with other stuff anyway, I just don't want it to look tacky/cheap.

So before:

Click to view attachment

And with a little cut and paste to simulate ... the after:

Click to view attachment

Some advantages, no speedo cable or wire to hook up. Fuel gauge will work with 914 sender unit, Water temp and oil pressure will require their sensors but then so would the VDO gauges. Nightime red back glow would look way cool.

Oh and these gauges are pretty shallow freeing up some wiring room.

Anyway just wondered what you guys thought, must admit I am 90% there.
Zaney
Here is Sawtooth's car build with those exact gauges!

I will do the same in the future.

IPB Image

my928s4
QUOTE(Zaney @ Aug 3 2012, 09:30 PM) *

Here is Sawtooth's car build with those exact gauges!

I will do the same in the future.


Too damn funny, well that pretty much seals it.

Thanks Nate.
my928s4
Got my fuel pump, a Walbro GSL-392, need to find a suitable filter and then I can plumb up the fuel tank. Going to put it in the stock pump location.

Click to view attachment

Well the UPS truck came today with my Gauge package, Speedhut were great to deal with and the look is exactly what I was after. I had the 914-WRX logo in all 3 gauges but it made the quad and speedo cluttered so I just left it in the tach.

Quad gauge has metric water temp and oil pressure, just like the German's would do it.

Tach is 0.5" larger than the quad and speedo but it still slightly smaller than OEM, also added a redline in the tach.

Was able to use the standard mount with a bit of fettling, now for some wiring.

Click to view attachment
my928s4
And here is a night time shot, actually not too bad to wire except for the water temp and oil pressure sensor all is done. Even calibrated the fuel gauge.

Click to view attachment
bembry
Damn--I'm usually not a fan of aftermarket gauges folks stick in 914s, but those look terrific! Just a great project through and though.
FourBlades

Like the gauges.

That is a clean looking engine you found!

Great project.

John
mepstein
Really like the gps speedo.
my928s4
So the package from Ian arrived today!

Click to view attachment

Parts inside the box

Click to view attachment

Placed the mounting plates on the old engine mount and transmission mount.

Click to view attachment

Click to view attachment

Click to view attachment

After much hassle with the engine hoist I got the engine on the dolly and the cradle mounted, encountered my first issue. I did not have the 10mm nuts for the Subaru Engine mount, I went through all my stash of parts but the nuts I found were the wrong thread pitch. At that point I was limited to how far I could get, will have another crack later in the week.

Click to view attachment

Transmission brackets on

Click to view attachment

Took the rear of the transmission off, can see the nut that has to be removed to put in the adapter to lock into 2WD mode.

Click to view attachment

Here are the parts to be discarded.

Click to view attachment

Looking forward to getting the engine/transmission in so I can mock up all the odds and ends.

At the weekend I also managed to get the fuel pump/filter and lines hooked up at the front.

Click to view attachment

Click to view attachment

IM101
WOW! this is the first time I've looked at this build, man impressive! hah, sorry to make you wait on the cradle, hope it'll be worth it.

Just another build that I'm proud to be a small part of.

Again, I know i have not put any instructions up yet so please feel free to call me if you have anyquestions with the assembly.

Ian

PS. I think i will just make the 10mm nuts a part of the kit as it seems that may not always come with the stock mounts.
Cupomeat
Damn impressive! beerchug.gif

I also found this thread for the first time and am really impressed and inspired!
Chris H.
Looking really good Chris. What a top notch build.

That settles it, I gotta scrounge the cash for the subie kit from Ian. looks like high quality stuff.

my928s4
So classic case of when frustrated and tired leave it and come back later, worked for a few hours last night on cutting out the rear trunk and getting the engine in place. I got the engine of the pallet and on a dolley and was using the jacks and a hoist to place the engine. Well could not get it right, slept on it and in 30mins this morning it was all buttoned up.

Cutting the rear trunk was like taking a step back but will be worth it, I have seen someone else do a nice panel which looks stockish. Be nice to use the welder again!

As you can see plenty of room up front.

Click to view attachment

Nice big opening for access, at least for now. You can see the turbo is the biggest interference.

Click to view attachment

Click to view attachment

Underside shot, pretty tight at the back but it all fits, nice setup, kudos to Ian for that.

Click to view attachment

Coolant lines and routing is going to be one of the easier tasks.

Click to view attachment

Noticed once I had the engine of the pallet that the sump is pretty dinged up, will need to fix that later.

Click to view attachment

Heading out of town for a few days so going to take the time to work out the todo list and what parts I need to buy, would like to get everything mocked up and running without taking the engine out 5 times. Can but hope, that way it would only need to come out once to get everything powdercoated.
jimkelly
sweet drooley.gif

here is a pic of dbcooper's rear trunk - seems like this will leave enough room for a spare tire?

and his thread...
http://www.914world.com/bbs2/index.php?showtopic=102887
my928s4
OK found the pic, here is the trunk modification I am going to try and implement. Might be a while though as having the improved access is big benefit until I get everything sorted.

Click to view attachment
my928s4
Managed to get qIan's 2WD adapter fitted to the transmission and the rear cover bolted on.

Click to view attachment

Next decided to get the harness on the car and start hooking all the connections up including the modifications to get the AVCS wired up. I liked the idea of having the ECU under the passenger seat so drilled hole in the firewall to allow that.

Click to view attachment

I thought I had completed a lot of the harness work but laying it out on the engine proved there was more to be done, seems to take forever. However, getting close.

Can see where I added connectors to join to the 914 harness, for now just using cable ties, will wrap and protect once I know I have it all right ...

Click to view attachment

Click to view attachment

Click to view attachment

So once I tidy this lot up I will be ready for a power on test ...

Click to view attachment
jimkelly
question and comment ...

does subaru need a return fuel line back to tank?

since you are using a stock subaru ecu - i assume you will be faking some signals to the ecu?

tony's thread says he planned to fake several signals to ecu...
http://www.914world.com/bbs2/index.php?sho...1579&st=100
(see post #109)
Fuel level sender (0.12 to 4.95 volts)
Fuel Temp sender (2.5 to 3.8 volts)
Fuel Tank Pressure sender (2.3 to 2.7 volts)
Rear O2 sensor signal (0 - 0.9 volts)
Neutral position sensor (+12 in neutral, 0 when in gear)
Rear O2 heater sensor signal (0-1.0 volts)
Power Steering oil pressure sender (open/close)

thanks
jim

my928s4
QUOTE(jimkelly @ Sep 23 2012, 05:38 PM) *

question and comment ...

does subaru need a return fuel line back to tank?

since you are using a stock subaru ecu - i assume you will be faking some signals to the ecu?

tony's thread says he planned to fake several signals to ecu...
http://www.914world.com/bbs2/index.php?sho...1579&st=100
(see post #109)
Fuel level sender (0.12 to 4.95 volts)
Fuel Temp sender (2.5 to 3.8 volts)
Fuel Tank Pressure sender (2.3 to 2.7 volts)
Rear O2 sensor signal (0 - 0.9 volts)
Neutral position sensor (+12 in neutral, 0 when in gear)
Rear O2 heater sensor signal (0-1.0 volts)
Power Steering oil pressure sender (open/close)

thanks
jim


Hi Jim

Yes the Subaru requires a return line, also has a vent line which I have not figured out yet. Hopefully just plug.

As for sensors although I completed the wiring and powered it all up I have yet to start the engine so I am sure there will be sensor issues ahead but I bought the interface board from small car performance. It had inputs for the radiator fans, fuel tank level, pressure and temp + two more for valves (Iforge which).

My engine and ECU are JDS and it seems they came without rear O2 sensor and exhaust gas temp sensor evidently.

I bought a cheap OBII reader from HF just to see if the ECu was alive, I plan to invest in http://www.romraider.com/ as the engine will definitely need some tuning changes.

Hope this helps.

Chris
jimkelly
these guys seem to offer a way to fake 2 ecu sensor inputs?
Simulators for Subaru VSS Sensor and Rear Oxygen Sensor Signal...
http://www.enginewiring.com/catalog.htm#Featured

thanks!
jim
Hydra.
Car will run fine without a rear O2 signal, you can (permanently) turn off the resulting CEL with a software reflash. In fact you can turn off almost any CEL with a reflash...
my928s4
Well the ECU is all hooked up, powered up and I can do some interrogation with the OBD II scanner so it is alive. I also turned the engine over from the ignition which was pretty cool. Still some tidy up to do with the wires but that can wait until we get this baby started and running.

Click to view attachment

Decided to remove the intake, I need to add the oil pressure and water temp sensors so it made sense and I also wanted to find out which fuel port was in and out. Not too bad of a job once you know where all the connections are.

Click to view attachment

Click to view attachment

Unfortunately I need the old coolant sensor for the ECU and the gauge part of the sensor is not compatible with the new gauge. So I drilled a hole in the bridge and added the new sensor.

Click to view attachment

I was just going to replace the old oil pressure sender with the new one but there is limited height between it and the alternator. There is another port at the rear of the engine which has an alan keyed bung, I bought the Subaru adapter (cheap) to screw in where the bung was.

Click to view attachment

I thought removing the oil pan to fix the dent was going to be easy but someone had replaced the pan before and used a very effective liquid gasket. Took forever to prize the sump off AND clean both surfaces, removing all of the dent proved impossible because of the baffling but I did fix the area around the pickup with the aid of a press. Back on with a rubber gasket and also put on a new oil filter (makes me think I am getting close to the big day if nothing else)

Click to view attachment

My Subaru drive shafts arrived, so already to modify once Ian get his shafts complete.

Click to view attachment

Also picked up the wastegate solenoid and it associated plumbing with the restrictor pill, not sure why this was removed from the engine but it was.

Click to view attachment
Porcharu
How is the oil pan clearance? I spoke with Ian a few weeks ago and he said the pan hangs down about 1-1/2" below the floor (or the cradle - I forgot.)
BTW after talking to Ian for a while I am not only purchasing some of his parts I have offered him any help in any way I can to help him make this a success.
Steve
my928s4
QUOTE(Porcharu @ Sep 30 2012, 11:28 AM) *

How is the oil pan clearance? I spoke with Ian a few weeks ago and he said the pan hangs down about 1-1/2" below the floor (or the cradle - I forgot.)
Steve


Hi Steve

Yep about an inch below the cradle.


my928s4
Got some parts this week, I got the flange for the turbo of Ebay and the 3" tube and muffler from Summit. Actually ordered way more tube than I needed but it was pretty inexpensive.

I think this is going to be a little loud but will be good enough to get things going.

A bandsaw would have made this job a lot easier!

Click to view attachment

Click to view attachment

Click to view attachment

Need to fabricate a hanger and get some kind of exhaust tip, 3" looks a little ricey but minor issue for now.

Going to leave it tacked for now, just incase I feel the need to modify something in the next couple of weeks.

I have the coolant adapters from RH, so tomorrow coolant pipes hooked up!
rohar
It's comming along nicely. If you've got some time, stop by the track tomorrow. I'm fielding the Teutonic Turd and there's a lot of great people to meet out there.
charliew
My advice is a little late but did you look at the pickup real close to see if the pan contacted it when it was dented in? The pickups seem to be easily cracked where they are brazed or silver soldered on the flange where they bolt on the block. The pan to pickup clearance is real close when it's all stock and it doesn't take much to bump the pickup. Nasioc has a few threads on the cracked pickup. I have added a brace on all the pickups we are using at my house to try and stop any vibration.

Also while the intake is off is a good time to do a delete on the tgvs for better airflow in the intake. I actually don't see any shaft or connectors for tgvs so it must not have them. Pretty neat.

Also while I was studying your pictures there is a sensor it appears on the back side of the drivers side head in the oil gallery. This is new to me. I'm trying to remember and I think that oil gallery is restricted with a orfice to reduce the oil to the heads, I'm wondering if it is a low oil pressure feedback safety thing to the ecu. To clean the oil gallerys on the heads you have to tap the orfice out and put it back in and it only goes one way out of the gallery, it fits against a shoulder in the gallery. You have to remove the 1/8 plugs on either end of the head to do this. I think it is in the front on the drivers side and the rear on the pass side as the turbo gets its oil on the pass side. I'm pretty sure that new sensor not there on the 04 sti of my sons, we have had it apart a couple of times. It might also just be a jdm thing.

I also wonder if this is a jdm motor if it has higher compression like the older jdm motors, if so it will need better fuel but it also will be higher horsepower than the usdm version.
my928s4
QUOTE(rohar @ Oct 6 2012, 10:21 PM) *

It's comming along nicely. If you've got some time, stop by the track tomorrow. I'm fielding the Teutonic Turd and there's a lot of great people to meet out there.


Could not make it happen today but you chose perfect weather! Were you out with Scott Adere and gang?


QUOTE(charliew @ Oct 7 2012, 02:20 PM) *

My advice is a little late but did you look at the pickup real close to see if the pan contacted it when it was dented in? The pickups seem to be easily cracked where they are brazed or silver soldered on the flange where they bolt on the block. The pan to pickup clearance is real close when it's all stock and it doesn't take much to bump the pickup. Nasioc has a few threads on the cracked pickup. I have added a brace on all the pickups we are using at my house to try and stop any vibration.


You may well be right on the pickup, I checked to make sure the brace was straight but did not check the joint for cracks, I was cranking the engine yesterday and did not see oil pressure so looks like sump will come off again.

See the attached pic for the location for the rear sensor, this was from NASIOC.

Click to view attachment
my928s4
While picking up some hose clamps from Autozone I picked up the parts to cobble together an intake. One more thing of the list.

Click to view attachment

Hooked up the coolant lines from engine to radiator, RH adapters are actually nice parts and not too spendy either.

Click to view attachment

Click to view attachment

Shot under the car

Click to view attachment

Also hooked up the accelerator cable, standard cable works with some minor mods, still a little long but it does the job.

Click to view attachment

Also checked out the clutch cable, again looks like it will work but it needs to be longer, once I have the details will have Terry Cable make me one.
Chris H.
You're getting close Chris! Looking good... Your comment, "I think it's going to be a little loud" might be an understatement... laugh.gif But loud is good!
charliew
Chris make sure the map sensor is turned the right direction. One time after reinstalling my sons motor on an all nighter we put a different aircleaner and cold air intake on that I made and got it turned around and it wouldn't even idle. He got on nasioc and figgured it out while I rested on the couch that morning. Also try to check the cfm requirements on that aircleaner you probably need at least 500 cfm. For each 1hp you need 1.45 cfm. I bet that motor is at least 260 hp. Also slow cranking will make it hard to get the oil up in the pump if it has drained down for a long while. The rear of the motor like you have it, is the best place to get a accurate oil pressure reading because it's after the rods. Also make sure the knock sensor is torqued to the correct specs or you may get knock errors prematurely.
rohar
QUOTE(my928s4 @ Oct 7 2012, 05:34 PM) *

QUOTE(rohar @ Oct 6 2012, 10:21 PM) *

It's comming along nicely. If you've got some time, stop by the track tomorrow. I'm fielding the Teutonic Turd and there's a lot of great people to meet out there.


Could not make it happen today but you chose perfect weather! Were you out with Scott Adere and gang?


Yup, had a friend that needed to learn to drive and a new track car that needed shaking down. It was an amazing weekend. Scott knows how to put an event together.
jimkelly
questions?

1- are these what renegade calls - coolant hose adaptors - and sells two for $39?

2- the two large ID hoses you have connected to your engine - did you source them yourself or are they part of renegades cooling system offering?

thanks
jim
BIGKAT_83
here's the place to get hose adapters.Jags that run. Ive ordered from them a few times and have been very happy with the service and product. After you buy more than 5 the price drops to $10 each.

Click to view attachment

Bob
This is a "lo-fi" version of our main content. To view the full version with more information, formatting and images, please click here.
Invision Power Board © 2001-2024 Invision Power Services, Inc.