I already have that installed. The RD piece was designed to be a one piece repair section. The factory design of the inner wheelhouse long was two layers. The outer portion everyone sees is a solid metal u shaped channel. Inside of that is the corrugated section that Nathan built. It adds to the strength of the structure.
Too add to complexity, the original factory was one piece. I want the corrugated piece to strengthen the welded joint.
Full Version: Palindrome 914 Build Thread
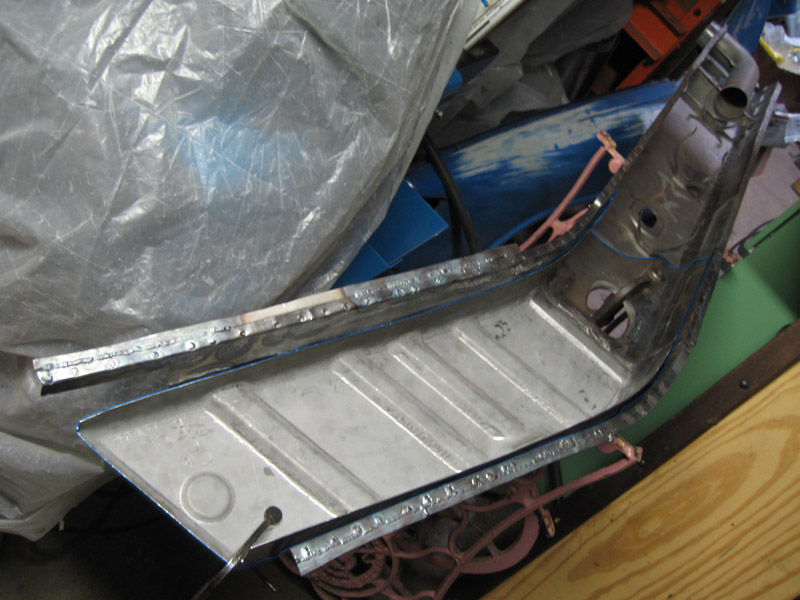
Here's a picture of what you get when you have the two RD pieces ready to install.
If you look at the RD wheelhouse you'll see it has flanges so it can be welded to the inner fender. One piece design.
Click to view attachment
The piece Nathan built would lay inside those two piece. The seat belt nut plate would need to be removed.
If you look at the RD wheelhouse you'll see it has flanges so it can be welded to the inner fender. One piece design.
Click to view attachment
The piece Nathan built would lay inside those two piece. The seat belt nut plate would need to be removed.
All of Nathans parts are either original or R.D. You have the inner long attached properly. Buy the inner rocker, it is the piece with the ribs. the flanges of the 2 are spot welded together to form a rectangular box. There is only one layer for most of the length of the long, inside and out. There is a second smooth piece that covers where the kickup into the engine bay is, but no one makes that, and AFAIK no one ever has. Not sure why, as it is a appearance piece that alwaysgoes along with the repair
It's complicated to explain, "inside-outer", etc, so I made a diaagram. 
I was thinking this is the best way to describe it.
Click to view attachment
Both inner and outer are double layered from just forward of the lower seat belt bolt until they reach the trunk, but people claim that the 1 piece rd is thicker and is to be used instead of both layers from the firewall back.
I chose not to do it that way. I would rather it be smooth, and I think 2 layers would be stiffer there, just better overall. So I attached the stock inside inner piece forward of the firewall, to the RD corrugated piece. I'd posted this pic in post 109, I used a radius from the top of the long and corrugations from the bottom of the driver side of the donor car to remake the bottom.
I'm a little slow, but I'm getting it.
1. Scotty. I have a four pieces of new RD. Inner Long, Long, Inner Rocker and Inner Wheelhouse.
2. So to copy Nathan, I would build the extension on to the inner long to get a longer box and tie? Looks like it would need to lapped so it would slide inside the new RD long?
3. Looks like there's multiple ways to skin this cat.
4. Then build the box to cover the inner long inside the engine compartment.
5. I still don't like the firewall, long and inner long coming together in the same spot. Adding Nathan's extension helps a little. Anal .................
I have been meaning to post progress.
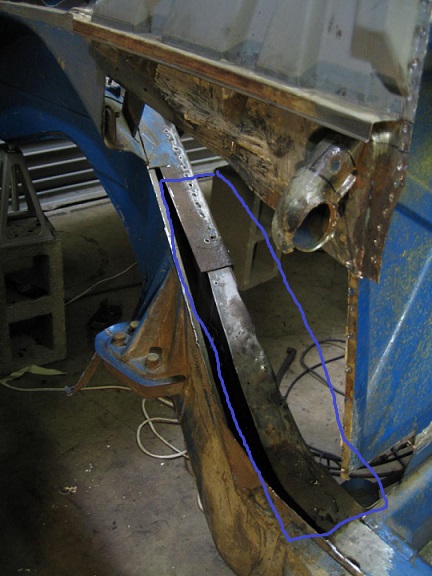
I cut out more at the back of the long. I am planning to splice it back together at one of the inside's corrugations so I can weld the inside, and then a patch to the outer to seal that up, that little piece there.
Click to view attachment
You can't go all the way back or the engine shelf becomes complicated at the corner.
Click to view attachment
Here, attaching the piece that was going to be the patch, but the plan changed. I am trying to attach the suspension console to the long, build the whole thing and then spot weld it all in as 1 big piece, maybe even the engine shelf with it.
Pieces I cut out, inside and outside inner. It curves there, toward the outside, just rearward of the suspension console.
Click to view attachment
Fitting it up to put the next piece on.
[this wants to be at the end of the post for some reason]
Welding the inside to the RD piece. I had cut some of it off before. The outer didn't want to let it sit right, but I wanted to make sure it would go together right so this is how I got it all set up to weld.
Click to view attachment
Got it tacked
Click to view attachment
and ready to fit. Some 1/4-20 bolts holding it together.
Click to view attachment
I put the rear up first and pop it in up front over the lip that sits at the base of the front wheel well.
Click to view attachment
I bolted the floor in wrong, so the gap is big at the front, should have measured. I'm going to fit this again, trying it with the engine shelf attached. I can pivot it in. I will add the forward piece of the firewall, too. I think I need to cut the support under the seat at and angle to make this work for fitting 2, to come.
Click to view attachment
My other ride has been taking my time, discovered some nasty rust under the front bumper. I've been dividing up my 3 hours a day to work on these things. This is how I've driven my bus to work the past week and a half. I oil it up everyday, I've been using penatrol, which is like an oil paint additive that smells like linseed oil, hasn't rusted yet. No ticket for the license plate.
Click to view attachment
Look'in good!
How much of the inner long is double walled Im currently in the process of replacing my rear pans and the bottom of my inner longs have some rust and pitting .. Im trying to figure the best way to repair before I weld the floors in place..in my photo you can see some minor rust where the pans sits against the long but on the outside the metal looks fairly fresh..
Should I weld the holes closed and put the pan in or cut out the bad stuff and patch in a new piece If its double walled the inner piece is un rusted as I can see down in the there
Should I weld the holes closed and put the pan in or cut out the bad stuff and patch in a new piece If its double walled the inner piece is un rusted as I can see down in the there

This thread is awesome!!! Hats off to all the effort displayed!!! 
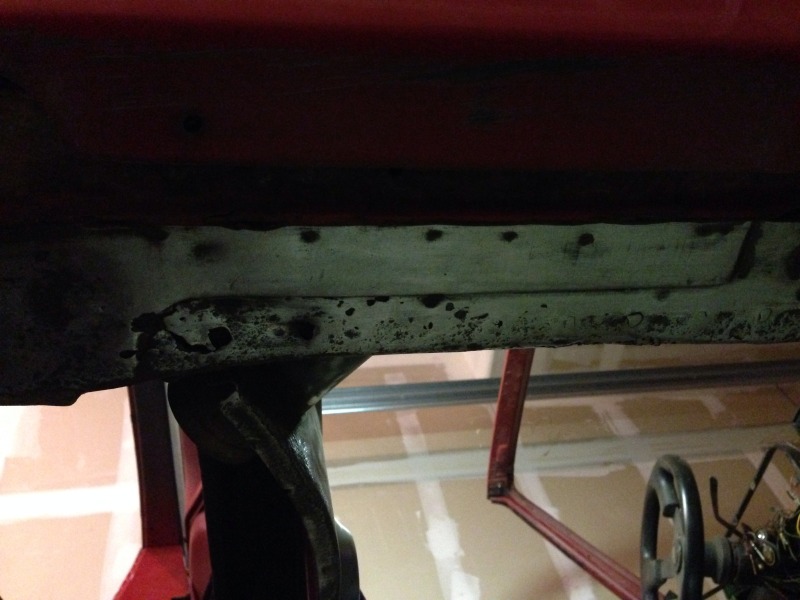
What you're working on right now is the long. The inner long is the continuation of the same piece that goes up the wheel well in the engine compartment.
It only has a small section that is double layered.
In the blue box.
Click to view attachment
But to answer the original question. The portion outlined below in blue is the actual inner layer that Nathan exposed after he removed the outer layer. It does go further up the inner long but I can't remember exactly where it stops.
Click to view attachment
I'm going exit before I get run out of town for being a hijacker. LOL.
Thanks for the response.. Great thread info like this save's these rust buckets. I can call them that cause I have filled up a bucket of rust lol..
QUOTE(ONTHEGRIND @ Dec 15 2013, 06:32 PM) 
How much of the inner long is double walled Im currently in the process of replacing my rear pans and the bottom of my inner longs have some rust and pitting .. Im trying to figure the best way to repair before I weld the floors in place..in my photo you can see some minor rust where the pans sits against the long but on the outside the metal looks fairly fresh..
Should I weld the holes closed and put the pan in or cut out the bad stuff and patch in a new piece If its double walled the inner piece is un rusted as I can see down in the there
That part is double walled. You can't see it as clearly on the RD piece, but it is there, the indent for the floor that lines up with the indent you have in your pic.
Ideally you could get the pitting to be all white metal with a spot blaster, but you could weld that as is I think, especially with a mig. If it's solid inside, I wouldn't cut. I think it would be making it harder and all the burn from welding in a patch woulds be worse than what you have, which seems not too bad. Some small plug welds seem best from there, trying to not burn the factory weld through too much. Seems you'll want to run a wand up the inside to treat it after, though.
I was reading through, planning what to do next. I changed the thread name, too, to be incognito as most views of the forums are during the work week.  I updated the first post explaining, and also put up pics of my front trunk vin plate, window vin, kunstharslack plate, rear trunk chassis stamp, as well as my dash number which should match my chassis number, but doesn't.
I updated the first post explaining, and also put up pics of my front trunk vin plate, window vin, kunstharslack plate, rear trunk chassis stamp, as well as my dash number which should match my chassis number, but doesn't.
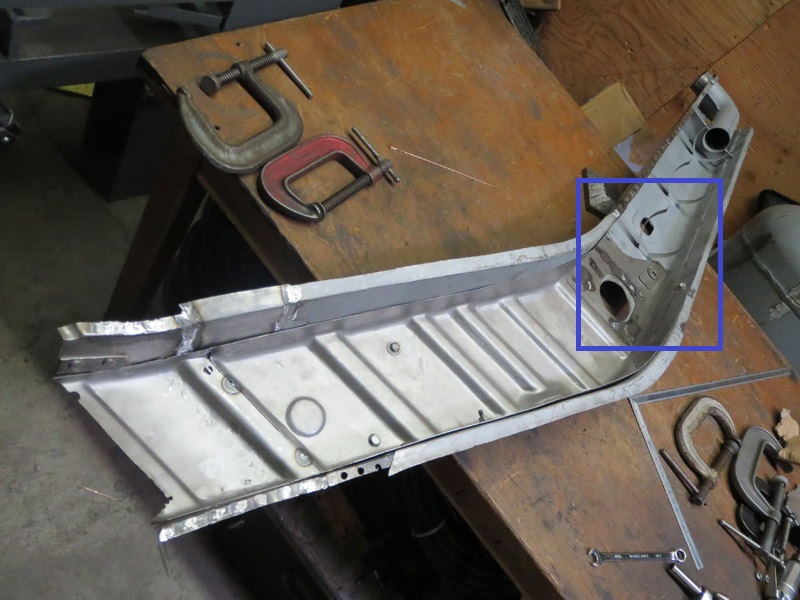
I saw you sort of correct yourself after the first pic, but I wanted to set this straight. The inner goes all the way to the trunk. There is a flange off the rear of the inner that is spot welded to the front of the trunk. I did an outline pick in post 110, it is a bit harder to see, but outlined in blue, the inner piece. at that point it is short about 15 inches at the back.
I'm going to work on my firewall right now, or after lunch actually.


What you're working on right now is the long. The inner long is the continuation of the same piece that goes up the wheel well in the engine compartment.
It only has a small section that is double layered.
In the blue box.
But to answer the original question. The portion outlined below in blue is the actual inner layer that Nathan exposed after he removed the outer layer. It does go further up the inner long but I can't remember exactly where it stops.
I'm going exit before I get run out of town for being a hijacker. LOL.
Hijacker I have been subscribed to your thread for awhile now.
I'm going to work on my firewall right now, or after lunch actually.
QUOTE(cary @ Dec 15 2013, 09:13 PM)
What you're working on right now is the long. The inner long is the continuation of the same piece that goes up the wheel well in the engine compartment.
It only has a small section that is double layered.
In the blue box.
But to answer the original question. The portion outlined below in blue is the actual inner layer that Nathan exposed after he removed the outer layer. It does go further up the inner long but I can't remember exactly where it stops.
I'm going exit before I get run out of town for being a hijacker. LOL.
Hijacker
I have been subscribed to your thread for awhile now.
I had some issues a few weeks ago fitting the engine mount. The details of that are in this thread
http://www.914world.com/bbs2/index.php?sho...997390&st=0
I was pretty bummed out and didn't know what to do. My friend Derek sent me a link to this chassis jig. I posted about it in this thread of Cary's
http://www.914world.com/bbs2/index.php?sho...997390&st=0
It is finally here at my studio.
Click to view attachment
Click to view attachment
I was pretty impressed, and slightly frightened, with how the guy got it off the truck by angling it down the lift gate, at one point, with the pallete jack hanging out under it from the back. He actually moved the truck forward while it was halfway out then lowered it the rest of the way down with the lift gate. Somehow he moved the whole thing with a pallete jack while my neighbor and I dragged/slid the back of it into place in my parking spot there. 1000Lbs with the other boxes in there.
I got the unistrut from Unistrut direct- the guy actually drove it over from Bellflower over to my mailbox in Irvine.
I got the threaded rod and 3/4" hardware, but couldn't figure out what smaller hardware I'd need in advance. I put an order with mcmaster carr to get the rest of it quick. I don't have room for it in my studio with the car being on stands in there. I need to assemble it and roll it under the car, but can't do that until the hardware comes, maybe tomorrow. I can't wait to see it just up on there.
http://www.914world.com/bbs2/index.php?sho...997390&st=0
I was pretty bummed out and didn't know what to do. My friend Derek sent me a link to this chassis jig. I posted about it in this thread of Cary's
http://www.914world.com/bbs2/index.php?sho...997390&st=0
It is finally here at my studio.
Click to view attachment
Click to view attachment
I was pretty impressed, and slightly frightened, with how the guy got it off the truck by angling it down the lift gate, at one point, with the pallete jack hanging out under it from the back. He actually moved the truck forward while it was halfway out then lowered it the rest of the way down with the lift gate. Somehow he moved the whole thing with a pallete jack while my neighbor and I dragged/slid the back of it into place in my parking spot there. 1000Lbs with the other boxes in there.
I got the unistrut from Unistrut direct- the guy actually drove it over from Bellflower over to my mailbox in Irvine.
I got the threaded rod and 3/4" hardware, but couldn't figure out what smaller hardware I'd need in advance. I put an order with mcmaster carr to get the rest of it quick. I don't have room for it in my studio with the car being on stands in there. I need to assemble it and roll it under the car, but can't do that until the hardware comes, maybe tomorrow. I can't wait to see it just up on there.
Cool ...................

Can you post some detailed shots of how your attaching the body to the jig?
With your fabricating skills any thoughts of building shock tower hold downs like the Celette has? Following Rick's idea.
Without a lift it looks like its a bit of a bitch getting it on there.
With your fabricating skills any thoughts of building shock tower hold downs like the Celette has? Following Rick's idea.
Without a lift it looks like its a bit of a bitch getting it on there.
QUOTE(cary @ Mar 2 2014, 05:49 AM)
Can you post some detailed shots of how your attaching the body to the jig?
With your fabricating skills any thoughts of building shock tower hold downs like the Celette has? Following Rick's idea.
Without a lift it looks like its a bit of a bitch getting it on there.
Currently it's sitting on 2 spans of channel, 1 under the rear firewall and at the front under the pedal area. I'll definitely post pics once I have some progress.
I've got to get it leveled, which I don't see how you could do with swivel casters. I'm going to make some leveling feet. I need to some more hardware still.
It was a chore getting it on there, took about 4 hours raising it up - ridiculously high, like 8 inches higher than in the pic above, but I was too busy to get a pic, I thought the wind might blow it down.
It was raining a bit too. I had a drop cloth over it outside a day because I forgot to buy the fat half inch fender washers for the bottom. The palette, I'd put on top of it to keep the wind from blowing the drop cloth away. It mostly worked, but 2 pools formed on each side, and pulled the cloth off the middle of the one side. There are pretty crazy storms going on the past few days.
I finally got it up and in, and it is so tall!. It makes me think that a mini monster truck 914 would be really cool.
About the fixtures for the shock towers, that was something that I was struggling with, for both the front and the back. Talking to the guy at JD2, it seems the way it is done on a jig is to mount the struts/shocks themselves to the car and measure off of them.
I think the difference between a jig and a rack is the latter is so rigid and stout that you can leverage against it to straighten what is bent or "pull" the car. On the jig, the channel strut is the limiting factor to be sure, especially torsionally.
There is this info in the specs book that I will check against.
It lists the track of the front as
1331mm or 1343 with 4 1/2 or 5 1/2 inch rims, respectively.
Click to view attachment
Click to view attachment
It lists the track of the front as
1331mm or 1343 with 4 1/2 or 5 1/2 inch rims, respectively.
Click to view attachment
Click to view attachment
I've been setting it up, I've cut and filed the ends of 22 1 foot lengths of 3/4" threaded rod, so far. More still to do. I need to get 1 1/2" threaded rod for the leveling feet, some more hardware, and to make some fixtures, probably 1/2 inch plate, I am thinking..
Click to view attachment
Click to view attachment
where did he go ?? hope all is good
Been wondering the same thing.
Hope so too. This thread has been a great 914 anatomy reference for me.

It's not looking encouraging....
nathansnathan - Last Active: 1st June 2017 - 02:48 PM
nathansnathan - Last Active: 1st June 2017 - 02:48 PM
QUOTE
From: Laguna Beach, CA
I knowCA. > Is Huge >>Butt>>>
I sent an email.... we gotta track a brother down...he was no casual.......

Wellness Check? Anyone? Anyone? Bueller?
I knowCA. > Is Huge >>Butt>>>
I sent an email.... we gotta track a brother down...he was no casual.......
QUOTE(sixnotfour @ Mar 11 2019, 06:50 PM)
QUOTE
From: Laguna Beach, CA
I knowCA. > Is Huge >>Butt>>>
I sent an email.... we gotta track a brother down...he was no casual.......
@nathansnathan The world wants to know.
Or possibly @Beach914 as he had dealings with him and lived near by?
Or possibly @Beach914 as he had dealings with him and lived near by?
Last time I saw Nathan was when he came by to buy a set of Pedro is and cut some parts out of a 72 chassis I had. Must have been 2014 or so. I was wondering the same about his whereabouts.
QUOTE(sixnotfour @ Mar 12 2019, 09:09 AM)
He was from Laguna Beach. I have a number for him if someone wants to give him a ring. I'm drawing a blank on him but my memory sucks. If I saw him I'm sure I'd recognize him. I'll shoot you a PM Jeff with his number
I hope the bench he bought didn't reveal a grand  up that made him withdraw. If that's all it is he should checkout some my failures and gather hope.
up that made him withdraw. If that's all it is he should checkout some my failures and gather hope.
Hey, thanks to everyone reaching out. A lot of changes awhile back set me back, health problems, money problems, a bit of burnout on the project. I moved shops, got another vw bus and did a bit of a rebuild on it. The 914 kinda got on the back burner. But I still have it, waiting for the urge to do more metal work - seriously wish I could get that part tackled. Thinking of getting back to it. I'll post updates when I do.
Again thanks for hitting me up, everyone who did, means a lot.
Again thanks for hitting me up, everyone who did, means a lot.
Holy Shit...Hooray......charge up,, you got friends here....


![popcorn[1].gif](http://www.914world.com/bbs2/style_emoticons/default/popcorn[1].gif)


your work is #1..enjoyed your posts..... Cheers
This is a great thread and I'd love to watch you finish this. At the time, I was so consumed with my own project that I missed this one dropping off the Radar. Looking forward to the resumption of your build and hope that it isn't too far away. Kent 
QUOTE(nathanxnathan @ Mar 14 2019, 07:08 PM)
Hey, thanks to everyone reaching out. A lot of changes awhile back set me back, health problems, money problems, a bit of burnout on the project. I moved shops, got another vw bus and did a bit of a rebuild on it. The 914 kinda got on the back burner. But I still have it, waiting for the urge to do more metal work - seriously wish I could get that part tackled. Thinking of getting back to it. I'll post updates when I do.
Again thanks for hitting me up, everyone who did, means a lot.
Thanks for the reply. I realized how much I had followed your progress as I cut out rusty parts of my own. Kinda figured you were still around, then realized you weren’t, good to hear you are ok.
QUOTE(worn @ Mar 15 2019, 05:49 PM)
QUOTE(nathanxnathan @ Mar 14 2019, 07:08 PM)
Hey, thanks to everyone reaching out. A lot of changes awhile back set me back, health problems, money problems, a bit of burnout on the project. I moved shops, got another vw bus and did a bit of a rebuild on it. The 914 kinda got on the back burner. But I still have it, waiting for the urge to do more metal work - seriously wish I could get that part tackled. Thinking of getting back to it. I'll post updates when I do.
Again thanks for hitting me up, everyone who did, means a lot.
Thanks for the reply. I realized how much I had followed your progress as I cut out rusty parts of my own. Kinda figured you were still around, then realized you weren’t, good to hear you are ok.
Ditto. There is a lot taken from this thread that went into my car.
I've been easing back into working on the 914, been working on it like a day or 2 a week. Pretty slow going but as long as I keep making some progress, I think I'll get there.
It had been like years since I worked on it so, instead of jumping back into the hell hole, I decided to get some momentum tackling the other end which I'd always kind of dreaded getting further into.
Back on page 1 of the thread, I had this at the driver side cowl.
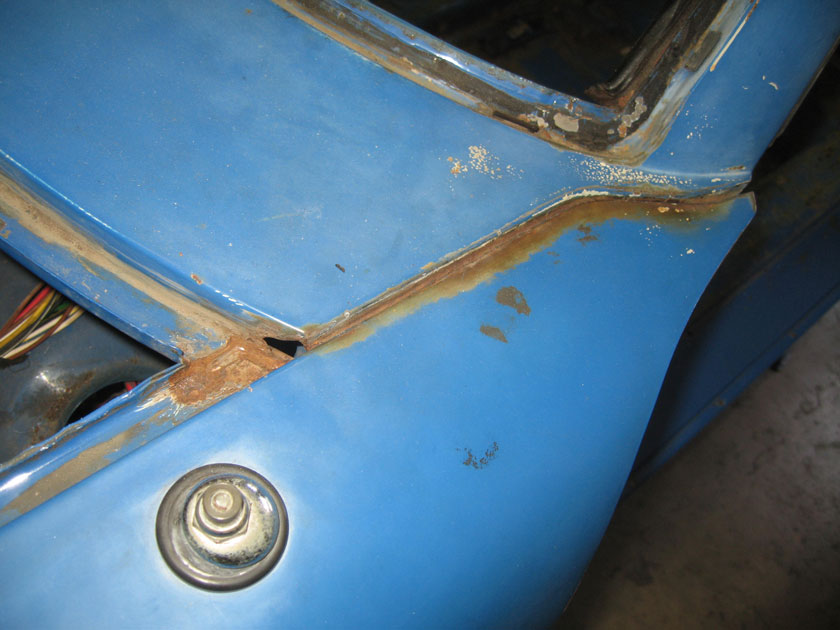
Somewhere around page 3 I'd taken off the whole driver front fender. I think if I had to do it again, I would have cut the fender and left the front of it on - best to plan so you can weld where you can back it, and not mess with the seams as much.
But I've been looking at this for a few years now, thinking about how to go about it.
Click to view attachment
The driver door getting hyperextended did a number on the door pillar plus the rust at the top from I guess the cowl seal going bad.
Click to view attachment
Te cowl section was rusted thin and damaged a bit when taking the fender out. -Tricky area for real. I decided to go in. I got a little out of hand on the windshield pillar, and Ill have to fix that some...
Click to view attachment
Click to view attachment
I went further in with that out of the way. The inner fender well rust and then the damaged area of the door pillar.
Click to view attachment
I bent up a replacement panel. The metal seems thicker here, idk. I used a bit of a scrap piece of a trunk that has a rear inner fender well that seems thicker also.
Click to view attachment
Click to view attachment
Click to view attachment
I had another door pillar from the parts car that I'd saved. It's rough getting the part I needed off. I should have taken a pic of it once I drilled out all the spot welds holding it, but you can kind of see here after closing them up and grinding them down flush.
Click to view attachment
Click to view attachment
It took awhile to get the cut and the piece fitted, and I've been working on building up the lip at the top of the inner fender well where it was damaged from removing the fender, and at the front. Next to fix the fender itself and put the pillar patch back in.
I'm pretty slow, but I wanted to update even if it's now actually less together than it was lol This should be easier than the hellhole and will feel good to get conquered, needs to be done... anyway, coming along again
It had been like years since I worked on it so, instead of jumping back into the hell hole, I decided to get some momentum tackling the other end which I'd always kind of dreaded getting further into.
Back on page 1 of the thread, I had this at the driver side cowl.
Somewhere around page 3 I'd taken off the whole driver front fender. I think if I had to do it again, I would have cut the fender and left the front of it on - best to plan so you can weld where you can back it, and not mess with the seams as much.
But I've been looking at this for a few years now, thinking about how to go about it.
Click to view attachment
The driver door getting hyperextended did a number on the door pillar plus the rust at the top from I guess the cowl seal going bad.
Click to view attachment
Te cowl section was rusted thin and damaged a bit when taking the fender out. -Tricky area for real. I decided to go in. I got a little out of hand on the windshield pillar, and Ill have to fix that some...
Click to view attachment
Click to view attachment
I went further in with that out of the way. The inner fender well rust and then the damaged area of the door pillar.
Click to view attachment
I bent up a replacement panel. The metal seems thicker here, idk. I used a bit of a scrap piece of a trunk that has a rear inner fender well that seems thicker also.
Click to view attachment
Click to view attachment
Click to view attachment
I had another door pillar from the parts car that I'd saved. It's rough getting the part I needed off. I should have taken a pic of it once I drilled out all the spot welds holding it, but you can kind of see here after closing them up and grinding them down flush.
Click to view attachment
Click to view attachment
It took awhile to get the cut and the piece fitted, and I've been working on building up the lip at the top of the inner fender well where it was damaged from removing the fender, and at the front. Next to fix the fender itself and put the pillar patch back in.
I'm pretty slow, but I wanted to update even if it's now actually less together than it was lol
This should be easier than the hellhole and will feel good to get conquered, needs to be done... anyway, coming along again
I dont know if you have a pillar patch piece, but AA made this ,,just an fyi...llookin good ..
nathanxnathan - So glad to see you still have the car and are back at it. We all, (mostly) know how things happen in life and projects get set aside for a bit. Life is complicated and can get messy. I am very happy to see you back at it and making progress. Soon the metal work will behind you and then it is all down hill at speed.
I met Nathan at the old Aliso Viejo cars and coffee. He was in a VW bus and super interested in all of our 914s.
I forgot about this thread too, good to see him back at it.
Life is too short to not drive your 914.
I forgot about this thread too, good to see him back at it.
Life is too short to not drive your 914.
QUOTE(sixnotfour @ May 30 2019, 01:28 AM)
I dont know if you have a pillar patch piece, but AA made this ,,just an fyi...llookin good ..
Wow, pretty awesome that they make it... might have to get out my wallet for it. I don't have as much in that dept as I used to, but if I value my time at anything, I'd be making out I think...
QUOTE(nathanxnathan @ May 30 2019, 11:25 PM)
QUOTE(sixnotfour @ May 30 2019, 01:28 AM)
I dont know if you have a pillar patch piece, but AA made this ,,just an fyi...llookin good ..
Wow, pretty awesome that they make it... might have to get out my wallet for it. I don't have as much in that dept as I used to, but if I value my time at anything, I'd be making out I think...
I know you have the skillls ,,,sometimes money talks .... plus you you could recharge on the beach....

Just for fun today I read through this (monumental) build thread. Wow I was hoping to see a completed awesome ride in the end, but as many of us (me included) have gotten stalled mostly because life gets in the way.
Hopefully you can get back into this, great workmanship with the completed work
Hopefully you can get back into this, great workmanship with the completed work
Glad this thread was bumped. First time reading and lots of great ideas. Wishing you the best @nathanxnathan and hopes you will get her completed. The visualizer is awesome! Many thanks for sharing this.
Dan
Dan
Good to hear from you again
This is a "lo-fi" version of our main content. To view the full version with more information, formatting and images, please click here.