Help - Search - Members - Calendar
Full Version: OT: Working on my shop car
914World.com > The 914 Forums > 914World Garage
Pages: 1, 2, 3, 4, 5, 6, 7, 8, 9
aircooledtechguy
This weekend I turned my attention to the steering since I’m awaiting a set of camber plates assemblies from Chris @ Tangerine Racing (www.tangerineracing.com). The goal was to finish the welding on the front mounts from last weekend (since I ran out of welding gas) and get the front-end ready to accept the Porsche rack & pinion steering gear. I fell a bit short, but made fine progress nonetheless. It is surprising even to me just how much time this stuff takes to do.

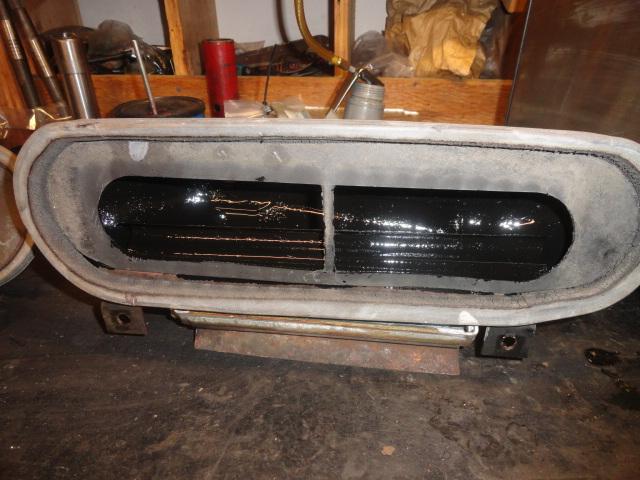
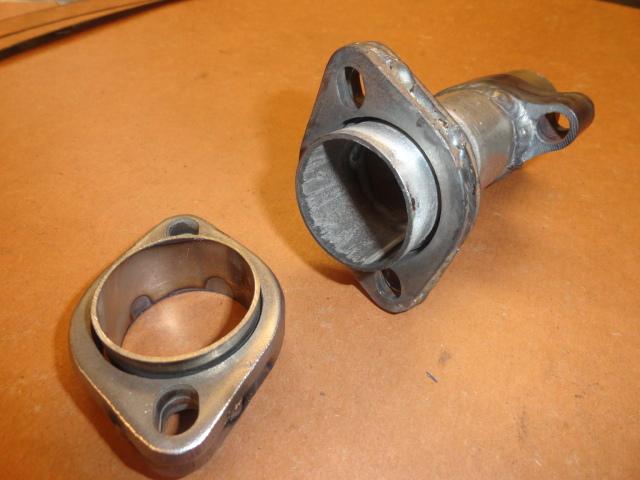
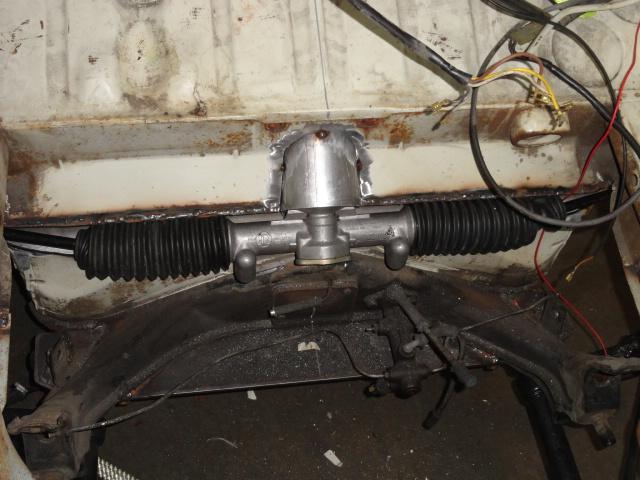
Since I’m going all Porsche on the front suspension, it’s only natural to upgrade to a Porsche R&P set-up. So I acquired a nice factory unit and upgraded it with Porsche 930 turbo tie rods which is a popular upgrade to add a more positive feel and preciseness to the steering.

IPB Image

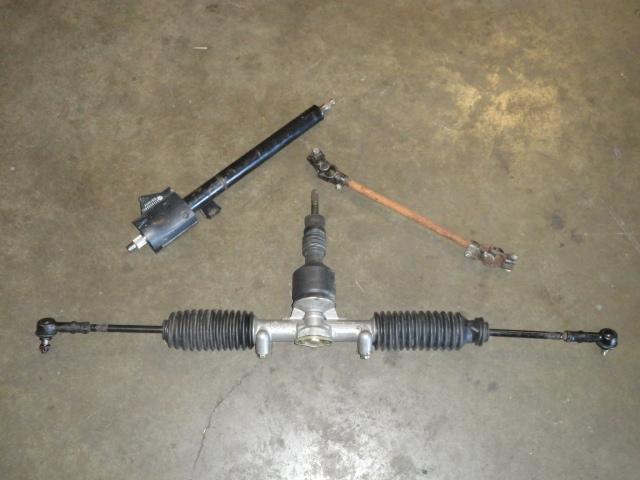
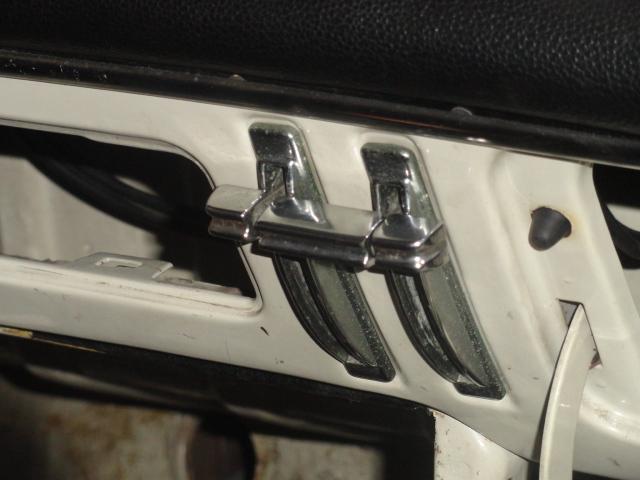
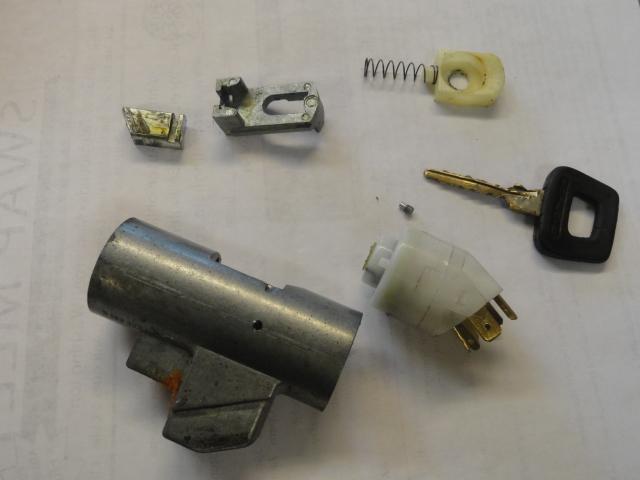
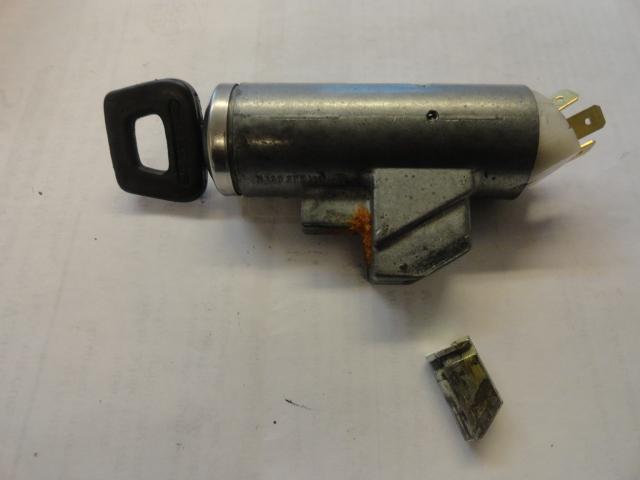
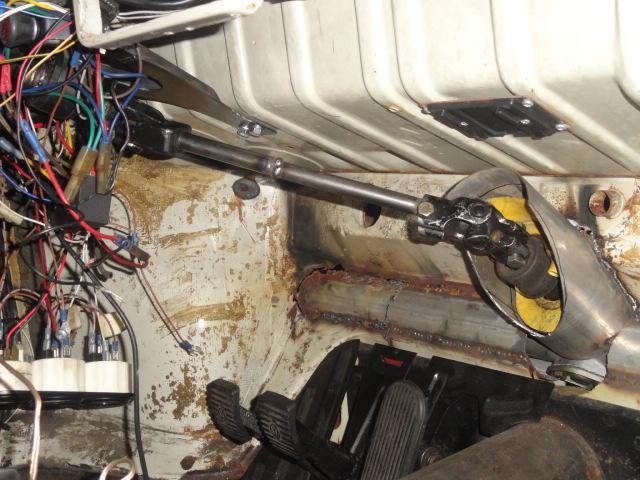
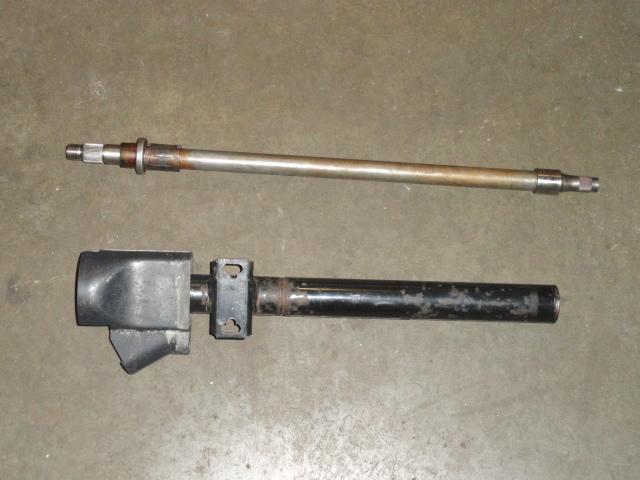
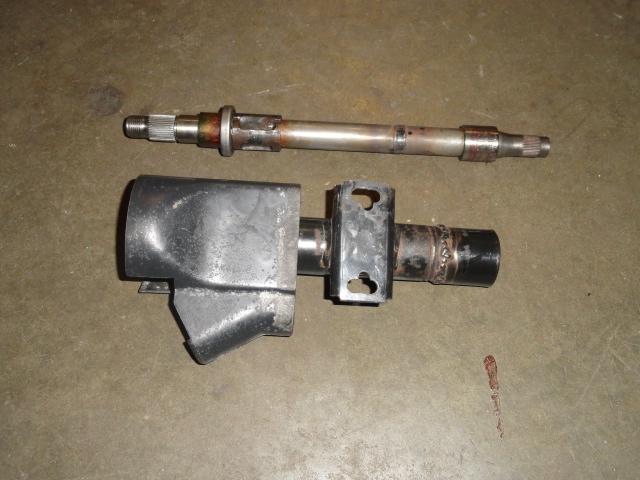
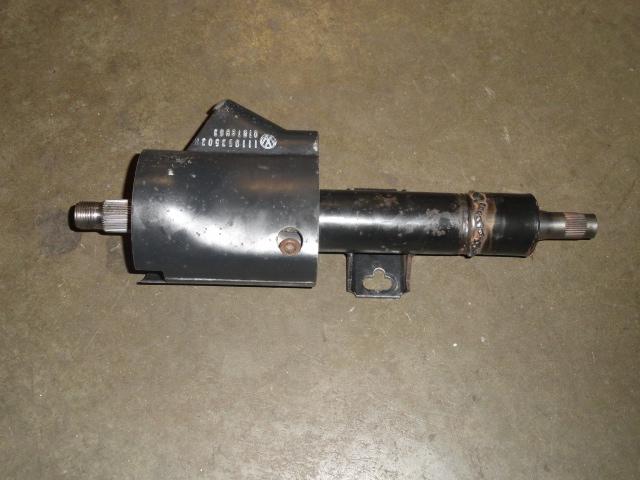
The column chosen is from a '73-on Super Beetle. I want to have a modern dual stalk column so I can get the wiper switch off the dash and onto the column and have a steering lock. This is also a dual bearing column which uses a similar intermediate shaft as the Porsche unit in the photo. Of course the column mounting will have to be heavily modified for the type3 as well as shortened considerably along with the intermediate shaft in order to work in the Squarsche.

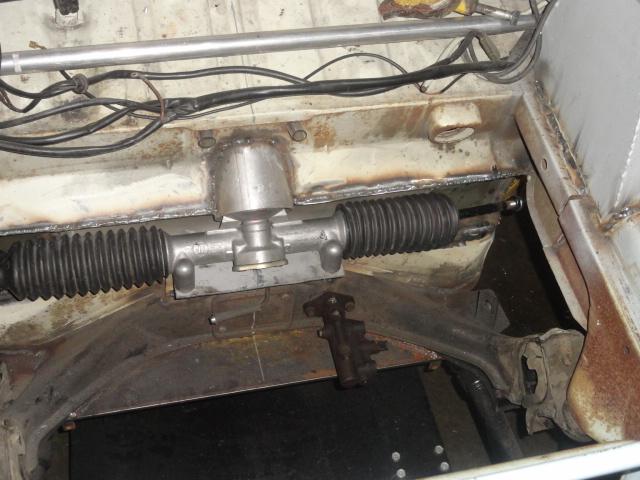
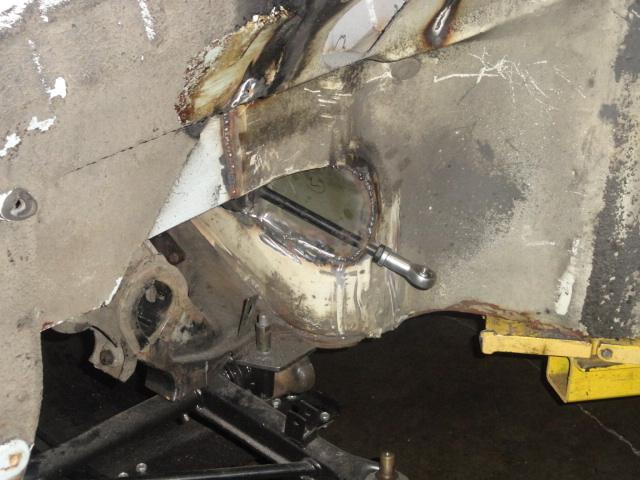
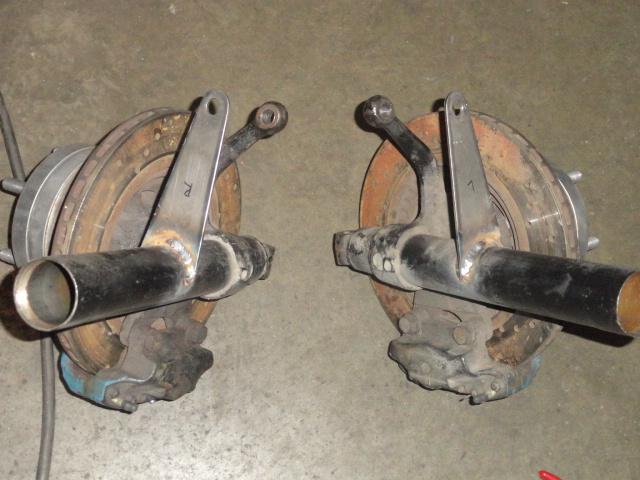
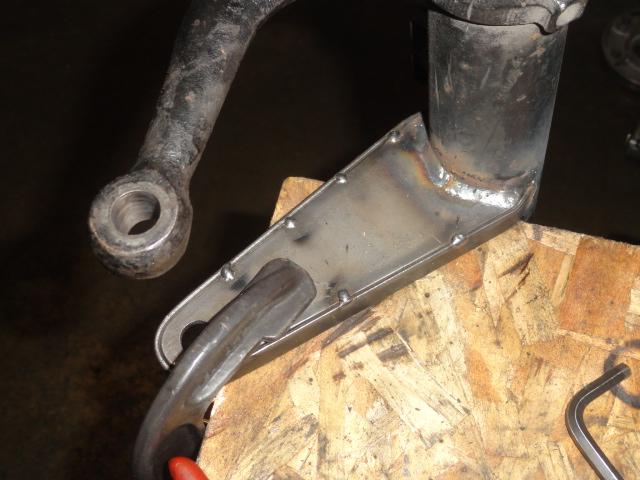
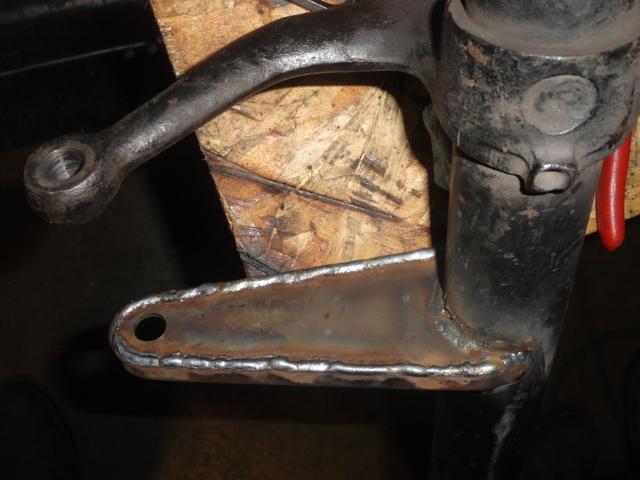
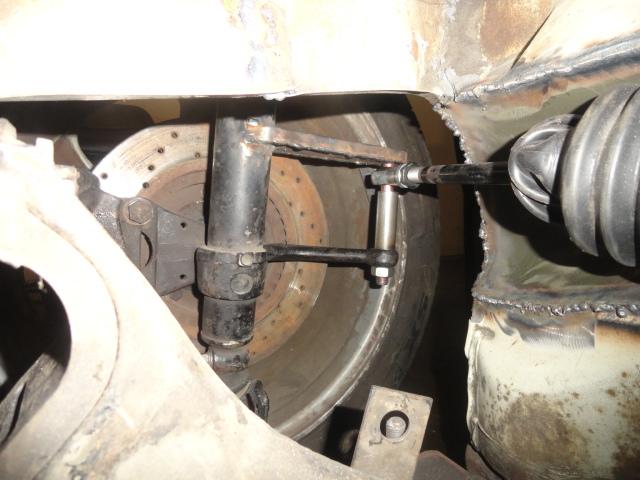
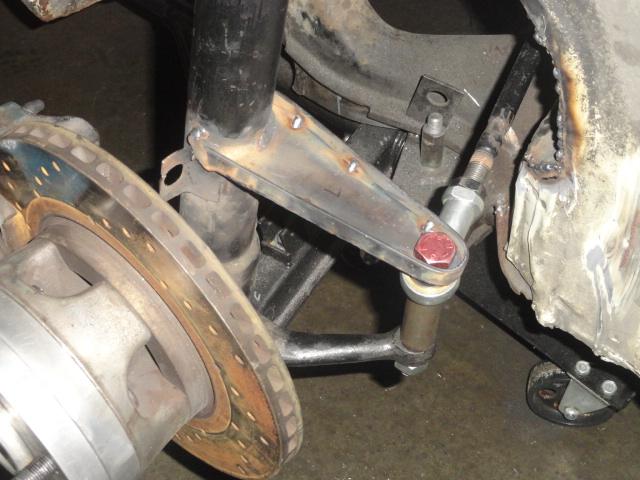
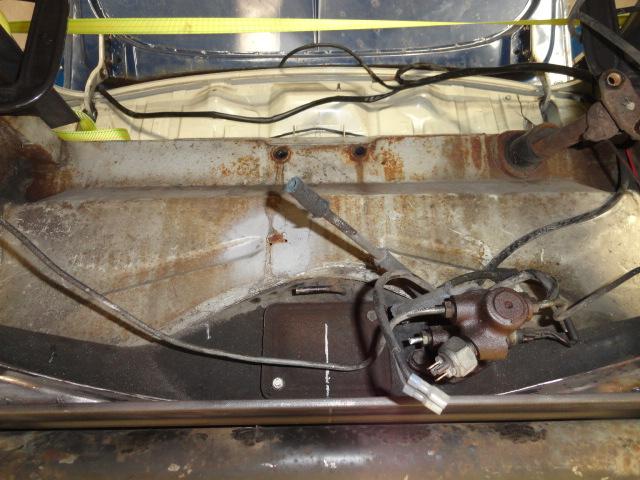
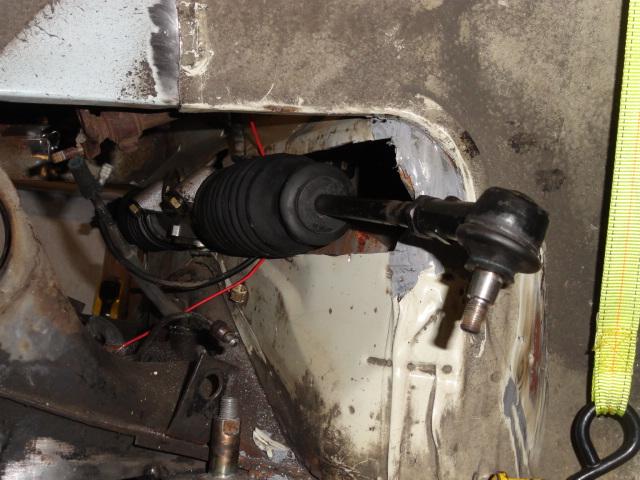
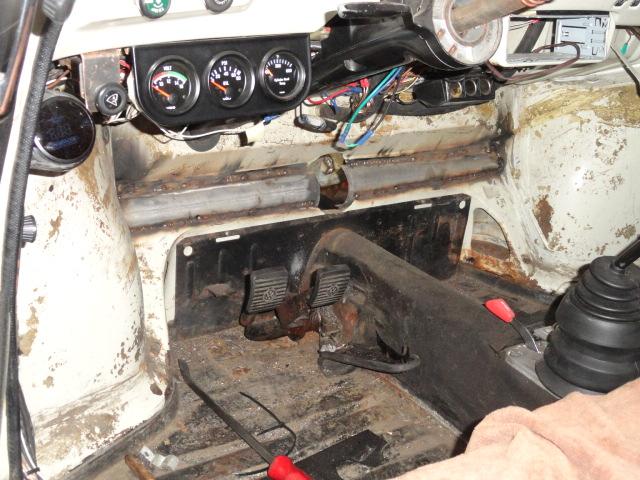
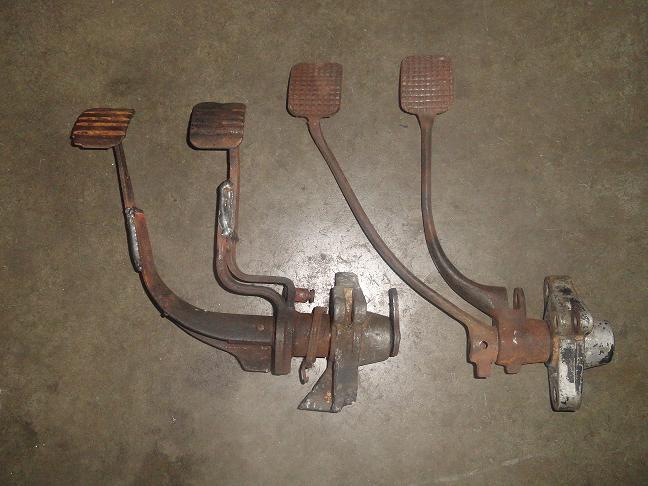
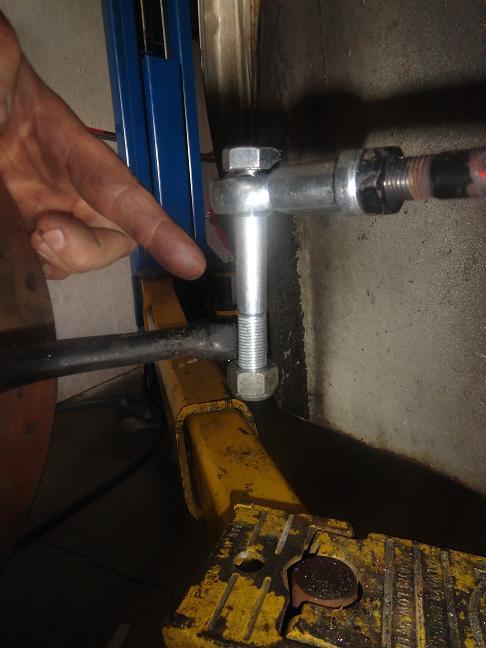
Since the lay-out of the car and pedals prevents me from installing the R&P unit in the same location as a Porsche, I had to mount it above the master cylinder. This, actually, is a good thing since it will enable me to attach the tie rods from the top of the pitman arms rather than from the bottom and thus avoid bump-steer issues. To attach them, I will be modifying them with a VW Super Beetle bump-steer kit. As luck would have it, the Super Beetle tie rods have the same length and taper as the Porsche tie rods, so a cheap $15 kit is all that’s required.

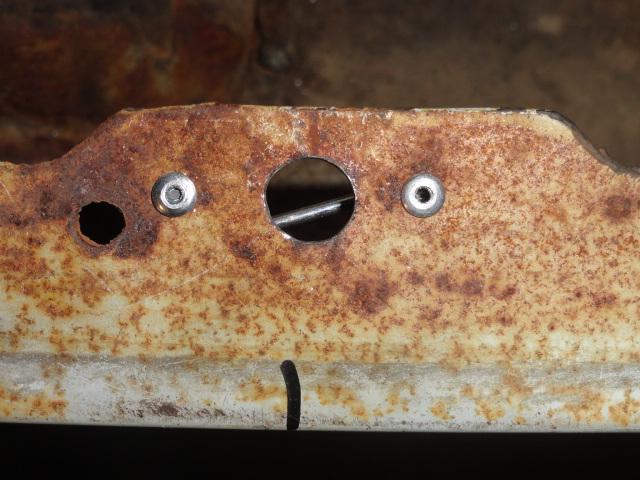
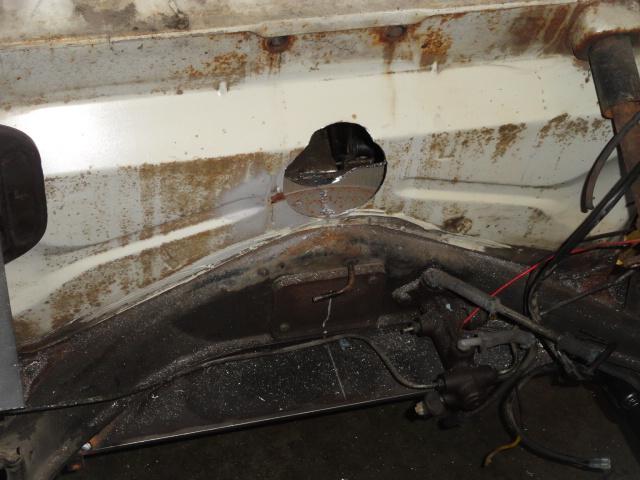
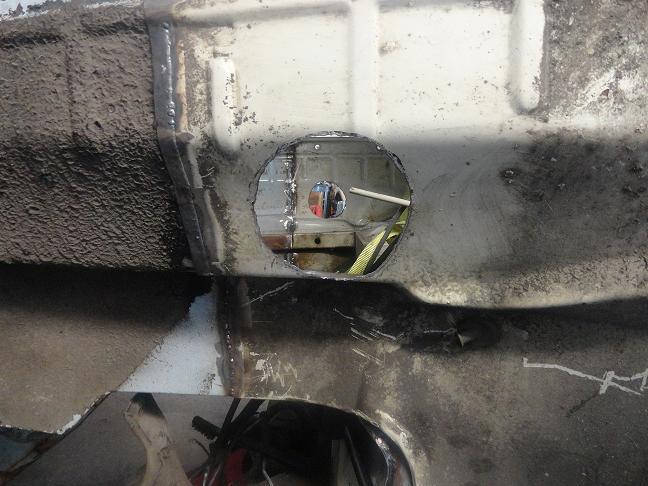
I began by locating the center and where the steering shaft assembly would pass through the fwd firewall. Then I used a 4” hole saw to make the hole.

IPB Image
IPB Image

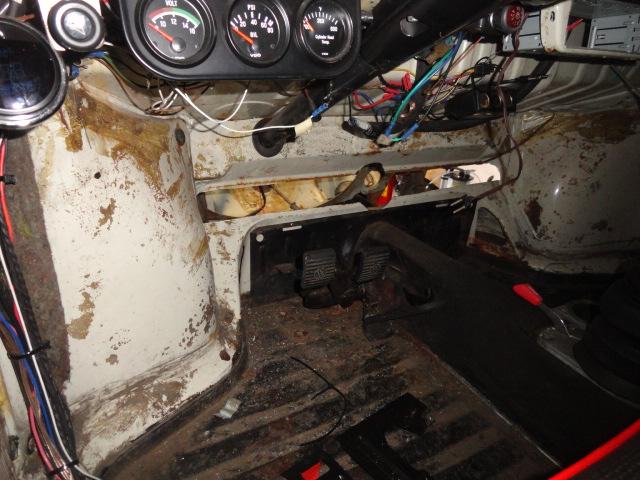
The rack could have been installed as is, however, it would be too far fwd by about 1.5” so the tie rods would be swept too far back (more than stock) and cause more bump-steer issues. So I had to set it back. So I traced a pair of lines 3” apart and carefully cut a slot lengthwise in the front firewall so it would be in the correct position.

IPB Image
IPB Image
IPB Image

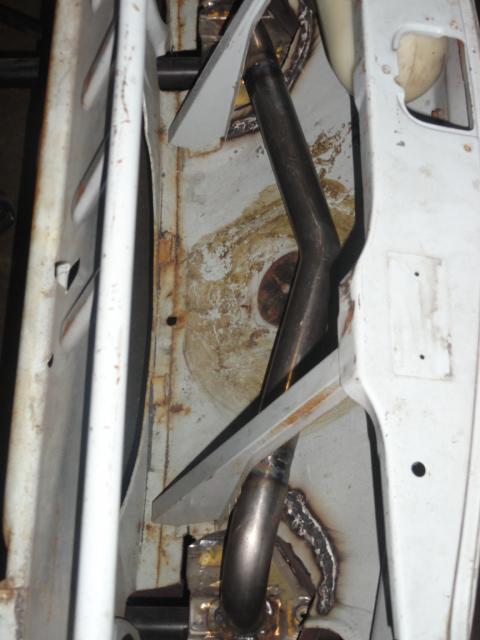
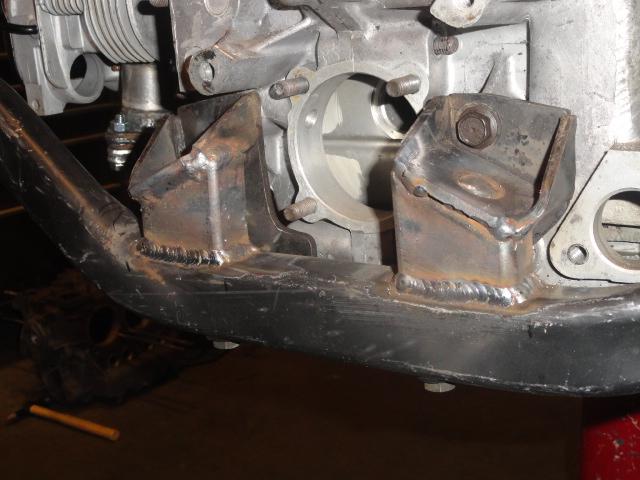
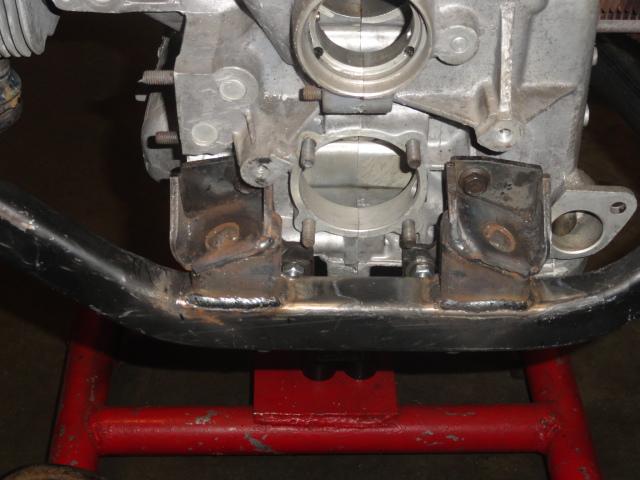
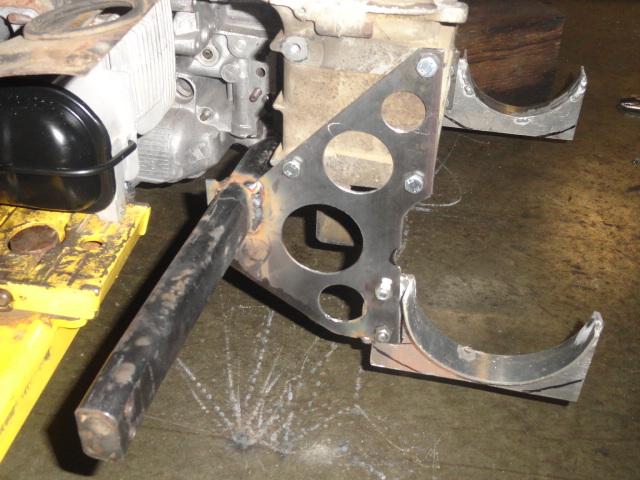
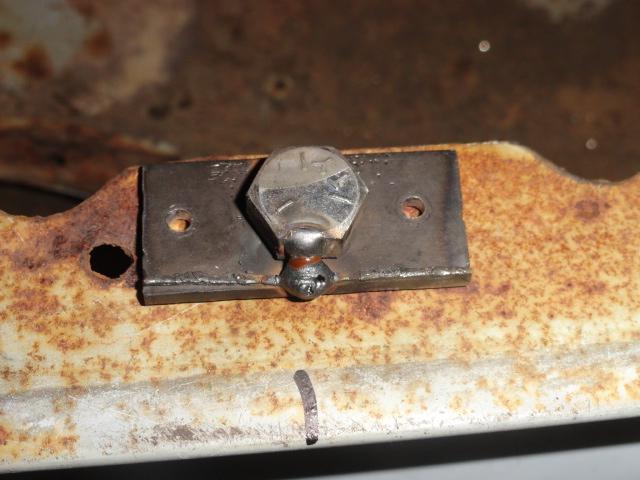
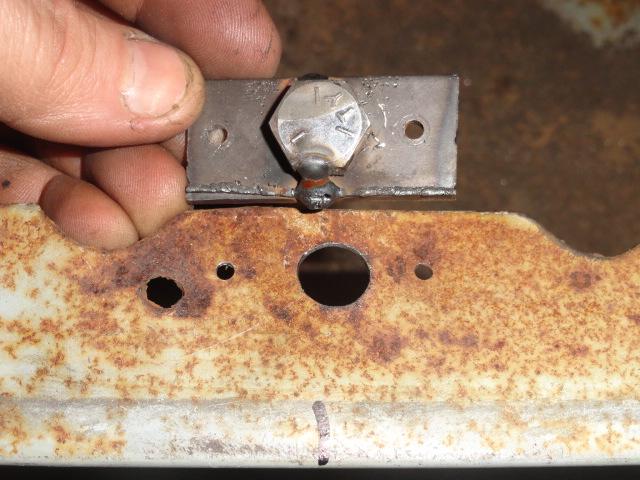
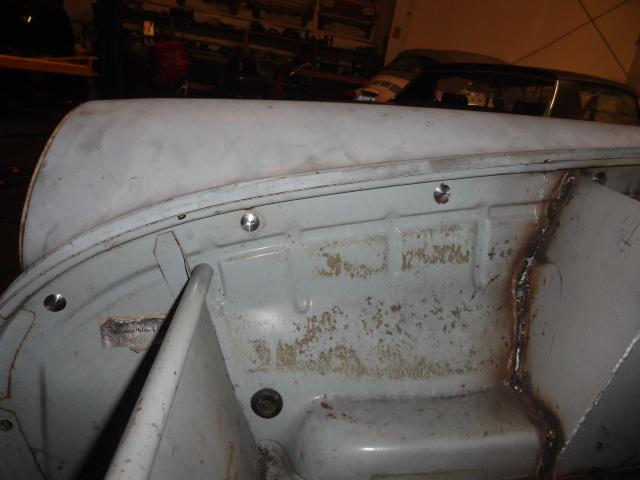
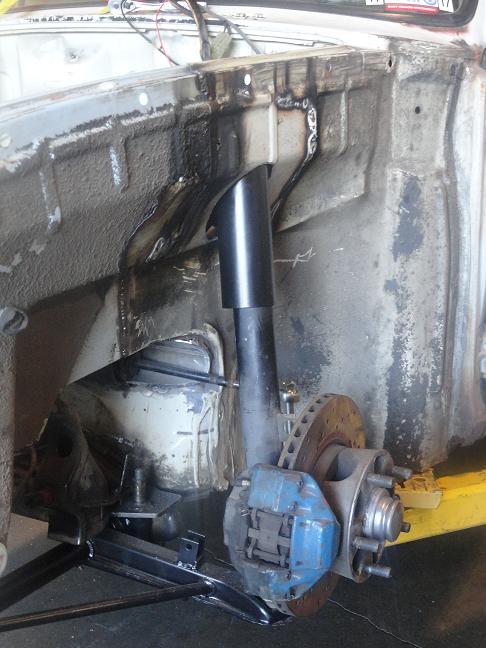
Then used half a 3” muffler pipe to box-in the section and make it all strong again.

IPB Image

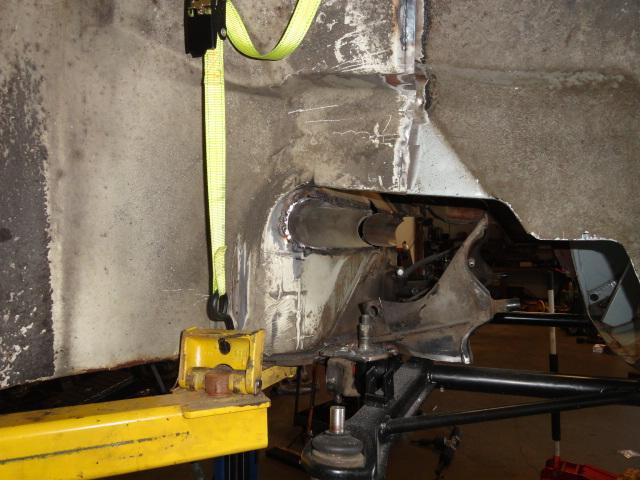
The pipe actually intersects 3 pieces of metal since the bottom half is a double-wall.

IPB Image

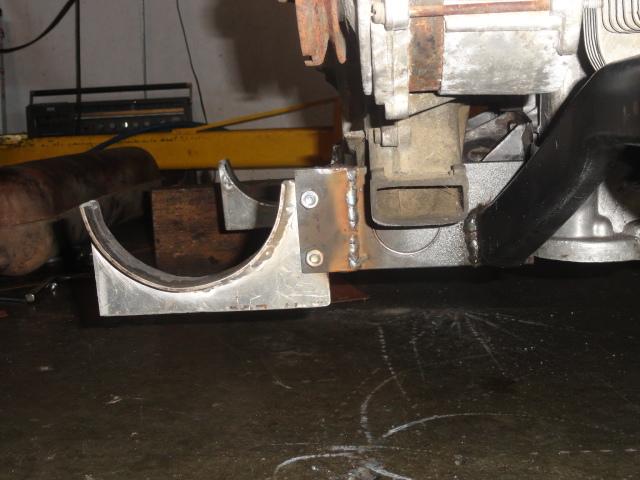
This is actually stronger than stock now and will become stronger when I install the 4” piece of pipe to the center to make the pass-through for the steering shaft.

This is as far as I got this weekend. I was shocked at just how much time that took to get accomplished ; I burned the better part of a day getting the tube fitted and welded. . .
scotty b
quick reading resulted in a hasty post. Carry on smile.gif
PanelBilly
Such creative workmanship. What's next?
aircooledtechguy
Got some new tires for the Squarsche today via Tire Rack. This aught to piss off the purists. . . :twisted: Staggered fitment; 205s in front, 235s out back. That should keep the rear-end under control. I just went with some cheap Sumitomos this time to get things going. We'll see how well they hold-up to the abuse and maybe upgrade to a better tire/compound in the future as funds allow.

IPB Image
IPB Image

I also took delivery of a set of camber plates from Tangerine racing. OMG are these things cool!! I'll be able to add up to 2.5 degrees of camber in the front if I want. So if I have a track day/auto-X, I can add more camber and improve the handling. So I'm in the process of making the shock tower templates now so I can get those fitted and get this beast back on it's feet.
carr914
Those Sumitomos may be Cheap, but they are Great Tires
bozo914
agree.gif
aircooledtechguy
QUOTE(carr914 @ May 9 2013, 02:02 PM) *

Those Sumitomos may be Cheap, but they are Great Tires


That's good to hear. They got pretty solid reviews on-line so,. . . I figured that for the price, even if they last only one year, they will be O.K. This has been an expensive week for this project with having to buy wheel spacers, camber plates and tires, but I need everything now in order to proceed.
carr914
QUOTE(aircooledtechguy @ May 9 2013, 06:50 PM) *

QUOTE(carr914 @ May 9 2013, 02:02 PM) *

Those Sumitomos may be Cheap, but they are Great Tires


That's good to hear. They got pretty solid reviews on-line so,. . . I figured that for the price, even if they last only one year, they will be O.K. This has been an expensive week for this project with having to buy wheel spacers, camber plates and tires, but I need everything now in order to proceed.


They are very good, I used them as Track Tires on my S2000. The rest of the Sumitomo line is Junk IMHO
aircooledtechguy
My attention today was the steering. I needed to fit the Porsche R&P steering unit, fabricate the bracket to mount it. Then shorten a Super Beetle steering column (yeah, Supers ARE good for some things laugh.gif )

I first had to modify my 4" hole that I cut earlier so that the tube would not be in the way and so that the input shaft would be in the right position when mounted. Then it was tacked.

IPB Image

The mount was next. Spent some time getting this made so it would be strong and fit right. I'm happy with how it came out.

IPB Image

Then I needed to shorten the Super Beetle steering column. I used a Super column for 2 reasons.

1. It has a bearing at both ends which I needed.
2. It is a dual stalk column, so I'll be able to move the wiper switch off the dash where it's a total PITA to use and right where it should be; within fingers reach. This will also enable me to use a delay wiper relay if I want to later.

IPB Image

This turned out to be a really easy job. I cut about 1 foot out of the outer tube. I then trued-up the ends on my 12" disc sander and removed the paint. Then I tacked it together and finished welded it.

Once that was made I could take measurements for the steering shaft to ensure it was the right length. I used a tubing cutter to cut it apart. This makes a nice clean and straight cut. Then on the disc sander, I beveled the ends at a 45degree angle since the metal is thick. This allows for proper penetration when it's welded. Then I clamped it into my vice tubing clamps to ensure it was held straight and tacked it. After verifying that it was straight and worked i the column, I finish-welded it together.

IPB Image
IPB Image

Another thing I got accomplished this week in preparation of today, was to remove the dash vents and get those back to working condition though they are still out. And I modified the wiper assembly so I could use the late wiper pivots and arms. I made some custom wiper arms out of late bus arms since the type3 units are harder to find.
aircooledtechguy
So,. . . I FINALLY got a Saturday to get back to the debauchery and I made some good progress.

First, I have to confess that I’ve been putting off the purchase of a plasma cutter for way too long. So after my last update, I was so tired of doing all this fabrication the hard way that I finally man’d-up and bought one.

FYI: I bought one of the cheap Ebay specials after reading reviews on-line. I got a Cal Electric Cut-50. It’s yellow and everyone knows yellow tools cut stuff better, so. . . lol-2.gif For being $320 delivered to my door, it works pretty darned good and has saved me a ton of time already. I think of all the time I wasted fabbing the camber boxes and other parts and . . . So to recap: after 80% of the fabrication in DONE, I decide to make things easier. . . rolleyes.gif Well, I’ve NEVER been accused of brilliance or good timing, so all I can say is, better late than never!! ANYWAY!! Back to the debauchery. . . happy11.gif

VW pedal assemblies are great for driving to and from work and stuff, but they are just too tall and un-ergonomic for any kind of performance driving where the right foot needs to do heel/toe duty. So to bring the pedals to a better height, I cut them down 1.5”. Now before some cry, “Hey, that’s gonna make the brakes harder to apply!” Not to worry, if I find the brakes are too stiff, I’ve already got a secret weapon in the arsenal in the form of a Porsche 996 master cylinder and matching power brake booster. I may not actually need this since I’m gonna have Porsche 944 brakes out back and 911 in front running a Porsche 911 MC, but just in case, I’m prepared to make changes to the power 996 unit.

IPB Image

I also ordered and received a very hard to find set of female, metric M14XM1.5 heim joints to replace the factory Porsche tie rods. Since I had to move the R&P up a couple inches, I could not use the stock tie rods. Normally they mount from under the pitman arm, but mine will have to mount from the top or massive bump-steer would be an issue (similar to how you have to flip them in a lowered super beetle). I found these in Europe and they fit the bill perfect. I’m still waiting on the 14mm drill bit so I can’t finish the job. Once I ream the hole 14mm, I’ll make one long spacer that goes ¾ of the distance they will need to be and add shims for the remainder so I can have some tuneability in the bump-steer area.

IPB Image

The rest is all getting the Squarsche back on it’s shoes.

I finished the camber boxes , so I had to ensure the holes on the inner fenders were large enough for the shock struts could fit through with the dust covers. So I marked them out on a Sharpie and cut them with the Plasma cutter (Damn I love that thing!!)

IPB Image

After stripping the paint away from the areas the camber boxes would mount and priming everything with weld-through primer, I sparked up the MIG welder and tacked them in place. Then after careful measurement, I finish welded them in place. They’re permanent now, like it or not. shades.gif

IPB Image

Once they were cooled-off, I assembled the struts with the dust covers and the Tangerine Racing mono-ball strut mounts and assembled the struts for a test fit. Like a glove!!

IPB Image

The Squarsche is now back on all for wheels for the first time in over 3 months!!! There’s still a lot of work to do, but it’s nice to know jack-stands and blocks of wood are a thing of the past!! If I listen closely, I hear winged H*nda fart-cars scrambling to get their passports stamped so they cam make a quick escape before the embarrassments begin. . . happy11.gif

The first pic of it back on the ground. . .

IPB Image

I hung a fender to see what I could be in for. It hides everything. It’s nice and stealthy; just a wagon with new wheels rolling down the street, really. . . happy11.gif Sorry Rich; the wheels are staying; get used to them. av-943.gif 
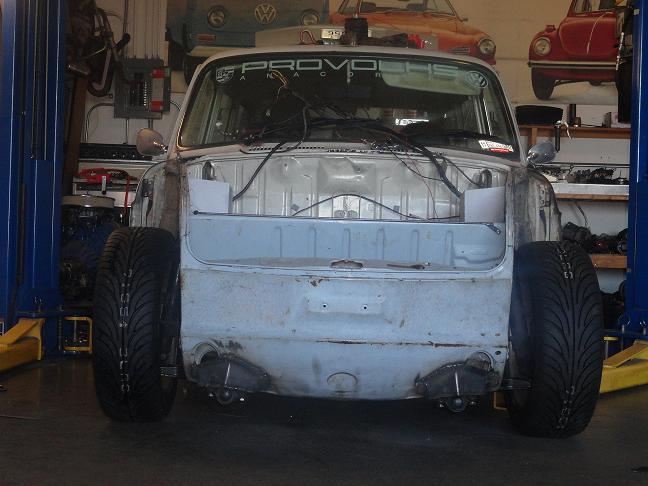
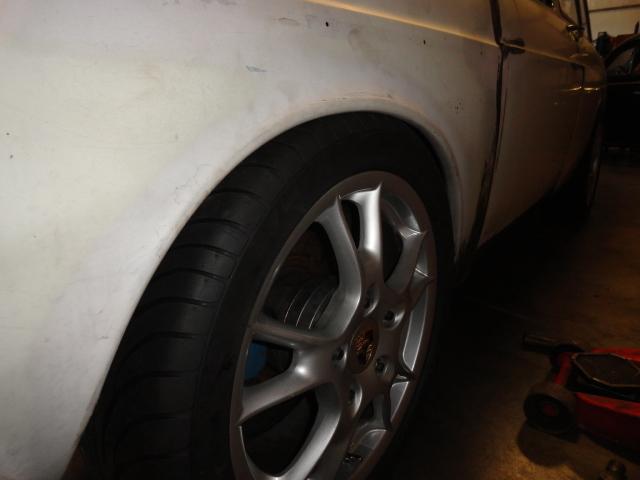
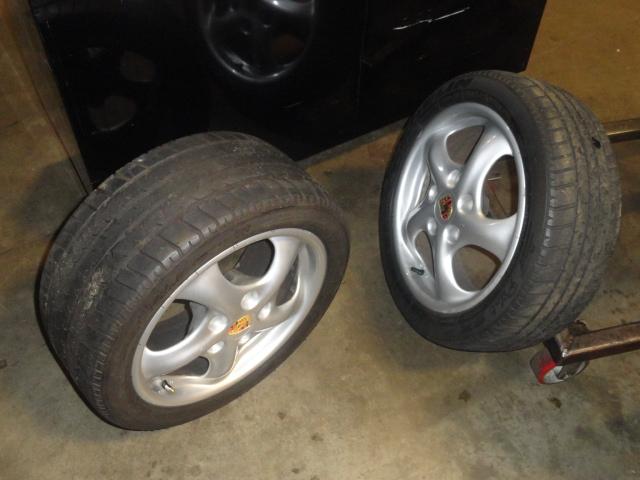
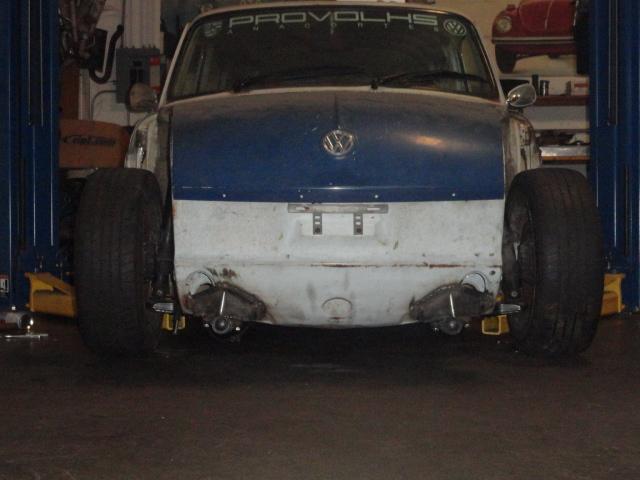
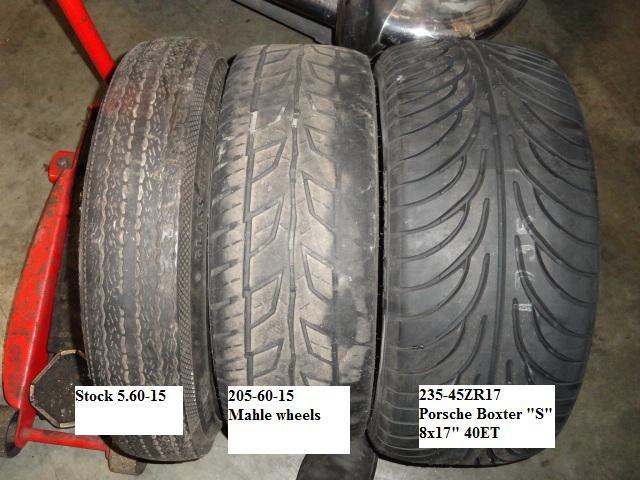
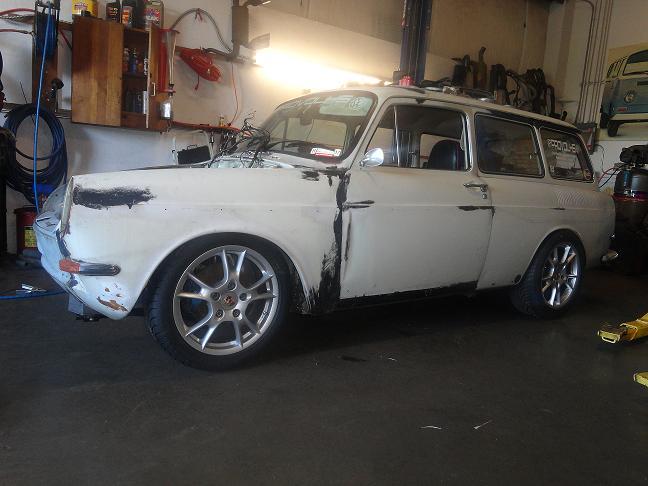
If my plans didn’t call for wheel spacers front and rear, I could probably roll the rear fenders with my fender roller and be finished, but I have much more debauchery planned. Stay tuned. . .
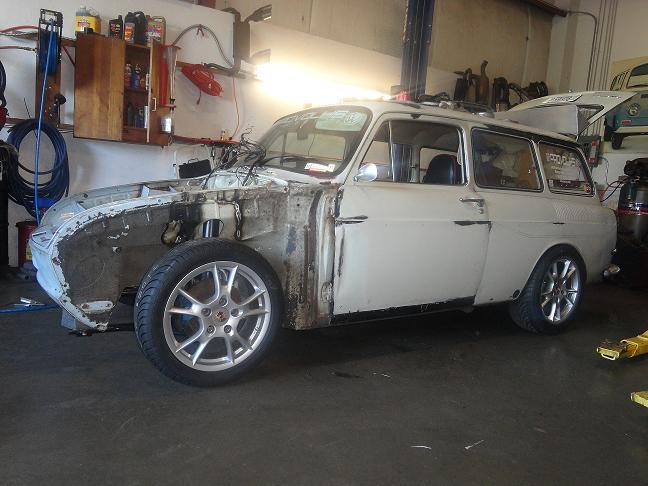
IPB Image
IPB Image
McMark
So sick... drooley.gif
NORD


Nate; Room for a V8 up front? Pretty Cool.
sixnotfour
Nice ..17's vs 15's youre on it.. popcorn[1].gif
BajaXJ92
I love this build! wub.gif

Jealous! beerchug.gif
Mike Bellis
Very Cool!!!
914werke
Ba-LING!!! biggrin.gif
montoya 73 2.0
Everytime I read this thread, it makes me want a Squareback again! My first car way back in 1986 was a 65 variant S. I loved that car. Good job Nate!
jaxdream
You need a custom emblem on the back ...VW-T314!!! piratenanner.gif

Jack
JawjaPorsche
I really admire your skills. Awesome build. beerchug.gif

Had a 68 Fastback when in college. Traded it for my new 914 in 1973. Had some good times in the Fastback.
aircooledtechguy
QUOTE(rdauenhauer @ Jun 23 2013, 10:22 PM) *

Ba-LING!!! biggrin.gif


Isn't a requisite for that chrome twenty-fo's?? confused24.gif lol-2.gif
aircooledtechguy
QUOTE(jaxdream @ Jun 24 2013, 07:01 AM) *

You need a custom emblem on the back ...VW-T314!!! piratenanner.gif

Jack


I tried to order one from Jim a year and a half ago. . . rolleyes.gif headbang.gif
aircooledtechguy
QUOTE(NORD @ Jun 22 2013, 09:03 PM) *

Nate; Room for a V8 up front? Pretty Cool.


Not a snow-balls chance in a hot place brotha!! driving.gif
sean_v8_914
super cool project
Java2570
Hey Nate - I love this build you're doing with the Squareback.....excellent stuff!! Jon
aircooledtechguy
Thanks for the kind words guys. I'm having a lot of fun making it all work in a new car. Can't wait to go driving. . . driving.gif
aircooledtechguy
I spent my lunch today installing a set of 100mm wheel studs on my front hubs. The stock 45mm studs were not long enough to allow for wheel spacers larger than about 10mm, which just would not do. I was planning to run a pair of Porsche 944 21mm spacers on each side up front (42mm total) in order to widen the track so that it would be equal to the rear track. Actually, it only would take 1-21mm spacer in front if I weren’t planning to run 1-21mm spacer in the rear, but I wanted the flexibility of spacers front and rear if I decide to run a different set of wheels/tires in the future. So I ordered a pack of 10-100mm studs. I didn’t need longer studs for the rear since the Porsche 911 trailing arms already have 65mm studs installed for the factory 21mm spacers.

IPB Image

It didn’t take too long to remove the hub, then the rotor and finally the studs. Luckily I recently bought a 20-ton press so they came out and went in like butter.

IPB Image

Now with the wheel spacers installed, I have a track width of 64” in front and 64.5 out back; perfect!!

IPB Image
IPB Image

Now I need to seriously stretch the fenders front and rear so everything fits.

IPB Image

Fortunately, this weekend when I was at the vintage races, I found a guy with a Mustang that had stretched his fenders almost exactly the way I want to do mine. For now, I'm keeping that close to the chest until it's done. I’m looking forward to getting that started after I button-up all the loose ends on the suspension.
aircooledtechguy
Finally!!! I got a bit of time today to work on the Squarsche.

I began with POR-15ing the fresh air vent assemblies. They were pretty crusty and since they are just spot welded together, I wanted to ensure they wouldn't leak (and corrode) in the future. Then I lubed the cables with a motorcycle cable lube tool and lubed all the hinge points. For the first time since I've owned this car (10 years), they will work 100% correctly.

IPB Image

Then I had to install them which is easier said than done. . . Of course, the wiper assembly was already installed, so I had to first remove that.

IPB Image

While the wipers were out, I decided to update the wiper pivots to the later style like the '71-on use. I was hoping to just swap out the early assembly for the later style and be done with it, but of course, the wipers are in slightly different positions compared to the early cars. :roll: So I removed the early pivots and cut the arms off. Then did the same to the late pivots and then welded the early arms to the late pivots. Then assembled everything back again. Since I like the extra spring pressure of the extra spring pressure that the late bus wiper arms have, I cut down and re-welded a pair of bus arms so that they were type-3 sized. I forgot to take photos of the process, but t's virtually the same as this:

http://www.aircooledtech.com/early_wiper_upgrade/`

When I broke for lunch, I received a call from a guy with a spare set of Porsche Boxter wheels cheap. So I picked those up so I can mount a set of winter tires on them. They are just the basic 17 X 7" & 8.5" staggered set.

IPB Image

In order to comply with SCCA rules, I have to remove the steering lock mechanism from the lock cylinder. So I completely dis-assembled the Porsche 914 ignition assembly and removed the lock bar. Then re-assembled it with a new ignition switch since the old one was cracked. It fits like a glove in the shortened, '73 Super Beetle dual stalk column.

IPB Image
IPB Image

It was really good to get back on this again!!
aircooledtechguy
I had a little time last night to finish-up the brackets that allow me to mount the shortened Super Beetle steering column into the car. Now it fits well and has a solid feel.

This morning, I turned my attention to the steering shaft that connects the column and the Porsche R&P unit. It's just roughed into place at this point, but it's all there and works like it should. Woohoo! driving.gif

IPB Image
aircooledtechguy
I may not have had much time to dedicate to building the Squarsche as of late, but I have acquired a few parts. I recently took delivery of a massive box of random 1 5/8” mandrel bent tubing in preparation for building a custom header. Gotta love eBay!! I’m going to first have to build a set of custom stub pipes and then create an equal length 4into1 system for a special muffler I plan to use on the new motor.

I should be able to make a header or two out of this box of mandrel bent goodness. . .

IPB Image
aircooledtechguy
While my wife combat-shopped at crowded stores full of frantic holiday shoppers, I was hold-up at the shop, locked behind a prominently displayed "CLOSED" sign 20+ Gigs of music playing on shuffle and spent some much needed quality time with the Squarsche. MAN, did I need it; it felt great!!

I began by finishing up the firewall pocket for the Porsche 911 steering rack. The center 4" tube was tacked in, but I needed to fabricate the outer 8" or so to have proper clearance for the 930 turbo tie rods. I made some rough cardboard templates and then transferred them to sheet steel. Then I bent them by hand around some tubing. Tacked them in and then finish welded everything in place. Now I'm happy with how they came out and I have proper clearances when turning the wheels lock to lock.

IPB Image
IPB Image

Then I turned my focus to the forward suspension mounts. I wanted to tie the two mounts together with tubing side-to-side in a first step toward stiffening the front-end. In time, the center of this brace will also have the mount plate for a Braille racing battery (an effort to lighten the car AND shift the weight as far forward as possible to get the rear weight bias under control). I still plan to add a pair of braces from the uper factory beam mounts to the front mounts as well, but this is the main brace.

IPB Image

Then I turned to the pitman arm braces. This basic design idea was brought to my attention by "gearheadgreg" (Thank you!!) and is my take of a factory Porsche RSR style brace. I first made a cardboard template of the basic flat brace. Then I transferred that to 1/8" plate steel and cut it out with my plasma cutter. After smoothing the edges and trial fitting, it was ready for mock-up and mounting. Before that could happen, I had to drill out the taper in the Porsche pitman arm with a 14mm drill bit. Then I mounted up a 130mm long M14x1.5 thread bolt and set the proper height for the new braces. Then the bare arms were tacked and then finish welded in place. The arms are strong, but I wanted to ensure they wouldn't deflect when highly stressed, so I took some 1/2"x1/8" flat steel and boxed-in the new braces. I first ground the inner edge so I could get good penetration when welding Then I tacked one end and bent it around the perimeter, tacking it as I went. Once it was all in place I finish welded a bead all the way around it. I plan to add one large gusset unter the brace between the pitman and the brace for good measure, but I ran out of time this weekend. With this set-up, I'll be able to tailor the bump-steer by simply switching around some spacers so the tie rods have the desired angle. It should work pretty good and be simple to make adjustments. Here's some shots of the process. . .

IPB Image
IPB Image
IPB Image
IPB Image
IPB Image
IPB Image
IPB Image
jaxdream
Dadgum , this is just plain slicker than socks on a rooster !!!! piratenanner.gif piratenanner.gif
Keep it going dude !!!
Jack
zambezi
Great job, and nice to see more progress. I know the sloping nose of the earlier type 3's is more appealing but if you had started with a 70 - 73 model the front suspension pickup points would be totally hidden. Love the fabrication going on here.
MDG
QUOTE(jaxdream @ Dec 2 2013, 09:33 AM) *

Dadgum , this is just plain slicker than socks on a rooster !!!! piratenanner.gif piratenanner.gif


ohmy.gif

mellow.gif


smilie_pokal.gif


I have no idea what that means but I will use that line.
aircooledtechguy
Thanks for the kind words guys.

Zambesi; actually the front end only appears to be longer on the late model cars due to the area above the bumper sticking out further. The area the suspension actually mounts to is just as long as the earlier cars. No way, I'd roll in a fat-chick Square. . . I just can't get past the looks of that nose. laugh.gif shades.gif

I never liked the location of my 4 gauges that I had mounted to the left of my dash since I really couldn't see them unless I leaned forward and peered over the spoke of the steering wheel. To be honest, it was always a temporary location to get it on the road until I found a better solution. So, I had a good friend of mine that builds racing sail boats, build me a prototype center gauge panel for the Squarsche. I'm not a fan of full center consoles mainly because they get in the way of my "Bozo-ish" feet and they tend to make a car feel smaller by being less open. So I opted for a center/right custom panel that could house my gauges. Then to angle them up slightly and toward me, I fitted a set of S/S angle mounts that I purchased (and never used) when I was stationed in the Philippines back in 1990. All the Jeepneys had these for the gauges on the dash and finally I have a perfect use for them. So if you're an old-timer like me and have ever ridden in a Jeepney, those will probably look kinda familiar and may bring back some memories. . . Now I will have a perfect view of the gauges at all times at a glance.

Some photos of it all mocked-up. . .

IPB Image
IPB Image
IPB Image
Chris Pincetich
beerchug.gif
popcorn[1].gif
aircooledtechguy
So this week I focused on the rear engine hangar and the engine mounts among other things. I’ve got some severe torture in store for this car in the near future, so when I install the new motor, I’m not willing to continue running the factory rubber engine mounts. These don’t last long in a stock bus 2.0L w/ 70hp and I’ve been punishing them long enough with my Porsche 2056cc that’s probably putting out a mere 100-110hp. I don’t want to risk them with a race-prepped 2.3L running MS3 and COP. So I opted to modify a set of bus rear engine mounts and a bus mount bar (since that’s what I’m currently running) and make it a solid mount arrangement.

For this, I bolted together a mock-up motor to my engine stand so I could ensure everything fits 100%. Finally a shop full of crap pays off!! lol-2.gif I’m also in the process of making my stub pipes and exhaust, so some of these features will be incorporated in since they also use the mount bar, however, I’m not going to be letting that cat out of the bag just yet. . .

Here’s a few photos of the solid mounts. These should transfer a lot more engine noise into the cabin. . . Oh well, it’s the cost of being able to go *really* fast. Nothing ear plugs can’t handle.

IPB Image
IPB Image

Here’s a couple shots of the almost completed mount bar with the part of the custom exhaust hangers welded in place. I'll let you all speculate as to what exhaust I'll going to be running. . . shades.gif

IPB Image
IPB Image

I’m only letting on to about ½ of what I’ve been up to recently. . . Stay tuned for the rest of the story. . . shades.gif
scotty b
popcorn[1].gif smile.gif
aircooledtechguy
With the new, more powerful 2.3L street/race motor that’s going in the Squarsche, I needed to upgrade to a full-on performance minded exhaust. So the stock type-4 heat exchangers and off-the-shelf bus 4into1 header was not going to cut it anymore. Since there are not any affordable systems that will work, I opted to make my own so it would fit and incorporate the muffler I wanted to use; a Bischoff S/S Porsche 911 banana can!

So I began by creating a set of stub pipes. I chose to use 1 ½” pipe for the stubs and 1 5/8” for everything else before the collector. I also wanted to try out a new idea that’s been rolling around in my head that would enable me to have leak-free stub to header connections. It involves 2 slip-joints, which cause any exhaust gasses that wish to escape to have to turn 180 degrees, then another 180 degrees and finally another 90 degrees for a total of 450 degrees all in a millisecond; that just isn’t going to happen! So these stubs will be leak-free while being exhaust gasket free too. They were kind of a PITA to make, but they came out exactly as I envisioned and they fit the bill perfectly. I still have some finish welding to do on the flanges and cleaning up on the flanges, but you get the idea. . . Once it's all tacked together, I'll go back and TIG weld every joint.

IPB Image
IPB Image

When building an exhaust, you have an obvious starting point for the system at the heads, but you also need to have an ending point so you can figure out how to get it all to fit. So next I mounted the muffler. Since I had never seen a 911 banana can muffler on a VW engine, I needed to come up with a muffler mount system. You just can’t mount it to the fan shroud since it’s not really made for mounting anything larger than an AC compressor, your mounting options become limited. So I decided to make the mounts attach to the main engine mount bar which is the main load bearing member at the rear and is tied into the body of the car.. The right side mount I made from ¼” steel since it has to bear the full weight on that side and the lions share since that mount is about 1' off center-line.. The left side I made out of 1/8” steel, but tied it into the AC compressor mount holes that already exist in the fan shroud. I cannot tell you for sure just how many times I mounted/dismounted the bar and fan shroud during the build process, but it was at least a couple dozen! Everything was dry fitted, then welded in place to ensure a perfect fit.

IPB Image

Once the bare mounts were made, I needed to make a pair of cradles where the muffler will sit. I chose aluminum for this since it needed to be ¼” thick and steel would just be too ridiculously heavy for this part. All the mock-up was done with the engine sitting on my lift about 10” off the ground with the muffler sitting atop wood bucks that held it at the right position. One of the goals with this exhaust is to not have any part of the system below the bottom of the engine. Ground clearance can be an issue with the car lowered and I got really tired of my exhaust scraping occasionally as I exited a couple parking lots in my town. Plus this car should see a fair amount of track time in the future and I'll be lowering it on those occasions.

Mount holes were drilled through all materials at once so there was no chance of bolts not fitting or fitting loosely. The result is a super-solid mounting that does not rely on the tightness of the bolts to be a tight fit. Here's a few shots of the muffler cradles in place on the mock-up motor:

IPB Image
IPB Image
IPB Image

Here’s some shots of the muffler in place on the new cradle on the mock-up motor:

IPB Image

Strapped on with temporary straps:

IPB Image

I also modified the muffler to exhaust mounting with a V-band coupler so that for track days I can easily remove the muffler and add on a Supertrapp or more basic flow-through muffler/stinger system.

IPB Image

Now that I have a definite beginning point and ending point I needed to locate where the collector would be and begin building to the rest of the header. Stay tuned. . . 8)
914werke
Crazy!
bigkensteele
piratenanner.gif I love this thread!

How much room will there be between the fan pulley and the muffler? Are you concerned about cooling the engine with hot air?

Just curious as you have obviously thought this through.
aircooledtechguy
QUOTE(bigkensteele @ Dec 17 2013, 05:41 PM) *

How much room will there be between the fan pulley and the muffler? Are you concerned about cooling the engine with hot air?

Just curious as you have obviously thought this through.


I'm using a custom steel air guide that replaces the factory rubber bellows on the type-3 that brings the air from the rear duct directly into the fan. I may add a second skin 1/4" off the center section of the muffler if I find it's too close and transfers heat but I don't think it will be a problem really.

What I may do to monitor incoming cooling air is to add a temp sensor and integrate that into the Megasquirt dash so I can monitor it directly rather than assuming heat by watching my head temp gauge which is a very indirect way.
aircooledtechguy
I spent Saturday hold-up here at the shop and made it my mission to get the Squarsche's new exhaust header built and tacked together. The goals were to have a header that (1) was equal length (or darned close), (2) not have any part of it hang down below the sump and cause ground clearance issues and (3) to not interfere with access to the engine (like the valve covers, etc). I began by getting the collector positioned and tacked into place. Then it was a matter of getting all the other pipes to fit from their respective stubs to the collector while adhering to the rules.

I began with cyl. #2 since this was the longest run and the most direct shot, then I did #1. I needed those two to fit between the bell housing and the case where there's a bit of room and it's there that I installed a slip-joint for expansion and to ease in installation & removal.

Cylinder #3 & #4 were the most difficult since I also wanted to ensure they didn't interfere with the valve cover on that side. and because of that, it's easy to run out of room for tubing. Cyl #3 was the most difficult but I got it all to fit in there and be smooth so I'm happy with it. I hope it sounds good. . .

Here's the system all tacked together and ready for finish TIG welding:

IPB Image
IPB Image
IPB Image

With the muffler:

IPB Image
IPB Image
wingnut86
Ummm, Mongo REALLY want one!!
Java2570
beerchug.gif that looks great! Can't wait to hear what she sounds like!!
aircooledtechguy
I came in a little early this morning so I could put a nagging issue to rest. Since going to Porsche 5-lug wheels, I have not had a real spare or one that I would call handy. The only affordable type I could find was at a local Porsche swap that was from a Porsche 944. I recently priced a single early 911/912 wheel in 15x4 .5 and that ain't happening!!!!!! Holy crap guys are proud of those things!! While it could do the job alright, it's truly a VERY temporary spare that has absolutely no re-enforcement chords of any kind and basically no tread either. The other issue is that it's designed to be stowed in the deflated position which would necessitate carrying an air pump. . . Another thing to haul around everywhere. To make matters worse, the rim was 5" wide which made it a super snug fit into the tire well.

IPB Image

Last week on a whim I measured the ID of the hoop on both rims and discovered that they were exactly the same. idea.gif happy11.gif So this morning I carefully cut the welds that hold the wheel centers to the hoops. After prepping the Porsche center and the 4.5" VW hoop, I tapped the center into the hoop.

IPB Image

Then I bolted it to my front hub and trued the hoop on the hub by spinning it while a piece of chalk showed me the high points. Once the chalk made constant contact, I knew it was true so I tacked it in place. Then I carefully dismounted the rim and finish welded the Porsche wheel center to the VW hoop. 'Cause I know someone will say something; YES, the tire is a junker and was deflated with the valve core removed!! stirthepot.gif welder.gif

IPB Image

Viola!! A spare that is full size, can be aired fully, can be driven hundreds of miles if need be, is the same diameter as my Porsche wheels/tires and fits like stock in the tire well. Surprisingly, it only took about an hour to complete. Now I'll have to send it out for powder coating when I have a bunch of stuff get done.

IPB Image

Before it goes in the scrap pile, does anyone want a 4-lug VW rim 5" wide with a folding Porsche spare tire?? shades.gif
rick 918-S
Great solution! Way to think out of the box! aktion035.gif
KELTY360
Since this build is obviously out of this world it begs the question.....what color is the sky on your planet?

pray.gif
aircooledtechguy
Since this car will see a race track from time to time, the fenders will be going on and off quite a bit for maintenance and adjustment track side. So I figured replacing the stock screws and installing dzus fasteners would be a good upgrade. Luckily I have a sprint car supplier showroom near by (www.speedmart.com) so I hit them-up for some aluminum dzus parts.

I had to first slightly enlarge the holes in the fenders with a burr.

IPB Image

One thing that always slows the process is drilling the holes for the spring catches in exactly the right spot. So after pondering the problem, I came-up with this steel template that centers itself in the hole via a cut-off bolt and then you just drill through the guide holes on either side. Viola!! Perfect placement and it only takes about 2 minutes to drill ALL the rivet holes for the springs!

IPB Image
IPB Image
IPB Image

Rivet the springs in place:

IPB Image

Then fit the fender and fasten the dzus fasteners with a 1/4 turn "click".

IPB Image

Now I'll be able to remove a fender in about 30 seconds rather than several minutes.
KELTY360
Way cool!
NORD

Kelty; I. Was down to Nate's shop a few weeks ago. That square back is going to be really different than stock. I'll let Nate share that when the fenders are on. driving.gif

This is a "lo-fi" version of our main content. To view the full version with more information, formatting and images, please click here.
Invision Power Board © 2001-2024 Invision Power Services, Inc.