Help - Search - Members - Calendar
Full Version: OT: Working on my shop car
914World.com > The 914 Forums > 914World Garage
Pages: 1, 2, 3, 4, 5, 6, 7, 8, 9
aircooledtechguy
So over the past several weekends I have been working to make the Porsche 912E (923/915 series) 5-speed fit and work like a stock trans in my Squareback. I have now finished the fabrication and I am please to say that it works and works well. It feels and looks like it belongs in the car. Aesthetically, it’s pure Porsche and I’m really pleased with the result.

Some of the challenges I’ve had to deal with or over come were:
- The height if the transmission case (at the nosecone)
- Connecting the trans to the stub axles (Porsche inners/VW outers)
- Choosing a shifter that will work
- Modifying a shifter to work
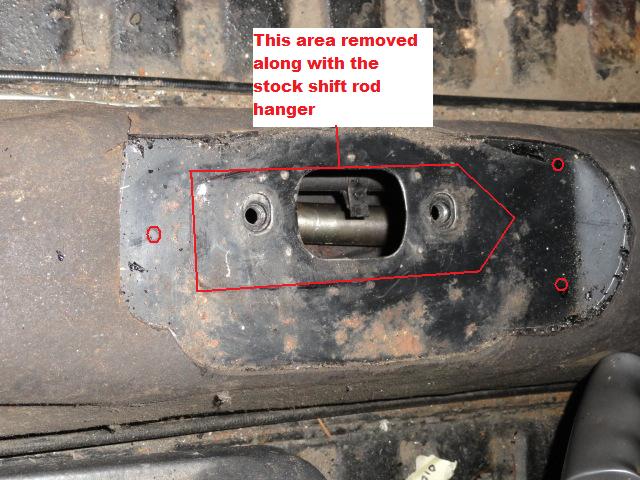
- Modify the tunnel for the shifter to fit (honestly, it’s not nearly as bad on a T-3)
- Designing shift linkage (linkage that will compensate for an un-parallel trans shift shaft)

We’ll discuss these in order. . .

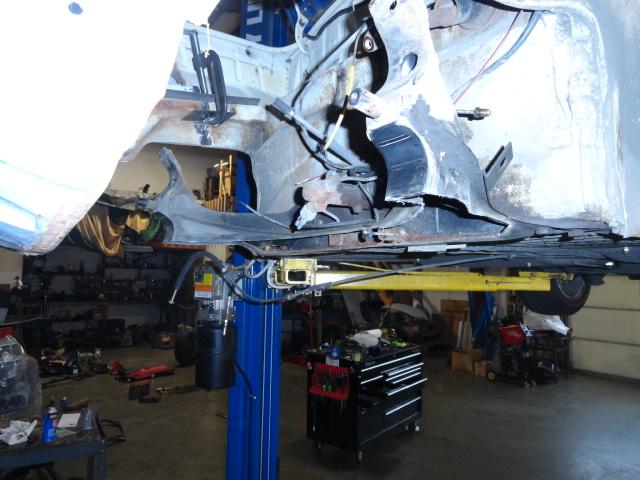
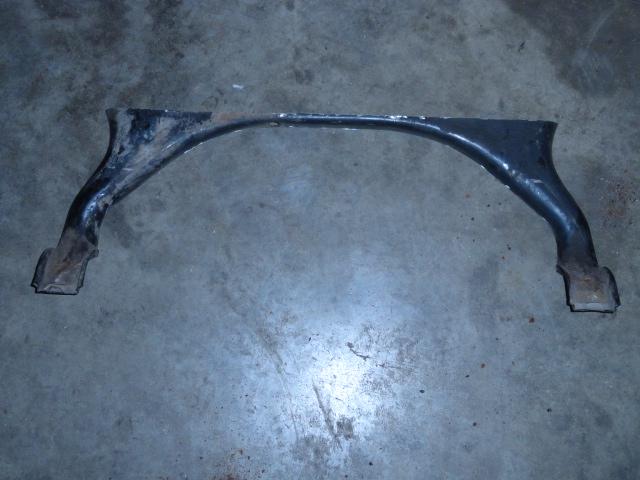
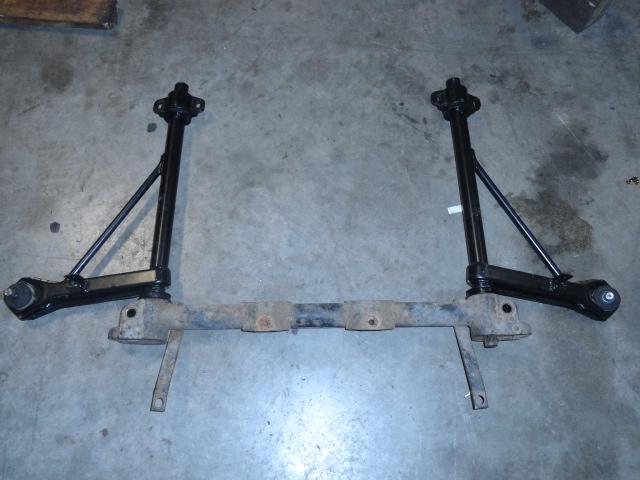
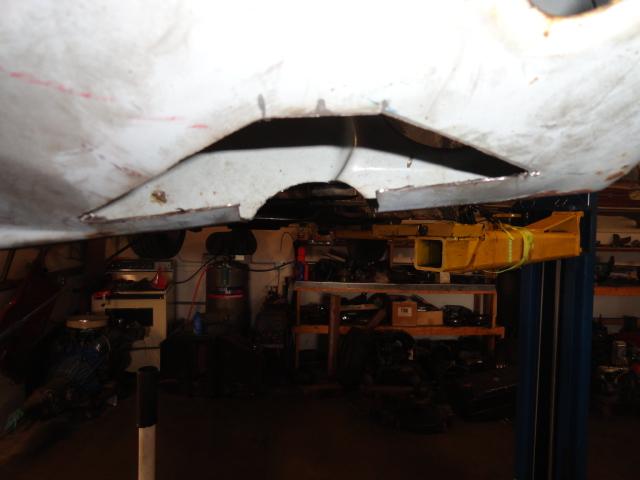
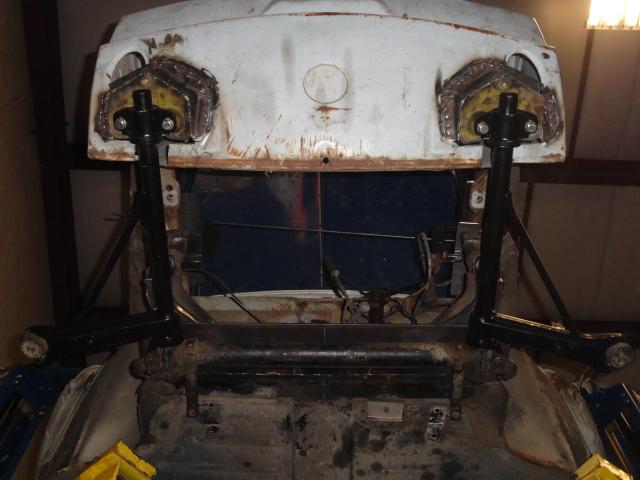
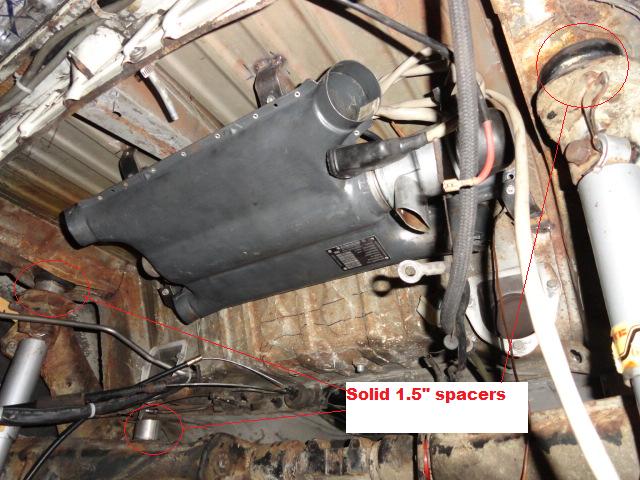
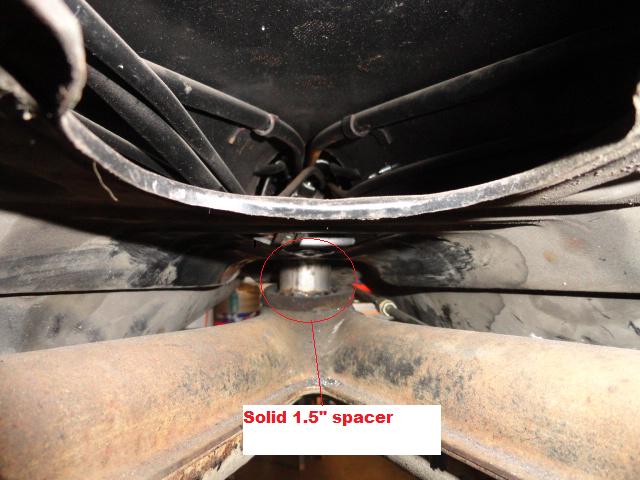
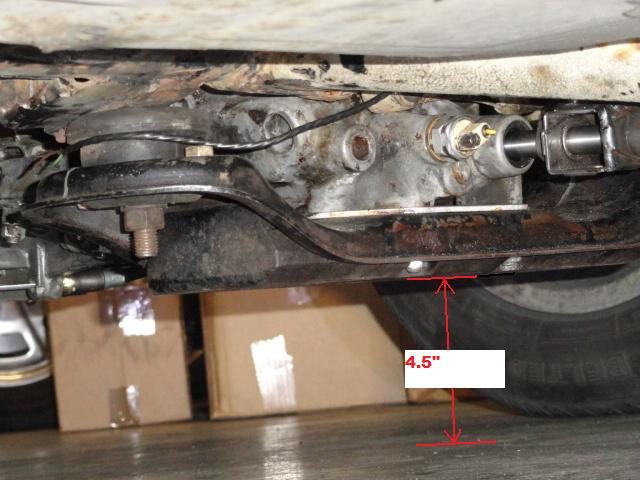
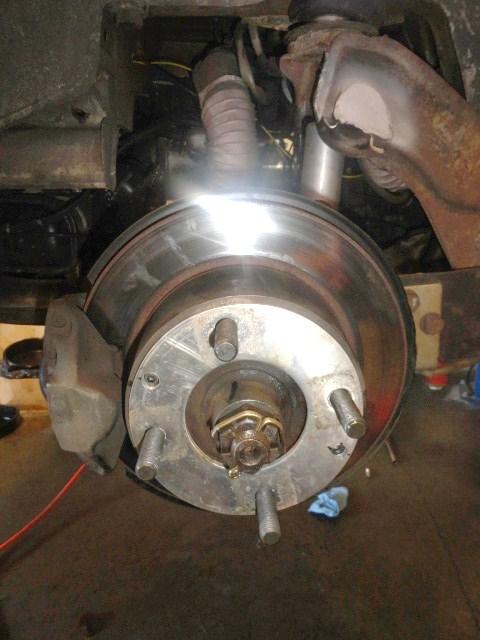
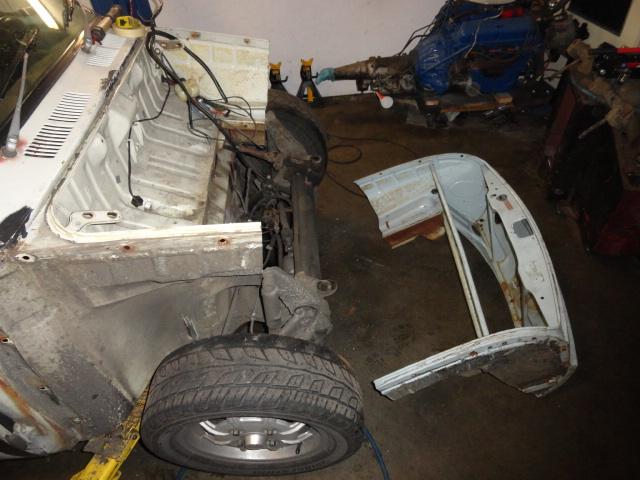
Since the height of the trans at the nose cone was WAY taller than the stock T-1 trans, most times, as a fabricator you would simply add a pocket to the area under the seat and be done with it. However this is not an option with a Squareback (well at least if you still want to fold the rear seat flat like stock). So instead of moving the body up with a pocket, I had to move the mount down. Not wanting to have a trans nose hanging super low, I opted to lower the entire rear suspension sub-frame 1.5” (which effectively raised the rear of the car 1.5”). I had to make 5 custom spacers to pull this off and then also re-adjusted the height of the car with adjustable spring plates. Now, the lowest point on the car is the factory Porsche skid plate for the trans mount and it’s an acceptable 4.5”. Actual trans and engine is a full 6”+.

IPB Image
IPB Image
IPB Image
IPB Image
IPB Image


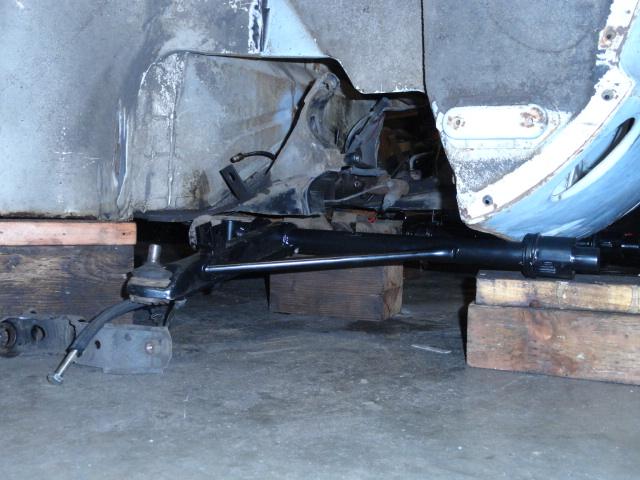
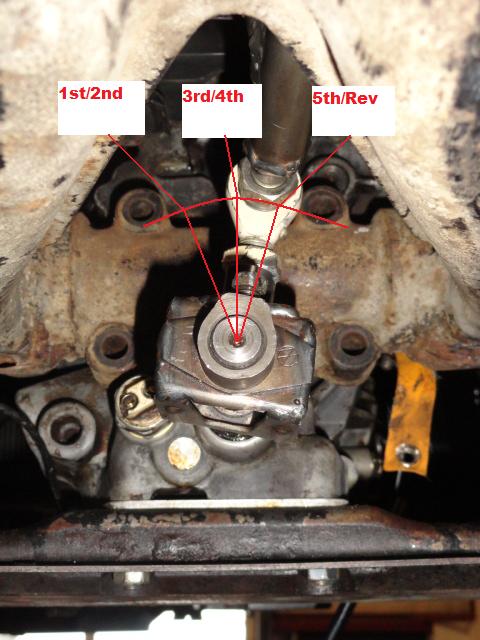
Once the trans was physically in place I had to figure out what CV/Axle arrangement to use. The 923 trans has output CV flanges that fit 911 CV joints. However I found that the output flanges are the course spline type just like a 914 (woohoo!!). I have a bumper-crop of 914 CV flanges around here, so I simply bolted a set to the trans, used stock Beetle axles with 914 CVs on the inner side and they bolt up as stock!!


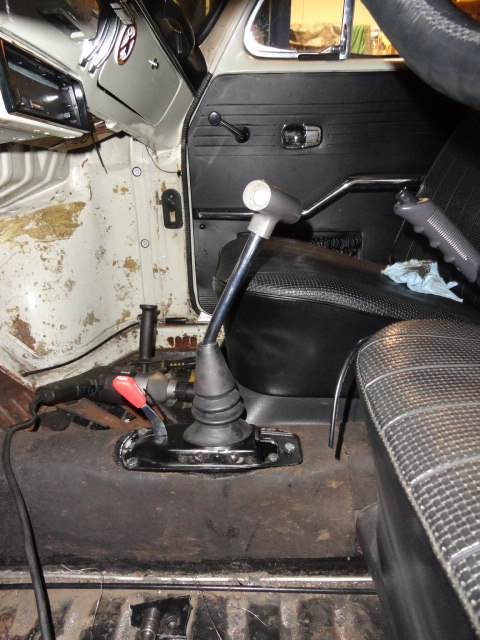
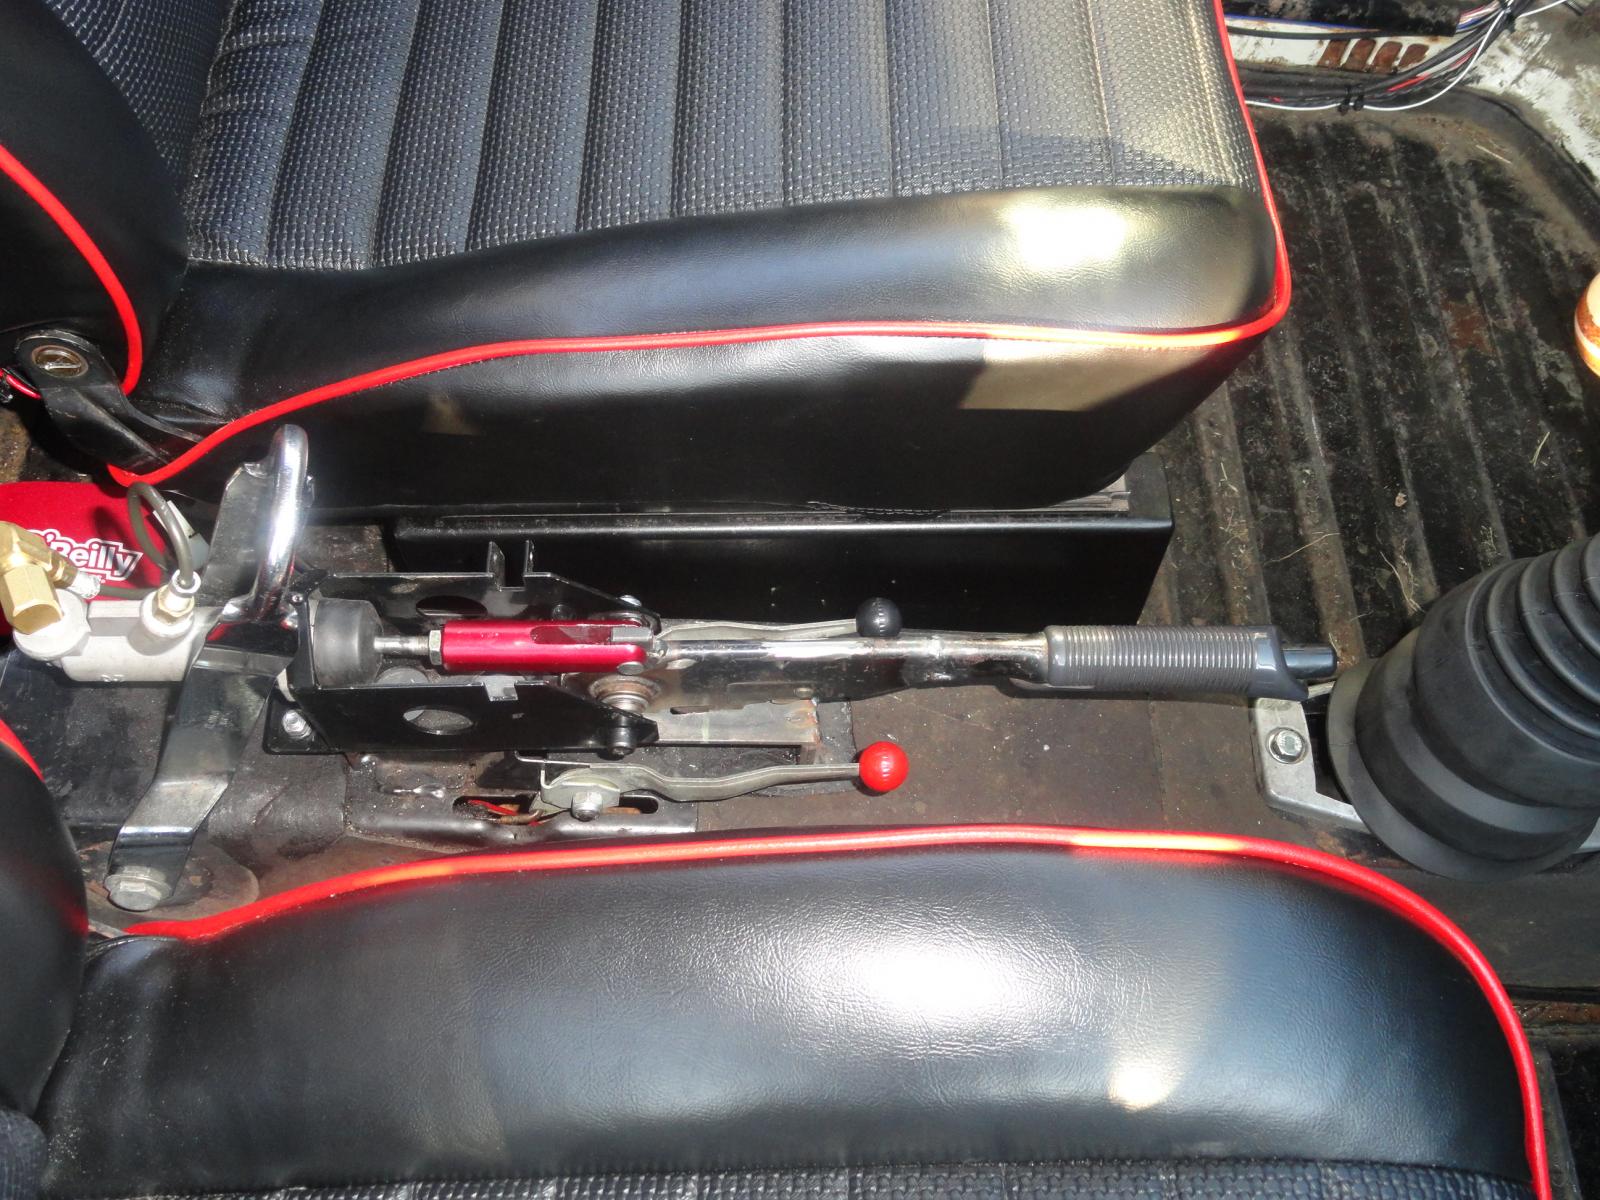
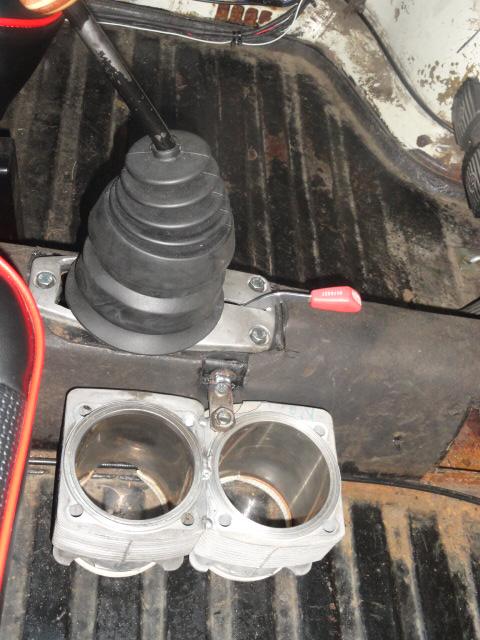
When it came to shifters, I used 3 different ones before I ended-up with the one I like and worked. I did 90% of my mock-up using a slightly modified Superior Formula Vee (VW) shifter and honestly it worked great except that the shift pattern ended up being backwards due to the linkage arrangement. So that also precluded the use of a stock Porsche 911 shifter either early or the late 915 style since they all move the shift rod in the tunnel opposite of the shift handle. Normally that’s not a problem, but my shift linkage flips the movement at the trans so I had to use a shifter that would move the shift rod with the handle. My solution was a ’73-’76 Porsche 914 unit.

IPB Image

I did have to modify the shifter slightly so that the spring lock-out for Reverse/1st (for the 901 shift pattern) was flipped to the other side and correct for 5th/Reverse (for the 923/915 shift pattern) This was accomplished by first removing the springs and plate. Then I drilled out the welds for the alignment pin plate. Then I had to drill a new hole on the opposite side for the alignment pin plate and finally rosette welded the plate back to the other side. Viola!! A Porsche 914/923/915 shifter with correct 5th/rev lock-out.

IPB Image
IPB Image


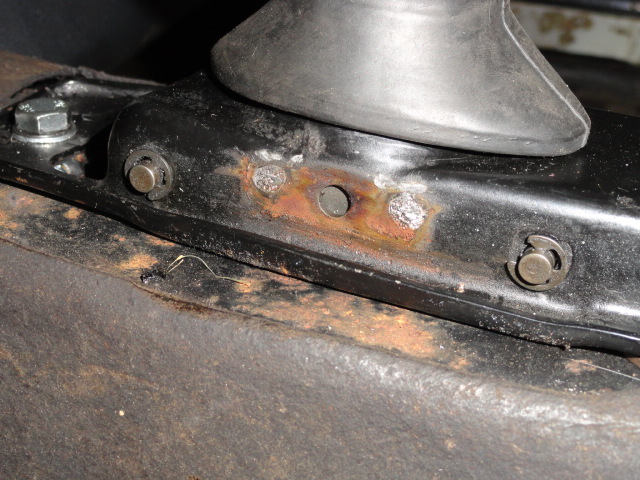
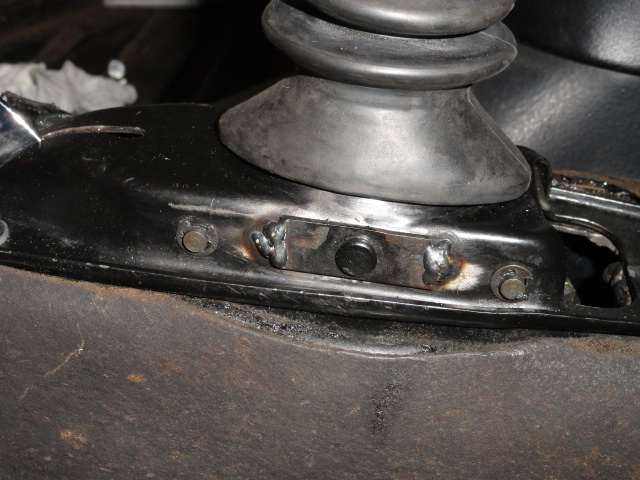
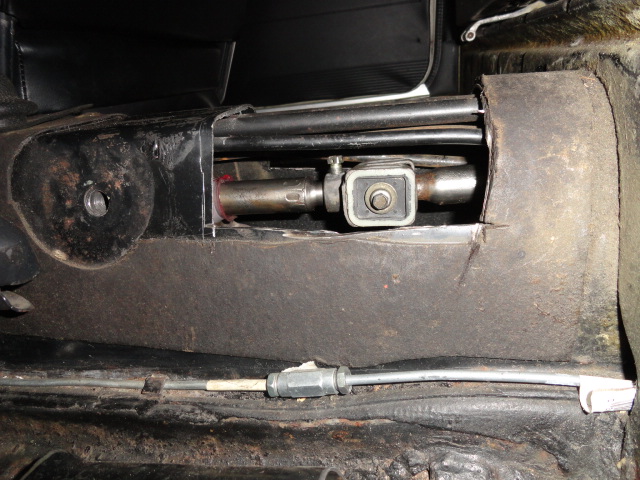
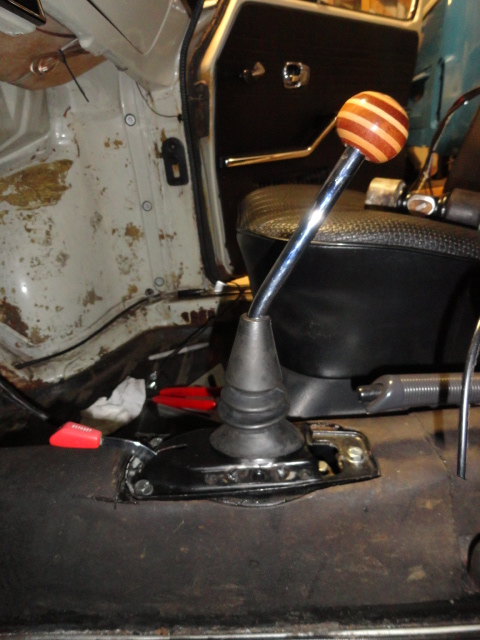
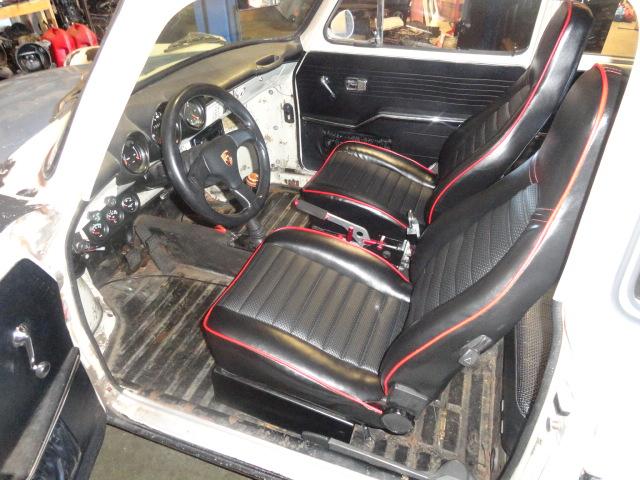
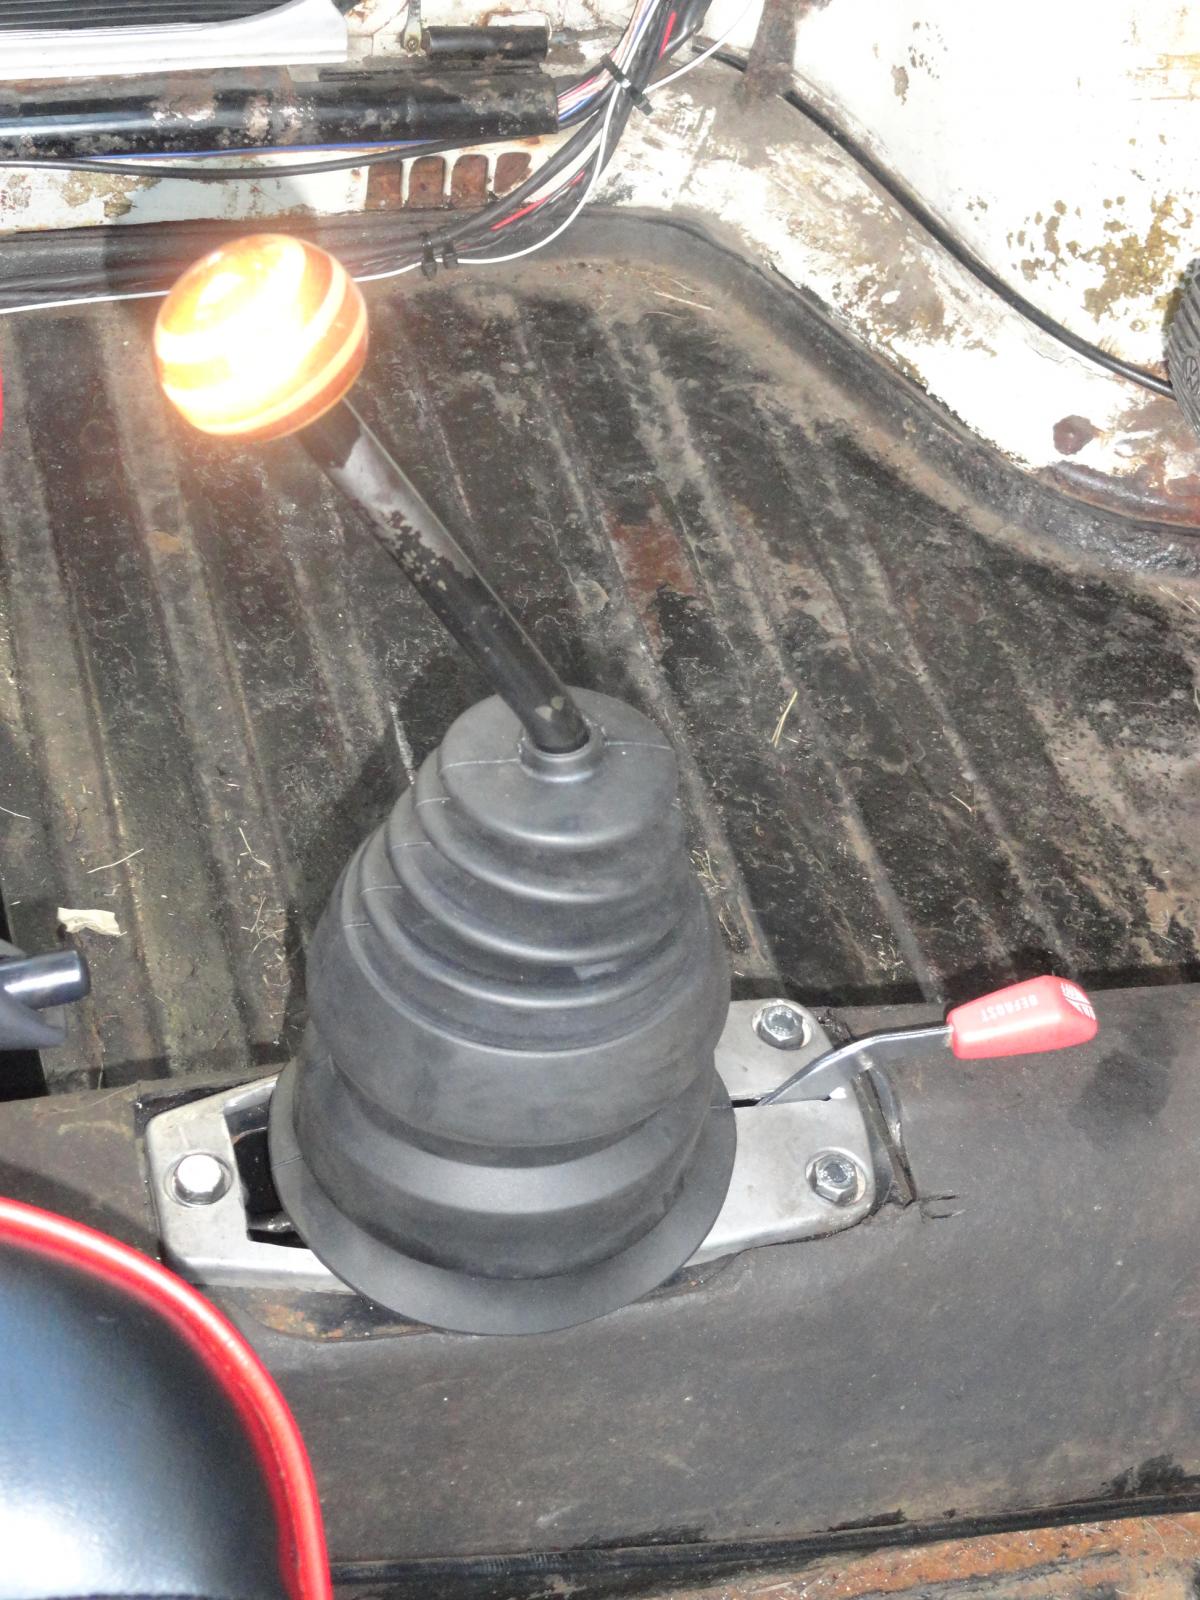
Modifying the tunnel was pretty straightforward. On a T-3 the tunnel is wider and the shifter is more centered than a beetle. So I just needed to enlarge the center hole and mark/drill the three mount holes. I made simple nut plates out of flat stock and 8x1.25mm nuts and then welded them to the under-side of the tunnel. As a bonus to using a Porsche shifter, I was able to mount a stock Porsche 914 heater lever in the nose of the shifter for my gas heater. It won’t actuate a cable, but it will be wired as the ground for the gas heater and heater fan. It gives the look though of an early 911 shifter w/ the factory enrichment lever!!

IPB Image
IPB Image


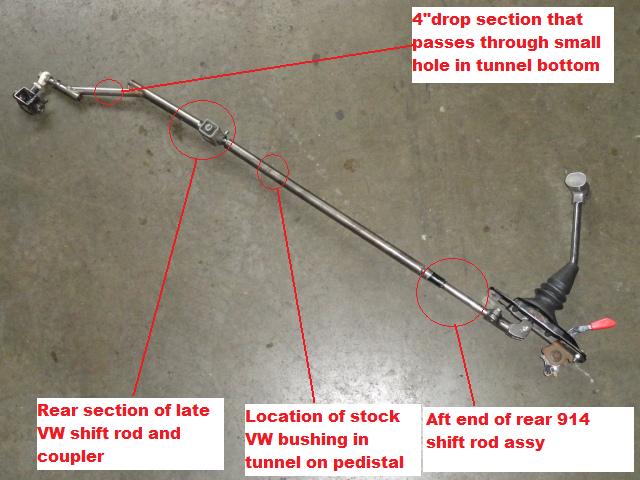
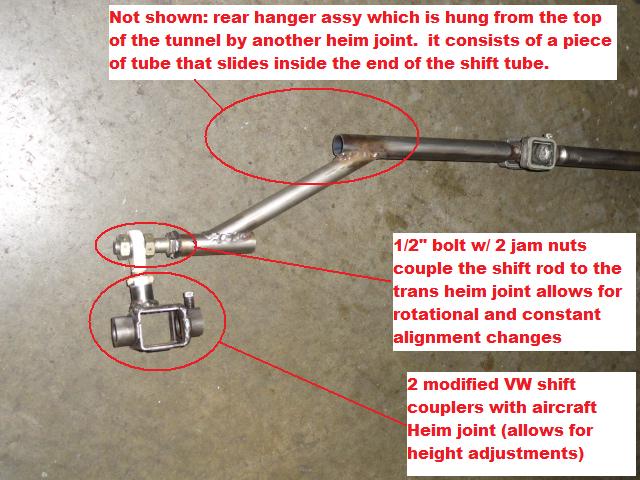
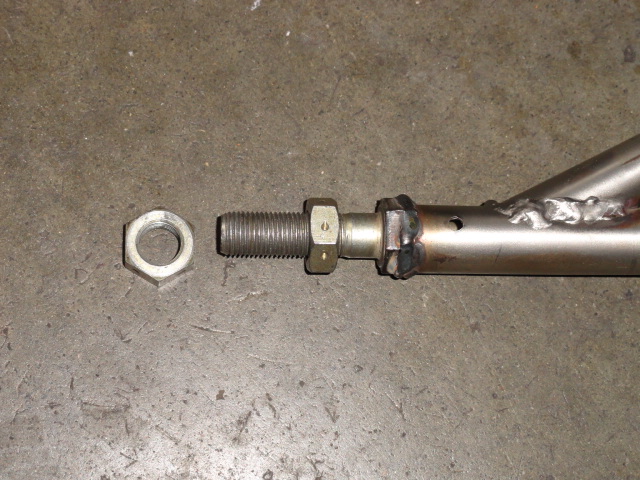
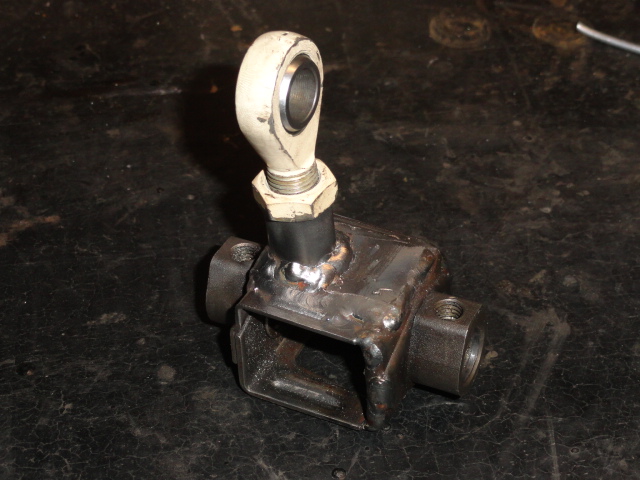
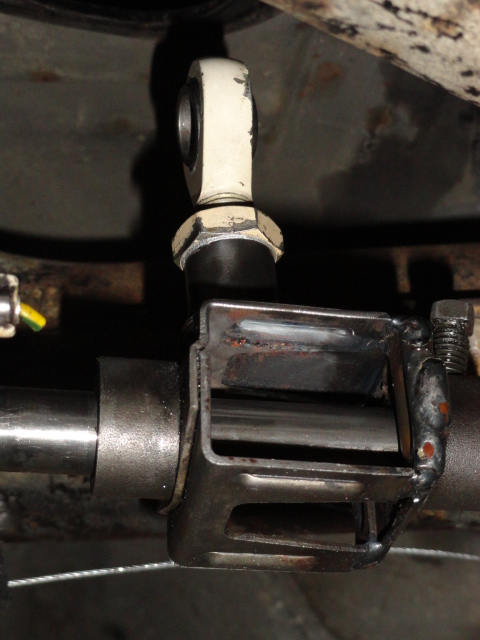
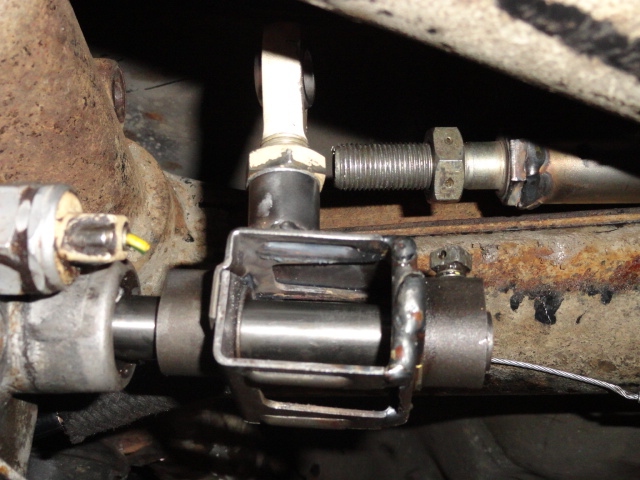
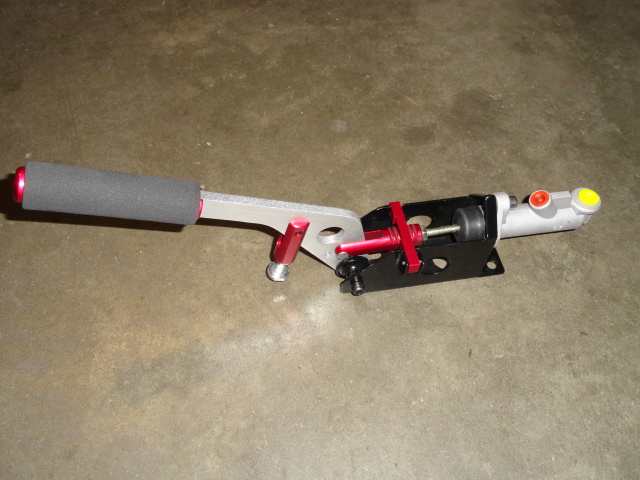
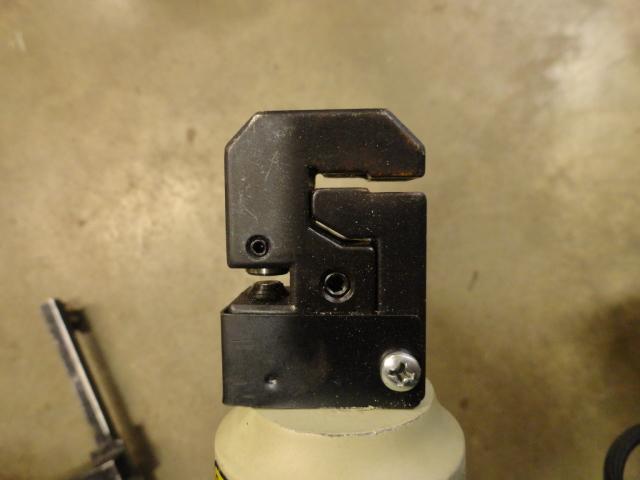
Designing the shift linkage was in a word, CHALLENGING!! Part of lowering the rear suspension was that if I lowered it straight down, not only would I have room for the trans nose cone, but an side effect was that the exhaust would also be showing more AND my intake air bellows would now not fit. So I had to mount it tilting down in front. What this did was disrupt the parallel plane between the shift linkage in the tunnel and the shift shaft at the nose of the trans (the trans was tilted about 10 degrees down). This caused stiction as you shifted. I had about a 6” drop and a 10 degree down angle to overcome. My design incorporated two, ½” heim joints to allow for movement at increasing angles without stiction. This linkage was redesigned and remade about 4-5 times before I had solved all the issues that came-up. You can now see why the stock style shifter caused the shift pattern to be flopped and why I had to go with a late 914 side-shift shifter to get the shifting back to normal. I’m really happy with the result. Shifting is positive and it’s infinitely adjustable

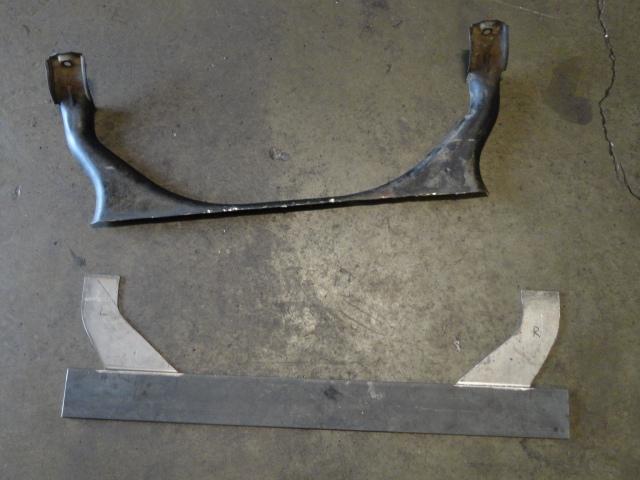
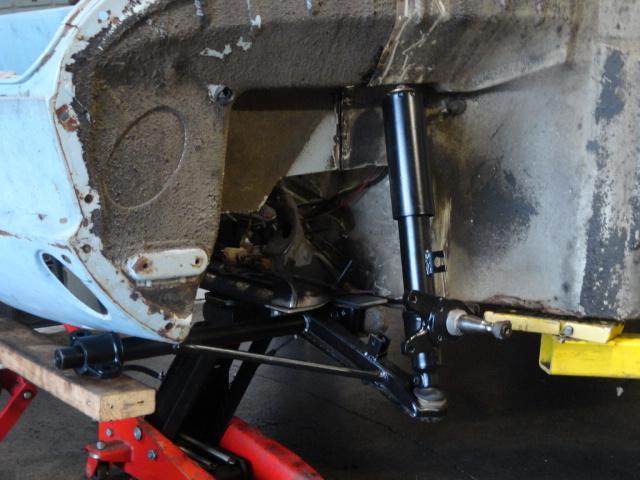
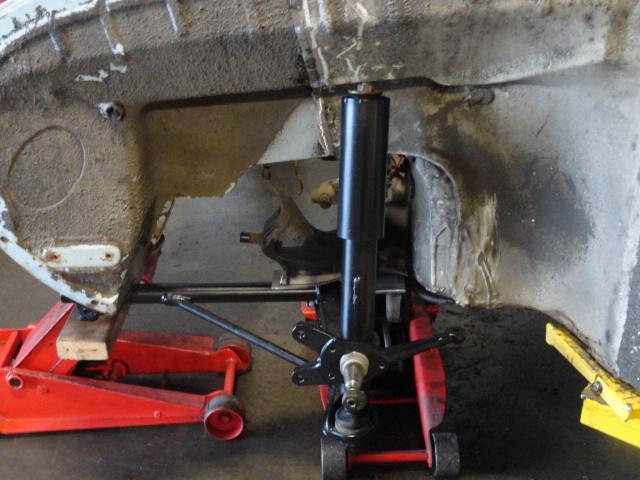
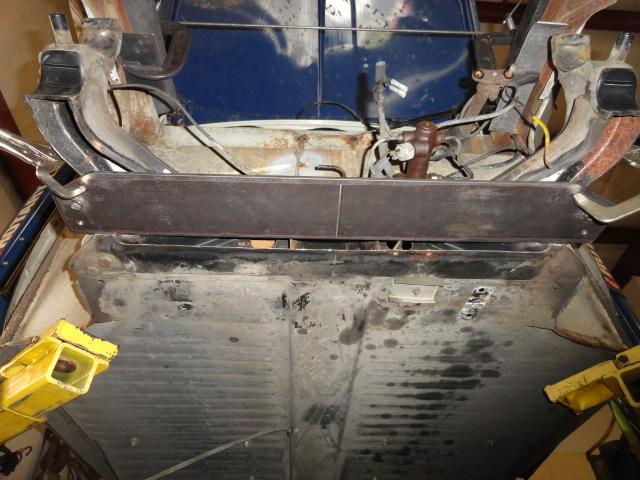
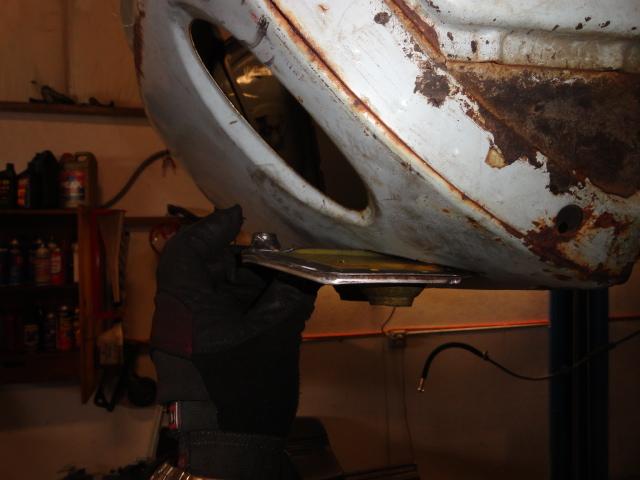
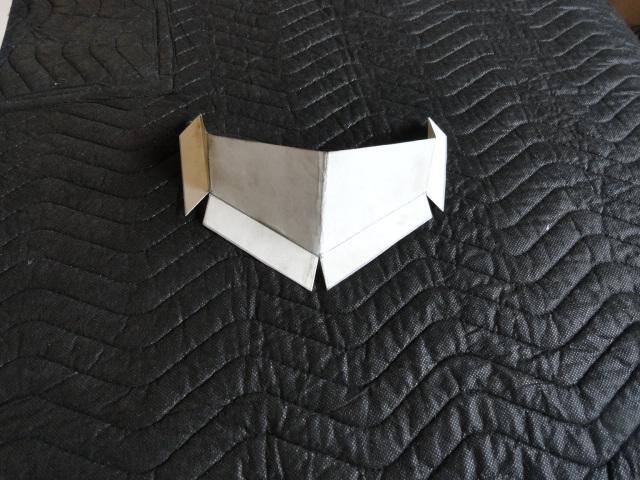
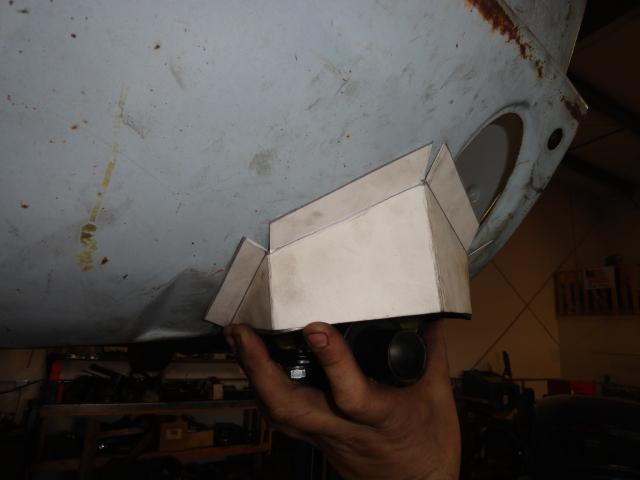
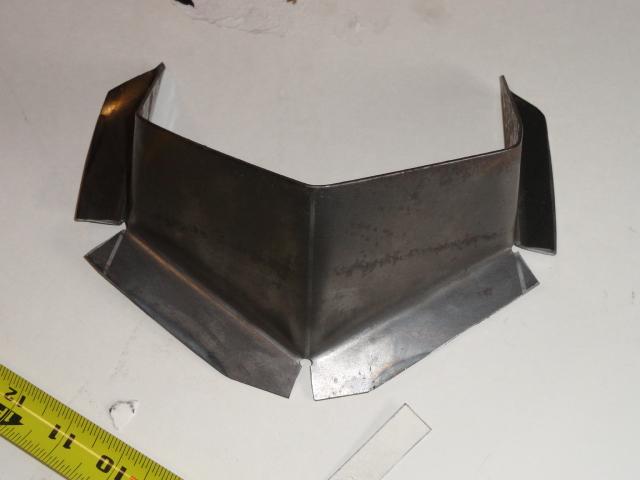
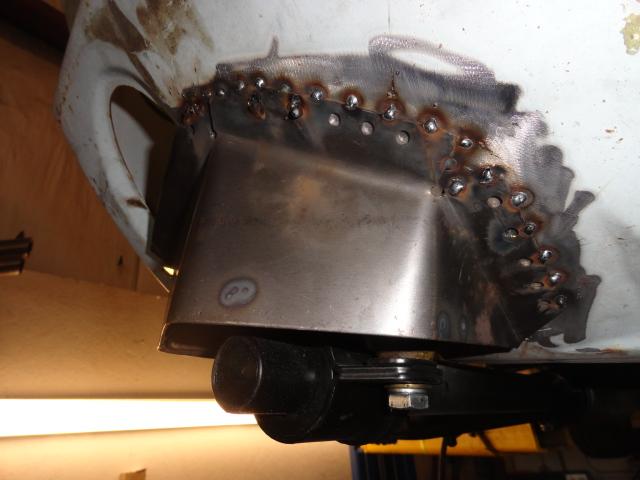
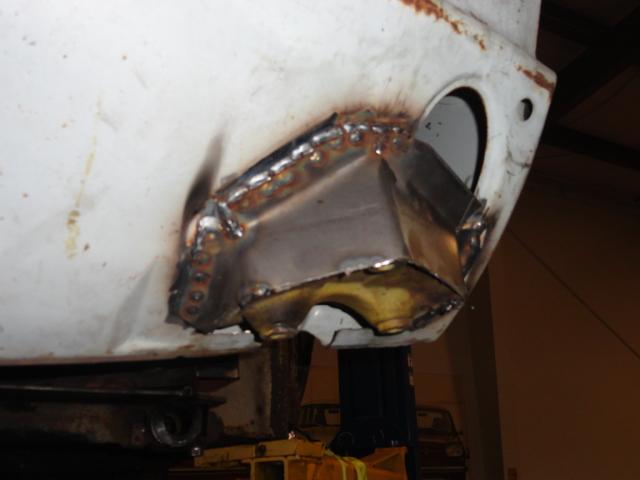
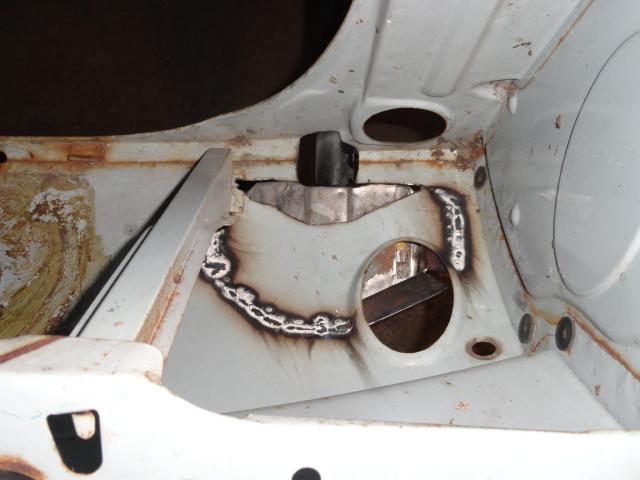
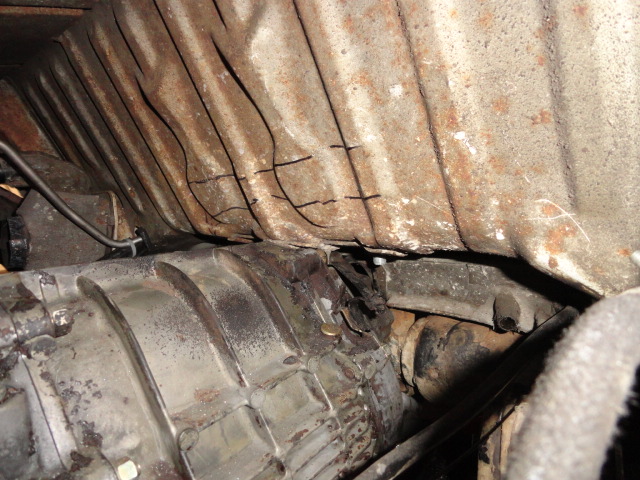
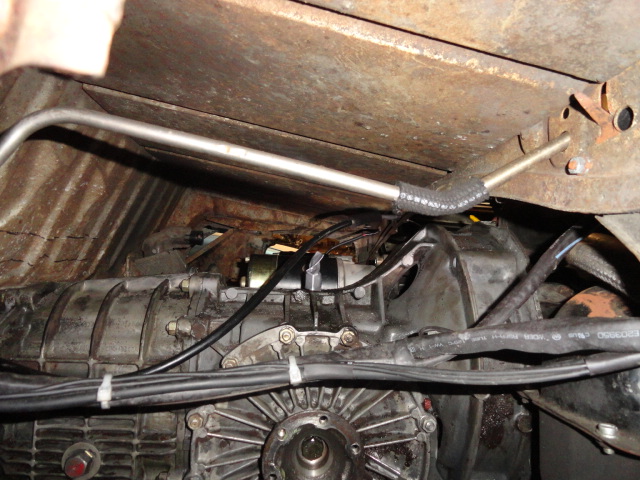
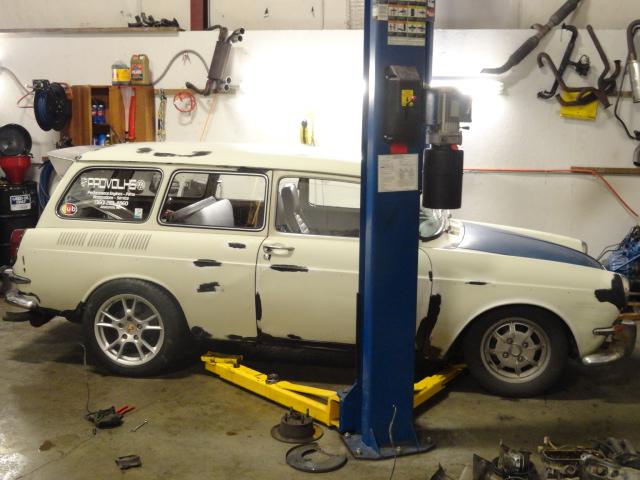
Rather than describe it, below are some photos to show exactly how it’s made.
IPB Image
IPB Image
IPB Image
IPB Image
IPB Image
IPB Image
IPB Image
IPB Image
Irish914
great project looks like lots of fun piratenanner.gif
veltror
I do like this...
Prospectfarms
Fascinating, but the difficulty of fabricating the new shift linkage made my head hurt. Will the custom mount of the transmission change the effective lube level of fluid coverage in the sump? Will part of the gearbox ever become fluid starved?

(BTW, I've often visited Nate's Aircooled webpage for some tidbit of info and similarly interesting how-to's. Now here you are. Thanks. (The link is in his signature)
aircooledtechguy
Been spending my Saturdays of late, wrapping up all the small details that come with the new 5-speed, the rear brakes the gas heater and all the wiring-in of all the various components. Whew, there's a lot of little stuff that takes a lot of time.

I made one change to the brakes. I had planned on running stock 914 calipers in the back so as to retain my stock e-brake. The issue I had was the cable routing since my brake calipers had to be on the rear of the trailing arm, the cables would end up being very close to the axles/CVs. So I traded them out for 912E calipers that I had. Fit like a glove!! But now i don't have en e-brake. Perusing eBay I came across a really simple hydraulic e-brake set-up used by drift cars guys. . . I pulled the trigger on it and now I'm going to have an fully functional hydraulic e-brake!! biggrin.gif

IPB Image

I've also made a few purchases that will add to the creature comforts. Updating this older car with modern car amenities is also a goal of the project. I've never owned an air-cooled car with cruise control, so I picked-up a Dakota Digital fully digital cruise system. It uses no vacuum off the motor, and I'll be able to stuff the module under my rear seat (like every other bit of electronics). Every day, I pass through several highly patrolled speed traps so I'm looking forward to the added piece of mind cruise control provides (especially with a car that really moves).

IPB Image

I got this little jewel from Zach (Vacca Rabite) so I'll be rolling this cool 917 replica shift knob. It feels sooooooo nice in my hand (cool in summer, warm in winter) and the finish is simply un-believable. It's actually finished with about 20 thin layers of super glue(!) and polished to a mirror finish. It simply must be seen to be appreciated fully.

IPB Image

I also picked-up a pair of mid-70s/early 80s Porsche 911 seats off Craigslist super cheap. While I'm not a fan of high-backs, they are a lot safer. They also have bolstering top and bottom so I won't be sliding off the seat while cornering like I do in the stock, flat, low-backs. I'm having these recovered in black vinyl w/ stock black VW basket weave in the centers. Before the covers go on though, I also opted for seat heaters for both seats. I've never had a car with that option, so I figured, what the hell!! 8)

IPB Image
IPB Image
rhodyguy
heat exchangers, gas fired heater, heated seats...you moving to the south pole?
aircooledtechguy
QUOTE(rhodyguy @ Mar 20 2012, 09:36 AM) *

heat exchangers, gas fired heater, heated seats...you moving to the south pole?


My wife always complains about my cars being cold. screwy.gif I'm putting an end to that right here. happy11.gif
aircooledtechguy
Been sewing up details on the shop-car over the past few weekends. Finally got them all finished and can officially close out phase-3 piratenanner.gif cheer.gif

Fired the motor up and did some gear checks. Found all five so that''s good. Then out of the blue, my alternator let the magic smoke out headbang.gif Luckily I have some spares around here (and it's easier to change than on the teener).

I could have this beast prowling the back-roads by tomorrow afternoon. . . happy11.gif driving.gif

I've decided that this is as far as I will take things this year. The front-end swap is as ambitious an undertaking as the 5-speed and also includes a power brake upgrade, so knowing how much I will actually have to dedicate to this during the busy months here at the shop it will be put on hold until next winter. I want to be able to drive and enjoy it for the upcoming show season and only do fine-tuning to the current set-up.

I will be going ahead with custom widened wheels and tires though and adding in my 911 seats when the upholsterer gets them finished in a week or so. I also may fabricate a custom center console so I can move my gauges in there permanently. If I do, I'll probably wire-in the cruise control at that time.

I do plan to have the MS2 re-tuned for the added displacement and CR when I upgraded from the stock U.S. spec 94s to the flat-top 96s.

I know some have been interested in the gearing and what it would translate MPH = RPMs The preliminary tests on the gearing for the 923 (912E) trans are as follows (as indicated by the speed sensor in the trans and indicated by the 912E dash gauge I have installed and wired into the car)(RPMs are rounded):

In 5th gear

40mph = 1700rpms
50mph = 2200rpms
60mph = 2600rpms
70mph = 3100rpms
80mph = 3600rpms
90mph = 4000rpms

I didn't feel real comfortable running it faster than that on my lift in the shop with the tires only an inch or so off the ground. laugh.gif I may have to wire in that cruise control sooner than later. . . idea.gif
aircooledtechguy
So I've logged about 60 miles on the Square since getting the 5-speed installed and I LOVE it. Cruising down the hwy, I have less engine noise and we'll see about the fuel mileage when I get the bugs out of the speedo (needle sometimes works flawlesly; other times not at all).

Some things that I definitely need to do to make it a solid driver are:

- rear-end alignment. I can tell it's out. It drives perfectly straight, but becomes a little "twichy" as speed increases. It's O.K. below 55-60, but the couple times I sprinted to 85-90, it was beginning to feel dicey. Don't want to crack this thing up because of a simple alignment issue. . .

- I need to replace my rear axle bearings. Probably should have done that during mock-up, but i didn't think of it.

- Rear brakes slightly drag. I may need to do my Porsche brake MC upgrade sooner than later. . .

- I need to get the wider tires on this before I even attempt another high-speed run over 80mph!! The 155R15s(!) that are currently mounted are wholly insufficient for anything other than drifting (which is quite fun BTW), and don't add to the stability in or out of corners. lol-2.gif

- The speedo works only about 1/3 of the time. I'll have to investigate that. I may just have a wire that is grounding on the back (they are really close to the chassis).

- The lights for high beam, park lights and blinkers don't work or don't work correctly. I just LOVE wiring. . . headbang.gif

- My oil pressure gauge is not reading right. I may have the wrong sender. I also need to re-wire all the grounds for my gauges. I daisy-chained a few of the grounds together for simplicity of wiring and I think they are insufficient so some weirdness is going on.

Other than the alignment problem, the axle bearings and the brakes, the rest is more convenience stuff that I will just have to get sorted as time allows.

The ugly and unassuming "Squarsche Type-3/P SS" (Super Sleeper) is now mobile and prowling the roads for winged H*nda f@rt-cars to embarrass and demean publicly. happy11.gif
Mike Bellis
I run one of those hydraulic brakes. It will loose pressure as the fluid cools. Not great for hills. It will hold on my steep driveway for a few hours, just not over night. If I wait until the fluid cools and press the brake pedal (under the dash), it will hold over night. Works great on flat ground to hold the car from moving.

Great thread btw. I had a 66 & 67 fastback. loved those cars. Still have a set of dual carbs for it. Now I need a T3 to put them on...

Click to view attachment
aircooledtechguy
As I log more and more miles onto my shop car, I have found that I miss the larger 15 gallon tank on my 914. I drive 40 miles round trip a day minimum and find that because of that, I need to fill up before the weekend if I fill it on Monday. Also, the Porsche 911 fuel gauge works on a slightly different oHms range so when full, it only read about 7/8 full. Currently I'm getting around 27mpg in mixed driving. So I decided to do something about the lack of range and the incompatible sender.

I have had a spare tank for years, so I carefully cut it with a cutting wheel (after ensuring there were no old fuel fumes present) and cut off the original filler neck. This is the tank "on the half shell"

IPB Image

I added 2 "L" shaped pieces that were 4.5" tall into place and welded them into place.

IPB Image

After everything was fully welded, I placed the top back on and welded that into place. Then I brazed a custom filler that will fit below the hood like stock. I also brazed in a fuel return nipple to the bottom as well so the plumbing can finally be correct for the MS2.

IPB Image
IPB Image

Now I need to coat it with POR-15 tank resin to ensure the rusted areas are stopped AND to ensure that if there are any small pin-holes in the welds, they will be permanently sealed. Then a black paint job and undercoating to make the outside look the part.

I should also mention that another reason for this was to better balance the car and up the weight a bit over the front wheels for better cornering (she pushes a bit in the corners like my 914 does when the tank gets below 1/2 full). I will be giving up a good portion of my frunk, but it's a Square, so room for crap is no big deal and I never really used the frunk anyway. shades.gif
Jamie
Dangit, the guy can even make a custom fuel tank! This has been a very interesting project to follow, and I bow to a great craftsman. As a retired photographer I'm appreciative of the excellent images made in some awkward positions. I'm constantly amazed by the projects that some 'teener gearheads will tackle when they have the skills and tools to get 'er done. pray.gif
Jakeodoule
Nice work Nate! really cool ride!
aircooledtechguy
Thanks for the kind words guys; it's been a really fun project so far. . .

Last Friday, I cleaned and treated the new tank with POR-15 tank treatment to seal and treat the rust and any minor pin holes that may have been present after all the welding. It has to cure for a full 4 days afterwords, so on Saturday, I painted it and under coated the bottom, added a new fuel sock screen and a new petcock.

Today was the swap-out day. I had to remove the breather tube and do some minor surgery to it to make it fit the new height so a low point was not created and block proper breathing.

Before:

IPB Image

After:

IPB Image
IPB Image

I added 2 gallons from a can I had, then proceeded 1 mile away to the filling station where I proceeded to top it off with an additional 17.2 gallons. I was expecting somewhere around 17 gallons total, so i was a bit surprised when the total ended up being 19.2!!.

No leaks (whew!) due to the POR-15 sealer I'm sure. biggrin.gif As was expected, the car has a heavier feel at the wheel at slow speeds due to the added weight right over the front wheels, but it's not excessive and the added weight where I need it going into a corner will be welcomed. I plan to auto-X this car and hopefully use it on an occasional track day.

I did get around to putting the car on a vacant truck scale this weekend (before the tank swap). It weighs 2200# total with just over 800 on the front axle and 1400 over the rear axle. I'm going to have to check it again now that I have made this significant change to the bias. Even though the rear is significantly heavier, it doesn't act that way. I think the wider slightly cambered tires and the rear sway bar help a lot with it sticking. But I also suspect that lowering the center of gravity (by lowering the motor and trans in relation to the body to get it all to fit), has really made the biggest difference. This may sound far fetched, but I believe that this thing may be able to keep up with my Porsche 914 on a twisty road; no problem. It feels that firm in the corners. Once I get my new seats installed, I'll really be able to lean on it in the corners without feeling like I'll be flung out of the seat. laugh.gif

Speaking of new seats. . .

Got my Porsche 911 seats back from the upholstery shop this morning. I’m lovin’ how they turned out. We used stock VW black basket weave for the inserts so they look more at home in the VW. Then I chose red welting and stitching to accent the black. The car will be painted hot rod black with red pin stripping so these should accent the final look really well. I do like the clean look of the stock, low-backs, but these are safer and if I kept the low-backs I would never be able to get it the car onto a race track in the future.

I had seat heaters installed so this winter my wife should be comfy and I should hear no complaints.

Before:
IPB Image

After:

IPB Image
IPB Image

Mr.242
ARE you fricken kidding me? Nate...you've been hiding your talents way too long.

Nice work and you da man!
aircooledtechguy
I finally got the chance to install the new seats. Man are they comfy!! My seating position is a lot better and they are mounted about 1 inch lower than the stock seats. This helps the viewing of my gauges and lowers my center of gravity (which can't be a bad thing since I'm a big guy).

IPB Image
IPB Image
914werke
aktion035.gif
Tom
Nice work Nate. What a cool shop car! Would putting baffles in the tank help with weight transfer left to right?
Tom
OU8AVW
Awesome! Simply Awesome!
aircooledtechguy
QUOTE(Tom @ Jul 12 2012, 07:53 AM) *

Would putting baffles in the tank help with weight transfer left to right?


Yeah, it most definitely would. Actually, I meant to add a set into the lower half of the tank to keep fuel from sloshing away from the p/u tube, but in my haste to get-r-done, I totally forgot until I was on my last 6" of welding. . . headbang.gif

I may end up having to make another tank anyway due to the front-end swap that's in the future, so I might have to re-visit this all over again anyway. If I do have to make another tank, I want it to be aluminum and fully baffled top to bottom to keep the sloshing down.
aircooledtechguy
The Porsche fornication continues. . . happy11.gif Made a couple refinements to the shifting and to the e-brake this week.

Last weekend I attended John Walker's annual Porsche swap in Seattle. I scored a perfect '72-'89 Porsche 911 shifter. This is the original style of shifter that was used with my 912E (923) 5-speed. Until now I have been using a slightly modified '73-'76 Porsche 914 shifter and while it worked well, it lacked the reverse lock-out of the 915 style shifter. However this style if shifter is no bolt-in part. I had to cut the ball off the bottom of this shifter and weld on the linkage mount off the 914 shifter in order to have the shift pattern right. Then I had to carefully cut a window behind the shifter tower so that I could access the shift adjustment bolt. Then I also had to cut a slot in the front and shave down some of the right fwd edge in order to continue to use my Porsche heater switch. Viola!! Smoother, even ore positive shifting with reverse lock-out!!

IPB Image

Next was the e-brake handle. Since I upgraded the rear brakes using 914 rotors w/ 912E calipers, I had to switch to a hydraulic e-brake. The lock ratchet worked O.K. (barely O.K.) but needed both hands to dis-engage. I figured at first, no big deal. But after a couple months driving it, I really got tired of 2-handing the brake handle. So my solution was to shorten the handle 4" and add a boss to the top that would work the piston of the slave cylinder. I also shortened the actuator arm to get it to all fit and work like a stock e-brake, but this one REALLY grabs the brakes now!!

IPB Image
aircooledtechguy
I finally got a chance to really put the "Squarsche" through it's paces on a long twisty road yesterday. I connected up with members of the Chuckanut Sports Car Club after work yesterday and we sprinted up to Artist Point and back on Mt Baker, in NW Washington state. This drive was my first real test of the engine, trans, suspension mods, brakes and virtually everything I have been doing to the car thus far. The drive is about 100 miles round trip and begins at about 100' above sea level. During the first 35 miles, it's a fast sprint with un-impeaded speeds averaging between 50mph and 75 mph through some farm lands & forest with beautiful stretches that border the Nooksak River as it gently climbs to about 1500'. The drive then gets progressively twistier as the rate of ascent steepens in the final 12 miles. This is where it becomes really fun. In the final 12 miles you climb to 5100' with the better part of that in the final 6 miles. There are virtually no straight stretches of road with which to allow your mind to wander and take in the beautiful views. In all the years I've been driving this road, I have yet to enjoy the scenery except from the summit laugh.gif

The car handles really well for having a weight bias of 37/63 (37% front - 63% rear). When I see the numbers like that I immediately think, "this should make a nice drift car", but it doesn't handle like I expected. Flat in the corners and the rear-end was firmly stuck to the road in all but the most extreme situations. There are a couple fast left-right-left-right corners that if you carry too much speed in and have to stab the brakes, you can feel the rear-end getting a little light and it whips a bit during the transition, but I experience that too in my Porsche 914 (with a 49/51 weight bias), so it's the nature of the beast. It does push going into a corner hard because there is so little weight in the front. However, I was a little pressed for time getting to the meeting place and totally forgot to fill my extra large 20 gallon tank before the drive. So I not only had about 1/3 of a tank of fuel, but also had all that weight sloshing side to side aggravating the problem. So next time I'll be filling the tank first. I still plan on shedding some weight off the rear and relocating the battery to the front and as much other stuff as I can.

The motor pulls like a freight train above 3K even in the thinner air. At 4K+ it really gets a pissed off sound that I just love. :twisted: AFR averaged between 12.7 & 13.5 on the LC-1. The Porsche disks could haul the 2200# car down to sane speeds in a hurry and I never felt the pedal fading. The Porsche 912E trans-axle has PERFECT gearing for this motor and the car. 2nd is low enough that I could still have good power getting out of the tight switchbacks. 3rd is my favorite gear since you can easily rev it to about 65mph before getting close to the red-line. 4th was good for cruising at even speeds through fast sections where I still wanted instant power on tap at higher speeds. There were only a few places that I could even engage 5th on this road since speeds were generally 65mph and under in the upper sections. Once we pass the snow plow barn, the pace really intensifies with speeds between 60-80mph.

Overall, I could not be happier with the results. This car will absolutely SMOKE my Porsche 914 in every aspect except getting into the corners (the under-steer). It pulls harder, brakes faster, lays flatter and sounds meaner (and that really the most important thing, right?? laugh.gif )

For your viewing enjoyment, here's the 1st leg of the drive from the summit down to the ski lodge. The second leg will be up loaded hopefully tomorrow. BTW, I'd like to thank Nord (in the silver G35) for waving me by laugh.gif poke.gif driving.gif

http://www.youtube.com/watch?v=7I-2T0ZghD8&feature=plcp
FourBlades

This is such a great thread.

You've got some serious car building skills. smilie_pokal.gif

John
NORD


I'm glad you all got to see I let Nate by me. I followed him down and that

square back runs pretty good for a VW. Nate was lieing about the speeds

we were going though My disclaimer " we never excedded the posted speed

limits" Nate's speedo must be wrong. driving.gif
aircooledtechguy
QUOTE(NORD @ Aug 31 2012, 03:26 PM) *

Nate was lieing about the speeds

we were going though My disclaimer " we never excedded the posted speed

limits" Nate's speedo must be wrong. driving.gif


Everyone knows a VW can't go that fast rolleyes.gif

Here's an action shot via the GoPro on Troy's Honda

IPB Image
speed metal army
I love this thing! Buddy of mine is scooping a notch next week...
Question!
Why the heck did you weld up the tank,then braze on fittings? idea.gif
aircooledtechguy
QUOTE(speed metal army @ Aug 31 2012, 09:10 PM) *

Question!
Why the heck did you weld up the tank,then braze on fittings? idea.gif


That's a great question. . .

When building the tank, I had to remove the super long neck at the base and shorten it. The filler necks on the tanks are originally brazed on at the factory. I believe it's because it was easier to have a guy braze the tight fitting slip-joint rather than have to weld it by hand. The joint is originally like a sweated copper plumbing pipe joint. The reason I brazed my new neck on was because once you have metal that is contaminated with brass from previous brazing, there is no way to weld to it with a MIG, TIG or any other traditional welding method, so your only option is to braze to it again.

The two half shells are machine welded together with a machine that welds as it rolls along the seam (kind of a rolling, continuous spot welder). Since they are welded in the traditional way without brass, I could simply cut the joint apart and then weld to it.

As for the return nipple on the bottom,. . . I already had the oxy/acet. torch out but the real reason is that for sealing up a small tube like that where the fit is really tight, brazing is the easiest and cleanest solution. Welding a tube that is almost laying flat against the tank is a total PITA to get sealed then you risk burn-through in the process. Brazing it takes seconds and burn-through is darn near impossible.
speed metal army
QUOTE(aircooledtechguy @ Aug 31 2012, 10:19 PM) *

QUOTE(speed metal army @ Aug 31 2012, 09:10 PM) *

Question!
Why the heck did you weld up the tank,then braze on fittings? idea.gif


That's a great question. . .

When building the tank, I had to remove the super long neck at the base and shorten it. The filler necks on the tanks are originally brazed on at the factory. I believe it's because it was easier to have a guy braze the tight fitting slip-joint rather than have to weld it by hand. The joint is originally like a sweated copper plumbing pipe joint. The reason I brazed my new neck on was because once you have metal that is contaminated with brass from previous brazing, there is no way to weld to it with a MIG, TIG or any other traditional welding method, so your only option is to braze to it again.

The two half shells are machine welded together with a machine that welds as it rolls along the seam (kind of a rolling, continuous spot welder). Since they are welded in the traditional way without brass, I could simply cut the joint apart and then weld to it.

As for the return nipple on the bottom,. . . I already had the oxy/acet. torch out but the real reason is that for sealing up a small tube like that where the fit is really tight, brazing is the easiest and cleanest solution. Welding a tube that is almost laying flat against the tank is a total PITA to get sealed then you risk burn-through in the process. Brazing it takes seconds and burn-through is darn near impossible.

Well there ya go! Makes sense to me. welder.gif
aircooledtechguy
Here's the 2nd leg from the ski lodge down about 7 miles or so. . .

http://youtu.be/TwWxfx1n23M
aircooledtechguy
The relentless quest for more power and speed continues. . .

Ever since installing the 5-speed, I was forced to go back to using the stock Porsche flywheel. It's a nice forged piece, but damn this thing is boat anchor @ 17+# compared to the conversion flywheel I had on it that weighed in at about 12.5#. Believe it or not, when I had to switch back to the Porsche flywheel (due to installing the Porsche 5-speed), I also upgraded to the larger P&C set upping my displacement 85cc and the car got a bit SLOWER. . . This COULD NOT STAND!! So I did some calling around and found a local place to lighten a spare Porsche flywheel I had laying around. They were able to conservatively shave a full 5.5# off and still leave me tons of meat on it. I'll bet they could have gotten another 2# if they had not conservatively done it. Next time, I'll tell them to go crazy with it!!

IPB Image
IPB Image

I'm SUPER happy with the results. Instead of using HP and torque to spin that heavy flywheel, the motor can now put that lost energy to my tires, and these things are gonna pay for their past 6 months of laziness. :twisted: The car is MUCH quicker getting to a given speed. It's lighter, but not so light that it is jerky to drive and still drives like stock. Coincidentally, I had the opportunity on the way in this morning to test the added acceleration against a guy in a winged H*nda fart-car. I don't think he ever had the chance to see that I have a blue trunk lid that doesn't match the rest of the car. . . laugh.gif

I also removed my rear hub assemblies and modified them for Porsche 930 press-in wheel studs. One thing VW really missed the boat on is using wheel bolts instead of studs and nuts. I only did the rears for now since I'm planning to change the entire front-end this winter. Instead of using steel nuts, I modified a set of Porsche alloy nuts on my lathe for use with the long studs. Now tire changing will be a breeze. Especially since I have to use 1/4" wheel spacers on the back. What a PITA to hold the wheel AND spacer when using the lug bolts. . . :evil: BTW: the photo makes it look like the lugs are not pressed in straight, but that is just an illusion due to zooming in for the photo (I blame the jerk behind the lens laugh.gif ).

IPB Image
IPB Image

The final thing was that I made a significant change to the end of the shift linkage where it mates to the Porsche trans-axle. Over the past 6 months, I had come to realize that my dimensions were off just slightly on a couple things and this resulted in a "compressed" shift pattern which sometimes made 2nd to 3rd and 5th to 4th gear changes a bit tricky. So after lots of thought and staring at it from underneath, I realized the error and corrected them. Thankfully it turned out to be a fairly simple fix after some careful measuring, cutting and welding. The result is that now it shifts *EXACTLY* like a stock Porsche 911. All gears are super positive, the shift pattern is spread out like stock and I have not missed a shift since, even in fast power-shifting. I even had a client stop by who drives a Porsche 911SC with the same trans and shifter and asked him to shift it through the gears and tell me what he thought. He said it felt better than his Porsche!! That's what I was going for, so the design is finalized and I can put the shifting to bed once and for all. 8)
Cap'n Krusty
Having had a bad experience with hydraulic hand brakes, I would caution you to be VERY careful with it. If it's tied into the main braking system, the heated fluid contracts as it cools and releases pressure. You could find your car in the street in the middle of the night as I did. Beyond that flaw, it's illegal (DOT) to use the main braking system as a parking brake.

The Cap'n
aircooledtechguy
One thing that consistently bugs me about ALL A/C VWs is that there are no cup holders in the car. Typical aftermarket one-size-fits-none solutions generally suck and are flimsy. The Squarsche needed a set, so I came up with these (after seeing sixnotfour's cool drink cup), which could be the words fastest cup holders. biggrin.gif I made them out of a pair of un-usable Porsche 911 Nikasil-coated Aluminum cylinders. I first TIG welded them together, added a piece of pinch-welt to the base (from an old set of beetle pop-outs I had) and then mounted them to a bracket I welded to the tunnel to keep them from moving around while driving. They fit a large McDonald's coffee (Mmmmmmmm. . .) great as well as any of the drink cups.

IPB Image
IPB Image
aircooledtechguy
I finally got the opportunity to make a mount for the seat heater switch and the cruise control switch (though I haven’t yet mounted that). I didn’t want it to be visible from the outside and didn’t want to cut big holes in the dash, so I made a 4 sided box and a pair of brackets and mounted it all to the side of the passenger seat mount between the mount and the tunnel. It’s ergonomic for yours truly to reach as I drive and that was a must. I ran most of the wires down the tunnel so they won’t be visible and won’t interfere with carpet later.

So how do the new seat heaters feel??. . . Aaaaahhhhhh, so nice on a cold morning and they have really turned cold as of late which was part of my motivation. It takes about 2 minutes for them to heat-up and then it’s pure heaven with 10 adjustment settings. I can definitely see my lower back getting a therapeutic benefit from this upgrade. New car amenities in an old package; gotta love that combo!! If you’re planning to re-do your front upholstery anyway, these are worth the $80-$100 for the set of elements, the switch and the wiring.

IPB Image
IPB Image
JRust
Nice! Love heated seats in the good old PNW. Excellent add on piratenanner.gif
Chris Pincetich
OMG I want cup holders like those! beerchug.gif
aircooledtechguy
Big changes coming to the ProVolks shop car. . .

I've taken it off the road for the foreseeable future to complete the final body mods to fit the wheels, brakes and front-end under it. I'm begining with the rear-end since it's the easiest. laugh.gif

Brakes: I recently scored a complete rear-end off a Porsche 924 turbo so i could switch to Porsche wheels and brakes the right way. Since I already had IRS rear-end under it, I just swapped out the backing plates and the hub assembly. At this time I didn't swap the stub axle since I the stub is identical other than the CV required. Since I already had that sorted out, I figured, why bother at this time??

New brakes mocked-up:

IPB Image

Mocked-up with 17"x8" 40ET Porsche wheels w/ 235-50-17 wheels w/ the 23mm factory spacers:

IPB Image

Mocked-up with 17"x8" 40ET Porsche wheels w/ 235-50-17 wheels w/o spacers:

IPB Image

On the ground (yeah, it's on the fenders):

IPB Image

A glimpse of the old and new:

IPB Image

I'm gonna have to stretch the rear fenders about 2.5" - 3" in order to get everything to fit. I'm going to be doing all the body work with these over-sized tires AND the factory spacers so that there's plenty of clearance ion the inner side (which was tight without the spacers). When completed, I plan to run slightly smaller tires on these rims, but also this will allow me to run 17'/18" BBS LM wheels if they should ever present themselves for a good price. 8)

So much debauchery; so little time!!
aircooledtechguy
Friday, a friend of mine came by the shop to help me out with removing the damaged front clip off the ’67 Square. Originally I was going to just run what I had and body work it, but I soon discovered that the clip was pushed back almost ¼” on the drivers side making it all not square underneath and preventing the fenders from mounting properly. What I have planned for the front suspension requires it to be 100% square, so the old had to go.

We began by removing the fenders. Then made a series of careful measurements so as to ensure repeatability from one side to the other. Then marked the front-end with cut lines. Then taped the cut lines and cut along them with a cut-off wheel.

IPB Image

Won’t be driving fro a while until this gets back on. How’s that for adding some motivation??

IPB Image

I’ve currently got about ½” overlap which will be slightly trimmed to about ¼”. Then I’m going to flange the rear side with a flanging tool so I can properly overlap and weld the pieces back together on either side. This method should make a super strong re-connection.

Had to stop on a clients car early due to waiting on a part, so I put the rest of the day to good use.

I prepped the edge of the cut on the body with a 2" wheel down to bare metal. repeated this to the replacement clip section. Then brought out the flanging tool which is air driven. It makes a nice off-set flange so you can slightly overlap metal to be welded. Makes for a nicer joint in the end and is easier to fit pieces too.

IPB Image

Once the body was flanged, I test fit it and double-checked the key measurements. Then triple-checked them again. Then tacked it in place. . .

IPB Image

Then mounted the hood for a test fit before final welding. . . PERFECT!!

IPB Image

Now I have to finish weld both sides after I get another bottle of shielding gas.
VaccaRabite
Badassed!
Kirmizi
popcorn[1].gif
RickS
This is good stuff!
audio_file
I'm such a sucker for (all) wagons, love it!
914werke
Break out the Teener front end!
aircooledtechguy
QUOTE(rdauenhauer @ Mar 20 2013, 07:22 PM) *

Break out the Teener front end!


Patients Rich, patients. . . happy11.gif

I gotta get the foundation layed before I can start the major surgury.
sawzall-smiley.gif welder.gif Once this front clip is welded on, I will have no excuses for not tackeling the front suspension.
aircooledtechguy
Am I missing something here????? :shock: The "point of no return cut" takes place. . .

IPB Image
IPB Image

The lid is ready to come off on my plans for the front-end. Out with the old beam, in with highly tunable Porsche 914/911 front suspension. :twisted: Don't worry, the center beam will be powder coated like all the rest once any mods that need to take place happen first.

IPB Image

Mocked-up to the general position where this front-end will call home from now on. Before that happens, MUCH prep work will take place beginning with boxing in the area that was cut out in order to gain back the strength.

IPB Image

The fun continues. . . 8)
VaccaRabite
QUOTE(aircooledtechguy @ Sep 27 2012, 10:05 AM) *

...Porsche 911 Nikasil-coated Aluminum cylinders. I first TIG welded them together, added a piece of pinch-welt to the base (from an old set of beetle pop-outs I had) and then mounted them to a bracket I welded to the tunnel to keep them from moving around while driving. They fit a large McDonald's coffee (Mmmmmmmm. . .) great as well as any of the drink cups.


I was thinking about this today.
Wouldn't this set up effectively make hot drinks cool and cold drinks warm a lot faster then usual? After all, those jugs are made to shed heat quickly.

Zach
aircooledtechguy
QUOTE(Vacca Rabite @ Apr 3 2013, 11:22 AM) *

I was thinking about this today.
Wouldn't this set up effectively make hot drinks cool and cold drinks warm a lot faster then usual? After all, those jugs are made to shed heat quickly.

Zach


You're way over-thinking these cup holders. . . poke.gif
aircooledtechguy
Made a fair bit of progress today. Made the box-in section for the frame horns to regain the strength. I made the load bearing part out of 1/4" thick flat stock. The rest that actually goes up the front of the horns is 1/8" steel. Once I have it all tacked in place, I'll be boxing-in the outer edges where the center truss mounts. I plan to tie it into the body of the car with plates and gussets since this is where 80% of the stress is on this front-end.

IPB Image

Here's a couple shots after I raised it up in place so I could see how it would all fit in the car. I can already tell that I will need to make a small pocket for the aft end of the torsion bars and clearance the bottom of the frame horns where the strut arms connect. The shock struts are approx where they will be mounted, eventually. . . happy11.gif

IPB Image

IPB Image
aircooledtechguy
I finally got the Porsche front mounts that I cut from a derelict 914 trimmed down and prepped for mock-up. In these shots, they are mounted to the a-arms and the whole lower front-end is mocked in place so I could get a really good look at where the cut lines will need to be made. These will be recessed into the nose at the rear about 3/4", but will need to be boxed outward significantly at the front. I'm going to first recess the rear edge so that it fits correctly. Then after that is done, then I can tackle the box structure in the front.

IPB Image

IPB Image

The material it's boxed with will be the same .75" (2.0mm) sheet that the Porsche mounts are made from. This will then have plates on the inside that tie it all to the body and pan via the upper frame horns. So far everything is going according to my sick plans. . . happy11.gif
aircooledtechguy
Made a ton of progress this Saturday. Here are the highlights:

- Finished the main front-end support.
- Welded said support to the frame head.
- Located front mounts on body and cut recesses for them.
- Fabricated and welded front mount supports that box them in and tie them to the front-end.

I started off with the main support. I had that basically made (all the hard stuff anyway), I really needed to make the relief cuts on the fwd corners so it didn’t interfere with the movement of the A-arms. With that finished, I decided that I could no longer put off mounting this piece to the car.

IPB Image

Everything else depends on this piece, so I really took my time to get it aligned with the center line of the car and to immovable points on the pan; Points that I knew would have to have been very accurate when the pan was made on the jig at the factory. With it all spot-on, double-checked, triple-checked and one more check for good luck, I tacked it into place and then made another check. With it still good, I began laying beads of weld to make it all permanent.

After that was in place, I attached the main support beam and slipped in the A-arms so I could then locate where those would mount. On the under side of the sheet metal, I carefully measured for center line and then measured out from there. The torsion tubes are just less than 26” apart (center to center), so I marked out the centers for those and began marking the rear edge of the relief that would need to be cut in order for them to sit straight and level on the multi-curved surface. I also had to cut a relief so that I could use a 2.5” piece of tube cut in half so that the tops of the torsion bars could pass through the bottom edge of the front apron.

IPB Image
IPB Image

Once all that was done, I needed to make the fwd sheet metal that would box-in the front of the mounts. Rather than begin with sheet metal, it’s a lot easier and quicker to make a template out of cardboard. After some careful measurements, I was able to make this cardboard template in about 15 minutes and it fit pretty well.

IPB Image
IPB Image

The next step was to transfer this to my metal and fabricate a pair. The metal I used was pretty thick; .065” mild steel. I need these mounts to be extra heavy duty and at least as thick as the metal that the mounts themselves are make from. This is how they turned out.

IPB Image

Once I got them placed exactly where they needed to be, I used the hole puncher and made a series of holes in the mounting flanges. This way I could not only weld the out side but get some rosette welds inside. These cannot come loose!! Then I welded them in place one at a time indexing off my center line mark.

IPB Image
IPB Image

Happily, they are exactly the same distance apart at the front as they are at the main support tube. So far, I believe it should align and track straight since everything is done exactly as planned (whew!!).

I didn’t have time to box-in the inside of the front since I ran out of welding gas.

IPB Image

No big deal since I was out of time and tired!! I did bolt everything on since it’s not going anywhere at this point. Here’s the first look from underneath.

IPB Image

All in all a good day. . .
Dr Evil
Dibs if you ever sell this smile.gif
This is a "lo-fi" version of our main content. To view the full version with more information, formatting and images, please click here.
Invision Power Board © 2001-2024 Invision Power Services, Inc.