Help - Search - Members - Calendar
Full Version: Signal Single Orange 74 EG33 Swap
914World.com > The 914 Forums > 914World Garage
Pages: 1, 2, 3, 4, 5, 6, 7, 8
gryphon68
QUOTE(914forme @ Apr 23 2014, 07:40 PM) *

Still have a long way to go. Rinse and Repeat 40 times. Once done, they will be all nice and shiny on each end. Next is debarring the gear teeth. Oh come on guys really, I have to knock edges off all the helical gears. headbang.gif


Would it be appropriate to just throw all the gears in a vibrator/tumbler with some abrasive media?

Is it critical the parts go back in original position?
914forme
QUOTE(gryphon68 @ Feb 16 2015, 11:30 AM) *

QUOTE(914forme @ Apr 23 2014, 07:40 PM) *

Still have a long way to go. Rinse and Repeat 40 times. Once done, they will be all nice and shiny on each end. Next is debarring the gear teeth. Oh come on guys really, I have to knock edges off all the helical gears. headbang.gif


Would it be appropriate to just throw all the gears in a vibrator/tumbler with some abrasive media?

Is it critical the parts go back in original position?


I guess you could do that for demurring the gears, I don't have one, so..... And no the gears don't have to go in specific positions, I just like to do that, little OCD about that stuff. Tends to make things easier to assemble when I walk away from a project for a while.

If I was to do only two things to the OBX, it would be deburr the return holes at the bottom of the gears where they drilled from the other side. And changing the bolts and shim stacks. Oh three things, making sure the guide pin fits in the its receiver space on the other side, and oh......
914forme
So this weekend I got busy on engine mount, and trans mounts.

Laying Out the brakes for the lower trans mount. I used the stock Sumaru Transmount for my guide.

Click to view attachment

Click to view attachment

Pile of scrap always makes me feel like I am getting something done.

Click to view attachment

Upper Trans Mounts to the body

Click to view attachment

Energy Suspension Busing added, looks like I need to clearance the holes a little.

Click to view attachment

And Seated correctly

Click to view attachment

Upper part of the trans mount

Click to view attachment

And well the bottoms of the trans mount bolted to the chassis.

914forme
Now making my first bad design I wanted to use so DOM I had around. It did not go well.

Click to view attachment

And more crap

Click to view attachment

That tool requires more setup than what it is worth. And well, I had little less than 6" to play with in the car, so I was a bigger pain than it was worth.

So yesterday I cut them all apart and went at it again. This time I had some 1" Square with .125" wall. Back at it, and much easier. Sorry no pictures I got busy building sawzall-smiley.gif smash.gif welder.gif

I drilled a small hole in the top bracket, and in the bottom where I wanted the center of my tube to hit. I took a long zip tie, and threaded it between the two points. Now I have my line and my angles. aktion035.gif I then took a cereal box, and cut out pattrens and made them fit between the two mounts. I then took a sharpie and traced the zip tie. Removed the cardboard from the car, up on the bench I used a protractor, and figured out the angles. and cut my tubes. And well then fit, nice and tight welded them up.

Here they are in the car.

Click to view attachment

Click to view attachment

After much messing around I have the EG33 as far forward as I could get it. I used the engine front mounts forward by drilling the holes off center. That pushed me forward and extra 1.25"

Click to view attachment

Which did this for my CV alignment.

Click to view attachment

And still allowed for this, just barely.

Click to view attachment

And if I was going to use the stock snorkel I would need to clearance the firewall just a little bit.

Click to view attachment

Only one hole in the car so far it got a little bigger due to this little issue right here,

Click to view attachment

And I'll make a nice plate to cover this barf.gif

Click to view attachment

And my starter clears with plenty of room.

Click to view attachment

And this is the part number if you wish to duplicate it.

Click to view attachment

914forme
Yesterday I got a set of wheels I have been waiting to find for a very long time. Been on the list since the 80s. aktion035.gif

Click to view attachment

5 of them piratenanner.gif

Click to view attachment

So why am I so excited?

Not produced any more, and they weigh nothing.

These are 15x8s, they weigh in at less than 13 pouds 2 ounces with valve stems and wheel weights. A 15x8 Fuch's is 15.4 lbs, My Mahle Gas Burners are in the 11_12 pound range for a 15 x 5.5" wheel.

And Hoosier makes an A7 in 225-15, forgot the aspect ratio. These where just announced, new tire, yes for auto-x only, but that will allow me to driving.gif

To round out my wheel dealing again. I also got these.

Click to view attachment

Click to view attachment

Click to view attachment

Click to view attachment

7x17, and 9x17s 10 spokes off a 996. Oh and these are pretty light with out the OZ or Forge line budget.

7s are 18 pounds 1 ounce, and 9s come in at 20 pounds, 7 ounces. With stems, wheel weights, and center caps. Plan is to black these out, as it will look nice off setting the Orange, these will be my street wheels.

For reference the OZs are $1300 it per wheel, way out of my budget.

So now I'll be getting back to the boring progress stuff. Up for this weekend, removing the doors, setting the door bars in place, flipping the shell on its side, and cleaning the bottom side dry.gif
914forme
spent the day finishing stripping the car. Doors off, had to cut my parking brake handle pin that holds the cable out, as it was stuck. vacuumed everything up, and started cutting un-need brakes and studs out of the body shell. Lots of drilling of spot welds. And I only drilled all the way through one spot weld. Ventilated my floor board under the passenger seat. headbang.gif

Click to view attachment

Nothing a welder.gif can't fix.

Click to view attachment

Click to view attachment


Also started working on the Alternator mount for the EG33, going to put it where the Power Steering pump was. And try and use the belt adjuster from the Power Steering bracket.

No pictures of that yet

After I removed the doors, I found this damage left over from a fender bender.

Click to view attachment

I'll need to take measurements and make sure Im good.
Chris H.
Meant to post this...very pricey, but the Rocky Mountain Westy intake is nice. Smaller and provides more clearance.

RMW Intake

In case you want to attempt something similar yourself.... wonder what they would charge for just the box idea.gif ...probably $397.99

Nice score on the wheels! A couple of my favorite styles.
914forme
Chris, Man them guys are expensive, and yes I have plans for something similar, larger MAF will be needed for my plans. yes I'll build my on, thats most of the fun for me.

Today I got the alternator bracket figured out, just need to add some triangulation. Unfortunately my SD card seems to have crapped out, and my pictures are gone. The bracket works great everything fits with the flipped manifold, and I can even use the stock adjuster and belt. Though the belt could be a little shorter to make it work better. Lots of adjustment in the stock belt tensioner. Now back to try and recover the pictures.
mgp4591
Failed SD card is no excuse... still needs pictures!! slap.gif biggrin.gif
Chris H.
Yeah re: the RMW intake...the part I don't get is how they attached the rubber tubes that connect to the throttle body to their metal intake piece and made it air tight....they must have a serious lip on them or something...or maybe they are a one-piece mold. I've searched on ebay and at home improvement stores for something similar, no dice. You could probably just go with PVC pieces and use a rubber piece to connect between them and the throttle bodies, or go with 90 degree silicone pieces that would bend downward and allow you more room (use 1.5" BTW NOT 1.75 as it measures or it's not tight enough). Then you could connect with PVC or a custom box of some kind. It would be nice if we could convert the throttle body to a single hole. How cool would that be???

BTW you really helped me out by telling me about that whole cruise control removal thing. I can cap that off and flip my manifold around. I was hating how my setup encroached on the whole trunk. I also think the way I had the cruise hose set up with my custom intake was incorrect, causing an intermittent stall issue. So beerchug.gif .
914forme
Bad SD Card reader / cable. mad.gif I tossed something on the cable. and like magic it popped up, and I seized the opportunity to grab the files.

So here we go!!!!

Click to view attachment

Overal Picture, plenty of clearance for cabling etc....

Click to view attachment

I will add triangulation in the plane the lines represent. This will tie the bracket in at three places. Even though its plenty strong , reduce metal fatigue do to vibration.

Click to view attachment

Will do the same on this side. Bracket will be made to catch the two points one down at the block and the other off the upper manifold. I will just need to finish welding, clean it up, and add it to the pile to get powder coated. The wood is my prototype spacer, it will not make it to the production vehicle. Though I have been thinking that maybe it should as a sheet of G10 Phenolic Material from USP is $1344.99 sheeplove.gif I can replace a bunch of them as the get gross, from Lowes for $1.49 in raw material. Not the correct Material for the job. I'll keep searching for a better price, and or sandwich the phenolic material between another piece of aluminum. Which is most likey the solution. As a 1/8" sheet is only $190.78 and I am sure I can sell off the extra material for other peoples projects. Or make up a bunch of EG33 phenolic spacers and sell them off, long return on my investment, lol.
914forme
Its been cold around here -15 the other day, and I am out of fuel for my heater headbang.gif

So I started working on things that I could do in the house. So back to gauges. I ordered two items, I have given up on redoing a bunch of gauges, yet I might still do one.

I need to have a speedo that works with Subaru trans.
I want a tach, with programable shift light.
I naed a fuel level gauge, I have run my 914 bone dry before
I would like a volt meter
I would like a water temperature gauge
I would like oil pressure


The speedo I solved by getting a new VDO 4" programable speedometer. It has an LED trip / ODO. Just a modern version of our old speedo. Different font, but easier to match.

Click to view attachment

The Tach, I went with a VDO Pro Eliminator tach, it has a shift light, programmable, and replayable, if I want to watch a tach needle bounce up and down. I will most likely redo the gauge face on the tach, as I don't like the huge Pro Elm lettering...

Click to view attachment

I will need to remove it from the pedestal mount. And move the function buttons some where else in the car.

I can thank DBCopper for these tips.

And well then I need to build a combo gauge, so here comes the 924 to the rescue. These are the basis for the build, I still need to design the plate that holds the gauge movements in. All needles will move clockwise, I know that bugs some people, but unless I use an amp meter or find other senders that cause the gauge to swing in the opposite direction. Heres the mockup of the gauge.

Click to view attachment

The VDO fuel gauge is setup that way, I don't like it. It's currently all digital so I can change it. Need to hook it up and see, where empty really is. I eliminated all the extra info I don't need to see.

Notification center for battery, brake, Oil Pressure, and C. E. (Check Engine) Though I could move that to the Fasten Seat Belt light in the center dash.

Click to view attachment

The system I am using to label the gauges, uses a foil that is activated by the toner on the page. So the design is done in reverse, so I can print it in white and other colors.
914forme
Old man winter did not keep me out of the shop yesterday, today he decided to pile on some snow to slow me down. Dug out 6" so far today, still more to come.

So yesterdays progress. project ADD kicks in, and I start looking at the sandblaster I have in the back of the shop. Well modified a bunch of items, and upgraded a bunch of crap. Project not done yet, still need to build a stand. I hate buying cheap tools never worth the effort to get them correct.

Sometimes I have the feeling that cheap swaps are the same way. confused24.gif Case in point, alternator amount. I changed my plan a little when I got an idea, very bad thing ideas are.

This was taken before I finessed the mount for the alternator and cleaned it up. so it has a little tilt to it. That has been fixed smash.gif

Click to view attachment

Since I am building a spacer between the lower section of the intake and the upper, why not extended it out, catch this bolt, and support it from this side. idea.gif

So I finished up the bracket, triangulated it down the the left side bolt, and the rear and well it fits like it was supposed to. Welded it all up, cleaned up the welds, and now it is done until I prep it for finishing.

Click to view attachment

Closer shots, that is the stock SVX belt.

Click to view attachment

Like Fuji Engineers plan for that lug to be there.

Click to view attachment

And cross over pipe clearance, I think that will work.

Click to view attachment

So there you have it the last detail that will keep me from using the stock intake flipped forward so I don't have to cut up even more of the rear trunk.

But then bad ideas came into my head again, happy11.gif idea.gif happy11.gif and I dug some TBs out I had been saving for a project.

They came from one of these.....

Click to view attachment

And this is what they look like on another H6

Click to view attachment

My plan is to get the car running with he stock intake, and mess around with these as I like the look, retro, yet modern.

And well these things are cheap, I have less than an uncle ben in 6 TBs. Each TB is 44mm at the throttle plate, and 50mm overall per each runner.

But there is a lot of fab work to b done, and well, it is a back burner project.

Project ADD get my focus back on, and keep moving forward.

I did try a mockup unit from Vintage Air, even their smallest unit, does not fit a 914 with out some modifications. Either to the unit, or the 914, I am thinking the 914! If I drop the shelf down a little this might just work!!!! Need to mark it up, and see whet might be required to be moved.

Click to view attachment

Some cutting I think it would work, but I also think other manufactures might have a better fitting system. Or I move the blower off the the side on the vintage air unit. I like there unit as its all electrical servers. That makes hooking up and breaking the system apart easier.

Then I have another idea, what if I used an under dash unit, and just built a setup around it. Heat, A/C, and then I could route over to defroster.

I know I know Renegade sells a unit, I just never liked the look of the under dash systems.
914forme
Works been hell this last week, so time for some 914 therapy!!!

Got this in finally, and well I could not leave well enough alone, so I took it apart!

Click to view attachment

Click to view attachment

Click to view attachment

Popped the needle off, two spoons, pops right off!
Click to view attachment

Click to view attachment

Click to view attachment

Pried the bezel off

Click to view attachment

All of this work to get to this.

Click to view attachment

Plan is to make it look more like this.

Remove all the logos and the barf.gif COMP Eliminator II

Add three LED spots for turn signals and high beam And maybe the check engine light, though Im not happy with it.

Click to view attachment

Dave_Darling
I hope you marked the "rest" position of the needle.

--DD
914forme
QUOTE(Dave_Darling @ Mar 7 2015, 09:42 PM) *

I hope you marked the "rest" position of the needle.

--DD

Thank you Dave for bring this up, as I forgot to mention it. The easiest way to calibrate the tach again is one of three ways.

If you have access to a pulse generator, generate the pulse use a calibrated instrument to measure the pulse, hook up the tach, and gently put the needle on the running tach, in the proper position. Or you can mark it and the place the needle on once you disconnected it. Just have to turn the shaft back to the marked position. lots of original faces have these tick marks on the outs side edge where quality control hooked them up to a bench unit and did this, adjust the potentiometers, and glue them closed once it was done. Modren instruments are a little more refined than that. Older instruments have the look an feel of precision. Some have the precision of a watch maker. They can be art work with in them selves. Modren stuff is a servomotor,and a few chips, resistors, and diodes. And then the newest stuff, is a server driven, via a pulse from the computer.

On an engine test stand, hook it up with another tach, and well get it done. Not as accurate, but can be close enough

In the car, same thing. Harder to move around, stuff in the way.

Least favorite trail and error!!!

You can do this with any gauge. Just have to know its input needs and its scale, done. Even mechanical driven speedos can be calibrated by a controlled source.

BTW, if you don't know this about me, I have been working on gauges since I was 13 years old. First gauge restoration was on a 1967 CJ-5. After that I got into Karmann Ghias. I had a sleeper Ghia, used a 930 Tach, with 914-4 guts, and the Boost gauge as a fuel gauge. I had a 914 combo gauge Oil temp and oil pressure thank you 911 on the other side, and 914 speedo 150 MPH on the other. Even installed the trip reset function. 914-4 5.5 Inch steelies crammed in the fenders, with stock ghia hub caps, where the only external signs the car was not stock. But if you followed it through the twisties, you found out that its was no normal Ghia!!!! Stock 1600DP engine except a CB performance dry sump setup. My parents house was on a long up hill sweeper. Every morning, I knew where to turn off the engine and coast to the stop sign, where I would refire the engine. The dry sump solved that problem.

I miss that car, its the car I had when I dated my wife, its the second car my father and I rebuilt, this one was a rolling restoration. Family, and work got in the way, parts got sold, body had rusted away. Not many panels being made back then, and well being in the rust belt took it's toll.

After that I started doing the 904 triple gauge setups, machining the pieces was easy, laid them out in AutoCAD, sent them to a laser cutter, and bam, we had the kits. Got a local plater to do the back plates, same guy that also plated parts for the space shuttle. Silver Cadmium. Down fall was the powder coating process was still brand new, quality sucked, and then the screen printing sucked also. So I sold off what I had left to Pelican, they got the face work done, and sold the kits. I lost money on that deal.

John seems to do a great job with then now. Technology has progressed to the point now that custom work is much easier. Heck if I had heard of an ALPs printer back then, I might have a different career.

I now do this stuff for my cars, doubt I will reproduce these for anything but my own cars, as it is fun, for me. Lets me play, and engineer some one off stuff, and makes that car mine, all mine. And I enjoy the build more than the drive in reality.

But then I tend to like to hang out with the hot rod / old school racer crowd. Matter of fact, I also did this yesterday, though the gauges in this car where not impressive. The Buggati in person was aktion035.gif pray.gif wub.gif

Click to view attachment

Detroit Autorama - must go to event for me!!!!
914forme
My wife had a 1990 Miata, I added a bunch of goodies, very clean car. 25th anniversary present for her. We where married in Dec. 1989, Miata was manufactured in Nov. 1989. It was the car we wanted back then but could not afford. Wife decided she wanted an EOS sold the Miata, picked up an EOS, son drives it more than my wife, he's home from college confused24.gif

Person I sold the Miata to wrecks it with in 2 months of car being sold. I buy it back for salvage costs. Lots of good parts for my parents car. Hard top, good soft top with glass window. 1994 Torsien LSD ( they don't need, they have a 1994 M editions sticks had LSD) Wheels etc.....

Start looking at it and thinking man that car can be brought back for less than my 914 project. idea.gif Sell 914 and all its stuff, build Miata.

Nerd in me takes over and I do a spreadsheet over lunch.

Rebuild to stock = $3338.00
Swap in 1999-2000 engine 140HP NA in a 2000lbs car $4787.00
V6 Swap happy11.gif drooley.gif $7138.00
Did not even price out the LS swap

Time, Stock 2 months
1.8L Swap 3 Months
V6 Swap 6 months - winter time , so 9 months before on the road
914 Swap in current state - 2 years, unless I hire out metal work and paint, then 1 year of sheeplove.gif around with bad body shop, 1 year to get it done right, and another for me to finish the swap.

Exercise talked me out of redoing the Miata. Post the tub onto a Miata forum see if someone grabs it up. I have way to much in parts for my 914 project. I have 15+ in the 914 right now, I should have never done that math. headbang.gif barf.gif Most likely more than that if you count the number of iterations this car has been though.

Stock 2.0L
Built 1911
Built 2.0L
Built 2056
Built 2.5L never got done
Now EG33 most likely never gets done, if I don't start doing some build work on it.
Amenson
Stephen,
I was reading your post and all I could think of was that I have a guy from Dayton coming to my house today to pick up some C10 parts and I could send a dope slap back with him to knock some sense into you.

Unless you are including the words, turbo, LS, and E85....step away from the Miata.

Focus on the glorious sounds and excellent torque that the EG33 will bring to your daily commute.

Cheers,
Scott

Chris H.
Stephen...come back to the reservation...

DON'T worry about getting the bodywork perfect or the paint work before you get the car running and driving. Just get the drive train done and installed and do the mechanicals/rust/safety stuff.

You'll learn in the end that you like the process just as much or better than the end result. It will never be done. BTW I just learned this...

Fuel Pressure Regulator Mod

Fuel pressure is a tad low with stock ECU settings. Adding an aftermarket FPR increases performance and solves the stall issue.

BTW we have another EG33 guy coming soon. TBA...our numbers are building! You can't leave the club now! Your insight is too valuable!
914forme
Scott, not to worry I talked with my wife this morning, and she promptly whack_3.gif me. Hey that guy could have been my neighbor, he has a few C10s littering his property. At least they are not up on blocks. BTW, how did you know the EG was going to be running E85, you reading my mind.

Chris, thanks for the tip, I hated that stumble, always thought it was part of the fuel, automatic, gear shifting program in the SVX.

I need to get the Miatas out of the shop, they are fun, but sometimes I get a little bit distracted from the goal.

And thank you both for bringing me back to reality, I need that at times. beerchug.gif
Amenson
QUOTE(914forme @ Jun 28 2015, 03:40 PM) *

Scott, not to worry I talked with my wife this morning, and she promptly whack_3.gif me. Hey that guy could have been my neighbor, he has a few C10s littering his property.

...


You have a good wife!

Ask your neighbor if he has a '67-'72 bed that he wants to get rid of. Preferably a short bed but a long bed at the right price would also work.

Cheers,
Scott
914forme
sawzall-smiley.gif smash.gif sawzall-smiley.gif The none fun stuff..... And still more stuff to cut out....

Click to view attachment

Click to view attachment

Click to view attachment

Click to view attachment

Rad opening cut out, will roll the opening over with lots of smash.gif and a T bar.
Click to view attachment

Oh and some bling came in drooley.gif

Click to view attachment

Always wanted a set of GT headlight lifts. Thanks to the Mike and his GB, I have a set aktion035.gif

Spot weld cutter bits are getting a workout here. Removing everything I don't think I will need. I am sure I will have weld some stuff back in.

Next up engine shelf, still idea.gif on how to take that one out. Right now I am thinking plasma cutter, but am open to suggestions.

Amenson
QUOTE(914forme @ Jul 20 2015, 02:18 PM) *

sawzall-smiley.gif smash.gif sawzall-smiley.gif The none fun stuff..... And still more stuff to cut out....

Next up engine shelf, still idea.gif on how to take that one out. Right now I am thinking plasma cutter, but am open to suggestions.


Great progress, I really like the cable headlight parts!

As for the engine shelf, cut out big chunks the most efficient way possible and get back to spot weld cutting. I had a Blaire kit with a pack replacement cutters and burned through a few.

Cheers,
Scott
914forme
Hmm, so I was reading the ForSale ad for the RS, sad to see it go, I am sure Joe has is reasons. And he mentioned he was giving it a redo to make it less unique. All in hopes it will appeal to the crowds and sell quicker.

Well, I popped the question and ended up with these, love to have a couple other parts but I fear they will be gone before I save the coin to grab them.

Thank you Joe, should of had you sign them or something.

Click to view attachment

Click to view attachment

Oh real Hella Lamps drooley.gif

Click to view attachment

And test fit in the car:

Click to view attachment

All boxed up now and on the shelf, need to get back to cutting up the car. Also spending way to much time reading ajserrano GT build thread over on pelican. aktion035.gif pray.gif

Have not made it to the end, I stumbled into looking for an idea I remembered from Jon Lowe's old site. Now spent part of the night studying very page in detail, I am half way done..

I forgot I met him back in 199? at the Savannah HSR race, meet Jon and Nancy Lowe down there, hung out with the Brumos crew, drank Hurley Haywood Cola, thanks to Bob, and had a great time. And then this guy showed up and took pictures of every square inch of that car. Im guessing my foot is in at least one of his shots. Looking over his pbase site I see all the pictures and remember the car well. That was a great weekend at the races.
76-914
poke.gif About time that you got busy again. stirthepot.gif I like those tail lights, as well. Who sells them? I looked at the same Vintage Air set up until I was blue in the face. I really wanted to use the existing face plate with their adapters, as a controller, but I ran into the same thing as you. About a 1/2" too tall to fit and I didn't want to start cutting that area out at this stage. Their "slim line under dash unit" with heat looks OK and can work with a console if you trim the top of the console down about 2". I also saw these Chinese AC/Heat units for $70 shipped. 12"x12.5"x4". idea.gif Misery loves company and I could help but laugh as I read thru your ADD exercises. Jesus H Christ, ADD ADDs lots of hours to a project, doesn't it? av-943.gif Ask me how I know. I've got to go now. Something shiny just flashed before my eyes. wacko.gif
914forme
Not sure the guys name, I can't retrieve it currently. John I think, one of the Mulholland racers. Now that will drive me nuts. John Hall? Dang it, this drives me crazy, I can see his build thread like its in front of me. He owns the rights to the light buckets, when they came up, I had to grab a set. the other pieces I want to grab the carbon fiber deckled are gone sad.gif I knew that deal would not last long!!!

Chris also has a set on the 914R

Click to view attachment

That under dash unit, gives me an idea, I might be willing to cut that one up, as it is pretty easy layout. Replace the vents with ducts for the dash vents and stick a couple in the dash, or center console and be done. Thanks for giving me another path to run down.

mepstein
I thought craig at camp914 had done the RS tail light at one time. Jeff hail also used a set in his build but I think he made them from scratch.
914forme
Place called AR Concepts seems to have done them, thats what Chris has in his car.

Chris' r taillight thread

So your guess is as good as mine, and thank for the name reminder. beerchug.gif
914forme
Got the wrecked Miata out of the shop, hoping the guy coming down takes it home tomorrow, we will see.

After doing a few other things I started working on the 914 piratenanner.gif

Started cleaning all the adhesive off the targa bar. And ran out of 3M adhesive remover mad.gif Add that to the to order list.
Click to view attachment

Worked on cleaning up the clutch slave cylinder hole.

Before, I scribed the line.
Click to view attachment

And After
Click to view attachment

Flip the car over and started cleaning up old weds , and cutting out not needed stuff. I welded all this stuff, upside down, never cared about how it looked as long as I got on track.

Click to view attachment

Click to view attachment

Click to view attachment

I have been trying to get this dirt oil, grease, tire rubber messed clean up. Anybody got ideas on how to clean this crap, so I can epoxy prime it?

Started cutting out the engine shelf, my body saw, needs more power!!! I do like the control it gives you.

Click to view attachment

Click to view attachment

Click to view attachment

Thats it until tomorrow, can't wait to spend another day in the shop! Its like Im getting a vacation. Forgot all about work today, thats a very good thing, love my job, just need a break so I can go back refreshed.
76-914
How close is your starter terminal to the chassis. I could never locate the starter that has the terminal at the 9 o'clock position and mine was too close to the chassis so I opened that hole up. I don't know if this will be your situation or not but it's something you might encounter. beerchug.gif
914forme
Yes thank you, I think I tested that, but maybe I should just plan ahead, and raise that section also. Be easier to do it now rather than latter.
914forme
First of Miata sold, one less temptress in my life. piratenanner.gif

Got to work this after noon, started taking out the engine shelf pieces, just needs cleaned up not with a grinder. Need to order more disc for that too. blink.gif

Click to view attachment

Click to view attachment

Oh no, I busted an old hell hole repair loose, investigate that latter. No reason to open that can of worms just yet.

Click to view attachment

Opened up the holes for the radiator exhaust exits.

My rad opening is 26.25 sq. in. These exits combined are 67.5 sq. in. Need to re-enforce the opening, add some mesh, and then I am thinking about Louvers just to keep crap from trying to come back in. Over kill I am sure.

Started with a template.


Click to view attachment

Drilled my pilot holes

Click to view attachment

wanted a 3/4" radius on each of the holes, started to use my hole punch, but grabbed the uni-bit instead. 3/4" holes like butter.

Click to view attachment

Now play connect the dots with the sawzall-smiley.gif

Click to view attachment

And this might be a helpful tip, after trying to get a 12" ruler in the hole to scribe the final trim line, I deceided that a sawmill blade will do the trick as a guid, and it is slightly flexible. thumb3d.gif

Click to view attachment

cut all the lines then ground them down to the scribe line.

Click to view attachment

Rinse and repeat on the other side.

Click to view attachment

the sign of todays progress.

Click to view attachment

An now for an idea, well two really.

Pink idea:

Adding 14a of steel down the inner log to catch the inside box. I would llove to run it into the cabin, and tie into the egmann kit. Any benefit?

Blue Idea. Adding a semi jointed rod from the ear up to the seat belt retractor Nice stiff area of the firewall, maybe it will work.location. Thoughts, open to suggestions.

Click to view attachment
914forme
Finished cutting and grinding all the engine shelf bits out.

Click to view attachment

Click to view attachment

Click to view attachment

Trunk Pivots, have been fixed multiple times.

Click to view attachment

May Just order these and save myself a future frustration.

Click to view attachment

Next up Hell Hole repair, Chassis stiffening for the 3rd go around, and well lots of grinding on old race car additions. Never had to look pretty just had to be functional and strong.

BTW, Steam cleaner with a mixture of Zap Industrial De-greaser and distilled Water will do this.

Click to view attachment

Now to do the rest of it, once I have all the metal dust cleaned up.
Andyrew
QUOTE(914forme @ Aug 1 2015, 04:34 PM) *


Click to view attachment

An now for an idea, well two really.

Pink idea:

Adding 14a of steel down the inner log to catch the inside box. I would llove to run it into the cabin, and tie into the egmann kit. Any benefit?

Blue Idea. Adding a semi jointed rod from the ear up to the seat belt retractor Nice stiff area of the firewall, maybe it will work.location. Thoughts, open to suggestions.

Click to view attachment


Blue idea will give you more strength than the pink idea... smile.gif
Amenson
With all that cleared out of the way there is plenty of room for a turbo now! happy11.gif
914forme
agree.gif

I have my plans still trying to figure out what I want to do. In reality the turbo is easier than the supercharger I was thinking about. I could mock it up, and do one, a twin scroll might be the way to go idea.gif Biggest issue is compression E85 helps with that, as would methanol injection. The intercooler gets to be an issue.

Air to Water
Air to Air in engine compartment, maybe even STI sprayer
Air to Air like Marty's car, in the rear trunk. I would like to have trunk space as I would like to drive the 914 all over the US and Canada.
Also would like to be able to ice it down, for auto-x and track events. Or if I feel like seeing if I can get into the 10s on the strip.

I think I could run the stock engine with a low boast level as long as I used tricks to keep the pistons from melting.

Okay back to progress.

Last night, I spent cleaning, and mocking up cuts, and smash.gif

Steam cleaner did an excellent job
.Click to view attachment

To use the GT head light cable setup, you have to cut an additional slit in the head light bucket.

So I marked up one side waiting on the water to come up to steam. Used the plate on one side to set my inner dimension.

Click to view attachment

Used a Nut to set the other side, it just wider than the bolt that holds the latch mechanism.
Click to view attachment

Scribed the final line, ~3/8" wide, make it easier to round the corners.

Click to view attachment

I then steamed some more.

Click to view attachment

I then worked on the triangles getting them more in shape than they where.

Click to view attachment

Thats it for now, off to read up on twin scroll turbos. :evil grin: Also thinking that maybe a pressure washer blast, would get me part of the quicker. The caked on stuff steam does a good job on, seems like a waste to wait for steam, when part of it is just years of dirt. confused24.gif I guess I could run it into the big city, and get it steamed that the Freightliner dealer.
914forme
Weekend and back into the shop, long slow process of cleaning the bottom is done, at least round one. Need to fix all the surface rust, scuff all the paint, clean it again, and shot some epoxy primer on it. Then Wurth, and then a color coat,

Click to view attachment

I also started work on the hell hole repair.

Templates are a good thing.

Click to view attachment

I will be doing something slightly different I am going with plan "a" above to fix the hell hole region. I will do hybrid plan "b" but move the pickup to shock tower area. More on that latter happy11.gif

Other items done, but no picture documentation.

GT headlight latch scribed on the other side.

Spent most of Saturday driving around swapping parts, meeting people, and having a good day of it. Thank you Eric beerchug.gif, and thank you Mike for the sheetmetal! Now to see if I can put it to good use. sawzall-smiley.gif smash.gif welder.gif

mepstein
Are you removing the engine bar motor mounts.
914forme
Nope, using a Small Car Mount and an early -4 engine bar. With a few other tricks I have moved the engine forward. So the only cut I have currently is the trunk for the clutch slave.

I need to dimple the firewall if I want to run the stock air snorkel with the flipped stock manifold. That part is easy.

Now using the small car mount did give me a few other issues though. Mainly all the oil filters I had on hand did not fit. I'll get to that, a little latter. Not a huge deal as I will most likely add a remote filter, and have to figure out how to incorporate the Accusump anyway.
Chris H.
QUOTE(Amenson @ Aug 3 2015, 08:54 AM) *

With all that cleared out of the way there is plenty of room for a turbo now! happy11.gif


Speaking of turbo'd EG33's...anyone seen this nasty thing?


https://www.youtube.com/watch?v=9dBql7tSIts


Looks like it's pretty well done. He cut the middle of the intake and turned it 180 degrees so it would sit right. Rewelded it at the 6 "star" points.
jd74914
QUOTE(Chris H. @ Aug 12 2015, 10:29 PM) *

Speaking of turbo'd EG33's...anyone seen this nasty thing?


https://www.youtube.com/watch?v=9dBql7tSIts


Looks like it's pretty well done. He cut the middle of the intake and turned it 180 degrees so it would sit right. Rewelded it at the 6 "star" points.


It's quite the car; it runs a Syvecs ECU and as far as I know it was the first DBW EG33. The guy who built that car, Simon Roe (?) was a English tuner who died last year IIRC.

Look up Andy Forrest. He has a 1000hp 3.6L EG33 time attack car which is quite interesting as well.

Sorry for the hijack.
914forme
QUOTE(jd74914 @ Aug 13 2015, 03:10 PM) *

QUOTE(Chris H. @ Aug 12 2015, 10:29 PM) *

Speaking of turbo'd EG33's...anyone seen this nasty thing?


https://www.youtube.com/watch?v=9dBql7tSIts


Looks like it's pretty well done. He cut the middle of the intake and turned it 180 degrees so it would sit right. Rewelded it at the 6 "star" points.


It's quite the car; it runs a Syvecs ECU and as far as I know it was the first DBW EG33. The guy who built that car, Simon Roe (?) was a English tuner who died last year IIRC.

Look up Andy Forrest. He has a 1000hp 3.6L EG33 time attack car which is quite interesting as well.

Sorry for the hijack.


No problem on the hijacked.gif

Andy Forrest's engine is most likely a EZ36. Nice engine, would love to have one, but will stick with the EGs for now, or until I blow them all up. happy11.gif

Subaru six turbos are all good to me. Andy's car is crazy fast and setup very well.

mgp4591
QUOTE(914forme @ Aug 13 2015, 07:13 PM) *

QUOTE(jd74914 @ Aug 13 2015, 03:10 PM) *

QUOTE(Chris H. @ Aug 12 2015, 10:29 PM) *

Speaking of turbo'd EG33's...anyone seen this nasty thing?


https://www.youtube.com/watch?v=9dBql7tSIts


Looks like it's pretty well done. He cut the middle of the intake and turned it 180 degrees so it would sit right. Rewelded it at the 6 "star" points.


It's quite the car; it runs a Syvecs ECU and as far as I know it was the first DBW EG33. The guy who built that car, Simon Roe (?) was a English tuner who died last year IIRC.

Look up Andy Forrest. He has a 1000hp 3.6L EG33 time attack car which is quite interesting as well.

Sorry for the hijack.


No problem on the hijacked.gif

Andy Forrest's engine is most likely a EZ36. Nice engine, would love to have one, but will stick with the EGs for now, or until I blow them all up. happy11.gif

Subaru six turbos are all good to me. Andy's car is crazy fast and setup very well.

If you check out the engine, it's a poked and stroked EG33- I don't know if the EZ would handle that type of boost whereas the EG is fairly bulletproof for wild mods like that. All that stuff is fun to watch but the driveability goes right out the window- remember, the more boost you have the shorter your fuse is! shades.gif
mepstein
I'll be pretty happy with the stock eg33 - hp. 3X more than my stock '71.
mgp4591
QUOTE(mepstein @ Aug 13 2015, 08:59 PM) *

I'll be pretty happy with the stock eg33 - hp. 3X more than my stock '71.

Even mild mods to your stock 3.3 will produce big results. A bigger TB along with larger injectors (I'm thinking 370cc) along with less restrictive exhaust and a tuned ECM will produce 300 hp fairly easily. All with the same reliability and mileage- if you can keep your foot out of it! That's a comfortable range for me... shades.gif
914forme
agree.gif

Big injectors come fairly easy, I all ready have a set, forgot what car they came from. Nissan I think, well documented modification.

Bigger MAP is also an easy mod. Again a Nissan product.

Exhaust is the pain, and I contend it will only do you little good, because the cams are the limiting factor on this engine. You can spend the money for cams it will really bring this N/A engine up to mark. And yes the EG is built like a tank, 7 full Mains.

I read the write ups on the Green Car above. Not of Forrest's car. For me drivability is key. Low boast does put a bandaid on the cam issue. And as Scott says you got the room do something cool with it. A turbo also cuts down exhaust issues. Yes I have to build a custom header, that was already in the plans. That little spinning impeller helps knock out a lot of noise, which means I might be able to reduce muffler sizes and gain that all to critical item of space in the back of the 914. With the Subaru transmission space back their is still at a premium. And you loose the capability to use a larger Muffler like a 911 banana, or even sport style. at least on my car, even wit the engine being pushed forward as far as I could go.

Here is the key for me, I will do this in baby steps anyway. Stock EG3.3 with flipped manifold will go into the car. I will have all the lines ran for things like interceding, Larger Fuel, lines, and the like. Planning ahead. The basis for all the additions will be their, I can take my mockup engine and build it. Maybe as an N/A engine with Cams and all the tricks. 300HP N/A running on pump gas, or more on E85 would be a very nice 914 to drive around in, and especially on the auto-x. Do not want to get out of balance.

But you all know the power bug gets to people. happy11.gif And once you have 225HP, you get used to it. So 300Hp seems like a good step, you get used to that. Pretty soon, your thinking this car needs 350, 400, 500, 650, 800, 1000.

It is a slippery slope I have been down many times.
I drive TDIs as my daily driver cars. The one before this one was an insane built car. Still got 45 mpg as the day was long. But in the end I had a tune so wild, my wife was scared to drive it. I could light them up in the first 3 gears. If I got stuck in stupid traffic, the thing was a bitch to drive stop and go. As it would load up. So you would have to build enough space to let it rev a little. Which meant I was laying 11s every time traffic started to flow. Not to mention, the huge puff I would leave behind. Made me look like I was a total ass of a driver with road rage issues. I was not, just trying to keep the car running correctly. That last iteration of Jetta TDI ran a custom Malone Tune, huge hybrid turbo,DC auto front intercooler, only one they built for a 6-speed TDI. European PD 150 intake parts, cams, and injectors etc. And a full 3" exhaust that was a straight pipe. Dinky on the build was only 245HP, with a TDI its all about torque, I was at almost 550 FtP with boast pooping up, at 35PSI. We cranked the boast up to 45 for a while. Car was dysfunctional! Don't even know the kind of power I was making at that point. EG temps where alarming though, so took it back down to 35.

I had all the stuff to do it correctly, full GLI suspension and brakes, Large tires, hurt my fuel milage, and a Perloguin LSD. A very stiff South Bend Clutch, that gave my left leg a work out. Great car, the drivability and the fact that a highly tuned car takes a lot of maintenance for a daily drive caused me to sell it. It was fun to take people for rides in, it really need to be AWD, and if VW group would bring an AWD TDI over in a Golf or Jeta, or even A3, I would be buying the first used one I could find.

See it every now and again, usual passing me. And think man I wish I had that car again. So my current one, love the car, wish I had GLI suspension and brakes, and Seats, but I will keep it at a sane level of tune. Once factory warranty is out the door, I'll add a Molone tune to it. And drive it with the little extra that gives me and be happy.

Yeah right happy11.gif

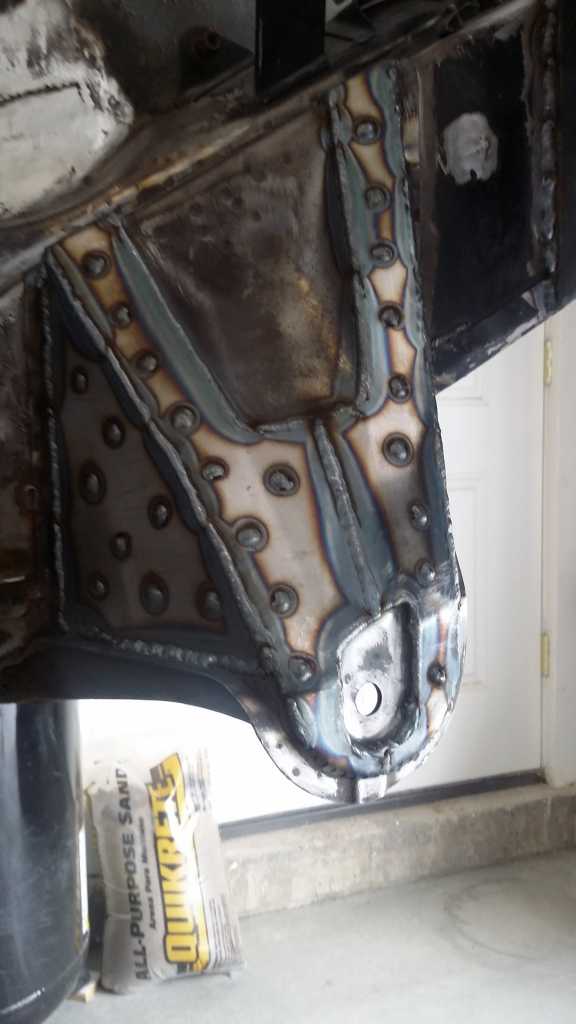
Tonight back to the mundane part of the build, making templates and cutting metal to fix the hell hole area. Maybe I'll get into so more fun, as I have to make a few mods to tunnel exist in the engine bay. Mine is solid, but I need to close up a few exists and add a few more entrances.

The lines running front to back are getting crazy.
Fuel x2
Water x2
A/C x2
Clutch
Brake
Battery
Electrical Harness
Engine Harness
Throttle Cable
Heater?
Intercooler x2
Cable Shifter

Missing anything?
Chris H.
Wow Steve, I should just copy this last post of yours and paste it into the thread asking about increasing the performance of the EG33....much better than my attempt biggrin.gif .

Hey BTW I came across something in my searches on increasing the injector flow, changing the MAF to the Nissan Z32, etc. So it seems like unless you change to an aftermarket ECU you have to install the ECUTune chip. It's been called a few different things but I think this is the guy who makes it:

Modified SVX Chip Info

The page I linked is for the chip that compensates for the Z32/370-500cc injectors.

So the question/fyi...finally. See where it references "other options"? A couple of them mention using two MAFs. I kinda like that idea since the dual inlet throttle body is a pain to find an aftermarket substitute for. Wonder if it would work well though idea.gif ... What do you think?
3d914
QUOTE(914forme @ Aug 10 2015, 05:28 AM) *

Templates are a good thing.

Click to view attachment

I will be doing something slightly different I am going with plan "a" above to fix the hell hole region. I will do hybrid plan "b" but move the pickup to shock tower area. More on that latter


Stephen, nice build. I'd definitely like to do a build with the eg33 - nice motor.

Here's an example of how you could extend P4 to reinforce the dog ear. I includes pieces on sides also. More details in my project thread.

IPB Image

Enjoy!
914forme
Chris, not sure about the dual MAFs, unless you put a logic circuit in there to work out the details.

ECU tune is a great guy, also does CAMs BTW.

Gerald,

Nice reinforcement you have there. Need to go read your thread, with the welds you have there I'm sure I'll find some more tidbits in the thread. beerchug.gif

I'm tying into one I did on the lower ear a long time ago. P4 butts up against it, I could add another layer to make sure like yours. I think it will be good enough. I was more worried about the bolt hole going out of round than, the ear. I have a drop link running to the front firewall, on Hemi Joints. Will be adding a few more for triangulation, and I have just finished mocking up the outer ear reinforcements. happy11.gif

I'll post what I got done today, a little latter, its Mom's Birthday so got cleaned up and taking her out to dinner.

birthday3.gif

Then read Geralds thread, as it looks like it will be a good one popcorn[1].gif
914forme
Today's Progress:

Finished Hell Hole Template, need to transfer it over to pasteboard, I don't have any confused24.gif

Click to view attachment

First Major Change sawzall-smiley.gif

Click to view attachment

Drivers Side Fender is gone. That gives me access to clean a few old welds and build a few new items.

Grinding down welds, GT stiffening kit has seen some rubber in its time.

Click to view attachment

Started Mocking up the outer rear suspension arm pickup stiffening prices.

Two sides are done:

Click to view attachment

Front done:

Click to view attachment

Now for the fun part, the Front Skin that triangulates the entire console into the Brad Mayer 914Ltd. Rocker pieces.

Click to view attachment

That along with the Hemi Rod off the lower suspension mount, makes a huge difference in stiffness of the outer ear. The Hemi Rod also allows for easy toe adjustments.

Now for more fun.

Plate in seat belt pocket.

Click to view attachment

Front Wrap around the rocker. Ties in to three planes for this piece. Cardboard does not hold its shape like Metal.

Click to view attachment

That will allow me to do a removable door bar looks like this. Blue Line.

Click to view attachment

The Idea is that their will be another bar in the engine bay to the same location.

Also added these, need to finish it up.

Click to view attachment

Click to view attachment

More tomorrow cheer.gif


This is a "lo-fi" version of our main content. To view the full version with more information, formatting and images, please click here.
Invision Power Board © 2001-2024 Invision Power Services, Inc.