Griffen rates that rad at 600HP with their electric fan, 400HP if your doing your own thing. I am guessing you can do your own thing, and cool 600HP, its just they do not want to take the liability hit, for our stupidity.
Full Version: Blue Porscheru Conversion
QUOTE(JRust @ Sep 27 2015, 05:58 PM) 
Wow that radiator does look really small. I've been rethinking the front radiator lately. Saw a guy on FB with a suby conversion. Guy had put the radiator in front where the bumper goes. Had a 916 bumper with the fan in front of the radiator. So you saw the fan. Looked like crap but I didn't have close up pics. Since then it has had me rethinking how to do it up front. Possibly having the radiator come through the bottom of the cutout up front behind the bumper. Literally having the top of the radiator right behind the front trunk latch. It would keep 90% of the front trunk open. Since seeing that weird setup it has had me turning over ideas up front I had never considered before

I've wanted to figure out a way to build a rad INTO the front bumper (or an aftermarket one) too. Take back the whole front trunk. Not quite enough room...
I'm worried about your engine mount. My rotary mount was very similar and started to sag after a couple months of driving. My new cradle ties the front to the rear so no sagging is possible.
QUOTE(Mike Bellis @ Sep 27 2015, 06:36 PM)
I'm worried about your engine mount. My rotary mount was very similar and started to sag after a couple months of driving. My new cradle ties the front to the rear so no sagging is possible.
The factory bracket bar is very heavy. Feels pretty stout to me. Did you build yours like I did? What page is it on in your thread?
QUOTE(914forme @ Sep 27 2015, 04:28 PM)
Griffen rates that rad at 600HP with their electric fan, 400HP if your doing your own thing. I am guessing you can do your own thing, and cool 600HP, its just they do not want to take the liability hit, for our stupidity.
Only doing 165 HP, so I'm good?
QUOTE(R_u_dd @ Sep 27 2015, 07:16 PM)
QUOTE(Mike Bellis @ Sep 27 2015, 06:36 PM)
I'm worried about your engine mount. My rotary mount was very similar and started to sag after a couple months of driving. My new cradle ties the front to the rear so no sagging is possible.
The factory bracket bar is very heavy. Feels pretty stout to me. Did you build yours like I did? What page is it on in your thread?
Here is my rotary build thread. http://www.914world.com/bbs2/index.php?showtopic=113156
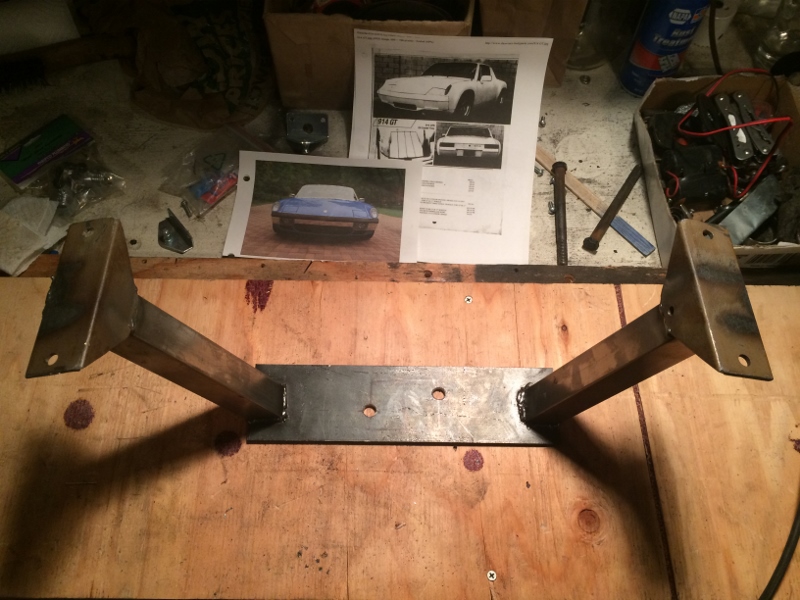
Although not exactly the same, the forces applied to the square bar are the same. My bar is made from 1.5", 0.120 wall square tubing. The rotary engine is also lighter than a Subie. The rear mounts sagged a full inch. Yours may not sag as much but the twist force is similar on the main bar. V8 motors are heavier but the angled motor mount bars lean toward the main bar mounts sending more load to the 914 mounting point and not the center of the main bar.
Click to view attachment
Click to view attachment
Click to view attachment
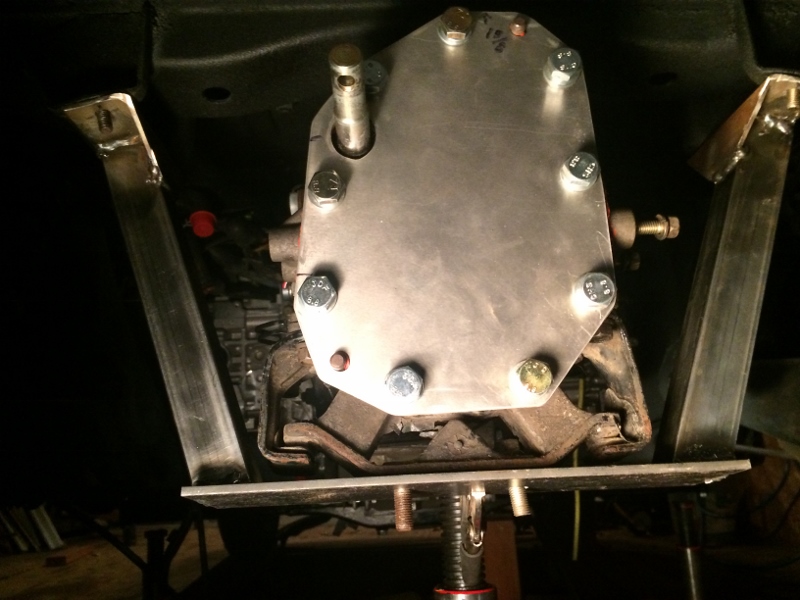
Transmission Mount
From the Subaru 5MT Transmission out of a 2002 Impreza TS, I saved the transmission mount and integrated into the design to mount onto the Porsche. The rubber stoppers are stout and will prevent vibration. It was also easier to fabricate than using the circular Porsche mounts. I deliberated whether to use the circular mounts because they seem to provide a full range of motion to the transmission, but I was concerned there might be too much flex. In the end I went with the Subaru mount which also allows some movement front to back and up and down.
From the Subaru 5MT Transmission out of a 2002 Impreza TS, I saved the transmission mount and integrated into the design to mount onto the Porsche. The rubber stoppers are stout and will prevent vibration. It was also easier to fabricate than using the circular Porsche mounts. I deliberated whether to use the circular mounts because they seem to provide a full range of motion to the transmission, but I was concerned there might be too much flex. In the end I went with the Subaru mount which also allows some movement front to back and up and down.
Smart move.  Your moving right along. Looks like your having fun too!
Your moving right along. Looks like your having fun too!
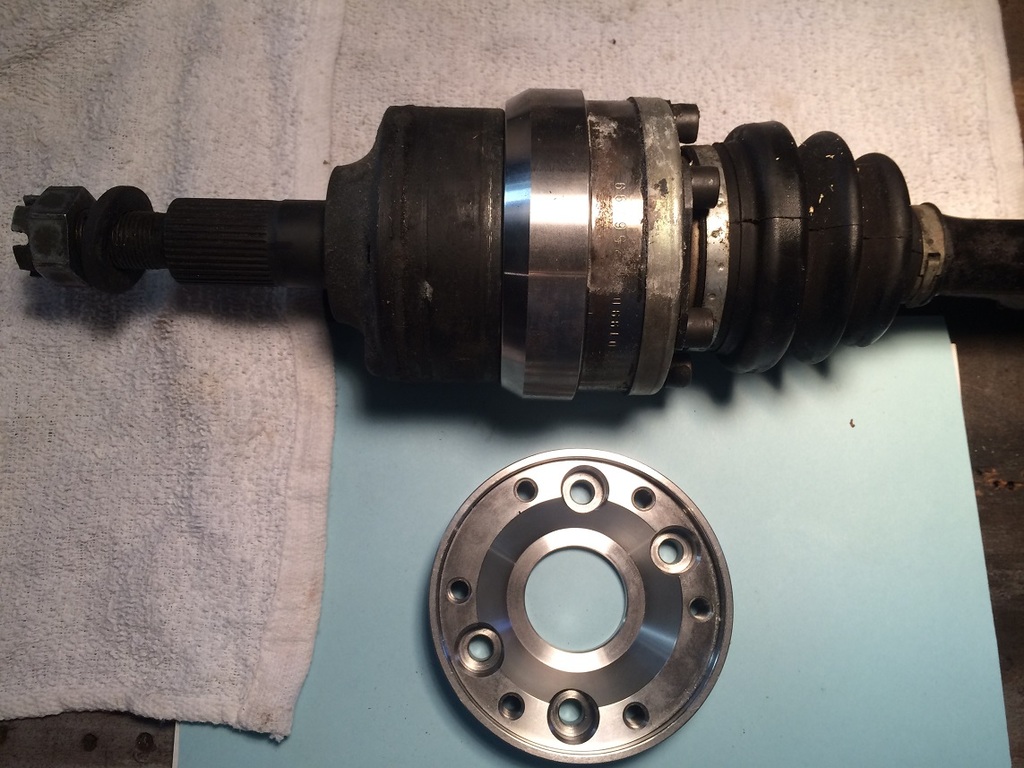
Axles
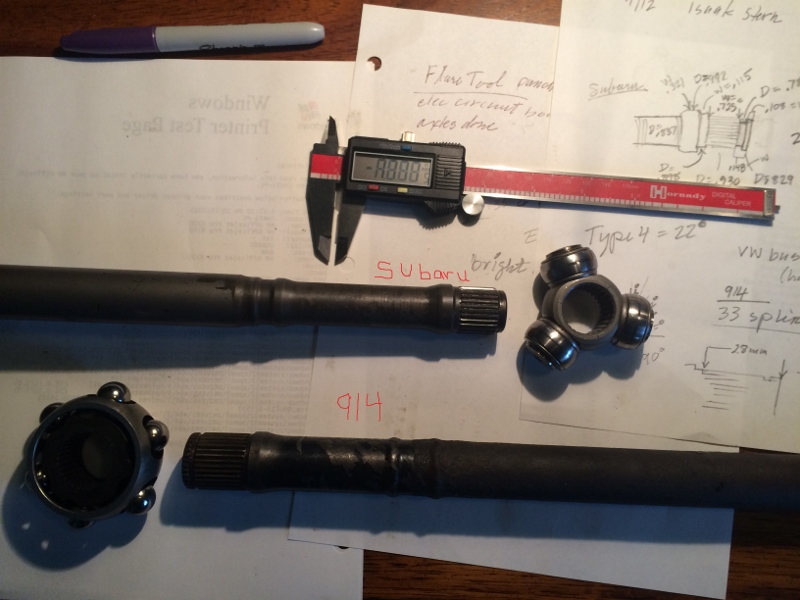
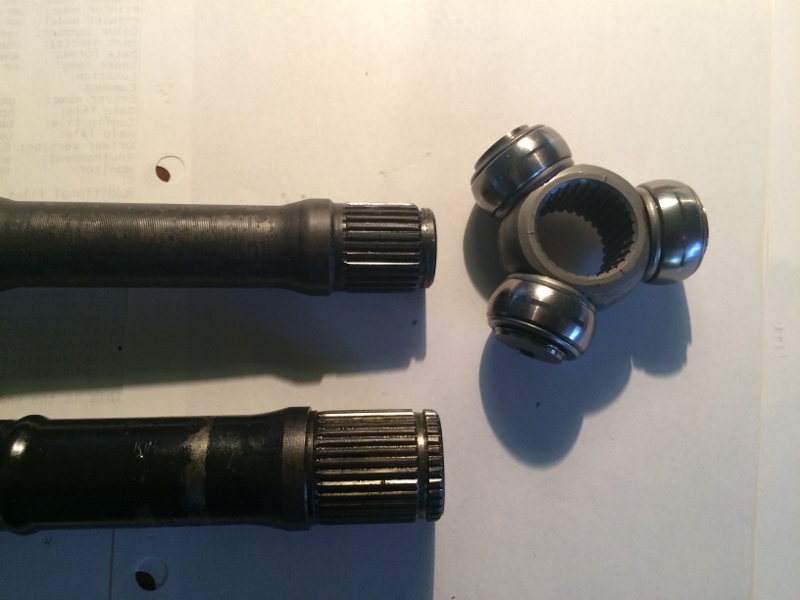
Subaru on top and 914 on the bottom. The Subaru is a 29 spline and the 914/bug axle is a 33 spline.
My axles will need to be shortened because the engine is set forward slightly from the designs of other cradles such as Ian's. I set the engine farther forward to avoid cutting the trunk and flipping the manifold (for now). Note that there is 4 inches of offset from the transmission to the wheel hubs.
There should be some bend in the axles and CV's for proper lubrication of the CV's, but how much is too much? According to the Blind Chicken, the maximum angle for the Type 1 CV (bug CV measures the same as the 914) is 12 Degrees. For this reason, I may have to go with the 944 CV's (22 degrees offset capability), on the 914 axles and do a 5 lug conversion while I am at it.
Sawtooth shortened his axles to 18" from 20.25". When I called Dutchman, they suggested doing a mock up by cutting the Subaru axle off and using angle iron to splint the axles together, which would work fine if I had an extra axle to cut up. Anyone? I am going to have to mock up some temporary axles to make sure the CV's will handle the offset and to get the right measurements before I cut the axles down to size.
Otherwise, I am concerned about getting the measurements right for the axle length. One positive (with Dutchman) is that you don't need to send all the measurements if you have a sample Subaru axle end to use as an example of what you want, so the only real measurement you need is the axle length- with no other modifications (ie. 911/944 CV's). I would like to keep it simple and use the 914 axles and CV's if possible.
This is similar to what I plan to do here:
Subaru inner CV- 914 axle- 914 outer CV- 4 lug wheels (for now)
Update: The plan is to use 914 stub axles, Renegade conversion plate, 944 CV and axle, resplined on the inside for the Subaru CV to the 5MT transmission. The following discussion is me trying to learn what to do.
Axle Info and Threads:
Axle Info 101 from Blind Chicken
"Things I think I know about CV's and Axles"
Dutchman Axles
Corkus- Axle questions for a Subaru Tranny, Another Subaru conversion...
Axles Shortened in Subi Swap?
Angle of Articulation Bus Axles 944 vs 914
5 Lug Axle Conversion:
Sir Andy- Convert to real 5-lug using 944 CVs
Eric Shea- Easy 5-Lug Conversion - 911 Running Gear, For High Power Applications...
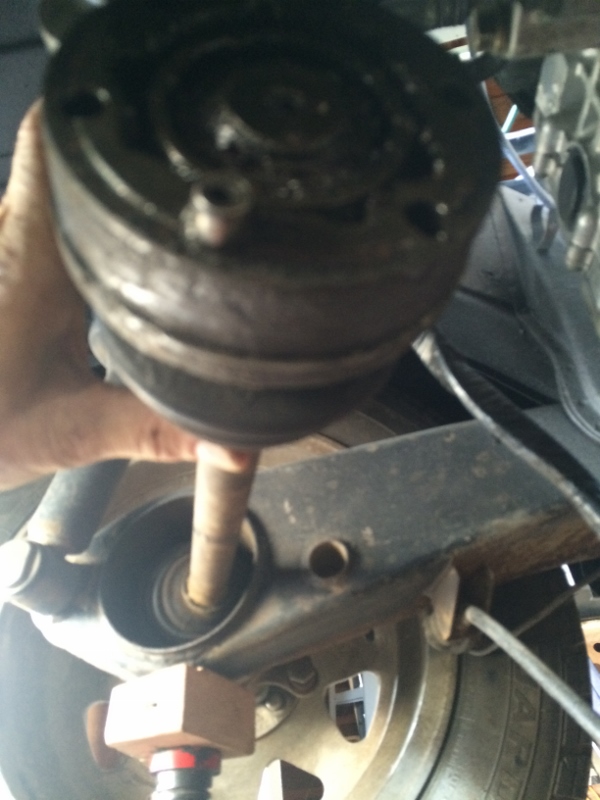
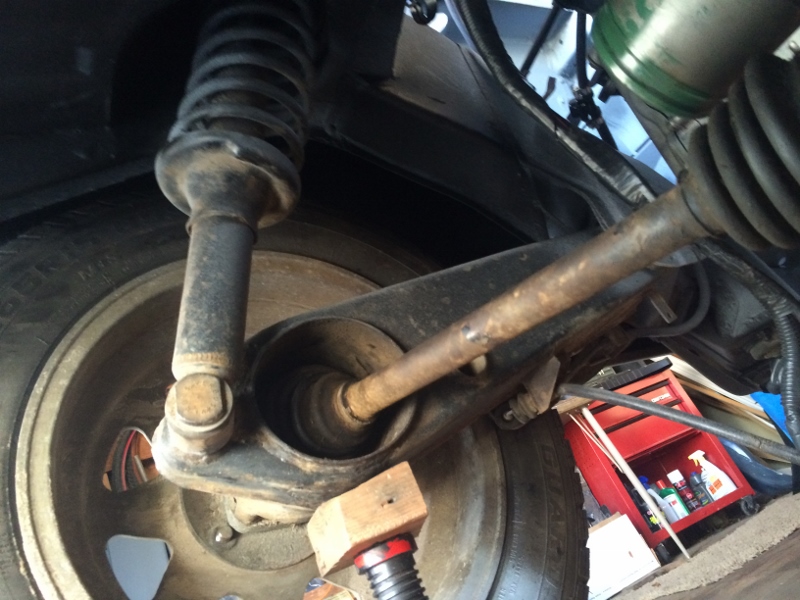
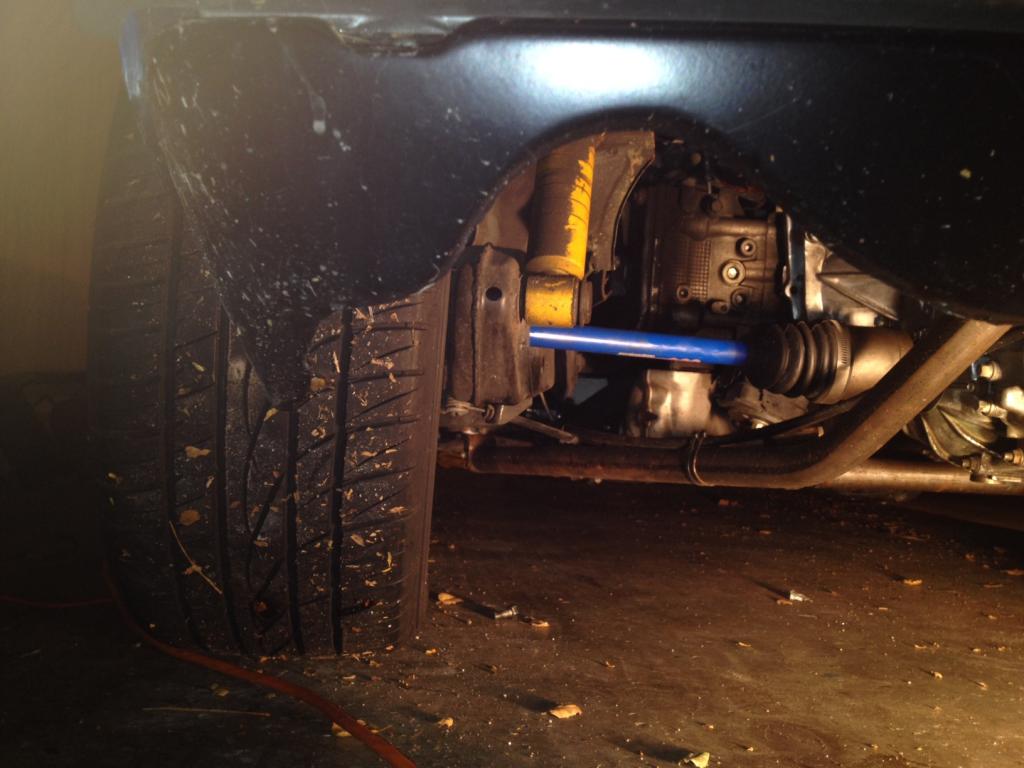
I went out and took some measurements with the 914 axles. It looks like I am close to 22 degrees which is the max for a 944 CV. (Update- At 12 degrees) Hmmm. This is a critical decision here. The 914 CV is supposed to max out at 12 degrees. So, I may have to find some 944 CV's but that is fine since it allows me to switch to a 5 lug wheel.
Take a look at these pictures. I am curious and need opinions here on this angle. The wheel and CV seem to turn without much friction, but apparently I am past the angle that these CV's can handle. If this angle is too steep (even if I go with the 944 CV), I have to stop here and redesign my cradle and likely cut the trunk.
What do you think?
More pix-

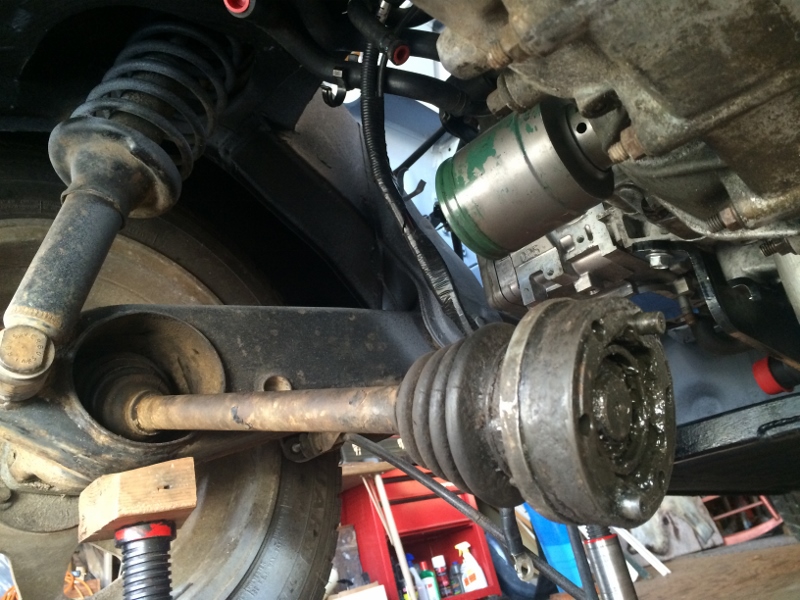
The 944 axles and conversion plates have arrived. I purchased the plates from Renegade Hybrids. They are about a half inch thick and bolt into the 914 stub hub on one side and the 944 cv on the other. This gives a much stronger CV threshold and a larger angle of travel, now up to 22 degrees. This should prevent me from having to redo the engine cradle and flip the manifold.
Subaru on top and 914 on the bottom. The Subaru is a 29 spline and the 914/bug axle is a 33 spline.
My axles will need to be shortened because the engine is set forward slightly from the designs of other cradles such as Ian's. I set the engine farther forward to avoid cutting the trunk and flipping the manifold (for now). Note that there is 4 inches of offset from the transmission to the wheel hubs.
There should be some bend in the axles and CV's for proper lubrication of the CV's, but how much is too much? According to the Blind Chicken, the maximum angle for the Type 1 CV (bug CV measures the same as the 914) is 12 Degrees. For this reason, I may have to go with the 944 CV's (22 degrees offset capability), on the 914 axles and do a 5 lug conversion while I am at it.
Sawtooth shortened his axles to 18" from 20.25". When I called Dutchman, they suggested doing a mock up by cutting the Subaru axle off and using angle iron to splint the axles together, which would work fine if I had an extra axle to cut up. Anyone? I am going to have to mock up some temporary axles to make sure the CV's will handle the offset and to get the right measurements before I cut the axles down to size.
Otherwise, I am concerned about getting the measurements right for the axle length. One positive (with Dutchman) is that you don't need to send all the measurements if you have a sample Subaru axle end to use as an example of what you want, so the only real measurement you need is the axle length- with no other modifications (ie. 911/944 CV's). I would like to keep it simple and use the 914 axles and CV's if possible.
This is similar to what I plan to do here:
Subaru inner CV- 914 axle- 914 outer CV- 4 lug wheels (for now)
Update: The plan is to use 914 stub axles, Renegade conversion plate, 944 CV and axle, resplined on the inside for the Subaru CV to the 5MT transmission. The following discussion is me trying to learn what to do.
Axle Info and Threads:
Axle Info 101 from Blind Chicken
"Things I think I know about CV's and Axles"
Dutchman Axles
Corkus- Axle questions for a Subaru Tranny, Another Subaru conversion...
Axles Shortened in Subi Swap?
Angle of Articulation Bus Axles 944 vs 914
5 Lug Axle Conversion:
Sir Andy- Convert to real 5-lug using 944 CVs
Eric Shea- Easy 5-Lug Conversion - 911 Running Gear, For High Power Applications...
I went out and took some measurements with the 914 axles. It looks like I am close to 22 degrees which is the max for a 944 CV. (Update- At 12 degrees) Hmmm. This is a critical decision here. The 914 CV is supposed to max out at 12 degrees. So, I may have to find some 944 CV's but that is fine since it allows me to switch to a 5 lug wheel.
Take a look at these pictures. I am curious and need opinions here on this angle. The wheel and CV seem to turn without much friction, but apparently I am past the angle that these CV's can handle. If this angle is too steep (even if I go with the 944 CV), I have to stop here and redesign my cradle and likely cut the trunk.
What do you think?
More pix-
The 944 axles and conversion plates have arrived. I purchased the plates from Renegade Hybrids. They are about a half inch thick and bolt into the 914 stub hub on one side and the 944 cv on the other. This gives a much stronger CV threshold and a larger angle of travel, now up to 22 degrees. This should prevent me from having to redo the engine cradle and flip the manifold.
I'd say you're too far. You say it's 22 degrees now? At ride height? Then what's the angle get to at top and bottom of the suspension travel? That should add a few degrees. Also it's true that not being at zero degrees is preferable for lubrication of the CV's, but I don't think that running at the maximum angle all the time is going to work for very long. That's a LOT of movement inside the CV each revolution.
QUOTE(DBCooper @ Nov 14 2015, 04:24 PM)
I'd say you're too far. You say it's 22 degrees now? At ride height? Then what's the angle get to at top and bottom of the suspension travel? That should add a few degrees. Also it's true that not being at zero degrees is preferable for lubrication of the CV's, but I don't think that running at the maximum angle all the time is going to work for very long. That's a LOT of movement inside the CV each revolution.
Yeah, giving this some thought. I might just have to scoot the engine/tranny back a couple inches. If I flip the manifold, I might not have to cut the trunk. The problem with using the Suby tranny is that the stubs are forward of the 901 which pushes the engine back and the weight is pushed from the mid-engine arrangement closer to the back.
Another idea is to try the 930 CV's which will go up to a 25 degree angle. Those are 28 spline though and I would have to respline both ends of the axles. The dollars start to add up fast.
I am still curious if anyone has run their axles at this angle for some miles?????
That's my trunk, to fit a WRX engine with flipped manifold. The big bump up on the right is for the turbo, which you wouldn't have. The freeze plug in the middle is for the clutch slave fluid fitting, and the left bump is for the starter. I saw that someone else used a different starter so was able to avoid that clearance problem. It's is quite a bit of extra work to flip the manifold, but probably cheaper than 930 CV's and you don't have to worry about CV longevity because of that angle. There are some other photos in my thread showing how the engine could actually come back even further except for the plumbing for the turbo.
To know about max angles give Sway-a-Way a call. They've done lots of off-road cars with extreme axle angles for maximum suspension travel so they should be able to tell you what's possible and what's too much.
QUOTE(DBCooper @ Nov 14 2015, 08:28 PM)
To know about max angles give Sway-a-Way a call. They've done lots of off-road cars with extreme axle angles for maximum suspension travel so they should be able to tell you what's possible and what's too much.
That's a great thread. I have looked at it many times, especially for the cable shifter design.
It looks like these CV's on your photobucket have a bit of an angle as well:
What's the story there?
That's my son's car. It uses a Coldwater cradle and the axle angle is about 10 degrees front to rear (by sight) so not too radical. Also a WRX but unfortunately the previous owner didn't flip the manifold, instead hacked out a big section of the trunk, so it's not easy to tell how much the engine would have intruded. And those Sway-a-ways were later swapped out for re-splined OEM axles.
One other thing I forgot to mention is that at greater angles the CV is weaker, so you'll break them more often. If you don't change the angle that fact might tip things more towards the stronger 930's.
One other thing I forgot to mention is that at greater angles the CV is weaker, so you'll break them more often. If you don't change the angle that fact might tip things more towards the stronger 930's.
QUOTE(DBCooper @ Nov 15 2015, 06:16 AM)
Also a WRX but unfortunately the previous owner didn't flip the manifold, instead hacked out a big section of the trunk, so it's not easy to tell how much the engine would have intruded.
I am curious in shifting the engine back a few inches from the original setup if you notice a difference in weight shift. Does it still retain its mid engine feel.? It would be pointless to do all this if I end up with a rear weighted car like a bug. I still have the 901 transmission, but think it best to use the 'ru tranny.
QUOTE(R_u_dd @ Nov 15 2015, 07:40 AM)
QUOTE(DBCooper @ Nov 15 2015, 06:16 AM)
Also a WRX but unfortunately the previous owner didn't flip the manifold, instead hacked out a big section of the trunk, so it's not easy to tell how much the engine would have intruded.
I am curious in shifting the engine back a few inches from the original setup if you notice a difference in weight shift. Does it still retain its mid engine feel.? It would be pointless to do all this if I end up with a rear weighted car like a bug. I still have the 901 transmission, but think it best to use the 'ru tranny.
There's absolutely no difference that I could tell, and we've done two cars now, first the engine and then later the transmission on both cars. You HAVE to do the Subaru transmission. I think anyone who's done it will tell you that the Subaru transmission was almost as significant an improvement as the Subaru engine, huge in both performance and drivability, and the gears are matched. It just works.

QUOTE(DBCooper @ Nov 15 2015, 06:16 AM)
And those Sway-a-ways were later swapped out for re-splined OEM axles.
Do you remember the length of the axles? I should be able to figure it out once the engine is in place bycreating a mock up, but 18" seems to be about right?

Calculating the Angle of the CV joint.
Web Trigonometry Calculator
Good News. It pays to know your math. Or, to enlist your daughter to remind you how. So my angle is only at 12.84 degrees which should be within the 944 CV joint tolerance (22 degrees) when upgrading to the 5 lug wheel. Here's the calculation with angle A being the critical angle and 4 inches of offset with the 18 inch axle:


So, I don't have to move the engine back!!!!!!!!!!!!!!!
Math is fun. And saves time and money!!!!
Web Trigonometry Calculator
Good News. It pays to know your math. Or, to enlist your daughter to remind you how. So my angle is only at 12.84 degrees which should be within the 944 CV joint tolerance (22 degrees) when upgrading to the 5 lug wheel. Here's the calculation with angle A being the critical angle and 4 inches of offset with the 18 inch axle:
So, I don't have to move the engine back!!!!!!!!!!!!!!!
Math is fun. And saves time and money!!!!
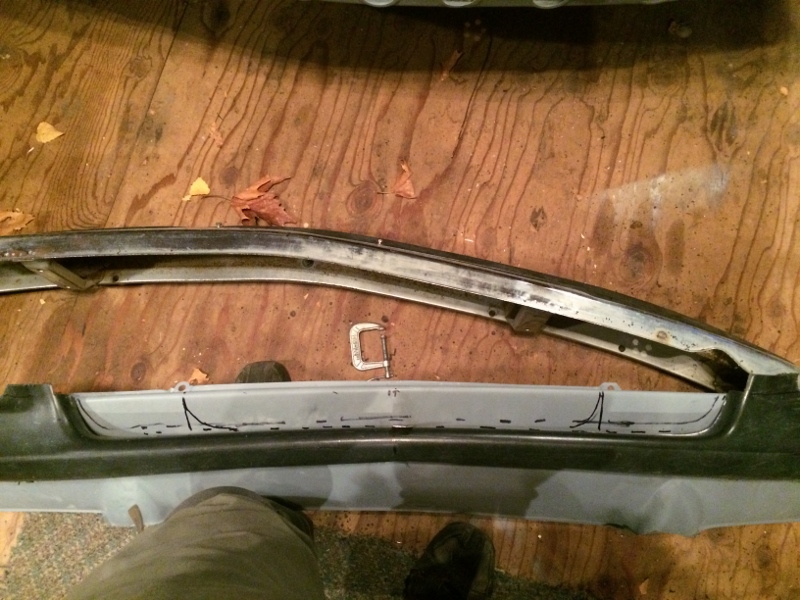
Bumper
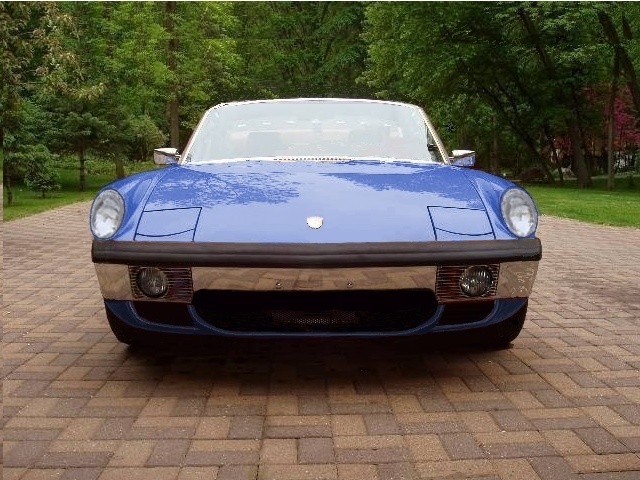
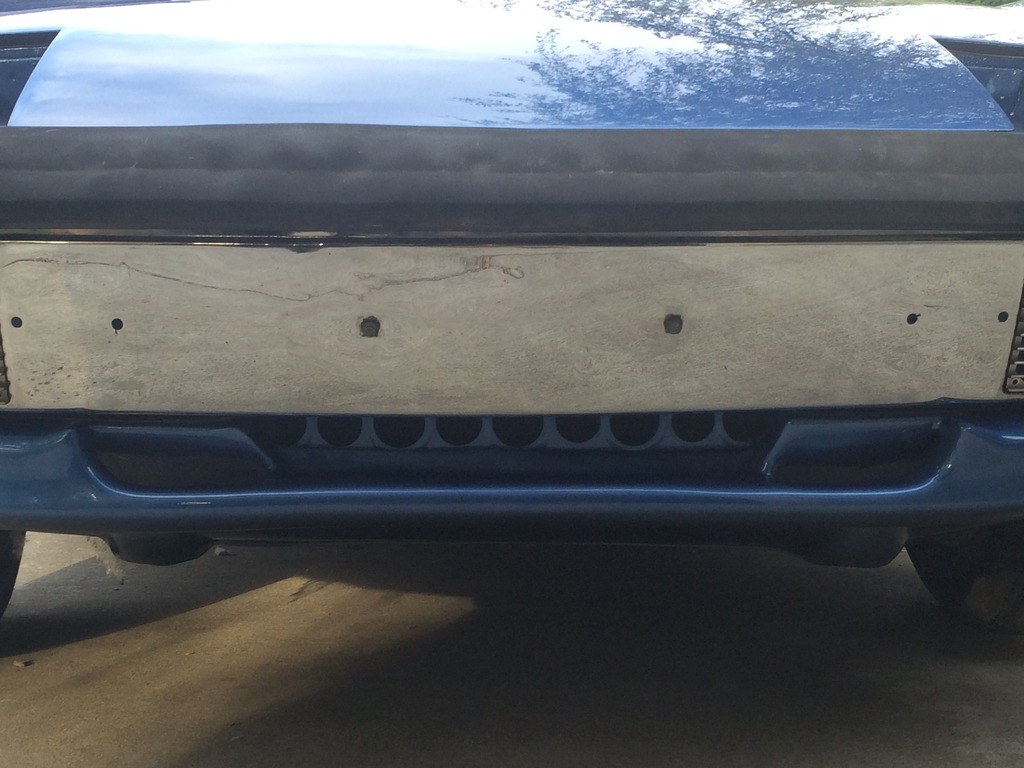
The idea with the bumper was to deflect air into the radiator. I am going for the look below. I used the stock valence, cut out a portion and welded tabs to mount an aftermarket valence from a Honda Civic from the junkyard for $35.
I love the look of this valence from iamchappy.
Aiming for this look from member veekry9:
Started by welding on some tabs and the plastic bumper.
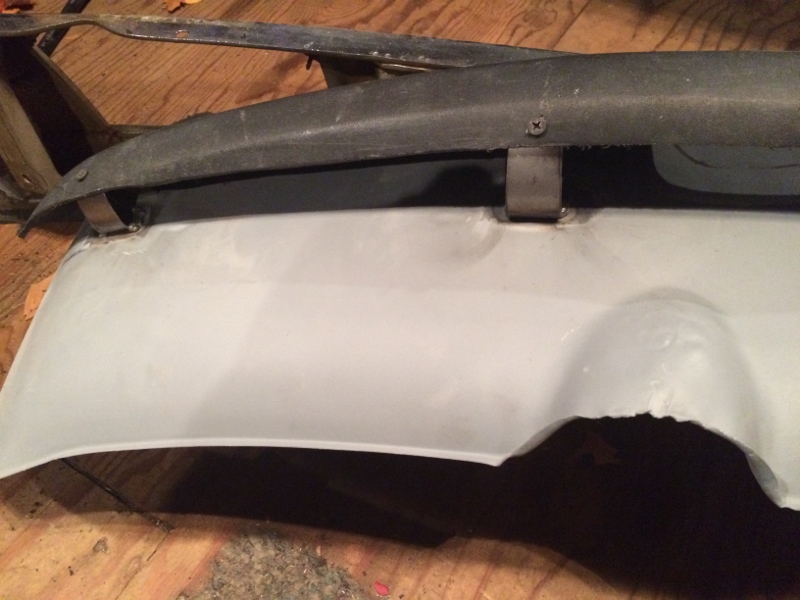
Cut along the line...
Metal tabs support the plastic civic valence.
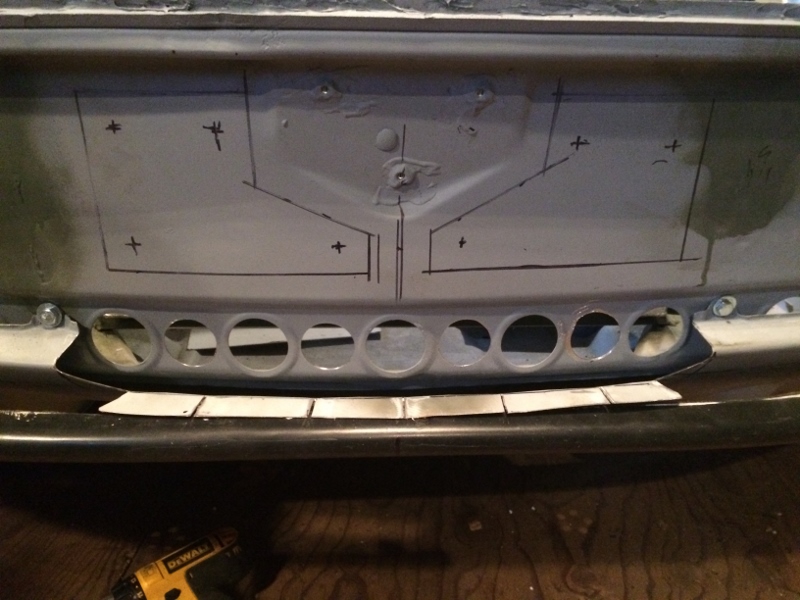
Fiberglass covering the metal tabs. This part will scoop the air through
these holes and into the radiator.

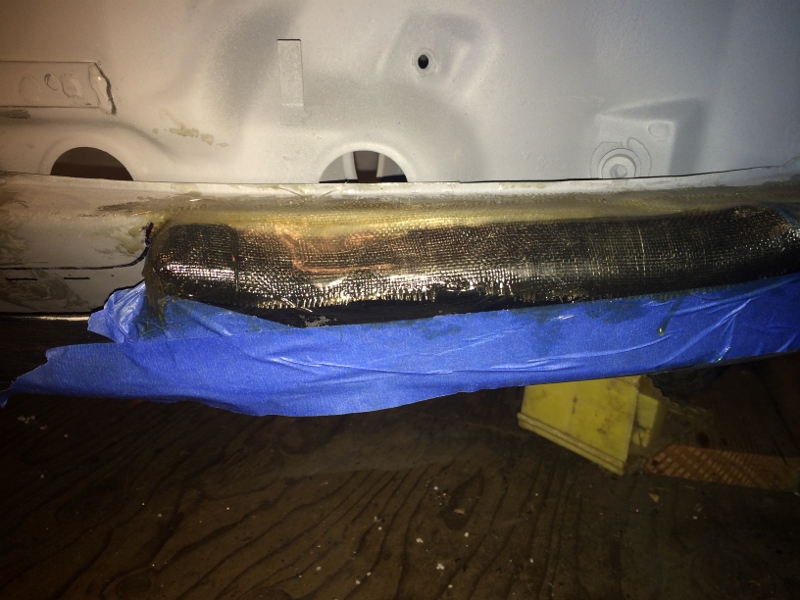
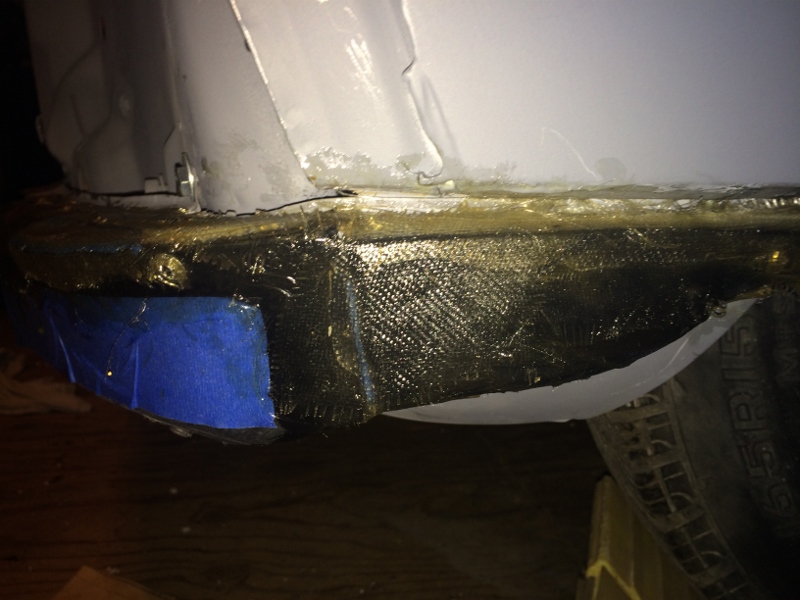
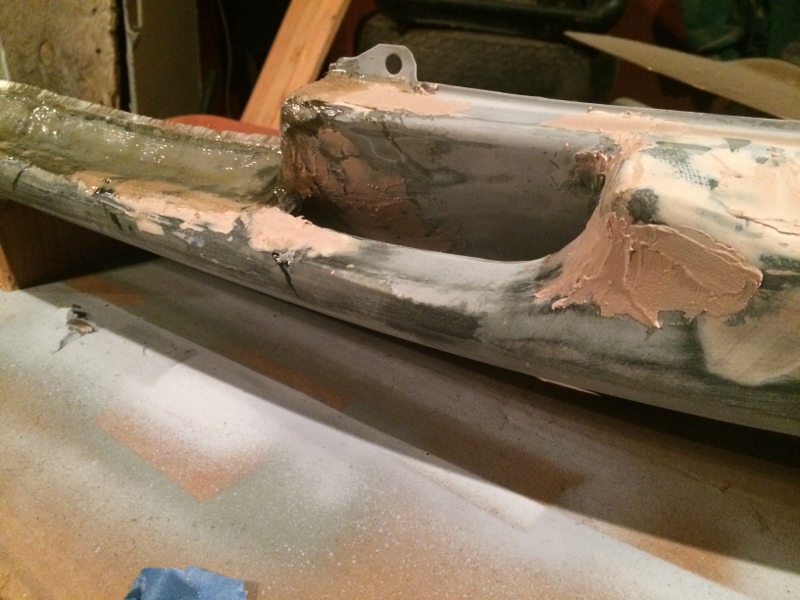
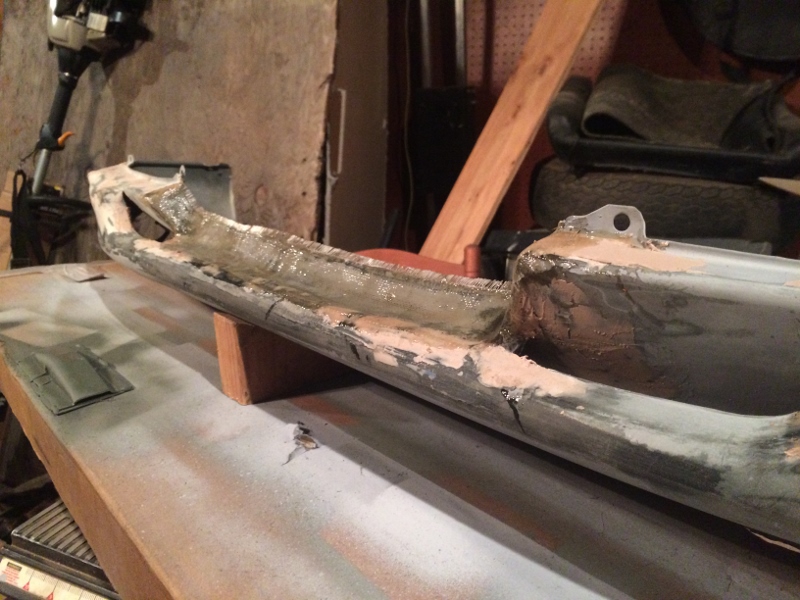
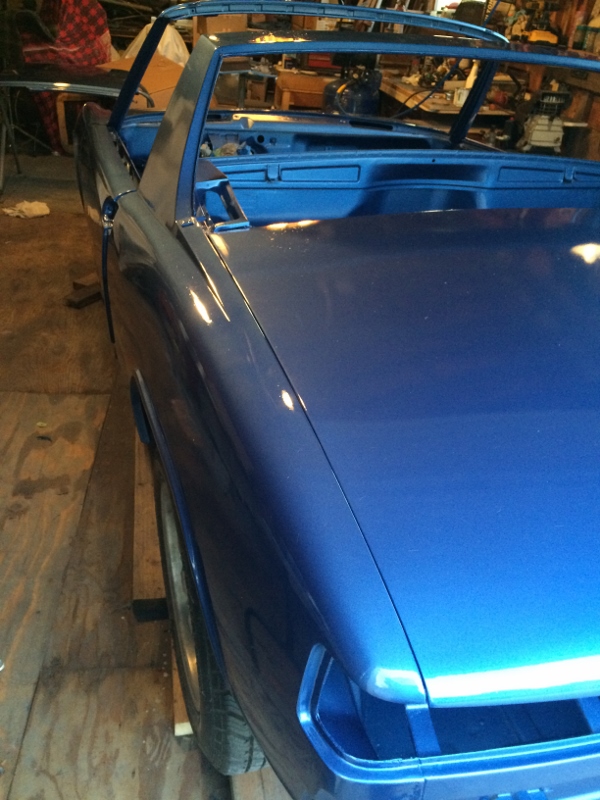
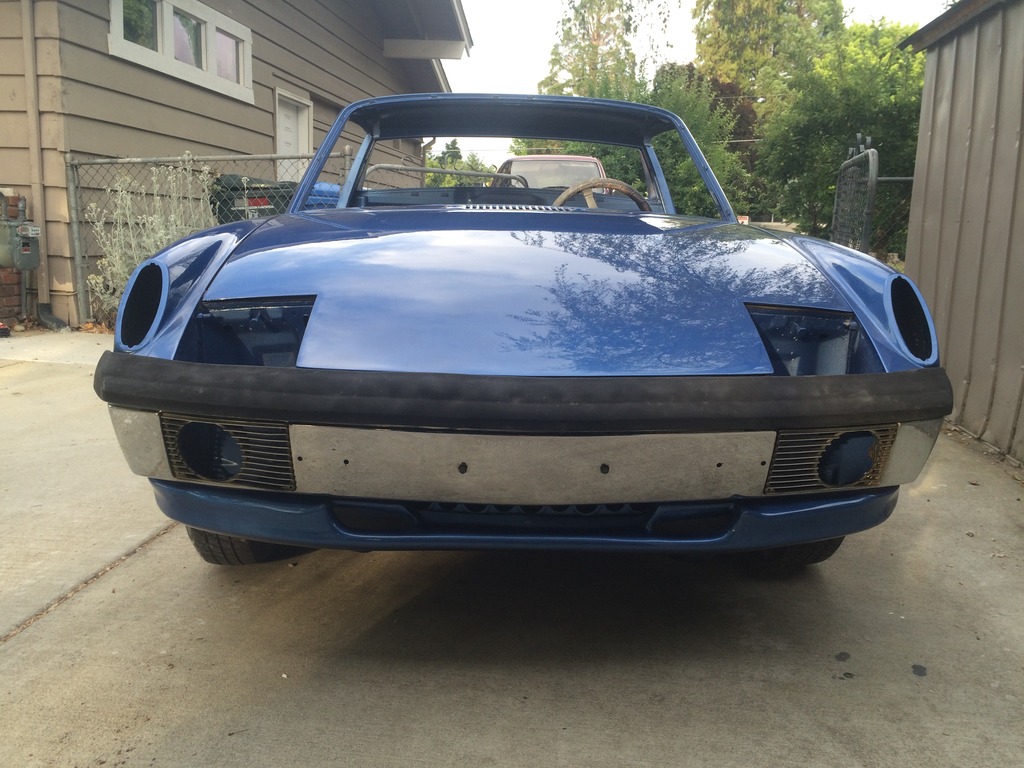
Finally, the final product:

Hard to get a good perspective shot, but here it is. The valence is designed to scoop air underneath the bumper. This will need to be tested to see if we get enough air into the radiator to keep it cool. If not, expect the bumper to get cut out significantly.

The idea with the bumper was to deflect air into the radiator. I am going for the look below. I used the stock valence, cut out a portion and welded tabs to mount an aftermarket valence from a Honda Civic from the junkyard for $35.
I love the look of this valence from iamchappy.
Aiming for this look from member veekry9:
Started by welding on some tabs and the plastic bumper.
Cut along the line...
Metal tabs support the plastic civic valence.
Fiberglass covering the metal tabs. This part will scoop the air through
these holes and into the radiator.
Finally, the final product:
Hard to get a good perspective shot, but here it is. The valence is designed to scoop air underneath the bumper. This will need to be tested to see if we get enough air into the radiator to keep it cool. If not, expect the bumper to get cut out significantly.
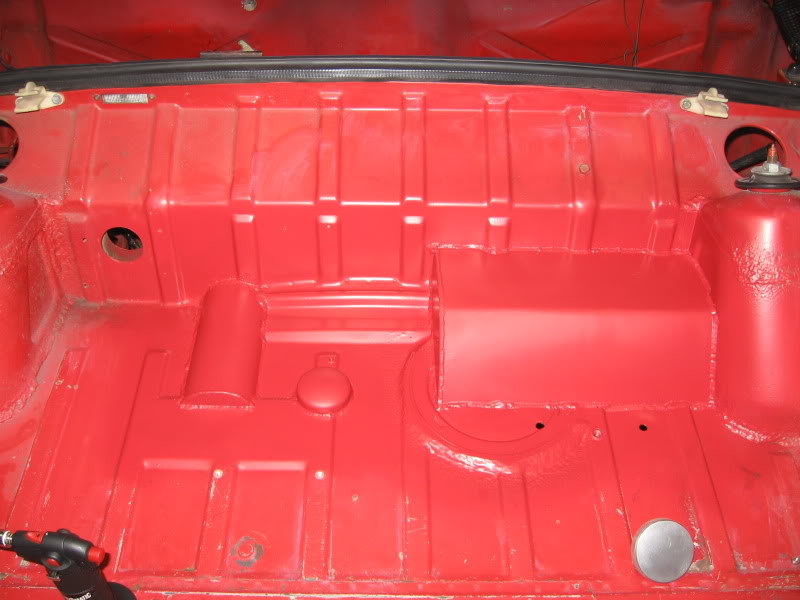
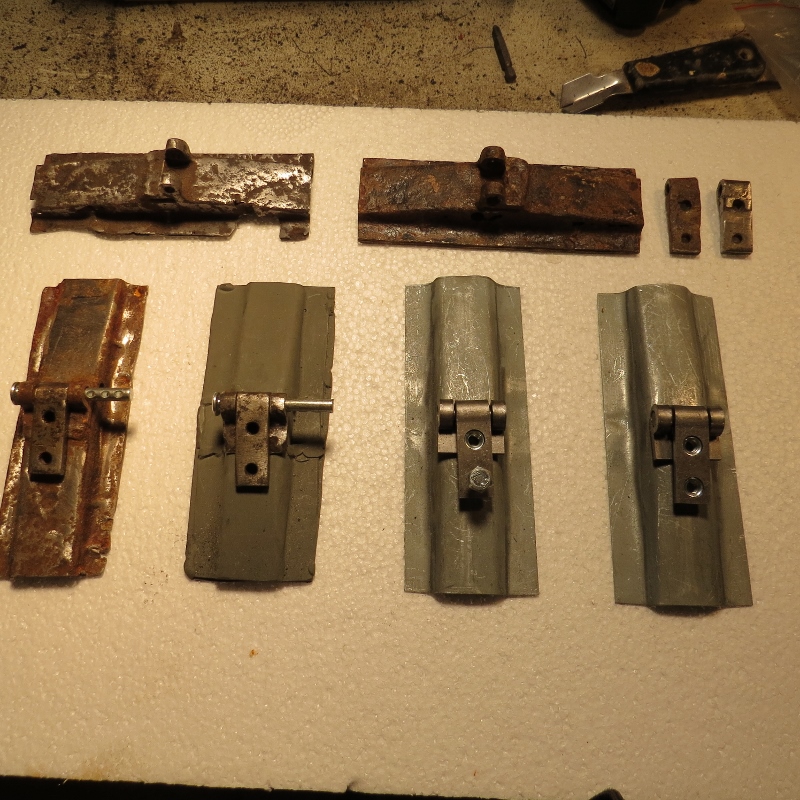
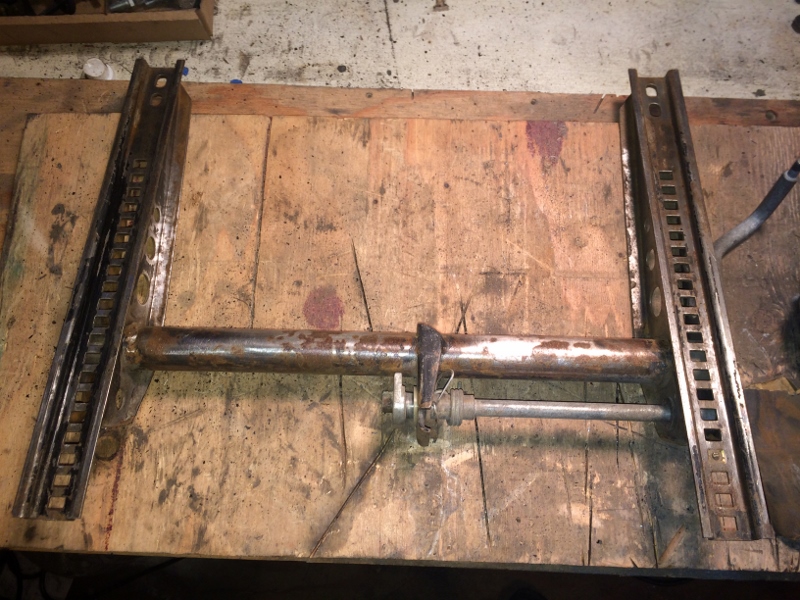
Seats and Interior
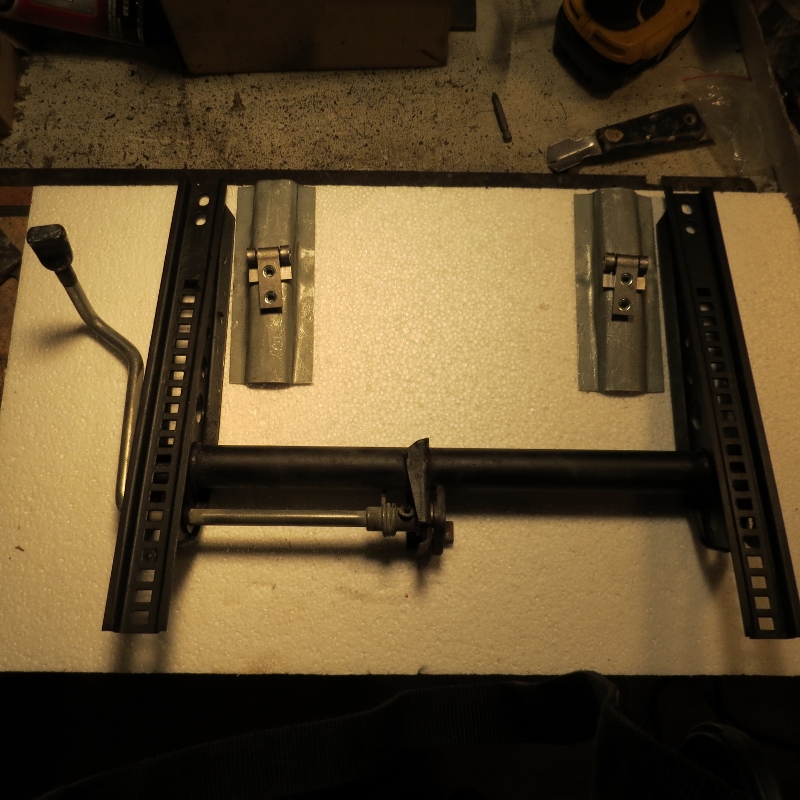
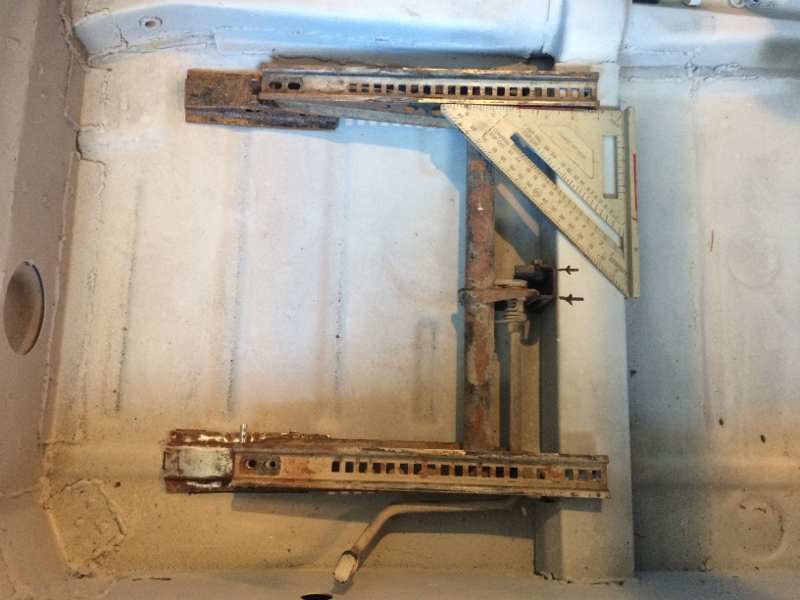
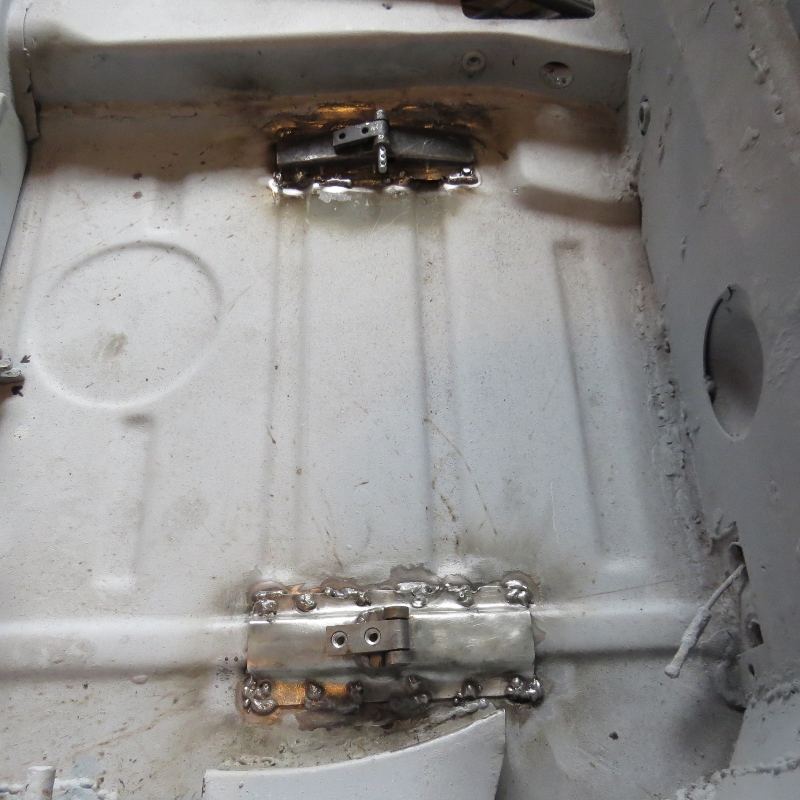
After much deliberation, I have decided to go stock with the seats and upgade the passenger seat from the '71 fixed to an adjustable. My floorpans were rusted badly and I could not save the seat hinges, so thanks to mrihop I was able to get some newer parts, seat brackets, risers and hinges. Still, I had to break down and buy a couple newer hinges and risers. It's just not worth trying to save them out if they are rusted. There's a great video on how to align the hinges and weld everything together from restorationdesign.com
How to mount the seat hinges in a 914
___________________
I decided to reupholster my seats at least partly. I got tow seats on 914world for $75 bucks each and cushion covers for another $70 bucks each. Went down to Joe (Women's fabric shop) and bought a yard of vinyl for $20 and some glue. Here's some before and after shots. These are not concourse seats but I think they look pretty good and they're certainly a lot cheaper than new.

Before
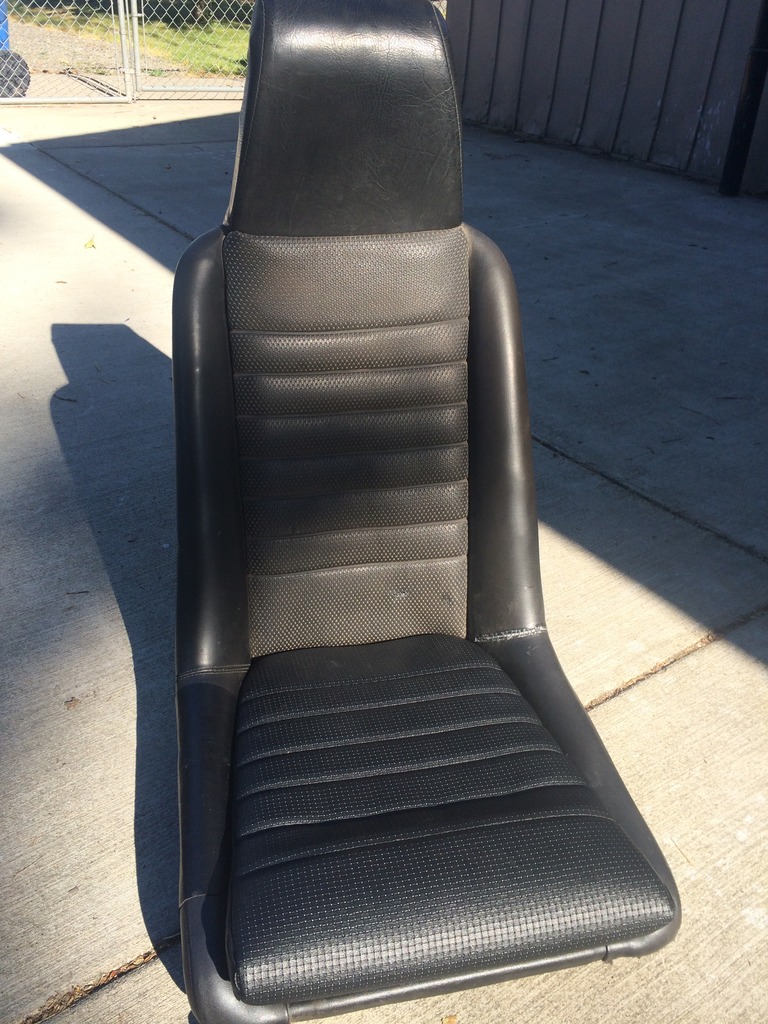
After
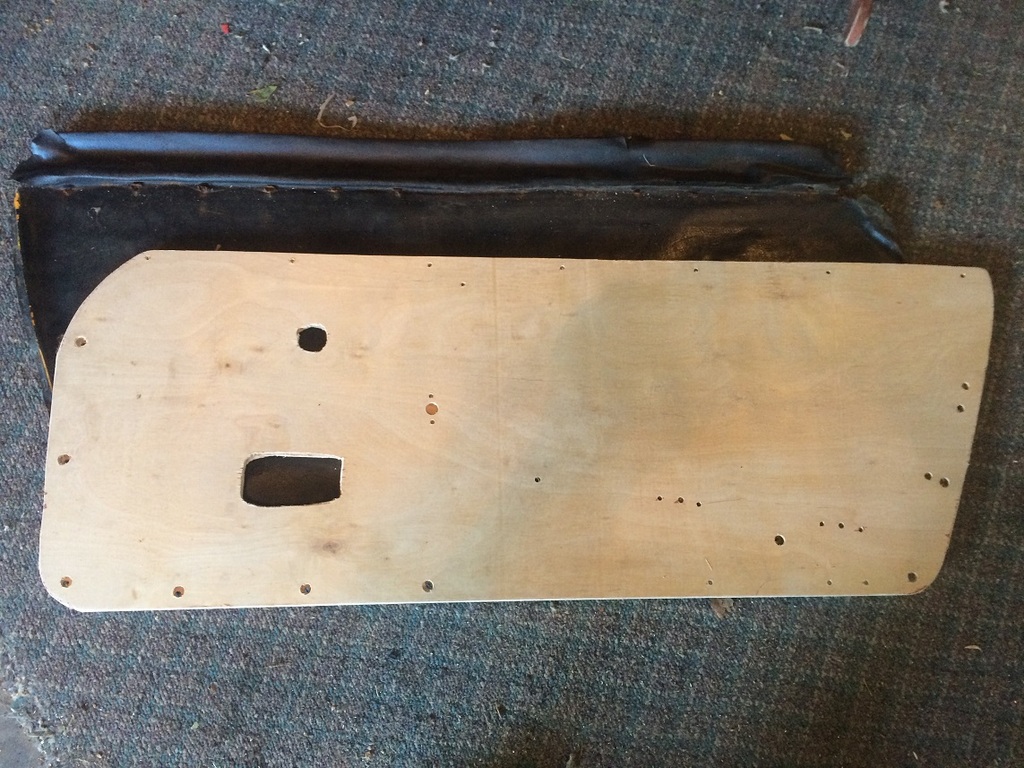
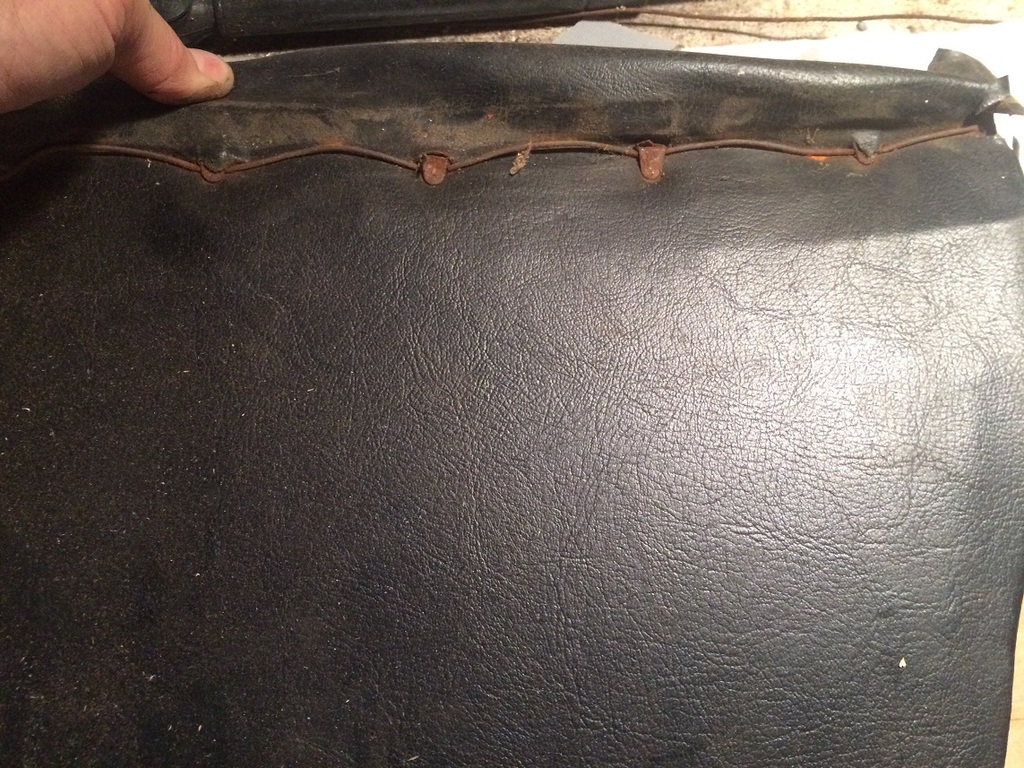
My door panels were not serviceable, so I decided to redo the inside panel and re-upholster the vinyl. I used thin plywood, about 1/4 inch birch. The old panel was used as a template which worked great. I used bubble insulation for padding and noise reduction. The most important part is to use a good glue. In my case, I used weather strip adhesive- GREAT STUFF!.
The wood cutout from the original template:
Funky backing:
Bubble Wrap padding:

After much deliberation, I have decided to go stock with the seats and upgade the passenger seat from the '71 fixed to an adjustable. My floorpans were rusted badly and I could not save the seat hinges, so thanks to mrihop I was able to get some newer parts, seat brackets, risers and hinges. Still, I had to break down and buy a couple newer hinges and risers. It's just not worth trying to save them out if they are rusted. There's a great video on how to align the hinges and weld everything together from restorationdesign.com
How to mount the seat hinges in a 914
___________________
I decided to reupholster my seats at least partly. I got tow seats on 914world for $75 bucks each and cushion covers for another $70 bucks each. Went down to Joe (Women's fabric shop) and bought a yard of vinyl for $20 and some glue. Here's some before and after shots. These are not concourse seats but I think they look pretty good and they're certainly a lot cheaper than new.
Before
After
My door panels were not serviceable, so I decided to redo the inside panel and re-upholster the vinyl. I used thin plywood, about 1/4 inch birch. The old panel was used as a template which worked great. I used bubble insulation for padding and noise reduction. The most important part is to use a good glue. In my case, I used weather strip adhesive- GREAT STUFF!.
The wood cutout from the original template:
Funky backing:
Bubble Wrap padding:
Seats and Re-Upholstery info:
Re-Upholstery-Autos International
Built up Bolsters
GTS Classics - Classic Seats for Classic Cars
Seat materials World Upholstery
Seat Materials Company Links
914 Rubber Seat Materials
Renegade Seats Thread See post 17. Interesting information on bolsters
More Renegade Seat info
Lakewell UK - Has tan interiors
While driver and passenger seats are interchangeable, there are minor differences.
Camp 914 Le Mans Seats
Auto Atlanta Seat Parts for Re-upholstery
Back Pad Vinyl from 914rubber.com
I'm glad you like it.
I drew this largemouth look to emulate the '50-60s Vette.
An older brother had a convertible from that era,I liked it in '59,still do.
The details are a little deceiving,as the car is much wider than stock.
The inner sponson is pretty much normal,the width of the lites is of course wider and therefore the fender too.
That was the purpose of using the larger lite,the method of achieving the new width is a filler strip at the top of the sponson.
A lot of planning,mapping and hammer and dolly work,for the wide narrowbody look.
How it would look without new doorskins is up for debate,the stepout being up to 6".
Note too that the bumper is widened the same amount.
http://www.914world.com/bbs2/index.php?sho...22522&st=51
Just flogging some ideas around,seeing what fits.
Yes, I really like that look for the form and function of it. It looks like a nice design to pull air through a front radiator. What can you tell me about that car? Is it pure animation, or is it a real car? What is the color? Perhaps you have more pictures. What software did you use to change the look?
https://www.gimp.org/
Some people can use a camera properly,this was a 'front' pix.
The pix was from the most immaculate 914-6-Turbo you will ever see.
'iamchappy' here on board.
Drawing is from 2008,when I first sampled the pix.
The auto sector had taken a dump,and some 20k people had been laid off.
Had some spare time and tried sketching a few things.
The methodology today is a little different than days of old.
https://www.youtube.com/watch?v=mbrq2fDN8bA
Click to view attachment
This panel is the traditional aluminum hand beaten method.
Light,beautiful,difficult.
A panel man from Illinois made it.
http://imgur.com/gallery/lnluh
/
I can't wait to see your finished product on the front valance panel. ![popcorn[1].gif](http://www.914world.com/bbs2/style_emoticons/default/popcorn[1].gif) It is one of the best alternate designs I have seen as of yet. make sure to keep a mold. you have potential of making so dough from this community alone. I would buy one if the price is not over the top.
It is one of the best alternate designs I have seen as of yet. make sure to keep a mold. you have potential of making so dough from this community alone. I would buy one if the price is not over the top.
It is one of the best alternate designs I have seen as of yet. make sure to keep a mold. you have potential of making so dough from this community alone. I would buy one if the price is not over the top.
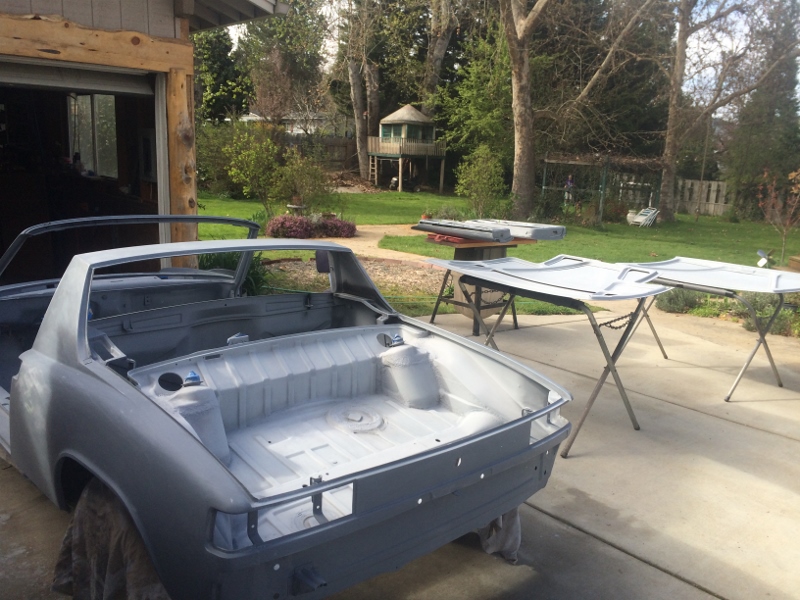
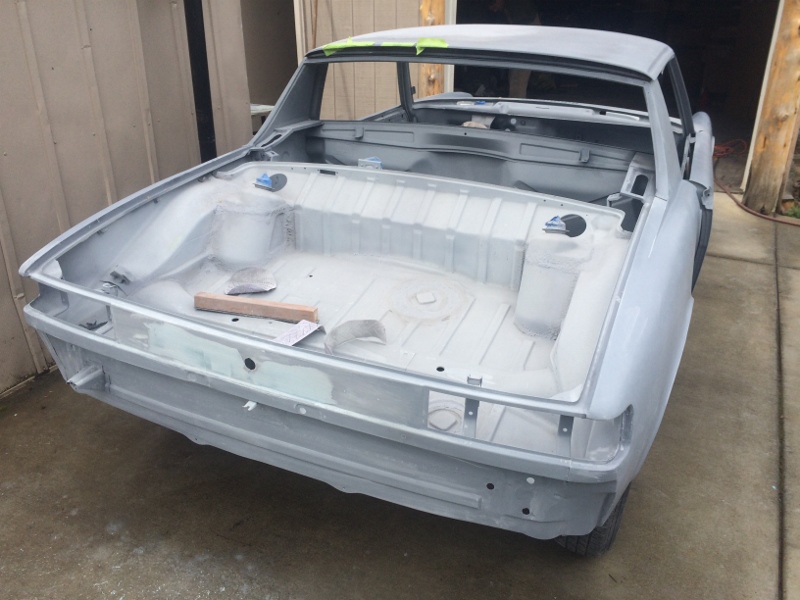
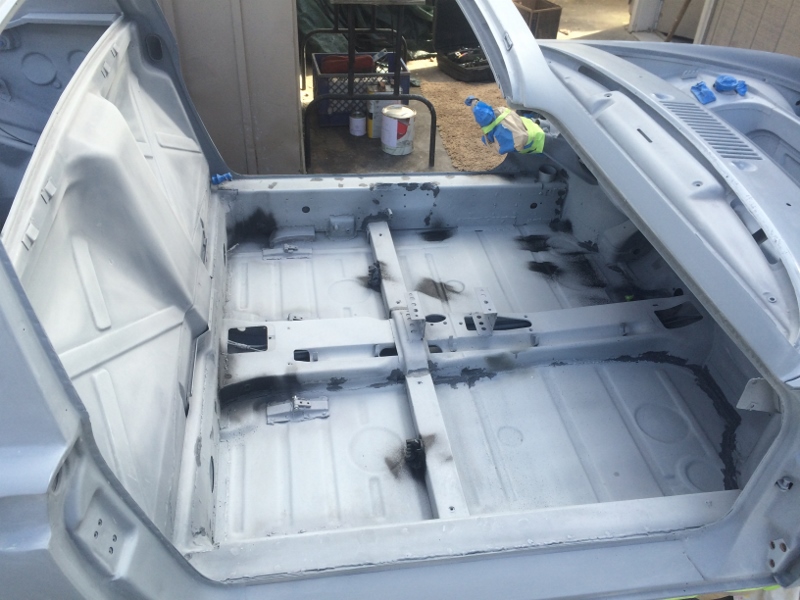
Paint Prep Continued...
The metal work and preparations for final paining are at the point where I could call Scott, my painter, back into the game. We started doing some final paint prep before we go to paint. The whole process is new to me and it's great to learn from a veteran. These are the steps that we are taking:
Metal work to remove rust.
Bead blasting with glass beads. Similar to sand blasting, but the beads are much smaller.
Primed with Epoxy Primer
Primed within one week with high build primer
Primed with Urethane Primer over the top
Rust encapsulator in key locations, like over the battery tray area.
Most of this was done several months ago. I then worked on some final metal work like the radiator mount, front valence, rear jack point.
Now we are ready for final prep work which included block sanding with 80 and 180 grit. We used foot long blocks made of a flexible rubber, with velcro on the sides. Scott also uses a metal file to knock off the high points. Scott marks the low spots with a circle and the high spots with an "X". The low spots are then filled with glazing compound, a very thin filler, and sanded with 180 grit. He also used an air sander.
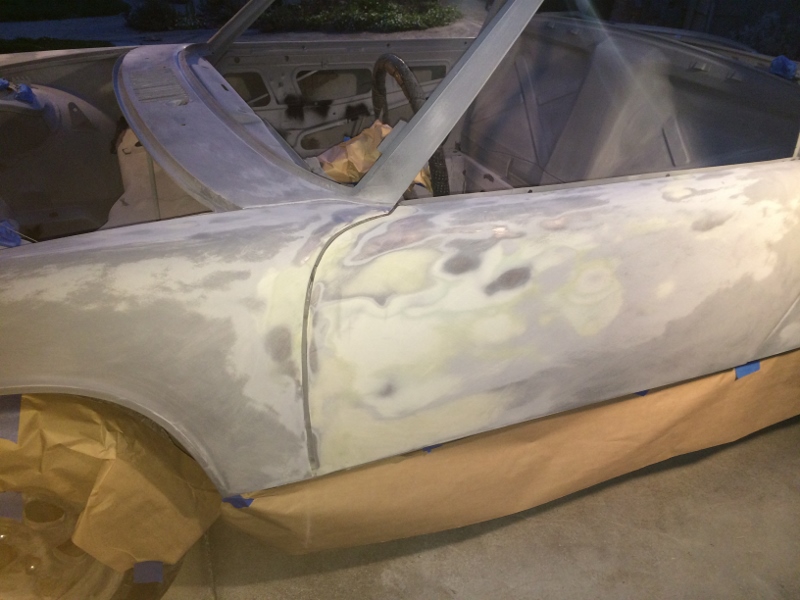
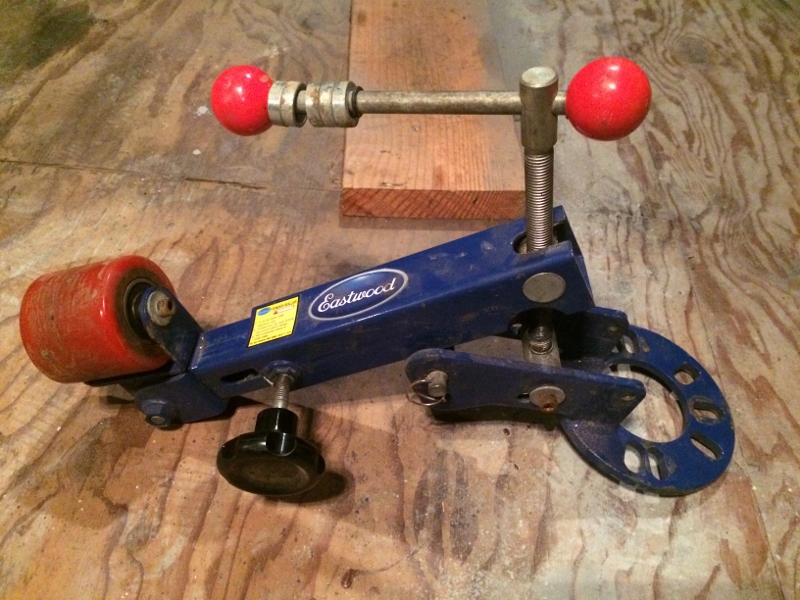
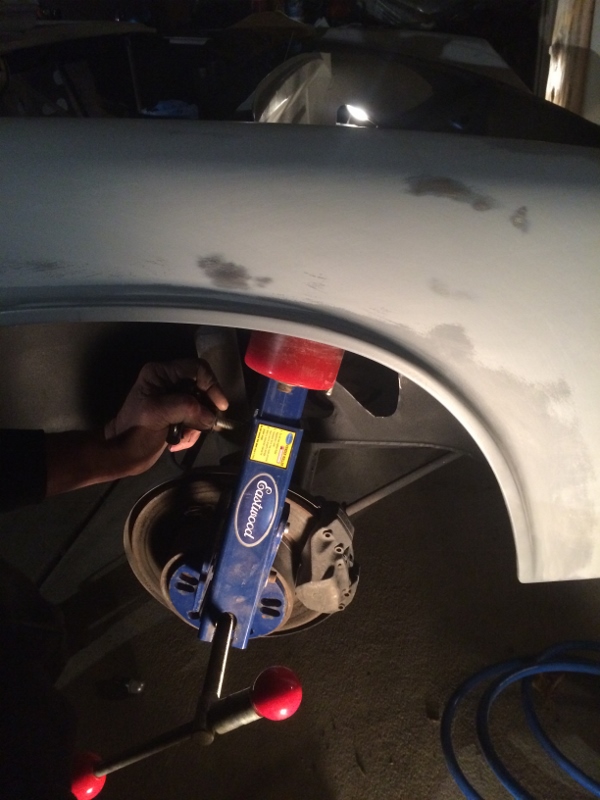
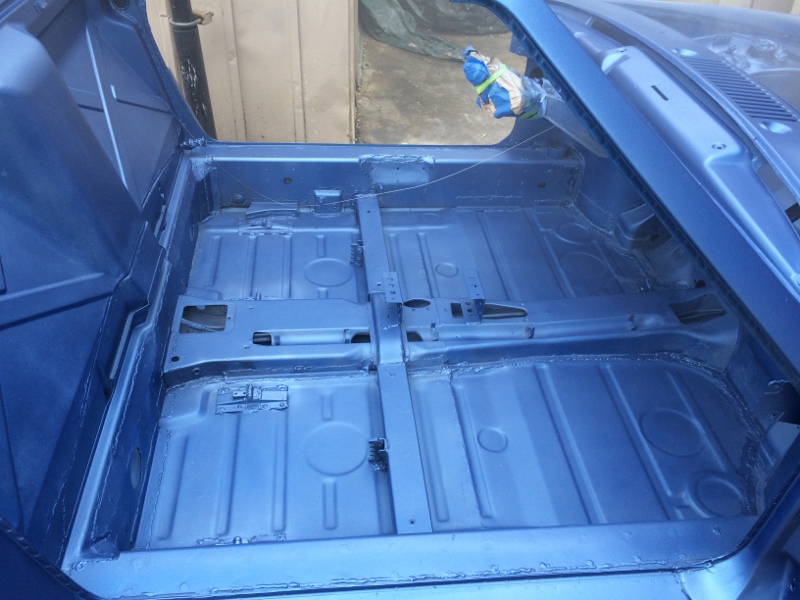
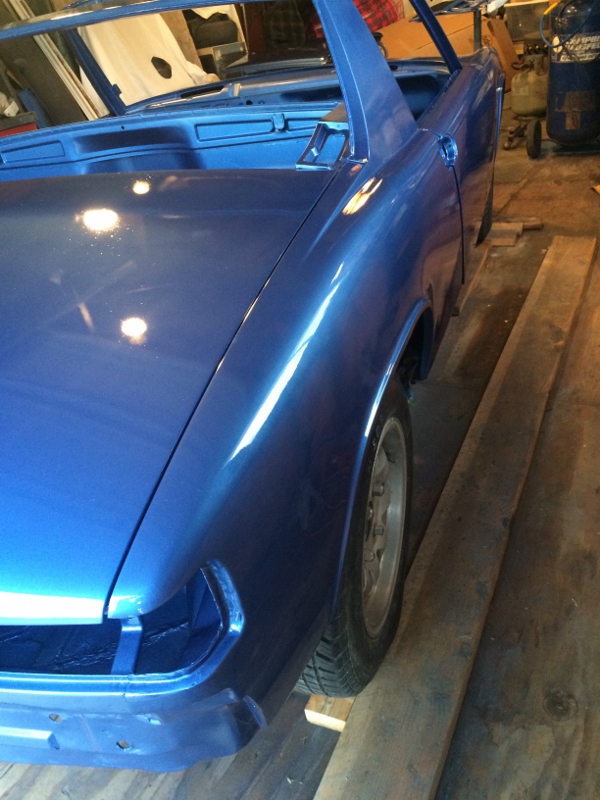
One of the steps we took was to roll the fenders to give them a better shape. We only moved the fenders a quarter inch, but rolled the lips and got rid of the funky inward curve of the shape when looking overtop the fenders. It is amazing what a subtle change like this can do to the aesthetics and functionality.
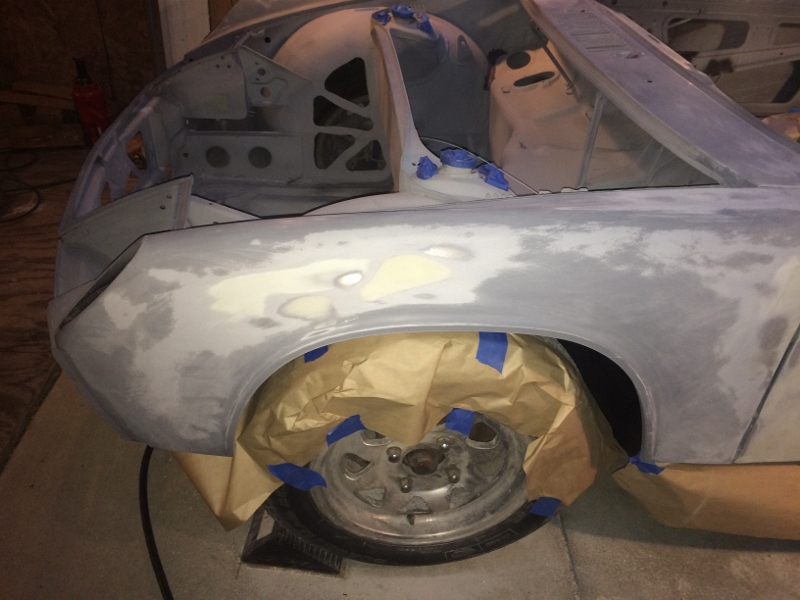
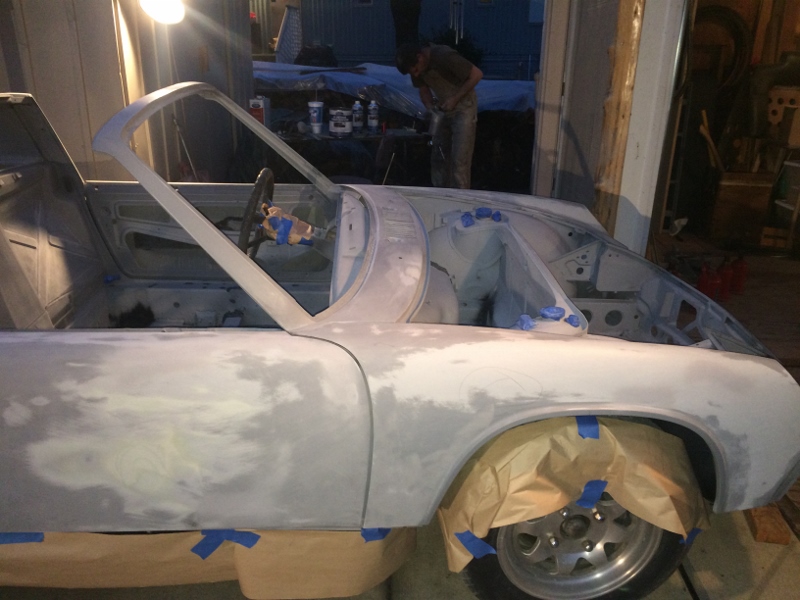
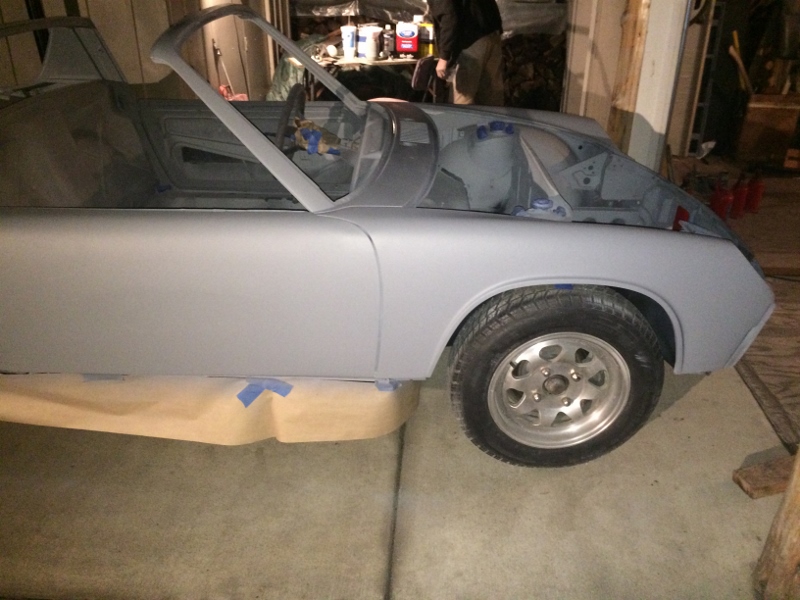
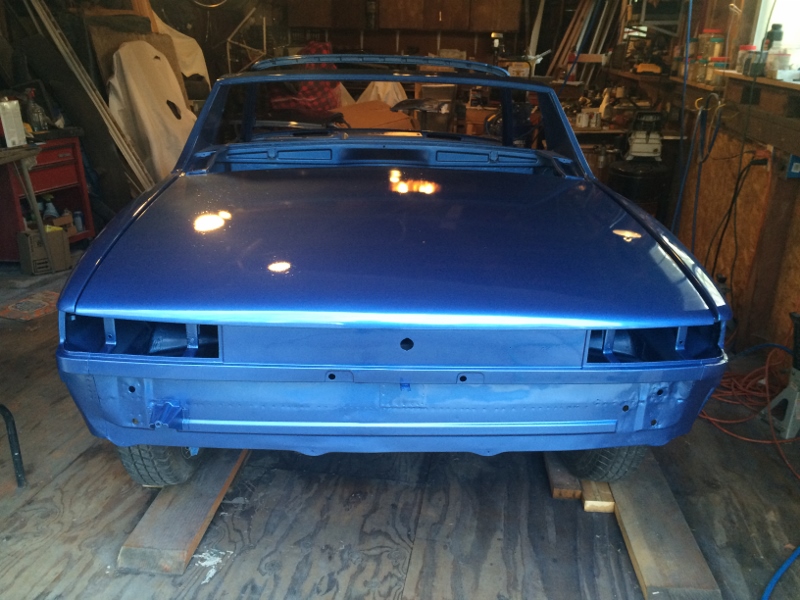
This is what the primed car looks like. This is "two laps around" the vehicle, or two coats of Urethane primer separated by 10 minutes of drying.
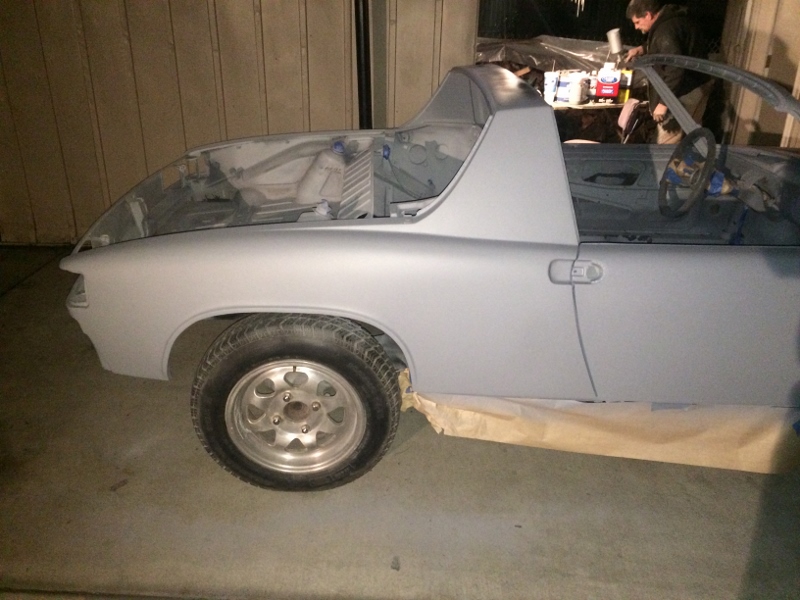
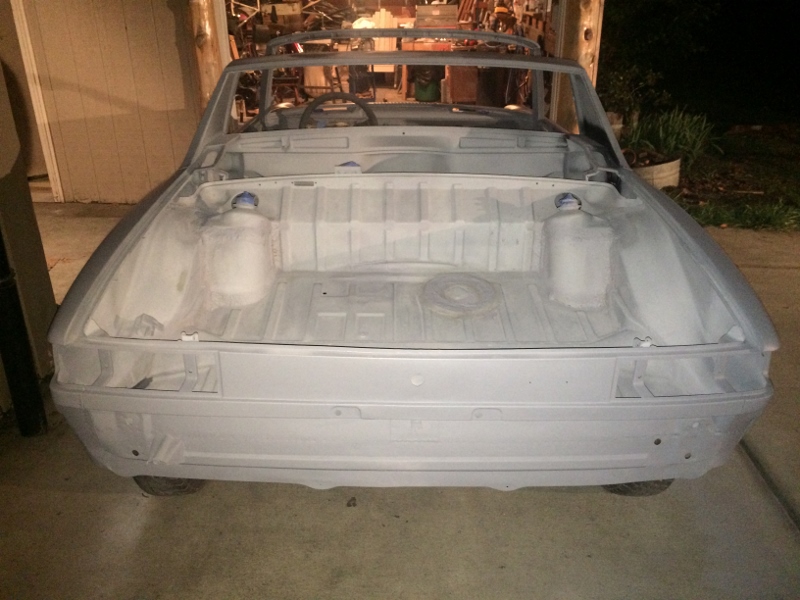
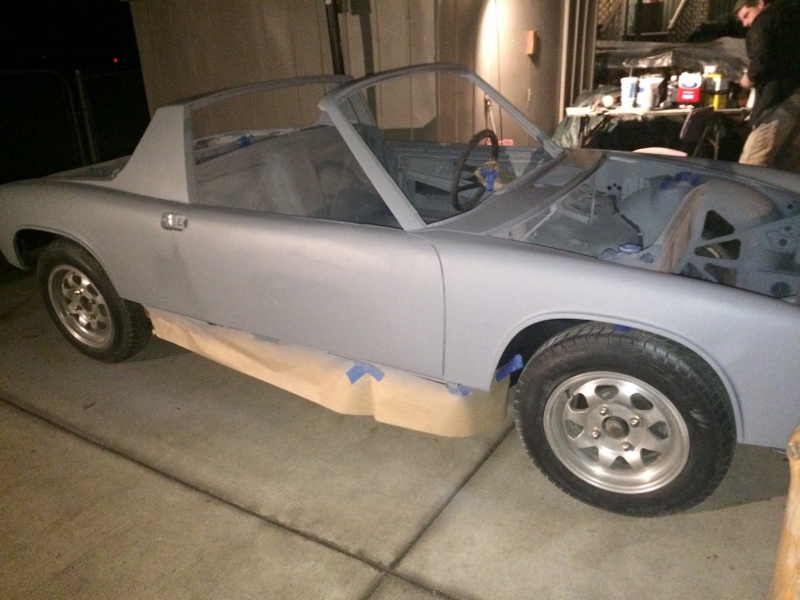
Next up, sanding with 400 and 600 grit, some final prep and then Painting!!!
The metal work and preparations for final paining are at the point where I could call Scott, my painter, back into the game. We started doing some final paint prep before we go to paint. The whole process is new to me and it's great to learn from a veteran. These are the steps that we are taking:
Metal work to remove rust.
Bead blasting with glass beads. Similar to sand blasting, but the beads are much smaller.
Primed with Epoxy Primer
Primed within one week with high build primer
Primed with Urethane Primer over the top
Rust encapsulator in key locations, like over the battery tray area.
Most of this was done several months ago. I then worked on some final metal work like the radiator mount, front valence, rear jack point.
Now we are ready for final prep work which included block sanding with 80 and 180 grit. We used foot long blocks made of a flexible rubber, with velcro on the sides. Scott also uses a metal file to knock off the high points. Scott marks the low spots with a circle and the high spots with an "X". The low spots are then filled with glazing compound, a very thin filler, and sanded with 180 grit. He also used an air sander.
One of the steps we took was to roll the fenders to give them a better shape. We only moved the fenders a quarter inch, but rolled the lips and got rid of the funky inward curve of the shape when looking overtop the fenders. It is amazing what a subtle change like this can do to the aesthetics and functionality.
This is what the primed car looks like. This is "two laps around" the vehicle, or two coats of Urethane primer separated by 10 minutes of drying.
Next up, sanding with 400 and 600 grit, some final prep and then Painting!!!
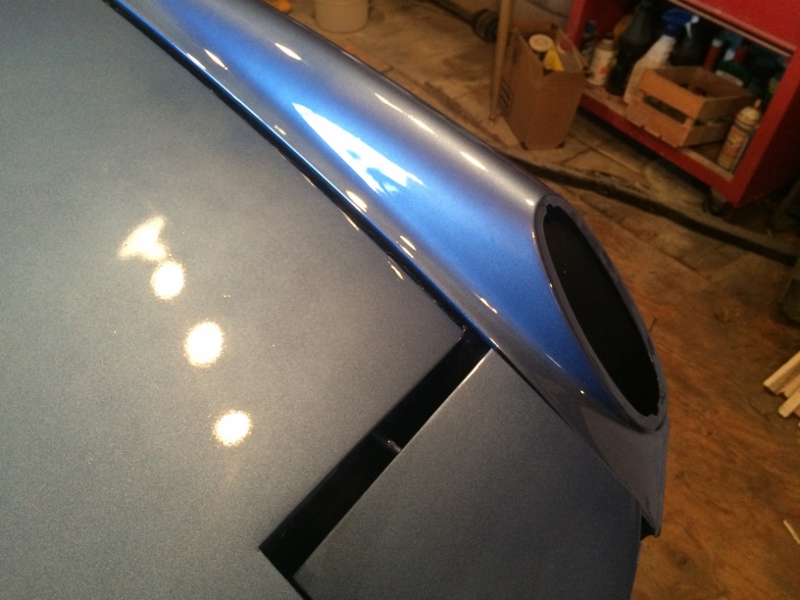
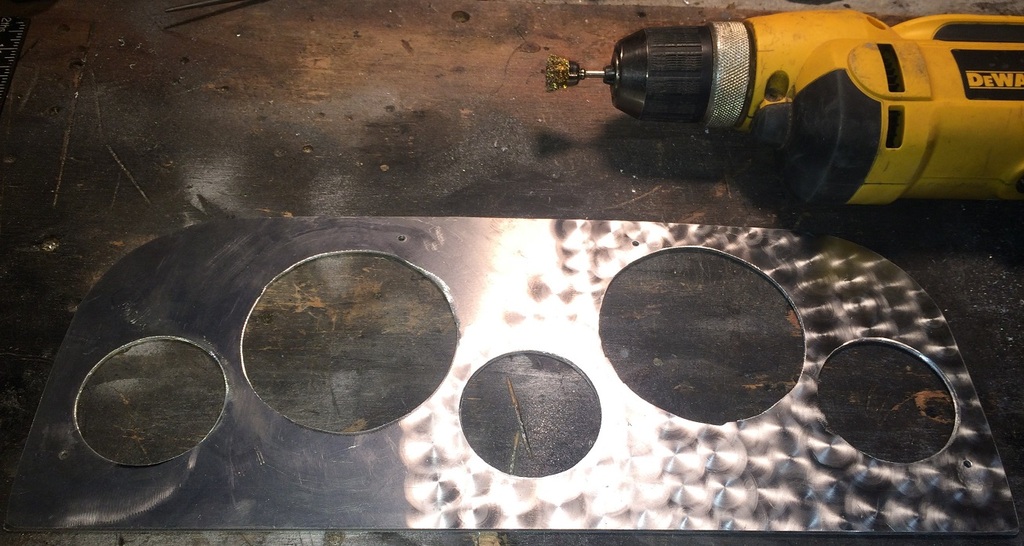
Interesting fender cut outs, I like them
Yes the radiator vent holes. I figured that the triangles would retain more strength.
Also see post #48
Also see post #48
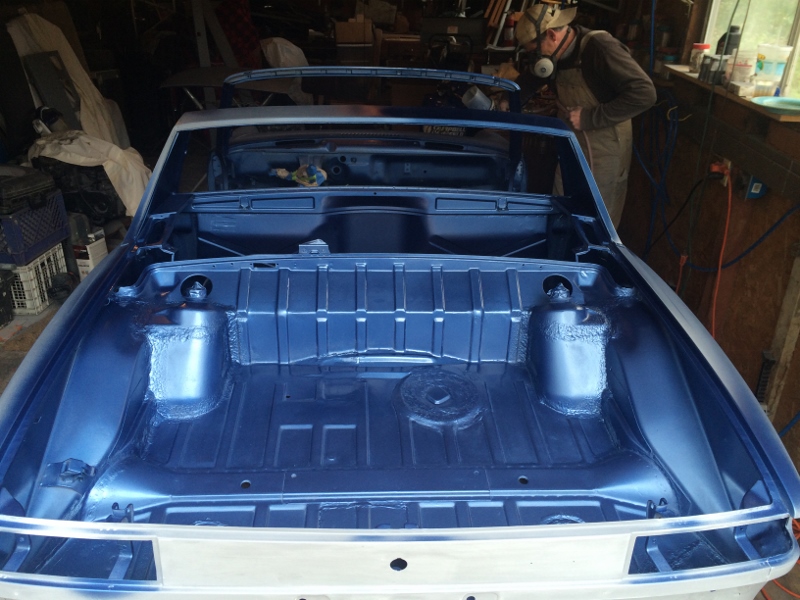
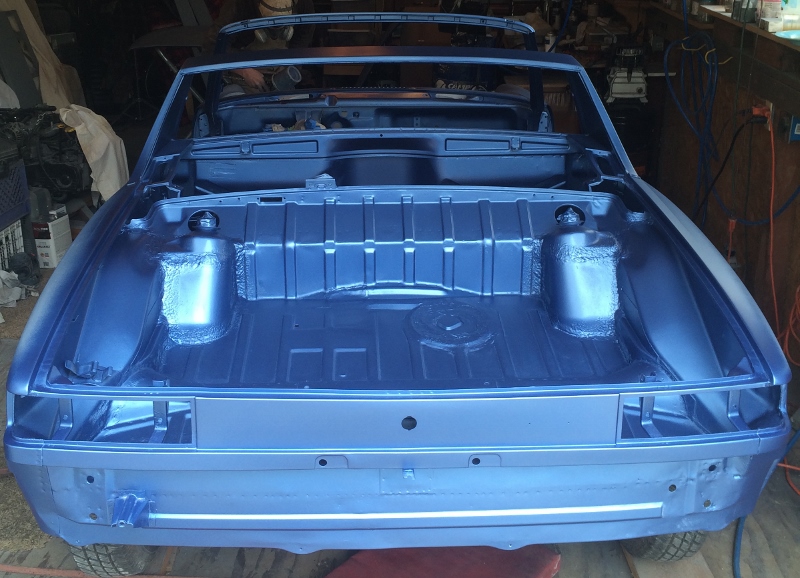
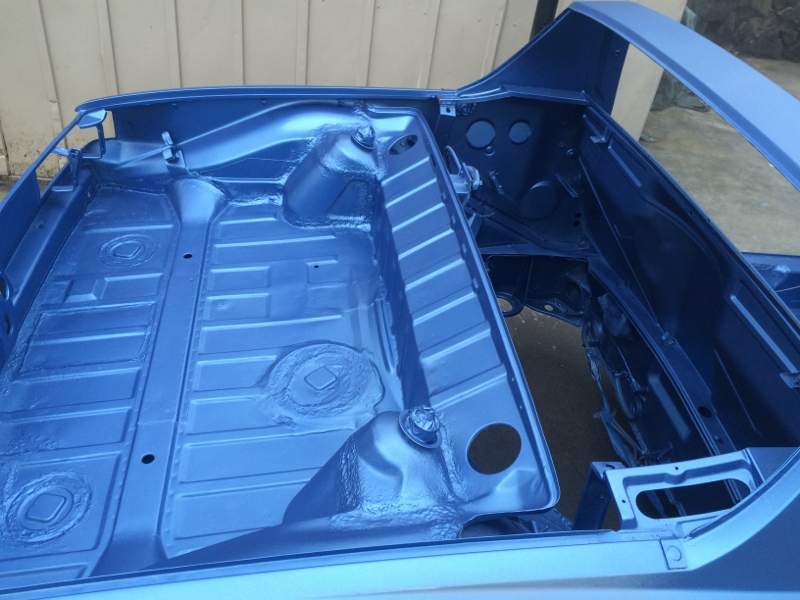
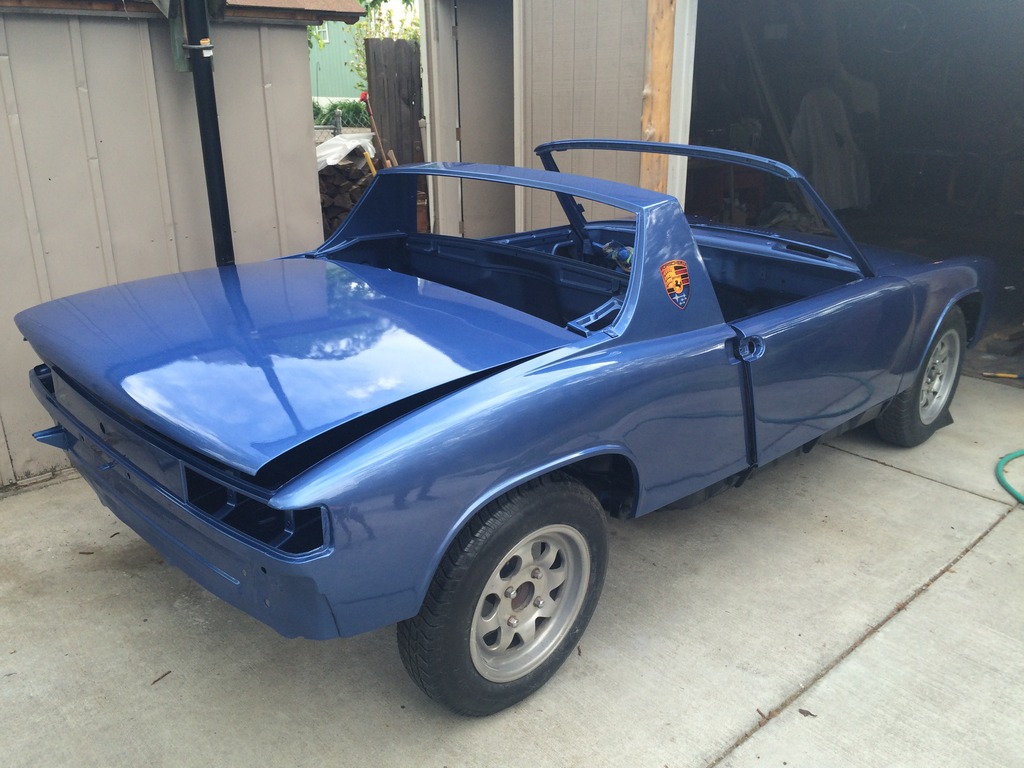
Painting Begins
I can't wait to post these photos. We are half-way through the painting process doing the interior first, two coats paint and two coats clear-coat. We decided on a non-stock color, a Honda Integra B97M code color. It's a pearl, which is mica rock, in the old days, it was made with fish scales, much easier to paint with the modern paint, but still shows every flaw. I am starting to see bumps I didn't know were there.
Blue Color survey post
Painting Notes/Tips
- The guide coat is very important throughout the paint prep process. This is a thin coat of mist sprayed over the primer to create dots or texture that reveals low spots and where you've sanded. It's particularly important for wet sanding. We used 400 grit 3M paper for wet sanding and could get away with it because of the high solids in the paint.
- Foam sanding blocks work very well.
- Use the green masking tape. The glue withstands the chemicals in the paint better than blue. blue is ok for priming, but must be changed out for the paining. Better to use the green.
- Put a little dawn dish soap in the water when wet sanding. Dawn is a great cleaner for the painting process.
- Spray water down on the ground before priming and paining to remove static discharge and keep the paint from sticking to the cement.
- Use lacquer thinner for solvent.
- Mix hardeners exactly, but reducers are up to the painter.
- Buy a small amount of test paint and spray it out with one, two, and three coats, with clear coat over the top, because the paint varies considerably with the number of coats and methods of spray. Also, photos on the internet vary widely depending on lighting conditions.
- There is a face coat and side cote tone that varies between light and shadow. The difference in tones is important as you will see it in the curves of the car.
- More to follow as I remember them (Feel free to add your painting tips)
Pictures:
Our color trials. The lower colors are a candy version that we will use for the rocker panels.
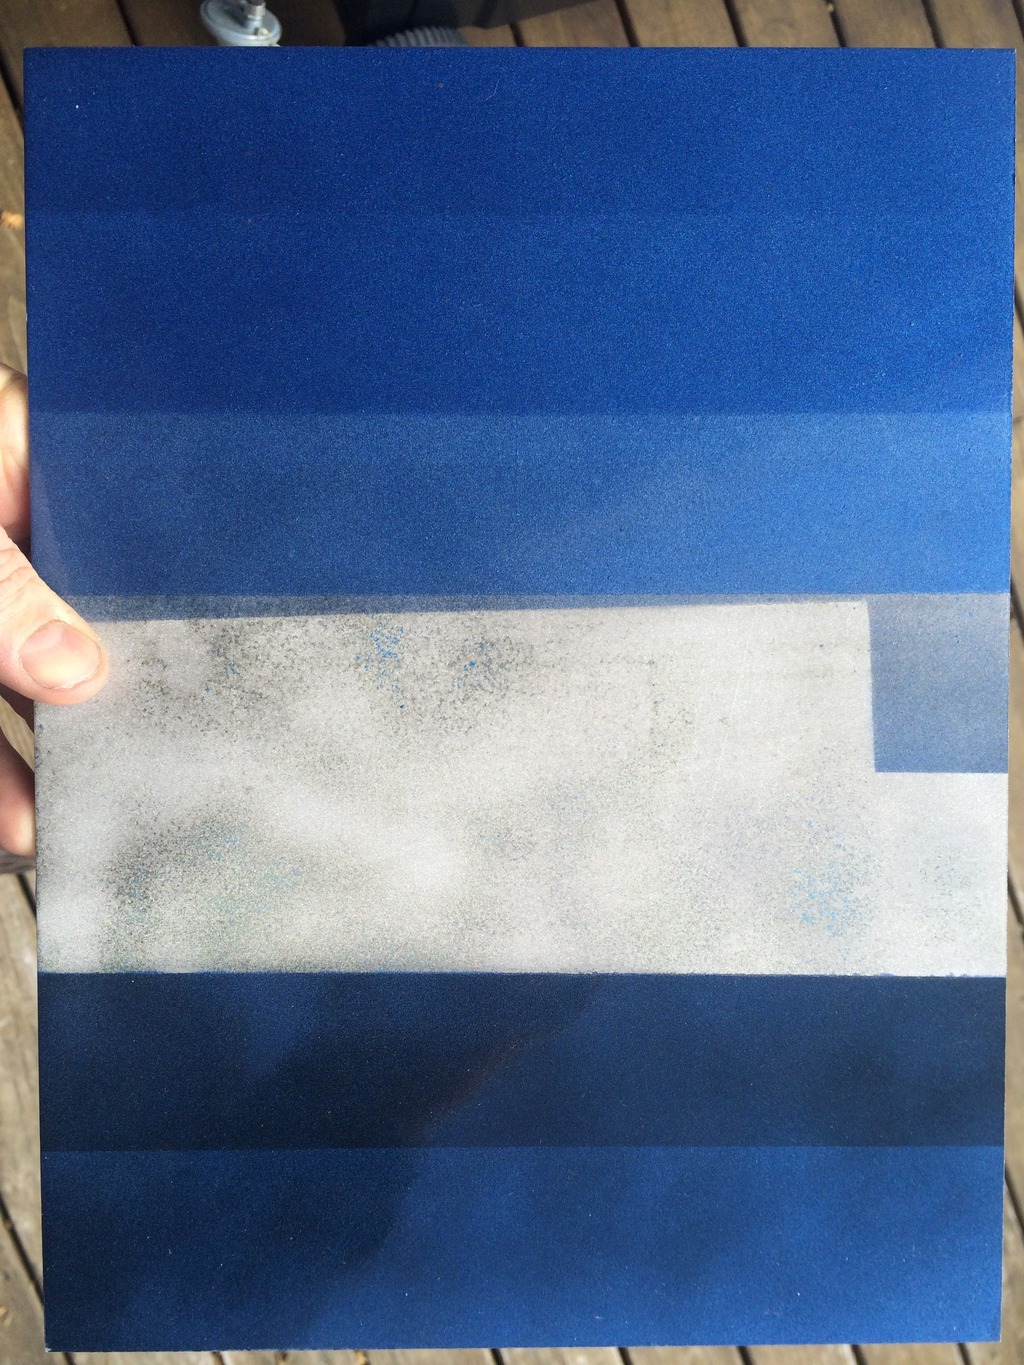
These pictures were taken before the clear coat was applied, which really makes the paint pop.
I can't wait to post these photos. We are half-way through the painting process doing the interior first, two coats paint and two coats clear-coat. We decided on a non-stock color, a Honda Integra B97M code color. It's a pearl, which is mica rock, in the old days, it was made with fish scales, much easier to paint with the modern paint, but still shows every flaw. I am starting to see bumps I didn't know were there.
Blue Color survey post
Painting Notes/Tips
- The guide coat is very important throughout the paint prep process. This is a thin coat of mist sprayed over the primer to create dots or texture that reveals low spots and where you've sanded. It's particularly important for wet sanding. We used 400 grit 3M paper for wet sanding and could get away with it because of the high solids in the paint.
- Foam sanding blocks work very well.
- Use the green masking tape. The glue withstands the chemicals in the paint better than blue. blue is ok for priming, but must be changed out for the paining. Better to use the green.
- Put a little dawn dish soap in the water when wet sanding. Dawn is a great cleaner for the painting process.
- Spray water down on the ground before priming and paining to remove static discharge and keep the paint from sticking to the cement.
- Use lacquer thinner for solvent.
- Mix hardeners exactly, but reducers are up to the painter.
- Buy a small amount of test paint and spray it out with one, two, and three coats, with clear coat over the top, because the paint varies considerably with the number of coats and methods of spray. Also, photos on the internet vary widely depending on lighting conditions.
- There is a face coat and side cote tone that varies between light and shadow. The difference in tones is important as you will see it in the curves of the car.
- More to follow as I remember them (Feel free to add your painting tips)
Pictures:
Our color trials. The lower colors are a candy version that we will use for the rocker panels.
These pictures were taken before the clear coat was applied, which really makes the paint pop.
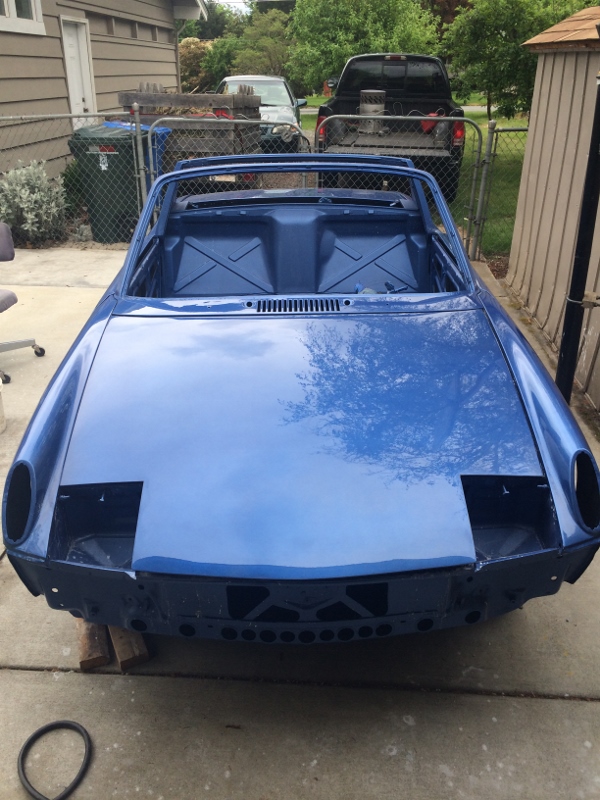
We got some paint on the panels yesterday and clear coat today. Two coats paint, one coat pearl, 4 coats clear. We need to do some cutting and buffing yet. There's still orange peel and quite a bit of texture to be buffed. But, again, I can't wait to post pix, so here they are...
The color is amazing, but you can't see it as well with these pictures taken inside. I will have to push it out there for pix when the pollen stops flying and we are done with the paint.
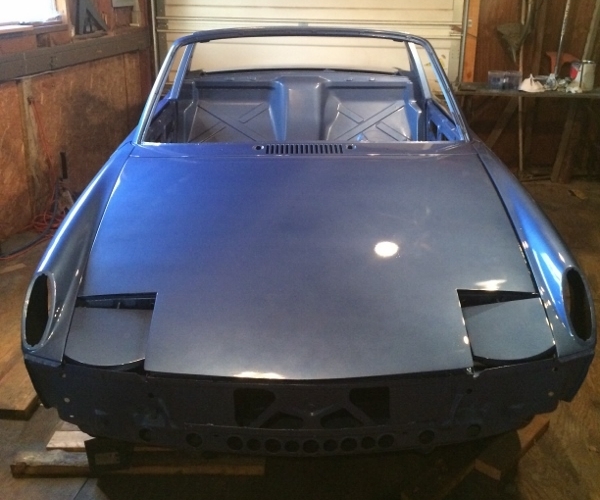
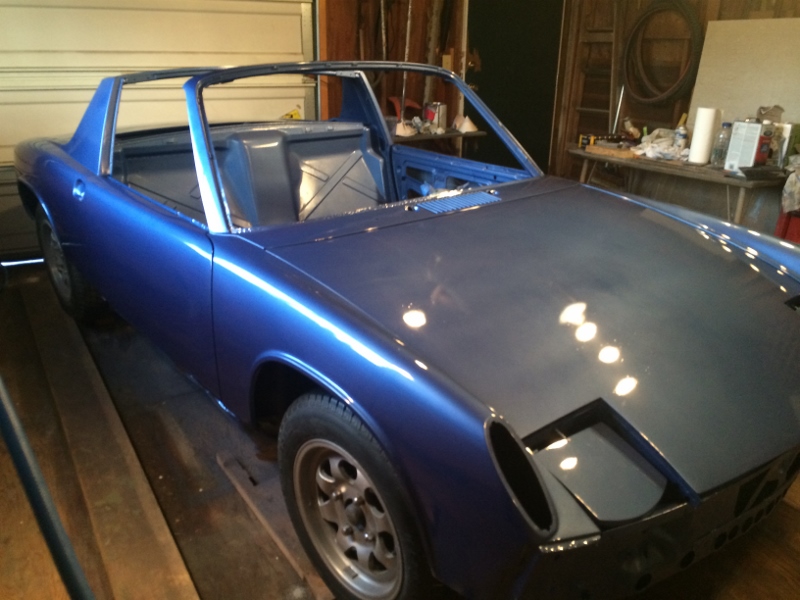
And a surprise on the way ...

The color is amazing, but you can't see it as well with these pictures taken inside. I will have to push it out there for pix when the pollen stops flying and we are done with the paint.
And a surprise on the way ...
Great progress!!! Looking good!!! How about some shots of the front bumper and air dam.
QUOTE(ahycaramba @ Apr 2 2016, 10:34 PM)
Great progress!!! Looking good!!! How about some shots of the front bumper and air dam.
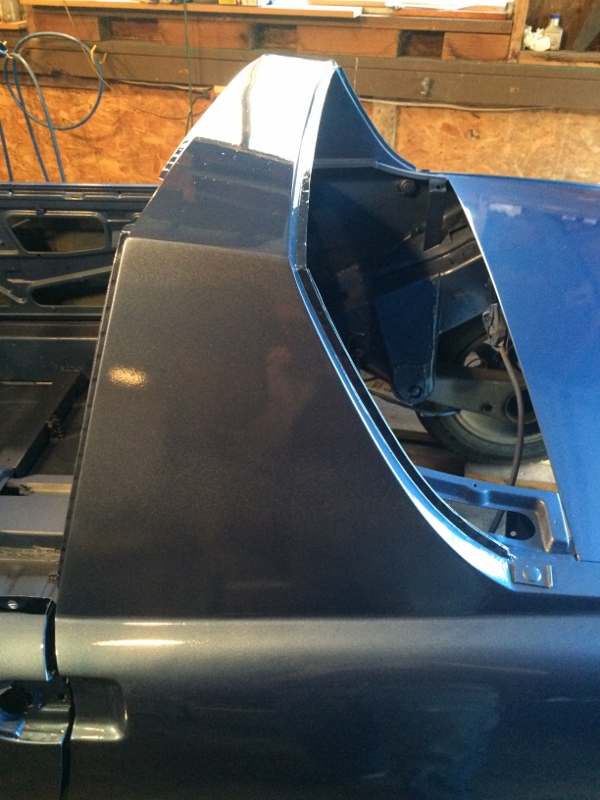
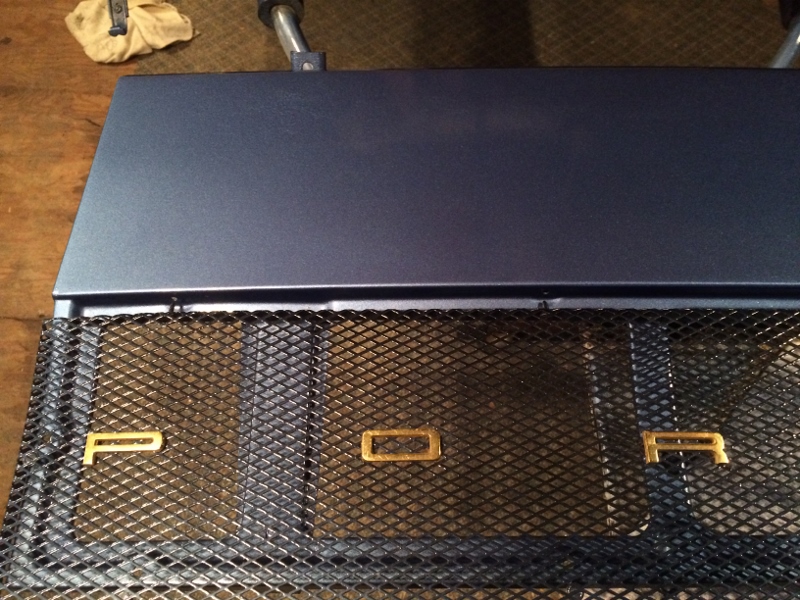
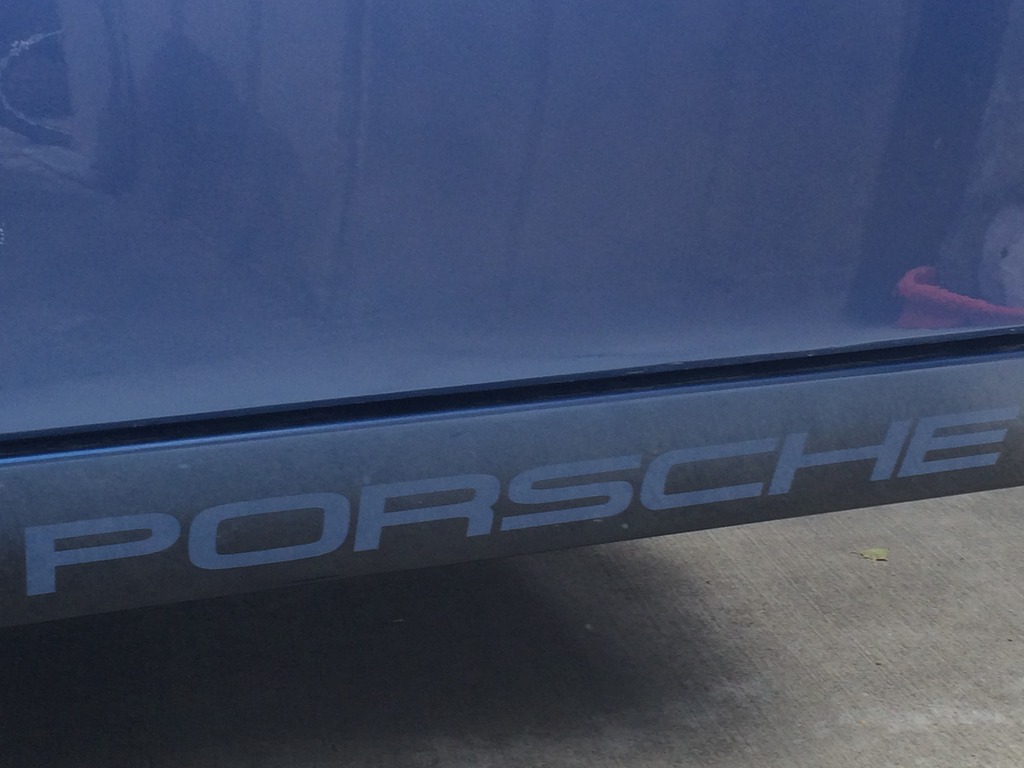
We are going to paint the lower portion (original valence) in a candied blue black and the upper portion (custom civic part) in the voltage blue. Scott has it at his shop because he was doing some final glazing work. I can hardly wait to get it back myself. He also has the rocker panels which will be done in the candy blue black fading from dark to light with a "Porsche" negative stencil. So, I am hoping to get those back on Monday. The grate over the engine is in the candied blue black. Looks sweet. The photos don't do it justice.
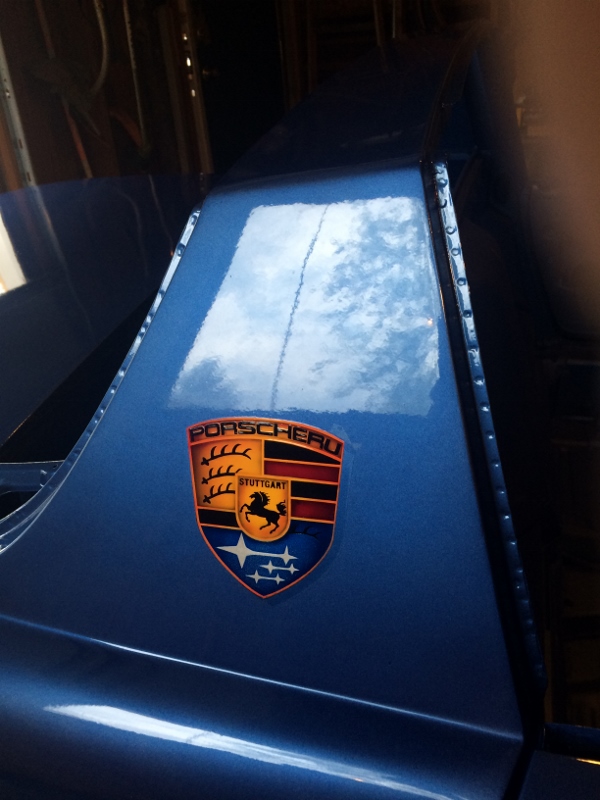
The big reveal today. Scott finished the logo. He painted this by hand with an aribrush. It's on the sail panel.
It's not a sticker believe it or not. The pictures are a little larger than life size.

It's not a sticker believe it or not. The pictures are a little larger than life size.

QUOTE(R_u_dd @ Apr 7 2016, 12:53 AM)
The big reveal today.
Ho WOW that thing rocks!
Love that, I would use that crest and do a 3D printed badge. Is it copyrighted?
That looks great!!!
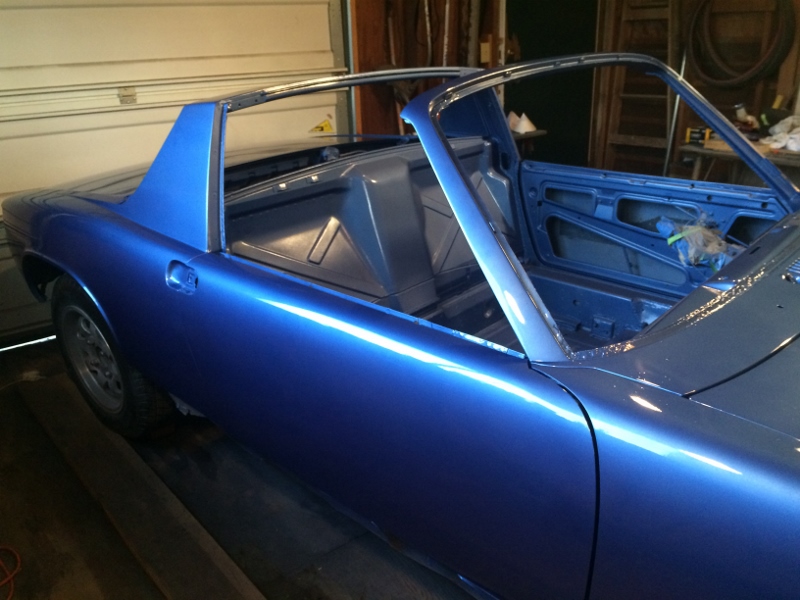
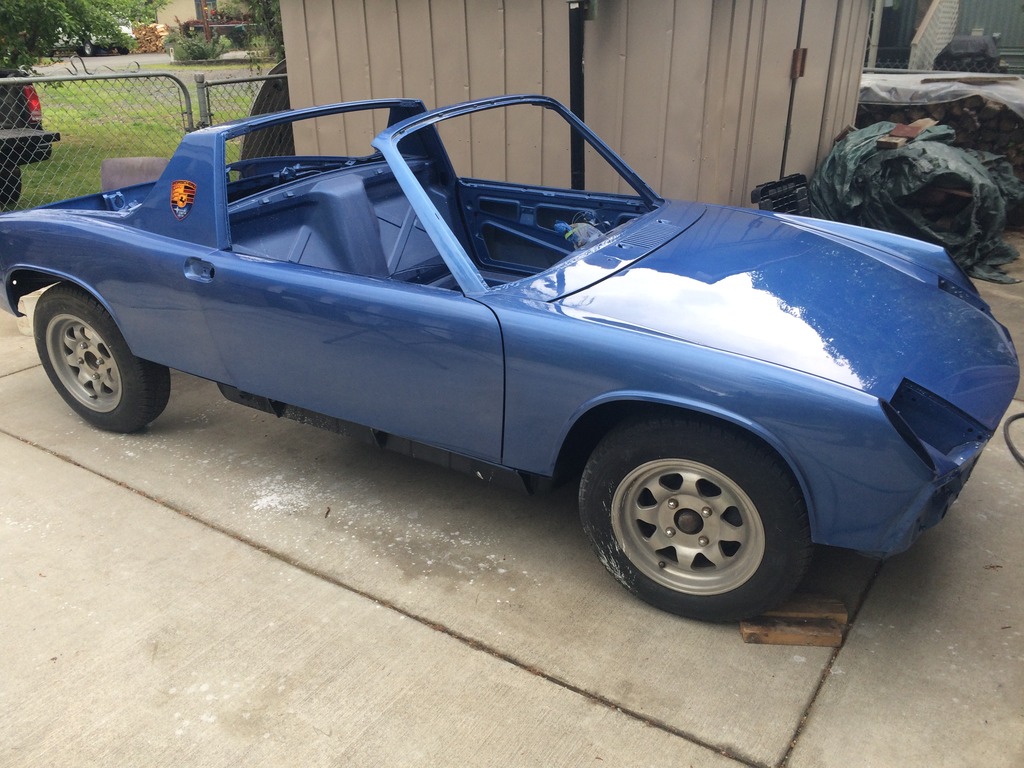
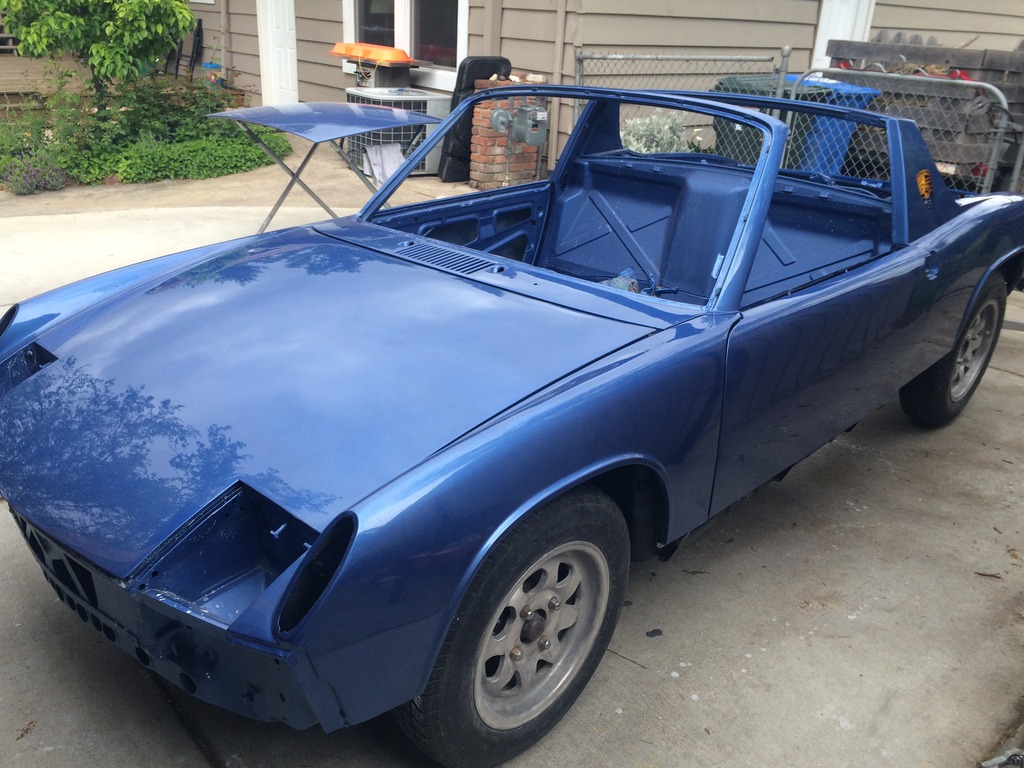
The painting is almost finished. We cut and buffed this weekend. There's still some fine finishing work and small pieces, bumper and rockers to paint.
High Resolution - cell phone
High Resolution - cell phone
Rocker Panels (They look like a pair of skis, don't they?)
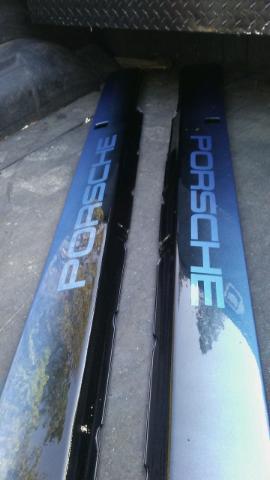
Notice the fade from blue to black on the bottom? I think it is reminiscent of the original look even though it's not correct.
Love the blue bud. I even like the logo you made up. Not sure I like it on the sail panel. It's your car though & all that matters is you like it. You got a little work to do to have it ready for WCR. It is looking great though. Can't wait to see it in person.
QUOTE(JRust @ Apr 25 2016, 09:07 PM)
Love the blue bud. I even like the logo you made up. Not sure I like it on the sail panel. It's your car though & all that matters is you like it. You got a little work to do to have it ready for WCR. It is looking great though. Can't wait to see it in person.
You know we thought about putting the logo behind the front wheel on the quarter panel- taped a paper copy in both locations and the logo just looked better on the sail panel. The original idea was to put the logo- a single logo only on the front hood where the badge goes, but it would have looked like two eyeballs and a nose, so that didn't work. The sail panel logo grows on you after a short while. I like the checkerboard sail panel on the blue autocross car that is out there- the inspiration for dressing up the sail panel.
Hey it's looking great man. I like the logo like I said. I don't think I would have put it there but who cares. It's your car & what matters is you like it. I am sure there are plenty who will love it. Now show me some pics of that suby drivetrain going in 
You know we thought about putting the logo behind the front wheel on the quarter panel- taped a paper copy in both locations and the logo just looked better on the sail panel. The original idea was to put the logo- a single logo only on the front hood where the badge goes, but it would have looked like two eyeballs and a nose, so that didn't work. The sail panel logo grows on you after a short while. I like the checkerboard sail panel on the blue autocross car that is out there- the inspiration for dressing up the sail panel.
QUOTE(R_u_dd @ Apr 25 2016, 09:59 PM)
You know we thought about putting the logo behind the front wheel on the quarter panel- taped a paper copy in both locations and the logo just looked better on the sail panel. The original idea was to put the logo- a single logo only on the front hood where the badge goes, but it would have looked like two eyeballs and a nose, so that didn't work. The sail panel logo grows on you after a short while. I like the checkerboard sail panel on the blue autocross car that is out there- the inspiration for dressing up the sail panel.
That looks great, love the badge details and the choise of blue. Keep up the good work!
Cars coming together nicely
Gauges, Gauges and More Gauges
The original look of the gauges is great. In a concourse or restored 914 with original engine and transmission the best thing is to restore the original gauges. But for me, a Suberite, one has to use the digital speedometer rather than the cable speedo. Questions to think about: Should I rebuild the speedometer and save the faceplate and recalibrate? Should I just start over with new gauges? Which of the other gauges are usable? After a lot of web searching and pricing, what I decided to do is replace the gauges entirely with some original look VDO gauges.
Here is some background material that I found while trying to make an informed decision:
Everything you need to know about your model year Gauges from P 914 Forum
Time For Gauges, What Should I consider, thread by Cairo94507
Gauges by timothy_nd28:
How to Rebuild Gauges Using Modern Parts
Gauge Lighting, This Little Light of Mine
Custom Gauge Lighting, DIY kits or send them to me
Upgrading the tachometer, to remove that bounce
Vendors:
Palo Alto Speedometer
And from:
Ideas for Dash Board Layout (Pictures from forum member cars)-
Link to: Pictures of 1973 Dash and Gauges
Pictures from another interior. Not sure the year.
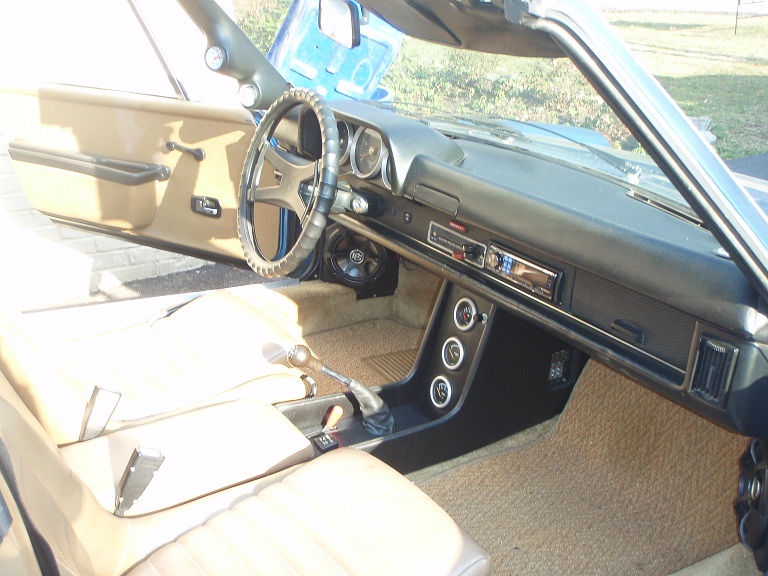
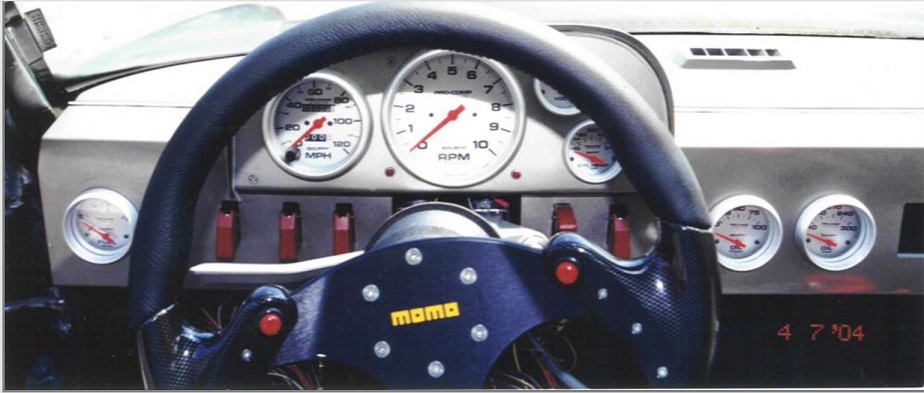

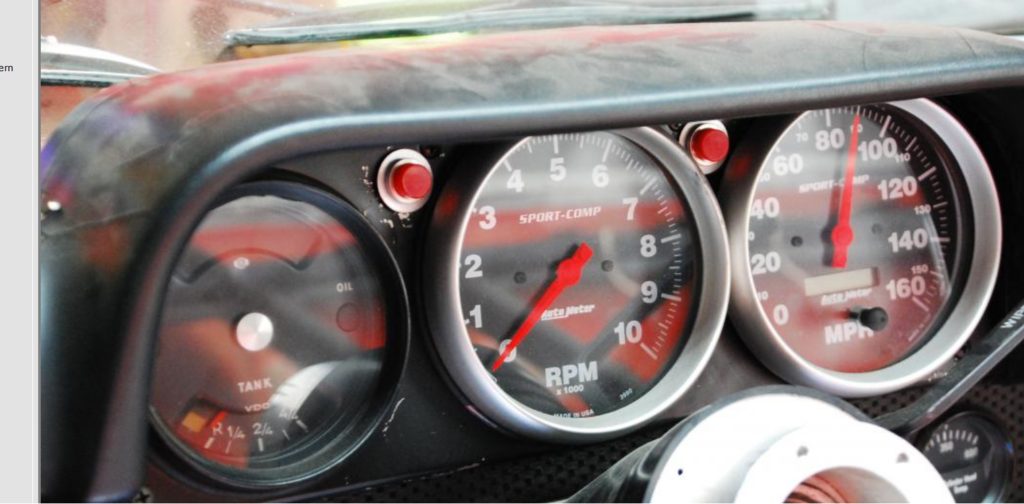
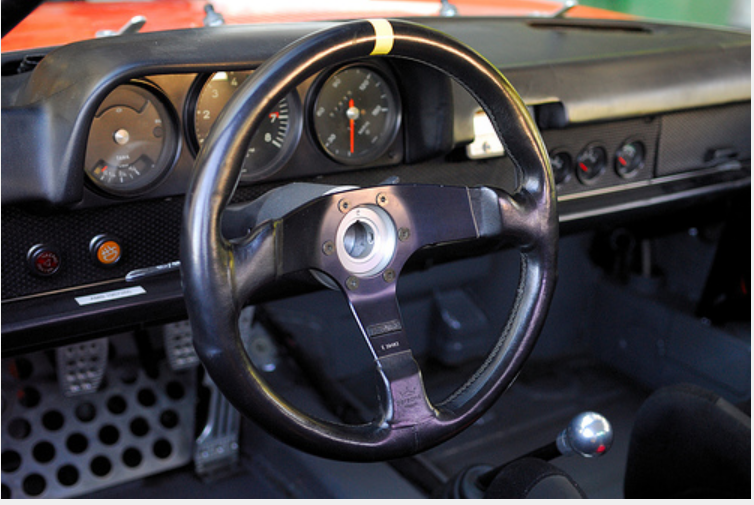
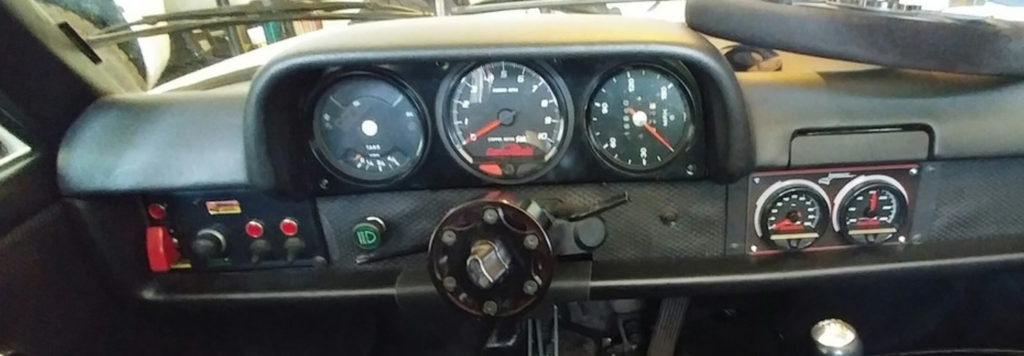
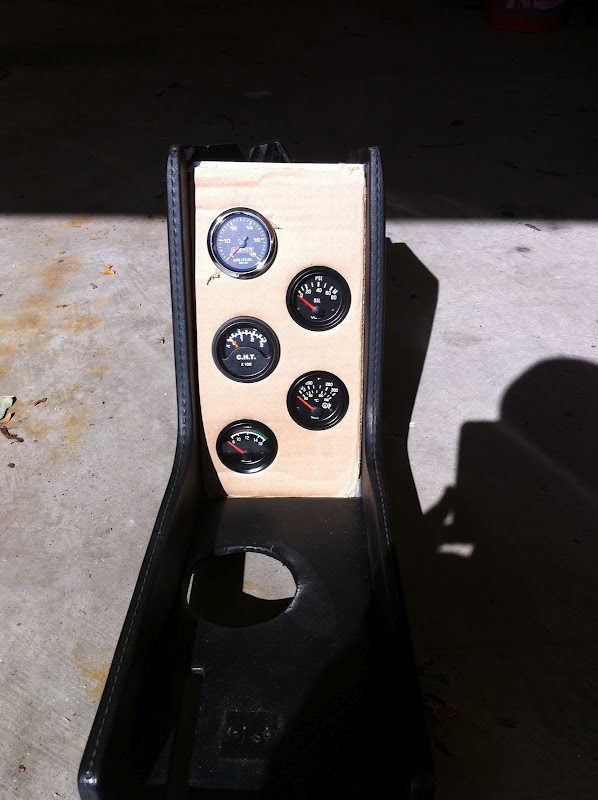
I bought a 6 gauge set of genuine VDO gauges off ebay for $280 bucks plus a clock for another $40. The small gauges are 2 1/16 inch and the two large gauges are 3 3/8". They are a bit small, but that allows them to be put into the main dashboard. I tried six gauge clusters and five gauge clusters above the steering wheel and decided on the five plus two in the ash tray area. The center console looks very nice, but in the end, I think I might feel confined in the cockpit with it there.
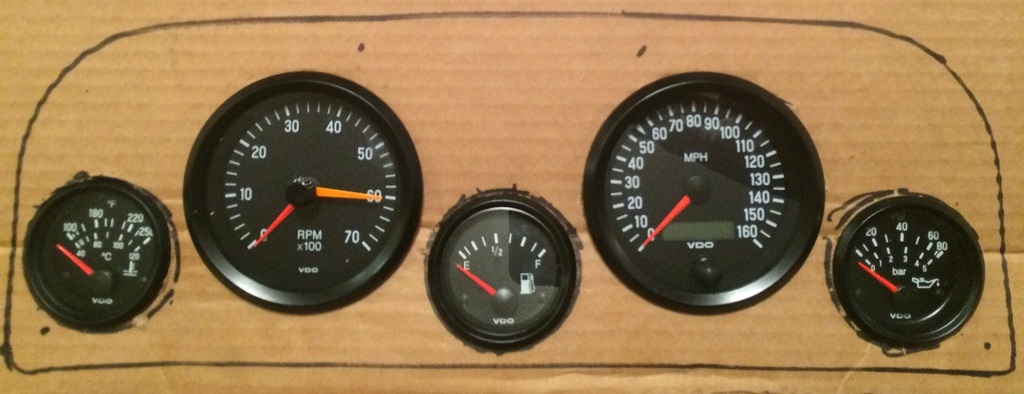
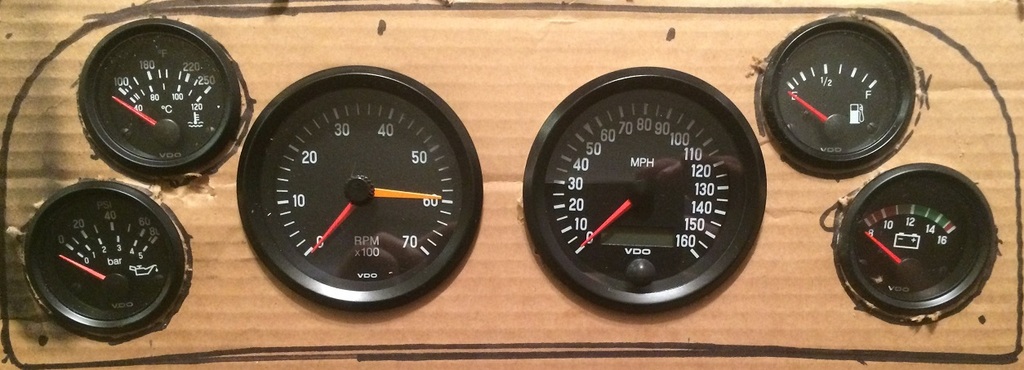
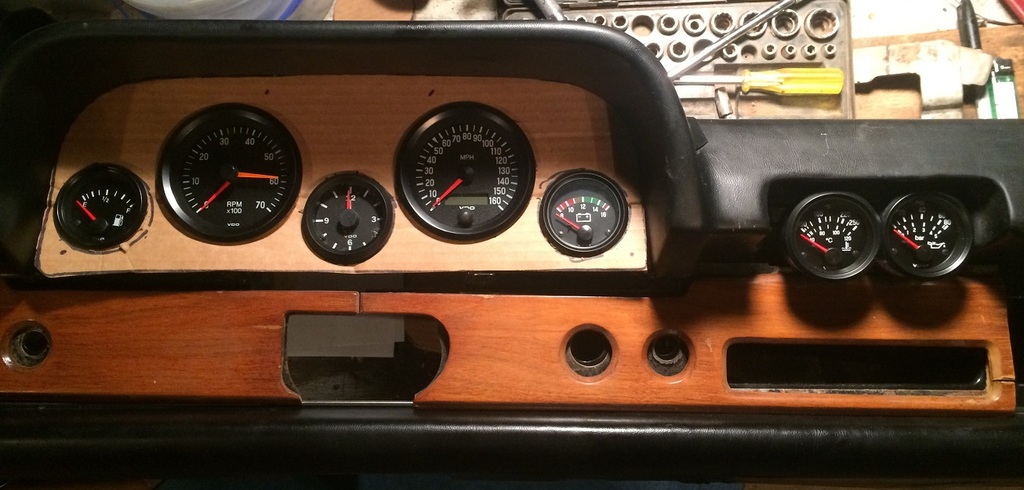
I learned that the 2" hole cutter actually creates a larger hole when you don't use a drill press. Cutting by hand, there is just enough wobble to make the hole a bit larger. The 2 1/16 inch measurement is for the outside of the gauge. The hole needs to be 2". Since my hole was just slightly larger, I put a rubber bumper around the outside of the gauge (cut from a bicycle inner tube). Worked perfectly, and I have a snug fit now. I cut the larger holes very carefully with a jigsaw and got the fit nice and snug.

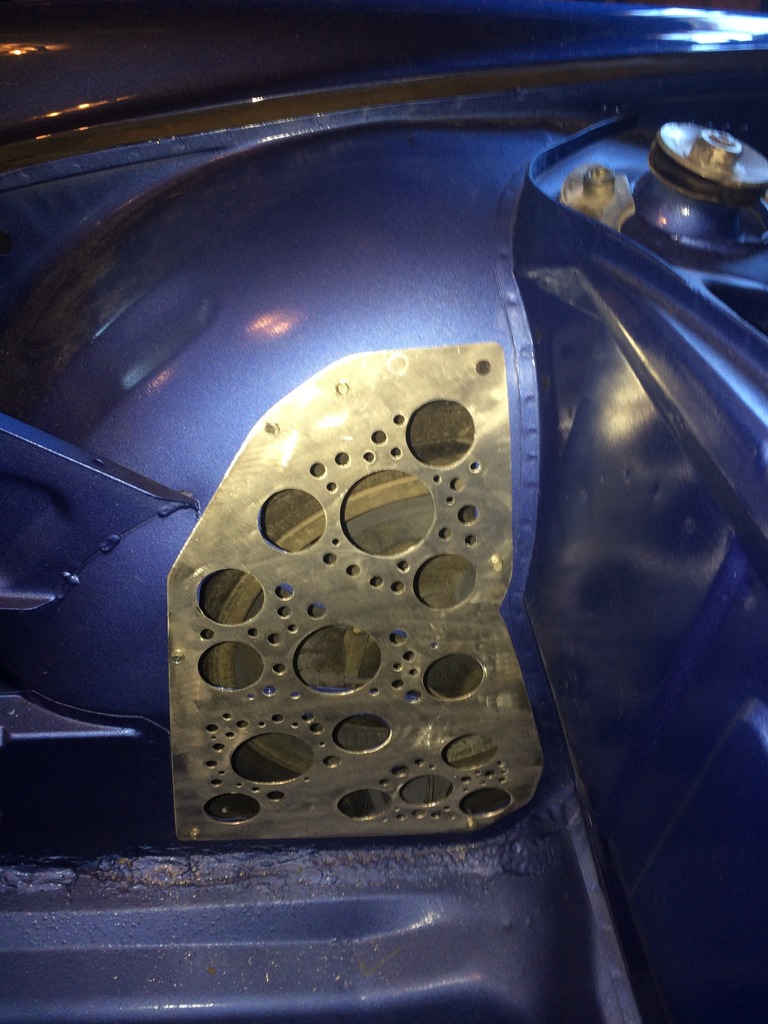
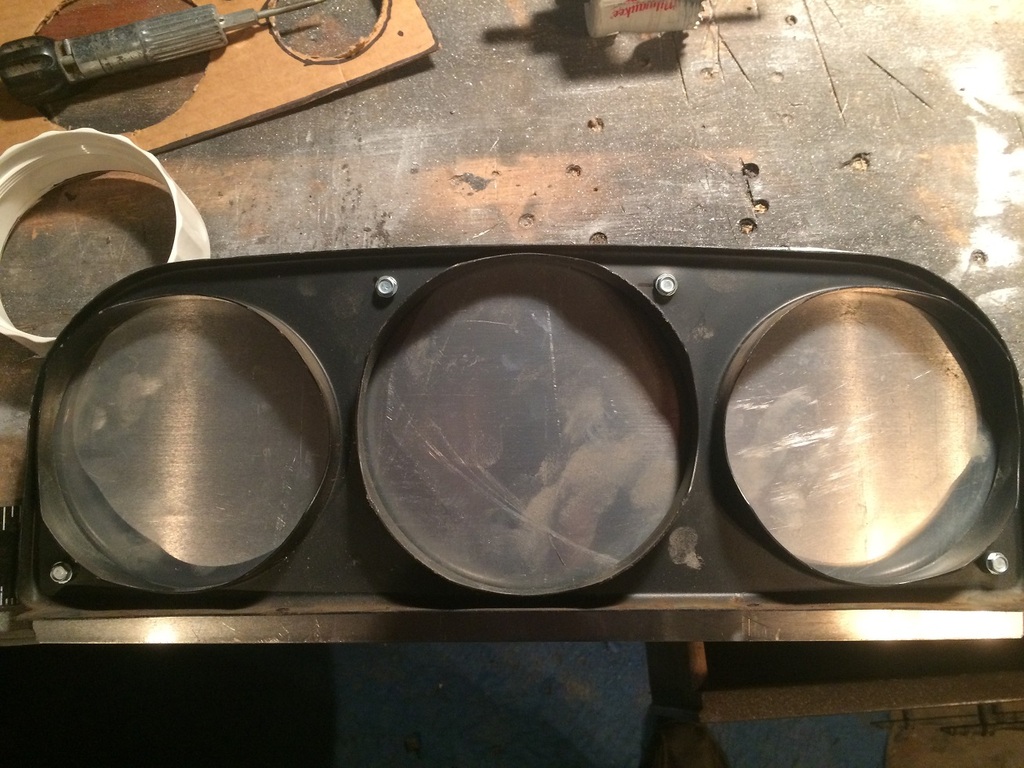
I screwed the aluminum sheet metal to the back of the original to use for a template to cut the outside perimeter and mark the location of the screw holes.
I saw this technique somewhere to create a pattern in the aluminum. If you make the swirls, here's a few tips. Use a drill press. Take your time. Go the same direction with your swirls. Cut half the previous circle with your bit. You can't very well redo your swirls, because it creates a different reflection. Keep your lines straight. I did mine by hand with my drill and a brass brush from a dremel kit. Seems to work fairly well, but if you look closely, my pattern is not that precise. The lines could be straighter and pattern more precise. They should all look like Japanese fans. Usually only the artist notices their own flaws. I like the swirls though. It gives the dashboard more depth and covers up the fact that the gauges are slightly off center.
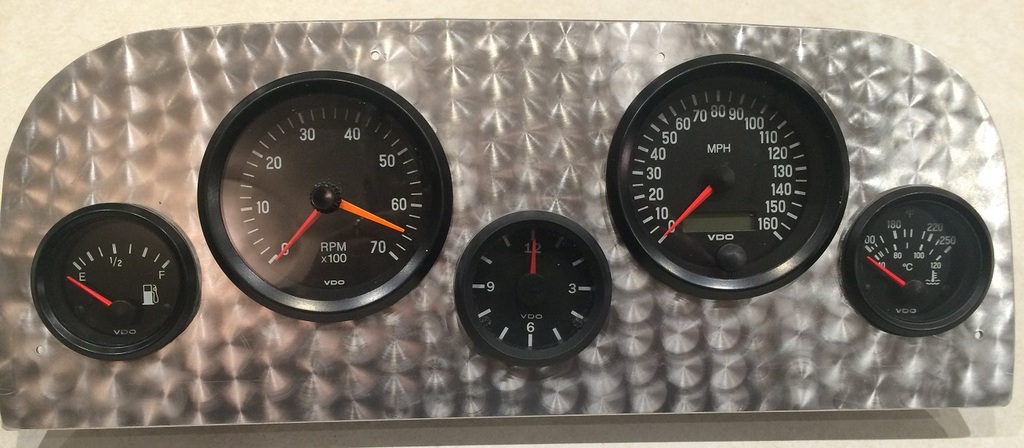
The board with the gauges in them. The lower part will be folded down.
The original look of the gauges is great. In a concourse or restored 914 with original engine and transmission the best thing is to restore the original gauges. But for me, a Suberite, one has to use the digital speedometer rather than the cable speedo. Questions to think about: Should I rebuild the speedometer and save the faceplate and recalibrate? Should I just start over with new gauges? Which of the other gauges are usable? After a lot of web searching and pricing, what I decided to do is replace the gauges entirely with some original look VDO gauges.
Here is some background material that I found while trying to make an informed decision:
Everything you need to know about your model year Gauges from P 914 Forum
Time For Gauges, What Should I consider, thread by Cairo94507
Gauges by timothy_nd28:
How to Rebuild Gauges Using Modern Parts
Gauge Lighting, This Little Light of Mine
Custom Gauge Lighting, DIY kits or send them to me
Upgrading the tachometer, to remove that bounce
Vendors:
Palo Alto Speedometer
And from:
Ideas for Dash Board Layout (Pictures from forum member cars)-
Link to: Pictures of 1973 Dash and Gauges
Pictures from another interior. Not sure the year.
I bought a 6 gauge set of genuine VDO gauges off ebay for $280 bucks plus a clock for another $40. The small gauges are 2 1/16 inch and the two large gauges are 3 3/8". They are a bit small, but that allows them to be put into the main dashboard. I tried six gauge clusters and five gauge clusters above the steering wheel and decided on the five plus two in the ash tray area. The center console looks very nice, but in the end, I think I might feel confined in the cockpit with it there.
I learned that the 2" hole cutter actually creates a larger hole when you don't use a drill press. Cutting by hand, there is just enough wobble to make the hole a bit larger. The 2 1/16 inch measurement is for the outside of the gauge. The hole needs to be 2". Since my hole was just slightly larger, I put a rubber bumper around the outside of the gauge (cut from a bicycle inner tube). Worked perfectly, and I have a snug fit now. I cut the larger holes very carefully with a jigsaw and got the fit nice and snug.
I screwed the aluminum sheet metal to the back of the original to use for a template to cut the outside perimeter and mark the location of the screw holes.
I saw this technique somewhere to create a pattern in the aluminum. If you make the swirls, here's a few tips. Use a drill press. Take your time. Go the same direction with your swirls. Cut half the previous circle with your bit. You can't very well redo your swirls, because it creates a different reflection. Keep your lines straight. I did mine by hand with my drill and a brass brush from a dremel kit. Seems to work fairly well, but if you look closely, my pattern is not that precise. The lines could be straighter and pattern more precise. They should all look like Japanese fans. Usually only the artist notices their own flaws. I like the swirls though. It gives the dashboard more depth and covers up the fact that the gauges are slightly off center.
The board with the gauges in them. The lower part will be folded down.
Click to view attachment
Very nice indeed.
/
Click to view attachment
I like this treatment,tho a dark matte coating or anodizing would avoid reflections in the windscreen.
Still,a nice effect,fighter jet.I worked in cnc punching and diemaking in the early '90s,mil spec enclosures.
https://www.google.ca/search?q=sheet+metal+...YceCsoQ_AUIBigB
https://www.google.ca/search?q=cnc+sheet+me...95zk1M9p6w0M%3A
For those sheetmetal and monocoque needs,a perfectly folded and punched fabrication.
Plasma cutters,lasers,waterjets too.
Like sheetmetal origami.
A local guy with a hobby cnc router could cut that metal in a jiffy,and at good quality.
/
QUOTE(R_u_dd @ Oct 2 2016, 01:04 PM)
Gauges, Gauges and More Gauges
The original look of the gauges is great. In a concourse or restored 914 with original engine and transmission the best thing is to restore the original gauges. But for me, a Suberite, one has to use the digital speedometer rather than the cable speedo. Questions to think about: Should I rebuild the speedometer and save the faceplate and recalibrate? Should I just start over with new gauges? Which of the other gauges are usable? After a lot of web searching and pricing, what I decided to do is replace the gauges entirely with some original look VDO gauges.
That looks vaguely familiar.
This is a "lo-fi" version of our main content. To view the full version with more information, formatting and images, please click here.