raynekat
May 27 2017, 09:21 PM
QUOTE(ConeDodger)
Is the back of that light black or chrome? Show the mount without the light cuddles up to it...
My housing is black.....does that matter?
ConeDodger
May 28 2017, 01:38 PM
Probably doesn't make a difference but...
Tom provided me with the example we used to do the Solidworks drawings and ultimately the manufacturing. Tom believed this was an original NLA mount. I believed Tom, Mark believed me. What you got is a copy of that.
Here are a list of possible problems:
Tom's example isn't actually a 914 rear fog light mount. In which case, it would probably work well for what it is, but not for a 914.
The guy who made the Solidworks drawing messed up the angle. I doubt this, but don't rule it out entirely - he's an MIT trained Mechanical engineer. His roommate invented the Roomba vacuum.
The possibility the chrome vs black lights are different. We need to get the chrome and black lights together for a party at WCR to see.
Obviously, Tom has a mount that works on his car. If we find that the first possibility is true, we start over with the actual exterior mount from Tom's car. If the drawing was bad, we tease Eric Purcell mercilously until he turns in his mechanical engineering card. If it's a difference in the lights, you'll have to get chrome. In any outcome, we'll get this straightened out.
Dion
May 28 2017, 09:01 PM
Lawrence is correct. I have a chrome housing, just did a trial fit. Angle is incorrect. It's too steep. Thus Fog light is aimed down too much.
Keep us posted Rob. Thanks.
Larmo63
May 28 2017, 09:08 PM
The mount shown in the TJB post above of the yellow 914 is completely different than the one we received.
I have a pile of "just doesn't work" stuff for my 914. I'm not butthurt, but the mount is on it's way to that pile.
McMark
May 29 2017, 05:37 AM
QUOTE
The mount shown in the TJB post above of the yellow 914 is completely different than the one we received.
TJB's bracket is home made. It uses M8 bolts instead of M6, and if you look at the drawing the PET it's not tall enough.
Another thought... maybe it's not supposed to point straight back.

Maybe it's supposed to point at the gound. The 914 location is really high for a rear fog light. And none of the brackets that are actually on cars (if you search old posts) are using a factory bracket. By which I mean there all
obviously home made. Which is fine, but those homemade installations do not make this part 'wrong'. Maybe all the homemade ones are wrong...
But regardless, it looks like the only happy medium is for me to order a fog light, redraw the bracket myself with parts in hand and send out replacements for those who want 'straight facing' rear fog lights.
In the mean time, has anyone seen a
vintage picture of a 914 rear fog? Were they in any advertisements or promotional materials?
McMark
May 29 2017, 06:09 AM
Upon further reflection, nah, I'm not drawing these up again. I think I've learned my lesson about making parts.
If anyone wants a refund, just send the parts back.
914Sixer
May 29 2017, 06:25 AM
I may be mistaken but I am almost certain I sold Tom original Porsche factory outside mount. I did not have an inside mount at the time. I think he sourced the inside elsewhere.
McMark
May 29 2017, 07:15 AM
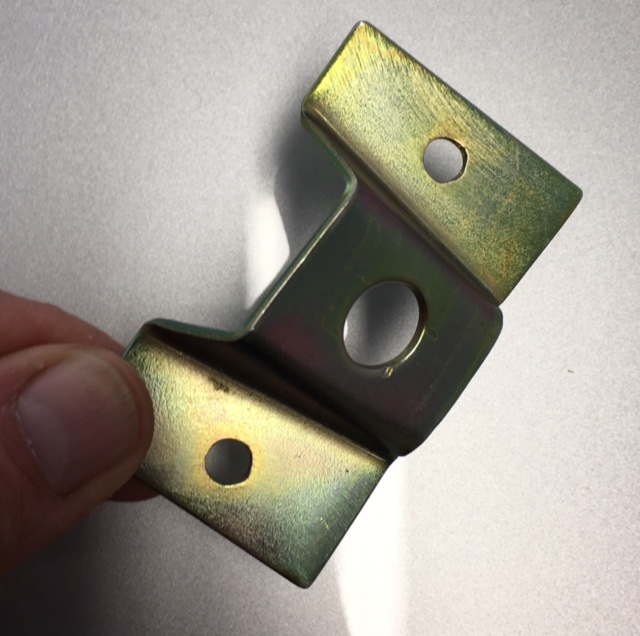
This is the picture I'm referencing. M8 bolts, not tall enough -- assuming the PET drawing is correct. Oh and it's either bare, or silver zinc. All OEM parts should be cad plated (yellow). The rounding on the corners strikes me a non-original as well. A factory part usually doesn't have corners that round because it's harder to make the part for no benefit. Plus the factory would have die stamped these, the rounding on these corners isn't stamped, it's filed/sanded.
This is the one Rob had the drawings made from. It's yellow cad, it's got M6 mounting holes, it's got 'hard' corners from stamping. But I don't like that the holes aren't completely round, or that there are sanding scratches.
ConeDodger
May 29 2017, 07:36 AM
Perhaps McMaster Carr sells a wedge washer that would work?
Dion
May 29 2017, 11:09 AM
QUOTE(ConeDodger @ May 29 2017, 05:36 AM)

Perhaps McMaster Carr sells a wedge washer that would work?
No worries McMark & Rob. I'll make it work. I was thinking just that Rob.
Just a "tip up". Thanks for the link. I was gonna put a little bead of weld on
and rest the washer upon it. Didn't realize these washers existed.
Thanks .
ConeDodger
May 29 2017, 11:25 AM
QUOTE(Dion @ May 29 2017, 02:09 PM)
QUOTE(ConeDodger @ May 29 2017, 05:36 AM)
Perhaps McMaster Carr sells a wedge washer that would work?
No worries McMark & Rob. I'll make it work. I was thinking just that Rob.
Just a "tip up". Thanks for the link. I was gonna put a little bead of weld on
and rest the washer upon it. Didn't realize these washers existed.
Thanks .
If the washer works, it would probably need to be put into a drill press to redirect the hole, but might work. Mark hasn't sent me mine (or maybe ots at home and I haven't seen it yet), but this is what I'm going to try. If it works perfectly, I'll send a package to Mark to include in everyone's order.
TJB/914
May 29 2017, 03:06 PM
QUOTE(McMark @ May 29 2017, 09:15 AM)
This is the picture I'm referencing. M8 bolts, not tall enough -- assuming the PET drawing is correct. Oh and it's either bare, or silver zinc. All OEM parts should be cad plated (yellow). The rounding on the corners strikes me a non-original as well. A factory part usually doesn't have corners that round because it's harder to make the part for no benefit. Plus the factory would have die stamped these, the rounding on these corners isn't stamped, it's filed/sanded.
This is the one Rob had the drawings made from. It's yellow cad, it's got M6 mounting holes, it's got 'hard' corners from stamping. But I don't like that the holes aren't completely round, or that there are sanding scratches.
Guys,
The pic of my outer bracket in the photo is stainless steel and sourced from someone I can't remember who?? The outer bracket Rob has was included in an orig. Porsche Hella Fog Light pkg. that Rob got. I agree with Mark, don't do this stuff anymore:headbang:
Tom
sixnotfour
May 29 2017, 03:29 PM
one bracket bolts directly to the fog light housing,, the other requires the swivel light...my guess
TJB/914
May 29 2017, 03:38 PM
Guys,
The inside bracket is 100% correct since I purchased some direct from the Porsche dealer and they came from Porsche-Germany with part #'s. It was a no brainer installation since they fit on the ledge inside the trunk. The holes were drilled using the inner bracket holes.
I am showing some photo's I used to locate the fog light hole location using the inner bracket (see photos of inside and outside for location). The inner bracket is Porsche correct from the factory.
Tom
02loftsmoor
May 30 2017, 06:27 AM
so in a nut shell these brackets are not going to work unless you cobble something up? yes or no
McMark
May 30 2017, 06:37 AM
QUOTE(02loftsmoor @ May 30 2017, 08:27 AM)
so in a nut shell these brackets are not going to work unless you cobble something up? yes or no
What do you mean by work? They work, the light just points down a bit. The conversation is essentially realizing that nobody know what the rear fog light is supposed to look like. Most people who have mounted them before this group guy, using alternative mounting methods and brackets, have mounted them straight up and down (straight back).
Nobody has a confirmed stock outer bracket. The mounting bracket that Rob (ConeDodger) had duplicated is the most likely candidate of any I've seen. And it's likely that it is original. But it makes the rear fog point down at an angle.
So it's not really about works or doesn't work -- it's about straight back or angled down.
02loftsmoor
May 30 2017, 07:25 AM
QUOTE(McMark @ May 30 2017, 07:37 AM)
QUOTE(02loftsmoor @ May 30 2017, 08:27 AM)
so in a nut shell these brackets are not going to work unless you cobble something up? yes or no
What do you mean by work? They work, the light just points down a bit. The conversation is essentially realizing that nobody know what the rear fog light is supposed to look like. Most people who have mounted them before this group guy, using alternative mounting methods and brackets, have mounted them straight up and down (straight back).
Nobody has a confirmed stock outer bracket. The mounting bracket that Rob (ConeDodger) had duplicated is the most likely candidate of any I've seen. And it's likely that it is original. But it makes the rear fog point down at an angle.
So it's not really about works or doesn't work -- it's about straight back or angled down.
if it's pointing down it not going to work. I bought a useless part. unless I want cobble something up, the whole idea is a direct fit, maybe a little tweaking.
McMark
May 30 2017, 09:48 AM
As I said, send it back and get your money back. Done.
McMark
May 30 2017, 10:06 AM
I need someone post a picture with the lens. Without a picture, I don't know whether to pursue trying to fix it, or just issue refunds to everyone. I need someone to help me out.
ConeDodger
May 30 2017, 10:49 AM
Mark,
Mine came, along with all the WCR stuff you sent. I'll get a picture when I get back home. Did you see the wedge washer solution?
ConeDodger
May 30 2017, 10:53 AM
Better yet, I'll send you a lens!
McMark
May 30 2017, 10:53 AM
QUOTE(ConeDodger @ May 30 2017, 12:49 PM)
Mark,
Mine came, along with all the WCR stuff you sent. I'll get a picture when I get back home. Did you see the wedge washer solution?
I saw the wedge washer. I don't have a lens/light, so I can't test anything. So I'm completely blind here. All I know is what people have said. It would be
REALLY nice to see WTF people are talking about.

McMark
May 30 2017, 11:00 AM
QUOTE(ConeDodger @ May 30 2017, 12:53 PM)
Better yet, I'll send you a lens!
That's one way, except I'm all out of effort. I will either refund money or hopefully someone can find a way to make it work so all my effort so far isn't completely wasted. No more parts manufacturing for me.
02loftsmoor
May 30 2017, 11:05 AM
QUOTE(McMark @ May 30 2017, 10:48 AM)
As I said, send it back and get your money back. Done.
Missed that sorry.
02loftsmoor
May 30 2017, 04:15 PM
QUOTE(McMark @ May 30 2017, 10:48 AM)
As I said, send it back and get your money back. Done.
don't worry about it. I didn't give that much for a raw bracket.. but instead of shimming under the light could a shim under the bracket and the body work, just tossing that out there
jd74914
May 30 2017, 04:22 PM
QUOTE(Dion @ May 29 2017, 12:09 PM)
QUOTE(ConeDodger @ May 29 2017, 05:36 AM)
Perhaps McMaster Carr sells a wedge washer that would work?
No worries McMark & Rob. I'll make it work. I was thinking just that Rob.
Just a "tip up". Thanks for the link. I was gonna put a little bead of weld on
and rest the washer upon it. Didn't realize these washers existed.
Thanks .
If you search Metric Leveling Washers on McMaster there is another option, assuming you need <5 degrees of rotation.
Larmo63
May 30 2017, 11:11 PM
In my original picture, the fog light (sourced from England) is bolted to the bracket and facing down at that shown angle.
It is the light/Hella kit mentioned in the thread above, chrome back.
ConeDodger
May 30 2017, 11:32 PM
QUOTE(02loftsmoor @ May 30 2017, 07:15 PM)
QUOTE(McMark @ May 30 2017, 10:48 AM)
As I said, send it back and get your money back. Done.
don't worry about it. I didn't give that much for a raw bracket.. but instead of shimming under the light could a shim under the bracket and the body work, just tossing that out there
It could, but I'd guess it would be more obvious than a shim under the light...
ConeDodger
May 30 2017, 11:33 PM
QUOTE(Larmo63 @ May 31 2017, 02:11 AM)
In my original picture, the fog light (sourced from England) is bolted to the bracket and facing down at that shown angle.
It is the light/Hella kit mentioned in the thread above, chrome back.
Lawrence, bring yours to Mammoth and let's brainstorm a bit...
simonjb
May 31 2017, 01:34 PM
Damn - And I already purchased the wiring harness....
Oh Well....

ConeDodger
May 31 2017, 01:59 PM
QUOTE(simonjb @ May 31 2017, 04:34 PM)
Damn - And I already purchased the wiring harness....
Oh Well....
It looks easy enough to solve. I wouldn't worry about it yet...
ConeDodger
May 31 2017, 03:22 PM
I might have it figured out.
I think Hella "superseded" a part number. If they did, and it looks possible, the mounts are correct, the lights are wrong, sort of...
If you hold the light up to the mount and then rotate it so the positioning is correct you see what I'm saying. What I'm going to try, is taking the light apart and seeing if I could re drill the hole for the mount stud and seal the old hole.
Yopu tells me I definitely want to take her shopping right now or I would do it right away and take pics.

Firstcar
May 31 2017, 05:05 PM
Brackets look fine to me - Light mounting post angle is wrong.
This link appears to be the correct light - right p/n, illustrations show correct post angle:
http://www.sierramadrecollection.com/Hella...ies-p29020.htmlNo affiliation with vender no figment guarantee, just an observation
raynekat
May 31 2017, 05:37 PM
QUOTE(Firstcar @ May 31 2017, 04:05 PM)
Brackets look fine to me - Light mounting post angle is wrong.
This link appears to be the correct light - right p/n, illustrations show correct post angle:
http://www.sierramadrecollection.com/Hella...ies-p29020.htmlNo affiliation with vender no figment guarantee, just an observation
This is the exact light I have and she's no good with the bracket that was fab'd up.
Firstcar
May 31 2017, 06:15 PM
Ah, now I see. I was getting confused by the picture of the yellow car- that bracket looks more like a 45 degree angle. Yup, the GB bracket has a shallower angle. Sorry to add to the confusion.
jkb944t
Jun 1 2017, 10:40 AM
Does anyone have this version of the fog light?
http://www.sierramadrecollection.com/356A-...-89-p21436.htmlIt looks like you could remove the adjustable bracket from the back of it and then the hole might be in the right location.
Jeff B
7TPorsh
Jun 1 2017, 12:00 PM
QUOTE(jkb944t @ Jun 1 2017, 09:40 AM)
Does anyone have this version of the fog light?
http://www.sierramadrecollection.com/356A-...-89-p21436.htmlIt looks like you could remove the adjustable bracket from the back of it and then the hole might be in the right location.
Jeff B
Is there a lens difference between the brake and fog lights?
Larmo63
Jun 4 2017, 04:51 PM
Rob (ConeDodger) and I talked about the rear fog light bracket angle issues at this weekend's WCR. I came home and solved the problem using Rob's advice. I drilled out a new hole 15mm higher, (there is a round circle boss there on the inside, probably for different fitment/manufacturing) and now it fits fine. Just drop in a correct size 3/8" grommet in the old/existing hole, run your wiring out there, and you're good to go. I drilled the outside of the housing, and started with a small bit, stepping up a few times. This housing is a tough piece, it was much more difficult to get through than I would have thought.
Drilling out the back of a convex chrome light is a bit of a trick, but I did it on my bench here. Make sure you use a punch as a starter, or it's not going to happen.
Click to view attachment
Dion
Jun 4 2017, 04:58 PM
Nice going Lawrence. I'll give that a go.
Nice shirt btw!

Larmo63
Jun 4 2017, 05:05 PM
If you really want to do it trick, you could offset the hole a tiny bit so that when installed, the light points perfectly perpendicular to the car. The back of a 914 has a slight curve which makes the light shine a bit askew and not exactly straight back although it is now level.
I'm just being overly pedantic in mentioning that, but I thought of it AFTER I drilled and mounted the light to the bracket.
Click to view attachment
ConeDodger
Jun 4 2017, 05:16 PM
QUOTE(Firstcar @ May 31 2017, 09:15 PM)
Ah, now I see. I was getting confused by the picture of the yellow car- that bracket looks more like a 45 degree angle. Yup, the GB bracket has a shallower angle. Sorry to add to the confusion.
The group buy bracket IS correct. The Hella light part number is a superseded #...
ConeDodger
Jun 4 2017, 05:21 PM
Great job Lawrence! Great meeting you this weekend too. Pity you couldn't have brought the car. It looks good in that picture!
ConeDodger
Jun 5 2017, 10:02 AM
So here is what I discussed with Lawrence and as you can see, it worked.
Here inside is a boss with the text "21W"
If you center punch right in the middle of that and step-drill a hole in the same size as the other, the angle is perfect.
I would then get a rubber plug for the original hole, but Lawrence's method obviously works.
I would get your order in to McMark before he gets disgusted and mails the hole lot to me. He has a really low tolerance for things that keep him out of his welding helmet!

ConeDodger
Jun 6 2017, 10:08 AM
Problem solved! Get 'em!
ConeDodger
Jun 17 2017, 02:16 PM
Well, as I said, the Group Buy bracket is correct. You see above that Lawrence did the modification to the light housing as he and I discussed at WCR17. Today, I had my first chance to do it myself.
As you can see, it works perfectly. When mounted, the light will point at the right angle.
Instead of step-drilling, (couldn't find my step-drill bit) I drilled a pilot hole big enough for a Dremel and opened up the hole, then I just drilled it to the proper size.
ConeDodger
Jun 17 2017, 02:35 PM
And here it is mocked up. I'll mount it in a bit, Just got to get Yopu out of the garage so I have room to work.

ConeDodger
Jun 24 2017, 11:55 AM
Hey guys! As you can see, the problem has been solved! Get your rear fog light mount parts while they last!
02loftsmoor
Jun 25 2017, 09:07 AM
I there any measurements on where to mount on the cars body? or is it where you want it ?
ConeDodger
Jun 25 2017, 09:16 AM
QUOTE(02loftsmoor @ Jun 25 2017, 12:07 PM)
I there any measurements on where to mount on the cars body? or is it where you want it ?
That depends. If Hans was working, and it was before lunch it was one measurement. If Franz was working and it was after lunch slightly different.
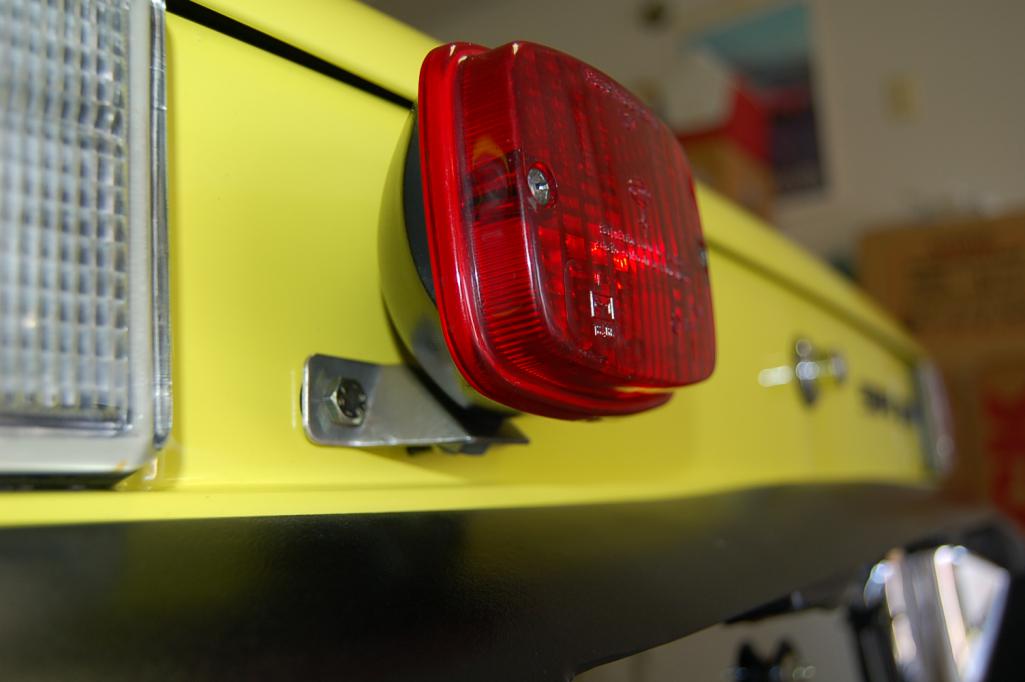
Eric Shea tells me 112mm or 4.4" from the plastic edge of the outside taillight housing to the center of the outboard hole. This measurement puts our outside the hold down for our lids. Non-GT cars would be closer to the taillight.
I think it is easier to use the inside as the mount rests on the lip so if you'll wait a couple days, I'll give you those measurements. I've got today and tomorrow left on my 7 day sentence at work...

ConeDodger
Jun 25 2017, 09:29 AM
I stole these from Eric's Facebook GT build pictures folder. He won't mind. It's better than me pestering him for them by text message...
See how the outside mount doesn't rest on the lip of the body? I'll get the inside measurement and post it here...
This is a "lo-fi" version of our main content. To view the full version with more information, formatting and images, please
click here.