jasons
Jun 14 2007, 10:23 AM
QUOTE(Vacca Rabite @ Jun 14 2007, 09:15 AM)

Also on Tuesday, I shot a rabbit from out of my garden (we grow rabbits in the garden too, you see). I was skinning it for dinner, and was wrist deep in gore.....
What did you shoot it with, a muzzle loader or a slingshot? Somehow I visualize you in your period outfit capping the varmit.
VaccaRabite
Jun 14 2007, 10:30 AM
QUOTE(jasons @ Jun 14 2007, 12:23 PM)
What did you shoot it with, a muzzle loader or a slingshot? Somehow I visualize you in your period outfit capping the varmit.
Nah, we are not allowed to shoot firearms within the city limits of Dallastown. Granted, I live next to farms, and hear them shooting all the time. But I bought a RWS 350 Magnum .22 air rifle to cull the rabbits. Its not a firearm, so I am within the letter of the law, if not the spirit of the law.
Its a hell of an air rifle too. You don't see many .22s that will push a pellet at 1050fps. Usually, ~800 is the top end for a 22. Has enough power to put a lead hollow point 14 grain pellet through a metal mason jar lid at 45 yards. I was impressed.
*edit* Is it possible to be a liberal yuppie hill billy? it sounds like thats what i am...*/edit*
Zach
jonferns
Jun 14 2007, 02:02 PM
so, hows the paint coming along

thx for the heads up on the 2.0 ---JON
VaccaRabite
Jul 3 2007, 07:21 PM
So, an update.
I was stricken with a sinus infection monday, and I headed for home about noonish. Get home ~1, go to bed. Wake up at 8:45 and make a doc appointment for 11:45. Back to sleep till 11. I _NEVER_ sleep like this.
Anyway, I go and get meds and start feeling better, so I figure I'll use the time to do some sanding. I have not really done more then look at my car for the past 2 weeks, so if I can get the body sanded down to 400, that would have me ready for color.
I get the body smooth, and I notice that there are still a few slight depressions on the drivers rear quarter panel. I made a choice. I am not putting any more plastic there.
On the front turn signal, I found a little high spot, where it sanded down to metal. Opps. I went to go mix some primer to shoot over the metal, and realized that I was out of paint filters.
That pretty much ended my evening. I could have done more sanding (both trunks, doors, roof and duck tail all need sanded) but I was feeling tired and ready to head in.
I'll go tothe paint shop thursday and get some filters in the morning and spray the bits that went down to metal. While that is drying, I'll sand the other stuff. By this weekend, I might be ready to start making the car GREEN!
Zach
jonferns
Jul 3 2007, 08:23 PM
nice...cant wait to see the conda green
-JON
iamchappy
Jul 3 2007, 08:59 PM
VaccaRabite
Jul 4 2007, 11:55 AM
^^^ That Aircooled Racing car was the one that solidified Conda Green for me, when I saw it at Hershey.
Today I did not have much time to do much of anything, and am still feeling a little under the weather (but am no longer contagious, and feeling way better then yesterday). But I was also a little cabin feverish. So, I spent 2 hours clearing the rust from both doors. There was a lot of rust under the seals. I ground that out using a 2 inch wire wheel, and then hit it with some of that 2 part Eastwood Rust Converter (that stuff that turns rust black). Once that is dried, I think that I am just going to squirt a little JB Weld in there to fill the pin holes and add a little strength, then re-epoxy prime the area and then I can sand the primer.
It was one of those tasks that has been lingering, simple but I kept putting it off. Now its done, and I need to go shower up for a 4th of July party.
Zach
VaccaRabite
Jul 6 2007, 12:45 PM
So, I totally lied earlier, about not putting on any more body filler and just painting it.
I was sanding away on the car, and I kept finding little depressions. Suddenly I found myself marking them with a pencil.
Yeah, I just put more plastic on the damn car.

The rear trunk needed quite a bit, and the rear drivers quarter panel needed some, but not much. I'm waiting for that to dry, and do some chores around the house. Then back out for more sanding, and shooting more primer.
I really have to admire body shops that can do in a few days what it has taken me WEEKS to get accomplished on my own.
On the

side of things. I shot my first coat of primer today that did not have any runs or orange peel. I have to admit, I'm getting better. I'm getting better all the time (I couldn't get no worse...).
Zach
jonferns
Jul 6 2007, 12:47 PM
when are you planning on paint?
VaccaRabite
Jul 6 2007, 02:53 PM
Depends on when I can get the sanding done. if I have time to get to it tonight, then I will paint tonight or tomorrow AM. if I don't have time to get to it tonight, then it will happen sometime next week. I can't start sanding for another 2 hours (primer needs to fully cure) but then I can see about putting on some green.
Zach
VaccaRabite
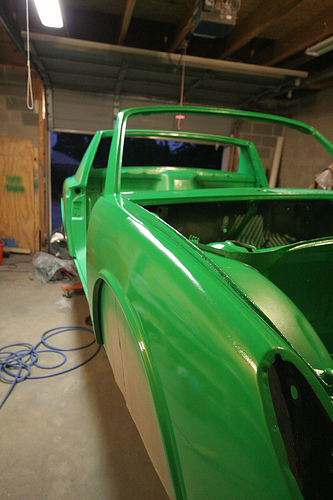
Jul 14 2007, 12:49 PM
My tub is green.
Pics later.
Demolition Derby now.
Zach
stepuptotheMike
Jul 15 2007, 09:35 AM
Well just touch me in the morning and walk away

Isn't there a rule about making a color change, telling people about it and then not posting a pic? I can't hold my breath this long.

Congrats on getting some color on
Mike
jd74914
Jul 15 2007, 09:48 AM
Zach, what kind of compressor are you using?
iamchappy
Jul 15 2007, 12:02 PM
Your tub is green.... Great Job!
I hope mine is Orange this week....
VaccaRabite
Jul 15 2007, 09:34 PM
Yeah, I know. Totally tardy.
It was too late when I got back from the demolition derby last night, and then I got up this morning to do 30 miles on my bike. Never made it into the garage today.
Here is a few pics from the derby to tide you over. I'll get some pics tomorrow after work (when I get more paint on the car too!)
Rubbin' is Racin'
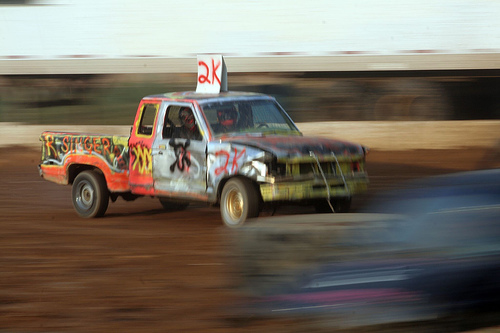
When I got home, I noticed I had this crazy sunburn on the back of my neck. I can't possibly explain it.
Zach
VaccaRabite
Jul 15 2007, 09:41 PM
QUOTE(jd74914 @ Jul 15 2007, 11:48 AM)
Zach, what kind of compressor are you using?
A Porter Cable 60 Gallon compressor. 7hp Peak, 3hp running. So far, it will run all my air tools just fine, though it will run continously on grinders and sanders.
I bought it early in the spring from here:
http://portercable.cpoworkshop.com/compres.../cplc7060v.htmlAt the time, it was something like $5 shipping, $449 NEW. it was the best deal that I could find. Amazon wanted $150 to ship the same unit. CRAZY I tells ya, CRAZY!
Zach
jonferns
Jul 15 2007, 09:42 PM
great pics man...cant wait to see the greeeeeeeen
jd74914
Jul 16 2007, 12:22 AM
QUOTE(Vacca Rabite @ Jul 15 2007, 11:41 PM)
QUOTE(jd74914 @ Jul 15 2007, 11:48 AM)
Zach, what kind of compressor are you using?
A Porter Cable 60 Gallon compressor. 7hp Peak, 3hp running. So far, it will run all my air tools just fine, though it will run continously on grinders and sanders.
I bought it early in the spring from here:
http://portercable.cpoworkshop.com/compres.../cplc7060v.htmlAt the time, it was something like $5 shipping, $449 NEW. it was the best deal that I could find. Amazon wanted $150 to ship the same unit. CRAZY I tells ya, CRAZY!
Zach
Thanks . . . shipping is up to 11$ for me now
It came ready to rumble right? (meaning with a regulator . . . all you need to add is the air line and tools)
VaccaRabite
Jul 16 2007, 06:53 AM
QUOTE(jd74914 @ Jul 16 2007, 02:22 AM)
Thanks . . . shipping is up to 11$ for me now
It came ready to rumble right? (meaning with a regulator . . . all you need to add is the air line and tools)
No. In the pic, the meter is just the pressure in the tank. The regulator, line filter and water trap, and fitings were all sourced from the local Home Depot. Remember to use plumbers tape when attaching the fittings and couplers, or there will be notable air leaks at all the joins.
Also, the compressor needs to be direct wired - I think that most larger compressors do. It does not ship with a plug. I ran a new circut from the fuse box in my garage to the compressor.
It also ships dry (no oil in it) but mine came with a quart of compressor oil to fill it.
Zach
VaccaRabite
Jul 16 2007, 08:28 PM
Today after work I put more paint on the car, and also painted the top and both trunks. I still need to do the doors.
I took 3 pics, but only one fo them got anywhere near the actual color of the paint.
So, here it is.
I still need to do a lot of wet sanding. Likely, that will start when I get back from Cancun, as I doubt I'll have time to do much of it until then.
I have gotten MUCH better at painting. No runs or sags. Not much orange peel (but there is a little). I can see more places that should be filled and leveled, and I may or may not go back and do it. I should, I have PLENTY of paint. but I want to get the painting done and start getting it back together. *impatient*
its really nice to see the car as one color again. *REALLY NICE*.
There are some parts that I have not even begun to prep yet (the fiber glass rockers, the headlamp covers, and the little parts that go in front of the eyebrow.) I'll got to them eventually.
Zach
iamchappy
Jul 16 2007, 08:55 PM
Looking good. I got mine almost ready for paint I should see it Orange by the end of the week. Thanks for the motivation.
The first time I painted a 914, I wore a plastic Yellow Devo suit I had left over from Halloween. It was a sauna in that outfit and sweat kept dripping from out of the wrists onto the paint. It really, really sucked.
VaccaRabite
Jul 20 2007, 08:25 PM
Wet sanding SUCKS!
After I drop off DrEvil's tools to some stranger at the airport tomorrow (still a chance, man. 40,000 small unmarked pesos, and you may see them again - the clock is ticking) I am going to pick up a cheap air DA from Harbor Freight that I can destroy wet sanding.
I have a green line above where my rubber gloves are, with green smears on my hands where the water dribbled under the gloves. This is a messy job.
And I have that panicky feeling as I am looking at the mess I am making. Oh crap oh crap oh crap what am I doing to my paint.
man, I hope this works!
Zach
stepuptotheMike
Jul 20 2007, 09:16 PM
But it looks like so much fun on TV
I mean... it only takes american hotrod a couple of hours. What's yer problem man?

iamchappy
Jul 20 2007, 09:32 PM
My body guy never wet sands only dry sands.
A little trick I like is to use a couple of drops of Dawn dishwashing liquid in the water keeps the paper from loading up and sands, smoother and cleaner.
I was only able to get the trunks and engine bay in etch primer and interior floor pans in Por15 the rest of the body is all in primer. I can see light at the end of the tunnel finally. Sunday should I should see some color in the trunks and engine bay....
Keep up the good work Zack, it helps me stay on my toes.....
scotty b
Jul 20 2007, 11:41 PM
Zach wet sand but do it by hand DO NOT use a da !! DA is WAAAYYY to easy to break through. Wet sand by hand starting with 1000 grit and progress at least to 1500. If you go higher the end result will be that much better. Sand with the 100 grit periodically wiping the spot DRY until the orange peel is ALMOST gone then proceed to the 1500. By doing this you will lessen the chances of burning through. Once you are done with the 1000, all you want to do with the subsequent grits is remove the previous sanding scratches. Do not try to eliminate all of the orange peel with the 1000. I can't stress enough how many times people try to do that and ruin the paint job by sanding to much. Chappy I may be wrong because I don't know your guy but I would be willing to bet he wet sands the FINAL coat be it 2 stage or single stage. I've been doing this for several years and have yet to know of anyone who dry sands the last coat prior to buffing. Paper won't sand as well,is harsher on the paint and loads up super quick.
Dr Evil
Jul 21 2007, 12:46 AM
Harbor Freight has 1000, 1500, 2000 grit paper for cheap
jasons
Jul 21 2007, 08:43 AM
QUOTE
Zach wet sand but do it by hand DO NOT use a da !! DA is WAAAYYY to easy to break through. Wet sand by hand starting with 1000 grit and progress at least to 1500.
And, I thought when you wet sanded, you were supposed to sand in one direction?
Zach, if you don't have a polisher, HF sells a decent polisher for about $30. You will want to buy some good bonnets and a good velcro disc from your bodyshop supply.
OH and one more thing, when I wet-sand I try to start soaking the paper a few hours before I need it so it gets really saturated. And I do add some dish soap to the water.
VaccaRabite
Jul 21 2007, 12:56 PM
Well, I had to sprint back home today from the airport to make it by 1, so I did not have time to swing by HF.
But I think that I am going to have to sand the current paint almost all the way back to primer and shoot another coat. last night I did the passinger quarter panel, and it looks way better after wetsanding now.
Fact is, I made an error when laying down the initial paint. I painted and went to bed. A few days later I added 2 more coats, but did not knock the shine off the initial base coat. So while color sanding, I was getting all these weird patterns where the base coat shine was comming through.

Live and learn, I suppose.
So with my test panel, I wet sanded down with 400 grit paper, and then 800. Dried everything, and shot it with a semi-heavy coat and let that dry over night. Wet sanded with 800 this morning and it looked MUCH better.
So now I need to do that for the rest of the tub. Weeeee.
I wonder how much I can get done before I leave for Cancun tuesday morning.
In the realm of good news, while I was waiting at the airport to give Mikes tools away, there was a Stearman and 2 AT-6 giving rides. I brought my camera, just cause there is usually something cool there. Now I have a new background for my PC.

Zach
Dr Evil
Jul 21 2007, 01:08 PM
Thanks for driving my tools to the airport, Zach. You should have seen Josh trying to land on the postage stamp of a runway we have here
took 3 times, but he did it without incident
VaccaRabite
Jul 23 2007, 01:44 PM
So this weekend felt like a total disaster in the realm of automotive restoration. The paint issues have me totally bummed out. Saturday, I could not bring myself to do more wetsanding to really knock down the paint like I need too. So I thought I would clean my tranny case.
The transmission that came with the car turned out to be fubar. But the case was clean. DrEvil and I got a parts tranny to rebuild the mine. but due to galling, I could not use my nice, shiny case. I had to use the parts case - which was covered from stem to stern in 1/2 inch of compacted dirt and oil. I took out the diff and speedo gears, and started spraying it down with breakclean. I scrubbed with a wire brush. I sprayed it with my power washer. After 3 hours of working, the tranny was as clean as it was going to get. I was covered with grease and dirt from the toes to my head.
I also cleaned out the central diff. Bits of brass and steel came out of it from a bearing failure. I cleaned it as well as I could, but it does not turn easily all the way around. Mike, I'll want you to look at it, but hopefully we will be able to use the Diff out of the other tranny I have.
And then I saw my driveway.
HOLY CRAP! MY WIFE IS GOING TO KILL ME! It looked like the freak'n Exxon Valdeze ran aground at the top of my driveway. I then spent another hour trying to clean up the mess, which just seemed to spread it around.
I was tired when I was cleaning the case (it was so fugg'n gross), and about at the end of my rope when I realized that the driveway was just going to have to be stained.
For some reason my wife did not kill me. Instead, I cleaned up as well as I could (I still have spots of dirt on me, 2 days and 3 showers later) and we went to a local bar for dinner, an Elvis impersonator, and a metric fuch tonne of beer.
Sunday Erin and I went on a 40 mile bike ride (training for the 100 miler, we are right on track). When ever I thought about my car, I got mad. So I decided that I was not going to even look at the car until I get back from Cancun.
I wanted to be further along that I am right now, but the paint killed that. The car is going to come off the rotesserie Aug4, whether it is really ready too or not. But until then, I am just not going to touch it, or look at it, or even think about it.
Zach
Dr Evil
Jul 23 2007, 01:59 PM
Bummer, I know how you feel. I thought you were going to spray it in the grass behind your garage. Live and learn. I am not clear in what you are saying with the diff, the ring gear looked good to me when I was there. Are the spider gears in the center binding? I would not have power washed it, you should spray some WD40 or gear oil on it so it does not corrode while you are on vacation.
We will get it figured out. Take a break.
VaccaRabite
Jul 23 2007, 02:06 PM
I was worried about killing the grass. I had no idea how much of a mess I was making until several hours passed by.
I did not powerwash the diff. Just sprayed it with brakeclean and worked out all the broken race/bearing parts. Hopefully it is fine, and I just got to a saturation point and did not want to deal with it. Water did not touch it, so hopefully there will be no corrosion. I tried to be careful not to power wash anything that was made of steel.
Zach
Dr Evil
Jul 23 2007, 02:46 PM
Its all good, Homey. We will make it work.
VaccaRabite
Aug 12 2007, 10:23 PM
Okay, I got back from vacation, and it was WAY to hot to try and do any work in the garage. Plus, I was too busy getting back into the work swing again.
Anyhow, this weekend the temps broke, and I got a lot done on the 914.
I totally wet sanded the tub with 400 paper, in some spaces all the way down to primer. I had messed up the paint by letting it dry between coats , so this was needed. I filled some dimples I found with filler (it seems I am always finding more dimples) and spot primed over the filler. Sand some more. Then I shot it again with several coats of paint (I hate tossing good paint, so I just kept putting on coats - probably 1 wet and 4 thin coats on the tub). It looks _SO_ much better! There is orange peel, but not very much of it. This took most of Saturday.
Today was supposed to be a riding day (60 miles) but Erin said that we had too much to do around the house
I think she was just too sleepy to ride. Anyway, as soon as I was released from chores I headed back out to the garage.
My doors are still in primer, so I sanded them smooth. There were some areas that needed more filler, so I fixed them and sanded them smooth. I was hoping to get them shot with color, but then I remembered that I had not even started prepping the headlight covers and eyebrows. I decided that I was going to try just knocking off the shine from the old paint, and then caoting them in epoxy. So that is what I did. Block sanded with 180 grit till the shine was removed from the old paint, and then mixed up an ounce of epoxy and shot them.
Tomorrow, after I get home from work and cut the grass, I'll spot prime the area on the doors that needed more filler, and hit the head light covers and eyebrows with sanding primer. If the weather stays below 90, I might actually have all the green painting down on the car, and will be able to start putting it back together. I think that I am going to get the seals on, and then re-attach the hoods and doors before I color sand. That way it is all done at once. Also, I need the hoods and tops on the car when I paint the black stripes so that everything will be alligned correctly.
I remember being pretty burned out on the car before I left for vacation, but right now I feel totally energized about it.
Zach
Dr Evil
Aug 13 2007, 12:06 AM
Sooo, its a race then, eh? I think I can beat you to the finish line with my car......
Ninja, DRIVE!


What, no clear coat?
VaccaRabite
Aug 13 2007, 03:42 PM
QUOTE(Dr Evil @ Aug 13 2007, 02:06 AM)
Sooo, its a race then, eh? I think I can beat you to the finish line with my car......
Ninja, DRIVE!
What, no clear coat?
Nope, no clear. The paint is a single stage.
If I can totally rebuild my car before you can get you built car running, I am so never letting you live it down.
Zach
iamchappy
Aug 13 2007, 04:05 PM
Zach I dropped my car off at the body shop today, it looks like they will paint it for me,
i had it all in primer which needed to be blocked once more.
I ran out of time on it.
Word is my mother is not expected to live much longer so i will be leaving for Florida Wednesday to be there.
When i return hopefully i can start to assemble my years worth of goodies purchased for the car.
The restoration threads make it tough on all of us, there are so many guys building and restoring these cars to the highest degree that the bar has been set so high it makes things difficult to refurbish a car less than that. I finally drew the line, with
the realization that my car is going to be really really nice but it doesn't have to be perfect. Set backs happen I was up late last night putting the final touches on my custom GT valance, when i got to the body shop with it installed on the car it had stress cracks in two places.
Good luck with yours and take pride in the job that you have done, it will be sooooo
nice.
Chap
VaccaRabite
Aug 13 2007, 05:05 PM
Oh, my car is still going to have its sticking points with me, body wise. But I decided to draw the line and forge ahead. The drivers side rear quarter panel is wavy. It had 3/8 an inch of old bondo that covered up what looked like someone just hit the hell out of it with a hammer. Though the title on it is clear, it is also clear that my car was in a colision at some point, and the entire drivers side was pretty messed up. I got it pretty smooth, but you can tell that there are still waves in my bondo job. But I needed to move on, if I ever wanted to get the car painted.
I have had several points where I just wanted to take the car to a pro and have them fix the body. In the end I figured that the imperfections would just be my fingerprint on the project.
In a way I am lucky. I can't afford to pay somone to do it for me. It forces me to persevere.
Zach
VaccaRabite
Aug 15 2007, 08:39 PM
This is a learning process. This is a learning process. This is a learning process.
And I have plenty of extra paint.
So, I was prepping to spray my last coat of green today. The doors are primed and smooth, as are the eyebrows and headlamp covers. I need to spray the undersides of the trunk lids and the edges of the targa top as well. I was hopeing to just be able to shoot them all tonight. But it was not to be.
After I "finished" my primer sanding on the doors, I started positioning tings to get painted. My restoration bay is *REALLY* crowded right now, so I needed to think it out.
As I was moving panels around, I looked at the targa top, and saw these little gray dots. Huh. I figured some sanding dust has gotten under the plastic, but the dots did not wash out. Then I looked at the other trunk lids... The rear trunk lid had the gray dots, and the front trunk lid had some light spots where I could see through the paint.
Deep breaths. I've beaten all the other roadblocks, I can beat this one too. It just pushes me back a little further.
I know what happened (pretty sure it is solvent pops), and I suppose this is all part of the learning curve with painting, just like blowing holes is part of the learning curve with welding. Sadly, this means that all of my first round of color painting had to be redone.
SO!
I need to do to these panels the same thing that I did to the tub. Wet sand them all with 400 and then 800 grit paper, and reshoot. Then I will have to reshoot them again to get the underside.
No problem. I can do the wet sanding tomorrow, and then shoot them over the weekend.
The good news is that I still have _plenty_ of paint. I had bought an entire gallon of color, and if I knew what I was doing from the start I would not have needed nearly that much - 3 quarts at the most to shoot the entire car and have a little extra. As it is, I have extra paint to reshoot all these goofs.
I'm not letting myself get discouraged. Its just part of the learning curve. The next time I paint a car (and there wil be a next time, I know) I will know better.
Damn, do I ever work slow.
Zach
stepuptotheMike
Aug 15 2007, 09:01 PM
so what caused the solvent pops? How would they have been avoided?
Hang in there.... this has been a great thread and has been a great help as I'm still a long ways away from even thinking about buying paint
-Mike
VaccaRabite
Aug 15 2007, 10:07 PM
Solvent pops form when something goes wrong. Too much solvent (reducer) mixed in the paint, the paint is shot too heavy, or it is too hot (or a combo - inb my case probably too hot and too heavy) The result is the same, the solvent seperates form the paint, and pops to the top of the coat, leaving a void. It needs to be sanded out and reshot.
These things happen. Every time that I need to correct something, I need to remind myself that I am starting from ZERO prior experience with HVLP guns, or auto painting. Also, I need to remind myself that every time I correct something, it looks way better then the last time.
This is taking me a lot longer then most people, but I don't care. in the end, there won't be a single process in auto restoration that I won't understand.
Zach
VaccaRabite
Aug 17 2007, 11:36 PM
So, tonight I sanded the trunk lids down largely down to primer, and reprimed, using up the last of my 2K sanding primer in the process. That took about 3 hours.
Tomorrow Dr. Evils woman is coming over to hang out with mine, before we have to go to the wedding of one of my wifes friends. I am going to NEED some garage time, its going to be freak'n estrogen fest at chez Nall. Depending on what time I get out of bed, I'll sand the primer, clean and shoot color. Tomorrow the temps are supposed to be unseasonably cool, so getting a chance to paint will be a _really_ good thing.
Zach
Spoke
Aug 18 2007, 06:53 AM
Lookin' good. Keep up the good work. Remember, it's a hobby and as such, does not need to be completed on any given timetable or does it need to be completed the first time around.
I always try to keep in mind that my forte is not auto painting, or bodywork, or welding, or whatever I do on my car and any job I tackle will take much much longer to complete and will require do-overs. But in the end, I have the satisfaction of saying I did it.
Love the green color. Can't wait to see it all together. There's something about seeing a tub with no rust and painted from stem to stern just like it came out of the factory.
Spoke
JPB
Aug 18 2007, 07:40 AM
Sounds like you have what it takes to do a great job. If you overmill your paint a little bit, you can color sand it down to a perfect finish. Nice to see you are having fun with it.

VaccaRabite
Aug 21 2007, 09:37 AM
Last night I further confirmed that my car will never be a CW car.
I put on gas shocks in the rear trunk, and ordered another set from CAMP for the front trunk.
my thought it that I want to get the panels aligned before I color sand everything. Rational being that if I color sand, and then ding the panel, it will be more work then if the panel gets dinged before color sanding.
And as I did ding the panel getting the front and rear trunks mounted again, I think I made the right choice. I had new seals for the rear trunk, and have decided that the front trunk also needs new seals - they look too ratty.
I am pleased with the gas shocks, but I see room for improvement. The rear ones were not from CAMP, and one of them was plenty strong enough to hold up the stock rear trunk (though I installed both). Also, I want to put some rubber washers where they bolt in, to form gaskets to keep water from getting to the metal there. I had to move the shocks inboard about 1/4 inch each from the indicated position on the instructions in order to keep them from binding on closing. I have not yet tested to make sure that the targa still fits in, and I will need to do that before I consider the job "done."
I bought these shocks a while back (over a year ago, everything seems to blend in time now...), and since then have heard that the camp kit is a better kit. However, I like the fact that this kit did not require any cutting of the trunk to make them fit. If the targa dose not fit, however... Well, I will dive off that bridge when I get there.
From this point forward, I will be color sanding, and sanding out a few fish eyes in the front trunk hood and targa top. Frankly, I am tempted just to let them be. my bondo job on the rear driver quarter panel is not as smooth as I had hoped (hey, it was a lot of bondo) so the paint job won't be perfect. but I know myself, and I will end up sanding out all the little imperfections, even if I am the only one that knows they are there.
I would not be surprised if I ended up working the rear quarter as well, trying to get it smoother. But that is not going to be a "right now" project.
Zach
VaccaRabite
Oct 22 2007, 09:05 AM
A special reply for McMark :^)
backfires galore! with Evil and ScottybVroom vroom - no oil leaks, and I get shockedMy motor ran for the first time Satruday at Root's place. I was very happy, until Chris busted out a leak down tester to try out for the first time.
All the cylinders held compression between 180 and 120 PSI. GREAT.
Cylinders 2-4 passed leakdown between 15-18%.
Well, 3 out of 4 ain't bad.
Cylinder 1 had a leak down of 45% Crap.
But wait, it held 120 PSI compression, what the hell.
Turns out that there is a slight (SLIGHT) gap where the head was amchined to the cylinder. I am going to try to lap it into shape, instead of taking the head to get cut to fix it.
Also, the #2 spark plug hole has been helicoiled, and the coil was unwinding. I'm going to time-cert it, since I already have the head off.
I have my pedal cluster rebuilt and almost back together. it looks AWESOME- I just need to finsh re-assemblly and put it in the car.
The wire harness is in my basement. An ENGMAN fuse panel is ready to go in. The wires look good for the most part. I;ll need to do a little fixing, but then the harness can go back in the car.
So, my goals fro before Xmas:
Fix the head.
Get the pedal cluster back installed.
get the wireharness back in.
install my SS tunnel line (and sell the return line since I went to carbs.)
fix the two big scratches that I put in my paint by (1) dropping the duck-tail and (2) hitting the car while installing a drill press in the restoration bay last week.
Progress is being made. Slowly.
Zach
McMark
Oct 22 2007, 12:18 PM

Bummer about the leak down. I think I need to get one of those gauges.
VaccaRabite
Nov 13 2007, 06:42 PM
So... Progress?
Well, not really. I have been buried with work and classes. But my last final for the semester is Nov17th, so I should be abel to get working again after that.
But, I have gotten some small tasks done.
I got my windshield in. Glued in with black rubber trim instead of butyl tape and silver trim. I used PPG glass, and it kinda sucked. Alon the edges, you can see where they glued the layers of glass together. I also had to go around the entire windshield with a razor to remove all the dried glue that had squished out. Are these really the best ones out there?
I painted on the duPont frit paint - not as well as I would have lked, but it looks good enough. The car will never be a show car.
That was about 2 weeks ago.
Every now and again I go in the garage and think about doing some work, but remember that I have a ton of other chores to do and don't get anything done.
Tonight I poked my head in and pretended I was working for about 15 minutes, before heading back inside.
Soon... soon...
Zach
Bogaat
Nov 14 2007, 11:09 AM
QUOTE(Vacca Rabite @ Nov 13 2007, 07:42 PM)
So... Progress?
I got my windshield in. Glued in with black rubber trim instead of butyl tape and silver trim. I used PPG glass, and it kinda sucked. Alon the edges, you can see where they glued the layers of glass together. I also had to go around the entire windshield with a razor to remove all the dried glue that had squished out. Are these really the best ones out there?
Zach
Dude, don't even get me started on PPG glass. My glass guy came out with 5 different ones and none of them fit! To clarify, they fit so tight that any insertion of the alum trim would crack the glass. Three of them had a high spot in the middle top and had to be pushed down to seal. This would probably have cracked given a little time. They left no where near the side/top clearance that the original did. I got them to order one from George and it should be going in the car later today. I am hoping it fits a whole lot better. I am tired of dealing with the windshield. I should plug Safelite though...these guys have lost so much cash on this and they are going to honor the original quote...even with the higher priced AA glass/shipping. They haven't even mentioned giving up. Keep it up man...

. I should hopefully be taking mine for it's maiden voyage later this evening...just need glass and CV joints
dakotaewing
Nov 14 2007, 12:44 PM
Zach, dude....

This is a "lo-fi" version of our main content. To view the full version with more information, formatting and images, please
click here.
