Help - Search - Members - Calendar
Full Version: OU8AVW's Build Thread
914World.com > The 914 Forums > 914World Garage
Pages: 1, 2, 3, 4, 5, 6
3d914
Scotty,

Hope you don't mind some questions about your work. Not meant to be critical - just trying to learn from your vast experience.

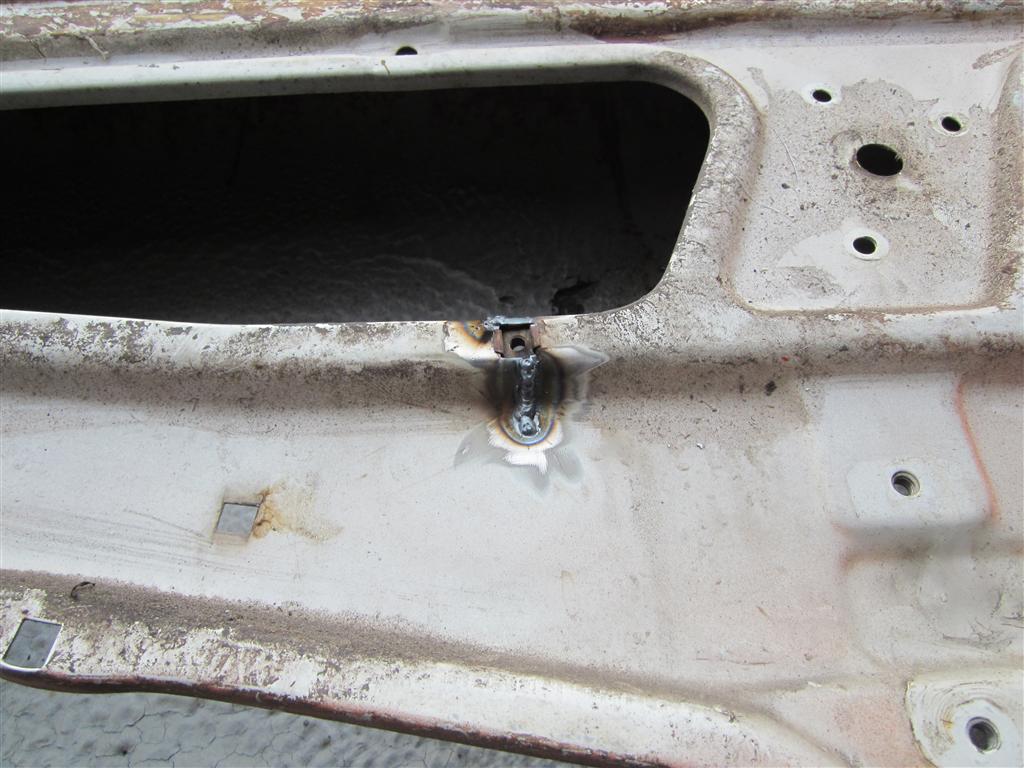
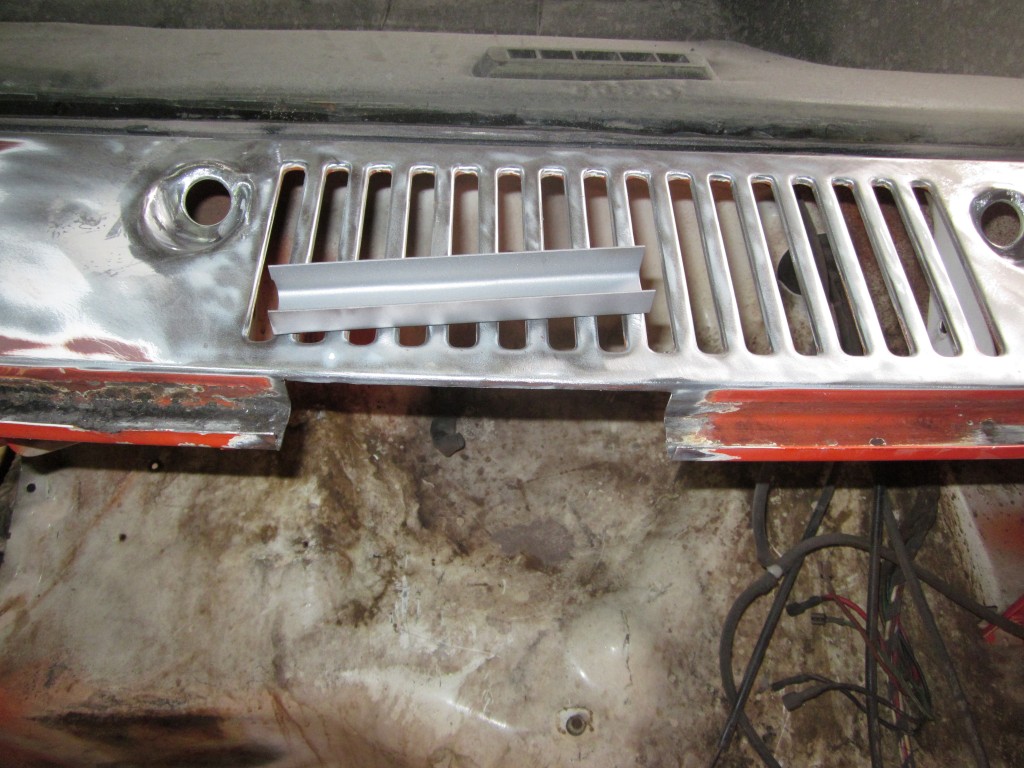
First, what type of welder are you using to get such nice "puddles" on thin material (pic-1) or welding on this thin channel without burning through?

pic1
IPB Image

pic2
IPB Image

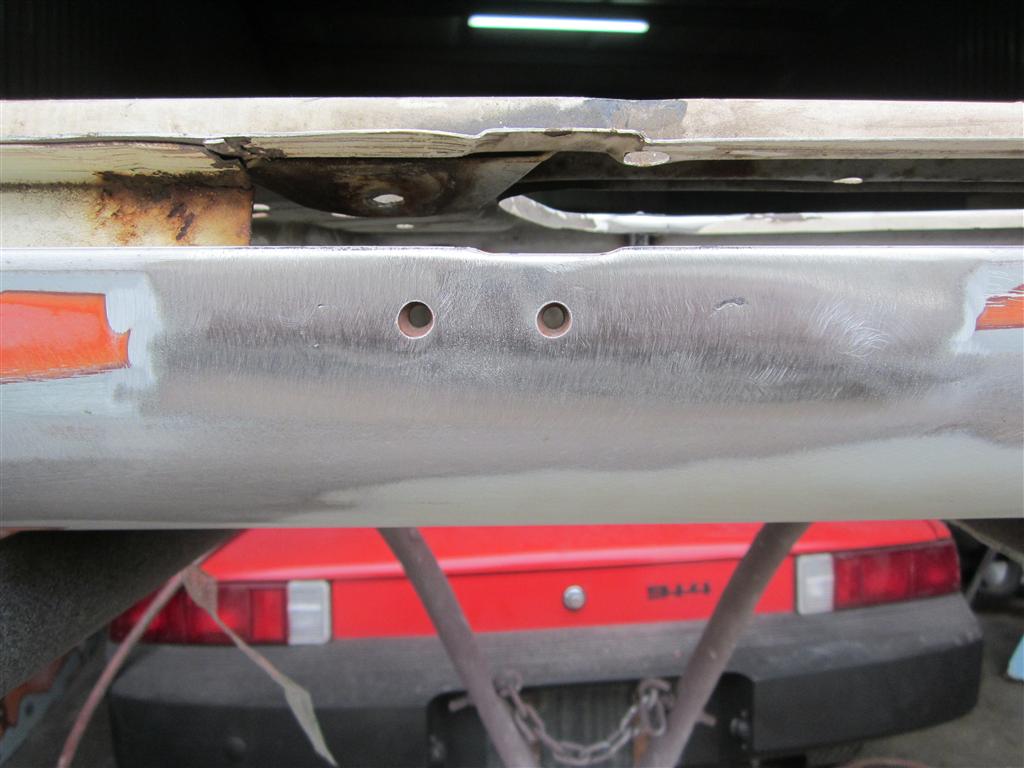
Also, do you go back and weld in small cavities (right side of pic3) or save them for finish filler and primer?

pic3
IPB Image

Thanks for the insight and keep up the great job.
scotty b
Miller 140 MIG for most of the welding and as far as the little crater on the outside of the weld goes, primer and a touch of filler does the deed. smile.gif
Dr Evil
Do you use gas or flux core?
scotty b
gas bootyshake.gif
OU8AVW
I picked up my engine tin and engine mount from the powder coater's last week. It all looks super sweet!

Click to view attachment

Click to view attachment
TargaToy
Love the progress. More pics as they come, please.

Scotty, I know you replaced the exterior corner after you cut this out. What did you do about the crusty skin behind it--the outside of the trunk wall? I presume wire brush, ospho, etc...but were there no pin holes?

Click to view attachment

scotty b
Yep, wire brushed, Ospho and a coat of black, fortunately there were no pinholes smile.gif
TargaToy
QUOTE(scotty b @ Jun 22 2012, 07:17 AM) *

Yep, wire brushed, Ospho and a coat of black, fortunately there were no pinholes smile.gif


Do you seam seal the back side of those welds or not worry about it since it's painted?
OU8AVW
A quick reference for what it looked like when I bought it.....

Click to view attachment
OU8AVW
Few More

Click to view attachment

Click to view attachment
seanery
You're keeping the sunroof, right?
OU8AVW
No sunroof, but I do still have it.
scotty b
you should put it back on. Along with those nekkid lady mudflaps you're using on it flag.gif
OU8AVW
The PO said he found it in West Virginia, so that look might work.....
scotty b
where's that sanding smilie ? I'll finish dealing with the bashed in door corner tomorrow welder.gif
scotty b
all ready to go back to Mike for the trunk and interior prep work beerchug.gif
MDG
smilie_pokal.gif smilie_pokal.gif smilie_pokal.gif
OU8AVW
Pickled until I have some time and $ to spend on her....

Click to view attachment
OU8AVW
So I've been looking for one of these for years. Scored one on ebay at 1:00am this morning. Only paid $54! I think that's a sweet deal for an NOS part. I almost had a NOS 914-6 badge too but some auto snipers kicked the bid up to $261 at the last second! Zowwie!

Click to view attachment
sixnotfour
So Close...good luck ..hit the bone yards for more Fuchs..
says the 2 time customer. aktion035.gif
Dr Evil
QUOTE(OU8AVW @ Aug 21 2012, 11:30 AM) *

So I've been looking for one of these for years. Scored one on ebay at 1:00am this morning. Only paid $54! I think that's a sweet deal for an NOS part. I almost had a NOS 914-6 badge too but some auto snipers kicked the bid up to $261 at the last second! Zowwie!

Click to view attachment


I wish I knew. I have one and would have sold it. I need to list it smile.gif
MDG
How does Scotty keep his socks so clean? huh.gif

Click to view attachment
balljoint
Those aren't socks. That's a tan line.
hot_shoe914
QUOTE(Dr Evil @ Aug 22 2012, 10:24 AM) *

QUOTE(OU8AVW @ Aug 21 2012, 11:30 AM) *

So I've been looking for one of these for years. Scored one on ebay at 1:00am this morning. Only paid $54! I think that's a sweet deal for an NOS part. I almost had a NOS 914-6 badge too but some auto snipers kicked the bid up to $261 at the last second! Zowwie!

Click to view attachment


I wish I knew. I have one and would have sold it. I need to list it smile.gif

Don't list it. Sell it to me. Send it when you send the 5 pack you were gonna send me. Never did tell me how much money to send you. poke.gif
OU8AVW
I bought a set of Pistons and cylinders here for $75. I expected to keep them as an extra set to play with. I opened the box and they are a set of unused KB 96mm pistons! stoked! biggrin.gif
That was about the last thing i needed before engine assembly can begin....

So engine spec will go a little like this:
2056 with 2.0 case Fully balanced
KB pistons and AA cylinders
Rebuilt heads with new SS valves and new guides
Raby 9550 cam kit
Chromoly push rods and NOS tubes
D-Jet with NOS injectors and NOS air temp sensor (so far)
Triad twin exit exhaust
Powder coated tin

Car specs should be something like this:
Rebuilt side-shift trans
Fully polished 2.0 fuchs
Full PMB restored brake set-up
Tangerine fuel hose and pump relocation set-up
90% new rubber, OEM and 914 rubber
Scotty B body work and paint
Leather stock seats
New door panels and carpet kit from 914 Appearance
Under dash gauges (in the market for the gauges)
LE front valance
Chrome bumpers
et al.....


OU8AVW
Built a Garage....
We use this shrink wrap stuff to store boats for the winter. I built a tube-frame then covered it with the shrink wrap. Voila! Instant garage. Now I can work on the car again biggrin.gif

Click to view attachment

Click to view attachment
scotty b
Makes a nice love shack too sheeplove.gif
Dasnowman
QUOTE(scotty b @ Dec 22 2012, 01:40 PM) *

Makes a nice love shack too sheeplove.gif


Scotty what was the primer and paint used? Looks like it was primered grey, then sealed with white but what was the redish orange it turned to or is the photo's not in sequance? confused24.gif

Also on my car I have a few pin holes in the front trunk channel above the fenders should I just spot weld to fill them in? Also the front channel is toast by the front trunk latch did you make the c channel or is there a supplier that sells it?

Sorry the the high jack! beerchug.gif
OU8AVW
The funky color was a sanding coat Scotty gave it. He sent it back to me to do the floors/trunk so I wouldn't hose up the new paint. Also he said something about some "real work". I think he meant a 911 poke.gif
scotty b
QUOTE(Dasnowman @ Dec 23 2012, 12:00 AM) *

QUOTE(scotty b @ Dec 22 2012, 01:40 PM) *

Makes a nice love shack too sheeplove.gif


Scotty what was the primer and paint used? Looks like it was primered grey, then sealed with white but what was the redish orange it turned to or is the photo's not in sequance? confused24.gif

Also on my car I have a few pin holes in the front trunk channel above the fenders should I just spot weld to fill them in? Also the front channel is toast by the front trunk latch did you make the c channel or is there a supplier that sells it?

Sorry the the high jack! beerchug.gif


the grey was a high buiild primer that got sanded smoth then epoxy was put on since it was going to sit for a while. Like Mike said. the red was just a guide coat to let me know where any high or low spots are when I go to do a fnial sanding.

for the trunk channel you either have to make it, or fill the pits with some filler. I use JB weld in that case. Just make certain you get it good and clean before putting any filler in or you will just waste your time.
OU8AVW
Got the car all sorted in my workspace and started patching the floors. The pans were in pretty good shape with a few exceptions and I can't really afford all new pans, so a few well placed patches will suffice. My welding skill got much better as I went along.

Click to view attachment

Click to view attachment

Click to view attachment
OU8AVW
Pulled my dash out to make it ready for new vinyl. My friends at the sail loft/canvas shop have some special UV stable upholstery I'm going to check out.

Click to view attachment
OU8AVW
Click to view attachment

I need one of these biggrin.gif
OU8AVW
I started to remove the rear trunk pan. Using an air saw was very effective. Until the thing locked up on me. I'll buy another as this one was an old $40 unit that I borrowed from a friend.

Click to view attachment
OU8AVW
So, I just got my replacement panel from Restoration Designs for the trunk. What a beautiful part. I was thinking about making the cut just forward of the aft curve of the support, see image. Then using a flange tool to flange the car to accept the new part overlapping the car. This will let me do a better job of welding these pieces together. The rest of the spot welding can be done like the factory from the outside of the rear apron. The original brace can then attach on top of the cross member.

What do you think? sawzall-smiley.gif

Click to view attachment
914itis
QUOTE(OU8AVW @ Feb 23 2012, 08:58 PM) *

I played hookie from work yesterday and continued prepping for paint. I got a doner floor pan that I'm going to use for some patchwork on the driver's side. All and all not too bad.

Click to view attachment

Click to view attachment

How did you approach these rust holes? Did you replace the panel or just clean and weld using small pieces?
OU8AVW
QUOTE(914itis @ Feb 11 2013, 10:13 AM) *

QUOTE(OU8AVW @ Feb 23 2012, 08:58 PM) *

I played hookie from work yesterday and continued prepping for paint. I got a doner floor pan that I'm going to use for some patchwork on the driver's side. All and all not too bad.

Click to view attachment

Click to view attachment

How did you approach these rust holes? Did you replace the panel or just clean and weld using small pieces?


I cleaned and welded small patches. The pans were in fair shape, just a three spots that had rust-through. I cut out the sections and then used them as a template for cutting a doner I bought on this board. Not the best way to do it, but cost effective and easier than whole pans. I'm building this car to be a fun driver so it works for me. Carpet and undercoating will cover the patches.....
OU8AVW
Click to view attachment

Welded on a new engine lid bracket

Click to view attachment

Tore down my front end a bit

Click to view attachment

Painted dust shields

Click to view attachment

Cleaning up CV Joints
OU8AVW
I had some time this weekend and got the rear trunk pan removed. I cut along the trailing edge of the trans support. An air saw got the aft end of the pan removed close enough to the welds that I could grind down the remaining material with little effort.

Click to view attachment

Click to view attachment

FourBlades

Nice work! popcorn[1].gif

John
OU8AVW
Front end is oot....

Click to view attachment
OU8AVW
Click to view attachment
OU8AVW
Click to view attachment
OU8AVW
Ok, any tips on removing the torsion bars? I got the A-arms off the crossbeam but I cant's get the torsion bars free....

Click to view attachment
FourBlades

It is dirt in the splines holding it in.

Turn it vertical and shoot some PB blaster down there.

Wait a few hours then turn it over and wiggle it and whack it.

It should come out.

John
boogie_man
Nice work, that is going to look awesome. Keep the pix coming....
nathansnathan
914 post count there smile.gif , awesome job on the trunk floor.
OU8AVW
Working on the restoration of the front suspension. Removing the torsion bars and bushings....

The torsion bars were pretty frozen so I drilled out the forward caps with an anular ring cutter and used a Mini Inductor to heat things up.

Click to view attachment

Cool tool! It uses an electrical field to heat metal to white hot is seconds. The tool itself stays cool to the touch as does any non-metallic items in the field.

Click to view attachment

Heats up in less than 30 seconds

Click to view attachment

Then a little pressure with the press.

Click to view attachment
OU8AVW
I had a strut cap walk away dry.gif
I have asked Rich is he has one, I may be in the market. You know it's going to turn up the second a replacement arrives....

Click to view attachment
OU8AVW
I pulled out my stash of NOS goodies to make sure I don't buy stuff I already have.

Click to view attachment
This is a "lo-fi" version of our main content. To view the full version with more information, formatting and images, please click here.
Invision Power Board © 2001-2024 Invision Power Services, Inc.