Mark Henry
Mar 3 2014, 04:10 PM
Didn't really want to make 14 little pins.

So I have a whole pail of 911 relays and they have pins that fit, so I broke them out and found the other end is a bit too big.
That's better than being too small

Mark Henry
Mar 3 2014, 04:12 PM
So I turned them down on my mini model lathe. I left a bit of a press fit.
Mark Henry
Mar 3 2014, 04:19 PM
I think this is going to work out just fine.
I wonder if a drop of loctite on the engine harness end would be ok on the pins?
I could snap it up now, but I'll wait till I get some longer red primary wire, these ones are cut a bit short. Why have a splice when you don't have to have one.
Note the top pic only shows one pin installed, almost every hole has a pin pressed in the final male connector.
Also I screwed up the first wiring attempt, as everything is backwards on the engine harness male connector, because that connector is flipped 180* from normal.
Mark Henry
Mar 3 2014, 04:59 PM
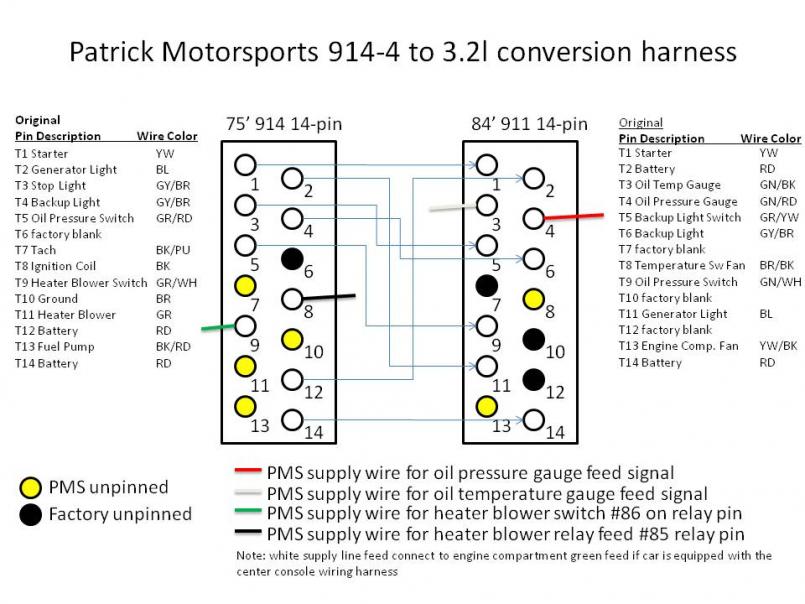
I used this diagram to figure this out...I wonder if I need both reds?
Min'es a carbed 3.0 so I just worked from the left side of the diagram.
Justinp71
Mar 3 2014, 05:43 PM
Not sure about the 2 reds, I can take a look at mine tonight.
Also keep in mind I think the 3.2 has an internal regulated alternator, where as I think the 3.0 does not?
Luke M
Mar 3 2014, 07:53 PM
QUOTE(Justinp71 @ Mar 3 2014, 04:43 PM)

Not sure about the 2 reds, I can take a look at mine tonight.
Also keep in mind I think the 3.2 has an internal regulated alternator, where as I think the 3.0 does not?
My brothers 3.0 has an internal regulator and IIRC it started on the later 2.7 engines on up.
Mark Henry
Mar 3 2014, 08:45 PM
I don't think I have an internal regulator, I know for sure I'm using a fan assembly from a 2.7, I also have one from a 2.0 but that's a lower amp alternator.
I'll have to figure out were to mount a regulator.
I also have to figure out the rear window defogger, but I think it just needs a fused power and a ground.
Mark Henry
Mar 4 2014, 11:58 PM
This evening I decided to look at my exhaust ports, a few studs needed some work.
This one is snapped off so I made a drill bushing and went to work on it. I made my own drill bushing but you can buy these. It's very important that you drill down the center of the stud.
Mark Henry
Mar 5 2014, 12:04 AM
Then you have to dig out any left over bits of the steel stud. This is real important, if you don't your repair is going to suck balls.
Drilling centered is the key, if you did that right digging these last bits of steel out should be fairly easy.
Just a little patience...
Mark Henry
Mar 5 2014, 12:06 AM
OK that's done time for the repair...or I should say lets Time-sert the repair

Mark Henry
Mar 5 2014, 12:13 AM
Now you have to drill the hole to size, you use the drill bit included in the kit with just a hand tap handle. the Aluminium is soft so this goes easy.
I use a guide to keep the drill bit square with the port. You can buy this guide for $40..but you know...I'm cheap...so I made this one myself.


Mark Henry
Mar 5 2014, 12:17 AM
Then you use this tool to cut a countersunk relief for the head of the timesert. Again important that you bottom this tool out so that the relief cut is deep enough
Mark Henry
Mar 5 2014, 12:20 AM
Then you tap the hole, try to keep the tap as square as possible.
The finished hole ready for the insert.
Mark Henry
Mar 5 2014, 12:22 AM
Thread the oiled insert in as far as you can by hand.
Mark Henry
Mar 5 2014, 12:26 AM
Then use the driver to drive in the insert.
Really important that the driver is well oiled. This is because the driver expands the insert as it drives it home.
Mark Henry
Mar 5 2014, 12:30 AM
The finished repair, better than new. The other hole the threads are fine so I'll leave it alone.
That's one exhaust port, I have a few more of these to do tomorrow.
CptTripps
Mar 5 2014, 03:54 AM
Great work!
My dad and I had to do about 10 of those on my first car. (1985 Saab 900 Turbo) I got REAL good at those after the 3rd or 4th one.
Mark Henry
Mar 6 2014, 08:44 AM
DING!Balancing shop phoned!

Road trip!

wobbletop
Mar 6 2014, 10:32 AM
I used a Timesert to fix a bolt that pulled the threads out of the block in my Subaru. Worked very well. Fairly easy to do and should prevent the steel-aluminum issue in the future (at least for that bolt).
/thread hi-jack
mrbubblehead
Mar 6 2014, 08:05 PM
i really like timeserts. i have most of the popular metric size kits. i dont know how i got along with out them.
r_towle
Mar 6 2014, 08:10 PM
Did you buy that tap handle?
Jeffs9146
Mar 6 2014, 08:14 PM
QUOTE(r_towle @ Mar 6 2014, 06:10 PM)
Did you buy that tap handle?
Old School! My dad left me a bunch of those when he died!
Mark Henry
Mar 6 2014, 08:41 PM
QUOTE(r_towle @ Mar 6 2014, 09:10 PM)
Did you buy that tap handle?
It didn't come with the kit, I bought it years ago.
r_towle
Mar 6 2014, 08:54 PM
My son made me mine.....

Mark Henry
Mar 6 2014, 08:57 PM
I do make a lot of my own tools, but I didn't make that one.
You should see the tool I'm making right now...oh wait... if you follow this thread you will be seeing it soon
Mark Henry
Mar 11 2014, 07:20 AM
I had to Time-Sert a few of my exhaust studs now for another stud repair, this time the case. The one bell-housing mounting stud hole had a very sketchy helicoil repair. They didn't even drill the stud right out, plus it was only helicoiled in about a half inch. This would possibly be "OK" as a dirty repair, but I have to hang this half out on the engine stand for the build....not cool.

So I didn't want to buy another timesert kit, a regular Time-Sert wouldn't work anyways because it's been helicoiled, it would need a Big-Sert.
But I do have lots of 10mm VW case savers. These ones have an odd coarse standard outer thread and I didn't have a tap, so I got one from China, $10 delivered to my door.
This doesn't show the 3/4 hour spent yanking the helicoil, drilling out the rest of the old stud and tapping for the case saver but you get the idea....
Note the homemade insert driver.
I think this is a good solution and I'm confident hanging my build from it.
Mark Henry
Mar 11 2014, 09:18 AM
Next job, a few of my piston oil squirters weren't up to snuff. Most of the time these are stuck shut and a bit of Seafoam or MEK will free them up. These were odd in that they wouldn't close.
The little freaking things cost $40 each.
I read some how to's and they dremal the peens, then drill and tap the squirter. Seemed like a waste of time.
A drill bit (A 1/4" is the same OD as the squirter) took off the peens then a bit smaller bit to open up the squirter. A couple came right out with the bit, one I jammed in a coarse screw and yanked out with a slide hammer. They all came out real easy.
bulitt
Mar 11 2014, 10:05 AM
Dr Evil time serted a speedo angle drive hold down at the clinic. I'm sold!
Mark Henry
Mar 11 2014, 10:57 AM
This is the busness end of the squirter, it's just a ball bearing on a spring.
Mark Henry
Mar 11 2014, 11:03 AM
If you have the old peening removed correctly the new squirter will just pop in. I used a bit of Loctite on the OD of the squirter only, you don't want to go crazy here because loctite in the squirter would likely be bad.
Then you have to peen the squirter in, I picked 3 new spots.
Another homemade tool.
We need a bench grinder smiliey
And there you have it, relatively an easy job.
Mark Henry
Mar 11 2014, 12:38 PM
Just flying today....not bad from a guy on perc's for kidney stones who also nursing a sore shoulder from wiping out on the ski hill on Sunday...
Time to put my cam tower spray bars back in, if you go back in the thread you will see me taking them out for cleaning.
Many peep's don't recommend bead blasting the towers but I did. I then blew out and power washed them 3 separate times just to be sure no beads were left behind.
As you re-install the bars you have to be super careful of the orientation. Both bars are the same but one goes in backwards of the other. When you get it to the proper spot you use a screwdriver to center the hole and the rear bolt has a tit on it the goes into the hole on the bar. Then a bit of Loctite on the 1/8" NPT plugs and your done. Very important that you tapped the plugs deep enough, you don't want to over tighten the plugs.
Since I'm not ready for these yet I bagged them to keep them clean.
mrbubblehead
Mar 12 2014, 09:37 PM
QUOTE(Mark Henry @ Mar 11 2014, 05:20 AM)
I had to Time-Sert a few of my exhaust studs now for another stud repair, this time the case. The one bell-housing mounting stud hole had a very sketchy helicoil repair. They didn't even drill the stud right out, plus it was only helicoiled in about a half inch. This would possibly be "OK" as a dirty repair, but I have to hang this half out on the engine stand for the build....not cool.
So I didn't want to buy another timesert kit, a regular Time-Sert wouldn't work anyways because it's been helicoiled, it would need a Big-Sert.
But I do have lots of 10mm VW case savers. These ones have an odd coarse standard outer thread and I didn't have a tap, so I got one from China, $10 delivered to my door.
This doesn't show the 3/4 hour spent yanking the helicoil, drilling out the rest of the old stud and tapping for the case saver but you get the idea....
Note the homemade insert driver.
I think this is a good solution and I'm confident hanging my build from it.
that is a great idea.
Mark Henry
Mar 13 2014, 06:53 AM
First pic is the case half clean with no studs.
2nd I put a drop of loctite in each stud hole.
3rd all the case studs re-installed.
My case is now clean and bagged ready for assembly
Mark Henry
Mar 13 2014, 07:00 AM
Ooooooppppps!!!!! Don't forget the main secret stud! that would really fuch my day if I forgot that one.
Mark Henry
Mar 13 2014, 11:44 AM
Not part of the build... but so slick I had to show this...
BTW These are not my heads, not my twin plug work, I'd never break the fins like this, to me breaking the fins is shoddy machine prep, but it's what the customer had. I just added this to show a Timesert plug hole repair.
mrbubblehead
Mar 13 2014, 09:13 PM
mark, is that a "big" sert? 14mm?
Mark Henry
Mar 13 2014, 10:23 PM
QUOTE(mrbubblehead @ Mar 13 2014, 11:13 PM)
mark, is that a "big" sert? 14mm?
Time-Sert spark plug repair set

Big-sert is oversize Time-Serts for repairing oversized holes like old helicoil repairs.
914Timo
Mar 14 2014, 01:34 AM
QUOTE(Mark Henry @ Mar 13 2014, 02:53 PM)
First pic is the case half clean with no studs.
2nd I put a drop of loctite in each stud hole.
3rd all the case studs re-installed.
Very nice, but is there some reason why you removed them in the first place ??
Mark Henry
Mar 14 2014, 05:41 AM
QUOTE(914Timo @ Mar 14 2014, 03:34 AM)
QUOTE(Mark Henry @ Mar 13 2014, 02:53 PM)
First pic is the case half clean with no studs.
2nd I put a drop of loctite in each stud hole.
3rd all the case studs re-installed.
Very nice, but is there some reason why you removed them in the first place ??
Well.... it was for sure easier to clean it this way, but the real reason is when I bought this core it was already torn down and every stud including the head and case studs were removed by the PO.
It all came in well labeled baggies.
Mark Henry
Mar 14 2014, 02:14 PM
Starting to get my ducks in a row for the bottom end build
Just a few last bits, first the oil pump, one thing I didn't like about Wayne's book was the lack of information on certain parts like the oil pump. His book the pump is voodoo and shouldn't be taken apart...I call BS on that.
I took it apart and with a straight edge found it to have .008 clearance on each side...just a bit sloppy IMHO
Mark Henry
Mar 14 2014, 02:18 PM
It also had a bunch of minor scratches, so first order of business was to treat the interior with DFL (dry film lube) coating.
Mark Henry
Mar 14 2014, 02:29 PM
Then using sandpaper and a flat glass I faced the surface till I had .002 -.003 clearance I only took about .012 off the total length of the pump.
I also honed any rough edges on the gears before reassembly.
Then I put it back together, tightening each nut a half turn at a time and constantly making sure it spun freely. Once done I primed it with a bit of assembly grease.
Mark Henry
Mar 14 2014, 02:36 PM
Next I cleaned out the intermediate shaft.
It has a circlip and little plug in the end. It came out easy and then I just used a bottle brush to clean it out. You wouldn't the sludge that came out of this, if you ever rebuild a /6 you have to do this job.
Mark Henry
Mar 15 2014, 11:16 PM
Didn't get a whole lot done today, but I did make some tools.
First up is P221 and P222, these will hold the rods and chain up as I place the engine case halves together.
Mark Henry
Mar 15 2014, 11:22 PM
Next, I made this tool for putting the Orings on the case half main studs. These Orings can get cut on the threads so this will hopefully eliminate damage. I made this so I can load all the Orings on at once, so I don't have to reload it each time.
Note that I'll be using the green viton stud Orings from Supertec, these are suppose to be better than the purple ones that come in a standard gasket kit.
Mark Henry
Mar 15 2014, 11:26 PM
This one I don't have finished yet, I still have make the plundger.
It going to be a piston circlip injector.
mrbubblehead
Mar 16 2014, 05:27 PM
QUOTE(Mark Henry @ Mar 15 2014, 10:22 PM)
Next, I made this tool for putting the Orings on the case half main studs. These Orings can get cut on the threads so this will hopefully eliminate damage. I made this so I can load all the Orings on at once, so I don't have to reload it each time.
Note that I'll be using the green viton stud Orings from Supertec, these are suppose to be better than the purple ones that come in a standard gasket kit.
mark, how do you feel about a few wraps of black tape over the threads and a dab of DOW 55 as lube to slide the o-ring down the stud? would that be sufficient if your tool wasnt available?
Mark Henry
Mar 16 2014, 08:56 PM
QUOTE(mrbubblehead @ Mar 16 2014, 07:27 PM)
QUOTE(Mark Henry @ Mar 15 2014, 10:22 PM)
Next, I made this tool for putting the Orings on the case half main studs. These Orings can get cut on the threads so this will hopefully eliminate damage. I made this so I can load all the Orings on at once, so I don't have to reload it each time.
Note that I'll be using the green viton stud Orings from Supertec, these are suppose to be better than the purple ones that come in a standard gasket kit.
mark, how do you feel about a few wraps of black tape over the threads and a dab of DOW 55 as lube to slide the o-ring down the stud? would that be sufficient if your tool wasnt available?
It will work but depending on what you are using for sealants you may be pressed for time. One of the sealants I'll be using is threebond so I have to be finishing the torque in 30 minutes. This tool will speed up the install of the Orings.
I will be using Dow 55 on the Orings.
Qarl
Mar 16 2014, 09:07 PM
My OCD tendancies love your attention to detail!
Mark Henry
Mar 16 2014, 09:10 PM
Shit about to get real
This is a "lo-fi" version of our main content. To view the full version with more information, formatting and images, please
click here.