The ring was made from a type 1 VW beetle flywheel.
The flywheel was lightened a bit, the holes were really just added for drainage/dust. Stock /4 flys have 6 holes, so I went a bit overboard, it "may" have taken a hair of weight off. Before I drilled the holes the ring and flywheel weighed just under 14lbs, about the same as a stock /4.
The pressure plate is a CSP HD performance type 4 vanagon 228mm.
No I will not make you one, not worth it to me to sell these. the VW and Porsche flywheels are hard as hell, this was tough going.
Full Version: Mark's ADHD/ADD/DWD 3.0 /6 conversion thread
Believe it or not this was made on my 1942 Montgomery Ward (Logan) lathe.
It's a 10"X 36" that's been modified with 2-1/2" risers, basically turning it into a 13" swing.
A PO did the mod and re-geared it, the feed works like normal.
It's a 10"X 36" that's been modified with 2-1/2" risers, basically turning it into a 13" swing.
A PO did the mod and re-geared it, the feed works like normal.
![popcorn[1].gif](http://www.914world.com/bbs2/style_emoticons/default/popcorn[1].gif) WOW a 300+ hp 3.0 rsr engine????
WOW a 300+ hp 3.0 rsr engine????

Can you weigh the flywheel w/ adapter as well as the whole flywheel clutch package? I'm interested in comparing a few as time goes on.
Nice Lathe ! When did you get that !
QUOTE(Mark Henry @ Feb 7 2014, 08:44 AM) 
Fired it up today with my laser thermometer pointed at a scrap piston in the middle rack.
I need to set at 320F for 300F
I need to set at 370F for 350F
The table does have quite a hot spot on the chimney area, 190F (@300) and 225 (@350).
So I'm wondering what to do..... leave it, part block it, cut a hole in the top or redirect it so I don't have to cut the top.

That's where you can put your coffee cup. Just make sure the handle is insulated.
once you start baking powder , You will wish the chimney vented outside...
QUOTE(MrHyde @ Feb 8 2014, 06:12 PM)
Nice Lathe ! When did you get that !
A couple of weeks after the clinic

QUOTE(kid914 @ Feb 8 2014, 04:30 PM)
WOW a 300+ hp 3.0 rsr engine???? Well not quite, but I could have a bit over 250, I'd say at the most 280hp
I'll probably jizz in my pants...or shit them.
QUOTE(sixnotfour @ Feb 8 2014, 09:38 PM)
once you start baking powder , You will wish the chimney vented outside...
Hmmm......
 I put in a heat sheild yesterday, but maybe the chimney needs a rethunk
Decided to make my adapter ring holes a little bigger. 
Also decided that I should also mark the flywheel so I can see the timing/valve adjusting marks through the bottom peephole. I had to put the marks 180 out so the read from the bottom, it was easiest just to put the crank in the case for marking.
I started doing the lines on the lathe, but they were to fine so I took a file to them.
I started doing the lines on the lathe, but they were to fine so I took a file to them.
Rebult rods with ARP bolts
Aaaahhhhh....reaming and honing....
Aaaahhhhh....reaming and honing....
Can I just send my engine parts to you and you can put them together?
QUOTE(PanelBilly @ Feb 9 2014, 11:39 PM)
Can I just send my engine parts to you and you can put them together?
You live a bit too far away

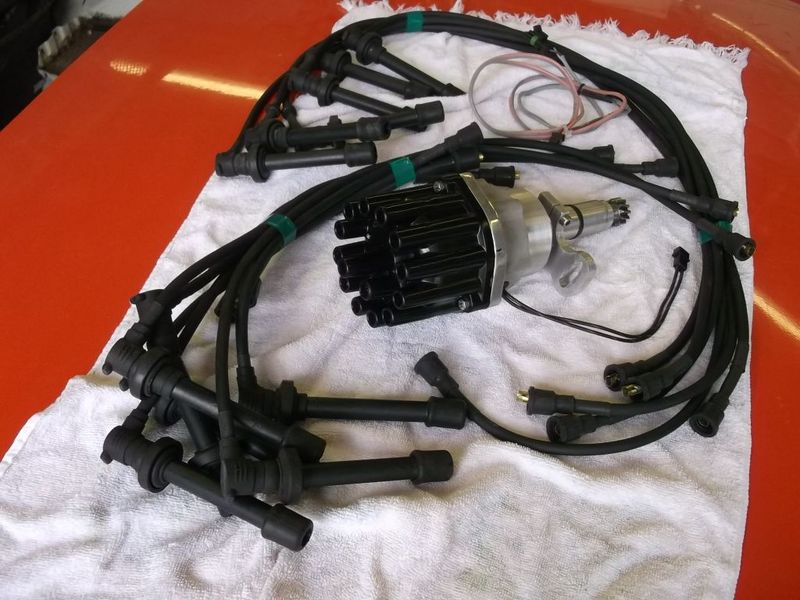
Last thing for today is I swapped out the dizzy drive gear.
A 3.0 has a counter clockwise dizzy, I changed the gear so that I can use a clockwise dizzy.
A 3.0 has a counter clockwise dizzy, I changed the gear so that I can use a clockwise dizzy.
QUOTE(Mark Henry @ Feb 9 2014, 08:27 PM)
Also decided that I should also mark the flywheel so I can see the timing/valve adjusting marks through the bottom peephole. I had to put the marks 180 out so the read from the bottom, it was easest just to pu the crank in the case for marking.
I started doing the lines on the lathe, but they were to fine so I took a file to them.
QUOTE(mrbubblehead @ Feb 9 2014, 11:50 PM)
QUOTE(Mark Henry @ Feb 9 2014, 08:27 PM)
Also decided that I should also mark the flywheel so I can see the timing/valve adjusting marks through the bottom peephole. I had to put the marks 180 out so the read from the bottom, it was easest just to pu the crank in the case for marking.
I started doing the lines on the lathe, but they were to fine so I took a file to them.
Pain in the ass to do that and it's too cold in the winter, thinking of running the chimney to the outside.
QUOTE(Mark Henry @ Feb 9 2014, 08:43 PM)
QUOTE(PanelBilly @ Feb 9 2014, 11:39 PM)
Can I just send my engine parts to you and you can put them together?
You live a bit too far away
You could come to Seattle.
QUOTE(PanelBilly @ Feb 10 2014, 12:47 AM)
QUOTE(Mark Henry @ Feb 9 2014, 08:43 PM)
QUOTE(PanelBilly @ Feb 9 2014, 11:39 PM)
Can I just send my engine parts to you and you can put them together?
You live a bit too far away
You could come to Seattle.
Tempting....
but I think the wife and kiddies would veto that idea.
QUOTE(McMark @ Feb 8 2014, 04:38 PM)
Can you weigh the flywheel w/ adapter as well as the whole flywheel clutch package? I'm interested in comparing a few as time goes on.
My setup on the top left
Flywheel 225mm 9.5 Lbs
Adapter ring 4.4 Lbs
Pressure plate 11.1 Lbs
Total 25 Lbs
Comparison on the top right, 930 245mm flywheel with Centerforce clutch package is 35.5 Lbs
On the lower center is the 1971 aluminum pressure plate at 7.5 Lbs it is a light weight with a stock PP i'm guessing about 20 Lbs total.
Note I have lightened my flywheel, but I didn't weigh it before I cut the outer edge off...I'm guessing stock weight at about 12 Lbs, but I could be wrong.
QUOTE(76-914 @ Feb 6 2014, 12:01 PM)
So you finally decided to jump into the "arena" with the rest of us idiots.
 Aboot time.
 Looking forward to watching this!
I've got a few years on you, and my car has now been apart for about 7 years...you/ve got skills, will be done before I. Jealous, in a good way!
QUOTE(sic6 @ Feb 10 2014, 02:10 PM)
QUOTE(76-914 @ Feb 6 2014, 12:01 PM)
So you finally decided to jump into the "arena" with the rest of us idiots.
Aboot time. Looking forward to watching this!
I've got a few years on you, and my car has now been apart for about 7 years...you/ve got skills, will be done before I. Jealous, in a good way!
Thanks
A new addition to the build list "Free Motion" needle bearings for the front, by Original Customs that I got from Rick. Well at least the check is in the mail
Mo' money...and mo' work.

Cool! My aluminum flywheel is about 3 lbs and my adapter ring is about 7. So looks like overall I'm about 6 lbs lighter than you for a total around 19lbs.
I'll have a stock 914/6 flywheel to measure soon.
I'll have a stock 914/6 flywheel to measure soon.
QUOTE(McMark @ Feb 10 2014, 04:47 PM)
Cool! My aluminum flywheel is about 3 lbs and my adapter ring is about 7. So looks like overall I'm about 6 lbs lighter than you for a total around 19lbs.
I'll have a stock 914/6 flywheel to measure soon.
The drilling I did on the adapter ring dropped almost 3/4 of a pound. I only drilled the holes bigger because they were already half way there.
I could lighten it a lot more, but this is a street car so I'm not too worried about it.
I'm guessing stock /6 fly and PP at just a hair under my weight.
Why reverse the gear on the dizzy?
QUOTE(PanelBilly @ Feb 10 2014, 05:41 PM)
Why reverse the gear on the dizzy?
Not just a matter of flipping it you have to use a different gear. The 3.0 uses a counter clockwise rotating dizzy the one I'm using rotates clockwise.
My dizzy for this project
WOW! That is gonna be one nice engine Mark.
Thanks
Anyone doing full rebuild on a SC engine and who are not using CIS might want to consider changing the CCW dizzy gear for a CW gear, then they can use an earlier dizzy.
BTW the CW gear is a standard VW gear from a type 1 or type 4, I took a gear from a 2.7 and it had a VW stamp on it.
Anyone doing full rebuild on a SC engine and who are not using CIS might want to consider changing the CCW dizzy gear for a CW gear, then they can use an earlier dizzy.
BTW the CW gear is a standard VW gear from a type 1 or type 4, I took a gear from a 2.7 and it had a VW stamp on it.
Got to keep thinks rolling
Next job is the cam towers, I'm going to pull the spray bars and clean them proper.
The /6 towers are always a bit dirty.
Next job is the cam towers, I'm going to pull the spray bars and clean them proper.
The /6 towers are always a bit dirty.
First I pull the factory plugs and then the spray bars (tubes) come out fairly easy. Not shown is the rear line plug actually has a point on it and this is what holds the spray bar in place, not the plugs.
The cam towers are now a little cleaner, this cleaning took quite a while. I have see if I can find a small caliber gun brush tomorrow for the spray bars.
Towers to be continued...same bat time.... same bat channel...
Towers to be continued...same bat time.... same bat channel...
mark, i have been using aircraft stripper on engine cases and gearbox cases. mag and aluminum. works fast and does not harm or etch the metal. little expensive. but its just so easy its worth it. just brush it on with a cheap chip brush.
Been feeling like shit...figured as much but it looks like I'm passing a kidney stone...oh well, I'll keep trying to carry on with the projects.
Just a tad bitchy....
Just a tad bitchy....
Take a break. Drive to Brampton.
![whistle[1].gif](http://www.914world.com/bbs2/style_emoticons/default/whistle[1].gif)
QUOTE(balljoint @ Feb 12 2014, 04:09 PM)
Take a break. Drive to Brampton.
Planning to visit you soon.... to pick up my new penguin....
dp
Working a bit slow today, but stiff upper lip got some towers to get done.
Need to tap for the new plugs, not much different than doing a type 4 galley plug.
You have to be careful not to distort the bearing bore, pipe plugs use a taper and you don't want the plug (or tap) to be jammed in too tight. You have to tap it deep enough so the plugs sits slightly below the surface. Do not use Teflon as it slippy enough to allow you to over torque the plug. Use something like loctite instead.
I'm using a 1/8" NPT steel pipe plugs with a hex head.
The plug and the fresh tapped hole.
This is how it must sit just below the surface when done.
This is how it must sit just below the surface when done.
While doing this it's a good time to chase the other threads.
Now....you're asking yourself why the hell is he doing all this work? Just to make the cam towers look pretty??
This is why, look at these burrs in the holes of the spray bars! Maybe they won't come off...maybe they will...do you feel lucky?
This is why, look at these burrs in the holes of the spray bars! Maybe they won't come off...maybe they will...do you feel lucky?
So I've been using Dr Evils favorite cleaner LA Awesome and I found this little brushes at the dollar store. They worked great.
Guess what I'm making
First hint it's not finished...damn belt for my lathe broke 
Yep it's leather.
Yep it's leather.
HE for /6s?
QUOTE(PanelBilly @ Feb 13 2014, 10:13 PM)
HE for /6s?

Another hint other side of the head and what is that part sitting on?
next..
It's a jig for...???
QUOTE(Mark Henry @ Feb 13 2014, 07:51 PM)
It's a jig for...???
ITB adapters?
QUOTE(Mark Henry @ Feb 13 2014, 09:51 PM)
It's a jig for...???
restrictor plates for you intake

Close.....custom phenolic spacers
The jig will be for finish cutting them on my router table.
Center hole will be bigger, once I get a new belt on the lathe.
The jig will be for finish cutting them on my router table.
Center hole will be bigger, once I get a new belt on the lathe.
Nice thread! A carbed 3.0 is an awesome engine for a 914...
Have you given any thought to what you are using to seal the case? I used triple bond 1184, great stuff and it seals very well. Have a very good understanding as to how thick you want it and where you want it before starting.
Also make sure your case has the chamfers on both sides for the thru bolt o-rings and dont use rtv on the o-rings like wayne calls out!!! I had to pull my case back apart from doing that one...
good luck...
This is a "lo-fi" version of our main content. To view the full version with more information, formatting and images, please click here.