Great work! Good call on bringing the gas tank in for cleaning, too. My dad ran out to C & C on Saturday for a few minutes to pass out All Porsche Show flyers. He thought he saw about 4-6 914s there...pretty impressive as you would have maybe seen 1 a few years back.
He's feverishly trying to get his 74LE back together in time for the All Porsche Show Sunday, June 26th at Central Park in Roseville, MN (shameless plug). All you MN, ND, SD, WI, IA (and beyond) guys NEED to bring your 914s. It is a no pressure show with 150+ Porsches on hand. It is a great time and the largest Porsche event around.
Full Version: Optimusglen's build off challenge
For sure! If mine was anywhere near ready to drive I'd push to get it ready, but I still have to drop the engine and rebuild some things. 
I'll be there though!
I'll be there though!
I picked up the tank from getting refurbed. I went to Gas Tank Renu USA to have it done, they patched a couple holes that were hidden, cleaned/blasted the inside, and coated it inside and out. Nationwide lifetime warranty too. In the end it was $275, and it'll be great to know the entire fuel system will be new or as new.
Picture using my potato phone, but you get the idea. It's clean inside
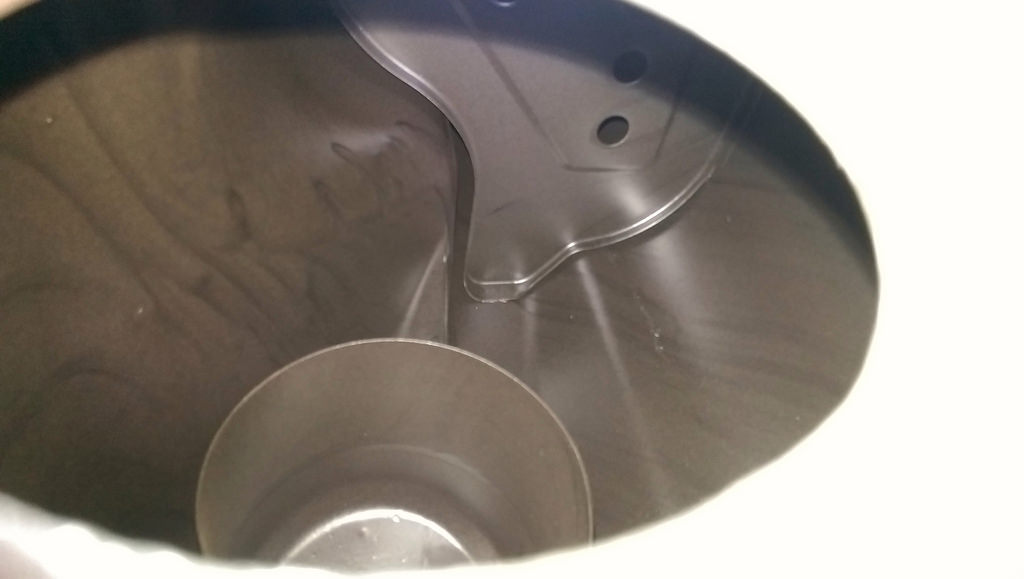
Picture using my potato phone, but you get the idea. It's clean inside
QUOTE(Optimusglen @ Apr 24 2016, 02:11 PM) 
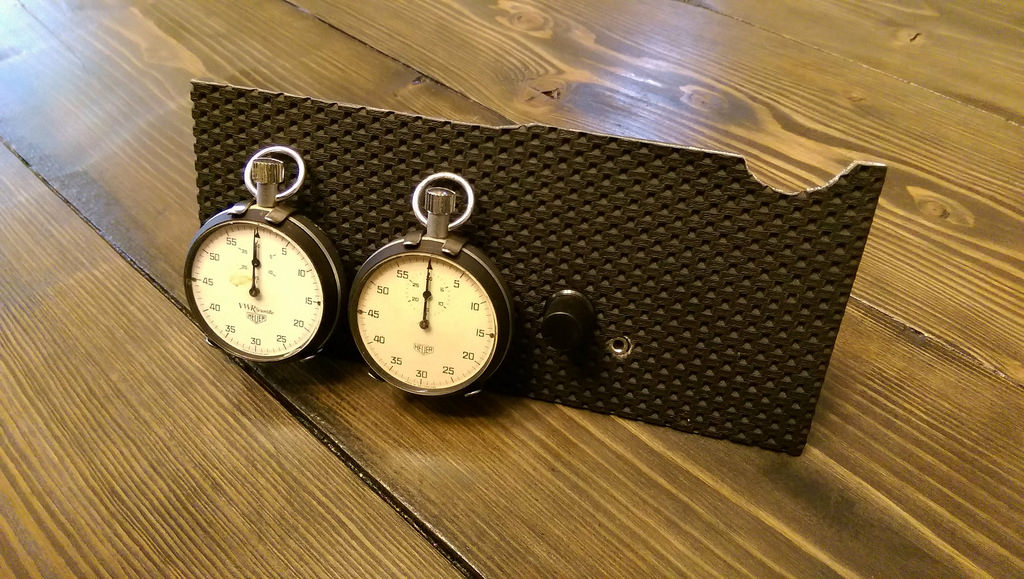
Radio delete panel complete
.
This is awesome. Nice touch.
To have your ash tray match your dash, buy Forever Black. It is a black dye product with a foam tipped applicator. Used it on mine and looks great. I also use it on any other rubber or plastic trim parts which I want to restore back to black. Think Amazon has it.
Great thread and great skills.
Great thread and great skills.
QUOTE(RickS @ Jun 15 2016, 10:02 AM)
To have your ash tray match your dash, buy Forever Black. It is a black dye product with a foam tipped applicator. Used it on mine and looks great. I also use it on any other rubber or plastic trim parts which I want to restore back to black. Think Amazon has it.
Great thread and great skills.
Thank you, I'll have to give that a try.
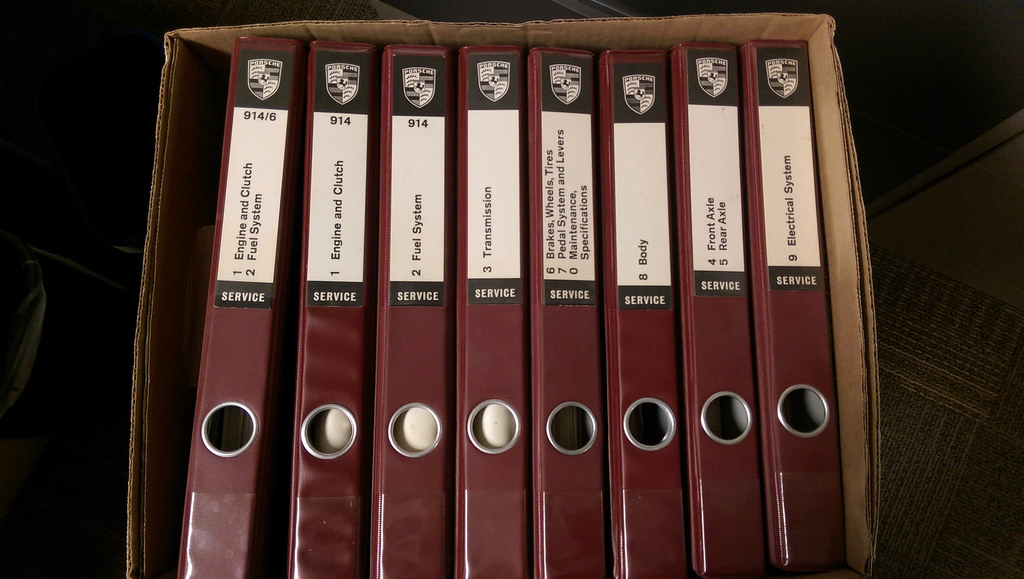
I had this in a seperate thread on here, but since it has to do with my project I'll put it here too. A co-worker of mine found out I had a 914 project and mentioned to me that he had a 914 several years ago. He went on to say that he still had a manual for it and had been trying to find a good use for it. If I wanted it I could have it for free. Of course I accepted and the next day came into work and to my surprise this was on my chair...
QUOTE(Optimusglen @ Jun 15 2016, 08:16 AM)
QUOTE(RickS @ Jun 15 2016, 10:02 AM)
To have your ash tray match your dash, buy Forever Black. It is a black dye product with a foam tipped applicator. Used it on mine and looks great. I also use it on any other rubber or plastic trim parts which I want to restore back to black. Think Amazon has it.
Great thread and great skills.
Thank you, I'll have to give that a try.
I had this in a seperate thread on here, but since it has to do with my project I'll put it here too. A co-worker of mine found out I had a 914 project and mentioned to me that he had a 914 several years ago. He went on to say that he still had a manual for it and had been trying to find a good use for it. If I wanted it I could have it for free. Of course I accepted and the next day came into work and to my surprise this was on my chair...
Very cool gift.
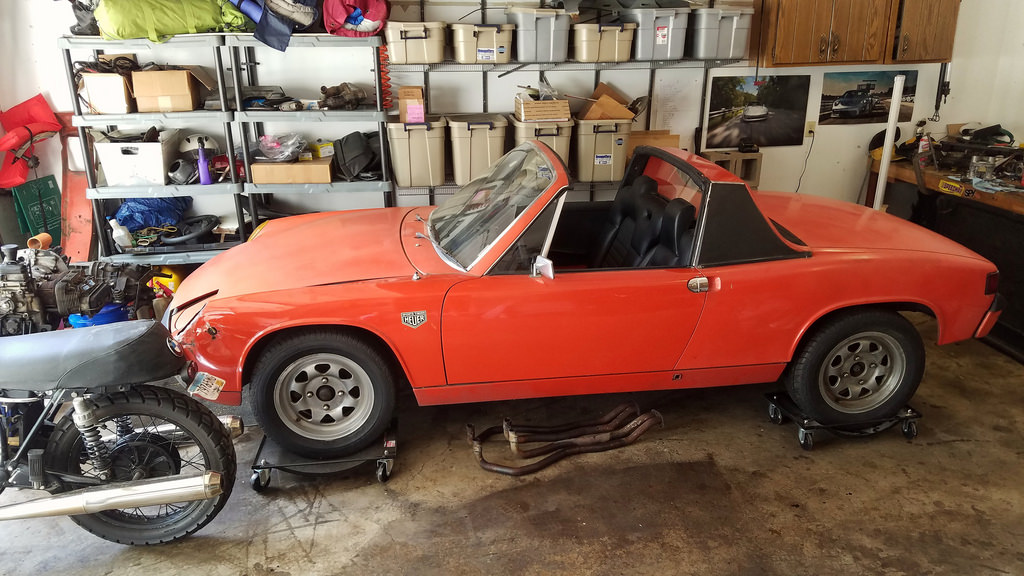
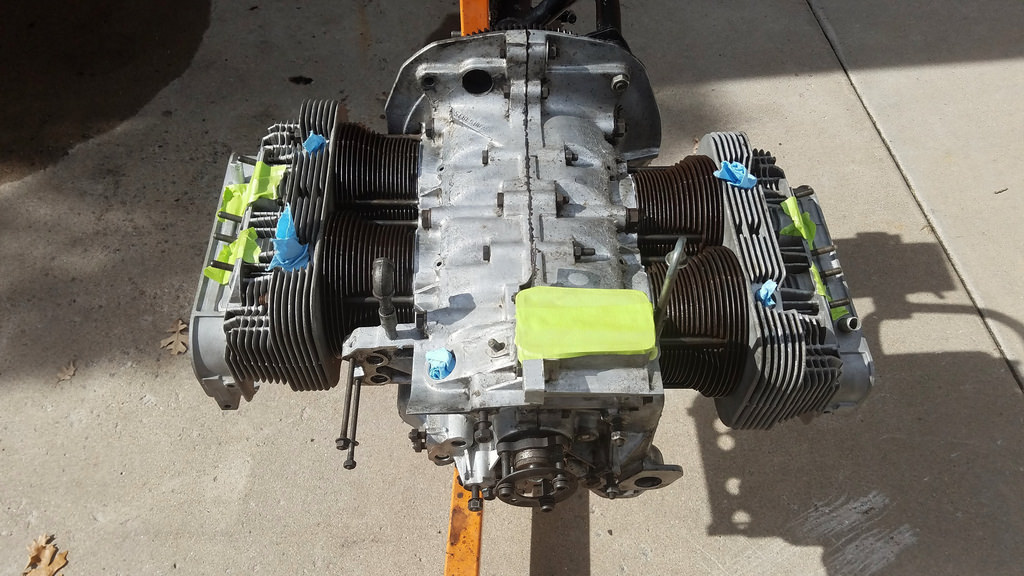
Big day today, i have most of the week off so i decided to dig in.
Dropped the engine, removed the heat exchangers and exhaust, separated the trans, and got the engine on the stand.
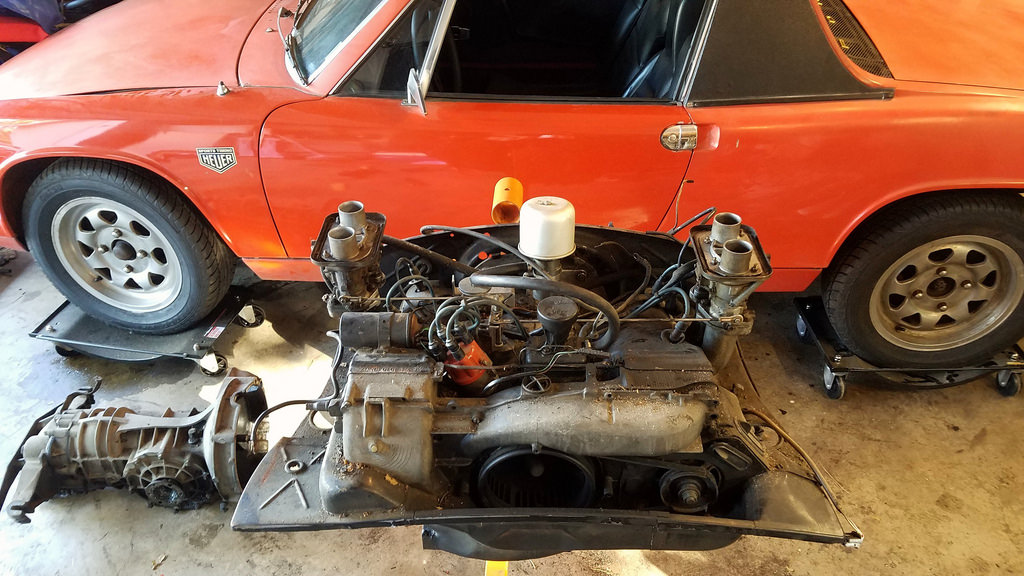
Dropped the engine, removed the heat exchangers and exhaust, separated the trans, and got the engine on the stand.
Awesome! Keep the updates and progress coming
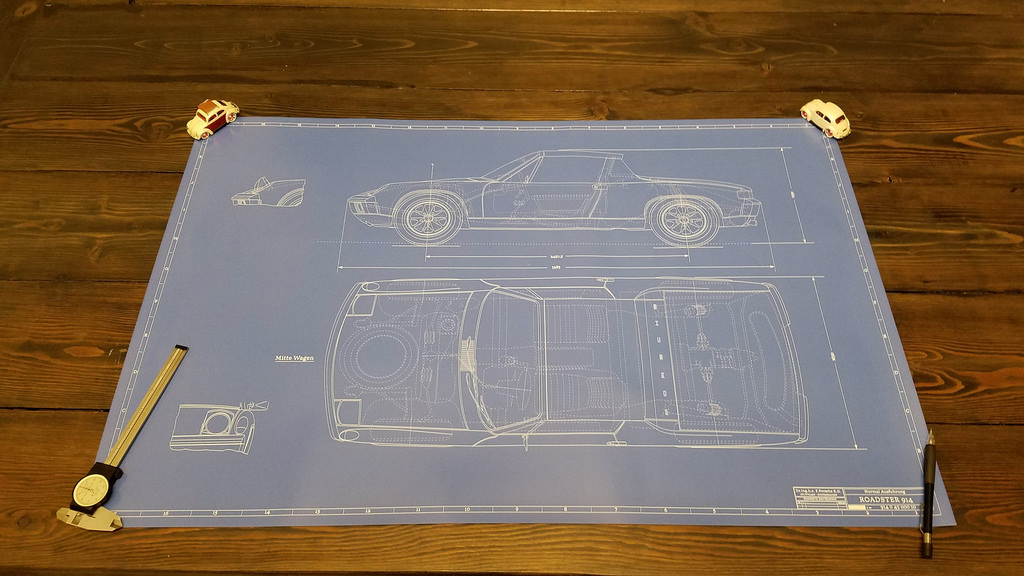
I finished up a drawing of the end product for this stage anyway.

If anyone is interested in seeing my other car art, or if you want a print of yours, check out my post in the member vendors section.
http://www.914world.com/bbs2/index.php?showtopic=281607
If anyone is interested in seeing my other car art, or if you want a print of yours, check out my post in the member vendors section.
http://www.914world.com/bbs2/index.php?showtopic=281607
Small update.
I finished where the rust left off with the heat exchangers. I'll be running the exhaust as budget headers.
Engine is down to the long block. This week I'll be pulling the jugs off and doing a lot of cleaning and inspecting. Gasket kit is in but it only has the head gaskets for the 1.7, I'll need to measure and get new ones.
I got sick of the amount of clutter in my garage, so I purchased a new roller cart for my tool box. Getting things more organized always helps with the morale of working in the garage.
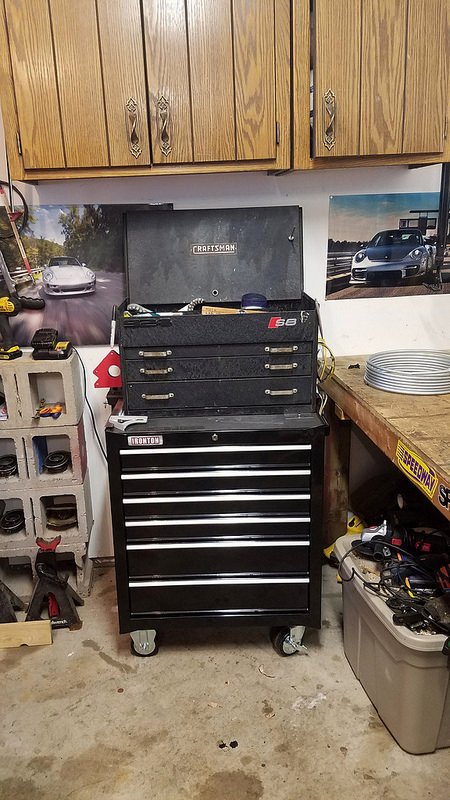
I know it still looks like a rats nest compared to many of you, but at least I know where everything is now.
Bonus, you can see one of the pictures from my trip to Birmingham for the Porsche Sport Driving School that I won, some of you might remember that post from a few years back.
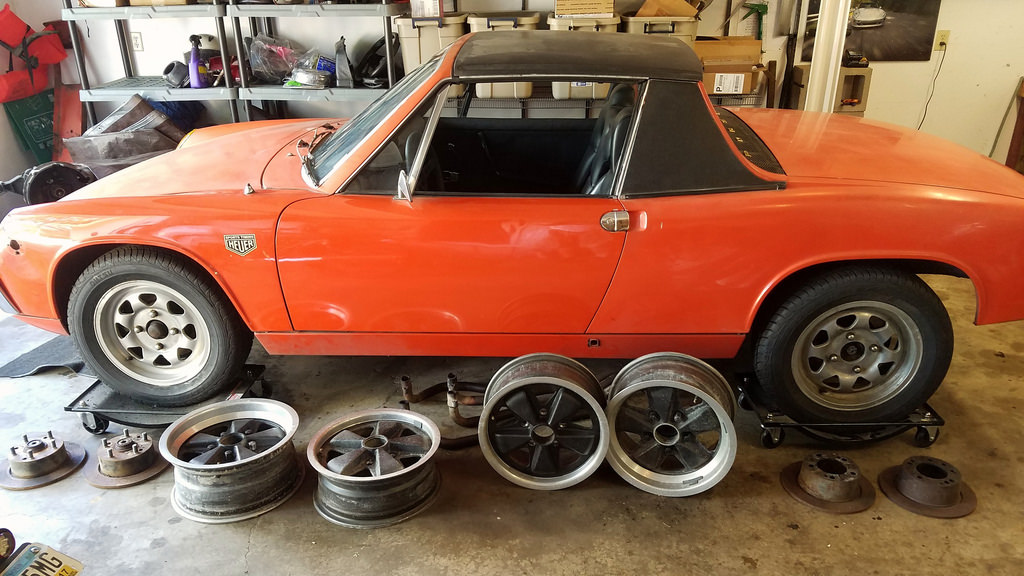
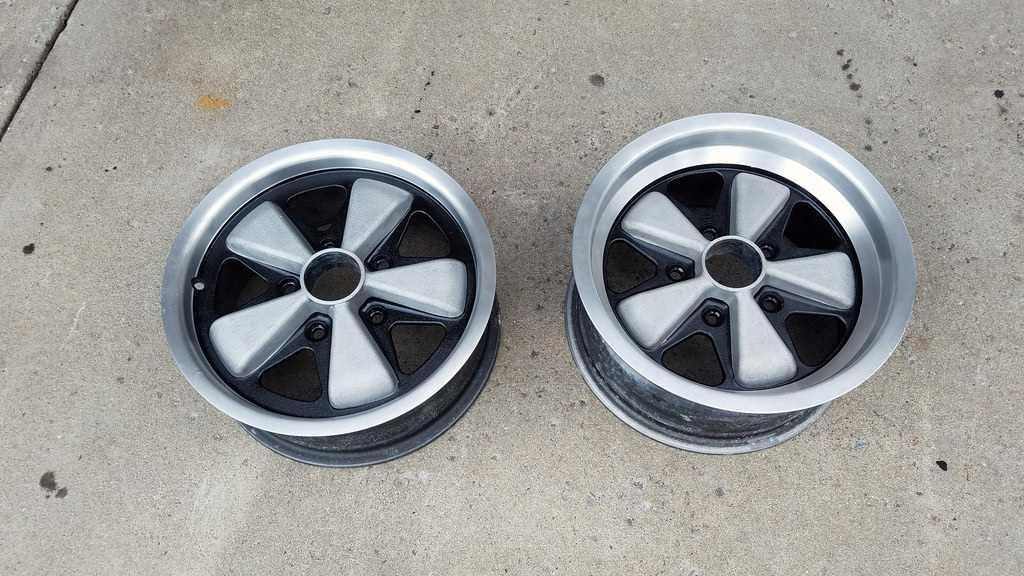
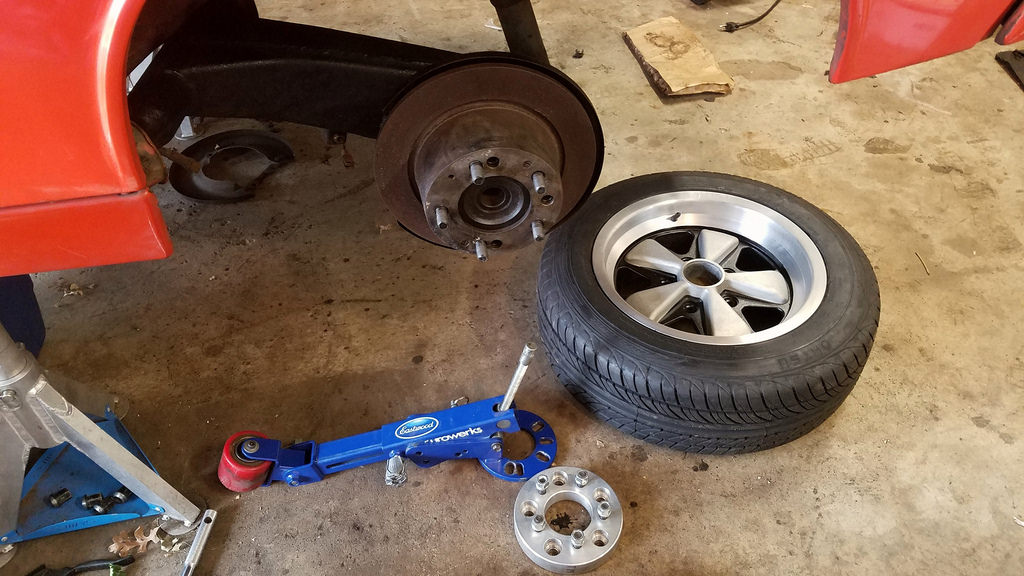
Last but not least, a member here was selling a drilled 5-lug swap with (Compomotive) Fuchs. It all needs to be cleaned up and refinished, but everything else on this project is the same way apart from the steering wheel. So I jumped on it and it should all be headed my way soon.
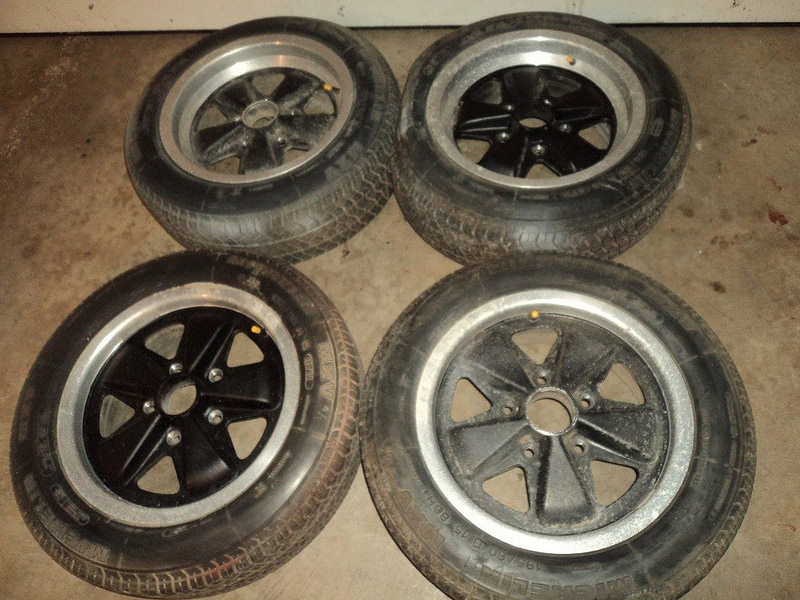
The wheels are 15x6 and 15x7 staggered. It'll be tight in the back, but I was going to have to roll the fenders anyway so I'm not worried. They aren't real/original Fuchs, so they're not ideal, but it will be easier to upgrade later on now that I'll actually be running 5x130.
Fortunately enough, even though they are not original they don't suffer from the replica issues where a company will use an original forged wheel to make their tool, but then cast the wheels instead of forging, which makes a replica much weaker. These are designed to be cast. The only thing that bugs me is the pedal shape, it's much narrower where it meets the center. I think it'll be fine if I do all black centers, but if I try to finish these as an RSR style wheel, they might look odd... We'll see.
OH, one other bit of news. I discovered that my brother in-law that lives 5 minutes away from me owns a sand blasting cabinet. #winning
I finished where the rust left off with the heat exchangers. I'll be running the exhaust as budget headers.
Engine is down to the long block. This week I'll be pulling the jugs off and doing a lot of cleaning and inspecting. Gasket kit is in but it only has the head gaskets for the 1.7, I'll need to measure and get new ones.
I got sick of the amount of clutter in my garage, so I purchased a new roller cart for my tool box. Getting things more organized always helps with the morale of working in the garage.
I know it still looks like a rats nest compared to many of you, but at least I know where everything is now.
Bonus, you can see one of the pictures from my trip to Birmingham for the Porsche Sport Driving School that I won, some of you might remember that post from a few years back.
Last but not least, a member here was selling a drilled 5-lug swap with (Compomotive) Fuchs. It all needs to be cleaned up and refinished, but everything else on this project is the same way apart from the steering wheel. So I jumped on it and it should all be headed my way soon.
The wheels are 15x6 and 15x7 staggered. It'll be tight in the back, but I was going to have to roll the fenders anyway so I'm not worried. They aren't real/original Fuchs, so they're not ideal, but it will be easier to upgrade later on now that I'll actually be running 5x130.
Fortunately enough, even though they are not original they don't suffer from the replica issues where a company will use an original forged wheel to make their tool, but then cast the wheels instead of forging, which makes a replica much weaker. These are designed to be cast. The only thing that bugs me is the pedal shape, it's much narrower where it meets the center. I think it'll be fine if I do all black centers, but if I try to finish these as an RSR style wheel, they might look odd... We'll see.
OH, one other bit of news. I discovered that my brother in-law that lives 5 minutes away from me owns a sand blasting cabinet. #winning
Looking good Glen!
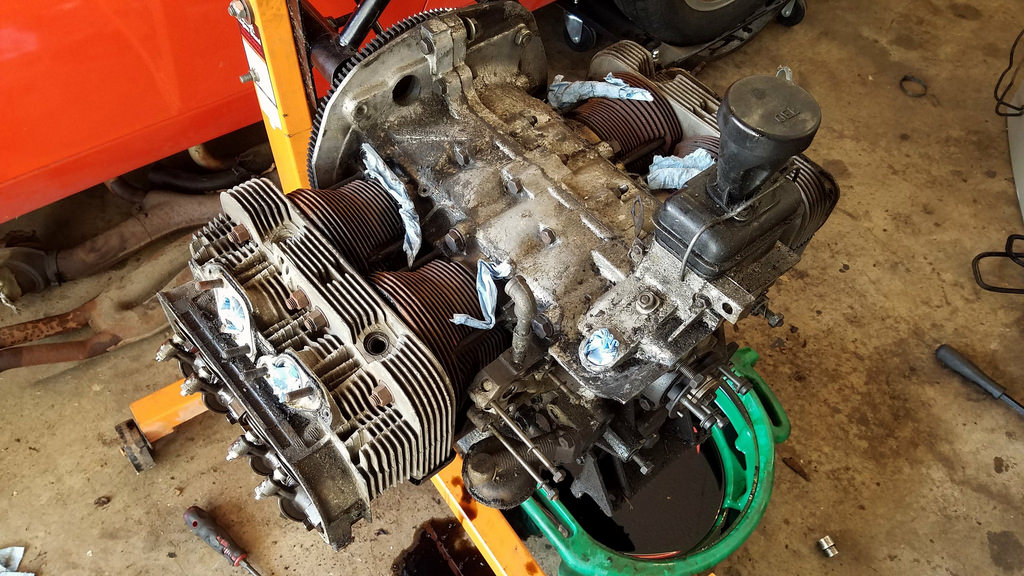
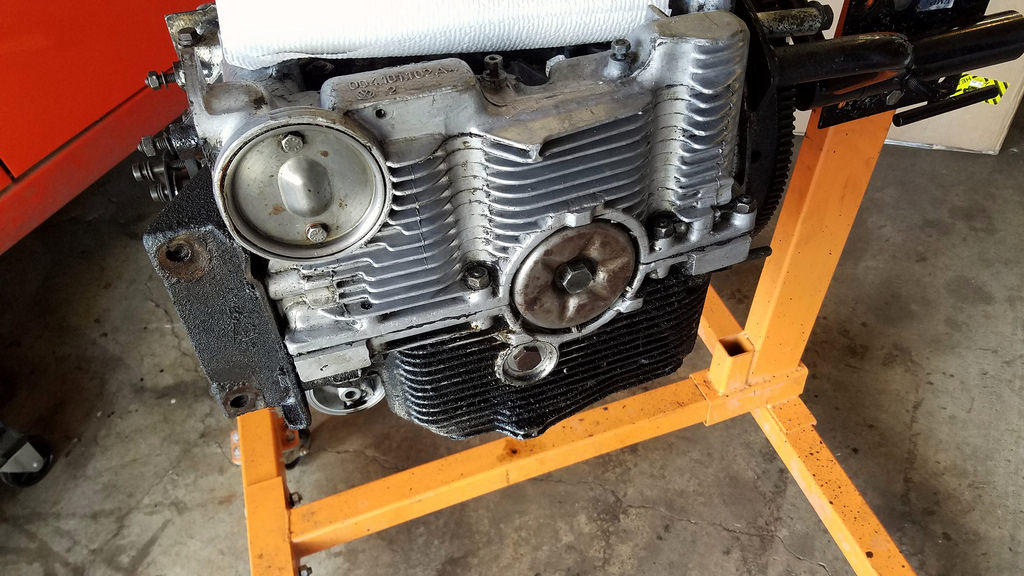
Engine is mostly apart, have not cracked the case open, and clutch/flywheel are still in place.
Everything went smoothly. Lots of dirt and oil but nothing scary.
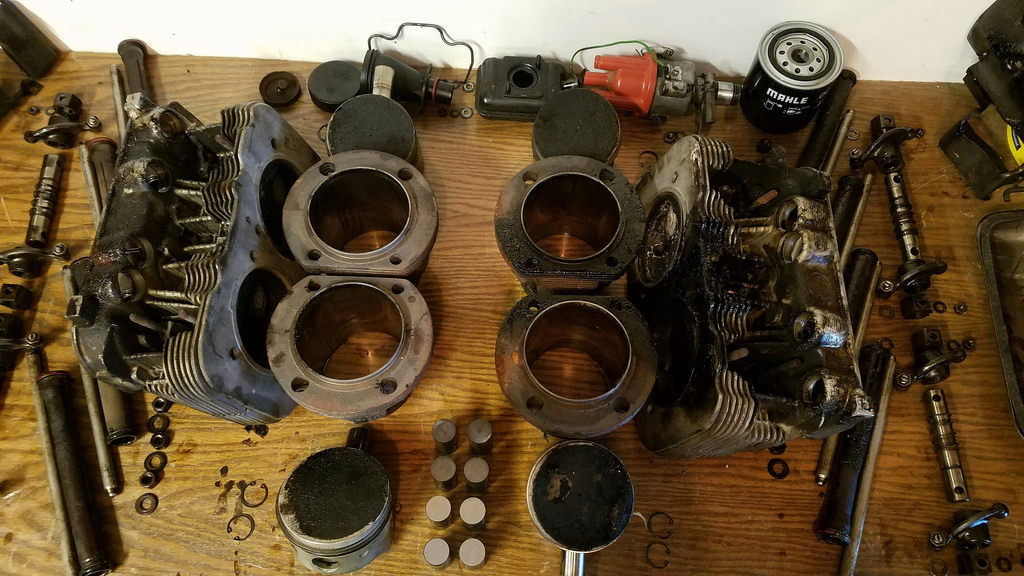
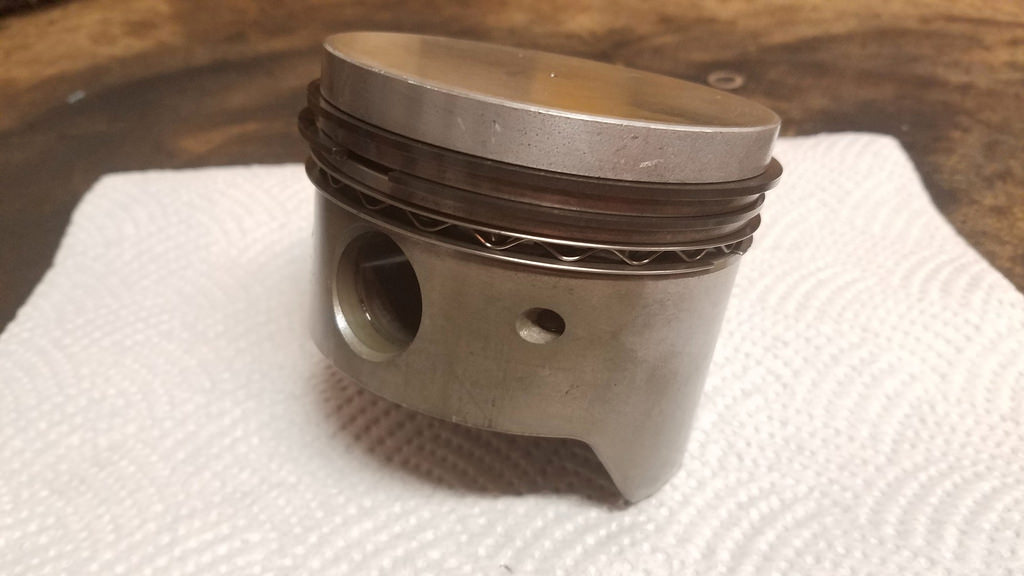
Cleaned up one piston so far, didn't take a whole lot of effort.
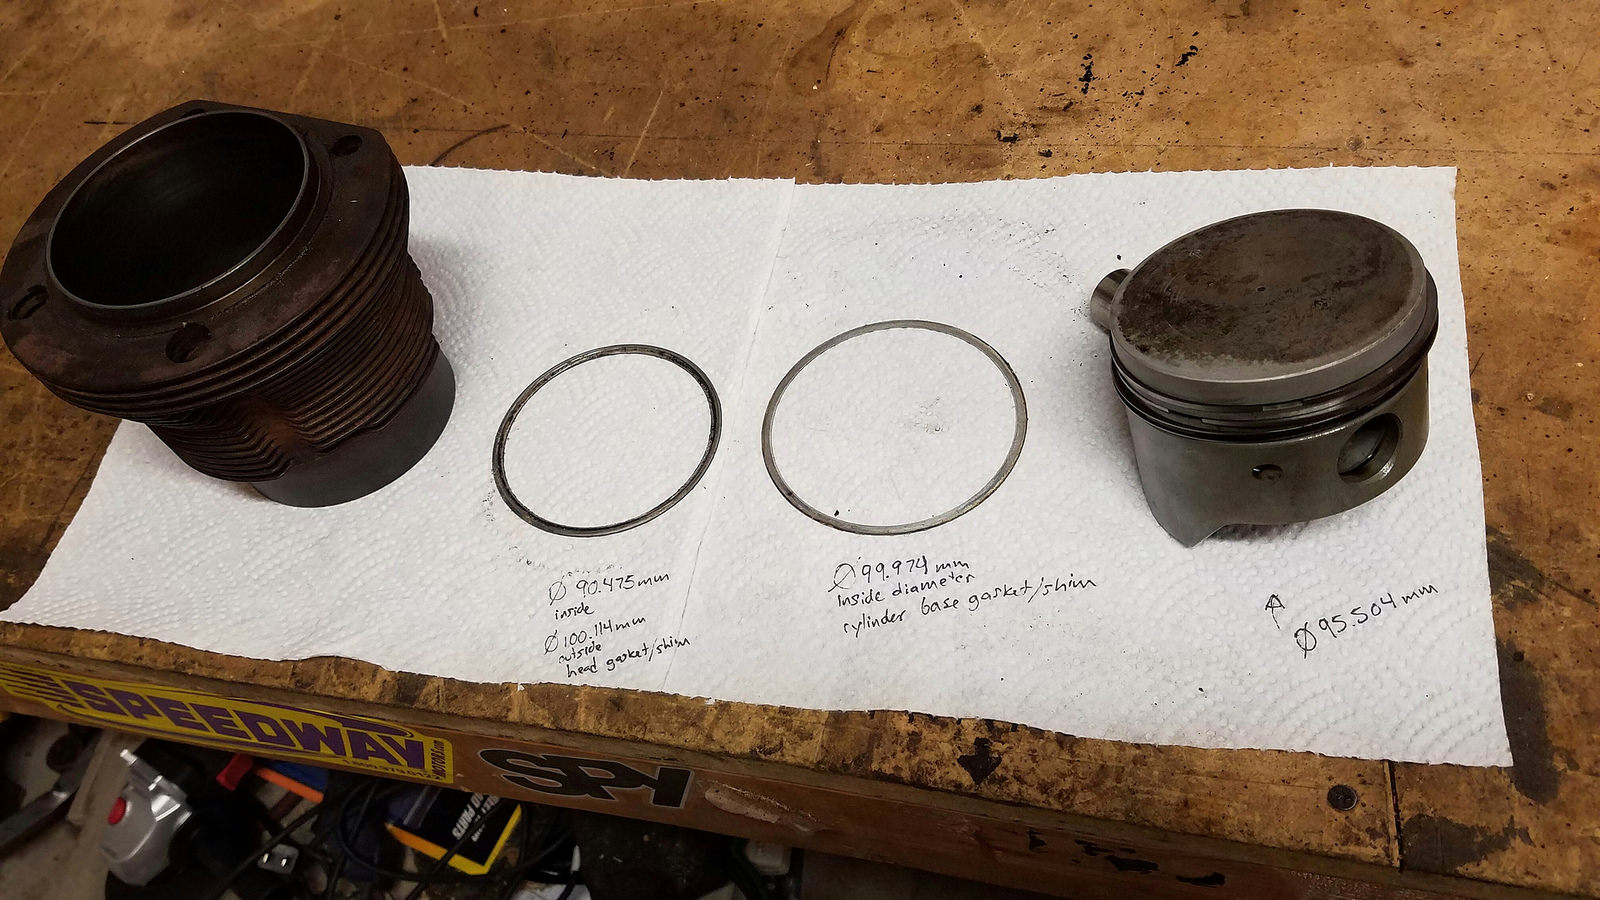
I forgot to write it down on that napkin, but the cylinder bore is 95.872mm. All measurements are approximate, taken with a standard caliper. So I think it's safe to assume they are 96mm cylinders.
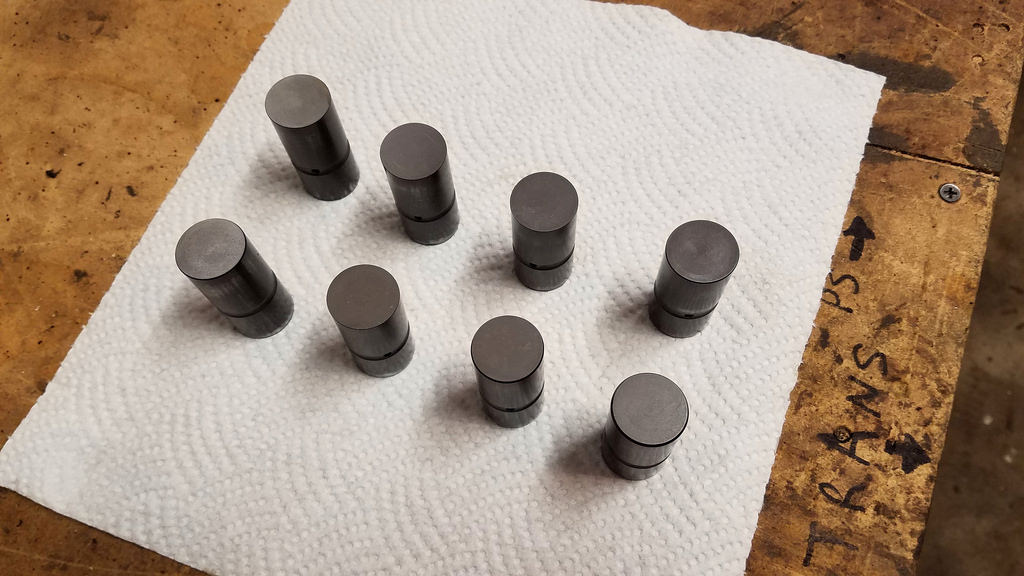
Lifters look wonderful, no pitting or scoring.
Cam looks pretty good too!
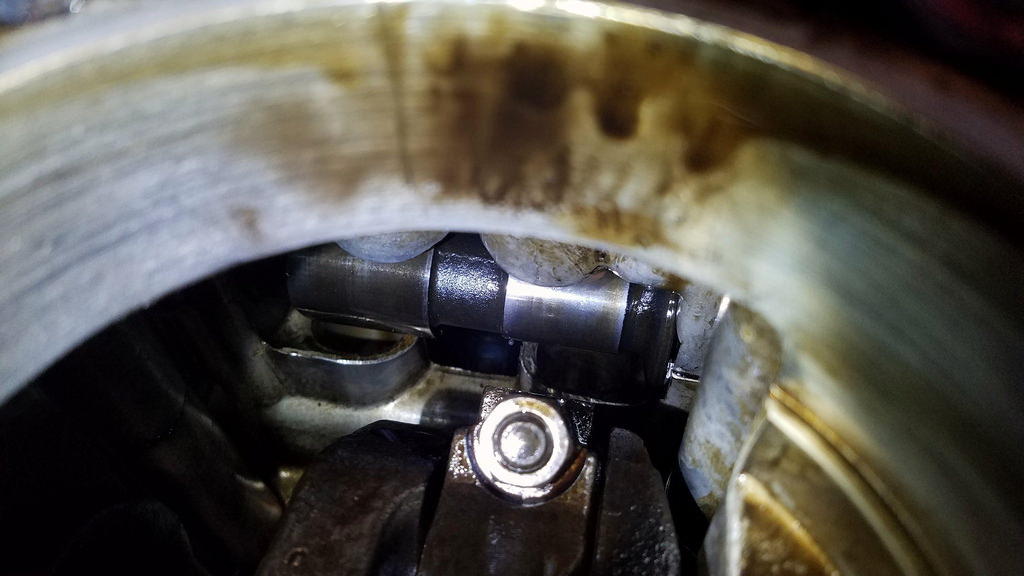
Some oil staining on this lobe, but no pitting and it's very smooth, by touch you cannot tell it's there.
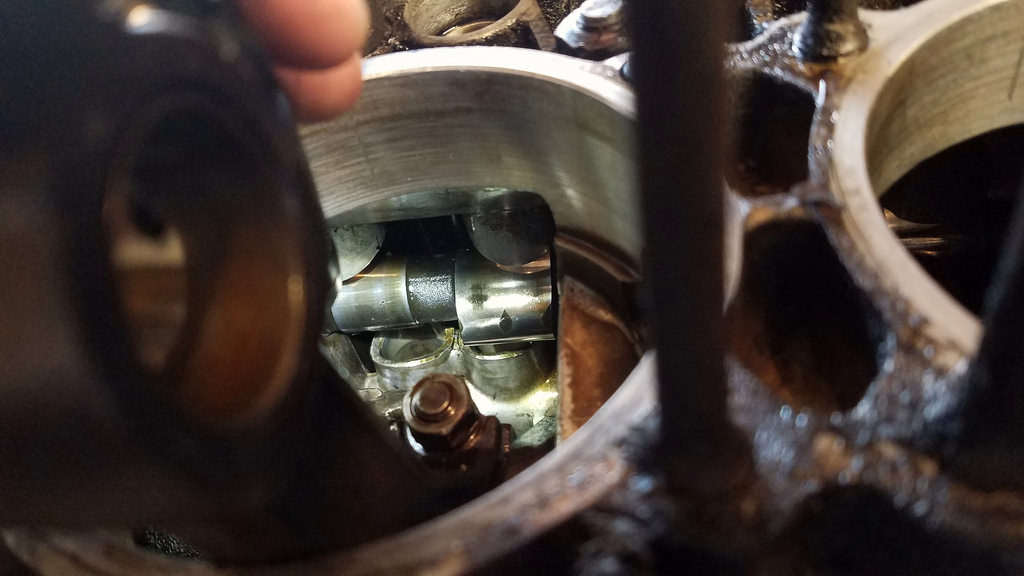
Cylinder bores are clean, I can't see the cross hatching though.
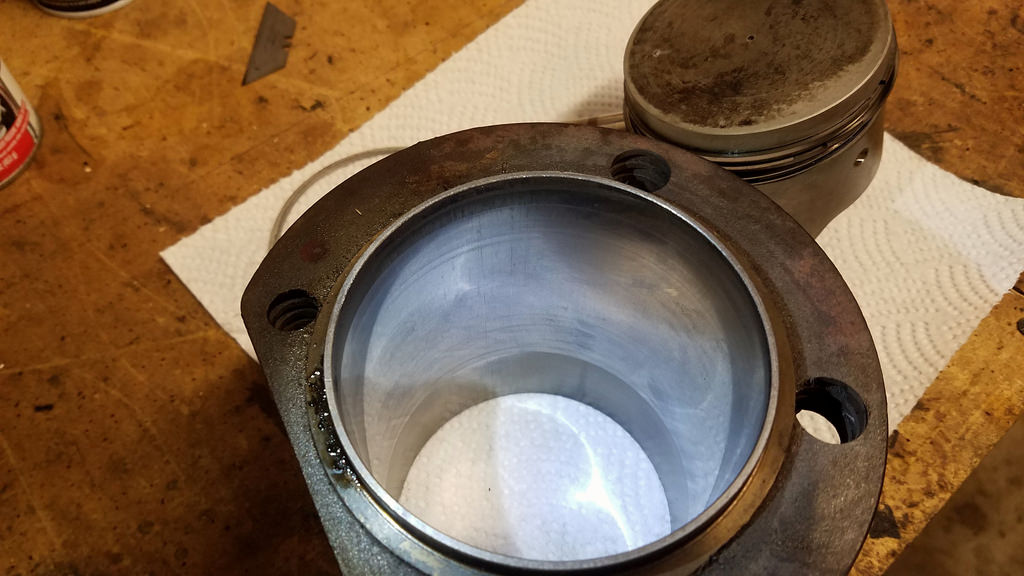
Is this something I need to have bored?
Questions:
-I seem to remember a bulletin from Porsche or VW effectively saying not to use the cylinder base metal gaskets. Can anyone confirm?
-Do I need to have any work done on the cylinders to replace the cross hatching, or is that only if I replace rings?
Everything went smoothly. Lots of dirt and oil but nothing scary.
Cleaned up one piston so far, didn't take a whole lot of effort.
I forgot to write it down on that napkin, but the cylinder bore is 95.872mm. All measurements are approximate, taken with a standard caliper. So I think it's safe to assume they are 96mm cylinders.
Lifters look wonderful, no pitting or scoring.
Cam looks pretty good too!
Some oil staining on this lobe, but no pitting and it's very smooth, by touch you cannot tell it's there.
Cylinder bores are clean, I can't see the cross hatching though.
Is this something I need to have bored?
Questions:
-I seem to remember a bulletin from Porsche or VW effectively saying not to use the cylinder base metal gaskets. Can anyone confirm?
-Do I need to have any work done on the cylinders to replace the cross hatching, or is that only if I replace rings?
No head gaskets. You still need to seal the cylinders to the case. Use sealer. You may need spacers, depending on what you need for CR. Not sure if you stack spacers AND gaskets. I assume sealer trumps any gasket.
QUOTE(Tbrown4x4 @ Aug 3 2016, 08:29 AM)
No head gaskets. You still need to seal the cylinders to the case. Use sealer. You may need spacers, depending on what you need for CR. Not sure if you stack spacers AND gaskets. I assume sealer trumps any gasket.
Thanks!
Since the engine was running fine before, I'll skip the spacers at the base. The ring that was in there was paper thin and had zero sealant. I think I'll leave that ring out, and use a sealant instead.
Got a few things in the mail today.
Lots of cleaning today. Since the case is open to the elements via the cylinder holes I can't really use more conventional cleaning methods.
So i have to do it the hard way, with paper towells and a small brush.
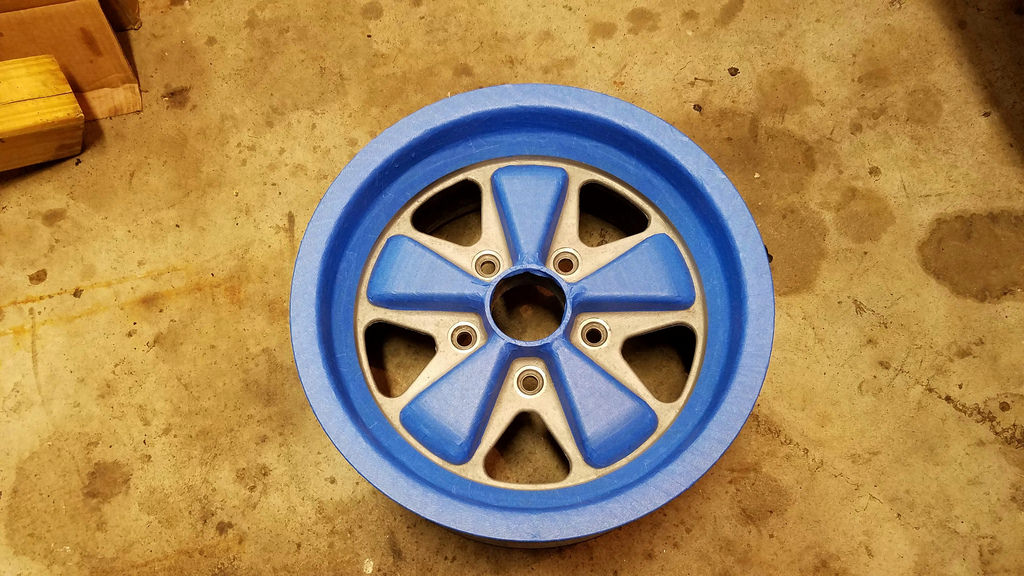
Started cleaning and stripping the wheels, but I'm thinking they were powdercoated. Two full installments of stripper but only a little black has come off each time.
So i have to do it the hard way, with paper towells and a small brush.
Started cleaning and stripping the wheels, but I'm thinking they were powdercoated. Two full installments of stripper but only a little black has come off each time.
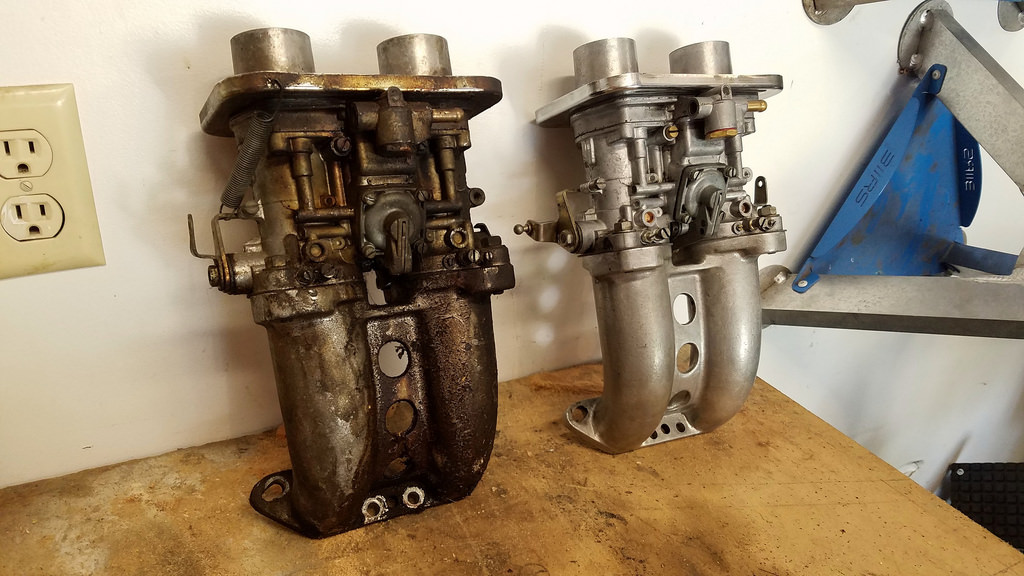
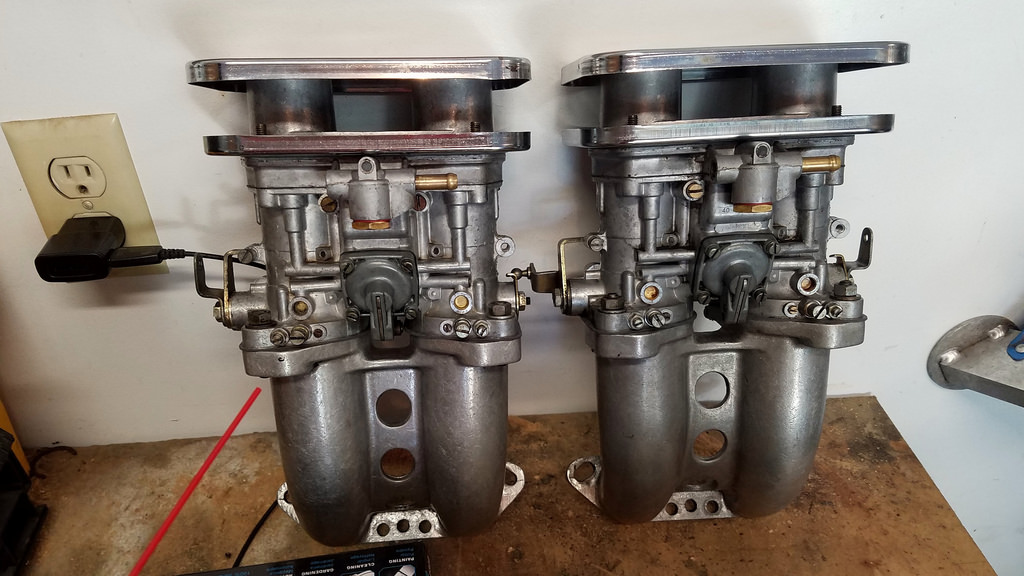
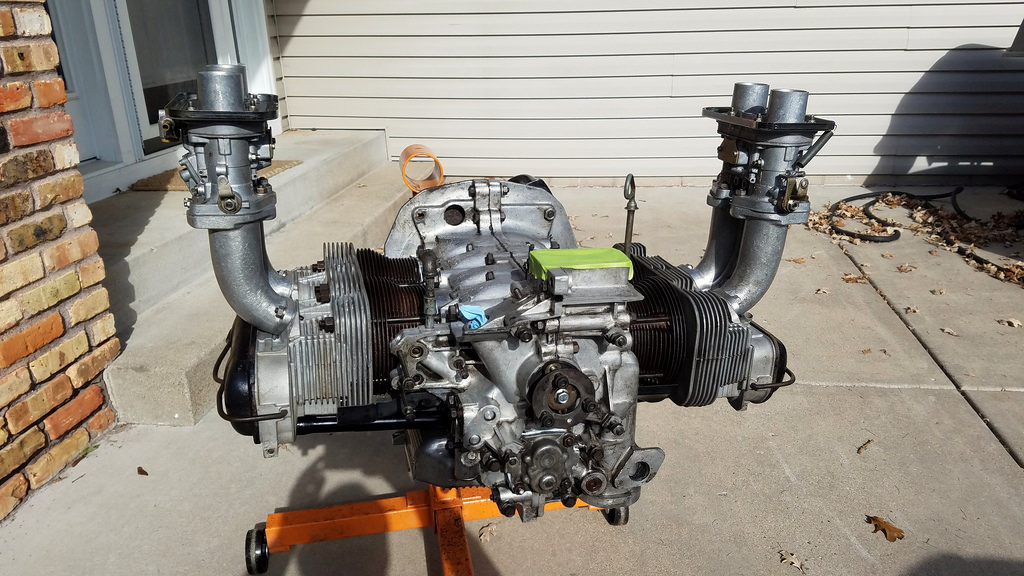
More progress today. Finished rebuilding one of the carbs.
great job on cleaning. i used the aluminum sealing rings in the head/cylinder interface, no sealant. car runs fine. i did not pull cylinders because i did not want to upset ring land. if it were mine, the bores look good, i would re-ring it and reassemble. only because you pulled the cylinders.
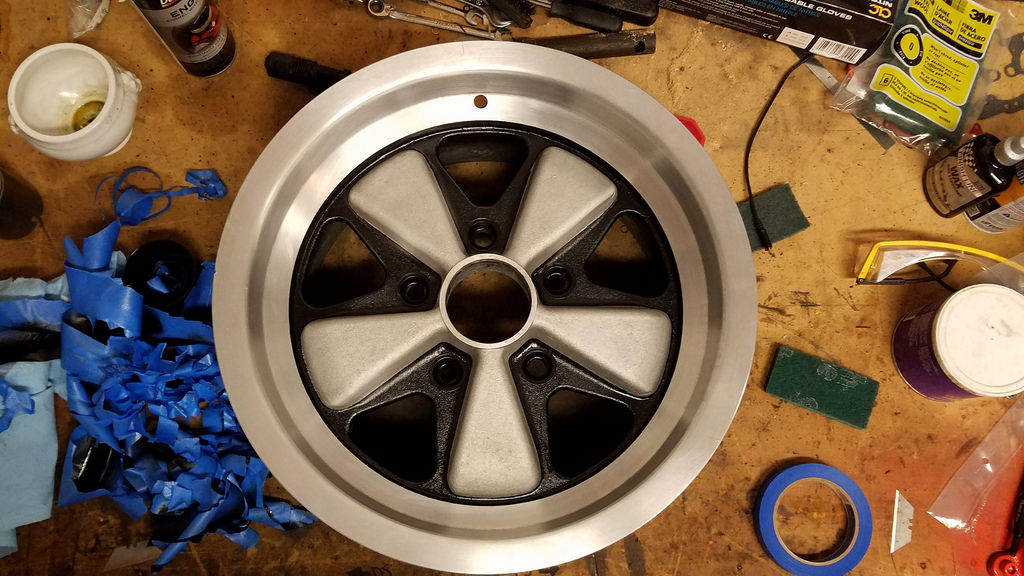
So I did a test wheel in the RSR paint scheme just to see if it would look weird because of the petal shape. Turned out better than expected so I will be doing all 4.
Stripped the paint off the wheels. Maybe it was powdercoat, it took 4 passes with paint stripper and on the final pass I had to use a brass brush as well. But, I got it all off. Cleanup using fine "0" 3M steel wool and to get that brushed look on the lips. The insides were textured from the factory and it looked nice so I left them.
There is a method for painting just the inside of the Fuchs that works well. You seal off the back side with tape (packing tape, or something with a good solid bond, i.e. not painters tape) place the wheel over a bucket that will fit snugly inside the wheel, then carefully fill each of the 5 valleys until paint reaches the desired level. Finally, you puncture the tape with a blade and let the paint drain out into the bucket.
I didn't use this method. Mostly because I didn't have pour-able paint, but also because I didn't have a bucket that would fit well that wasn't currently being used to store used engine oil. What I did have is a roll of painters tape, a spray can of ceramic semi-gloss high temp black, and more patience than your average bear.
Masking.
And done!
QUOTE(Optimusglen @ Apr 24 2016, 02:11 PM)
Radio delete panel complete
.
Growing up in Minnesota and being a Met Council of Sports Car Club member, one thing I remember is that there were some rally FREAKS in SCCA. You show up with those sexy stop watches and you're going to make some friends pretty quickly...
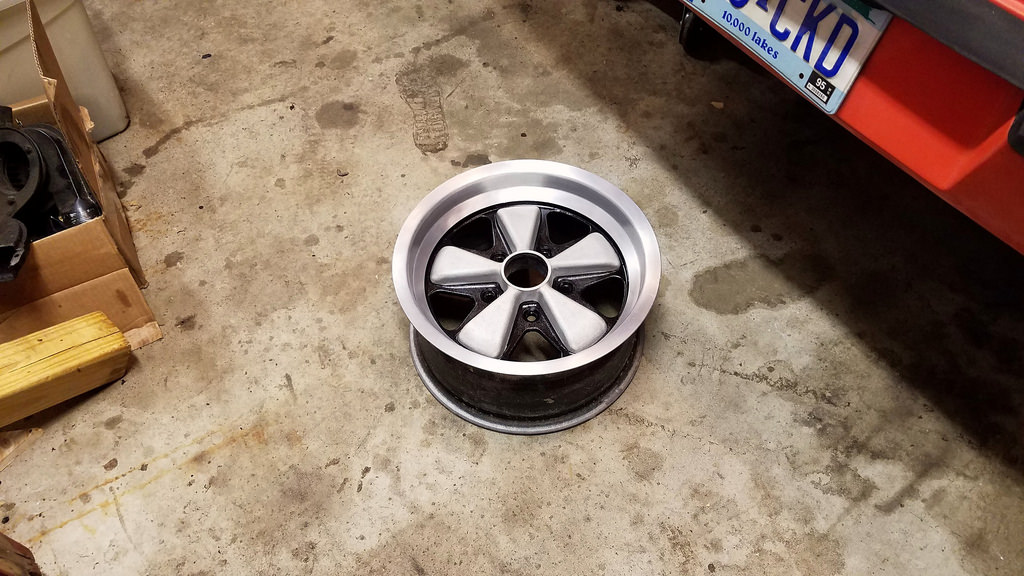
Two done, two to go.
All 4 wheels are now finished. Waiting on me to install the 5-lug swap and change the tires over.
More cleaning
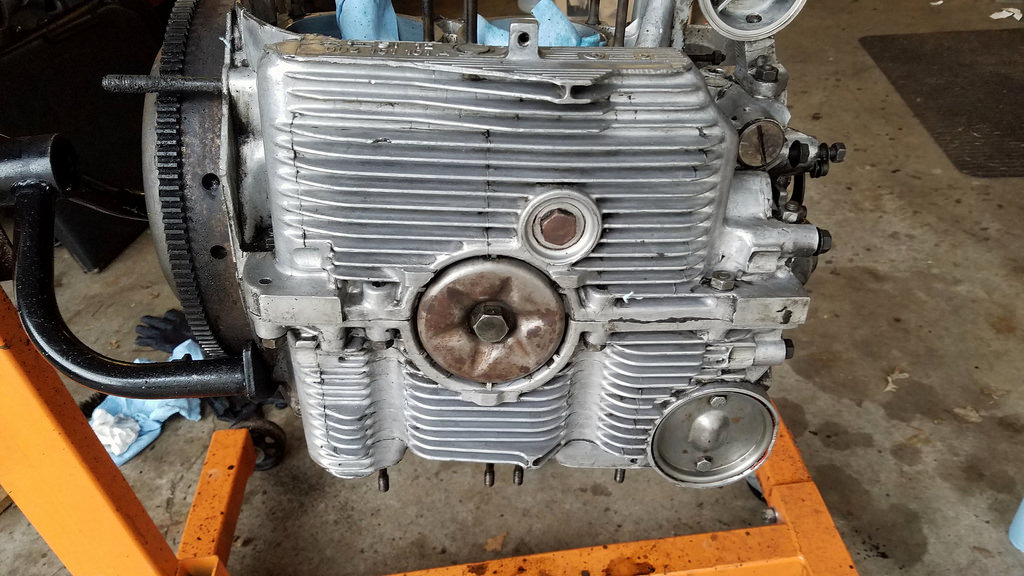
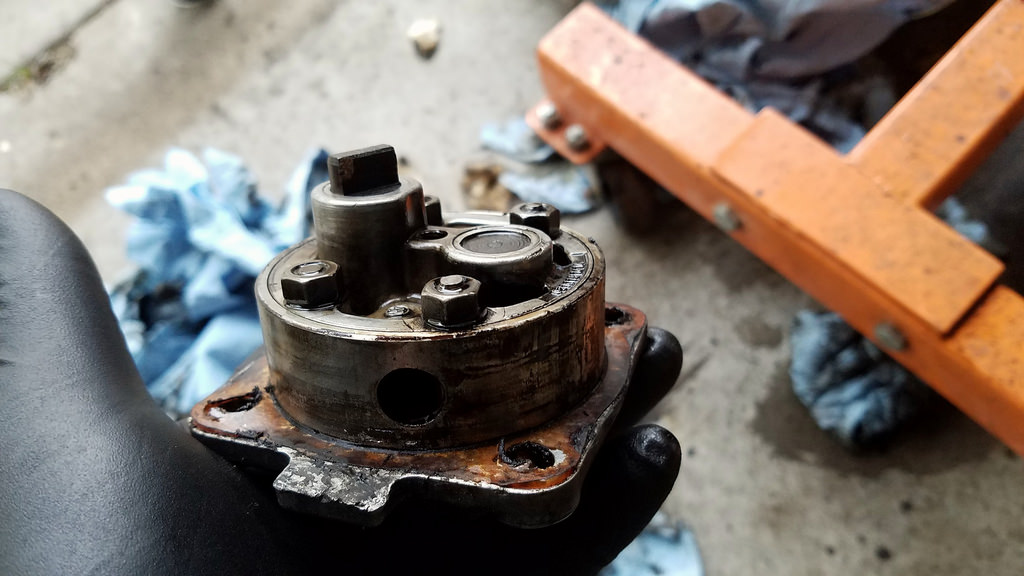
Pulled the oil pump. Looks good and no contact between the cam rivets and pump.
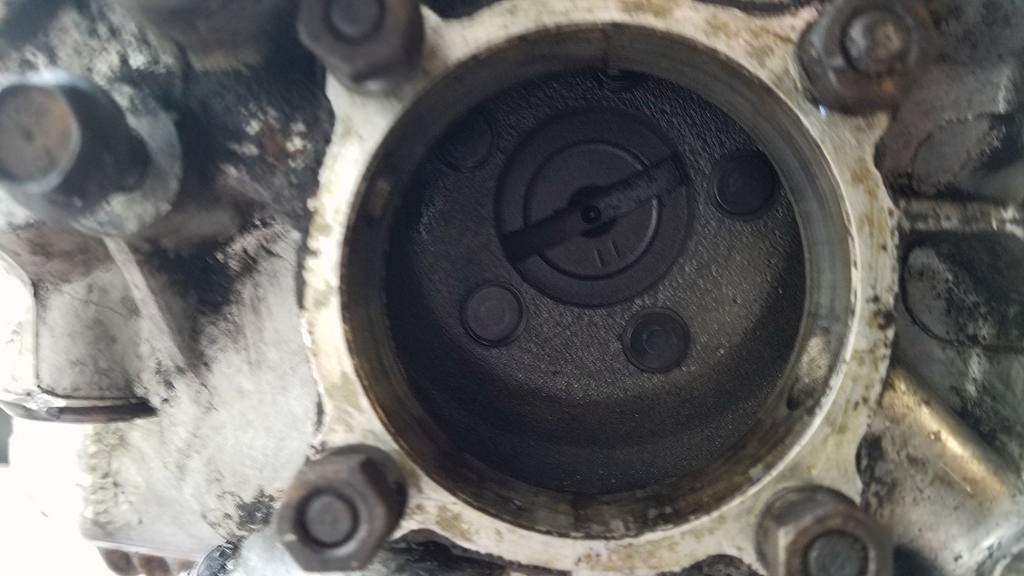
Camshaft, wish I could tell what is is. I was told it was swapped out with the carb install, but based on other things below it is possible that's not the case.
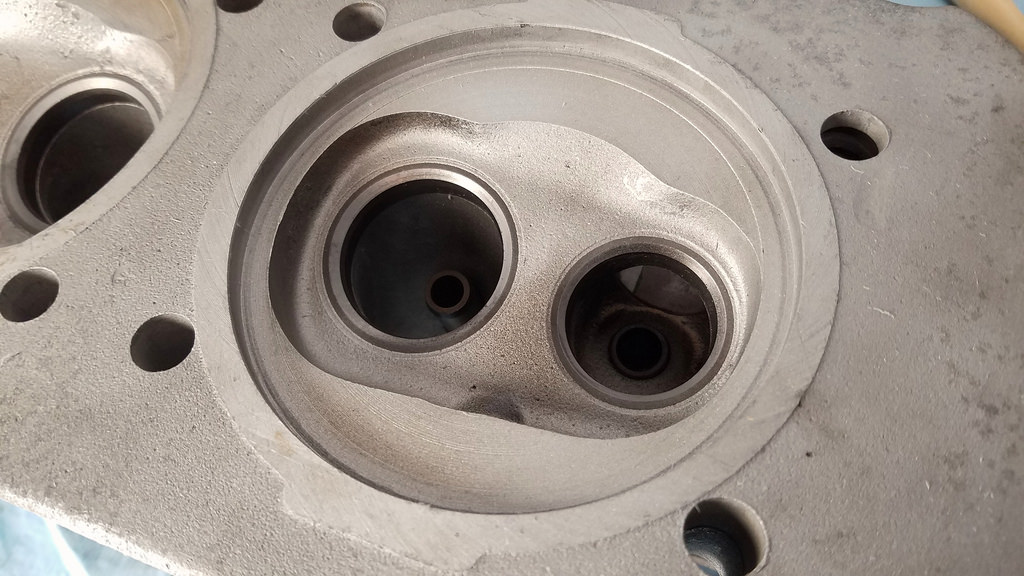
Now for the biggest part. I tore down one of the heads and started cleaning. Put a ton of elbow grease into it. There were some marks where something bad had happened in one of the combustion chambers, but I thought that since it had been running in this state, I would just clean, reassemble, and go from there. The pic makes them look worse than they are, they're just filled with carbon still. (Bottom head in the pic below)
Then I put it all back together and started in on the second head. I spent a good 3 minutes just pulling the valves out and a light scraping and found that the passenger side head was in far worse shape. One combustion chamber looks like a 14 year old boys face, huge gouges, something was bangin around in there something fierce!
Strange part is that for both heads, the damage is on the cyl closest to the trans. Wonder what caused this...
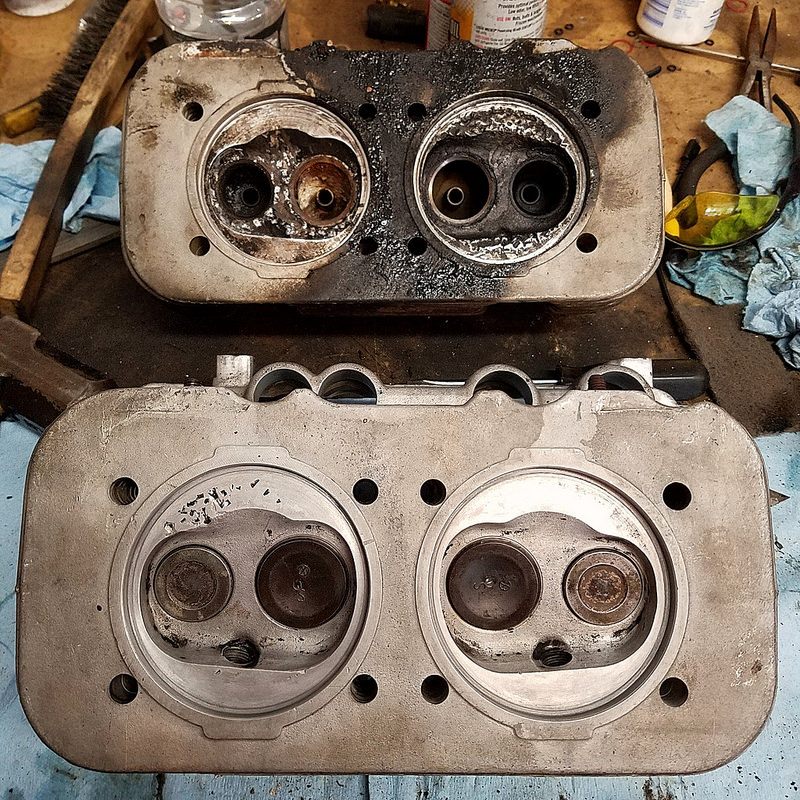
At any rate, I wasn't going to put a ton of time into cleaning this one up, looks toasted. So I messaged the local 914 guy that I've picked up a bunch of parts from and turned out that he had exactly what I need. Drove down to his place and picked these up.

New heads are super clean. He was unsure of the exact history, but he had gone through it and it looks like everything was done to them. There is one exhaust stud hole that I will need to fix some threads on, but otherwise they're cherry. I'll probably pull the valves and inspect it all to be on the safe side but these are great.
Further inspection of what I have shows that I have the stock crank (66mm stroke) and that paired with the 96mm pistons means the engine is actually a 1.9 and not a 2.0. This is also what makes me fear that the factory cam is still in there... Follow my line of thought...
At some point in the cars history there was some sort of catastrophic event that caused the head damage. The event also caused significant piston and cylinder damage. The owner probably brought it to a shop and they swapped the 96mm pistons and cylinders in. The 1.7 heads still have 100mm registers for the cylinders, so they got the 96mm cylinder necked-down kits that were used back then that meant not having to machine the 1.7 heads for larger cylinders. They must have been on a budget. That's why they may not have swapped the cam. Either that or they dumped all their money in the cam, carbs, P's and C's and didn't have enough for new heads, or headwork... Who knows. If they were really on a budget I feel like they would have just done a stock set of P's and C's. For the cam, I cam probably measure the lift, may not be able to get an accurate duration measurement with the cam still in there.
So next on the project list:
-pull valves on new heads and inspect and fix exhaust stud
-reassemble new heads
-clean up block some more
-pull a rod and inspect bearing surfaces
-clean some more
Also, I'm going to try and duplicate the engine lift plate shown in the factory manuals.
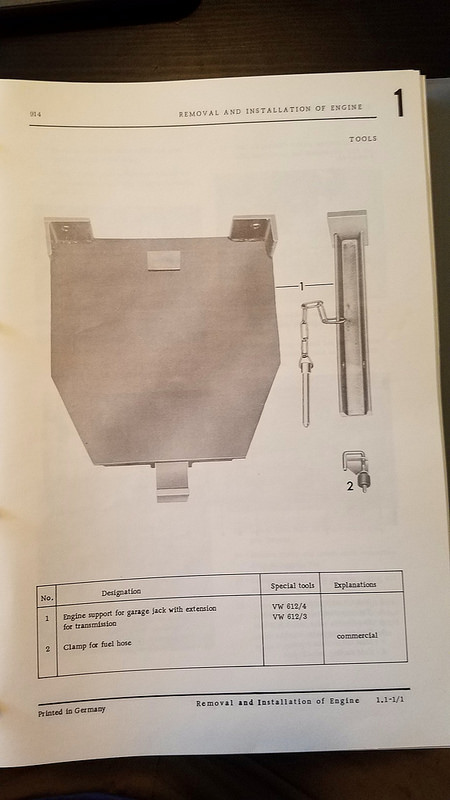
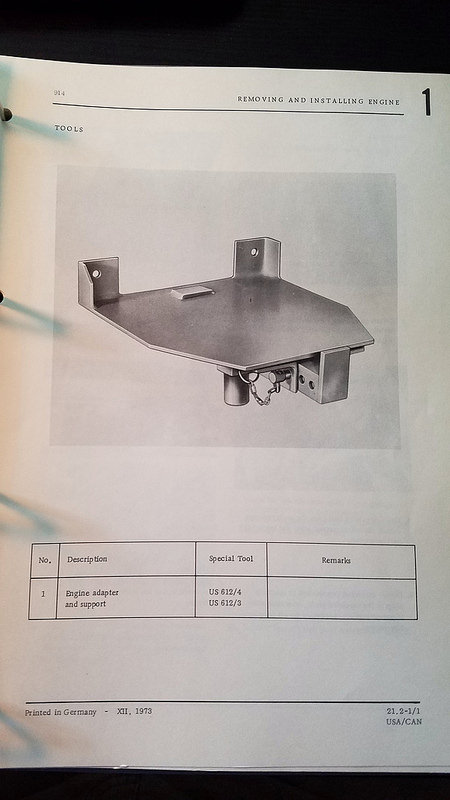
I am aware that Tangerine sells something similar for just north of $100, but I like the idea of fabbing one myself. I'll probably take measurements off the block for the important parts, just wish someone I knew had one of the actual VW tools.
More cleaning
Pulled the oil pump. Looks good and no contact between the cam rivets and pump.
Camshaft, wish I could tell what is is. I was told it was swapped out with the carb install, but based on other things below it is possible that's not the case.
Now for the biggest part. I tore down one of the heads and started cleaning. Put a ton of elbow grease into it. There were some marks where something bad had happened in one of the combustion chambers, but I thought that since it had been running in this state, I would just clean, reassemble, and go from there. The pic makes them look worse than they are, they're just filled with carbon still. (Bottom head in the pic below)
Then I put it all back together and started in on the second head. I spent a good 3 minutes just pulling the valves out and a light scraping and found that the passenger side head was in far worse shape. One combustion chamber looks like a 14 year old boys face, huge gouges, something was bangin around in there something fierce!
Strange part is that for both heads, the damage is on the cyl closest to the trans. Wonder what caused this...
At any rate, I wasn't going to put a ton of time into cleaning this one up, looks toasted. So I messaged the local 914 guy that I've picked up a bunch of parts from and turned out that he had exactly what I need. Drove down to his place and picked these up.
New heads are super clean. He was unsure of the exact history, but he had gone through it and it looks like everything was done to them. There is one exhaust stud hole that I will need to fix some threads on, but otherwise they're cherry. I'll probably pull the valves and inspect it all to be on the safe side but these are great.
Further inspection of what I have shows that I have the stock crank (66mm stroke) and that paired with the 96mm pistons means the engine is actually a 1.9 and not a 2.0. This is also what makes me fear that the factory cam is still in there... Follow my line of thought...
At some point in the cars history there was some sort of catastrophic event that caused the head damage. The event also caused significant piston and cylinder damage. The owner probably brought it to a shop and they swapped the 96mm pistons and cylinders in. The 1.7 heads still have 100mm registers for the cylinders, so they got the 96mm cylinder necked-down kits that were used back then that meant not having to machine the 1.7 heads for larger cylinders. They must have been on a budget. That's why they may not have swapped the cam. Either that or they dumped all their money in the cam, carbs, P's and C's and didn't have enough for new heads, or headwork... Who knows. If they were really on a budget I feel like they would have just done a stock set of P's and C's. For the cam, I cam probably measure the lift, may not be able to get an accurate duration measurement with the cam still in there.
So next on the project list:
-pull valves on new heads and inspect and fix exhaust stud
-reassemble new heads
-clean up block some more
-pull a rod and inspect bearing surfaces
-clean some more
Also, I'm going to try and duplicate the engine lift plate shown in the factory manuals.
I am aware that Tangerine sells something similar for just north of $100, but I like the idea of fabbing one myself. I'll probably take measurements off the block for the important parts, just wish someone I knew had one of the actual VW tools.
Glenn that damage in the head was most likely caused by a broken piston ring @ some stage.
Those replacement heads look clean but ask the seller if the exhaust valves are new or used,IMO put down some cash on new ones if not you will be walking on thin ice .good luck
Those replacement heads look clean but ask the seller if the exhaust valves are new or used,IMO put down some cash on new ones if not you will be walking on thin ice .good luck
QUOTE(porschetub @ Aug 28 2016, 08:39 PM)
Glenn that damage in the head was most likely caused by a broken piston ring @ some stage.
Those replacement heads look clean but ask the seller if the exhaust valves are new or used,IMO put down some cash on new ones if not you will be walking on thin ice .good luck
Is there something inheretly wrong with exhaust valves on these engines? I had heard bad things about failing valve seats, but this is the first I've heard of valves having issues. Care to elaborate?
I did figure that it was either piston ring bits, or maybe an exploded plug. I just can't figure out why it would happen to both of the cylinders on that end of the engine.
The carbs are ready to roll. New filters arrive today.
And I picked up a set of Hella fogs with stone guards.

I like the road rally style. I'll use regular horn grills and fab a bracket that comes out to mount the fogs. Easilly reversable if/when I decide not to run them anymore.

Great work, Glenn. I appreciate your regular updates!
Thanks!
Always good to make sure the carbs have a full charge before you put them in...
Click to view attachment
Click to view attachment
QUOTE(mbseto @ Aug 29 2016, 07:38 AM)
Always good to make sure the carbs have a full charge before you put them in...
Click to view attachment

Lookin pretty good!
Last night I pulled the heads apart to inspect. If these were run at all, they were cleaned up really well after. I did a quick lap of the valves and reassembled. Lapped the cylinders into the heads too.
All the heads need now is for one of the exhaust studs to be repaired. Will probably do a stepped stud.
I looked the exhaust valves over, based on your comments.
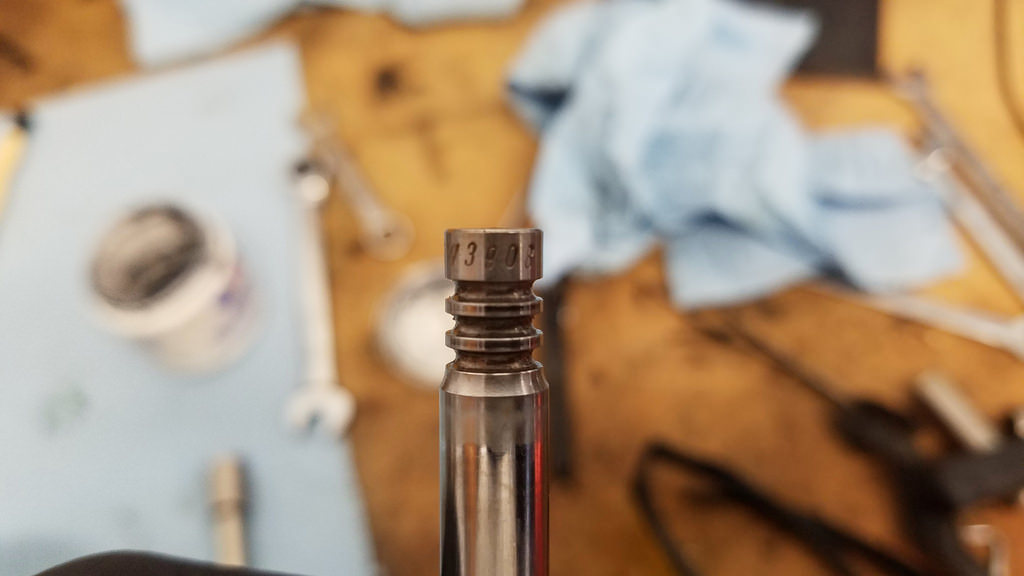
stamped with "T-TRW 3908" P.O. didn't remeber their history, so if anyone here can shed some light on if these are stock or not, I'd appreciate it.
Tonight I might hone the cylinders and then scrub them down. Getting close to reassembly!
Last night I pulled the heads apart to inspect. If these were run at all, they were cleaned up really well after. I did a quick lap of the valves and reassembled. Lapped the cylinders into the heads too.
All the heads need now is for one of the exhaust studs to be repaired. Will probably do a stepped stud.
I looked the exhaust valves over, based on your comments.
stamped with "T-TRW 3908" P.O. didn't remeber their history, so if anyone here can shed some light on if these are stock or not, I'd appreciate it.
Tonight I might hone the cylinders and then scrub them down. Getting close to reassembly!
Great job! Save the Porsche!
Sincerely
Claus Graf
Sincerely
Claus Graf
[quote name='Optimusglen' date='Aug 29 2016, 09:29 AM' post='2391588']
[quote name='porschetub' post='2391409' date='Aug 28 2016, 08:39 PM']
Glenn that damage in the head was most likely caused by a broken piston ring @ some stage.
Those replacement heads look clean but ask the seller if the exhaust valves are new or used,IMO put down some cash on new ones if not you will be walking on thin ice .good luck
[/quote]
Is there something inheretly wrong with exhaust valves on these engines? I had heard bad things about failing valve seats, but this is the first I've heard of valves having issues. Care to elaborate?
I did figure that it was either piston ring bits, or maybe an exploded plug. I just can't figure out why it would happen to both of the cylinders on that end of the engine.
Not sure if all years used sodium filled exhaust valves, but my 2L had them. When I was getting ready to dis-assemble the valves, zI gave a light rap to the stems with a brass hammer to check to see if any valves were stuck, one did this:
NEVER NEVER re-use 40 year old sodium filled exhaust valves !
Click to view attachment
Ah, yeah that looks bad!
The exhaust valves in the new heads looked to be brand new, and I don't believe they are original valves because of the TRW stamping (unless TRW supplied OEMs back then) So I will run what I have.
The exhaust valves in the new heads looked to be brand new, and I don't believe they are original valves because of the TRW stamping (unless TRW supplied OEMs back then) So I will run what I have.
QUOTE(Optimusglen @ Sep 2 2016, 01:27 AM)
Ah, yeah that looks bad!
The exhaust valves in the new heads looked to be brand new, and I don't believe they are original valves because of the TRW stamping (unless TRW supplied OEMs back then) So I will run what I have.
TRW are replacements, great I like them,fairly unlikely you will have original sodium ones.
Valve guide wear has a lot to do with exhaust valve breakage in VW engines,if the guide is badly worn there is poor heat transfer into the head casting ,the heat stays in the valve and repeat excessive heat cycling causes it to break.
The seats come loose as a result of the above issues and overheating that's why many won't rebuilt old heads anymore.
My machine shop won't touch them anymore but they still do type 1 heads,they don't do welding on any of them after having issues.
Over the years (many of them) I have seen my share of exhaust valve and seat issues with the type 4's.
QUOTE(porschetub @ Sep 2 2016, 03:00 AM)
QUOTE(Optimusglen @ Sep 2 2016, 01:27 AM)
Ah, yeah that looks bad!
The exhaust valves in the new heads looked to be brand new, and I don't believe they are original valves because of the TRW stamping (unless TRW supplied OEMs back then) So I will run what I have.
TRW are replacements, great I like them,fairly unlikely you will have original sodium ones.
Valve guide wear has a lot to do with exhaust valve breakage in VW engines,if the guide is badly worn there is poor heat transfer into the head casting ,the heat stays in the valve and repeat excessive heat cycling causes it to break.
The seats come loose as a result of the above issues and overheating that's why many won't rebuilt old heads anymore.
My machine shop won't touch them anymore but they still do type 1 heads,they don't do welding on any of them after having issues.
Over the years (many of them) I have seen my share of exhaust valve and seat issues with the type 4's.
Great info! The valve guides in the new heads are all awesome, no slop but still allow the free movement of the valves.
Last night i honed the cyclinders. Plateau hone with 260 and then finished with 600 and an intense cleaning. Then i gapped all the rings for their specific cylinders and installed them on the pistons. Piston grooves are well within spec as well. This thing is shaping up pretty well.
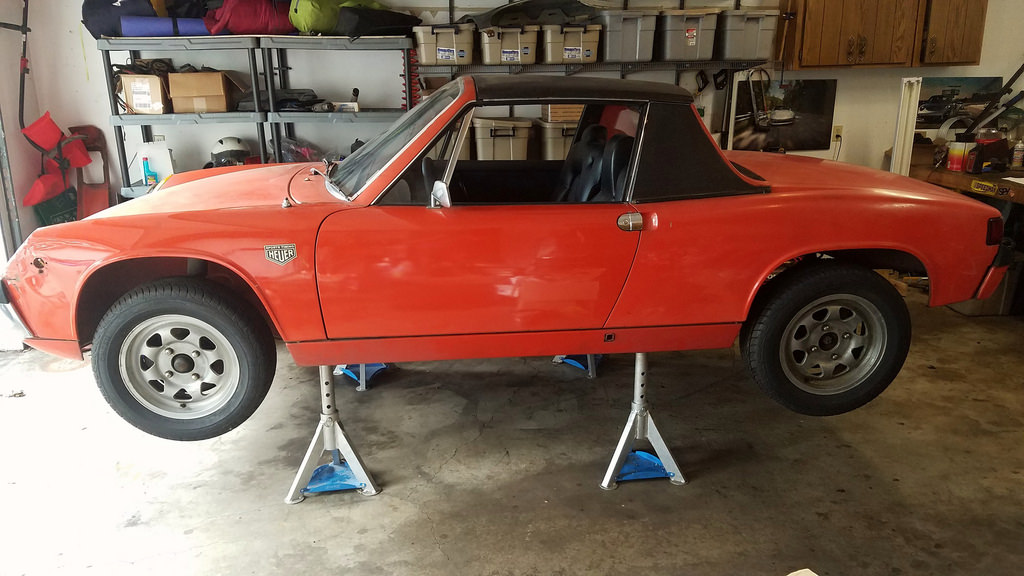
More work today. Waiting on stuff for the engine so I started on getting the 5 lug hubs swapped in. First, I needed to put it in the air. 2 feet of air. It's no lift, but these jackstands are awesome.
Started on the rear. Pulled the control arm and everything related to it. Greased a new wheel bearing and installed, new bushings of course, and put it all back together. Test fit one of my new wheels then called up my tire guy to set up a day next week to swap my tires to the new wheels.
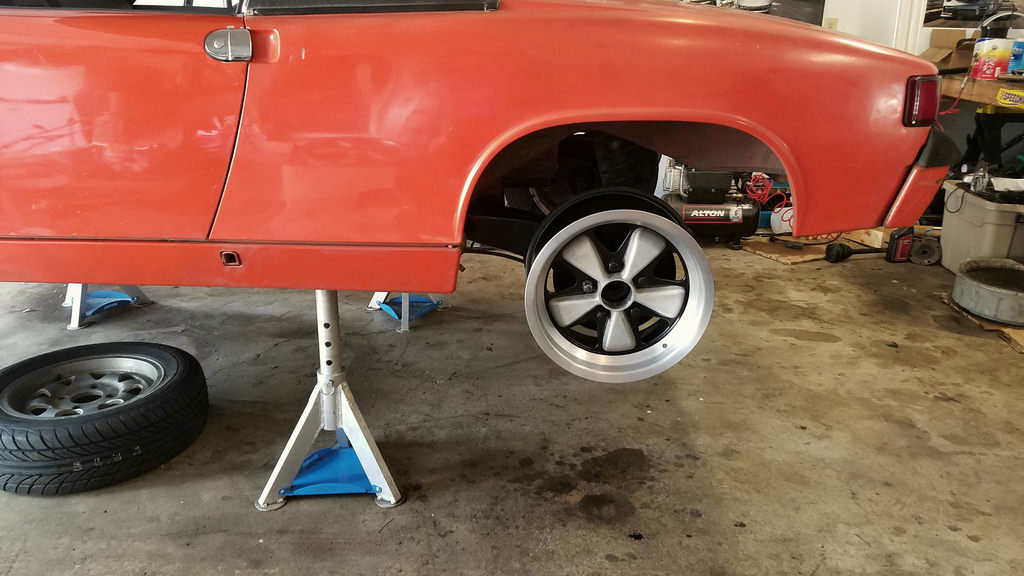
Started on the rear. Pulled the control arm and everything related to it. Greased a new wheel bearing and installed, new bushings of course, and put it all back together. Test fit one of my new wheels then called up my tire guy to set up a day next week to swap my tires to the new wheels.
Got the tires swapped over.
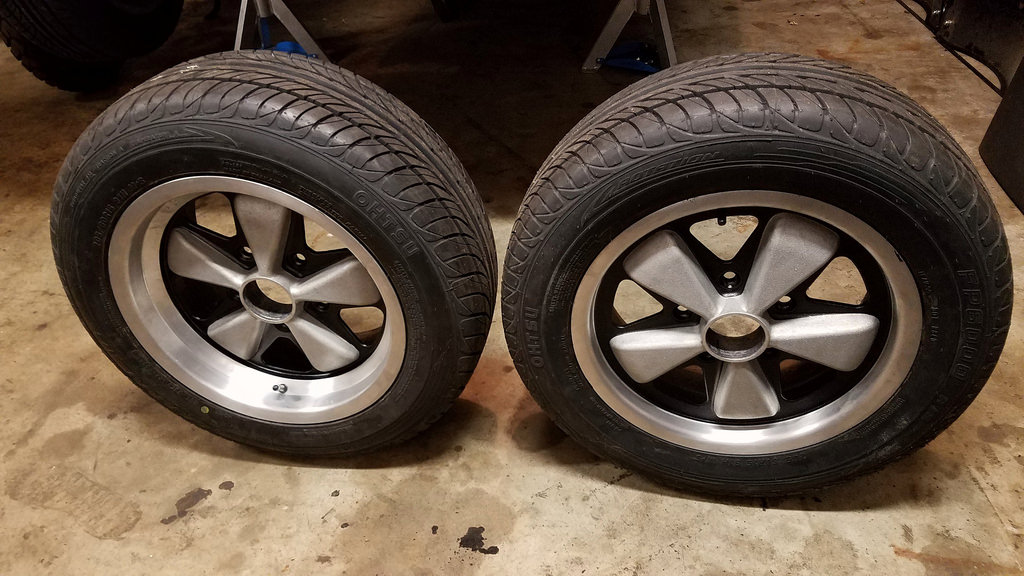
Tires are the same size front/rear. Probably the widest tire I can fit in the rear, as it sits I will need to roll the inner fender lip out back. Since the wheels are staggered, the rears have a slight stretch. Overall I don't think it detracts from the looks noticably, and performance differences are negligable, so they'll work. If I was buying new tires for these I would probably do staggered sizes, but alas, that's not in the cards right now.
Tires are the same size front/rear. Probably the widest tire I can fit in the rear, as it sits I will need to roll the inner fender lip out back. Since the wheels are staggered, the rears have a slight stretch. Overall I don't think it detracts from the looks noticably, and performance differences are negligable, so they'll work. If I was buying new tires for these I would probably do staggered sizes, but alas, that's not in the cards right now.
More progress last night. No pictures, but i fixed the exhaust stud. Drilled and threaded it up to 10mm then used a stepped stud.
Then I started in on swapping one of the front rotors, quickly discovered that the new 5 lug rotors were made from the late model 914 so I cannot use them.
Well, I can use them enough to get this picture, but thats it.
Difference is offset. To use these rotors I need late 914 spindles, calipers, ball joint, and I believe control arms. So now I'll be looking into getting my old rotors drilled.
Next I will be measuring deck height and figuring out which spacers I will need under the cylinders.
The car is coming along nicely!
QUOTE(gms @ Sep 9 2016, 10:11 AM)
The car is coming along nicely!
Thank you!!
Update time!
Since I can't use the new 5-lug front rotors/hubs I looked into and found a machine shop that can accurately drill out my existing 4-lug fronts. Figured I'd have them turn the rotors at the same time and looked up the spec to make sure they'd still be useable. No dice. Minimum is 10mm after turning, with a minimum worn state of 9.5mm. So I'll need to buy new front rotors and then have them drilled. This has been the biggest hang-up in the last couple weeks. I'll be able to order new rotors this Friday when my car fund is replentished a bit. New front bearings and seals are already ordered.
I measured the deck height and I'm getting .055" (averaged from 16 measurements in 8 places) From what I've read, I'l actually be able to run these cylinders without any spacer at the base. I will not be running a headgasket based off of Jake Rabys recommendation. Does this all sound right to you guys?
Of course, now I'll need to get the pushrods set up. The previous builder kept the stock pushrods I believe, and he spaced the rocker arm sub-assembly away from the head slightly with shims. Theoretically, I could keep the pushrods as they are and assemble the whole setup in the same way as it was before...
In other news, I was working in the garage last week trying to get the passenger side rear swingarm swapped. Trying to get the pivot rod out of the old arm, rubber bushings were really holding on. Seemed to be a bit tougher than the drivers side that I had done previously. Anyway, I managed to bash my hand with a 4lb sledge hammer. It didn't feel the greatest. Swelled up a little but it was manageable. Now I have a bump, maybe broke something? I dunno.
Finally, update posts are worthless without pictures, so here's a new illustration I had been working on.
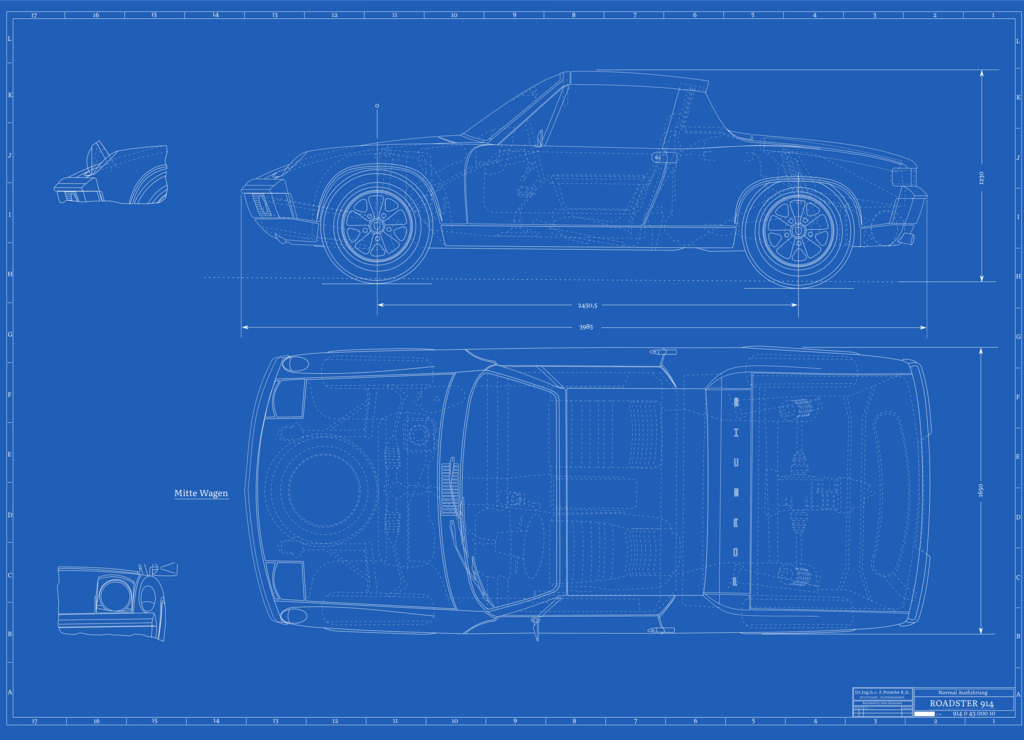
Tweaked the color and sent some to print, if anyone wants one let me know. Prices and sizes are in my Member Vendors thread in my signature.
Since I can't use the new 5-lug front rotors/hubs I looked into and found a machine shop that can accurately drill out my existing 4-lug fronts. Figured I'd have them turn the rotors at the same time and looked up the spec to make sure they'd still be useable. No dice. Minimum is 10mm after turning, with a minimum worn state of 9.5mm. So I'll need to buy new front rotors and then have them drilled. This has been the biggest hang-up in the last couple weeks. I'll be able to order new rotors this Friday when my car fund is replentished a bit. New front bearings and seals are already ordered.
I measured the deck height and I'm getting .055" (averaged from 16 measurements in 8 places) From what I've read, I'l actually be able to run these cylinders without any spacer at the base. I will not be running a headgasket based off of Jake Rabys recommendation. Does this all sound right to you guys?
Of course, now I'll need to get the pushrods set up. The previous builder kept the stock pushrods I believe, and he spaced the rocker arm sub-assembly away from the head slightly with shims. Theoretically, I could keep the pushrods as they are and assemble the whole setup in the same way as it was before...
In other news, I was working in the garage last week trying to get the passenger side rear swingarm swapped. Trying to get the pivot rod out of the old arm, rubber bushings were really holding on. Seemed to be a bit tougher than the drivers side that I had done previously. Anyway, I managed to bash my hand with a 4lb sledge hammer. It didn't feel the greatest. Swelled up a little but it was manageable. Now I have a bump, maybe broke something? I dunno.
Finally, update posts are worthless without pictures, so here's a new illustration I had been working on.
Tweaked the color and sent some to print, if anyone wants one let me know. Prices and sizes are in my Member Vendors thread in my signature.
Curious what the offsets (ET) or backspacing (measuring from the flange face to the inside rim) are for your 15x7 wheels?
I'm looking at getting a reproduction 15x7 R wheel that I hope is more offset to the inside of the car.
Thanks....
I'm looking at getting a reproduction 15x7 R wheel that I hope is more offset to the inside of the car.
Thanks....
I measured the combustion chamber volumes again and got the same results on all 4 pots. Same with deck height. Pistons, cylinders, and heads are bolted on. After I took the pic I also cleaned and assembled the oil pump.
As far as the wheels go, I'll check that next time I'm in the garage.
As far as the wheels go, I'll check that next time I'm in the garage.
More work. I was able to use the existing push rods with small shims under the rocker arm assemblies. Yes I remembered the tins that get installed before the push rods.
Seen lots of talk about what to use to seal the pushrod tubes. My bores for the tubes were incredibly clean so I just used some assembly lube on the o-rings. It's easy enough to take them out and try something else if those leak.
Carbs are just bolted on because I couldn't help myself.
Seen lots of talk about what to use to seal the pushrod tubes. My bores for the tubes were incredibly clean so I just used some assembly lube on the o-rings. It's easy enough to take them out and try something else if those leak.
Carbs are just bolted on because I couldn't help myself.
New front rotors arrived, got them machined yesterday for 5 lug studs and then pressed the new bearing races in and installed them. The unthreaded portion of the stud protrudes up from the contact surface between the wheel and rotor, and that unthreaded diameter doesn't fit with clearance in the wheel holes. So now I need to replace the studs, or open up the wheel holes a few thou.
Also rebuilt the master cylinder last night. Before you freak out, the bore was perfect so it was really just installing new ATE rubber seals.
I removed the pedal cluster to rebuild it and discovered that someone had already swapped bronze bushings into it to replace the plastic. Everything moved freely and sprung the right direction, so I just cleaned it up a little. I probably would have swapped in the new parts I have but the pin that needs to be pressed out was a real bugger. Worked on it for a bit and decided that it wasn't broken so why fix it.
Progress since the last post:
-ordered a new oil cooler, received it, and installed it.
-started organizing the tins for cleaning, didn't clean them
-purchased new wheels studs, pounded old ones out, pounded new ones in, front wheels mount up cleanly
I started in on the brakes. I had removed the master cylinder and calipers before I had read to break the pistons free using the brake pressure. I guess I had just assumed the old air pressure trick would work.
It didn't.
So I had to use the messy method, a grease gun which happened to have the same threads as the caliper pipe input. It all came apart smoothly.
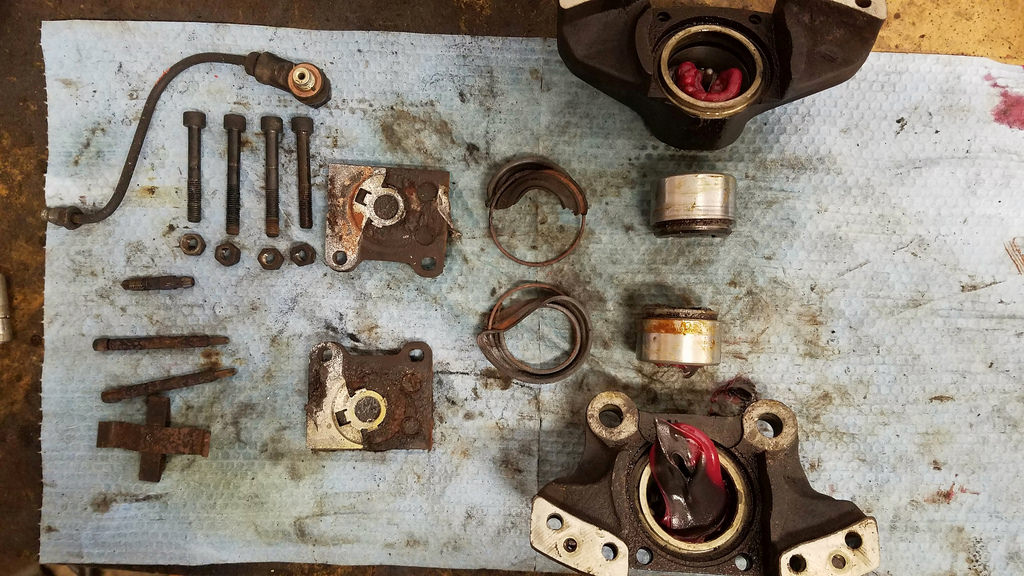
3 more to do. I put a feeler out for budget friendly yellow cad plating, but I'm not holding my breath. Since I no longer have hundreds of dollars to pour into this project I may have to find an alternative in the paint isle. It'll be clean though, i.e. black, silver, or if I can find something that looks similar to yellow CAD.
Now that the 5-lug swap is complete I can roll the fenders. The Eastwood fender roller "universal" bolt pattern doesn't extend all the way out to 130mm BC, which is why I couldn't roll the fenders when it was 4x130 using this tool. The local club that lends this out to members had an adapter made to bolt up to a Porsche 5x130 hub so now I'm all set. Except I'm not. Upon test fitment it looks as if my lug nuts (the long alloy style) are too long and protrude past the mounting surface for the tool. Today I'll buy 5 lug nuts that are lower profile and THEN I should be ready to roll.
-ordered a new oil cooler, received it, and installed it.
-started organizing the tins for cleaning, didn't clean them
-purchased new wheels studs, pounded old ones out, pounded new ones in, front wheels mount up cleanly
I started in on the brakes. I had removed the master cylinder and calipers before I had read to break the pistons free using the brake pressure. I guess I had just assumed the old air pressure trick would work.
It didn't.
So I had to use the messy method, a grease gun which happened to have the same threads as the caliper pipe input. It all came apart smoothly.
3 more to do. I put a feeler out for budget friendly yellow cad plating, but I'm not holding my breath. Since I no longer have hundreds of dollars to pour into this project I may have to find an alternative in the paint isle. It'll be clean though, i.e. black, silver, or if I can find something that looks similar to yellow CAD.
Now that the 5-lug swap is complete I can roll the fenders. The Eastwood fender roller "universal" bolt pattern doesn't extend all the way out to 130mm BC, which is why I couldn't roll the fenders when it was 4x130 using this tool. The local club that lends this out to members had an adapter made to bolt up to a Porsche 5x130 hub so now I'm all set. Except I'm not. Upon test fitment it looks as if my lug nuts (the long alloy style) are too long and protrude past the mounting surface for the tool. Today I'll buy 5 lug nuts that are lower profile and THEN I should be ready to roll.
Car looks killer.
Not sure how I missed this thread. You used to be on the Vortex didn't you?
Not sure how I missed this thread. You used to be on the Vortex didn't you?
QUOTE(Mr.Nobody @ Oct 24 2016, 09:55 PM)
Car looks killer.
Not sure how I missed this thread. You used to be on the Vortex didn't you?
Thanks! And yes, still on Vortex/TCL actually.
I thought so. Recognized your name and MKIV you did the welding on. I still peruse TCL occasionally. Lots of good info there. Actually the Vortex archives are phenomenal.
Nice looking 914 you got. I've had mine about a year and a half and love it. Really fun car.
Nice looking 914 you got. I've had mine about a year and a half and love it. Really fun car.
Thanks!
Ended up going with just a standard cast-aluminum type finish, from a rattle can. It is high heat paint at least. Color looks a little yellowish, but that's just from the lighting.
Opted not to remove the e-brake lever arms, but otherwise they're all disassembled. Bores had light corrosion that I was able to get off with some super fine steel wool, pistons the same. Calipers are all painted and ready for reassembly.
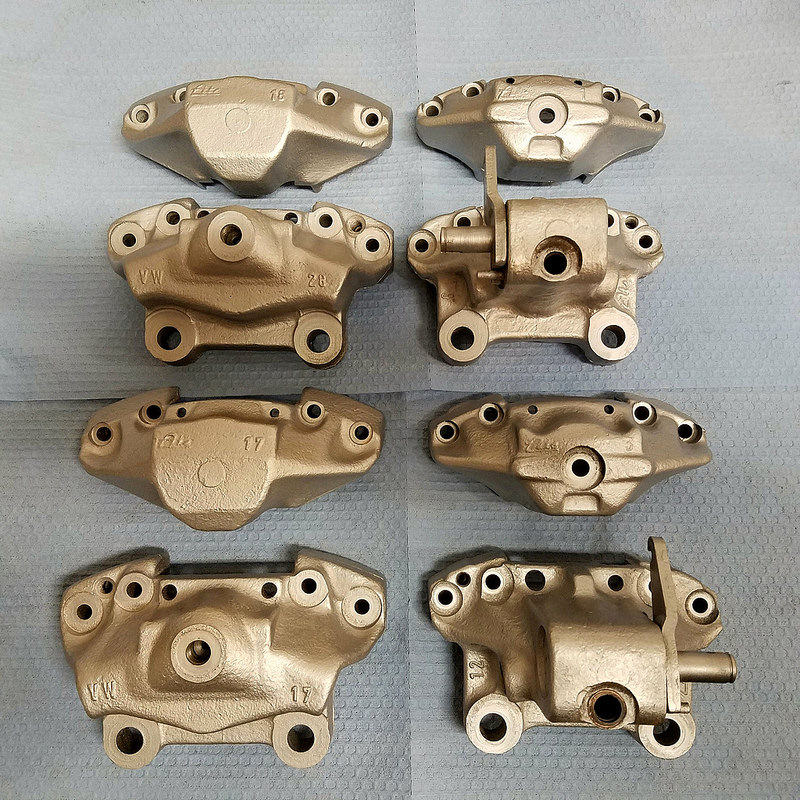
Ideally I would have stripped these down completely and had them re-plated, but time and money are no longer my friends.
On the bright side, the pistons all came out remarkably easy for having sat for so long.
Ended up going with just a standard cast-aluminum type finish, from a rattle can. It is high heat paint at least. Color looks a little yellowish, but that's just from the lighting.
Opted not to remove the e-brake lever arms, but otherwise they're all disassembled. Bores had light corrosion that I was able to get off with some super fine steel wool, pistons the same. Calipers are all painted and ready for reassembly.
Ideally I would have stripped these down completely and had them re-plated, but time and money are no longer my friends.
On the bright side, the pistons all came out remarkably easy for having sat for so long.
This is a "lo-fi" version of our main content. To view the full version with more information, formatting and images, please click here.