Full Version: Safari 914 project

The weather finally cooperated and I got the tub painted. This completes the paint for the car, a milestone I’m glad to have behind me!
Click to view attachment
Click to view attachment
Ok, so this is demoralizing………the tub came out a completely different color than all the other parts. I purchased a gallon of paint (base) and knew I would be pushing it to get the tub done without running out. So, I ordered another quart to be sure and it seems they completely screwed up the mix. I even added the new quart to about a quart of the original paint just to minimize any slight variability that could occur. So here I sit with my tub painted with 2 coats of base and 3 coats of clear (and it came out beautifully except for the color).
My only option is to sand and paint again, but I’m waiting on a response from paint supplier before proceeding. I can’t imagine what the cost would be to correct this if this had been done by a shop. Unfortunately, the weather is so hot now I probably won’t be painting until early fall……oh well!
Here are some pics of the difference…..
Click to view attachment
Nice! Always such a good feeling when paint goes on a 914.
Arggg. I can't imagine how frustrated you must be! Any chance you could add some graphic or something to either distract from it or, even better, make it look like you did it on purpose?
Just tossing out some ideas. Feel free to toss out what I just suggested.
Best of luck on a resolution.
Just tossing out some ideas. Feel free to toss out what I just suggested.
Best of luck on a resolution.
QUOTE(tygaboy @ Jul 5 2023, 03:17 PM) 
Arggg. I can't imagine how frustrated you must be! Any chance you could add some graphic or something to either distract from it or, even better, make it look like you did it on purpose?
Just tossing out some ideas. Feel free to toss out what I just suggested.
Best of luck on a resolution.
Thanks for the sympathy and suggestions! After all I’ve done to make this thing straight I think I’m just going to bite the bullet and sand the tub and respray it. That said, it’s only an option if I can get paint to match the other pieces. I’m going to get new paint and spray a test piece first to make sure it matches. If it doesn’t, then I’m looking having to respray everything…….and that would really suck!
I hate when that happens. 2 3/4 gallons of paint on Juergen's car but I mixed it from one gallon to another before starting. Paint is so expensive now. 
Just posting to see if I can get a picture to come out right side up…..ok, it seems to work. I had to open the picture I took with my phone on my iPad and then screen shot it. I guess this will need to be the new process for posting to my build thread, still don’t understand why since I haven’t changed any settings on my phone and they posted correctly for the first 7 pages of my thread.
Click to view attachment
Click to view attachment
While waiting for cooler weather to repaint the tub I’ve been chipping away at smaller projects that can be done in the air conditioned portion of my shop. Since I’m running the complete Subaru wiring harness I wanted to use the Suby gauge pod as well. As anyone who’s tried this knows, the pod doesn’t fit in the 914 gauge area. I’ve seen some where they added height to the gauge “hump”, but I really wanted to keep the stock dash pad.
I was able to get the Suby gauge pod reduced in size by removing the connectors at the top of the pod and direct soldering the pigtail cable directly to the PCB. This saved me 1-1/2” to 2” that would’ve been needed at the top for cabling. I did have to cut the dash at the bottom of the pod area about 5/8” but the will not be an impact.
I reduced the Suby gauges down to the bare minimum and then made a new gauge bezel and glass that matches the Suby gauges but has the outer shape of the 914. I had to relocate the mounting tabs in the dash hoop to allow them to clear the Suby pod, but I’m pretty happy with the result.
Click to view attachment
I’m also going with the Suby hvac controls and added those with a little tweaking of the factory hole.
Click to view attachment
Click to view attachment
Hard to tell from the photos but I also removed the indicator “films” from the stock Suby faceplate and glued them behind the cuts above and to the right of the tach and Speedo. This will give me the indicator lights for turn signals, high beams, Alt, Oil, and check engine. They’re behind the little oval cutout and the guitar pick shaped cutout.
Amazing project, love the color!
QUOTE(sreyemj @ Jul 20 2023, 05:47 PM)
Amazing project, love the color!
Thank you! It’s certainly been a fun a challenging project so far.
Finished up the dash. Upholstered the top and the face of the dash with pieces from 914 Rubber. Finished the gauge pod by painting a black border on the inside of the glass. I think it looks more finished that way and it hides the mounting hardware pretty well.
Click to view attachment
Click to view attachment
Don’t know how I missed this either, but I’m blown away by your imagination/creativity skills that are matched by your fabrication abilities. Digging pretty much everything that’s been done. 
Congratulations on your retirement, I was wondering how you found the time.
Great color choices (you can’t go wrong with a little Nepal orange ) and yeah, the paint problem sucks but not a dealbreaker for me if it’s consistent on the exterior.
Following, looking forward to seeing it on the beach
Congratulations on your retirement, I was wondering how you found the time.
Great color choices (you can’t go wrong with a little Nepal orange
) and yeah, the paint problem sucks but not a dealbreaker for me if it’s consistent on the exterior. Following, looking forward to seeing it on the beach
That came out super nice.
Started working on the heater core setup. I’m adding a heater core to the fresh air box for heat/defrost. I had to remove some material and then add some to the front of the box. I used ABS sheet from McMaster-Carr to make the addition. More to come, I’m just getting started…….
Click to view attachment
Click to view attachment
Heater core install wrapped up. I had to cut the box and add a section to the front, and had to make my own rain water diverted to go over the core.
Click to view attachment
Click to view attachment
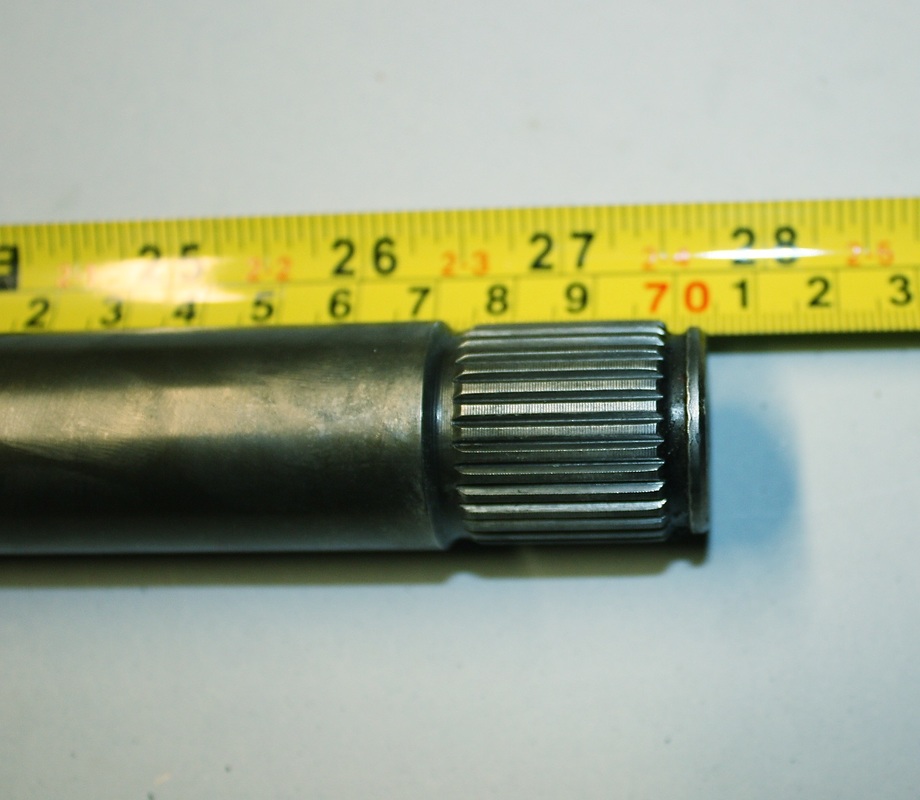
Started tinkering around with machining my axles for a Subaru spline at one end. I turned a piece of aluminum to the diameter of the Suby shaft so I could practice on softer metal until I nailed the process.
It came out well. I still need to adjust the tool depth out a little bit but I’m getting real close. I wanted to play with this before cutting on my real axle.
Click to view attachment
It came out well. I still need to adjust the tool depth out a little bit but I’m getting real close. I wanted to play with this before cutting on my real axle.
Click to view attachment
QUOTE(East coaster @ Aug 7 2023, 03:33 PM)
That is awesome
Very cool!
What's the deal with the mill? Is that an automated 4th axis?
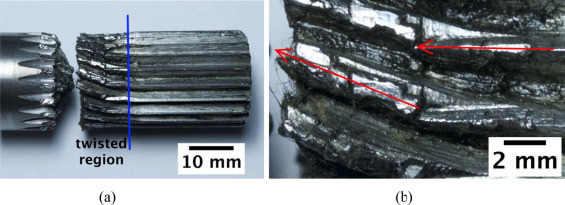
Unsolicited feedback: You might want to relieve on the back of the splines (cut down the axle and then fillet into the splines). I've done the same cutting you're showing and twisted then sheared at the stress concentration where the splines land in the main axle on two occasions and now always put a neck down like shown in the below image.
What's the deal with the mill? Is that an automated 4th axis?
Unsolicited feedback: You might want to relieve on the back of the splines (cut down the axle and then fillet into the splines). I've done the same cutting you're showing and twisted then sheared at the stress concentration where the splines land in the main axle on two occasions and now always put a neck down like shown in the below image.
Thanks for the feedback Jim. The mill is just an old Bridgeport that I put a DRO on. It’s awesome to have in the shop. I also have a 100 year old LeBlond lathe, and between the two of them you can make almost anything if you have the skills (I’m working on it).
The piece I machined was just a practice piece I was using to test out the process. I plan to mimic the Subaru shaft when I cut and spline the real shaft and I think the Subaru shaft has a relief like you mention.
The piece I machined was just a practice piece I was using to test out the process. I plan to mimic the Subaru shaft when I cut and spline the real shaft and I think the Subaru shaft has a relief like you mention.
Cool! Sounds like a nice set! I love my Clausing lathe and can't wait to get a new [to me] mill.
You can get a lot of work done with just a DRO. And TBH full manual is probably a better starting point, at least from what I learned from the master machinists who taught me. It's nice to be able to be able to assess a cut by sight/sound/touch all at once while you're working the machine.
Sounds good on the half shafts. The car I twisted/spiral sheared almost exactly like the below picture and when we analyzed saw that the cracking actually started at the root of the spline.
In my case is was a 25mm diameter shaft on a 120ish hp car formula car which did launch so perhaps more load than you'll see, but still something you don't forget.
Can't wait to see the final product! Your whole project is awesome BTW!
Working on things I can do in the air conditioned portion of my shop. Decided to tackle my fuel tank. I’m using a complete Subaru fuel pump and sender so I fitted that to the tank. The pickup sits in the sump and I made a backing plate with studs to mount the unit. I also cleaned the tank with a vinegar soak for a few days, followed my baking soda and water. All that is left is giving it a coat of paint.
Click to view attachment
Click to view attachment
Pickup in sump…….I had to turn the sock filter around 180 degrees to have it fit in the sump.
Click to view attachment
Click to view attachment
Wrapped up the fresh air box/heater today. All new seals from 914 Rubber, new fan and motor from URO, and mods to house the heater core and the Subaru resistor pack.
Click to view attachment
Click to view attachment
Rolled it out of the paint booth to began sanding off my perfect new paint job and repaint (in the correct color this time!). It’s been a while since I painted it and I was truly just waiting for cooler weather to tackle sanding and respray, but I think I needed this much time to get over the disappointment and frustration of being supplied with the wrong paint. I wished they had given me the wrong color and not just the wrong tone, at least I would’ve noticed before spraying.
Click to view attachment
Click to view attachment
Got back from a two week trip and decided to get a little done on the car while I’m waiting for cooler weather for sanding and paint. I’ve bounced around numerous ideas on a front push bar and here’s what I came up with. It’s all aluminum and pretty darn light so it’s not adding much weight (I think it’s lighter than the bumper tits that it eliminated).
Here are mounts. They’re 4” alum tube shaped to fit the bumper with a 1/4” plate welded at the back for mounting.
Click to view attachment
Here are mounts. They’re 4” alum tube shaped to fit the bumper with a 1/4” plate welded at the back for mounting.
Click to view attachment
I may still add a cross bar towards the bottom, but that’s for another day.
Love it. That looks great! 

You are doing some incredible work on this car. Mastercraftmens level.
That heater box is just so trick, Wow.
That heater box is just so trick, Wow.
This is a "lo-fi" version of our main content. To view the full version with more information, formatting and images, please click here.