Full Version: Project Turbo 914 begins...
...and the other side of the intercooler showing the routing to the hats on top of the ITB's. From there the charge air pushed thru the ITB's, and then thru Len's work of art heads, bounding off the JE pistons, making some MassIVe power to rocket thru the cones.
At first when I saw this thread the first 5 or so pages I was going "uhhhh" and now that i've finished it i'm going "OHHHHHHHHH man, nice!"
this looks like a lot of fun!
this looks like a lot of fun!
Wow! That build has got me mesmerized. I really think that I want to try to tackle a similar build for my new, engine-less acquisition I picked up several weeks ago. In fact I went out today and bought Jay Miller's book "Turbo - Real World High Performance Turbocharger Systems" just to re-familiarize myself with the newer technology which currently exists -as compared to my 25 year old prior research. A lot has changed, and I realize I have a lot to learn.
Obviously, I have a lot of questions for you but I will not bother you with any specific questions until I have acquired a sufficient baseline of knowledge to properly phrase my questions. I did want to ask you though, knowing what you know now, would you change anything in the way you designed the project?
For instance, would you have chosen to mount the turbo elsewhere (even assuming you would need to build your own header?) Or would you have chosen a different turbo (assuming money was not an object within the range of reasonableness)? Would you suggest a different intercooler or mounting location, or perhaps a different cooling system?
Thanks in advance for your help.
Can't wait to see videos of it running!
Rob Rose
QUOTE(moparrob @ May 19 2010, 07:26 PM) 
Wow! That build has got me mesmerized. I really think that I want to try to tackle a similar build for my new, engine-less acquisition I picked up several weeks ago. In fact I went out today and bought Jay Miller's book "Turbo - Real World High Performance Turbocharger Systems" just to re-familiarize myself with the newer technology which currently exists -as compared to my 25 year old prior research. A lot has changed, and I realize I have a lot to learn.
Obviously, I have a lot of questions for you but I will not bother you with any specific questions until I have acquired a sufficient baseline of knowledge to properly phrase my questions. I did want to ask you though, knowing what you know now, would you change anything in the way you designed the project?
For instance, would you have chosen to mount the turbo elsewhere (even assuming you would need to build your own header?) Or would you have chosen a different turbo (assuming money was not an object within the range of reasonableness)? Would you suggest a different intercooler or mounting location, or perhaps a different cooling system?
Thanks in advance for your help.
Can't wait to see videos of it running!
Rob Rose
It's been done before get a copy of June 02' Excellence magazine 2.0 4 cyl. w/CIS injection and a K 26 turbo still runnning strong

That CIS car was kind of the inspiration to do what I have done.
What would I change? How much time and money do you have?
I designed the system with the ITB's because I bought those and put them on my 2.0, along with the SDS, thinking I would just build one of Jakes 2316 motors. But that plan got sidetracked with all this turbo silliness. So ITB's are really not needed.
In my perfect world, my perfect system uses Chris Foley's top mount cooling fan, (which is only now coming available), a fabricated even length exhaust to mount the turbo high and in the center of the car, so the oil can drain back in to the oil chimney on our cars. From there shoot the charge air from the turbo into a single throttle body mounted on the end of a subi intercooler ducted and mounted over the CF fan. Yes, this would be pre-heating the engine cooling air, but that IC seems well oversized for the job, I don't think the temp rise would be all that bad. Plus that CF system moves alot of air. Changing the belt would be a pain, and you'd have to do some work to the exhaust to keep the temps down in this area. From the intercooler some fabricated "stacks" would need to be made to support the IC, take the charge air into the heads and provide a place to mount the injectors, which could be mounted high up next to the IC to provide more distance for the fuel/air mixture to tumble and mix, and perhaps add a little cooling effect before getting into the head. A single exhaust from the turbo out the car, and as long as we are dreaming and fabricating here, you could make a heater tube wrapping around the single exhaust and blow some warm air back in the cabin. Turbo selection would depend on the motor you were dressing with all this cool stuff.
Sadly, the CF system was still a dream when I started the project, I don't have a shop full of cool machine tools and pipe benders, and I needed to build the car with as much off the shelf stuff that I already owned to keep the $$$ in line.
Maybe someday...
Spent the 1/2 the day in Wayzata, MN got about 1/2 a motor built. Case is together, cam/crank/rods are all happy and smoothly moving about. I felt like a bit of a chump, as 95% of the work we did I could have knocked out on my own. Its that last 5% I need to be thankful for the help with. And some of the cool tools Dick has makes that 5% seem just sooooooo easy. But w/out the tool, sooooooo hard. Everything we have measured is nearly dead on for clearance. A good thing with the amount of new and machined parts going into this thing. And some of the BTDT that Dick brings is amazing. Setting the end play for the crank. He eyeballed it, measured a couple shims I brought, we screwed it all together, he grabs some crazy measuring tool, we check the endplay, and BAM, its right at the factory spec. First test fit. no real drama. It just works out. We caught a couple parts related problems that again, with his selection of cool tools and measuring devices, cost us 5-10 minutes, where as I might have caught the problem, and spend hours figuring out if my fix would work or cause more trouble. Should have a complete short block home in rice lake tomorrow night. Still need to dress it in cooling tin once I get it home, get some additional gauges wired into the car, get the engine and trans ready to install, so plenty of work left to do on my week of "mancation". Will it run by the weekend? I don't know, but as is usual for me, I'm going to take my time and try to get it as right as I can the first time before turning the key to wait for that never ending 20 min of cam break in.
Monday morning. Full boxes, empty case.
Tuesday night. (mostly) Empty boxes and full case. Now on to valve train geo...
UPDATE: spent some time in the garage today, not as much as I might have liked, but as I noted before, I don't have all the parts needed to get it all back in the car, so whats the big deal anyway? Checked the valve lift and push rod tube length. When a new cam goes in, with a different base circle from stock, or different valves go in, (different stem length) you need to check and set up the correct push rod length. A dial gauge is mounted on the head to measure valve lift in the same plane as the valve stem. Insert an adjustable push rod with the same ends as the ones you will be building/using. Put the rocker arms on. Cycle the engine around by hand so the valve being measured goes from fully open, (zero out the gauge) to fully closed. This reading should be within 5% of the stated lift value on your cam card. (Per Jake) If this is not the case, take it all apart, and either make the adjustable push rod longer or shorter, rig it all up, test it again, and see what you get. If the lift value you get is less than the prior attempt, you adjusted the push rod the wrong way. Do it all again. A quarter turn makes a big difference. I ended up with a reading of .483, against a stated lift of .500, so as I was inside that 5% range, called it good enough and stopped. So now I know the cam will be performing to its full potential. Those Honda guys with DOHC heads don't know what they are missing here.
Next is to set up the gauge again, and check for the orientation of the valve adjusters at 1/2 lift. They should look like an extension of the valve stem, going straight out from the valve, no angle. Angle = side pressure on the guides, more wear, sooner re-build. I took an old push rod, cut it in 1/2, tapped threads to match the valve adjuster. Now I can screw this on the valve adjuster, and have a better visual reference to the relationship between the adjuster and the valve. If at 1/2 lift, (1/2 of your actual lift, not stated lift) the line is not straight between the valve stem and the PR tube/valve adjuster, you need to shim the rocker arm assembly out to get the correct geometry. So take off all the measuring gear, take the valve train off, add a shim of known thickness to each side of the rocker arm assembly, re-assemble the dial indicator, and check it all again. I haven't gotten this done yet, but maybe tomorrow, after wrapping up a paneling project at Nan's dads place.
Did the CR math, taking into account the bore, stroke, piston dish, deck height, chamber volume, and came up with 8.95:1. The prior CR was around 9:1, and with the heavy cast pistons (euro p/c's and light deck to the heads) and high rings, and 11psi, there was no damage to the pistons or rings when I tore it down. The pistons were ordered to be 8.5:1, but with no base shims or head gaskets, the CR got a little higher, which is fine by me. I expect 9:1 with the forged J & E's will be just fine up to the 15psi I hope to run once things are all broken in and tuned well.
Thats it for tonight.
UPDATE: threw my back out last week, not much progress. Feeling better the last couple days, got the new CHT/EGT gauge in, new oil temp/pressure gauges, working on new harness belts for both seats. Should have them done and the interior back together by tomorrow night.
Its gonna happen this weekend. I have friday off to work on the motor, and sat/sun are open, with the exception of fathers day dinner with my dad.
So some questions about firing the beast up-
I have plenty of Brad Penn 30w break in and Mahle filters. I was planning on getting the motor buttoned up, soaking a filter full of 30w, filling the crank case. Since the SDS handles the spark, I have a filler plug in the dizzy hole. I was thinking of pulling that off, and getting a thick screwdriver, cutting off the handle, putting it in a corded drill, and spinning the motor over to circulate oil. Sound good? Should I spin it clock-wise, or counter clock wise? Once I was certain there was oil everywhere, add plugs, transmission, and install. After install, I was thinking of using the drill trick to spin it over some more, to get oil back to the turbo. I know it'll be harder with the plugs in, but its a pain to put them in with the tin in place and the engine in. Not impossible, just a bother. I was then thinking of doing the 20 min cam break in, with the full exhaust and turbo connected, but no intercooler or charge lines. This way I can run it at 2-2500 rpm, watch the gauges, and have an easier time keeping the AFR in line. I can also sync the ITB's at this time with no turbo hats on them. I'll have a couple small, high volume fans blowing on the motor topside, and a couple of those "Service Master" big air movers blowing air under the car as well. Should be a loud, scary 20 min.
I'm thinking slightly lean is better than pig rich, so I think I'll be shooting for a steady 15 to 16:1 or so AFR. Would leaner be better? If I could see oil temps around 200-225, that'd be great, as I don't plan to hook up the extra remote cooler until the 2nd oil change, to keep any metal bits or assembly lube out of the cooler. I'll be starting with the CHT under #3 plug, as that is where the CHT for the ecu is. I think I'd be looking for around 350 steady here. I'll be watching EGT as well, but not sure which header to put that on. I was thinking 3, since the CHT would be there, but have read that checking the header with the most bends would be better, and to mount the probe as close to the exhaust port as I can. Anyone with an idea what the EGT's should be, in general?
So 20 min to break in the cam, cool down, check valve clearances, new filter and oil, connect the rest of the intercooler system, set 5psi and go for a short beating run, some 1/2 to 3/4 throttle accelerations. Do this for a couple hundred miles, check valves and one more oil change, then start adding boost and tuning the SDS for more boost and rpm with the new motor. Get a good street tune and stop by the dyno for some fine tuning and sheets to share.
Anything else I should or should not be doing that anyone can think of? (other than prayer)
good luck, david!
i'm munching popcorn, enjoying this show-
thefleur
i'm munching popcorn, enjoying this show-
thefleur
QUOTE(ottox914 @ Jun 16 2010, 11:08 PM)
I'm thinking slightly lean is better than pig rich, so I think I'll be shooting for a steady 15 to 16:1 or so AFR. Would leaner be better?
An AFR of 15-16:1 is very lean. I would not (I want to say ever, but that's not necessarily true) go any leaner. Usually you are shooting for 13-13.5:1 for longevity. You start getting pig rich at 10-11:1. Some people shoot for 12.5:1 at WOT, it all depends what you engine likes.
Good luck!
QUOTE(jd74914 @ Jun 17 2010, 03:22 AM)
QUOTE(ottox914 @ Jun 16 2010, 11:08 PM)
I'm thinking slightly lean is better than pig rich, so I think I'll be shooting for a steady 15 to 16:1 or so AFR. Would leaner be better?
An AFR of 15-16:1 is very lean. I would not (I want to say ever, but that's not necessarily true) go any leaner. Usually you are shooting for 13-13.5:1 for longevity. You start getting pig rich at 10-11:1. Some people shoot for 12.5:1 at WOT, it all depends what you engine likes.
Good luck!
Keep in mind this lean AFR is for the 20 min cam break in only. I certainly don't want to run 10:1 and wash the cylinders down with fuel, wreck the oil, and cause myself un-needed pain. I'll be tuning for 14-15 at steady throttle, and 11-12 at WOT with boost.
-Dave
I could be wrong , but I don't believe the drill trick will work on VW engines , maybe chevy / ford where the oil pump shaft engages the bottom of the distributor. The VW engine's oil pump is driven off the front of the cam , not the bottom of the distributor , you might wreck the brass gear on the cramk that drives the distributor. Check with others about the preoiling procedure, double check might save some grief .
My $.02
Jack / Jaxdream
My $.02
Jack / Jaxdream
Ya, doesn't the cam drive the pump not the dizzy? You may have to pull the plugs and crank the starter. Also maybe pull the oil line off the turbo so there is zero resistance when you start to crank the engine. A couple turns should produce a shot of oil coming out the turbo oil line. Then connect the line. You shouldn't have to guess if oil made it to the turbo using this method. Just a thought. I have no first hand experience with this.
Holy cow! TT's sure can haul a lot of 914 parts! 
Nice updates to the thread. I have this one bookmarked.
Nice updates to the thread. I have this one bookmarked.
Good luck with it David, I dont like the idea of running it lean for the break in, 14 or mid 14 sounds better to me.
Couple of comments:
Valvetrain geo sucks eggs the first time you have to do it. Getting the pushrod length went pretty well at Dick's shop, but getting the rest of the rocker arms to the right thickness for the swivel foot adjusters, and getting the shims right for the geo has been a bit of a pain given the tools in my garage. But while its not all physically DONE, I know how it all needs to be, so things are going faster and smoother.
My comments about lean running were not clear when I posted them- I was thinking of 14-15:1 for the 20 min cam break in only. Under boosted conditions and at WOT the mixture will need to be much richer, 11.5-12:1 or so, but we'll see what the motor likes. I have oil pressure, temp, CHT and EGT as well as wideband all wired in and ready, so getting a decent street tune should be very do-able, before taking it to a dyno for that last little bit of magic.
Trouble shooting help?
Got everything together, filled the engine with oil, and set up a test for oil pressure. Hooked up the engine/trans to my truck battery, hooked up a remote starter, and hit it. After 10 sec. or so, no oil coming out of the turbo oil line. Huh? So I disconnected the line from the block to a "T" fitting that supplied the oil pressure sending unit and the line to the turbo. Cranked another 10 seconds, no oil there either. Yes, the crank case is full of oil, good, green Penn break in oil.
I've got a couple of ideas of things to check, but rather then color your opinions on what to look into next, I'll leave this open-
Where would you guys look, what would you check for next, and in what order, to find out whats going on here?
Found this thread:
http://www.914world.com/bbs2/index.php?sho...c=61381&hl=
Says basically to remove the oil filter, crank it till you have a mess, put the filter back on and live happily ever after.
Why would pulling the oil filter make a difference?
I have a Mahle filter, primed and sat overnight filled with oil on the motor now.
QUOTE(ottox914 @ Jul 18 2010, 09:04 AM)
Found this thread:
http://www.914world.com/bbs2/index.php?sho...c=61381&hl=
Says basically to remove the oil filter, crank it till you have a mess, put the filter back on and live happily ever after.
Why would pulling the oil filter make a difference?
I have a Mahle filter, primed and sat overnight filled with oil on the motor now.
Resistance? McMark has a method. Not sure he will share though.
Oil pressure re-established. (crossing fingers) Should have engine in car and cam break in done yet today.

The Captain was right. Again.
The Captain was right. Again.
QUOTE(ottox914 @ Jul 18 2010, 11:18 AM)
The Captain was right. Again.
Don't ya just hate it when that happens?
Sounds like it won't be long now.
![popcorn[1].gif](http://www.914world.com/bbs2/style_emoticons/default/popcorn[1].gif) absolutely awesome and inspiring thread sir...
absolutely awesome and inspiring thread sir...
Engine and trans are in the car.
A true test of a wife, as I was driving the jack, and she was trying to watch out and adjust the engine going up. We're still talking, so that must be a good thing.
Still need to connect a bunch of wires, clutch and throttle cables, axles, shift linkage, exhaust system. Have meetings out of town wed/thru, so with a little luck, I might get this thing lit off tomorrow evening- if not then, it'll have to be friday or saturday.
About 50/50 nervous and excited.
At 10:14 am Saturday morning... it LIVES!!!!! (only now had a free second or two to post)
OK, I was an hour short of my planned blast off, but hey, thats how it went. EGT peaked around 1300, oil temps and pressure good, I used the SDS to run the AFR at 13.5-14.0 for the 20 min cam break in. It sounded a little rough for the first minute or 3, but got progressively smoother until 20 minutes had run. Can hardly wait to put it on the road and see how she runs.
We had a wedding to be part of, so the garage time was limited Saturday. Still need to: oil/filter change, check valves, connect clutch, mount intercooler and piping, fix a couple push rod tube leaks. I used the seals that came with the gasket kit from Jake, (viton?) a little assembly oil to lube them going in, and have a couple that dripped. Not alot, but a drip is a drip, and shouldn't be happening here.
Any suggestions? It might be something simple like the tension wire to retain the pushrod tubes might have popped out. Would just rotating the push rod tube 90-120 degrees possibly help it seal better? I certainly can pull the rockers, pushrods, and tubes, but if there is an simpler initial fix to try, I'd be all for giving it a try.
Being an insurance adjuster, with lots of hail in my area, (on my house as well) I don't expect much free time for the next month or more, but hopefully I can steal enough time to actually get it on the road and drive it!
Great news! I have no suggestions on the oil leaks. I'm chasing the carrot myself. (too much work) Great to read this though!
I use a little teflon thread sealant in the o-ring groove and on the o-ring on both sides of the tube - no leaks. I know I picked that up as a recommendation on some board.
I spin the tube as I gently push them in, most of the time if you have a leak you cut the O-ring as you installed it.
Jake uses a sealant on regular push rod tube seals. Not sure if he has bought into the Viton camp. Did you have to shim your push rod tubes?
Heck Dave, You're in Wisconsin - You don't have to go to the wedding just send beer and you will be forgiven.
Congratulations!!!
Heck Dave, You're in Wisconsin - You don't have to go to the wedding just send beer and you will be forgiven.
Congratulations!!!
The Viton push rod seals are the way to go, I have a set that are going on their third motor or thied year of use, the black or red or green seals after a year get hard and leak, due to engine expansion when at engine operating temps, remember aluminum push rods expand with the motor and operating temps and still have .006" clearance when hot.
The Viton seals are brown and EMW usually has them in stock.
This is how I do it: Rocker arm shafte shims installed case side of the push rod tubes (8), which hold the tubes out slightly which have a tighter seal on the seal, I use bosch point grease to lube the seal and bore and I don't have leaks.
Head side: Tubes are pushed in very carefully because the bore & seal are dry no luberacation except for a little spit on the seal to help it slide in.
I don't use the holding wire for two reasons one it's not needed and two it get's in the way when adjusting push rods, I run the cromoly push rods which are adjusted to 0.0 lash but are still able to spin, but some are very hard to spin with the wire in the way, but with it gone it makes much easier. .
I place a bead of high temp silicone around the edge of the push rod tube and tube bore rocker side, and it doesn't leak.
I use the high temp red silicon which is more pliable than the black after it hardens which allows the tube to move slightly when the engine expands at operating temps.
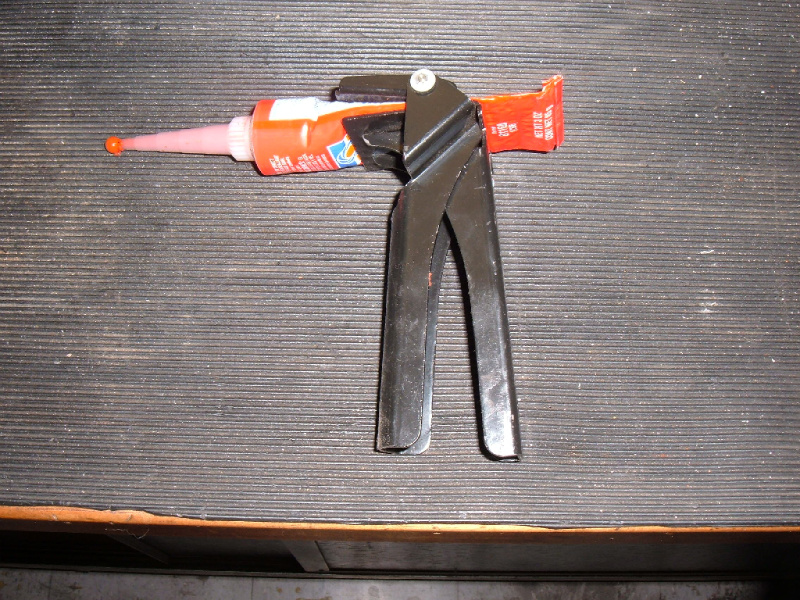
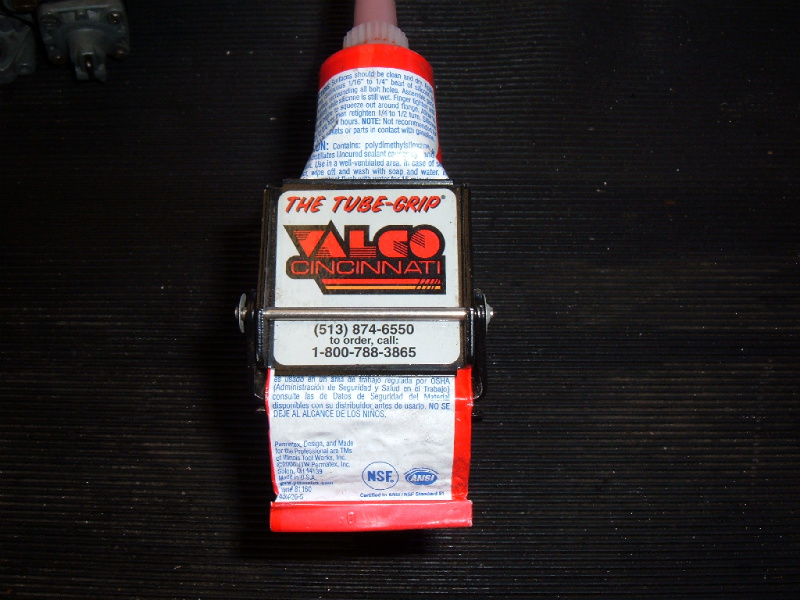
I have a silicone tube applicator that is so cool to use, will post a pic later and where to buy.
The Viton seals are brown and EMW usually has them in stock.
This is how I do it: Rocker arm shafte shims installed case side of the push rod tubes (8), which hold the tubes out slightly which have a tighter seal on the seal, I use bosch point grease to lube the seal and bore and I don't have leaks.
Head side: Tubes are pushed in very carefully because the bore & seal are dry no luberacation except for a little spit on the seal to help it slide in.
I don't use the holding wire for two reasons one it's not needed and two it get's in the way when adjusting push rods, I run the cromoly push rods which are adjusted to 0.0 lash but are still able to spin, but some are very hard to spin with the wire in the way, but with it gone it makes much easier. .
I place a bead of high temp silicone around the edge of the push rod tube and tube bore rocker side, and it doesn't leak.
I use the high temp red silicon which is more pliable than the black after it hardens which allows the tube to move slightly when the engine expands at operating temps.
I have a silicone tube applicator that is so cool to use, will post a pic later and where to buy.
A nice tool, that allows to apply a perfect bead with very little practice and allows to start & stopt beads as needed.
I believe they are under $20 a piece shipped I had bought several.
I believe they are under $20 a piece shipped I had bought several.
Houston, we have a problem. At the last autocross event the 914T was at, the turbo got a little "chirpy" as I got beyond the surge line for the compressor at 4500+ rpms in 2nd gear. But I was only showing 4-5psi at the engine due to some pesky boost leaks. Lord only knows what the little turbo that could was actually putting out. FINALLY got the boost leaks sealed, and took it for spin. Turbo seemed more responsive, so thats a good thing. Instead of straining to show 5psi at 4500 rpm, she shot right up to 5psi and beyond, by 3k rpm. Cool. And was chirping by 3500 rpm and 6-7psi boost at around 11:1 afr's. Backed off the gas. Hitting the surge line of the compressor. Hmmmmm....... the old motor, a bone stock 2.0, would push that turbo up to 10-11 psi, the intake air temps were never more than, say 20 degrees or so of the ambient temps, so I don't think I was overheating the intake air. Hmmmmm...... Len assured me the new heads would flow much better than the old ones. Jake was sending me a "top secret" cam that should flow like crazy, to spool up the turbo. I could never get the 2 of them to commit to any flow numbers. I think they are quite a bit more than before.
So one evening this week I'll be putting the subie WRX turbo and exhaust pipe back in, and we'll see how that goes. Hopefully the injectors can keep up...
So one evening this week I'll be putting the subie WRX turbo and exhaust pipe back in, and we'll see how that goes. Hopefully the injectors can keep up...
What are you using to control the turbo? Ball and spring or electronic boost controller?
I have learned that a ball and spring will severely detriment the spool time. I gained 500rpm's in spool time from a ball and spring to a electric..
I have learned that a ball and spring will severely detriment the spool time. I gained 500rpm's in spool time from a ball and spring to a electric..
That cam isn't secret, it has ran with awesome results in several 914 Turbo engines including some producing 30 PSI boost making over 300 RWHP from a 2 liter engine.
Your engine will be much different than before.
I have been using the Turbosmart Eboost 2 with great luck as of late. I have gotten 507RWHP from a 2.4 street engine, 510 RWHp from a 2.3 drag race engine and just made 270 FWHP @20 PSI from a 1500 Land Speed engine using the eboost 2....
Your engine will be much different than before.
I have been using the Turbosmart Eboost 2 with great luck as of late. I have gotten 507RWHP from a 2.4 street engine, 510 RWHp from a 2.3 drag race engine and just made 270 FWHP @20 PSI from a 1500 Land Speed engine using the eboost 2....
QUOTE(Andyrew @ Sep 6 2010, 08:42 PM)
What are you using to control the turbo? Ball and spring or electronic boost controller?
I have learned that a ball and spring will severely detriment the spool time. I gained 500rpm's in spool time from a ball and spring to a electric..
Still using a "boostvalve.com" ball and spring set up. In 2002 sport compact car did a boost controller show down, (unfortunately now that the mag is gone, so is the online copy of the results) and the boostvalve performed better than most of the EBC's they tested. So for now, cheep, stable and reliable will have to work for me, as many of the current crop of EBC's are $3-400+, and thats money I can spend elsewhere on the project, like for dyno time and other bits and pieces as needed. I am considering an EBC, probably the "gizzmo", as it has gotten good reviews and at under $300 seems a good value, doing what it needs to do, simple install, and reasonable to set up.
Jake- didn't mean to suggest your turbo cam grind is a secret- heck, if someone is thinking of doing a turbo motor right, call up the man and get the right cam. The specs are a little more of a guarded thing.
My dad and I run the Apexi boost controller. Older tech, but we wouldnt go with anything else. However there are some other good options. Get one with RPM programable boost and gear correction (Aka first gear +10%, 5th gear minus 25%)
I havent read the whole thread, you have a waste gate but do you also have a blow off valve??? I know dumb question.. But if the chirp from the turbo is after a lift?? the pressure hits the turbo... I'll go away again... Once a year I get these things right.. I think I'm over quota!! 
QUOTE(ottox914 @ Sep 8 2010, 07:29 AM)
QUOTE(Andyrew @ Sep 6 2010, 08:42 PM)
What are you using to control the turbo? Ball and spring or electronic boost controller?
I have learned that a ball and spring will severely detriment the spool time. I gained 500rpm's in spool time from a ball and spring to a electric..
Still using a "boostvalve.com" ball and spring set up. In 2002 sport compact car did a boost controller show down, (unfortunately now that the mag is gone, so is the online copy of the results) and the boostvalve performed better than most of the EBC's they tested. So for now, cheep, stable and reliable will have to work for me, as many of the current crop of EBC's are $3-400+, and thats money I can spend elsewhere on the project, like for dyno time and other bits and pieces as needed. I am considering an EBC, probably the "gizzmo", as it has gotten good reviews and at under $300 seems a good value, doing what it needs to do, simple install, and reasonable to set up.
Jake- didn't mean to suggest your turbo cam grind is a secret- heck, if someone is thinking of doing a turbo motor right, call up the man and get the right cam. The specs are a little more of a guarded thing.
Check this link it may be the art. you were thinking of saved at another site.
http://www.turbo-owners.com/forum/general-...ontrollers.html
QUOTE(d914 @ Sep 8 2010, 08:51 AM)
I havent read the whole thread, you have a waste gate but do you also have a blow off valve??? I know dumb question.. But if the chirp from the turbo is after a lift?? the pressure hits the turbo... I'll go away again... Once a year I get these things right.. I think I'm over quota!!
You're right- and not so right. There are 2 sorts of surge you can get. One is what you describe, on throttle lift. Been there, had that, adjusted the BOV to take care of it. What I am now facing is more like this:
http://www.youtube.com/watch?v=nCj6Spwl1CU
Although not on a car/engine/turbo combo like THAT one. This is surge from over spinning the turbo- need a bigger one now.
STT- that is exactly the write up I was referencing. Not to say that EBC's haven't come along way since 2002, but for now, the extra 3-4-500 to get into one is money better spent on dyno time and other updates.
Posting a little update- surge was really not what I thought- had a leak at the gasket between the intake and head. The car is/was LOUD, so much so that at our last autocross, (and keep in mind I'm on the board...) I was kicked off the grid for sound violations!!!!! In the 1st session I was at 95.5db at WOT in 2nd gear. 95 is the limit. In the 2nd session I took it easy runs 1 and 2, and I let'r buck for run 3. oooops, 97db on that one, and I'm done for the day.
So here is the solution:
OLD: http://www.youtube.com/watch?v=rGoTFrCu97k
(Car was just started and not warmed up yet.)
NEW: http://www.youtube.com/watch?v=1qV436Ydm_U
(Car was well warmed up...)
No surprise, the new system is more restrictive than the old, and the boost comes on slower and is a psi or 2 less than before. But. I have 12 more discs and an endcap with a 2" hole in it to try on event days, to see how close to 95db I'll end up with a freer flowing system. I can always pull some discs or put the solid end cap back on for the ride home.
Sounds good!
This would be a 914 I'd love to see in action.
This would be a 914 I'd love to see in action.
I personally dont like supertraps... But with that turbo location your kinda SOL...
So how did this turn out? I am very intrigued.
I suspect it will never be "done". Was chasing boost leaks last fall when winter came to WI. As the snow is going and garage temps raising, I should be back at it with a winters worth of ideas to try.
Updates will be posted as progress would warrant.
Updates will be posted as progress would warrant.
QUOTE(ottox914 @ Mar 17 2011, 05:55 PM)
I suspect it will never be "done". Was chasing boost leaks last fall when winter came to WI. As the snow is going and garage temps raising, I should be back at it with a winters worth of ideas to try.
Updates will be posted as progress would warrant.
Any warrents for updates yet?
couple of questions.
How did you address potential head/cylinder leaks?
Did you do anything special to the heads or the tops of the cylinders?
I did not see anything unique there.
Also,
What HP are you predicting at this point?
Rich
How did you address potential head/cylinder leaks?
Did you do anything special to the heads or the tops of the cylinders?
I did not see anything unique there.
Also,
What HP are you predicting at this point?
Rich
Got a few PM's lately on project status, and holy cow- its been awhile! Sorry guys.
First of all, overview of 2012. I got a tough hand of cards in 2012.
Started in 12-2011. Lost my job of 8 yrs, after 20+ in the industry. Oddly enough I was the most tenured and highest paid of myself and my co-workers. Hmmmm... In March scored a position in a related field. This co. stated out front they had no real training program but they thought I'd do just fine. After exactly 90 days I was let go, and the blond at the desk next to me, with no more experience than I had, got my desk. Hmmmm... Was on UE till the end of the year, looking hard to replace a 60K job in my little town of 8000 people. Didn't find it. Thankfully my wife and I were smart with our $$$ when we had some, and the bottom didn't drop out of our world. UE ran out 12-12, and i took a job managing a small auto shop. That pays exactly the same as UE did- except that there are health benefits that are affordable. The COBRA we spent most of the year on was just under 1k/mo for health insurance. OUCH.
SO- bottom line, there wasn't much motivation or money to take the 914T up another level.
Time spent: Spent 2012 trying to get the small turbo to work. On paper, the 9B turbo should have been a perfect match to the 1.8 turbo motor. I have learned that "on paper" and "real world" are 2 very different things. I pulled the 9B and put the wrx turbo back on. Better results. Rebuilt the 9B and put it back on. Less better results. Seems something is up with how that turbo works with my overall system. I don't know if it is the turbo location, the 2 valve heads vs the 4 valve heads of more modern engines, volume of the intake system, or what. But. For whatever reason, the 9B wouldn't build much more than 5-6 psi, and all this would be from 5-7k rpm. So not much low end, which is what I was going for with the smaller turbo. So the 9B is out. So much of 2012 was turbo swapping, which costs zero dollars, since I already had both turbos. End of the driving season I was taking the car out for a little October beat'n run, and the boost went away and the car ran but poorly. Got it back home and checked things out. The old, dirty air cleaner had collapsed in on itself, and was stopping the turbo from spinning. So more $$$ to spend on a cheep air filter, so I could get it running and into storage. The air cleaner I found was about 2x as big as the one that failed.
WINNER!!!!!!! With 2x as much air getting in, the turbo woke up. With the engine spinning to 7k, I'll see 13psi at the top of 2nd and 3rd gears. Fun. The car revs much more freely, boost and speed build much faster. Where before the car just felt like a bigger NA motor, with smooth power building across the rpm band, it now had a noticeable p u s h back into the seat from 4k to redline. Over and over again. Sadly all this fun happened on the drive to storage.
Money spent: Spent a small amount of real money to have an exhaust shop modify the supertrap to have it fit much better with the wrx turbo, since that is the one we're going with. It looks much better, and is much quieter at an autox. Most I blew was an 86db, which is well under the 90db limit at most of our sites. There was also a set of new/never used star spec tires I picked up over the winter from a chump car team that had moved onto a different car. They were only 195's, but $300 for a basically new set 4 tires was a deal I couldn't pass up, as the existing tires were 5+ yrs old and hard as rocks. The big cost was the elephant bushings for the rear trailing arms. I had an odd "click" in the rt rear for a yr or so, and the handling was getting odder and more weird at the autocross. I was thinking it was a bad shock, but traced it to the trailing arm bushing. So this spring I have a big project, to remove the trailing arms, power coat, replace bushings and bearings, and get it back on the road.
Autocross: Made enough events in 2 separate series to win my class in both. Even with goofy handling of the "variable random toe" provided by the trailing arm bushing wear. So with a more buttoned down suspension and more boost, the car should be even more potent next season. And if I can find better work and some Rcomp budget...
Things I love about this project. Off the line it feels like any strong type IV. And then. The torque when the turbo starts pulling is amazing. I'd love the tq to come on sooner, but we'll see how things develop. The engine and turbo pull like crazy right to the fuel cut at 7k. Having the tq come on in the mid-upper end is probably thermally less taxing on the motor. It looks basically stock but for the panasports. AND, I CAN"T say enough about Len Hoffman's heads. I'm sure the cam from Jake has plenty to do with this as well, but the new motor runs SO cool. Engine temps are right where they were expected and rock solid. EGT, CHT, oil temps and pressures, I couldn't be happier with how stable and steady these have been. If I were track lapping the car it might be a different story, but for back road zipping around and the weekend of autox, perfect.
2013: I'd like to try another turbo. Really? Really. I've been thinking of a Ko3 as would be found on our Audi TT. Thats a smaller turbo, seems to perform well on the 1.8L TT motor. They were out there on all manner of 1.8T motor from Audi and VW, so there may be some used options cheep. Get those trailing arms re-done. If I choose not to try yet another turbo, some dyno time for sure. I'm as curious as the rest of the world to know what it puts out. I'd like to pull the OEM mufffler heat shield and re-do the air cleaner to pull it up and away from so much road grit. And find a better paying job so I can afford more goodies for the 914T.
I should be out to the farm this weekend, I'll try to snap a couple pics of the new muffler and air cleaner set ups.
QUOTE(r_towle @ Oct 18 2011, 01:39 PM)
couple of questions.
How did you address potential head/cylinder leaks?
Did you do anything special to the heads or the tops of the cylinders?
I did not see anything unique there.
Also,
What HP are you predicting at this point?
Rich
Bad on me for taking so long, but the prior post is the story of 2012.
Nothing special on the heads/cylinder junction. Other than the wisdom of Len Hoffman. His suggestion was that he isn't really in favor of turbo type IV motors for just this reason. That junction is a potential problem area. His thoughts were that as I was building a budget motor here, lets use the 1.7 cyls as they have thicker walls, and therefore a thicker/wider sealing surface to the head. I got the cyls and heads to Len so he could check and be sure all the mating surfaces were going to be happy together. On my little motor, shooting for no more than 1bar boost, he thought this would be fine enough. If you were going for some larger cyl size, or crazy higher boost, there maybe other steps to take. And if you were paying to play at that level, you probably can and should take greater steps to preserve your investment.
As for HP. Anyones guess. I've only driven stock cars of all 3 engine sizes, and a 1600lb 200+hp autocross beast. My street car is somewhere in the middle. I'd like to guess 150+ or so at the wheels, but who knows how accurate the owners butt dyno really is. I really need to stop messing around here, tune the SDS to the turbo thats working, and see where we're at.
This is a "lo-fi" version of our main content. To view the full version with more information, formatting and images, please click here.