Full Version: Martini 914 1974
I'm prepping the car today for the last show of the season. Its a thing called Speed Art Design in the town where I grew up. It's about an hour and 20 minutes from where I live so it should be fine. Wife and daughter will be riding backup in the daily driver.
Click to view attachment
Well that sunday morning drive was worth it if nothing else then for just this photo. Magical light just as the sun broke thru the heavy fog.
Well that sunday morning drive was worth it if nothing else then for just this photo. Magical light just as the sun broke thru the heavy fog.
Great shot! I really love your car; there is just something about it that looks so right. Keep enjoying it!
QUOTE(Mayne @ Sep 10 2019, 04:45 AM) 
Great shot! I really love your car; there is just something about it that looks so right. Keep enjoying it!

I've enjoyed following this thread myself.
Maybe it's a Martini thing

Oscar
QUOTE(ValcoOscar @ Oct 15 2019, 06:04 PM)
QUOTE(Mayne @ Sep 10 2019, 04:45 AM)
Great shot! I really love your car; there is just something about it that looks so right. Keep enjoying it!
I've enjoyed following this thread myself.
Maybe it's a Martini thing
Oscar

I'm hoping for a sunny autumn weekend day so I can take it out for a last ride and test some key fobs.

QUOTE(ValcoOscar @ Oct 15 2019, 12:04 PM)
QUOTE(Mayne @ Sep 10 2019, 04:45 AM)
Great shot! I really love your car; there is just something about it that looks so right. Keep enjoying it!
I've enjoyed following this thread myself.
Maybe it's a Martini thing
Oscar
We have the right vehicle for you if you need a lift.
Excellent now I just need a Martini badged Jetliner to hop across the pond in too.
Gotta travel in style....
Gotta travel in style....
Well its winter here and its time for some service and leakfixing.
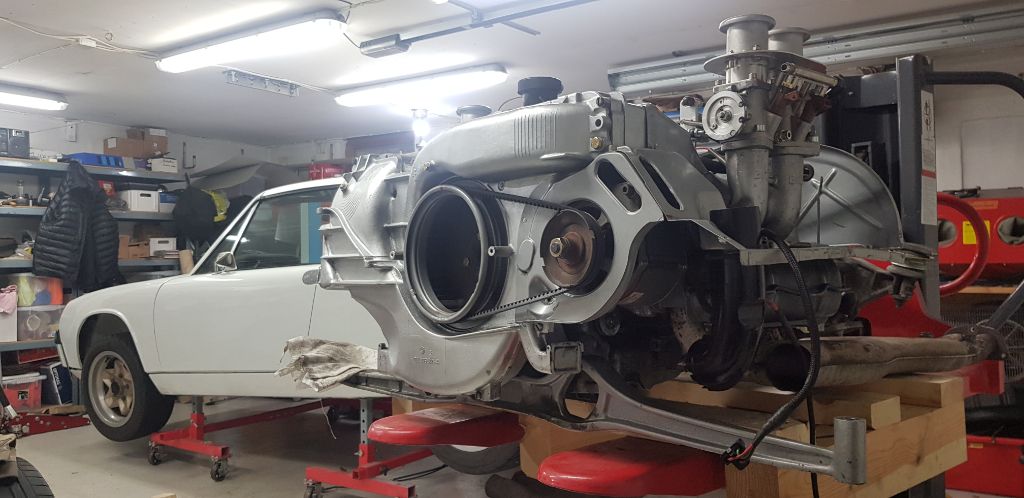
Engine out. First fixes was to remove the flywheel and pull the old Elring crank seal and swap it for a Sabo brand one. While in there's I've also adjusted the postion of my pilot bearing to make it support the input shaft a little bit more.
I thought I had a leak from the input shaft on the gearbox but it turns out it was more likely the reverse light switch. Took the old mangled brass? washer off and put in a new annealed copper one.
I still have to remove the washer I've spotted under the clutch pivot ball and see if that gives me a more centered clutch arm. Need to get a cheap 12 long 12 mm socket and modify it to get the pivot off.
While the engine is out I've also set the valves (zero lash on this engine)
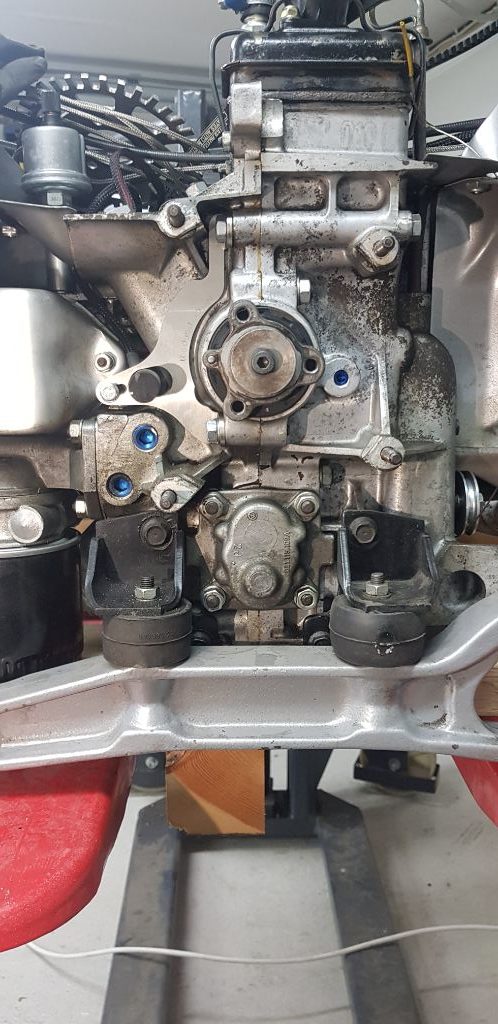
I've also noticed an annoying drip from the front of the engine. Typically its shown as a drop of oil hanging from the bottom of the drivers side engine bracket. (behind the engine bar in this picture)
I've taken the engine bar off and cleaned the entire front of the engine and wiped it dry. Now i'll let it sit for a day or two and see if the leak can be spotted. My main suspect is the oil pump.
Engine out. First fixes was to remove the flywheel and pull the old Elring crank seal and swap it for a Sabo brand one. While in there's I've also adjusted the postion of my pilot bearing to make it support the input shaft a little bit more.
I thought I had a leak from the input shaft on the gearbox but it turns out it was more likely the reverse light switch. Took the old mangled brass? washer off and put in a new annealed copper one.
I still have to remove the washer I've spotted under the clutch pivot ball and see if that gives me a more centered clutch arm. Need to get a cheap 12 long 12 mm socket and modify it to get the pivot off.
While the engine is out I've also set the valves (zero lash on this engine)
I've also noticed an annoying drip from the front of the engine. Typically its shown as a drop of oil hanging from the bottom of the drivers side engine bracket. (behind the engine bar in this picture)
I've taken the engine bar off and cleaned the entire front of the engine and wiped it dry. Now i'll let it sit for a day or two and see if the leak can be spotted. My main suspect is the oil pump.
Mats you've done a beautiful job.
What perseverance !
You should be very proud.
Tremendous.
Enjoy.
Rory
What perseverance !
You should be very proud.
Tremendous.
Enjoy.
Rory
DBL
Yea, definitely looking good there Mats.
You'll get all those oil leaks sorted, I'm sure of it.
Great looking car and concept for the car.
You'll get all those oil leaks sorted, I'm sure of it.
Great looking car and concept for the car.
Thank you both. 
Click to view attachment
So I've been chasing oil leaks for a bit and itseems to be coming from this plug.
Click to view attachment
The offending member weeps a bit of oil after sitting for a few days, I'm suspecting that it leaks more when being heatcycled.
I'd prefer to not pull it and reseal it, has anyone had any luck with some sort of exterior sealant?
QUOTE(falcor75 @ Jan 27 2020, 03:09 AM)
Click to view attachment
So I've been chasing oil leaks for a bit and itseems to be coming from this plug.
Click to view attachment
The offending member weeps a bit of oil after sitting for a few days, I'm suspecting that it leaks more when being heatcycled.
I'd prefer to not pull it and reseal it, has anyone had any luck with some sort of exterior sealant?
Seal all. You'll be suprised how well it works.
QUOTE(falcor75 @ Jan 27 2020, 02:09 AM)
Click to view attachment
So I've been chasing oil leaks for a bit and itseems to be coming from this plug.
Click to view attachment
The offending member weeps a bit of oil after sitting for a few days, I'm suspecting that it leaks more when being heatcycled.
I'd prefer to not pull it and reseal it, has anyone had any luck with some sort of exterior sealant?
That leaking plug appears to be steel. I think I see rust in the hex and lathe marks on the face. I can see the other two up at the oil filter area and by the one by the crank nose are aluminum.
Verify the leaking offender is steel with a magnet. These are NPT tapered pipe plugs. If steel, your are correct, it has probably loosened from heat cycling.
If steel you have 3 options:
1) Just tigten it. NPT pluts are an interference fit and tightening will stop the leak. Temporarily but probably for many years.
2) Pull the plug completely and use PTFE thread sealeant (liquid not tape) and reinstall.
3) Replace it with a properly installed aluminum plug.
If it's an aluminum NPT plug:
1) You'll have a very hard time getting it out without stripping the aluminum hex. Make sure you have a new tight fitting hex wrench before you even attempt this. Best bet is to gently heat the case (200F is plenty) and then cool the plug quickly by squirting water with a syringe right into the hex. Immediately try to loosen. This doens't work everytime. Sometimes the aluminum plugs have to be machined out but on the other hand if it is aluminum I'd be surprised that it is leaking in the 1st place.
2) If #1 fails, then you might go for the cover with JB Weld route but I absolutely hate this solution but in the past I've sucessfully used JBWeld to seal worse leaks in emergency situations.
3) If the hex strips, you're done. It will need to to be machined out. In your case #2 is likely the best solution unitl you need a rebuild or other case machine work.
Most importantly, don't mess with the blue aluminum plugs if they are not leaking. I prefer aluminum plugs. When they are installed properly, they don't leak and are basically a permanent fix when replacing galley plugs. DO NOT try to move or "re-seal" the blue aluminum plugs.
We just had a relevant thread discussion on aluminum vs. steel oil galley plugs.
http://www.914world.com/bbs2/index.php?showtopic=342995
QUOTE(Superhawk996 @ Jan 27 2020, 06:52 AM)
QUOTE(falcor75 @ Jan 27 2020, 02:09 AM)
So I've been chasing oil leaks for a bit and itseems to be coming from this plug.
Click to view attachment
The offending member weeps a bit of oil after sitting for a few days, I'm suspecting that it leaks more when being heatcycled.
I'd prefer to not pull it and reseal it, has anyone had any luck with some sort of exterior sealant?
That leaking plug appears to be steel. I think I see rust in the hex and lathe marks on the face. I can see the other two up at the oil filter area and by the one by the crank nose are aluminum.
Verify the leaking offender is steel with a magnet. These are NPT tapered pipe plugs. If steel, your are correct, it has probably loosened from heat cycling.
If steel you have 3 options:
1) Just tigten it. NPT pluts are an interference fit and tightening will stop the leak. Temporarily but probably for many years.
2) Pull the plug completely and use PTFE thread sealeant (liquid not tape) and reinstall.
3) Replace it with a properly installed aluminum plug.
If it's an aluminum NPT plug:
1) You'll have a very hard time getting it out without stripping the aluminum hex. Make sure you have a new tight fitting hex wrench before you even attempt this. Best bet is to gently heat the case (200F is plenty) and then cool the plug quickly by squirting water with a syringe right into the hex. Immediately try to loosen. This doens't work everytime. Sometimes the aluminum plugs have to be machined out but on the other hand if it is aluminum I'd be surprised that it is leaking in the 1st place.
2) If #1 fails, then you might go for the cover with JB Weld route but I absolutely hate this solution but in the past I've sucessfully used JBWeld to seal worse leaks in emergency situations.
3) If the hex strips, you're done. It will need to to be machined out. In your case #2 is likely the best solution unitl you need a rebuild or other case machine work.
Most importantly, don't mess with the blue aluminum plugs if they are not leaking. I prefer aluminum plugs. When they are installed properly, they don't leak and are basically a permanent fix when replacing galley plugs. DO NOT try to move or "re-seal" the blue aluminum plugs.
We just had a relevant thread discussion on aluminum vs. steel oil galley plugs.
http://www.914world.com/bbs2/index.php?showtopic=342995
Sorry wrong.
This plug is steel, but it's a factory plug there's no way it's NPT, it's a metric thread.
It's the machining hole for the oil pick-up. It won't leak running as it's suction from the oil pump, but it's likely leaking air into the pick-up circuit.
I've had it out before, worth a try at removing and reseal. If no joy clean and cover with JB, etc.
Wow, great car and great build!

Make sure to enjoy it to the max.
John
On that note though, the case will expand more than the steel when heated. The Aluminum based on alloy is over a 2:1 expansion rate of the steel plug counterpart. Depending on the amount of magnesium, we are approaching a 3:1.Heat it nice with a heat gun 100 Celsius is fine, and go at it nice and slow. Aluminum threads can gall.
I would use a good pipe thread sealant PFTE like Superhawk mentions. Or if you have the means, find or cut a plug to match that galley threads.
If you bugger the threads, then you will need to chase them, or rethread the bung. Grease, and lots of cleaning are your friends here. I would even go as far as to back pack the passage to keep things from migrating back in to the engine. And count all the stuff I put in and out. Like a surgeon or AP mechanic would.
Or like everyone else has mentioned seal it with your favorite epoxy-ish sealant, that is the easy way out and understandable, unless you where doing a rebuild.
QUOTE(Mark Henry @ Jan 27 2020, 09:04 AM)
Sorry wrong.
This plug is steel, but it's a factory plug there's no way it's NPT, it's a metric thread.
It's the machining hole for the oil pick-up. It won't leak running as it's suction from the oil pump, but it's likely leaking air into the pick-up circuit.
I've had it out before, worth a try at removing and reseal. If no joy clean and cover with JB, etc.
You are correct. Not NPT. My fault for not looking closely and being to fast to comment early in the morning .

It is straight cut thread and a very short thread at that. OEM design counts on this plug being threaded in deeply enough, and with enough torque to basically roll form a 1st thread from the steel plug into the aluminum case and on thread sealant after the fact.
The principle of a steel plug loosening over time and heat cycles is still relevant though. Honestly I had forgotten about that plug being straight cut and will have to look into addressing machining on my cases. Truly not a great design. In the case of the other lifter galley plug and the oil pressure relief valve they use a crush washer to ensure a good seal. Not sure why they didn't do the same here?
Maybe ultra tight clearances to the engine mount bracket? Thank you for keeping me honest.

I will go for a thorough clean and some sort of exterior sealant first. The engine barely has 3500 miles on it since it was built.
Mine was staked. Not sure if it was staked at the factory.
Devcon Titanium Putty for exterior repair...Peter Dawe recommended it to me for mag case cracks... expensive but top of the food chain...
So I've been chasing oil leaks for a bit and itseems to be coming from this plug.
Click to view attachment
The offending member weeps a bit of oil after sitting for a few days, I'm suspecting that it leaks more when being heatcycled.
I'd prefer to not pull it and reseal it, has anyone had any luck with some sort of exterior sealant?
[/quote]
Sorry wrong.
This plug is steel, but it's a factory plug there's no way it's NPT, it's a metric thread.
It's the machining hole for the oil pick-up. It won't leak running as it's suction from the oil pump, but it's likely leaking air into the pick-up circuit.
I've had it out before, worth a try at removing and reseal. If no joy clean and cover with JB, etc.
[/quote]
Interesting, both my 2L GC & GA cases have a pressed in plugs for the suction port.
Both cases have been tapped and plugged for all the other gallery plugs.
Barefoot
Click to view attachment
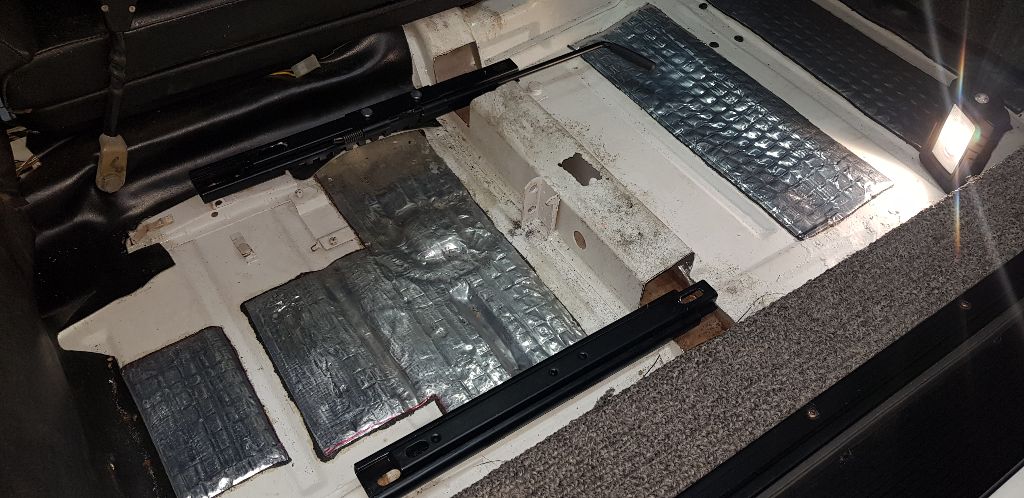
Pondering of wrapping the lower panels to get a more original and less fatbellied look...
Click to view attachment
Pondering of wrapping the lower panels to get a more original and less fatbellied look...
Click to view attachment
QUOTE(falcor75 @ Mar 27 2020, 03:17 AM)
Click to view attachment
Pondering of wrapping the lower panels to get a more original and less fatbellied look...
Click to view attachment
Matts, I like both, but the rockercover black is looking good. No Martini of Porsche Script on there ?
Really love the refinement that your car represents. Very sano.
How about Martini dark blue
How about Martini dark blue
The car's beautiful! What did you reseal the plug with?
The black down low looks great Mats.
Porsche script ?? ![popcorn[1].gif](http://www.914world.com/bbs2/style_emoticons/default/popcorn[1].gif)
The car looks spectacular in white trim on the bottom. Very clean look.
Thank you for all your comments and suggestions. About the script I prefer my car without....the only place it says Porsche on the whole car is on the engine grille and I kinda like that understated look.
Well I managed to burn the tach output on my ECU so that will take 4-6 weeks to fix so now I have time for some needed upgrades.
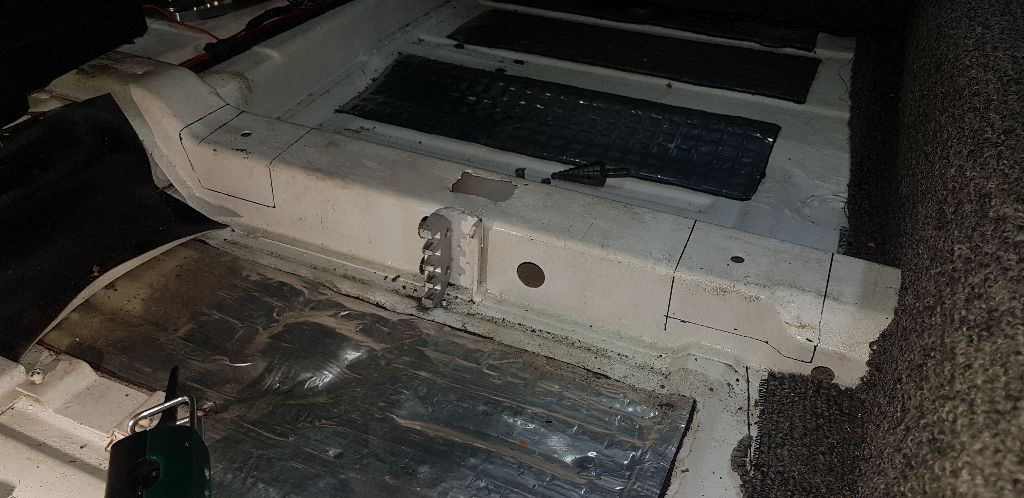
The nice seats I bought last year doesnt quite work with the stock seat rails/bases.
The seats ended up much too high and too reclined for my taste. I've been thinking about this alot but in the end there is no other solution than tho notch the beam that goes under the seats. The stock 914 seats will never go back into this car anyway since I will use them for my other project. Before getting this far I've measured the whole area and done some testing in Solidworks to make sure it will work.
Then its just to bring out the step drill and the airsaw and get stuck in there. The rail was much nicer inside than I expected. Surface rust on the bottom but still very solid.
I wirebrushed it was best I could and then treated it with a rust converter.
The aftermarket seat rails I bought for the Seven project gets used for mocking up and I have ordered a second pair so both cars will use the same kind of rails.
Wow Mats, I guess you really measured a couple of times before actually cutting that ! Good luck with this project !
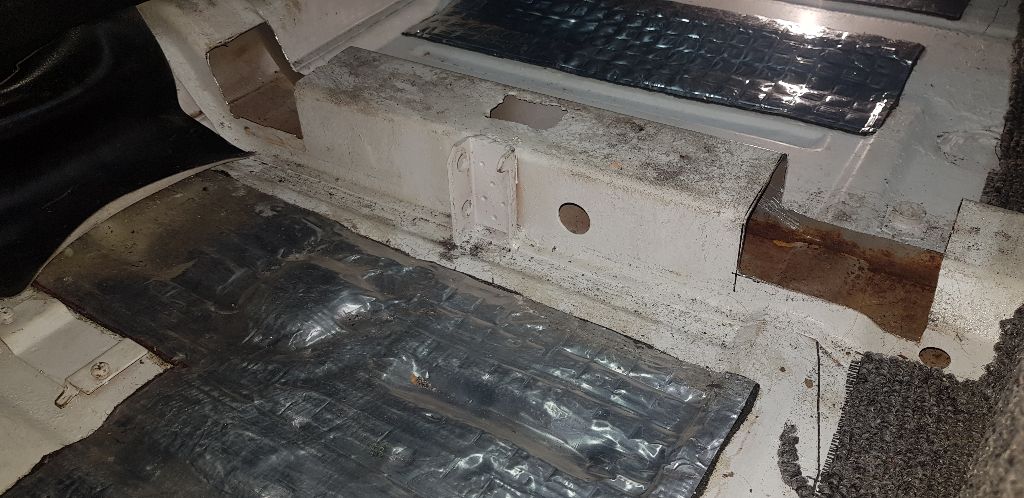
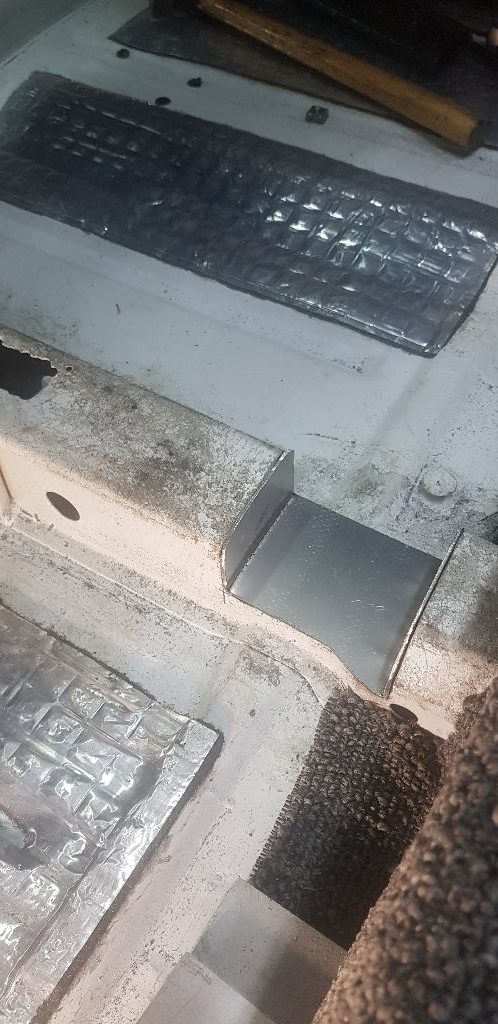
Nice cut job. What's the plan to close up the brace?
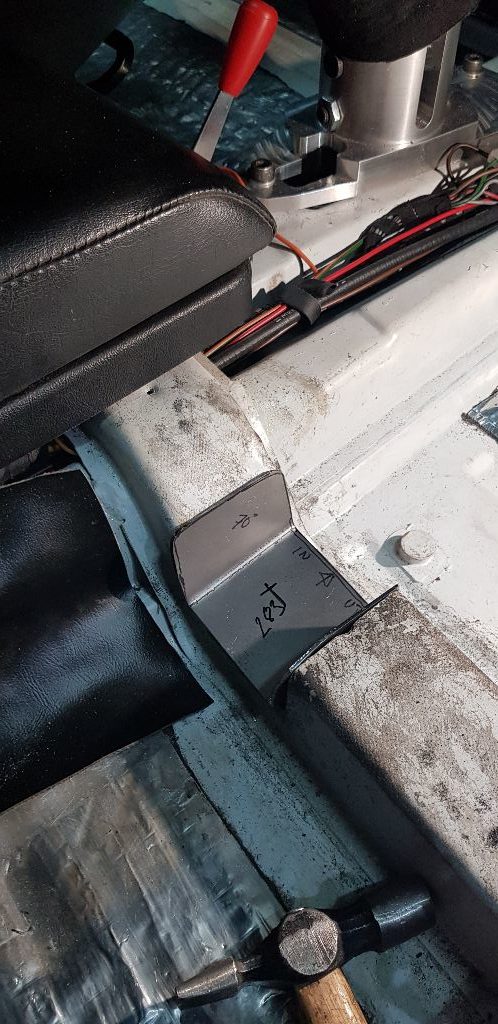
Good question Spoke. The original material wasnt very thick, 0,8-0,9 mm (20-22 gauge) and I'm making the filler pieces from 1,5 mm (thats about 15 gauge?)
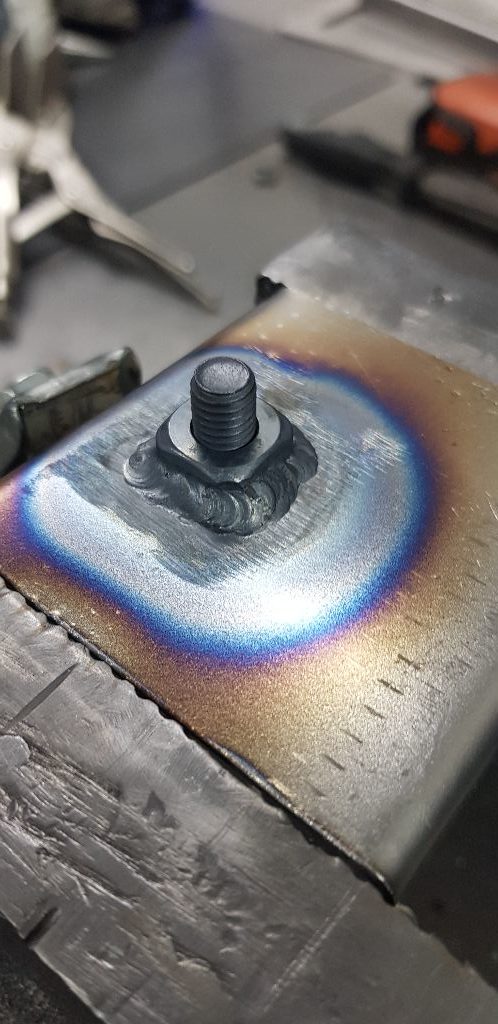
Welded in a capture nut on the underside as an offering to the Binky gods.
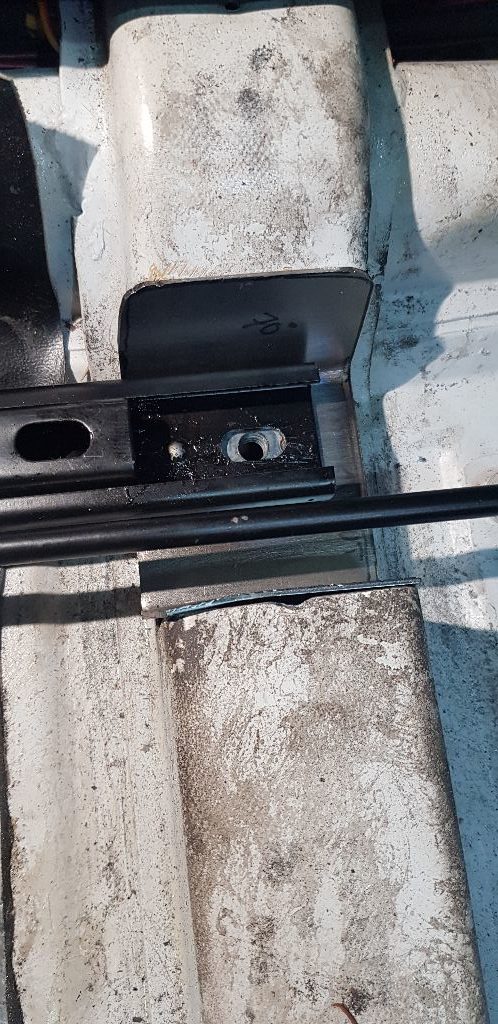
Looks like it will fit ok. Thank god for slotted holes tho..
Outside patch panel made. I'm using the masking tape trick in which you cover the hole with masking tape and run a dirty glove finger around the edge. This leaves an imprint of the edge on the tape. You pull the tape off the part and cut away the excess and as you fold out the tape onto your sheet stock you get a perfect pattern of the piece you need to make.
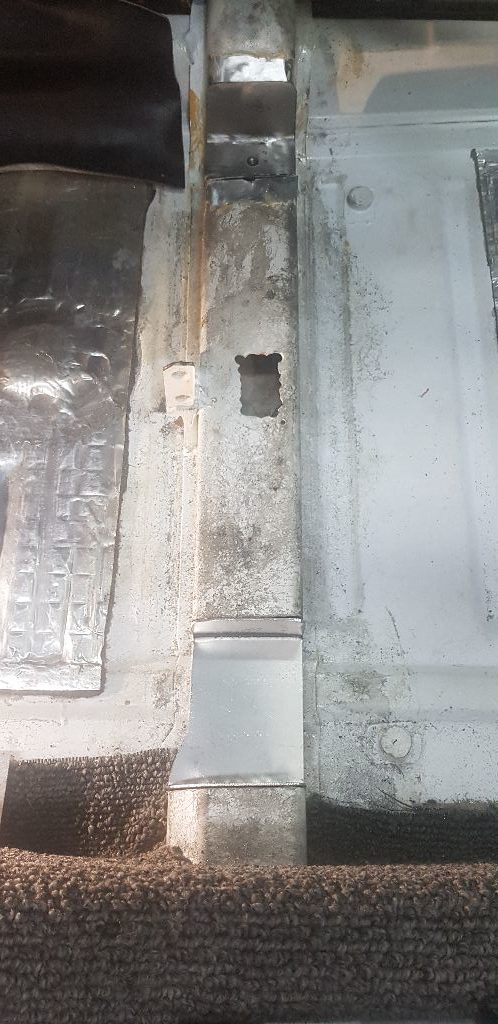
The outside panel got a capture nut too but I forgot to take a photo of that in the excitement of things moving forward and going quite well.
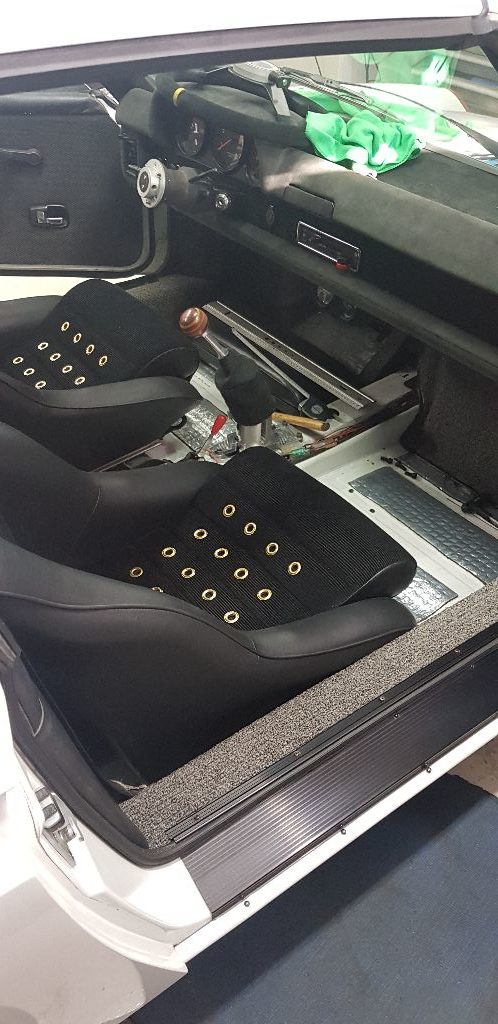
First test fit ! The front upper edge of the seat has come down 70 mm or almost 3 inches and makes the seat sit more upright. This makes me able to push the seat back another 50 mm or two inches because the top of the seatback doesnt hit the firewall as early as before. Success !!
QUOTE(falcor75 @ Apr 21 2020, 05:55 AM)
Success !!
Lets see more of those seats!
I had been following your work and progress on instagram, and recognized those pictures.
looks like those seat will now sit just like you wanted. The guy who sold you those seats go real defensive about you saying they didn’t fit, which i didn’t really understand.
it didn’t seem to me like you were saying that, but my feeling is he should be marking these as fitting in a 914, because they don’t without some significant modification.
it’s not like everyone has the ability or skill to do what you are doing here.
Anyway, i do like those seats, do they interfere with the E-brake function?
Phil
Good question Spoke. The original material wasnt very thick, 0,8-0,9 mm (20-22 gauge) and I'm making the filler pieces from 1,5 mm (thats about 15 gauge?)
Welded in a capture nut on the underside as an offering to the Binky gods.
Looks like it will fit ok. Thank god for slotted holes tho..
Outside patch panel made. I'm using the masking tape trick in which you cover the hole with masking tape and run a dirty glove finger around the edge. This leaves an imprint of the edge on the tape. You pull the tape off the part and cut away the excess and as you fold out the tape onto your sheet stock you get a perfect pattern of the piece you need to make.
The outside panel got a capture nut too but I forgot to take a photo of that in the excitement of things moving forward and going quite well.
First test fit ! The front upper edge of the seat has come down 70 mm or almost 3 inches and makes the seat sit more upright. This makes me able to push the seat back another 50 mm or two inches because the top of the seatback doesnt hit the firewall as early as before. Success !!
looks like those seat will now sit just like you wanted. The guy who sold you those seats go real defensive about you saying they didn’t fit, which i didn’t really understand.
it didn’t seem to me like you were saying that, but my feeling is he should be marking these as fitting in a 914, because they don’t without some significant modification.
it’s not like everyone has the ability or skill to do what you are doing here.
Anyway, i do like those seats, do they interfere with the E-brake function?
Phil
QUOTE(falcor75 @ Apr 21 2020, 08:55 AM)
Good question Spoke. The original material wasnt very thick, 0,8-0,9 mm (20-22 gauge) and I'm making the filler pieces from 1,5 mm (thats about 15 gauge?)
Welded in a capture nut on the underside as an offering to the Binky gods.
Looks like it will fit ok. Thank god for slotted holes tho..
Outside patch panel made. I'm using the masking tape trick in which you cover the hole with masking tape and run a dirty glove finger around the edge. This leaves an imprint of the edge on the tape. You pull the tape off the part and cut away the excess and as you fold out the tape onto your sheet stock you get a perfect pattern of the piece you need to make.
The outside panel got a capture nut too but I forgot to take a photo of that in the excitement of things moving forward and going quite well.
First test fit ! The front upper edge of the seat has come down 70 mm or almost 3 inches and makes the seat sit more upright. This makes me able to push the seat back another 50 mm or two inches because the top of the seatback doesnt hit the firewall as early as before. Success !!
I love your seats! Great work.
Looks great, Mats. Nice welds, too! 
Perfect job Matt's !¡ may replicate your hard work into our build Need to see what our mounting kit looks like first...when the seat order goes down.
Marty
Need to see what our mounting kit looks like first...when the seat order goes down.Marty
QUOTE(eric9144 @ Apr 21 2020, 05:17 PM)
QUOTE(falcor75 @ Apr 21 2020, 05:55 AM)
Success !!
Lets see more of those seats!
@eric9144
There are some more pictures on page 17 in this thread.
Yes saying they fit in a 914 is technically correct but they are not bolt in and to get them to fit well you either need to remove the backpad or do some mods of your own.
The seats do interfer slightly with the handbrake, but it still works. It still remains to be seen how well now that I adjust the drivers seat position aswell.
The seats do interfer slightly with the handbrake, but it still works. It still remains to be seen how well now that I adjust the drivers seat position aswell.
Click to view attachment
Polished up my old crusty gas cap yesterday and though it would be cool to upgrade it a bit. So I edited an old file i had of the Porsche crest and scaled it to fit on the top surface and asked the lady manning the laser etching machine at work to have a go.
Turned out great !
Click to view attachment
In place on the car, aligned so the point of the crest points forwards with the cap in the closed position.
Nice gas cap. That would be one heck of a product for someone to make.
QUOTE(Spoke @ Apr 22 2020, 09:18 PM)
Nice gas cap. That would be one heck of a product for someone to make.
I dont think making stuff with the Porsche crest on it would be very poular seen from Porsches viewpoint. One would get a cease and decist pretty quickly.
Well I just found that the drivers seat fits with the e-brake handle in place but there isnt any space to lift the handle. So I will need to make my own bracket and move it forwards along the side rail. Does anyone have a spare e-brake wire to donate or sell me? That way I could just use two of the short wires to lengthen system.
QUOTE(falcor75 @ Apr 23 2020, 01:09 PM)
Well I just found that the drivers seat fits with the e-brake handle in place but there isnt any space to lift the handle. So I will need to make my own bracket and move it forwards along the side rail. Does anyone have a spare e-brake wire to donate or sell me? That way I could just use two of the short wires to lengthen system.
Maybe modify the seat upholstery to be similar to the 914 driver seat cutout. On a 914 seat, it's just a slice of foam off the outside of the seat base.
Or center tunnel mount the hand brake, but that is a bit more involved than a seat cushion slice of some padding.
QUOTE(914forme @ Apr 23 2020, 01:16 PM)
Or center tunnel mount the hand brake, but that is a bit more involved than a seat cushion slice of some padding.
But a cool option that I'm planning for mine.
Jeff Hail's thread has a good photo tutorial on making a center handbrake.
I copied it, and later sold the copy. It uses the stock passenger side hand brake cable on both sides. Jeff's pictures make it easy to duplicate, and I added pictures also, in my EG thread.
This is a "lo-fi" version of our main content. To view the full version with more information, formatting and images, please click here.