SirAndy
Feb 25 2012, 05:48 PM
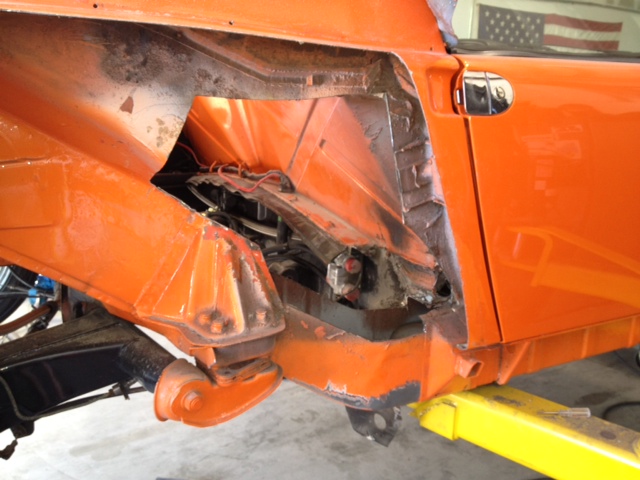
That's an awful lot of alignment shims there.

I'd check the trailing arm to see if it's bend.

ellisor3
Feb 25 2012, 06:55 PM
QUOTE
I'm going to need that code.....
House of Kolor PBC32.Q01
http://shop.houseofkolor.com/hok/store/pro...?productId=4280Not sure which clearcoat was used, I will check.
sixnotfour
Feb 26 2012, 02:57 PM
QUOTE
I've gone through a lot of underwear during this build!!
That is the best quote to date...sad but true and frigging hilarious

the camber shim stack , you can probably twist the whole body section. At this point.
Series9
Feb 26 2012, 04:55 PM
Metal has been ordered from Restoration Design.
I'm going to have to create some of it. More next week.
Series9
Mar 24 2012, 01:12 PM
After more than three weeks of moving the shop, it's time to get back to Porsche work.
Here are James' pieces from Restoration Design:
Series9
Mar 24 2012, 02:35 PM
I stabilized the car and removed a little more metal.
Series9
Mar 24 2012, 02:37 PM
I then started to make the rough cuts on the replacement piece. This takes time to make the patterns to get it right. It's now roughed in. Tomorrow, I'll start making the little trims that will get it in place.
Madswede
Mar 24 2012, 04:27 PM
Major surgery to remove cancerous rust ... looks like it's going well, prognosis is optimistic at this stage.

ellisor3
Mar 24 2012, 07:29 PM
QUOTE(Madswede @ Mar 24 2012, 06:27 PM)

Major surgery to remove cancerous rust ... looks like it's going well, prognosis is optimistic at this stage.
My ulcer says otherwise.

FourBlades
Apr 1 2012, 12:31 PM
Wow that is a drag to have to open that all up.
Better to do it this way than find out at Daytona on the banking...
Joe will have it better than new.

John
Series9
Apr 5 2012, 09:59 AM
Look, metal where there was previously none. Because the top is open, I will be able to run beads inside the long as well.
This makes me happy:
Series9
Apr 5 2012, 11:52 AM
Welding the back of the seams wasn't too easy, but I got it done.
This picture shows the extent of the remaining work. I have to fabricate the top of the longitudinal. However, the piece that's finished is the foundation for everything else and I think it will end up being the hardest.
Series9
Apr 5 2012, 12:10 PM
I put the car down and rolled it around to let it settle.
Here are a couple of interesting observations.
The door will have to be adjusted, but the gap is much better.
Look at the back. It's now higher on the right. I think there was so much compliance in the body previously that someone installed all those alignment shims on the right just to level the car. There are no shims on the left. I'll pull the shims out and send the car for alignment.
ellisor3
Apr 5 2012, 12:17 PM
QUOTE(Series9 @ Apr 5 2012, 02:10 PM)
I put the car down and rolled it around to let it settle.
Here are a couple of interesting observations.
The door will have to be adjusted, but the gap is much better.
Look at the back. It's now higher on the right. I think there was so much compliance in the body previously that someone installed all those alignment shims on the right just to level the car. There are no shims on the left. I'll pull the shims out and send the car for alignment.
Funny you should say that Joe, I had a hell of a time getting the ride height even on the front. I adjusted one side on the front almost all the way up and the otherside almost all the way down. Everytime I bounced the car, it was wrong again.

The back did not need much adjustment once the front was correct. I am sure all those shims and the compliance were the problem. I guess I will have to start with the ride height again.

Looks great Joe
Series9
Apr 6 2012, 08:59 AM
Rough-in on the upper wheel house metal:
Series9
Apr 8 2012, 01:06 PM
The upper wheel house trimming is finished and it's tacked in. Friends came over and made me have a beer, so that's all for today.
effutuo101
Apr 8 2012, 03:17 PM

Very nice work!
Series9
Apr 13 2012, 09:29 AM
The wheel house is a single piece again.
effutuo101
Apr 13 2012, 09:36 AM
So pretty!
Series9
Apr 13 2012, 10:29 AM
QUOTE(effutuo101 @ Apr 13 2012, 11:36 AM)
So pretty!
I'm pretty happy with how things are going:
Series9
Apr 14 2012, 01:08 PM
Here is the first of about four pieces that have to be made from scratch to repair the top on the longitudinal.
This single piece took four hours.

ellisor3
Apr 14 2012, 01:25 PM
Very nice Joe. A lot more work than you thought. Huh?
Series9
Apr 14 2012, 02:11 PM
QUOTE(ellisor3 @ Apr 14 2012, 03:25 PM)
Very nice Joe. A lot more work than you thought. Huh?
Yes, but I'm going to honor your original labor estimate +metal + paint.
Series9
Apr 14 2012, 05:22 PM
Here's where we are tonight.
The top piece is cut and welded and the bottom piece is mocked up:
Series9
Apr 18 2012, 11:36 AM
First time on the lift after installation of the new wheel house.
The door gap used to become ugly when this chassis was in the air.
No longer:
JmuRiz
Apr 18 2012, 12:24 PM
Nice!
Mr. 5150
Apr 18 2012, 04:20 PM
Clean repair!
Series9
Apr 21 2012, 10:12 AM
The longitudinal is whole again:
Chris H.
Apr 21 2012, 10:16 AM
Nice work Joe you have incredible talent.
You make that look easy... having attempted something much less complicated I've learned IT'S NOT!
Series9
Apr 21 2012, 10:48 AM
Test fitting the engine shelf.
Since the top of the long was hand made, this is taking some massaging to get it fit up.
Series9
Apr 21 2012, 10:50 AM
QUOTE(Chris H. @ Apr 21 2012, 12:16 PM)
Nice work Joe you have incredible talent.
You make that look easy... having attempted something much less complicated I've learned IT'S NOT!
Thanks Chris. You just have to really take your time to trim and fit the pieces.
sixnotfour
Apr 21 2012, 11:02 AM
good work !!
Joe there is a thread somewhere and we alerted Restoration Design that they should make the piece, your pics I will add to the thread.
Series9
Apr 21 2012, 01:01 PM
The shelf is welded and seam sealed:
Series9
Apr 21 2012, 01:28 PM
This one's for James.
I'll have it fully welded by the end of the day:
tomeric914
Apr 21 2012, 02:13 PM
Nice work Joe. It takes a lot of hours to make it right.

Series9
Apr 21 2012, 02:44 PM
I'll grind it tomorrow. I'm tired.
Only the battery tray and one bottom piece to go. I'm giving it to the painter in 24 hours.
My plan is to deliver it at the Cinco de Mayo party.
ellisor3
Apr 21 2012, 10:46 PM
Looks fantastic Joe, to bad most of your hard work will never be seen again.
Series9
Apr 22 2012, 11:00 AM
I'm in the home stretch now.
sixnotfour
Apr 22 2012, 12:00 PM
Don't forget to take off the stupid -4 mount on the suspension console.
Unless you are using it ?
Series9
Apr 22 2012, 12:28 PM
QUOTE(sixnotfour @ Apr 22 2012, 02:00 PM)
Don't forget to take off the stupid -4 mount on the suspension console.
Unless you are using it ?
They've been gone since I did the engine conversion.
That's how I initially found the weak metal in this area.
sixnotfour
Apr 22 2012, 12:44 PM
I meant the one on the inside of engine compartment on the inner ear.
triangle shaped.
Series9
Apr 22 2012, 01:59 PM
Done.
It's already been moved to the paint shop.
ellisor3
Apr 22 2012, 02:50 PM
Sooo that repair will stop that crunching noise when I use that jackpoint???

Series9
Apr 22 2012, 02:52 PM
QUOTE(ellisor3 @ Apr 22 2012, 04:50 PM)
Sooo that repair will stop that crunching noise when I use that jackpoint???

Yes, it will.
Series9
May 3 2012, 07:12 AM
Here she is back from the painter:
JmuRiz
Nov 5 2012, 09:38 AM
I know this is an old thread, just wondering how that oil cooler setup is working in the real world?
Joe, how much would a setup like that cost?
MoveQik
Nov 5 2012, 01:38 PM
QUOTE(JmuRiz @ Nov 5 2012, 08:38 AM)
I know this is an old thread, just wondering how that oil cooler setup is working in the real world?
Joe, how much would a setup like that cost?
I have a similar set up on my car that Joe installed. I have one cooler instead of two smaller ones but the surface area is the same, with two fans installed as well. It has always worked just fine even in our AZ heat.
ellisor3
Nov 5 2012, 04:30 PM
QUOTE(JmuRiz @ Nov 5 2012, 10:38 AM)
I know this is an old thread, just wondering how that oil cooler setup is working in the real world?
Joe, how much would a setup like that cost?
It has worked very well. Temps get to about 220f in the dead of summer driving on asphalt. I don't remember the cost, I try not to, but it seems like the fans were about $180 each plus pluming and the oil tank.
This is a "lo-fi" version of our main content. To view the full version with more information, formatting and images, please
click here.