JRust
May 18 2019, 05:27 PM
QUOTE(flmont @ May 18 2019, 03:22 PM)

Thats pretty sweet Jamie, I put my ECU behind the back pad on Pass.side,I just had to cut off a little piece of the Masonite looking backing at the very botom , It tucked in nicely,..
Yeah I'm not sure on my ECU yet. I'm thinking it may be in my new center console. Which I need to build once I figure that out. LOL
Costa05
May 18 2019, 06:19 PM
Looks great Jamie. Glad to see you posting progress again. Engine bay looks amazing.
76-914
May 18 2019, 08:12 PM

Keep the hammer down and don't let up.

dan10101
May 18 2019, 09:37 PM
Jamie, This is looking excellent!
Hope to see you at WCR
effutuo101
May 19 2019, 02:11 PM
Looking good Jamie!
I went to the zero decibel stuff. Much tighter than before! Love it.
JRust
May 19 2019, 04:17 PM
Okay I've got an pair of dual 8" fans to run for my intercooler. Do you guys think on top pulling air north to south? Or pulling air south to north? Or on fan on top & one on bottom doing one of each
JRust
May 19 2019, 04:44 PM
Also I've got a newly chromed early bumpers I will be putting on. My bumpers are in great shape but this gets rid of the holes for the bumper tits. Plus these bumpers are just plain pretty.
JRust
May 25 2019, 06:56 PM
Got the car up on jackstands to do my hydraulic clutch. I've got the bracket in place already. The hole I drilled was a bit off unfortunately from last year. I went & got some die grinder stuff. Just finished boring out the hole. Got my MC sitting there with my Hydraulic line done. Just need to bolt it in place, add fluid & bleed. Need to do my brakes as well. So glad I've got extra fuel line hose. Able to just have my gas tank sitting up top. I didn't have a ton of gas in the tank but still nice not having to drain it.
Also took off my rear trunk panel. This was done really well. I am more happy with it every time I see it.
JRust
Jun 1 2019, 06:46 PM
Okay clutch MC is in place. You'd think I have more time on the weekend but literally had an hour today. It is bolted in place & the line finished all the way back. Just need to decide how I am mounting the reservoir. Kinda figuring just next to the brake. Just not sure how I am going to mount it there? Then on to bleeding both the Clutch & Brakes
Andyrew
Jun 1 2019, 07:44 PM
What's the reservoir look like? I thought about next to the brake but it would take a bit of work . Probably be able to fab a bracket and bolt it to the brake mount.
Chris914n6
Jun 1 2019, 08:55 PM
JRust
Jun 1 2019, 10:58 PM
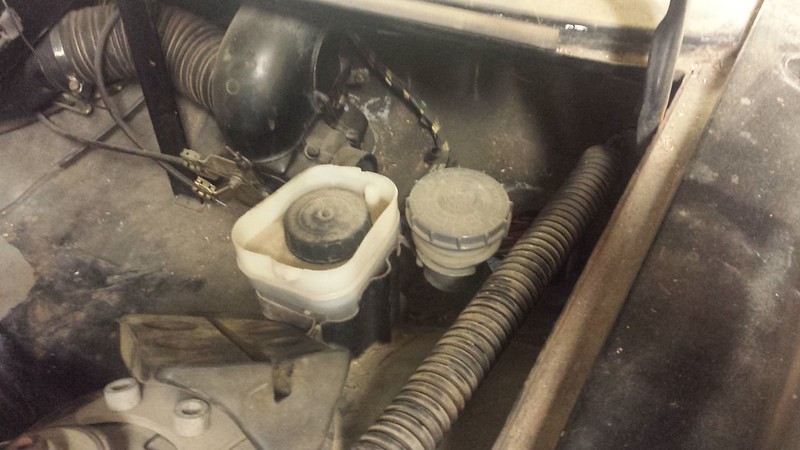
Here is the reservoir. It will sit there just fine. Just need to make a mount. Really should be no big a deal. Just a bracket coming off the Brake reservoir mount.
BIGKAT_83
Jun 2 2019, 08:08 AM
I used a Wilwood remote mount on mine.
Click to view attachment
914forme
Jun 4 2019, 05:07 AM
Tilton three chamber, no leaks, a thing of beauty. Push on or AN fittings, not sure why people use anything else, except being CSOBs.
Do it right do it once never look back.
In my case do it right, do it three times because you don't like the first result, only to end up pretty close to what you started with, minus the significant time you spent to re-invent the wheel.

JRust
Jun 4 2019, 10:33 PM
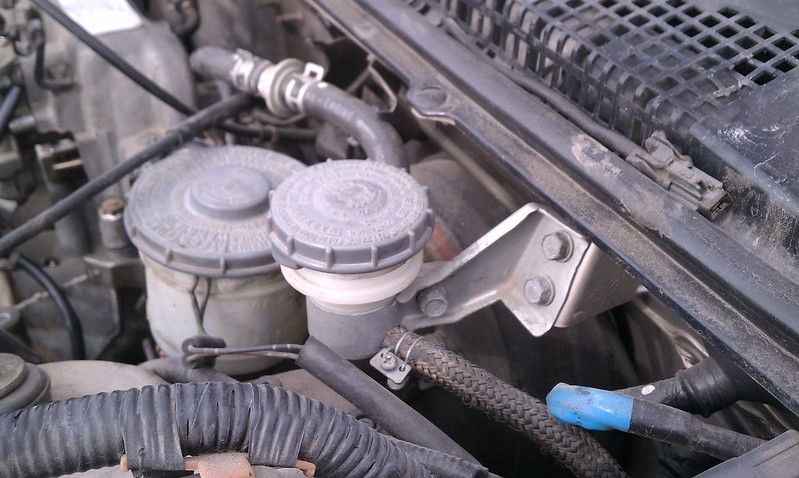
Okay Clutch MC reservoir is in place. I used a Wildwood remote one as well Bob. Just keeping it simple. It's solid & in a great spot. No clearance problems. I did add fluid to find I didn't have my line tight down below. SO it all leaked out on my floor

. Kitty litter to the rescue
JRust
Jun 6 2019, 07:29 PM
Found my line on the clutch MC wasn't tight. Think I knocked it loose trying to finagle it in with all the brake MC in place. It is super tight up there. Finally got smart & just took the brake MC lines off that were in the way. Oh so much better. Although the nut on the top of the clutch MC fell down inside my car. Somehow manage to get under the brake pedal cluster. Couldn't get it out so had to take the nuts off the brake MC. Pull that up & get the offending nut. You know what? With the plate for the Clutch MC. It is a serious Samuel L Jackson to get the pedal cluster lined up & back through the plate. Not to mention the MC all by yourself. After being ready to break shit I just dropped my tools & left the garage. I'm better off screwing around with it this weekend. Getting a buddy to come over & feed the pedal cluster bolts through while I am below.
JRust
Jul 3 2019, 09:27 AM
Finally got one of my scouts over to help me get my pedal cluster pushed back through. So both clutch & brake MC bolted in place. About lost my $hit trying to get my pedal cluster seated right & then go back under the car to get the bolts on. With the extra plate down there the bolts just didn't want to feed through without pressure on top while I put the nuts on. This weekend I will get them both bled.
Next is to put a heater core in the fresh air box I just got (Thanks Garold). Just need to figure out a good heater core that fits. Not putting my gas tank back in until I have that squared away. Was hoping to fire it up this weekend but at the rate I am going. I'll probably be screwing with that fresh air box heater core. Been so damn long not like another week is going to kill me
76-914
Jul 3 2019, 10:58 AM
Better some progress than no progress.
2mAn
Jul 3 2019, 12:07 PM
so close!
Andyrew
Jul 3 2019, 03:22 PM
Putting a heater core in during the middle of summer???
Someones crazy... Get it on the road and put some test miles on it!
JRust
Jul 3 2019, 09:15 PM
QUOTE(Andyrew @ Jul 3 2019, 02:22 PM)
Putting a heater core in during the middle of summer???
Someones crazy... Get it on the road and put some test miles on it!
I just don't want to pull my damn tank again. Otherwise I wouldn't bother with it
theer
Jul 3 2019, 10:29 PM
QUOTE(JRust @ Jul 3 2019, 11:27 AM)
Next is to put a heater core in the fresh air box I just got (Thanks Garold). Just need to figure out a good heater core that fits.
![popcorn[1].gif](http://www.914world.com/bbs2/style_emoticons/default/popcorn[1].gif)
I’m interested in doing the same thing on Grey Matter. I’ll be watching for updates. I was going to try a heater core from the original Mini’s. They are teeny-tiny and cheap!
Andyrew
Jul 4 2019, 08:01 AM
QUOTE(JRust @ Jul 3 2019, 08:15 PM)
QUOTE(Andyrew @ Jul 3 2019, 02:22 PM)
Putting a heater core in during the middle of summer???
Someones crazy... Get it on the road and put some test miles on it!
I just don't want to pull my damn tank again. Otherwise I wouldn't bother with it
Hood off, wratchet strap and ceiling joist and 30 mins and you can pull it yourself if it's empty... Just saying

76-914
Jul 4 2019, 08:39 AM
Same process but a pair of vice grips on each end. Very quick and easy to pull. C'mon Jamie. Get that thing a rolling!

JRust
Jul 24 2019, 12:42 PM
Was out trying to bleed my clutch MC last night. Picked up one of the hand vacuum bleeders. Even had the wife out to pump the pedal some. Just didn't get much of anywhere. Pedal won't return all the way. In back watching the clutch move it doesn't move much. Figured I need to extend my MC bolt so it will engage. I had finally found a longer clevis joint. Not long enough as I need about another inch of length. Going to get a deep nut with a stud & give that a while
Nut
76-914
Jul 24 2019, 01:14 PM
QUOTE(JRust @ Jul 24 2019, 11:42 AM)
Was out trying to bleed my clutch MC last night. Picked up one of the hand vacuum bleeders. Even had the wife out to pump the pedal some. Just didn't get much of anywhere. Pedal won't return all the way. In back watching the clutch move it doesn't move much. Figured I need to extend my MC bolt so it will engage. I had finally found a longer clevis joint. Not long enough as I need about another inch of length. Going to get a deep nut with a stud & give that a while
NutJamie, after you confirm that the long nut (aka rod socket nut or coupling nut) PM me with the length of the rod that you need and I'll make you one.
Andyrew
Jul 24 2019, 01:39 PM
QUOTE(JRust @ Jul 24 2019, 11:42 AM)
Was out trying to bleed my clutch MC last night. Picked up one of the hand vacuum bleeders. Even had the wife out to pump the pedal some. Just didn't get much of anywhere. Pedal won't return all the way. In back watching the clutch move it doesn't move much. Figured I need to extend my MC bolt so it will engage. I had finally found a longer clevis joint. Not long enough as I need about another inch of length. Going to get a deep nut with a stud & give that a while
NutI had to do this as well. Also note that the power bleeders are pretty much the only way to get them bled. The vaccum bleeders dont seem to do anything in my experience. I found it needed to cycle the pedal while it was bleeding with the power bleeder to really get it going and its taken me about 4 times. Im sure I still have air in it though
9144me2enjoy
Jul 24 2019, 07:43 PM
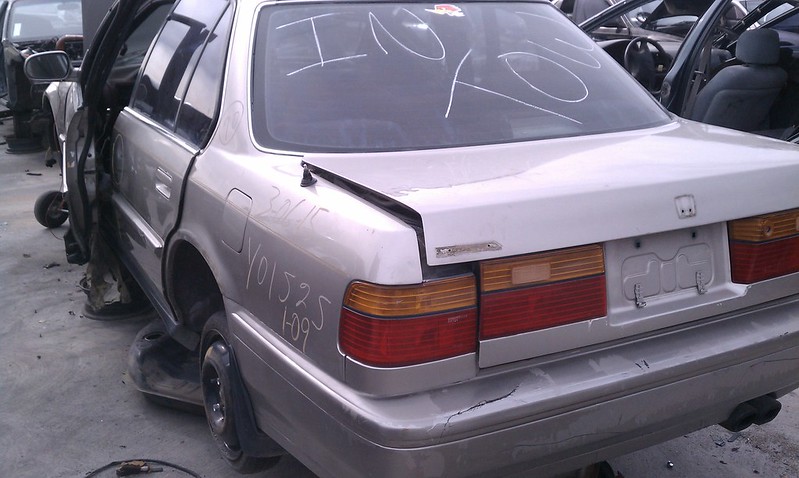
Jamie its been awhile, I keep getting out of the 914 business and somehow one keeps following me back home! Your car looks beautiful, looks like you’ve came a long ways on this Suby implant, looking great! I’m still in Eugene, I suppose your still up by Corvallis off I-5. If you need some help let me know. Let’s get together sometime. Later Roy
JRust
Jul 24 2019, 11:31 PM
Hey Roy I actually bought a place in Albany. I'm even closer to I5 now. LOL! Your 914 looks great man. We definitely need to get together.
JRust
Jul 29 2019, 10:47 PM
Here was my solution of extending my clevis joint so it was long enough. Still adjusting back & forth trying to get the right length. Gave up on it tonight. Such a tight spot to changing things. I put it on & off multiple times. It is really close but I couldn't quite get the locking pin through. Figured if I let it go tonight it will go on easier tomorrow night
JRust
Aug 24 2019, 09:28 PM
Made quite a bit of progress today. Got my clutch bled & my brakes. Installed my new early bumpers (Thanks Oscar). Got all my fluids in & almost everything connected. I've got some adjusting to do on my shifter cables. Missing one of the cool little dbl sided female that connects 2 bolts. Not sure I'll find one locally. It's for one of shifter cables on the Zero Decibals bell crank shift linkage.
I also need to order a new throttle cable. In filling up my radiator. I found I've got a water leak somewhere at the motor. Dripping down around the water pump. Got it back down on all 4's before I noticed. Been a long day so I didn't feel like jacking it back up so I could figure out for sure where the hell the leak is. I'm sure missing my lift.
Beside the water leak I am ready to start my car for the first time in damn near 3 years. I gotta admit I could go down & try tonight. I am absolutely terrified to do it though. So I'm putting it off until tomorrow afternoon
Robarabian
Aug 24 2019, 09:29 PM
WOW!! Great job! Looks awesome! can't wait to hear how it runs.
JRust
Aug 24 2019, 09:31 PM
Early rear bumper
dan10101
Aug 24 2019, 10:12 PM
JRust
Aug 24 2019, 10:35 PM
QUOTE(dan10101 @ Aug 24 2019, 09:12 PM)
That is some good inspiration
Andyrew
Aug 24 2019, 11:35 PM
Chris H.
Aug 25 2019, 07:53 AM
All worth the wait. You’ll see when you drive it. It looks great Jamie. Crank that sucker up!
Btw you need to add a “t” to that 2.5 badge.
JRust
Aug 25 2019, 02:52 PM
QUOTE(Chris H. @ Aug 25 2019, 06:53 AM)
All worth the wait. You’ll see when you drive it. It looks great Jamie. Crank that sucker up!
Btw you need to add a “t” to that 2.5 badge.
I actually need to change it to a 2.0T
9144me2enjoy
Aug 25 2019, 02:57 PM
Jaimie looks really impressive, I would have to drive yours first but I think I would trade you straight across! Smile
Chris H.
Aug 25 2019, 03:34 PM
Hey Jamie BTW did you end up using that Renault Alpine rad? If so it would be great to see some pics when you get a chance.
JRust
Aug 25 2019, 04:31 PM
QUOTE(Chris H. @ Aug 25 2019, 02:34 PM)
Hey Jamie BTW did you end up using that Renault Alpine rad? If so it would be great to see some pics when you get a chance.
I haven't done anything with that yet Chris. MY current setup works & as intrigued as I am with finding a smaller setup. I'm not screwing with it until winter
Chris H.
Aug 25 2019, 04:41 PM
That makes sense. Did you START it yet????

Costa05
Aug 25 2019, 05:01 PM
Inspiration for all of us Jamie! Looks great. I could use your old 2.5 badge.
JRust
Aug 25 2019, 06:20 PM
Okay I went down to try & fire it up. First I turned it over a few times without my fuel pump connected to get the oil flowing a bit through the motor. Then hooked up the fuel pump to give it a try. Turned the key a few times to cycle the pump without turning it over. Then went for it & turned it over. It did not start or even cough. Just turned over. I only tried it a few times. Tonight wasn't my night to work on it. So didn't go through to check for spark or fuel. I'll get back to it another day this week. Wish the news was better but i'm glad it isn't worse
 No start video
Chris H.
Aug 25 2019, 09:19 PM
Well at least you tried. You'll figure it out. It's usually something simple.
Andyrew
Aug 25 2019, 09:49 PM
It does turn over well
gotta consider the positives.
Fresh gas?
JRust
Aug 25 2019, 10:12 PM
QUOTE(Andyrew @ Aug 25 2019, 08:49 PM)
It does turn over well
gotta consider the positives.
Fresh gas?
Yeah I got the non ethenal good stuff. Only got like 4 gallons in a can to add.
dan10101
Aug 25 2019, 11:38 PM
A couple things to check in no particular order...

See what codes the OBDII is telling you.
The Vehicle Anti Theft System may need to be bypassed or disabled.
Some cars have collision systems that disable the fuel pump.
Check for spark.
Hot wire the fuel pump (add an inline fuse so all your hard work doesn't go up in smoke).
Spray some carb cleaner in the intake. (avoid the MAF) Maybe a vacuum line on the engine side of the MAF.
That's all I got for now. Hope this doesn't send you off in the wrong direction.
dan10101
Aug 25 2019, 11:47 PM
Sorry, I don't know your troubleshooting skills. So you're probably staying up at night diagnosing your no start.
Well, I just watched the no start video. Was that the fuel pump I heard clicking?
i think I would start with spark.
If you're getting spark, then I would look at finding a way to spray some carb cleaner in a vacuum port on the intake. If it tries to start even a bit, then look at fuel delivery.
Maybe 4 gallons isn't enough for the fuel pump to pick it up?
Internal or external pump?
pploco
Aug 26 2019, 07:55 AM
What's that clicking when you turn the key? Also, can you hear the fuel pump?
This is a "lo-fi" version of our main content. To view the full version with more information, formatting and images, please
click here.