They do not fit. The 012 tranny either comes in 100mm or 130mm CV configuration. If you could get the bearing and spacer that comes on the 012 stub, you could "fit" them on the 466, 108mm stub and pop them in the 012 tranny. The stubs are the same (almost) just missing a circlip and the above parts.
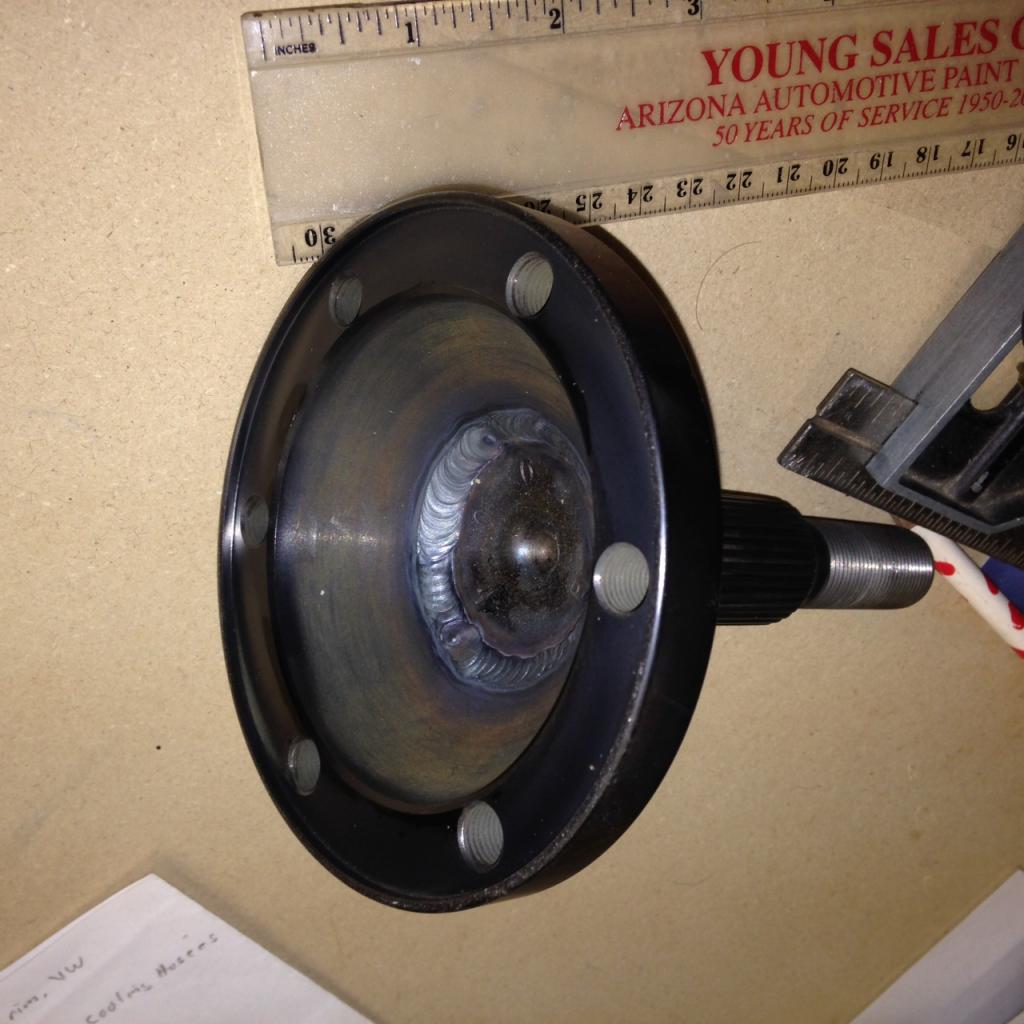
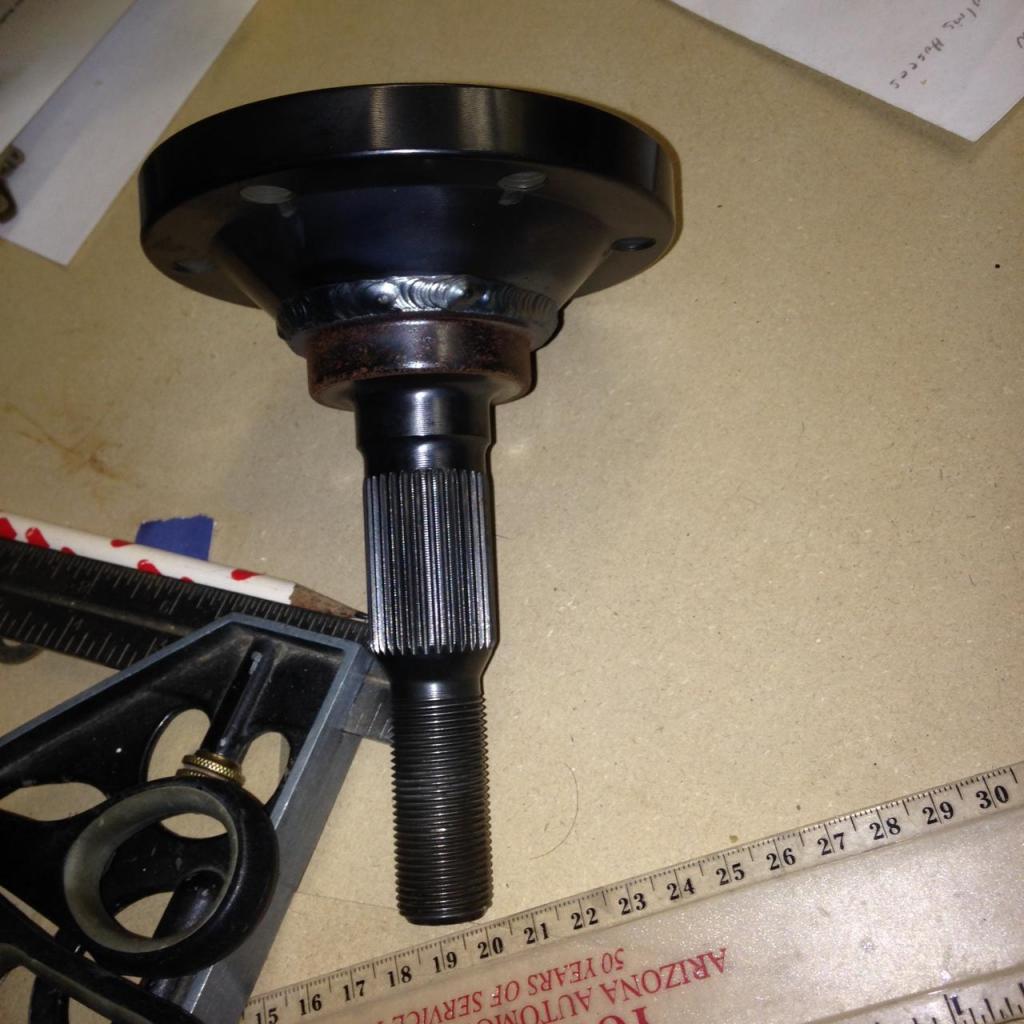
I instead machined down the 130mm stubs in a lathe. I bough some 94mm-108mm adapters from Patrick Motorsports. Designed for 914's tp use 930 CV's. I welded and spun to make sure they are true.
I have a set of 100mm stubs to use 944 CVs just in case.
Here are some dirty picks.. You can see the mounting holes used to mount on the 914 stub, they serve no purpose here. Big fat chamfered, layered weld holds everything together. It took a long time to get them tacked up true but they work very well.
Click to view attachment
Click to view attachment
Click to view attachment
Full Version: Sasquatch Part III Audi 1.8t transplant...
Mike,what about something like this ? I did this for another project.
Randy
Randy
QUOTE(914GTSTI @ Feb 22 2015, 07:07 PM) 
Mike,what about something like this ? I did this for another project.
Randy
If the welds are good I suppose it would work.
Ok, thanks.
I swapped out the 6 speed for my 5 in order to prep the 6 for some Dr. Evil love. The 5 went in without problems, or so I thought. I could not get the clutch to disengage after the install. I tried to bleed the system to no avail. I even purchased a new master and slave (I was wanting to do this anyway). The master I had at 5/8" bore was a little small. The new one is .875 bore to match the new slave. The stock slave was plastic my new Dorman is cast iron. I just like iron better.
The new master and slave would still not disengage the clutch so I new it was time to pull the tranny and see what's doing. I spent all day, 10 hours, trying to pull the tranny away from the motor. It would not move more than 1/4". WTF? In a move of desperation I cut a hole in the bellhousing with a 2" hole saw to access the clutch retainer bolts. I removed the 6 bolts by spinning the motor and the tranny fell out (almost) on to my jack and the unit easily was removed. I cut the hole on the top of the housing away from any case webbing. Hopefully it will hold up for a while. The Passat 012 trannys are cheap to replace so I wasn't too concerned and one day the 6 speed will go back in.
I could not slide the disc off the shaft at all. It would not move. I had to use a puller to dislodge it. Once loose it was clearly galled and boogered up. My SPEC stage 3 pressure plate took some collateral damage from the hole saw so I went to flaps and bought a LUK unit to run for the time being.
I'm not sure how I fucked up the disc going in but I did use the alignment tool and it seemed to slide in good. Oh well... Tomorrow the car goes back together and I hope to be driving it before the end of the day.
Here are some glory pics...
Click to view attachment
Click to view attachment
Click to view attachment
Click to view attachment
Click to view attachment
 Mike. That don't add up? You could slide the pilot shaft in thru the disc with ease yet they seized upon each other? I'm thinking alignment issue but how would it have slid in if it were that?
 ![popcorn[1].gif](http://www.914world.com/bbs2/style_emoticons/default/popcorn[1].gif)
Well that is nuts... I wouldnt hesitate to give Spec a call and ask them if they have ran into this issue. Maybe they'll send you a new unit, who knows..
This was the first time you tried running the 5 speed since you swapped it back?
I have a v6 FWD trani hooked up to my 2.8 v6 in my shed, I think it'll bolt on if for some reason you buggered up your trani bad and want to get it back on the road while your 6 speed is down. I just ask that you return it when you get your 6 speed installed
More background...
The SPEC Stage 3+ clutch came in the donor car. It has worked flawlessly. When I pulled the 6 speed I inspected the copper composite disc. It was glazed and burnt a little. When I compared it to e LUK organic disc I had, the copper unit was noticeably worn. I installed the LUK disc without inspecting it or trying it on the main shaft. It was new and I assumed...
The Spec pressure plate was damaged while cutting into the tranny. I bought a new LUK assembly; Disc, Plate, TO bearing, pilot bearing. I am going to order a new HP unit but this was to get it on the road. Hopefully it will last until after WCR.
This time I slid the disc on the main shaft and it slid perfect. I installed all the new parts and use the supplied lube on the splines. This time the tranny practically fell into the car. A couple wiggles by hand an the tranny seated flush with the motor. I reassembled the car and took it out for two drives today. The first run I jumped on the freeway and the clutch slipped bad. I melowed the throttle and came home to read the breaking instructions this time. Looks like I need 500 miles of stop & go traffic before I can get into the boost.
The second run was about 25 miles around Danville and Blackhawlk. The car is running great. It did go into limp mode once and came back with an O2 code. I restarted, cleared the code and kept driving. No other problems. When I got home 10 miles later, I checked the WB/NB switch I have to the ECU and the connections look suspect. I'm going to remove the switch and WB/NB converter bot and discard it. My ECU was dyno tuned to the NB signal and I don't need this extra circuit. I have a WB sensor still with my Haltecth controller and Innovate gauge. This signal was pushed to the adapter. It converts the WB 5V+ signal and scales it down the NB voltage. It theoretically gives you a WB signal at NB voltage. Since the tuner went with the standard NB signal, I don't need it. My ECU would need to be modified to WB to use the 5V signal.
I think the first new disc was messed up I never tried it before installation so I will never know for sure. Now I have a 2" inspection port on top of the tranny.
I plan to pick up a new flywheel too along with my new clutch. I'm very happy with SPEC and have use one ion the turbo rotary without issues. I may go with a new one again. There are so many to choose from with different weights. The one I have now is 11lb (said the PO). I haven't measured it but it looks smoked and blued. The DAPO told me he had to slip the clutch to prevent stalling. I have had no issues with stalling but my car is 1000+ lbs lighter than the donor. With this flywheel, I can let the car roll forward in 1st gear with out it being jumpy at low or no throttle. I thknk the weight is perfect for the chassis/engine combo.
Well the stock clutch isnt very strong but it should hold 200hp just fine. I would dial your boost back to 10psi but give it a good couple hundred miles of stop and go like you would any other new clutch.
I love my 16lb spec flywheel. Stock is like 23lb or more.
I love my 16lb spec flywheel. Stock is like 23lb or more.
QUOTE(Andyrew @ Mar 29 2015, 09:26 PM)
Well the stock clutch isnt very strong but it should hold 200hp just fine. I would dial your boost back to 10psi but give it a good couple hundred miles of stop and go like you would any other new clutch.
I love my 16lb spec flywheel. Stock is like 23lb or more.
I can't dial my boost. I would need to install a MBC. My ECU keeps it at 20psi. I got about 60 miles on it today just tooling around. I can feel the clutch gripping a little better but I'm well over the 200hp mark. I think it will last a month or two.
I pulled out the O2 adapter and got another 22 miles on the car without throwing any codes. My car is running great right now. I am going to trailer it to WCR just in case...
Why not just grab a bleed type boost controller (like $40 bucks on ebay?) and run that... Your ecu will adjust just fine. 20psi should make you close to 325 on pump. Certainly enough to glaze that clutch really fast. Or just put a vaccume line to your wastegate actuator and run off the wastegate.. at least till your clutch is broken in.
QUOTE(Andyrew @ Mar 29 2015, 10:02 PM)
Why not just grab a bleed type boost controller (like $40 bucks on ebay?) and run that... Your ecu will adjust just fine. 20psi should make you close to 325 on pump. Certainly enough to glaze that clutch really fast. Or just put a vaccume line to your wastegate actuator and run off the wastegate.. at least till your clutch is broken in.
Not a bad idea. My WG spring is 10psi. I can just plug the pressure line at the solenoid.
I was recently at a 914 swap meet in San Jose. I bought a tow bar setup for $20. The bar looked like it needed some bracing and stiffening. 8' of 1/2" DOM later and it's ready to go to the powder coater.
Then I turned my attention to the bracket. Clearly home made and in need of work. It mounts to the suspension points like any other but My car is too low and it will never work. BTW, for those following the adventure, my car died when I got home from the swap meet. I found a bad fuel pump relay was the cause.
Measuring my tow vehicle, the hitch is 19" off the ground. With the tow bar flat, the ball cup is 6" off the ground. A difference of 13" places the bracket mounts into the lower section of my bumper. This should make the tow bar level while towing.
Click to view attachment
So I pulled the bumper and valence and was reminded of how ugly the front end is. The PO really cut a huge hole in the front for air flow. Too big really. I think it might be time to overhaul the cooling system. I always hated how much space is lost up front. Al at Parts Heaven is hooking me up with all the Boxster pieces I need to make a big change. I also need to down size my oil cooler to suit as well. You can see how big my setup is. The oil cooler is sitting on top of the gas tank in this pic. Black paint was too cut down on reflection through the grill.
Click to view attachment
13" ends up just above the access holes. (plug missing on right) I need to get the radiator out and build reinforcements. I need to get all the parts before I decide on a final design and fabrication. The hacked hole looks terrible. I may have to section a piece from the parts car in my side yard.
Click to view attachment
Pretty cool about the tow bar!
I've been deciding on radiator setup as well. Thinking about a Sciracco radiator or a vw golf MK2 radiator..
Looking for something dual core and that has a A/C condenser that could fit.
http://www.ebay.com/itm/Fit-For-VW-Golf-2-...604&vxp=mtr
This is on my short list..
This is on my short list for a AC condenser 06 mini cooper
http://www.carparts.com/details/Mini/Coope...64-d402804d0e79
Got an evap built in.
Here is a workup I made for the radiator front pocket where I was going to put all the stuff for my setup.
If the 2 of you are considering radiators, take a look at the Celica, and the MR2 radiators as well. Some of the cores are 52mm, and appear to be close to a perfect fit. The MR2's are slightly larger, and you can find them with fan shrouds, and black fans. The Celica rads also can be found with shrouds and fans, but you settle for blue or red (cheesy IMHO) fans the that case. Fan and shroud can be found for less than the radiator alone that Andy posted a link to...
QUOTE(dakotaewing @ May 24 2015, 07:10 PM)
If the 2 of you are considering radiators, take a look at the Celica, and the MR2 radiators as well. Some of the cores are 52mm, and appear to be close to a perfect fit. The MR2's are slightly larger, and you can find them with fan shrouds, and black fans. The Celica rads also can be found with shrouds and fans, but you settle for blue or red (cheesy IMHO) fans the that case. Fan and shroud can be found for less than the radiator alone that Andy posted a link to...
Wow. The MR2 is a great fit! I will have to consider it. And, I can almost buy 3 for the price of Andyrew's Corrado radiator.
The one I posted was just the longest one I could find
The MR2 radiator sure looks like an interesting option Has a condensor that looks like it could fit as well....
Hmmm....
The lines look like they are made for the radiator to be tilted back a bit. This could work well to fit the radiator closer to the front.
The MR2 radiator sure looks like an interesting option Has a condensor that looks like it could fit as well....
Hmmm....
The lines look like they are made for the radiator to be tilted back a bit. This could work well to fit the radiator closer to the front.
Most of the images appear to be posted upside down for most of the radiators for the Celica and MR2. My calculations indicated that both radiators would fit vertically, and do so forward of the back of the headlight boxes.
I'm using the Celica radiator. It fits well.
Celica Rad
Get the fans and shroud if you go that way.
Mike, no wonder that thing never even comes up to temp. Sheeeeesh that's a lot of cooling area!
Celica Rad
Get the fans and shroud if you go that way.
Mike, no wonder that thing never even comes up to temp. Sheeeeesh that's a lot of cooling area!
Those cheap radiators scare me.. I mean they dont even know if they are a 3 row or 2 row! (God forbid if they are a 3 row...)
Im sure they would cool 1.8L just fine, Its just a fear of mine that they are total crap... The Mishimoto is a big company but they dont have a great reputation as a good radiator company.
Im sure they would cool 1.8L just fine, Its just a fear of mine that they are total crap... The Mishimoto is a big company but they dont have a great reputation as a good radiator company.
QUOTE(Andyrew @ May 25 2015, 12:04 PM)
Those cheap radiators scare me.. I mean they dont even know if they are a 3 row or 2 row! (God forbid if they are a 3 row...)
Im sure they would cool 1.8L just fine, Its just a fear of mine that they are total crap... The Mishimoto is a big company but they dont have a great reputation as a good radiator company.
And.... Those are the most expensive of all the radiators!
Yup. I might try one of the cheap toyota radiators but I think if I start to heatsoak I am going to go with a dual pass VW alum radiator.
http://m.ebay.com/itm/180901154597?txnId=1359740751008
Grabbed this one, tried to offer him a bit less but no go.
Ill be replacing the fans and giving the radiator setup a trial to see what it can do. If it ends up being junk Ill open up the ends to see how the core is made. Ill post in my thread when it comes in and give real dimensions and such
Grabbed this one, tried to offer him a bit less but no go.
Ill be replacing the fans and giving the radiator setup a trial to see what it can do. If it ends up being junk Ill open up the ends to see how the core is made. Ill post in my thread when it comes in and give real dimensions and such
I've been running a Turbo MR2 radiator and fans for 8-9 years now.
The car runs at 200-210* town and highway all day long. It will sit on the higher side(210) at night when the air is coolest and dense. I do have large silicone heater hoses(1.25) on feed and return so there may be some reduced flow velocity.
Most of what I've been able find says this engine in factory/mild tune likes 205*.
I am considering putting in A/C so a condenser will be a pre test of the air flow at some point while I consider trunk clean up as well.
Fabrication started in earnest today. Both the new oil cooler and new radiator have found their place. I added some 3/4" .120 wall DOM tubing from the shock tower to the front. I have a 1.5" square tube sectioned and welded to the top of the forward suspension points and !/4" plate welded to that to pick up the load of the tow bar. The DOM ties the from the shock tower to the 1/4" plate. This should also stiffen up the front end since the PO cut massive holes in the inner fender well. I'm sure things have been flexing under load. I will add some more gussets before I feel comfortable with the strength of the tow bar setup.
Click to view attachment
Click to view attachment
Click to view attachment
The celica radiator is a great fit between the headlights. I started to fab the shrouding too. I started with a 16ga floor with a bend to match the radiator bottom angle. 14mm holes locate the radiator in the floor. I then cut some 14ga scrap steel that had a perfect 90° in it to seal on the radiator. 914 Rubber supplied a seal (rear window to engine lid) that will seal the radiator to the shroud. The shroud had to be fit around the DOM for a good air tight seal.
Click to view attachment
Once all the gusseting is complete, I will graft in a new nose from my parts car in the side yard. I need a new bumper too. I posted a WTB but hopefully I will find one at the swap tomorrow. It will look like a GT but the cut out will be taller to match my oil cooler and the tow bar cross brace will need clearance in the bumper too.
Click to view attachment
Click to view attachment
Click to view attachment
Click to view attachment
The celica radiator is a great fit between the headlights. I started to fab the shrouding too. I started with a 16ga floor with a bend to match the radiator bottom angle. 14mm holes locate the radiator in the floor. I then cut some 14ga scrap steel that had a perfect 90° in it to seal on the radiator. 914 Rubber supplied a seal (rear window to engine lid) that will seal the radiator to the shroud. The shroud had to be fit around the DOM for a good air tight seal.
Click to view attachment
Once all the gusseting is complete, I will graft in a new nose from my parts car in the side yard. I need a new bumper too. I posted a WTB but hopefully I will find one at the swap tomorrow. It will look like a GT but the cut out will be taller to match my oil cooler and the tow bar cross brace will need clearance in the bumper too.
Click to view attachment
Love the tow bar setup Mike! Been thinking of doing something similar
QUOTE(JRust @ Jun 6 2015, 07:33 PM)
Love the tow bar setup Mike! Been thinking of doing something similar
Yours kind of inspired me. Then I looked at the standard connection on my car and realized the tow bar would be dragging on the ground.

Looks great! Love the support and the radiator shroud is looking pretty good! Is that going to get welded in?
Im curious with the empty area below the lights if you considered going there with your oil cooler?
I am going to see about doing dual oil coolers under the headlights like maybe two small 3x6 coolers run in sequence. and remove the fog lights.
Im curious with the empty area below the lights if you considered going there with your oil cooler?
I am going to see about doing dual oil coolers under the headlights like maybe two small 3x6 coolers run in sequence. and remove the fog lights.
PS thats a nice looking welding blanket! Kevlar?
My space below the headlights is reserved for brake cooling ducts. I plan to run them from the fog light grills.
Yes the blanket is kevlar shielding my oil cooler line from flying sparks! I have two of them given to me by someone? Don't remember who.
Yes the blanket is kevlar shielding my oil cooler line from flying sparks! I have two of them given to me by someone? Don't remember who.
Gotcha. I've been contemplating brake cooling as well. I Figured I'd put a discrete duct under the front bumper or make the fog light opening a bit bigger.
More fun today.
Gussets and bracing done. bracket for oil cooler done. Shroud sides done. I even mocked up the gasket seal. I put some on the GT valence too. Looks like it will seal great!
Time to go cut the nose off my parts car...
Click to view attachment
Click to view attachment
Click to view attachment
Click to view attachment
Are you going to rubber isolate the oil cooler? Also is the rubber shroud the only isolation your using on your radiator?
What are you using for the rubber shroud? Looks pretty good...
What are you using for the rubber shroud? Looks pretty good...
QUOTE(Andyrew @ Jun 7 2015, 03:51 PM)
Are you going to rubber isolate the oil cooler? Also is the rubber shroud the only isolation your using on your radiator?
What are you using for the rubber shroud? Looks pretty good...
There is a urethane pad under the oil cooler. The mounting tab has a little built in flex to it as well.
You can see the bottom pan and locating holes. They sell isolating donuts for the locating pins. There will also be an undetermined gasket under it too. The sides are done. The 914 Rubber gasket is the pad and the seal.
There will also be a top plate with some kind of seal, still yet to be built.
Click to view attachment
Click to view attachment
Click to view attachment
Click to view attachment
It looks pretty good! You seem to be able to fabricate things much faster than me 
What size inlet hole are you going to be using?
What size inlet hole are you going to be using?
QUOTE(Andyrew @ Jun 7 2015, 08:50 PM)
It looks pretty good! You seem to be able to fabricate things much faster than me
What size inlet hole are you going to be using?
Inlet hole is the size of the oil cooler core. 22"x5.5". Basically a taller GT opening.
The key is to force all the air through the cooler and then the radiator. I still need to figure out oil hose routing. Its completely sealed at this point. I think I will find some grommets to run them through.
Interesting, Did you eliminate your water/oil cooler completely and replace it with this cooler? Seems like your trying to cool the oil down quite a bit, I thought you were going to have the oil cooler just run open air like that maybe with a small fan behind it just in case.
That inlet is about the same size as the 916 inlet. I think I previously measured it to 21x5.5
That inlet is about the same size as the 916 inlet. I think I previously measured it to 21x5.5
QUOTE(Andyrew @ Jun 7 2015, 09:16 PM)
Interesting, Did you eliminate your water/oil cooler completely and replace it with this cooler? Seems like your trying to cool the oil down quite a bit, I thought you were going to have the oil cooler just run open air like that maybe with a small fan behind it just in case.
That inlet is about the same size as the 916 inlet. I think I previously measured it to 21x5.5
Yes the water/oil cooler has been replaced with a sandwich plate, Mocal thermostat and AN12 lines to the front.
The radiator fans will pull air through the oil cooler once the system is sealed off.
My old oil cooler was a 22"x17" Setrab unit. This one is much smaller. But with the old one hovering over the radiator, air has an opportunity to go around it. In theory this should have more air flow in total.
I picked up a factory shroud with fans for the radiator. Perfect fit but I need to check my stash for electrical connectors. I like this one better than the cheapo Chinese fans and shroud that's sold as a package with this radiator. If these fans don't blow enough, my old fans can be fit into this shroud with a little ingenuity.
Click to view attachment
Click to view attachment
Click to view attachment
Click to view attachment
What did you pay for that factory unit? Looks pretty nice. I was considering buying some nice fans but think that a factory unit would be nice as well..
QUOTE(Andyrew @ Jun 11 2015, 07:33 PM)
What did you pay for that factory unit? Looks pretty nice. I was considering buying some nice fans but think that a factory unit would be nice as well..
$120 ebay brand new.
Not bad at all. Should work pretty well IMHO.
How do the mounting holes fit? Look slightly off in the pic.
How do the mounting holes fit? Look slightly off in the pic.
QUOTE(Andyrew @ Jun 11 2015, 07:54 PM)
Not bad at all. Should work pretty well IMHO.
How do the mounting holes fit? Look slightly off in the pic.
They are a perfect fit! Pic is just a bad angle.
I got the nose finished today. Its hard to see but there is an upper flange to seal the top of the oil cooler. It's setup to use a gasket to seal on the face of the cooler.
I bought a QRS GT bumper today; to cut up. Yes, cut. The GT opening will be raised a little and I need a notch on each side for the tow hitch mounts. I will cut it and re-glass it before painting it black again.
Just finished
Click to view attachment
After a little satin black
Click to view attachment
Looks great! Much more clean and civilized than before.
Out of curiosity did you consider eliminating the horizontal bar and just bracing the tabs to the body better?
Out of curiosity did you consider eliminating the horizontal bar and just bracing the tabs to the body better?
QUOTE(Andyrew @ Jun 13 2015, 08:52 PM)
Looks great! Much more clean and civilized than before.
Out of curiosity did you consider eliminating the horizontal bar and just bracing the tabs to the body better?
I did. But I wanted to ensure strength. And, I don't trust the body there. It's right about at the bottom of the headlight bucket. Not good structure. Although the DOM tubing from the tower might be enough. At least I now have some structure in front to go with my fiberglass bumper.
Sounds like a smart move
Oil cooler is mounted and plumbed. Radiator is mounted and plumbed. Bumper is cut and modified for a larger cooler size. I used kevlar to glass the section back in. Very solid. Now I need some minor body work and reassembly. I still have to rework some wiring for the fans and thermostatic switch.
Click to view attachment
Click to view attachment
Click to view attachment
Click to view attachment
Looks great! Fit is very nice to that oil cooler.
I like how you held the radiator in place at the top. Looks like you cut the tabs down as well. How much clearance do you have to the hood?
I like how you held the radiator in place at the top. Looks like you cut the tabs down as well. How much clearance do you have to the hood?
QUOTE(Andyrew @ Jun 27 2015, 11:20 PM)
Looks great! Fit is very nice to that oil cooler.
I like how you held the radiator in place at the top. Looks like you cut the tabs down as well. How much clearance do you have to the hood?
Before I cut them (3/16" or so) the tab would just touch the bottom of the hood rib. Pushing on the hood, I was able to make the smallest mark. I may have been able to leave them long but I was worried about hearing a random tapping noise.
I'll take better pics one I get out of the garage. I'm pretty happy with the overall fit & finish. I need to figure out where I want the fan controls. before it was hidden in the shroud. Now they won't fit there.
The oil cooler lines were a bitch because they are -12. Bend radius sucks. I had to make a little more space between the headlight bucket and the inner fender well. I massaged it for oil line clearance.
This is a "lo-fi" version of our main content. To view the full version with more information, formatting and images, please click here.