Full Version: 2016 Build-Off Challenge - Official Contest Thread
Love the winch setup to pull your dollied 914 back into your shed. I was admiring your simple dolly, and then said WTF, whats that for, lol, and noticed the cable. Saves a few backs I am sure.
QUOTE(914forme @ Oct 27 2015, 11:20 AM) 
Love the winch setup to pull your dollied 914 back into your shed. I was admiring your simple dolly, and then said WTF, whats that for, lol, and noticed the cable. Saves a few backs I am sure.
I once used a come-along to get my old 914 into the garage...I used a 2x4 in the door way and prayed nothing broke while ratcheting it up the driveway!
October Update: Spent most of the month getting the car up on wooden cribs to allow me to move the motor under the car. Made a wooden cradle for the motor and transmission to hold it in place to build front bulkhead mount and rear transmission mount. Presently the front mount is complete with the exception of some cosmetic welding and grinding so it can be sent off to powder coat. The rear Transmission mount is tacked together and will be finished up this weekend.
Next month I will be cleaning the drivers and hell hole up and getting ready for primer. I will try to work out some of the wiring to clean it up and get it all heading in the right direction. By the end of the month I hope to have the floorboard on the drivers side repaired and my stiffening kit installed.
Wish me luck and thank you for the positive comments, they are really motivating after a day metal shavings and rust in the eyes.
QUOTE(914forme @ Oct 27 2015, 02:20 PM)
Love the winch setup to pull your dollied 914 back into your shed. I was admiring your simple dolly, and then said WTF, whats that for, lol, and noticed the cable. Saves a few backs I am sure.
You guys don't miss a trick

I have an anchor plate lagged into the front of the shed, using a small 12V 2500lb winch. works good when taking it out also. just lower it down the ramp.
I also used a come along till I got the winch. much easier now.
I don't feel like I had the most productive month. I spent most of it cutting out bad sections of the passenger long and then fabbing some pieces to go back on. I also fought some rust in the floor and prepped the wheelhouse for receiving its replacement after I finish the inner long.
I didn't receive any assistance from vendors, but I bought some parts from Restoration Design. The biggest challenge I faced was some extra rust and the fabricated pieces being a little more complex than I envisioned. On top of that, I found that I needed to do a lot of extra work to try and make later tasks easier. Most challenges were met and solved by patience and hope alone.
I'm really hoping November, with its 2 long weekends results in greater progress. My goals are to finish fabricating the inner long and have it fully welded in (as opposed to its current tack job), install the new wheelhouse (including finishing clearing up the surrounding area of crud and PO POR), and maybe even get everything completely lined up and the engine compartment long welded in.
October Update:
Well I feel like I got nothing done. I have spent most of my time thinking. People like madmax914 do these neat things like engine mounts, and make me want to redo mine.
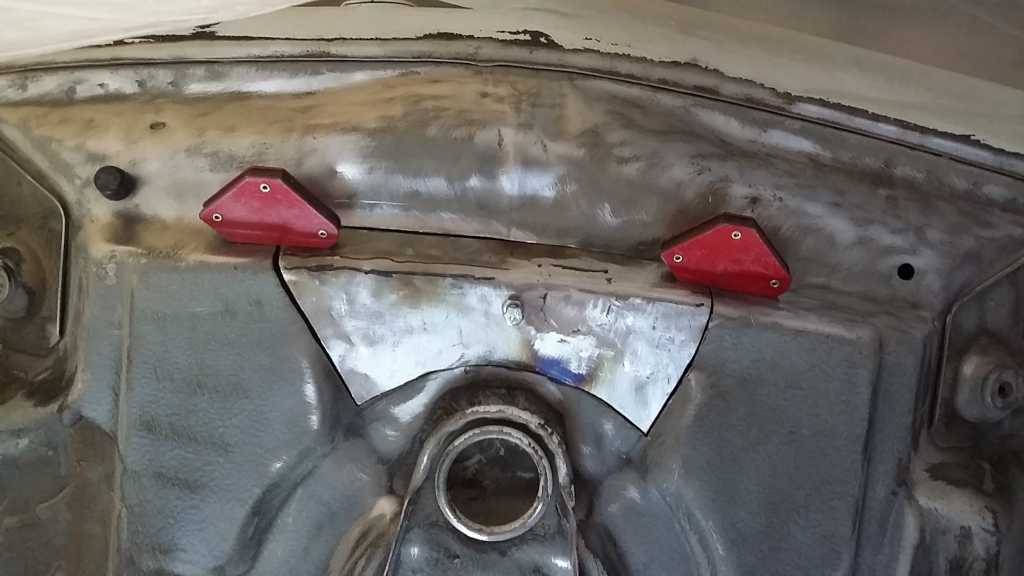
So this month, I have cut the 914 further apart. Cut a roof off a 944, and made slow progress towards getting focused and as of today, started installing the hidden hitch in my 914.
Click to view attachment
Click to view attachment
All fits behind this period correct plate.
Click to view attachment
Plate was my Grand Fathers
Well I feel like I got nothing done. I have spent most of my time thinking. People like madmax914 do these neat things like engine mounts, and make me want to redo mine.
So this month, I have cut the 914 further apart. Cut a roof off a 944, and made slow progress towards getting focused and as of today, started installing the hidden hitch in my 914.
Click to view attachment
Click to view attachment
All fits behind this period correct plate.
Click to view attachment
Plate was my Grand Fathers
October update:
Identified the front 914 wiring harness. Should be easy to match up to the Audi system.
Removed the v8 engine setup.
Did some work on the interior concept. I like it a lot
Picked up a members 914 to install the v8 into.
http://www.914world.com/bbs2/index.php?showtopic=267385
Got side tracked with rust repair. Hope to get this car out of the garage in 2 weeks with a running v8 setup.
October Update:
A. A brief description of the progress you made on your build:
I have gotten the car media blasted and epoxy primed this month. I have also worked with the painter and have about fifteen hours of my own time in seam sealing with an epoxy seam sealer. This week I started sanding the epoxy primer so the painter can paint the inside of all the cars bulkheads.
B. Any unexpected challenges you encountered this month, and how those challenges were handled:
The biggest challenge has been keeping the painter focused on working on my car and not any other cars. If I go over and help then it gets worked on. I sort of understand it but I only have so much time to help.
The other challenge is that there are five bulkheads to prepare and paint instead of the normal three that most other cars have.
C. Whether any shops/vendors provided any services for the build during the month, and the value of such services:
No, unfortunately I am providing the help to the painter.
D. Progress Pictures:
Click to view attachment
Click to view attachment
Jeff B
Click to view attachment
Complete "Michigan Build"Project Link
9/2015
October Update: Michigan Build
Build progress :
Removed all the tail section, and the back hafe of the rear trunk pan along with a second layer of sheet metal and lots of welding wire. scraped lots of carpet glue off the remaining area's, lots of body filler, what a mess. Alinged, fitted, prepped and welded in the new pieces. Filled the holes for titts that were drilled in a early bumper, and hung it.
Unexpected challenges:
The previous repaired damage required a lot of time to clean up, and repair correctly before installing my parts, otherwise the body lines would be off.
Vendors:
I purchased the rear trunk pan from Restoration Design, great vendor.
Progress Pictures:
Click to view attachmentClick to view attachment
Click to view attachmentClick to view attachment
Click to view attachmentClick to view attachment
Click to view attachmentClick to view attachment
Click to view attachmentClick to view attachment
Click to view attachmentClick to view attachment
Click to view attachmentClick to view attachment
November Update Link Page Post #94 pg:5
December Update Link Page Post # 127 pg:7
Complete "Michigan Build"Project Link
9/2015
October Update: Michigan Build
Build progress :
Removed all the tail section, and the back hafe of the rear trunk pan along with a second layer of sheet metal and lots of welding wire.
scraped lots of carpet glue off the remaining area's, lots of body filler, what a mess. Alinged, fitted, prepped and welded in the new pieces. Filled the holes for titts that were drilled in a early bumper, and hung it. Unexpected challenges:
The previous repaired damage required a lot of time to clean up, and repair correctly before installing my parts, otherwise the body lines would be off.
Vendors:
I purchased the rear trunk pan from Restoration Design, great vendor.
Progress Pictures:
Click to view attachmentClick to view attachment
Click to view attachmentClick to view attachment
Click to view attachmentClick to view attachment
Click to view attachmentClick to view attachment
Click to view attachmentClick to view attachment
Click to view attachmentClick to view attachment
Click to view attachmentClick to view attachment
November Update Link Page Post #94 pg:5
December Update Link Page Post # 127 pg:7
Am I too late to join in
Am I too late to join in
Eisberg, October update...
Progress, brief description.
October consisted of two themes: tools, and patches. At the beginning of the month I put together a sheet metal bender. It's got a 50" capacity so that I can fabricate the inner longs. More complicated parts will be purchased.
Click to view attachment
Also, I order and installed a new gun for the welder, a Chicago Electric Mono Mig 140 of a similar vintage as my 914. It was loaned to me by an original owner of a 914, a guy who is sympathetic to my project. This welder has been working on 914s its entire life. Oddly, installing the new gun did not miraculously make my welds into stacks of dimes.
Click to view attachment
Finally, I am cobbling together a set of metal forming tools for making patches.
Click to view attachment
Challenges.
Plenty of challenges, but I'm going to claim that none were unexpected.
A large part of my time this month has been practicing with welding 20g sheet, and also hammer forming patches. The challenges are in learning all the little details about doing these things well. I was not expecting to become an expert overnight. Not to say I wasn't hoping...
Click to view attachment
Click to view attachment
Shops/vendors.
No professional involvement yet, but preparing to send an order to RD in the beginning of November.
I'd call that some good metal working.
Nothing bought this month..
Striped the paint off the doors and hoods and bumpers shot with self etching primer.
Had a set back with regards to paint. while the body panels don't have body work in them when painted and shiny they look less than perfect.
So sanding all exterior of the shell and will begin a Dolphin Glaze process to get them mirror flat. Not that big of a deal since it's only the front fenders and rear quarters that have color on them.
progress pic
Click to view attachment
Build-Off Challenge Progress Update - Vysoc / Yellow Submarine
As of yesterday here is what I have accomplished in October, which is really not as much as I was shooting for, I am sure it is the same for everyone.
Reorganization of Garage, I found another place to park my White 914 Driver, so that I can focus entirely on getting some major metalwork done.
Yesterday I repositioned the Rotisserie and set up my work stations to best accommodate progress.
I patched a hole on the side of my Hell Hole and trimmed more of the old floor board away so that I could get a feel for exact placement of Driver's Side Cross Member and my new Floorboards as well as the Rear Corner Braces and Jack Point Donuts.
Unexpected challenges:
After I turned the car upside down I was removing the four, #6 Hex bolts that hold the steering column in place. One of the hex bolts was stripped, I had to cut a groove in the head by hand with a hacksaw blade, no good, heat, no good. I ended up drilling all the way through the middle of the hex bolt without touching the sides or ruining the threads, and then she came free. 2 Hours later.
Also was all set to use my New/Old Miller TIG, it seems I am not wired for the 220/50amp breakers required so I am going to install the correct female plug and correct amp wires to be able to do this in the garage. The Dryer works off of 30 Amp Breakers, and I did not have the correct extension cord or receptacle to set-up or run 220 out to the garage.
Better to set it up correctly and safely, would look awful funny burning the house down to TIG weld.
Shops and Vendors: None
Photo's here is my progress, it was definitely a month or reorganization and preparing to get things moving forward!
Room to work!
Click to view attachment
I am already Upside down on this thing?
Click to view attachment
OLD CROSS BRACE..... a rusted mess!
Click to view attachment
OLD RUSTY CRAP BRACE
Click to view attachment
New Product to match other side!!!
Click to view attachment
New Cross Brace
Click to view attachment
Prior to Floor Board Fitting
Click to view attachment
Initial Floor Board Fit-Up
Click to view attachment
Fit-Up for Corner Bracing and Jacking Point Donut
Click to view attachment
Happy Halloween.....more to come in November 

Vysoc
As of yesterday here is what I have accomplished in October, which is really not as much as I was shooting for, I am sure it is the same for everyone.
Reorganization of Garage, I found another place to park my White 914 Driver, so that I can focus entirely on getting some major metalwork done.
Yesterday I repositioned the Rotisserie and set up my work stations to best accommodate progress.
I patched a hole on the side of my Hell Hole and trimmed more of the old floor board away so that I could get a feel for exact placement of Driver's Side Cross Member and my new Floorboards as well as the Rear Corner Braces and Jack Point Donuts.
Unexpected challenges:
After I turned the car upside down I was removing the four, #6 Hex bolts that hold the steering column in place. One of the hex bolts was stripped, I had to cut a groove in the head by hand with a hacksaw blade, no good, heat, no good. I ended up drilling all the way through the middle of the hex bolt without touching the sides or ruining the threads, and then she came free. 2 Hours later.
Also was all set to use my New/Old Miller TIG, it seems I am not wired for the 220/50amp breakers required so I am going to install the correct female plug and correct amp wires to be able to do this in the garage. The Dryer works off of 30 Amp Breakers, and I did not have the correct extension cord or receptacle to set-up or run 220 out to the garage.
Better to set it up correctly and safely, would look awful funny burning the house down to TIG weld.
Shops and Vendors: None
Photo's here is my progress, it was definitely a month or reorganization and preparing to get things moving forward!
Room to work!
Click to view attachment
I am already Upside down on this thing?
Click to view attachment
OLD CROSS BRACE..... a rusted mess!
Click to view attachment
OLD RUSTY CRAP BRACE
Click to view attachment
New Product to match other side!!!
Click to view attachment
New Cross Brace
Click to view attachment
Prior to Floor Board Fitting
Click to view attachment
Initial Floor Board Fit-Up
Click to view attachment
Fit-Up for Corner Bracing and Jacking Point Donut
Click to view attachment
Happy Halloween.....more to come in November
Vysoc
So....my progress in a word? underwhelming!
I knew the start would be. I am a self employed contractor 9 months of the year an I work as a ski rep 5 months of the year. Guess what two months they over lap. October/ November.
In the evenings I have gotten some of the engine tin degreased, cleaned and blasted.
Click to view attachment
The plan for the next month is to remove the red cars motor/trans and stow it in the basement so I can work on it in a warm place. Maybe cut the red one apart.
Nothing bought.
sold some small parts
-$400.00
+$50.00 parts sold
-$350 in the red
Progress has been slow this month due to snow prep. The biggest challenge I am dealing with is time management and this:
Click to view attachment
I had this not so great idea 3 years ago to strip the inside floor and POR15 it. Another not so bright idea was to lay down new sound deadening material, follow the directions to the letter and now I am painfully removing it. I am glad that I am doing this since I found moisture underneath the material.
QUOTE(AndyB @ Oct 31 2015, 09:50 AM)
I had this not so great idea 3 years ago to strip the inside floor and POR15 it. Another not so bright idea was to lay down new sound deadening material, follow the directions to the letter and now I am painfully removing it. I am glad that I am doing this since I found moisture underneath the material.
I understand your pain. When I bought the silver car the PO swore by the POR 15 he had used in the rear truck. When we got it home we found rust under it. We caught it in time to not need a new trunk pan. But, I won't use POR15. Instead, Scotty suggests epoxy primer and then topcoat with paint. That is how I did the floor pans, and it seems to work well.
........before POR 15 is thrown under the bus let's consider what some folks may have done to prepare surface before applying same.....
Okay so I just realized I had to post on this page and not my thread page. Below is my post from my thread. Also adding pictures unrelated to Porsche. Once again sorry for the mostly unrelated porsche post but I hope you can understand. Amy is excited to hit the ground running on the interior when we return. My plan is to start working on the rust. Had some items from restoration design and tangerine racing arrive so going to open em up when I get home. The only 914 photo that I have is from my last post. That was where I was at when I left.
hello 914 crew! This post is going to be more brief than i would like because i am currently in colombia on a honeymoon and internet here is a bit scant. I havent made any progress since my last post because i got married in fort lauderdale and immediately left to go to Colombia.
For the progress on the car in the past month, i got the majority of the interior out and had a few problems getting the back interior piece out. The emergency brake handle was pretty rusted and it broke. Getting the engine out was also pretty difficult for me but ended up getting it. If i had it do it again i would probably have purchased larger jack stands. Being a cheap ass i opted to get the cheap harbor frieght small ones and it was somewhat of a hassle. I did get the rear rotors and calipers off prior to leaving and plan on painting them when i get back. I took the rotors in to get turned at Oreillys auto parts for $15/each and they came back looking brand new. Sweet! That was really the only service that i used thus far. Amy was pretty overwhelmed with wedding junk so she didnt make any progress any of the interior but its understandable.
Unrelated to the porsche the wedding was a blast. We did a destination wedding on a boat in florida and it was tons of fun. 100 guests for a destonation wedding was a little much but everything turned out really well. These are the only real photos that i have available at this point so sorry for not posting an official Porsche photo.
The keyboard here is also pretty funky making this post a little difficult but oh well. Im actually at a small little hotel on an island off the coast of colombia. The place has a monkey that has taken a strong liking to me for some odd reason. Maybe because i am about as hairy as him. Everytime my brother or anyone tries to take him off me he gets really mad and tries to bite them. Ha. This is my first time in Colombia and it is much much safer than i was expecting. everyone says its extremely dangerous and its just not true. Everyone here is just really friendly.
Once again really sorry for this type of post but thanks for understanding.
I have been trying to save the photo for a while and just figured it out. Alright thanks for understanding such a crappy porsche post.
Brett and Amy
QUOTE(whitetwinturbo @ Oct 31 2015, 12:00 PM)
........before POR 15 is thrown under the bus let's consider what some folks may have done to prepare surface before applying same.....
The moisture was between the two layers. POR 15 did its job.
October's updates:
I was test fitting the engine, so I can know what modifications to make to the layout, and configuration of the intake and such.
So far the trunk torsion bars have been removed, and I'm picking up an intake mainfold this weekend.
I was test fitting the engine, so I can know what modifications to make to the layout, and configuration of the intake and such.
So far the trunk torsion bars have been removed, and I'm picking up an intake mainfold this weekend.
Here is my first update. I am at ground zero of the valley fire in California, and have little access to internet due to infrastructure being burned. Will get my build thread up as soon as it is restored.
Working mainly on motor placement/mounts. I am putting a VW TDI engine and trans in transverse. I know it is unconventional... but it is all German.
Ill give more info when I get my thread up.....BrentClick to view attachment Click to view attachmentClick to view attachment
Working mainly on motor placement/mounts. I am putting a VW TDI engine and trans in transverse. I know it is unconventional... but it is all German.
Ill give more info when I get my thread up.....BrentClick to view attachment Click to view attachmentClick to view attachment
It’s been a busy month. I spent the first two weeks of October removing everything left on the car except the suspension/wheels. I wanted to have the car sitting on the wheels so that I could install some bracing in the floor area. I know that bracing will need to come out at some point but until I know which panels need replaced I want the additional support. I also decided that I want to be able to hang the doors to check the gaps as panels are replaced so I had to change where I attached the door braces so that I can fit a door with the braces in place. And, I wasn’t really happy with the door braces that I had previously made using black pipe. The pipe flexed much more than I expected so I remade the braces with some extra square tubing I had laying around.
Click to view attachment
The last 2 weeks of October were spent building a rotisserie. I went with Restoration Design’s rotisserie because I think it best fits my particular needs of wanting to be able to move it around a lot and be able roll it onto my lift if need be. $250 worth of steel got the job done but I wasn’t prepared for the amount of time it took to fabricate it and for the amount of dirt created cutting and grinding new steel with the oily mill finish on it. It was however fun welding thick steel and it gave me a reason to buy a better welding helmet. I’ve been using a Harbor Freight helmet and while I haven’t done much welding before, when I did I struggled with being able to see where I was welding. So, I bought a Hobart Pro helmet and the difference is night and day. Much easier to see, lots of adjustments and the head strap assembly works really well. I also bought a better ground clamp as the clamp that came on my Millermatic 180 was practically useless. Once I got the settings on the welder dialed in and my technique correct I was able to lay down some pretty good welds.
Click to view attachment
Click to view attachment
Once the rotisserie was attached I removed the remaining suspension and with my wife’s help we removed the entire wire harness .
So, what’s next is to strip the car of paint so I can see all the parts that need cut out. I have a guy coming out next week to soda blast it in my driveway. His business is called Stripper for Hire (www.stripperforhire.com)…… I’m sure I’ll be the talk of the neighborhood! I still need to put dolly wheels on the rotisserie but I am waiting for a piece of steel so I will use cheap furniture dolly’s from Harbor Freight to get the car off my lift and outside for the stripper.
No outside services or vendors were used and there we no real surprises other than the amount of welding to build the rotisserie.
Click to view attachment
The last 2 weeks of October were spent building a rotisserie. I went with Restoration Design’s rotisserie because I think it best fits my particular needs of wanting to be able to move it around a lot and be able roll it onto my lift if need be. $250 worth of steel got the job done but I wasn’t prepared for the amount of time it took to fabricate it and for the amount of dirt created cutting and grinding new steel with the oily mill finish on it. It was however fun welding thick steel and it gave me a reason to buy a better welding helmet. I’ve been using a Harbor Freight helmet and while I haven’t done much welding before, when I did I struggled with being able to see where I was welding. So, I bought a Hobart Pro helmet and the difference is night and day. Much easier to see, lots of adjustments and the head strap assembly works really well. I also bought a better ground clamp as the clamp that came on my Millermatic 180 was practically useless. Once I got the settings on the welder dialed in and my technique correct I was able to lay down some pretty good welds.
Click to view attachment
Click to view attachment
Once the rotisserie was attached I removed the remaining suspension and with my wife’s help we removed the entire wire harness .
So, what’s next is to strip the car of paint so I can see all the parts that need cut out. I have a guy coming out next week to soda blast it in my driveway. His business is called Stripper for Hire (www.stripperforhire.com)…… I’m sure I’ll be the talk of the neighborhood! I still need to put dolly wheels on the rotisserie but I am waiting for a piece of steel so I will use cheap furniture dolly’s from Harbor Freight to get the car off my lift and outside for the stripper.
No outside services or vendors were used and there we no real surprises other than the amount of welding to build the rotisserie.
Love all that steel
October Update:
A. A brief description of the progress you made on your build.
Going slow, but most of the car coming apart now. Got the hoods off, headlights out and getting prepared to get the dash out soon. Still can't get the rear window out...
B. Any unexpected challenges you encountered this month, and how those challenges were handled.
Time is my greatest challenge My silly day job eats up all my time.
C. Whether any shops/vendors provided any services for the build during the month, and the value of such services.
None
D. At least one photo of the build’s progress.
All pictures for my build are in my build thread.
QUOTE(boxsterfan @ Oct 31 2015, 05:07 PM)
October Update:
A. A brief description of the progress you made on your build.
Going slow, but most of the car coming apart now. Got the hoods off, headlights out and getting prepared to get the dash out soon. Still can't get the rear window out...
B. Any unexpected challenges you encountered this month, and how those challenges were handled.
Time is my greatest challenge My silly day job eats up all my time.
C. Whether any shops/vendors provided any services for the build during the month, and the value of such services.
None
D. At least one photo of the build’s progress.
All pictures for my build are in my build thread.
Quit your day job to
 (also win the lotto just in case)
Update? Progress? Work performed? Hell, I can not tell a lie, all I did was completely cover the car so it would stop collecting dust. I did do some major shop cleaning to have more uncluttered space for working on the car.
Move along folks, nothing to see here.
Hopefully I will make up for it in November.
Shoe

Move along folks, nothing to see here.
Hopefully I will make up for it in November.
Shoe
My update is similar to hotshoes.
I did manage to start taking the 5.3 LS apart in order to start cleaning it up.
Put together a vibratory cleaner with a 5 gallon bucket, and a vibratory unit from HF.
Working 60 hours weeks, along with a 2 hour commute only leaves Sundays to get anything done.
This past Sunday I spent cutting up the 40 ft. hackberry tree that fell in the back yard at our rental.
But, I head to SEMA Monday.
Here's a few new photos... Plus a photo of my new "anonymous" style on my old thread.
Progress:
Zero! I made no progress this month.
I am in the middle of a small remodel of my house and I was out of town 1 weekend for my granddaughters 1st birthday
Well, I did blow off some of the dust before Mike came and picked up a trans from me, looks a little better.
Any unexpected challenges?
Well I did not expect to spend much time working on my 914 this month.
I knew my month was going to busy but planned to work on it the weekend after my birthday.
Instead I spent the weekend in bed with a fever
Any shops/vendors provided any services?
None
Photo of the build’s progress:
Since I did not actually make any progress I post some pictures of progress I made prior to entering this contest.
Progress prior to the contest:
I pulled apart the headlight assemblies and repainted and rebushed the pivots.
Click to view attachment
As it turns out, I guess I am registered for this years challenge. Thanks for letting me join the madness, errr - I mean Challenge.
October Progress: Been working on getting the underbody coating off. Looks good and down to the factory primer in some parts, bare metal in others. Just about ready for primer, paint, and new underbody coating.
Challenges: The area around the right-rear jack plate is smashed in. It will need to be rebuilt before I can weld the jack plate in.
Vendor Participation: Picked up several parts from Mark at Restoration Design.
Pictures:
Underbody almost ready for primer
Jack plate parts from Restoration Design are first class.
Left one
Right one with issues at corner of floor
October Progress: Been working on getting the underbody coating off. Looks good and down to the factory primer in some parts, bare metal in others. Just about ready for primer, paint, and new underbody coating.
Challenges: The area around the right-rear jack plate is smashed in. It will need to be rebuilt before I can weld the jack plate in.
Vendor Participation: Picked up several parts from Mark at Restoration Design.
- Left & Right rear jack plates
- Hand brake cable cover plate
Pictures:
Underbody almost ready for primer
Jack plate parts from Restoration Design are first class.
Left one
Right one with issues at corner of floor
Hi all, been a bit of a random month with no work on my car, and my excuse is my better half was rushed in to hospital for 2 weeks ! Thankfully she's now back home and on the road to recovery.
So excuses given and the work begins again
The main work to take place is the extension of the footwell to accommodate the pedal assembly I'll be starting to cut this weekend keep an eye out for updates on my own build thread
So excuses given and the work begins again
The main work to take place is the extension of the footwell to accommodate the pedal assembly I'll be starting to cut this weekend keep an eye out for updates on my own build thread
Hi Steve,
Reading through the thread I'm a little confused as where I need to post my monthly updates?
Here? or in my thread or both?
I posted my October update on the 25th in my thread, should I have posted it here?
http://www.914world.com/bbs2/index.php?act...=0#entry2126625
Thanks in advance.
Regards
Darren C
QUOTE(Darren C @ Nov 4 2015, 04:28 PM)
Hi Steve,
Reading through the thread I'm a little confused as where I need to post my monthly updates?
Here? or in my thread or both?
I posted my October update on the 25th in my thread, should I have posted it here?
Thanks in advance.
Regards
Darren C
Your regular updates go in your own build thread. Once a month, we ask that you post an update in this thread outlining the progress made during that month, etc. So, you only need to post in this thread once per month.
EDIT: Here is what gets posted in this thread once per month:
Participating, referred to as Challengers, will be required to post in the main Challenge thread at least once each month of the Challenge. They are permitted to post at any point during such month. Such post must include:
1. A brief description of the progress made on their build.
2. Any unexpected challenges they encountered that month, and how those challenges were handled.
3. Whether any shops/vendors provided any services for their build during that month, and the value of such services.
4. At least one photo of the build’s progress.
Thanks Steve,
Got it!
Month 1, I worked in the engine bay, dropped the motor, replaced battery tray and stripped it all out for an engine bay repaint.
Got it!
Month 1, I worked in the engine bay, dropped the motor, replaced battery tray and stripped it all out for an engine bay repaint.
Following a pm from Steve (thanks Steve) I realized I need to list any parts bought from the nominated vendors.
In Month one, I used Auto Atlanta for the following parts
Relay board clip $30
Reproduction Relay Board Cover $42.75
Relay board Cover Nut $12.35
International shipping $59.50
Total $144.60
Unfortunately as I’m in UK I have to pay import duty on the parts & shipping.
This Tax is at 20%, so that cost me a further $28.92
Then there is a handling charge for the UK Post office administration at $13.85.
Grand total to me for a relay board cover was $187.37
You don’t know how easy you guy’s have it living the other side of the pond!
Olympic Blue Challenge Nov 2015 update.
Started doing the bodywork on the Pass side, Trying to get out there on the warmer days. easier to heat up the shed.
Click to view attachment
Then I did this...
Click to view attachment
Slowed me down a little. I didn't think about how much you use that finger. other than for waving at foolish motorists.
anyways every time I started working with it. I would open it back up.
I know excuses are like assholes.....
but in spite of that I did get a couple things accomplished..
stripped the old bearings / races out of my hubs and bead blasted them.
Click to view attachment
and installed my Elephant Racing rubber bushings in to my front control arms. Not as easy as in the video ( especially with this finger ) but still went pretty smoothly.
Click to view attachment
Click to view attachment
Question on the torsion bars, do the L /R markings go in front or in back?
Vendors
I took advantage of 914 Rubbers Black Friday sale and put in an order, even though I won't need the stuff for a little while. price ~ 500
I sent my front A calipers to PMB for a rebuild, and ordered the rest of my brake needs price ~ 2000
Hope to get these damn stiches out in time for Pennsylvania Deer hunting on Monday....
Later..
Month 2 was a busy month (just posted an epic saga in my resto thread)
I carried on taking the car apart, fitted a new master cylinder, refurbished the exhaust system, bushed the pedals and cleaned more parts up. Trouble is the more I get into the car, the more I find that needs doing!
No parts purchased this month from the sponsors, but a few from private vendors here in UK.
Hope you enjoy my thread.
Regards
Darren
Did not get as far as I wished this month, lots of upheaval in my life this month. Close friend lost her battle with the Big C. It was a great ride, glad I knew her. I traveled a lot which meant little time in the shop, which culminated in a trip to the emergency room after I had a medical emergency while on a plane. I am still wrapping up the testing so far, have not found a dang thing. 
So the car got put on the back burner, hopefully be back at it soon. I did get a lot of stuff done on the rear trunk, and started welding in the rear hitch.
While laid up in the hospital bed, I got a strange idea, I would like to do the one-lap in a 914. Not to be just to have the fun of
  and the insanity of the idea.
So the car got put on the back burner, hopefully be back at it soon. I did get a lot of stuff done on the rear trunk, and started welding in the rear hitch.
While laid up in the hospital bed, I got a strange idea, I would like to do the one-lap in a 914. Not to be
just to have the fun of and the insanity of the idea.
Wow! Where did the month go?
11.vendor purchases: $750;restoration design metal, vac hoses and some other stuff from A.A., and some stuff from 914 rubber, I'll have to look back to see $$,
But I've made no progress, as my DD needed attention, lime a new wheel bearing and the "while you are in there" hit me so I'm in the middle of replacing all of it (2000 audi tt)- shock/struts, bushings, bearings, tie rods and ball joints.
- it took up my whole day yesterday and had to help a friend move today, and last week I was at a conference 5 days in St. Louis,.and this past month had to do more painting etc of the house which we are trying to sell. But less $$ coming in this month so I'm done spending any $$ until after the holidays.
I do have a goal of soon stripping out the tar board.
Posted 2 sets of 5 lug Fuchs in the for classifieds so that I can get some of the body work done. I need then to save up about $3500 for the paint work.
November Update.
Progress Description:
November has been paint removal month and I got quit a bit of paint off. All tthe big panels have the paint off, except the bottom of the rear trunk lid.Click to view attachment Click to view attachmentClick to view attachment
I also got the hing brackets off and started cleaning up the replacement tail light panel.
Unexpected Challenges:
This month I found my drivers door is toast.Click to view attachment Click to view attachment Fortunatly Doug has a spare door for me. The rear trunk lid turned out not to be something to brag about either.
Shops/Vendors:
Sadly I did not get anything from the sponsor vendors. I did get some stuff from my local NAPA. Click to view attachment I actually got two of the primers. $135.
This month I haven't accomplished as much as hoped. Work has been crazy.
I have been working on a subframe for the engine and have it all mocked up. If Ican get my sons car off the lift I can get back to work.
Nothing purchased from vendors yet, but I have gone through a boat load of cut off discs.
Move along...nothing to see here...yet!
I have been working on a subframe for the engine and have it all mocked up. If Ican get my sons car off the lift I can get back to work.
Nothing purchased from vendors yet, but I have gone through a boat load of cut off discs.
Move along...nothing to see here...yet!
914-SHO project
November Progress: Finished getting the underbody coating off. Also cut out the damaged front trunk area. Patched and reshaped it, welded it back in and cleaned up the welds on both sides.
Also welded on the left side rear jack post from Restoration Design. Still have to cleanup the sheet-metal on the right side before installing that one.
Challenges: Had half a dozen dents in the front trunk floor. Got them all squared away after couple of hours of heating and pounding. Ready for primer on the underside, but still have to do more paint removal on the inside of the trunk.
Vendor Participation: None this month
Pictures:
Front trunk floor damage
Cut out and repaired damaged section - ready to weld in.
Finished repair for trunk inside and out.
Click to view attachment
Click to view attachment
Welded rear jack post on left side
November Update: Michigan Build
Michigan Build Link
Build progress :
Finished both rear fenders. I learned a lot on welding temp and speed. Patched in a front fender. Found that if the bottom of the fender lines up with the same as stock, the valance lines up, and the opening and fit of the fender worked very well in relation to each other. And looking forward to working on the valances next.
Unexpected challenges:
The amount of think time be for each cut. think 20 times, cut once. And keeping the fender orientated while cutting. The amount of hammer time required to stop the heat sinking from the weld. Lots of time.
Vendors:
I purchased a few things. 914 Rubber fantastic vendor.
Progress Pictures:
Click to view attachmentClick to view attachment
Click to view attachmentClick to view attachment
Click to view attachmentClick to view attachment
2016 Build-Off Challenge November Update: YELLOW SUB / VYSOC
NOVEMBER PROGRESS: Finally finished electrical work (yesterday) in Garage and am now able to run my Miller TIG Welder. The 240V/50Amp program was not as easy as first thought to be spent a great deal of time feeding wire through garage attic and getting it to the Electric Panel was a PITA. We are now operational and meeting all codes so now I can crawl forward.
CHALLENGES: Crawling through rafters and laying on trusses, trying not to fall through the drywall ceiling.
VENDOR PURCHASES: Nothing of major concern this month.
PHOTOS: I will attempt to attach them tomorrow.
But it has been a very busy month at work to the tune of about 3300+ rounds of golf, keeping the members happy is a full time 7 day a week job.
December will slow down a little and I will hopefully get the TIG Tuned in and accomplish some major work.
Vysoc
I fell short of the month's goals, but not by too much. I finished fabbing my inner long, and in the process learned it would have been worth doing something to make an extra $300 for the RD part...though I guess I had some fun. Of course there was unexpected rust issues to fight. I also spent a lot of time measuring and developing a jack/brace/rotisserie/black/whatever system to get the body straight and true for upcoming welds. And even more time fitting/trimming the wheelhouse and engine compartment long pieces for installation and developing a system of supports/strengtheners/stiffeners/braces to strengthen them. I've also spent many hours awake in bed trying to figure out how to do all this inside the closed long...
Challenges I faced this month were mostly in achieving the perfect fit, squaring the car, and figuring out the strengthener puzzle.
I received nothing from vendors this month, but did buy some parts from RD.
Challenges I faced this month were mostly in achieving the perfect fit, squaring the car, and figuring out the strengthener puzzle.
I received nothing from vendors this month, but did buy some parts from RD.
November progress: More of the same this month, learning to fabricate patches... I made a couple attempts at each patch, usually practicing in a thinner gauge first, then making the one that will get welded in. Made some tools as well, mainly anvils and T-dollies. Then there was a lot of exploratory cutting and cleaning in preparation for welding- not photogenic stuff.
No unexpected challenges unless you want to count distractions like replacing CV joint boots on my DD and helping a buddy replace a water pump.
Shop/vendor assistance: Yes! Received an order from Restoration Designs! I really thought it would take a while to get them from the far north. Canada's way up past the arctic circle, isn't it? But I think they arrived in less than a week. Thanks guys!
Click to view attachment
So these are all the patches, basically for rebuilding the passenger side foot well. Wanted to get this area strong again, so the long would be well supported forward.
Click to view attachment
November Update: Extreme Budget Makeover - Creamsicle Edition
A. Progress
Not really part of the Challenge but I did get heat ductwork hooked up on the driver's side to help ward of the chill of the morning commutes
Talked to a guy about a front hood and driver door. No deal made yet
My Raby 2056 was on the dyno this month producing mid 140s HP and mid 150s Torque
Cleaned out the garage enough so I can once again park the 914 inside
Installed the turbo and downpipe on the GTI. Now if I can just remember how to put the rest of it back together, I will have a winter driver which will allow me to tear into the 914
B. Challenges
Driving to work one morning and suddenly heard a chuh-ch-ch-ch-ch noise as if something was sliding across the asphalt For the next few minutes I pondered on what part fell off my car.
  Once parked, I checked and, sure enough, the piece that connects from the fan housing to the heat exchanger had fallen off.
  (A portion of the housing is broken off so it allowed the piece to work loose). Couple days later, I stopped at the approximate area and walked along the side of the road in search of the part. Found it! Reinstalled with the addition of the vertical J-pipe so now if it works loose it won't be able to fall off.
C. Shop/vendor provided services
Jake Raby at Raby's Aircooled Technology finalized my engine build. It is scheduled to be in my garage December 1
A. Progress
Not really part of the Challenge but I did get heat ductwork hooked up on the driver's side to help ward of the chill of the morning commutes
Talked to a guy about a front hood and driver door. No deal made yet
My Raby 2056 was on the dyno this month producing mid 140s HP and mid 150s Torque
Cleaned out the garage enough so I can once again park the 914 inside
Installed the turbo and downpipe on the GTI. Now if I can just remember how to put the rest of it back together, I will have a winter driver which will allow me to tear into the 914
B. Challenges
Driving to work one morning and suddenly heard a chuh-ch-ch-ch-ch noise as if something was sliding across the asphalt
For the next few minutes I pondered on what part fell off my car. Once parked, I checked and, sure enough, the piece that connects from the fan housing to the heat exchanger had fallen off. (A portion of the housing is broken off so it allowed the piece to work loose). Couple days later, I stopped at the approximate area and walked along the side of the road in search of the part. Found it! Reinstalled with the addition of the vertical J-pipe so now if it works loose it won't be able to fall off. C. Shop/vendor provided services
Jake Raby at Raby's Aircooled Technology finalized my engine build. It is scheduled to be in my garage December 1
Progress:
I made no progress again this month but I knew I would not have much time this month. The spare time I had went toward remodel work on my house.
On the positive side, the house has all new windows, the stucco repairs & color coat are almost done, the new bathroom and closet are all wired & painted, just need the tile floor installed, the vanities set and my beams and barn door hung.
Any unexpected challenges?
Well I was sick again this month, got a nasty cold that off work for a few days.
Any shops/vendors provided any services?
My dash from 914rubber arrived!!
I ordered it as part of the group buy before the challenge started.
Jim
Car was soda blasted the first week of November. Cost for soda blasting was $500. I had the guy concentrate on removing the yellow paint and cleaning all the area’s that I knew were bad and wanted to get a better look. Some parts of the car like the floor are likely to be replaced so I only had the edges of those panels blasted but didn’t waste time (and money) thoroughly cleaning all the panels.
Click to view attachment
All in all the soda blasting revealed that there are more areas to be addressed than I had hoped. Luckily, it’s only metal. Fortunately, Christmas came early in the form of this amazing tool.
Click to view attachment
I’m waiting for a sheet of 18ga to get here, hopefully this week. Also expect to be ordering RD parts this week. Not much else to report this month. I anticipated that November was going to be a fairly unproductive month because of work demands so I feel that I am still on my tentative schedule.
Click to view attachment
All in all the soda blasting revealed that there are more areas to be addressed than I had hoped. Luckily, it’s only metal. Fortunately, Christmas came early in the form of this amazing tool.
Click to view attachment
I’m waiting for a sheet of 18ga to get here, hopefully this week. Also expect to be ordering RD parts this week. Not much else to report this month. I anticipated that November was going to be a fairly unproductive month because of work demands so I feel that I am still on my tentative schedule.
This is a "lo-fi" version of our main content. To view the full version with more information, formatting and images, please click here.