Full Version: Muellers Honda V6 914 project
Great job Mike! It sounds great! See you at WCR.
QUOTE(Mueller @ Oct 22 2020, 04:33 PM) 
The PO of my 914 told me the transmission is in need of internal work, I'm going to drive as is for now. (Once I do drive it)
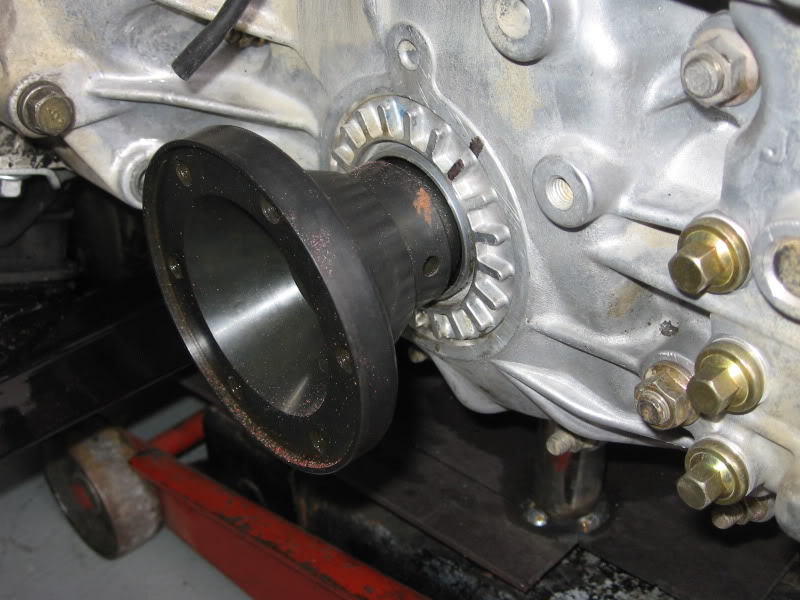
However this 2014 WRX 5 speed with 30K miles just happened to go up for sale not too far from me. I hope I can sell the rear diff to offset the cost.
Click to view attachment
What is the model #? How much did you pay for it? Once you remove the center differential you'll need to add 12-14 oz's of trans oil over the std amount. Park it level then mark the dipstick w/ the "new full" mark.
QUOTE(76-914 @ Oct 29 2020, 03:47 PM)
What is the model #? How much did you pay for it? Once you remove the center differential you'll need to add 12-14 oz's of trans oil over the std amount. Park it level then mark the dipstick w/ the "new full" mark.
Thanks for the info.
TY758VW1AA, 2014 WRX that was converted to 6 speed.
I'm confused by the axles or lack of axles I should say. Still trying to wrap my head around if I need axles with a drive spline for inside the transmission or get the stub axles.
QUOTE(Mueller @ Oct 29 2020, 04:16 PM)
QUOTE(76-914 @ Oct 29 2020, 03:47 PM)
What is the model #? How much did you pay for it? Once you remove the center differential you'll need to add 12-14 oz's of trans oil over the std amount. Park it level then mark the dipstick w/ the "new full" mark.
Thanks for the info.
TY758VW1AA, 2014 WRX that was converted to 6 speed.
I'm confused by the axles or lack of axles I should say. Still trying to wrap my head around if I need axles with a drive spline for inside the transmission or get the stub axles.
That was the last year for that model # transmission. Converted to a 6 speed? Wow, that's a new one. I'll look into that. The final drive will be 3.9 regardless. Although I'm not sure the quantity of oil I stated is accurate given it's been converted to a 6 speed. I came to this conclusion by immersing the center diff and related bearings and washers in a can of transmission oil and measuring the displacement. You can do the same thing after removing the diff. Just make sure that you measure the amount of oil that the rear cone takes vs. the flat plate you will use in it's place. The glove is blocking the view of the output. Post another pic of that area.
Very cool. It is great to hear it running and it sounds good. Will it be making an appearance at WCR? Regardless, hope to see it one day. Congratulations Mike. 
I think the 5MT was removed to install a 6 speed trans Kent. That one should be a 5.
On the axles/joints, I think @BIGKAT_83 has used male Subaru CV joints inboard, you just have to lower the trailing arm to get them in. He would know a lot more than me. On mine I used stub axles and female CVs. Mine is a 2006 removed for the same reason (converted car to 6 speed trans).
On the axles/joints, I think @BIGKAT_83 has used male Subaru CV joints inboard, you just have to lower the trailing arm to get them in. He would know a lot more than me. On mine I used stub axles and female CVs. Mine is a 2006 removed for the same reason (converted car to 6 speed trans).
QUOTE(Chris H. @ Oct 30 2020, 06:34 AM)
I think the 5MT was removed to install a 6 speed trans Kent. That one should be a 5.
On the axles/joints, I think @BIGKAT_83 has used male Subaru CV joints inboard, you just have to lower the trailing arm to get them in. He would know a lot more than me. On mine I used stub axles and female CVs. Mine is a 2006 removed for the same reason (converted car to 6 speed trans).
^thanks, I talked to my friend Steve last night, he made the CV adapters that use the 100mm CV joints which I happen to be using.
He might have a set of adapters left over.
QUOTE(Mueller @ Oct 30 2020, 12:09 PM)
QUOTE(Chris H. @ Oct 30 2020, 06:34 AM)
I think the 5MT was removed to install a 6 speed trans Kent. That one should be a 5.
On the axles/joints, I think @BIGKAT_83 has used male Subaru CV joints inboard, you just have to lower the trailing arm to get them in. He would know a lot more than me. On mine I used stub axles and female CVs. Mine is a 2006 removed for the same reason (converted car to 6 speed trans).
^thanks, I talked to my friend Steve last night, he made the CV adapters that use the 100mm CV joints which I happen to be using.
He might have a set of adapters left over.
Those look like an exact replacement for the ones offered by Subarugears. They look like some great workmanship!
Not only a runner also a driver.
I drove it around the block for the 1st time right before I hooked it up to my truck for the ride up to Petaluma for the 2020 WCR last week.
For the WCR I only drove it Saturday night for the picture and dinner. I didn't trust the car for the 2 drives thru the unknown roads.
Now to fix a bunch of little things and put a heater in it.
Click to view attachment
Click to view attachment
Great meeting you and seeing the car in person Mike!
- Tony
- Tony
We were talking about how much your J series sounds like a flat 6 when you were idling it in the parking log!!
Great progress mike! It was GREAT seeing you!
Great progress mike! It was GREAT seeing you!
Great seeing you & your car last weekend Mike! You are making great progress with that project. Always great seeing them in progress as well as finished. Keep it up
QUOTE(JRust @ Nov 14 2020, 11:01 PM)
Great seeing you & your car last weekend Mike! You are making great progress with that project. Always great seeing them in progress as well as finished. Keep it up
 Nice to meet you and see your car. Hopefully see you at the next one!!
Nice talking to you in the hotel parking lot Saturday - great build and I was behind you going to dinner - it scoots.
Mike, it looked like you got some of the running issues sorted out from what I saw on your Instagram post. Updates?
Randy, having some cooling issues, ordered an electric water pump to assist and crossing my fingers it helps. @roadglue
I changed the design a little for my version of the 911 hockey puck horn button.
The 914 is laser engraved from my cheap CO2 laser. The laser also cut the OD diameter....it sure stinks while it gets zapped.
..
The chrome ring is a replacement part for remanufactured hockey pucks.
360 serrations along the OD taped section. Part is far from perfect, not sure if operator error or bad programming on my part. The more I look at it I'd like to sink the center section in a bit more.
Click to view attachment
Click to view attachment
Click to view attachment
Hot Damn that looks good!!!!!
Yeah that GT horn ring looks nice Mike!
Are you SURE you need an electric water pump? The stock pump should do it I would think. Maybe post some pics of the completed setup if you can.
Are you SURE you need an electric water pump? The stock pump should do it I would think. Maybe post some pics of the completed setup if you can.
Sorry to hear about the cooling issues. Hopefully it's something pretty straight forward.
That's pretty good actually!
So just a few things to check....
1. Is the coolant overflow/fill tank at the highest point in the system?
2. Is your air bleed line at or near the highest point?
3. Is the system sealed? (is there a pressure release if you open the overflow tank when warm (be careful! Not when hot!).
3. Have you tried running it without the thermostat?
4. Are you SURE the coolant flow is as your diagram shows? I had my lines swapped for a bit.
It's usually an air pocket somewhere and once the system bleeds that out it's fine, BUT your system should technically be self bleeding.
Also what happens if you pinch off that "bypass hose" to stop the flow? I think that's part of the "warmup loop" so probably will not help unless it's diverting too much hot coolant back into the engine after it warms up.
When is it overheating BTW? Is it normal until you lean on it a bit or does it run hot right out of the gate? Are the main hoses connected to the rad up front getting hot?
QUOTE(Chris H. @ Dec 8 2020, 12:14 PM)
That's pretty good actually!
So just a few things to check....
1. Is the coolant overflow/fill tank at the highest point in the system?
2. Is your air bleed line at or near the highest point?
3. Is the system sealed? (is there a pressure release if you open the overflow tank when warm (be careful! Not when hot!).
4. Have you tried running it without the thermostat?
5. Are you SURE the coolant flow is as your diagram shows? I had my lines swapped for a bit.
6.What happens if you pinch off that bypass line?
It's usually an air pocket somewhere and once the system bleeds that out it's fine, BUT your system should technically be self bleeding.
1. pretty sure the upper small line is at highest point.
2. see above
3. yes it is sealed
4. no I have not removed the thermostat. I have the thermostat with the wax portion facing upwards.
5. I am wondering if the radiator lines should be swapped. I could have the upper and lower inlet/outlet mixed up?
6. Have not tried that.
I thought the system was good until I had it idling for about 10 minutes in the driveway and then it just puked out the coolant.
That's exactly what happened to mine when I had some air pockets initially. Had the same overflow tank as well. The only thing that sucks about that one is that it pukes coolant everywhere and there is no option to add a secondary overflow to catch it.
You really have to drive it a bit or at least rev it and get the RPMs up in order it push the air out if you have an air pocket. Couple of spirited laps around the block and then let it cool down and see if the coolant level goes down after a couple of hours. You can also try jacking up the front and rear to move the air around. If air is purging out it sounds like an office water cooler glugging.
Next time you fire it up make sure the hoses up front are actually getting hot when it comes up to temp. If not then your thermostat is not opening for some reason or your hose configuration needs to be revised. If that's not the issue it's most likely air in the system.
This is pretty normal BTW.
Do you have a vent on the engine as well? Looks like hoses on engine would have to push any trapped air down (that,s not going to happen) to get to front car and radiator to vent air out of system. generally need a way to get air to highest point to get complete coolant fill. Many vehicles have the expansion tank you show at front of car at highest point in cooling system so that any air will migrate to tank.
john
john
First obvious thing is the thermostat needs to be in the flow of the hot water. Was there something wrong with the factory location? Usually the thermostat will close off the bypass when it opens to the radiator.
Also my stock pump works just fine, I don't think you need something else.
Also my stock pump works just fine, I don't think you need something else.
So the thermostat is remotely mounted and not on the block?
Duplicate
QUOTE(Chris914n6 @ Dec 8 2020, 05:14 PM)
First obvious thing is the thermostat needs to be in the flow of the hot water.
FWIW - and from years of dealing with dodgy water cooled British cars - the thermostat does seem to be in the wrong place. It's the controlling and sense element for redirecting the coolant AWAY from the engine once operating temp is reached. Per your (excellently drawn) diagram, its not exposed to the water temp coming out of the engine.
Seconded, the idea of trying no thermostat, to see if anything changes....
- Tony
PS. air pockets could be an issue too.
In no particular order: 
In the stock application shown below the thermostat [5] is on the on the backside of the motor while the water pump is at the front of the motor.
Item [11] is the transfer pipe which I have a modified version which relocates the thermostat to the front of the engine.
I do not have a vent on the top of the water plumbing on the engine side, I could add one.
Looking at the diagram it now seems to me that the thermostat could be getting additional heat from the outlets of the cylinder heads since it is a common manifold housing.
The stock location for the thermostat is an ugly casting and if I ever wanted to put the rear trunk wall back in I believe it would have interference problems.
Click to view attachment
Click to view attachment
Ah its starting to make more sense now. I agree it'd help with air bleeding to add a small (like 5/16) bleeder somewhere at the high point by the engine. When I changed mine from where you have it on the radiator to the highest point of the coolant flow on the engine itself my system bled itself WAY better. I added a bleeder valve at the radiator port but have never needed to open it. If your overflow tank is up front you can also move that to the engine bay where it is definitely at the high point. I thought I saw it in the engine bay a few pages back. Maybe try running it without the thermostat and see what happens. Coolant should flow freely all the way through and it might take a while for the the engine to warm up. Keep us posted!
QUOTE(Chris H. @ Dec 8 2020, 07:29 PM)
Ah its starting to make more sense now. I agree it'd help with air bleeding to add a small (like 5/16) bleeder somewhere at the high point by the engine. When I changed mine from where you have it on the radiator to the highest point of the coolant flow on the engine itself my system bled itself WAY better. I added a bleeder valve at the radiator port but have never needed to open it. If your overflow tank is up front you can also move that to the engine bay where it is definitely at the high point. I thought I saw it in the engine bay a few pages back. Maybe try running it without the thermostat and see what happens. Coolant should flow freely all the way through and it might take a while for the the engine to warm up. Keep us posted!
Thanks,
I did have the tank in the engine compartment. It came down to not knowing where to plumb the top smaller hose so it seemed easier to relocate it up front near the radiator.
I will put a T in the bypass hose and then try it without a thermostat.
After spending an hour or so online reading I figured out I screwed up with my thermostat location. Highly unlikely for it to ever open up being so far away from the motor and in the inlet side. Fix coming soon.
I did get a chance to install my homemade horn button in the car. That is a sorry looking steering wheel. A project for another day.
Click to view attachment
I did get a chance to install my homemade horn button in the car. That is a sorry looking steering wheel. A project for another day.
Click to view attachment

The horn button looks great too!
RE: "I did get a chance to install my homemade horn button in the car. That is a sorry looking steering wheel"
Mike - I believe that should be referred to as "patina". I actually love the look of the wheel & horn button as is!
- Tony
Mike - I believe that should be referred to as "patina". I actually love the look of the wheel & horn button as is!
- Tony
You also need to drill a couple 1/8" holes in the thermostat diaphram. This allows water and air to move with the electric pump, and not deadhead when the engine is cold.
QUOTE(Mueller @ Dec 9 2020, 05:50 PM)
After spending an hour or so online reading I figured out I screwed up with my thermostat location. Highly unlikely for it to ever open up being so far away from the motor and in the inlet side. Fix coming soon.
I did get a chance to install my homemade horn button in the car. That is a sorry looking steering wheel. A project for another day.
Click to view attachment
You need to mill a billet steering wheel now.
Changing the cooling lines and routing again today.
1st off this cr@p in the bucket came out of the coolant lines while draining. Not sand, it easily breaks up and turns to a powder. I am thinking corrosion in the aluminum block/heads?
And I think I sunk to a new low in using donor parts for my build.
The hose adapter is an old mop handle that just happened to be the right size.
Click to view attachment
Click to view attachment
QUOTE(Mueller @ Dec 20 2020, 11:45 AM)
Changing the cooling lines and routing again today.
1st off this cr@p in the bucket came out of the coolant lines while draining. Not sand, it easily breaks up and turns to a powder. I am thinking corrosion in the aluminum block/heads?
And I think I sunk to a new low in using donor parts for my build.
The hose adapter is an old mop handle that just happened to be the right size.
Click to view attachment
Click to view attachment
So did you knurl the ends? That takes talent and tools..
I'm going to agree on the corrosion to the alumn.
I'd put a magnet in that crude to verify that it is all aluminum.
Repurposed the old rear trunk shocks from our '98 Volvo S70T5. Now I have gas lifts on the 914. Made some aluminium brackets and bolted it all together. Works as if I actually put some thought into it.
That is a 6 inch diameter slitting saw, 1st time using it I think.
Click to view attachment
Click to view attachment
Click to view attachment
Click to view attachment
Click to view attachment
Click to view attachment
That is a 6 inch diameter slitting saw, 1st time using it I think.
Click to view attachment
Click to view attachment
Click to view attachment
Click to view attachment
Click to view attachment
Click to view attachment
QUOTE(Mueller @ Jan 11 2021, 06:59 PM)
Repurposed the old rear trunk shocks from our '98 Volvo S70T5. Now I have gas lifts on the 914. Made some aluminium brackets and bolted it all together. Works as if I actually put some thought into it.
That is a 6 inch diameter slitting saw, 1st time using it I think.
Those mounts are nice

One step forward, two steps backwards...story of my 914 owning life...
Put the stock water manifold back on, hope to test fire this weekend to see if my overheating issues are fixed.
Made a bracket for my inexpensive radiator fan controller. Lots of good reviews so we will see. I do have a switch in the cabin to manually turn in the fans just in case.
Click to view attachment
Click to view attachment
Click to view attachment
Nice stuff.
Mike, I run that same temp controller for my intercooler, it works
Just be careful, it's probably in celcius.
Just be careful, it's probably in celcius.
Speedhut gauges installed. I used a flat sheetmetal piece from an old filing cabinet.
The gauges fit inside the stock formed gauge housing.
The smaller gauges needed the lock ring to be modified to fit in the bore.
Need to decide on a color for the sheetmetal, not sure if I want to go with black like stock.
Click to view attachment
Click to view attachment
Click to view attachment
Click to view attachment
Click to view attachment
Click to view attachment
Click to view attachment
Click to view attachment
Looks familiar...I did the same for my Speed Hut set up.
Congrats....
Hope to see you and your 914 again @ WCR2021
O
Click to view attachment
Click to view attachment
Click to view attachment
Click to view attachment
Congrats....
Hope to see you and your 914 again @ WCR2021
O
Click to view attachment
Click to view attachment
Click to view attachment
Click to view attachment
Mike you are doing it. Get that cooling figured out and drive it.
This is a "lo-fi" version of our main content. To view the full version with more information, formatting and images, please click here.