Full Version: CptTripps' Real Progress Thread
Thanks Mark...let me know.
Had ALL KINDS of fun tonight...No pics yet...I'm too tired. Here's the list of what I got accomplished.
Removed old fuse panel
Installed Engman's fuse panel
Installed Seat Belts (Too WAY longer than I thought...)
Put 2 (two) seats in the car, instead of the passenger seat I had on the drivers side
Re-installed the guage cluster.
Drove her around the block in the dark, and all the lights work!
I'm going to take her to the office tomorrow. I want the paint-guys to see it and tell me what prep they want before they get it on Monday. Should be a fun drive in!
I'll be hunting for 'what wire goes where' on the front marker lights tonight, so I can install those tomorrow. I have a feeling that's what's wrong with my turn-signals. I flip one way, the arrow blinks once, then they both flash. (The correct light does flash on the back, but just the indicator lights.)
Am I right in thinking that it's because I only have the rears hooked up right now?
i would say yes, need all hooked up to work properly. Why are you installing marker lights if your going to paint it soon? You have the itch like i have to drive the car or something?
| QUOTE (xsboost90 @ May 12 2005, 11:19 PM) |
| i would say yes, need all hooked up to work properly. Why are you installing marker lights if your going to paint it soon? You have the itch like i have to drive the car or something? |
I'm going to drive it to the painter...Just making sure I'm legal for the ride.
You know damn-well that the SECOND that engine fires up, and you can...you'll take it around the block a few times!
Now I need to find what wire goes where...
If both turn indicators flash you have too high of resistance in the circuit. Which means bad ground wire or corroded bulbs/bulb housings. Usually, taking the rear light assemblies apart and cleaning all the electrical contacts will cure that problem.
| QUOTE (CptTripps @ May 11 2005, 07:10 AM) |
Got my new shocks installed on the front lid. I wish it went up a little higher...maybe I did it wrong??? |
[QUOTE]
Just a guess... Try mounting the lifts on the forward hinge bolts...?

Nope...it's too short then. Craig, can you chime in?
Mount the bottom pivot to the back slot. It appears you are in the middle or the one further to the front?
The little rubber eyebrow plugs are available from the Porsche dealer.
CCLINHELPMEHELPME
The little rubber eyebrow plugs are available from the Porsche dealer.
CCLINHELPMEHELPME
| QUOTE (boxstr @ May 13 2005, 08:41 AM) |
| Mount the bottom pivot to the back slot. It appears you are in the middle or the one further to the front? The little rubber eyebrow plugs are available from the Porsche dealer. CCLINHELPMEHELPME |
Thanks Craig...that's what I was looking for. That might give me the extra 4" in height I've been looking for...
Just brought my car to the office and had the painter look her over. He commented the I did a pretty nice job...and I was doing the right thing by bringing her to him to finish off. They are going to fix a few other little marks I've been fighting with. I'm super excited about this. Can hardly wait for next Monday to drop it off!
So I'm driving it here and got REAL nervous when it started to loose power. I'm going over everythign in my head...worried that I didn't have oil, that I'd blown a gasket, thrown a rod, something horrible...car stalls. SHIT...WAIT...GAS! I guess I'd hooked the wrong light up when I was putting the gauge cluster back...I had about a cup of gas in the car. One painfull phone call to the wife later, she was on her way here with a gallon from the garage. Filled her up at the corner, and we were back in business.

how many hours are you putting into this a day?????? you are the man!!!! did you paint anythingbefore? i got to do the same rust repairs to mine too. but I got a welder and a buddy of mine has a auto shop and will paint mine for 500 if i prime it first and supply the paint. I also have to pre paint inside the doors, floors, and trunks, did you hand sand the body? wet? your post is practicly a how to guide its going to help me alot.
| QUOTE (shorty01 @ May 14 2005, 06:17 AM) |
| how many hours are you putting into this a day?????? you are the man!!!! did you paint anythingbefore? i got to do the same rust repairs to mine too. but I got a welder and a buddy of mine has a auto shop and will paint mine for 500 if i prime it first and supply the paint. I also have to pre paint inside the doors, floors, and trunks, did you hand sand the body? wet? your post is practicly a how to guide its going to help me alot. |
I put 2-4 a day...sometimes none at all. This weekend I won't touch it much. If my wife is on call (2nd year resident) I'll go in the garage at 3:30-4:00 when I wonder home, and go to bed at 12:00 when I realize the time. For me the trick was to not burn myself out...which I've done a few times. This board offers a lot of encouragement.
This was my first experience painting, priming, and doing any body work. I'd done some bondo/spray-can work on my motorcycle tank a few years ago, but I don't think that counts. My welding experience was limited to spot-welds that I'd built my fence with. For me the things that made the biggest difference were the Gas MIG and the HVLP Paint gun. Start with good hardware, and you'll never regret it.
If you have questions, don't hesitate to ask...that's what were all here for.
I'll get to posting pics of the last few days later. I've got to find the dohickey to download the cards to iPhoto...
what did you do to the under body. sand and por15? there was no rust in the main support that the battery was leaking into?
| QUOTE (shorty01 @ May 14 2005, 12:08 PM) |
| what did you do to the under body. sand and por15? there was no rust in the main support that the battery was leaking into? |
I replaced the ENTIRE floor with a new one. Just put it in, seam-sealed it, and hit it with 3M Undercoating.
The longs were pretty solid, and not anything other than surface rust inside the long. I hit it with Marine-Clean, Metal Ready, and then POR-15. A little goes a long way...get the 'Starter Kit' for $25 from POR15.com. It comes with Marine-Clean, Metal Ready, and a 4oz can of POR-15. I used one 4oz can to do the insides of my doors, inside the longs and I still have a little left.
Spent tonight wet sanding the whole thing with 600 for the painter tomorrow. I also took my two quarts, and the stuff that I had left and mixed it all together in a new pail for the painter. He's putting 2 coats on before he clears, so this ought to cover everything pretty well, and even the color out.
I'll be spending tomorrow gathering Adobe from the movers, and with my Mom (her birthday). I've got to do the bumpers when I get home. Strip them down, and get them primed. I need to paint them on Tuesday, b/c I've got Star Wars on Wed, and get the car back on Thurs, an dI need to have all the black-stuff painted and ready to go back on!
We're coming down the home streatch folks! This is getting exciting!
ill catch you damniT! mine will be running this week!!!! 
go, go, go, go
Here's where we stand today.
Wet-sanded everything last night with 600 for the painter. I packed up all the paint, clear, and associated stuff and drove it to the body shop this morning. I went over the car with the guy that's going to be painting it, and told him what I was looking for, and what to, and not to be concerned with. I'm confident that I'll get the results I'm looking for. Best of all, I'll have it back by Friday!
Here she is in the shop...
And this is the booth that'll bring it all together...

I'm going to pop my head in every day to take a few snap-shots of the progress. I told everyone over there that I'd be doing it, and to expect it...it's part of the deal.
They'll do body stuff today and tomorrow, and paint on Wed, clear on Thurs and buff it all out on Friday. I drive her home by 3:00 Friday!
I lucked out because Angie is on call Friday, so I get all Friday and Saturday to put it all back together...without feeling guilty about not spending time with her.
I'm gunning for you Dan!
Who put that screwdriver on your hood?javascript:emoticon(':o')
smilie
smilie
That was me...forgot to take it off before I took the pic. As I was taking the pic, I'm thinking...."Someone is going to comment on this screwdriver!"
Pics tomorrow, but I got the bumpers, rockers, and valances ground down, and in primer tonight. Hope to sand them all down tomorrow and put a coat of black paint on them. I'll do a second on Wed before Star-Wars.
Pics tomorrow, but I got the bumpers, rockers, and valances ground down, and in primer tonight. Hope to sand them all down tomorrow and put a coat of black paint on them. I'll do a second on Wed before Star-Wars.
what kind of tool are you using to take all of the paint off
im using one of those 3m paint and rust grinder type pads that attatch on a drill and im hitting bondo on the front fender i think its factory bondo since the layers i see are paint-primer-paint-primer dark reddishbrown primer? and then in some areas bondo then the metal
whats the red stuff
id like to know what tool your using cause the drill im using is cutting into the bondo or body filler and by doing that its going to be hart to shape the fender back to the stock look
or should i just grind all of the filler out
thanks
| QUOTE (shorty01 @ May 18 2005, 07:11 PM) |
| im using one of those 3m paint and rust grinder type pads that attatch on a drill |
You're using this on a regular drill? This might take you quite a while. I would look into an angle grinder. Much more power. Also, if you don't want to completely strip the filler, maybe use a DA sander if you have a compressor.
the pink is bondo and the green is bondo. The factory didn't use body filler. It looks like your car was painted several times. Look under a body gasket for origonal color. 120 grit on an electric random orbital sander will cut the paint without gouging the bondo.
Shorty: Brown was a typical sealer/primer in the 70s. You probably had a re-paint at some point. I took it ALL THE WAY to metal. Used the 3M SandBlaster purple pads on an angle grinder. If I had to do it over? I'd use a chemical stripper. WAY faster/cleaner/cheaper/better on the metal.
I went and checked on my car today...they did a bunch of body work...and a lot better than I would have! It's looking great. I stopped by at the end of the day, and it was primed, and waiting for it's paint tomorrow. He said they are going to paint/clear tomorrow afternoon, and then 'bake' it for an hour. Said it'll be hard as nails after that.
I painted the bumpers this morning in my garage. I'm going to wet-sand tomorrow morning, and put another coat on. Those are all looking great too. I can hardly pait to get all this stuff back on the car. It all looks so purdy in it's new shiny paint!
The factory did use bondo. Doug I didn't forget about your brake light switch. I checked my parts car and it didn't have one. I'll check my parts stash tomorrow.
Doug I didn't forget about your brake light switch. I checked my parts car and it didn't have one. I'll check my parts stash tomorrow.
Cpttripps what kind of stripper would you use, And should i take out all of the bondo and apply new? or just bondo over the old stuff.
what paint code are you using. I'm thinking about going with a yellow shade.
did you apply anything inside the long ofer the surface rust?
oh yeah Cpt? tripps? you an officer? if so what branch
Andrew
HUA!!!
what paint code are you using. I'm thinking about going with a yellow shade.
did you apply anything inside the long ofer the surface rust?
oh yeah Cpt? tripps? you an officer? if so what branch
Andrew
HUA!!!
I decided to poke my head in to see how your car was developing. Damn Doug you have been a busy little beaver! Looks like you are nearing, stab the gas phase in your restoration. I can't wait to see that puppy in person.
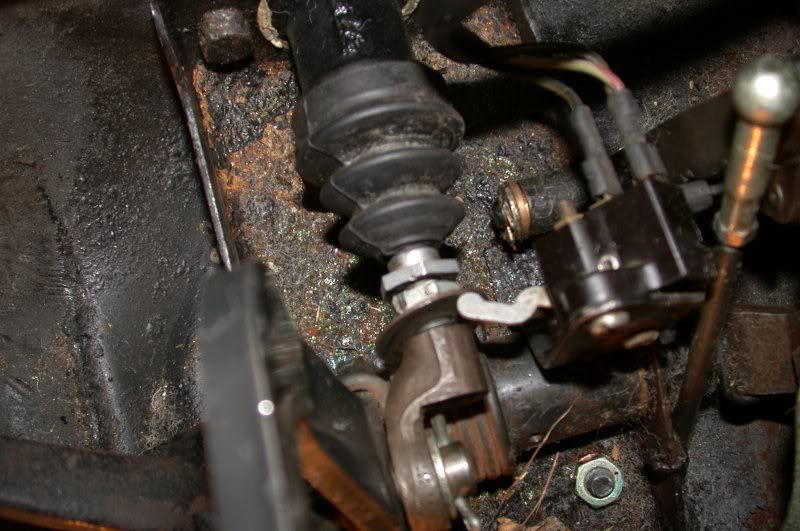
You asked for pictures before and I know this is a bit late but here they are. Here are some pictures I took of the brake light and the collar the switch arm rides on.
Top view shows switch behind the accelerator shaft. The collar and the adjustment nut behind (above in pic).
Another view showing the MC, MC adjustment mechanism.
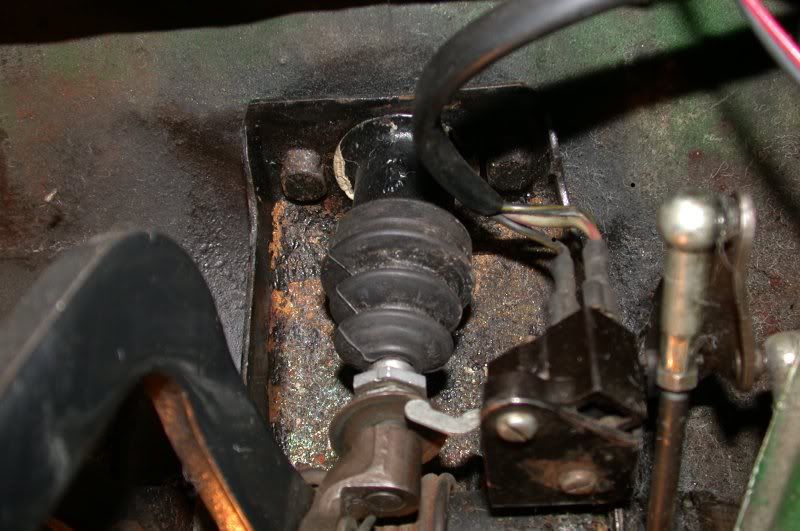
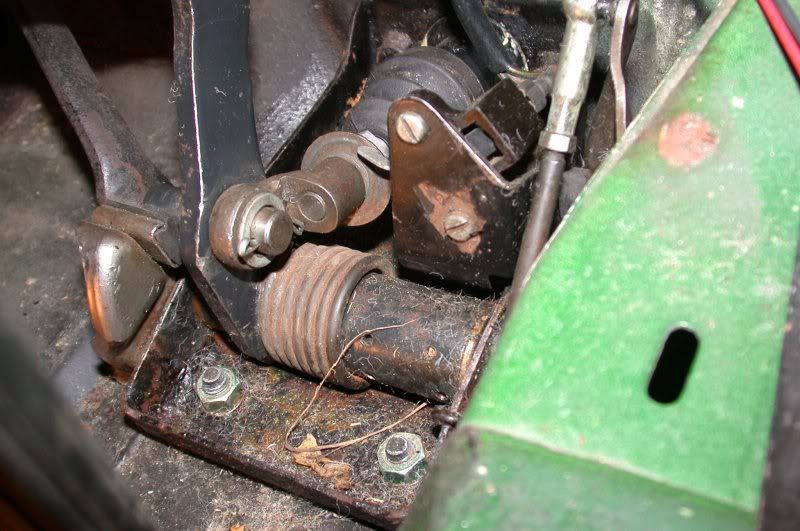
Another showing front view.
Top view shows switch behind the accelerator shaft. The collar and the adjustment nut behind (above in pic).
Another view showing the MC, MC adjustment mechanism.
Another showing front view.
Thanks for the pics Mike! Damn...I was doing that ALL wrong! I have it up on the front of the whole thing. That would explain a few things!
CptTripps was what they named the disease that wiped out the planet in the Steven King book "The Stand." No military affiliation.
Thanks Steve. I'll be driving her back from paint tonight, or tomorrow afternoon. If you want to come up Sat, or early Sun...I'll be putting her back together.
You all want to see the definition of a speedy restoration...watch how fast I get the seals/carpet/bumpers/rockers/interior/stereo in there. I'm a man on a mission!
Doug I'm done at school around 2:30 on Friday. I can bring a change of cloths and we can have that beast back together by Happy Hour 
Sam: It's a plan! I'll be home tomorrow 3:00ish. Depends when the body shop lets me take her home! Call my cell...I'll have it on all day.
Ok gang...lots to cover. Here we go!
Ok gang...lots to cover. Here we go!
Here she sits outside of KEI Auto Body in Chagrin Falls. I'd spent the last day wet-sanding her down so she'd take another coat of paint.

They found a few spots that needed some additional attention. (ie: places my bodywork skill REALLY shined!)

Here's my main-man Rob. He pulled her in the booth today after sanding everything purdy.
He's wiping it down with de-greaser before he does the final tack-cloth wipe, and then paints.

He's wiping it down with de-greaser before he does the final tack-cloth wipe, and then paints.
And then he digs right in!

30min later...

(And this is BEFORE the clear-coat is applied!)
(And this is BEFORE the clear-coat is applied!)
Meanwhile....here's what I've been using my garage for this week while KEI has had my car.
I DO NOT want to be one of those guys that drives around without rockers for 6mos.

I DO NOT want to be one of those guys that drives around without rockers for 6mos.
So I got it all primed and painted up!

Tomorrow I'm going to put the lights and the seals back in the car before I drive it back home. I don't want my nice new paint job ratteling its self full of chips. So I figured I'd spend tonight re-building the lights. What a great time to install the 'euro kit' I bought from Camp914!

damn! now i need to repaint mine to keep up!
I didn't take any pics of this step, but I cracked open my AutoAtlanta 'all the seals' special tonight...that's a lot of seals for $600! I laid them all out, and spent a few min figuring out what is what. I'm going to put the seals in the doors and trunks before I leave tomorrow...hope I can figure all these out!
Dude...I repainted mine to keep up with YOU!
| QUOTE |
| damn! now i need to repaint mine to keep up! |
Dude...I repainted mine to keep up with YOU!
Looks Great, By the way, do you have a picture of the AA seal kit? 
| QUOTE (Lou W @ May 19 2005, 11:23 PM) |
| Looks Great, By the way, do you have a picture of the AA seal kit? |
I'm going to take some today, as I'm putting them back on. People knocked it when I was buying it, but let me tell you...it's pretty nice. The seals I was worried about were the main windshield seal, the front hood, and the door seals. All look great, and I think the one for the windshield is OEM.
Doug (CptTripps)
You are an animal!!! You get more done in one week than most of us get done in one year. Looking good, can't wait to meet you in person.
Tom
You are an animal!!! You get more done in one week than most of us get done in one year. Looking good, can't wait to meet you in person.
Tom
| QUOTE (CptTripps @ May 20 2005, 02:50 AM) | ||
I'm going to take some today, as I'm putting them back on. People knocked it when I was buying it, |
Me thinks people were probably knocking you more on the fact you were buying ANYTHING from AA. I'm personanly waiting for them to fold so I can buy their 916

doug has it easy for one thing... his wife is in her residency ( sp ) to be a doctor so she is not home much and when she is she is a sleep. he does not have to hear her complain about him spending so much time in the garage.
good job so far doug maybe you will have a 914 for the wcc, with out buying it AT the wcc
good job so far doug maybe you will have a 914 for the wcc, with out buying it AT the wcc
| QUOTE (scott thacher @ May 20 2005, 09:49 AM) |
| doug has it easy for one thing... his wife is in her residency ( sp ) to be a doctor so she is not home much and when she is she is a sleep. he does not have to hear her complain about him spending so much time in the garage. good job so far doug maybe you will have a 914 for the wcc, with out buying it AT the wcc |
Yeah, with her gone for 36hrs every 4 days, it's easy to get a lot done. I just time UPS/FedEX shipments so they arrive when she isn't home.
What do you mean WCC....I'm going to be done this weekend!
but do YOU have a job?!?! I would have to quit my job and hire an extra person to make the kind of progress you guys make!! great job!
| QUOTE (tat2dphreak @ May 20 2005, 10:09 AM) |
| but do YOU have a job?!?! I would have to quit my job and hire an extra person to make the kind of progress you guys make!! great job! |
I'm the Cheif Technology Officer for a venture capital firm. In the winter...I'm working like mad. In the summer, the CFO and I work 10:00 till 3:00...with an hour lunch at the local diner.
I don't have THAT much more free time than most people...I just go fast at shit like this...before my ADD kicks ina dn I'm on to the next project. Like Lumberjacking or something.

This is a "lo-fi" version of our main content. To view the full version with more information, formatting and images, please click here.