Today I did the deck height check using both the vernier at TDC and the solder method. I did the check on cylinders #1 and #4. Ollie's had supplied 0.5 mm base gaskets based on their resizing of the case. Using these gaskets, deck height as measured on the crushed solder came out at 1.2-1.3 mm. That along with my measured combustion chamber and piston dome volumes results in a 10.0:1 compression ratio. Right on target so I will move forward on the assembly.
Click to view attachment
Click to view attachment
Click to view attachment
Full Version: Another 914-6 GT Tribute Project
Continuing to move forward on the engine build. Heads and cam towers are now installed, and the cams test fitted.
Click to view attachment
Click to view attachment
Click to view attachment
Click to view attachment
Looks great.
I applied JB Weld to seal the chain rail and tensioner posts on the backside of the chain boxes. I also used the JB Weld to seal the case oil line webbing on the RHS of the case behind the oil cooler.
Click to view attachment
Click to view attachment
Click to view attachment
Click to view attachment
Here is my homemade setup for the sprocket alignment. Works well. Very accurate and repeatable. I ended up with (3) shims per side. Next up will be the cam timing.
Click to view attachment
Click to view attachment
I did the cam timing yesterday. DC-60 cams with a spec of 4.8-5.2 mm at overlap. I set them at 5.25 mm.
Click to view attachment
Click to view attachment
That is some sweet work right there. Wow
Looks great
I installed the chain tensioners today and rechecked the cam timing. I am using the late 930 (non-pressure fed) tensioners with the later wide bushed idler arms. I am also using the tensioner guards as extra protection.
I use zip ties (rather than the Porsche special tool) to hold the tensioners after compressing them in my bench vice so they can be installed. The zip ties are then cut and removed allowing the tensioner to expand.
As expected, the cam timing remained unchanged.
Click to view attachment
Click to view attachment
Click to view attachment
QUOTE(mb911 @ Jun 6 2024, 04:15 PM) 
Looks great
Thanks Ben
I am sure I will be getting in touch with you for guidance on the oil line system I bough from you for this project.
I spent the past couple of days finishing up the long block.
I did the piston-to-valve clearance check by screwing in the intake and exhaust valve rocker adjusters on cylinders 1 and 4 by 1.5 mm and 2.0 mm respectively and then rotating the engine through several revolutions to check for interference. No interference between the pistons and valves means that there is at least 1.5 mm intake valve clearance and 2.0 mm exhaust valve clearance.
After assuring adequate piston-to-valve clearance I installed the JB Racing billet twin plug distributor and set the top rotor to the Z1 mark on the distributor while the engine was at TDC of the compression stroke for cylinder #1.
After this, I installed the remaining rockers, adjusted the valve clearance and installed the valve covers.
I then decided to recheck the engine oil cooler for leaks. I planned to use a 911 cooler that was modified for the 914-6 configuration with a welded in elbow. I had checked it with the Stromski pressure tester before sending out for the -6 modification and did not see any leaks. However, upon rechecking it, I got plenty of air bubbles. So now I need to find a replacement 914-6 style cooler.
Click to view attachment
Click to view attachment
Click to view attachment
Click to view attachment
Click to view attachment
Wow! That long block looks great. Sorry to hear about the oil cooler leak but so glad you re-checked it before installation only to have to remove it after you fired her up. 
Just got back from a nice long vacation and found the new cooler had arrived. In an abundance of caution, I repeated the leak check and as expected, no bubbles.
I installed the new cooler but it has a standard M30 fitting. So now I need an M30 X A N12 adapter to mate up cooler to hose.
Click to view attachment
Click to view attachment
I installed the new cooler but it has a standard M30 fitting. So now I need an M30 X A N12 adapter to mate up cooler to hose.
Click to view attachment
Click to view attachment
Really beautiful job your doing. This is coming out awesome.
Beautiful work Tom.
Looking great !
Tom, you should be very proud of the way your car is turning out.
Best Bob B

Best Bob B
Some more progress on the engine. Installed the oil scavenge line. I plan to run this over the rear of the engine/transmission to the external t-stat much like the early 911. I also installed the RHS heat exchanger. Thank you, Ben McFarland, for the beautiful workmanship on the heat exchangers and for the oil line hardware and plumbing suggestions.
Currently waiting for an M30 X AN12 adapter to connect the CSF cooler to the tank. Once I have that line insulated and in place, I will install the LHS heat exchanger.
Click to view attachment
Click to view attachment
Currently waiting for an M30 X AN12 adapter to connect the CSF cooler to the tank. Once I have that line insulated and in place, I will install the LHS heat exchanger.
Click to view attachment
Click to view attachment
The M30 X AN12 adaptor arrived yesterday. I installed it along with the insulated portion of the cooler to tank oil line. Heat exchangers went on very nicely.
Next up will be the shroud, alternator, fan, wiring harness and carbs.
Click to view attachment
Click to view attachment
Click to view attachment
Next up will be the shroud, alternator, fan, wiring harness and carbs.
Click to view attachment
Click to view attachment
Click to view attachment
More progress on the engine. I cleaned up an old 3.2 engine shroud and installed it along with the PMO intake manifolds. I then assembled the fan/alternator assembly and installed it while making the alternator connections from the Restoration Design new engine wiring harness.
Click to view attachment
Click to view attachment
Click to view attachment
Click to view attachment
Man those heat exchangers came from me? Must have been 3.5 ish years ago? I can’t recall but I haven’t been involved with any exhaust since January of 21
Looks great
Looks great
QUOTE(mb911 @ Jul 16 2024, 09:17 PM)
Man those heat exchangers came from me? Must have been 3.5 ish years ago? I can’t recall but I haven’t been involved with any exhaust since January of 21
Looks great
I wish you still made them. I need a set or two…..
Matt

Ben
I picked those up from a want to buy ad that I posted on the forum. One of our members had a set that he hadn’t used. They were perfect for this project, beautifully made and fit nicely.
I picked those up from a want to buy ad that I posted on the forum. One of our members had a set that he hadn’t used. They were perfect for this project, beautifully made and fit nicely.
QUOTE(Tom1394racing @ Jul 17 2024, 02:48 AM)
Ben
I picked those up from a want to buy ad that I posted on the forum. One of our members had a set that he hadn’t used. They were perfect for this project, beautifully made and fit nicely.
Oh yes that’s right.
QUOTE(mate914 @ Jul 16 2024, 05:49 PM)
QUOTE(mb911 @ Jul 16 2024, 09:17 PM)
Man those heat exchangers came from me? Must have been 3.5 ish years ago? I can’t recall but I haven’t been involved with any exhaust since January of 21
Looks great
I wish you still made them. I need a set or two…..
Matt
I am positive some has the patterns and designs and could make them but unfortunately not me and I refuse to send buyers to that group of people.
I went to install the lower spark plugs and ran into a couple of issues.
The heads were machined for twin plug but the clearances on the lower holes are too small to allow a regular spark plug and plug socket to fit. I recalled that I had run into this same problem when I built my RSR twin plug engine almost 20 years ago. The solution turned out to be a motorcycle plug with a 16 mm ATF hex and a 16 mm plug socket. In addition, I had open up some clearance access on # 4 lower plug hole by modifying the chain box. All good there now...lower plugs installed.
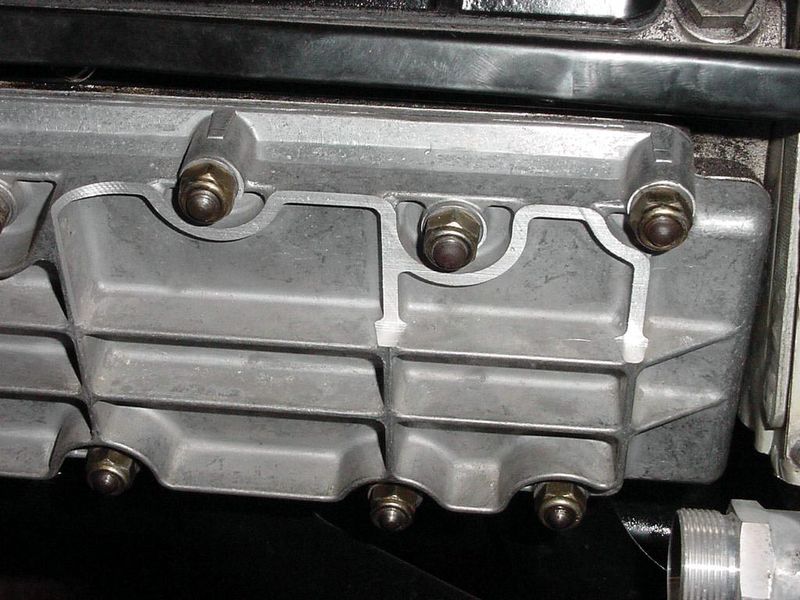
In the process of scoping out this issue, I had to remove the lower valve covers to check out the lower plug holes. I found that valve covers would not clear the heater exchanger boxes unless I removed two of the lower valve cover studs. This will be a PIA when doing valve adjustments. I think one possible solution would be to use 8 mm bolts rather than studs and nuts for the bottom of lower valve covers. Anyone ever run into this?
Click to view attachment
Click to view attachment
The heads were machined for twin plug but the clearances on the lower holes are too small to allow a regular spark plug and plug socket to fit. I recalled that I had run into this same problem when I built my RSR twin plug engine almost 20 years ago. The solution turned out to be a motorcycle plug with a 16 mm ATF hex and a 16 mm plug socket. In addition, I had open up some clearance access on # 4 lower plug hole by modifying the chain box. All good there now...lower plugs installed.
In the process of scoping out this issue, I had to remove the lower valve covers to check out the lower plug holes. I found that valve covers would not clear the heater exchanger boxes unless I removed two of the lower valve cover studs. This will be a PIA when doing valve adjustments. I think one possible solution would be to use 8 mm bolts rather than studs and nuts for the bottom of lower valve covers. Anyone ever run into this?
Click to view attachment
Click to view attachment
This is a pretty typical issue from what I've heard. I think you can get away with milling down just one corner of the covers. See this post:
http://www.914world.com/bbs2/index.php?sho...p=2239420&#
(Not my picture)
http://www.914world.com/bbs2/index.php?sho...p=2239420&#
(Not my picture)
In order to move forward with the engine sheet metal and the clutch system, it was time to move the engine from the stand to the lift table that I will be using for the engine install. Since I use my two post lift to transfer the engine to the lift table, I took the opportunity to install the roller wheels and tires and move the 914 from the lift and into the daylight for some pics.
Click to view attachment
Click to view attachment
Click to view attachment
Click to view attachment
Click to view attachment
Click to view attachment
Click to view attachment
Click to view attachment
Click to view attachment
Click to view attachment
QUOTE(troth @ Jul 21 2024, 09:05 AM)
This is a pretty typical issue from what I've heard. I think you can get away with milling down just one corner of the covers. See this post:
http://www.914world.com/bbs2/index.php?sho...p=2239420&#
(Not my picture)
Thanks for the suggestion. My covers have been milled. The interference I have is between the valve cover stud, the inside mate surface of the valve cover and the top of the heat exchanger.
Twin plug lower plug clearance is dependent on what head studs and nuts were used. The 964 on did not use the allen head nuts to provide more clearance. Several aftermarket set address this I issue as well. might be able to change out nuts to use same plugs top and bottom.
john
john
QUOTE(targa72e @ Jul 22 2024, 12:30 AM)
Twin plug lower plug clearance is dependent on what head studs and nuts were used. The 964 on did not use the allen head nuts to provide more clearance. Several aftermarket set address this I issue as well. might be able to change out nuts to use same plugs top and bottom.
john
Thanks John
Yes, I know I could replace the lower barrel nuts with 964 style head stud nuts. That might give me additional clearance and I might be able to get a regular spark plug socket down inside there. However, the motorcycle plug solution has worked well for me on my RSR twin plug motor And so I’m planning to go that route.
QUOTE(Tom1394racing @ Jul 22 2024, 01:47 AM)
QUOTE(targa72e @ Jul 22 2024, 12:30 AM)
Twin plug lower plug clearance is dependent on what head studs and nuts were used. The 964 on did not use the allen head nuts to provide more clearance. Several aftermarket set address this I issue as well. might be able to change out nuts to use same plugs top and bottom.
john
Thanks John
Yes, I know I could replace the lower barrel nuts with 964 style head stud nuts. That might give me additional clearance and I might be able to get a regular spark plug socket down inside there. However, the motorcycle plug solution has worked well for me on my RSR twin plug motor And so I’m planning to go that route.
So if you switch to bolt on solution rather then stud and nut you can slid the cover off. It works pretty well
QUOTE(mb911 @ Jul 22 2024, 06:29 AM)
QUOTE(Tom1394racing @ Jul 22 2024, 01:47 AM)
QUOTE(targa72e @ Jul 22 2024, 12:30 AM)
Twin plug lower plug clearance is dependent on what head studs and nuts were used. The 964 on did not use the allen head nuts to provide more clearance. Several aftermarket set address this I issue as well. might be able to change out nuts to use same plugs top and bottom.
john
Thanks John
Yes, I know I could replace the lower barrel nuts with 964 style head stud nuts. That might give me additional clearance and I might be able to get a regular spark plug socket down inside there. However, the motorcycle plug solution has worked well for me on my RSR twin plug motor And so I’m planning to go that route.
So if you switch to bolt on solution rather then stud and nut you can slid the cover off. It works pretty well
Thanks Ben...That is my plan. I will probably leave the upper studs and change out only the bottom row with bolts.
QUOTE(Tom1394racing @ Jul 22 2024, 05:13 AM)
QUOTE(mb911 @ Jul 22 2024, 06:29 AM)
QUOTE(Tom1394racing @ Jul 22 2024, 01:47 AM)
QUOTE(targa72e @ Jul 22 2024, 12:30 AM)
Twin plug lower plug clearance is dependent on what head studs and nuts were used. The 964 on did not use the allen head nuts to provide more clearance. Several aftermarket set address this I issue as well. might be able to change out nuts to use same plugs top and bottom.
john
Thanks John
Yes, I know I could replace the lower barrel nuts with 964 style head stud nuts. That might give me additional clearance and I might be able to get a regular spark plug socket down inside there. However, the motorcycle plug solution has worked well for me on my RSR twin plug motor And so I’m planning to go that route.
So if you switch to bolt on solution rather then stud and nut you can slid the cover off. It works pretty well
Thanks Ben...That is my plan. I will probably leave the upper studs and change out only the bottom row with bolts.
That works. I just went full bolts to ease it
A bit more progress. I did a preliminary fit of the engine sheet metal. It took a little fiddling with some enlarging of the mount holes and some tin snip work but it seems to fit well. I'll still have to drill some through holes for the lower plug wires.
I also installed the Kennedy Engineering Phase II clutch kit that allows me to use the 3.0 flywheel with the 901 gearbox. All seemed to go smoothly.
Click to view attachment[
attachmentid=917689]
Click to view attachment
Click to view attachment
Click to view attachment
I also installed the Kennedy Engineering Phase II clutch kit that allows me to use the 3.0 flywheel with the 901 gearbox. All seemed to go smoothly.
Click to view attachment[
attachmentid=917689]
Click to view attachment
Click to view attachment
Click to view attachment
QUOTE(troth @ Jul 21 2024, 10:05 PM)
This is a pretty typical issue from what I've heard. I think you can get away with milling down just one corner of the covers. See this post:
http://www.914world.com/bbs2/index.php?sho...p=2239420&#
(Not my picture)
The 993 uses bolts for the valve covers instead of studs. 900 075 345 02- but they are 6mm so e probably no help.... Just saying the factory did it too. .
Pete
Edit- wrong part number 900 067 238 02
QUOTE(peteinjp @ Jul 26 2024, 07:38 AM)
QUOTE(troth @ Jul 21 2024, 10:05 PM)
This is a pretty typical issue from what I've heard. I think you can get away with milling down just one corner of the covers. See this post:
http://www.914world.com/bbs2/index.php?sho...p=2239420&#
(Not my picture)
The 993 uses bolts for the valve covers instead of studs. 900 075 345 02- but they are 6mm so e probably no help.... Just saying the factory did it too. .
Pete
/
Edit- wrong part number 900 067 238 02.
Thanks!
OK...You guys have convinced me. I will change out all my lower valve cover studs to bolts. I am sure I must have the right size M8 bolts in my stash
QUOTE(Tom1394racing @ Jul 26 2024, 05:41 AM)
QUOTE(peteinjp @ Jul 26 2024, 07:38 AM)
QUOTE(troth @ Jul 21 2024, 10:05 PM)
This is a pretty typical issue from what I've heard. I think you can get away with milling down just one corner of the covers. See this post:
http://www.914world.com/bbs2/index.php?sho...p=2239420&#
(Not my picture)
The 993 uses bolts for the valve covers instead of studs. 900 075 345 02- but they are 6mm so e probably no help.... Just saying the factory did it too. .
Pete
/
Edit- wrong part number 900 067 238 02.
Thanks!
OK...You guys have convinced me. I will change out all my lower valve cover studs to bolts. I am sure I must have the right size M8 bolts in my stash
Good call
But you LOSE the cool nylocks...
Just kidding!
Now, every single 911 I have adjusted the valve on I purchased the kits with the new nuts.
I SAVED the old ones...
Been using them for 3 decades when I need a nylock for something.
I still have 60+ old ones!
Just kidding!
Now, every single 911 I have adjusted the valve on I purchased the kits with the new nuts.
I SAVED the old ones...
Been using them for 3 decades when I need a nylock for something.
I still have 60+ old ones!
Hey Tom
Your project is coming along beautifully.
See pics of my lower ignition wire routing.
The grommits are 993 or 996 OEM
I'm away at the moment so can't provide the part #
Also, I used full size lower spark plugs and found the only plug wrench that would
work was the one included in '69-'73 OEM tool kits.
I also used 12 point cyl. head nuts for additional clearance.
The lower valve covers are milleded 996 items with the rubber perimeter seals.
Hi Tom
Outstanding build and workmanship
If you need any of these 911 spark plug wrenches, free if needed.
Tom MI
Outstanding build and workmanship
If you need any of these 911 spark plug wrenches, free if needed.
Tom MI
QUOTE(TJB/914 @ Jul 26 2024, 02:11 PM)
Hi Tom
Outstanding build and workmanship
If you need any of these 911 spark plug wrenches, free if needed.
Tom MI
Tom that is badass. Wish I had some of those. They are not convenient then standard setups
QUOTE(rgalla9146 @ Jul 26 2024, 05:34 PM)
Hey Tom
Your project is coming along beautifully.
See pics of my lower ignition wire routing.
The grommits are 993 or 996 OEM
I'm away at the moment so can't provide the part #
Also, I used full size lower spark plugs and found the only plug wrench that would
work was the one included in '69-'73 OEM tool kits.
I also used 12 point cyl. head nuts for additional clearance.
The lower valve covers are milleded 996 items with the rubber perimeter seals.
Rory
Thanks for the tip on the lower plug wire grommets. I should be able to find them. I do have the 12 point head stud nuts and an original ‘73 tool kit. I think I will check out switching to regular spark plugs when I change out the valve cover studs.
Tom the pics were taken before I spent time to fully adjust the wire lengths,
especially over the top of the fiberglass.
Be carefull on the 4-5-6 side... leave enough length below the tin to remove plug
connectors
especially over the top of the fiberglass.
Be carefull on the 4-5-6 side... leave enough length below the tin to remove plug
connectors
I replaced to lower studs on the lower valve covers with hex bolts. I kept the top studs as they make it easier to hang the valve cover and gasket for mounting. No more clearance issue with the heat exchanger or oil hose.
Click to view attachment
Click to view attachment
Yesterday I mated the transmission to the engine using my lift to position the transmission to slide easily onto the engine rear studs.
Click to view attachment
Click to view attachment
Click to view attachment
Click to view attachment
Click to view attachment
Click to view attachment
I mounted my new WOSP high torque starter after checking the position of the drive gear relative to the flywheel ring gear. The only way the stater fit was with the electrical connections on the top. Rotating it 180 deg results in interference with the gearbox exterior gusset. I am wondering if there be enough clearance between the top connections and the bottom of the rear trunk floor pan?
Click to view attachment
Click to view attachment
Hi Tom,
@Tom1394racing My high torque started is installed with he terminals on top like you have. It fits and the terminals can be accessed.
@Tom1394racing My high torque started is installed with he terminals on top like you have. It fits and the terminals can be accessed.
This is a "lo-fi" version of our main content. To view the full version with more information, formatting and images, please click here.