Help - Search - Members - Calendar
Full Version: 914 2.0 > 3.0 GT Conversion
914World.com > The 914 Forums > 914World Garage
Pages: 1, 2, 3, 4, 5, 6, 7, 8, 9, 10, 11, 12
defianty
Have you ever thought of something you wanted and then after a bit of research realised no one really offers that service and if they did the cost would be ridiculous? I do often and usually you forget about the idea, but occasionally you realise you know the right people and maybe you could make it happen. Well this is one of those instances when I had a very good friend in exactly the right place.

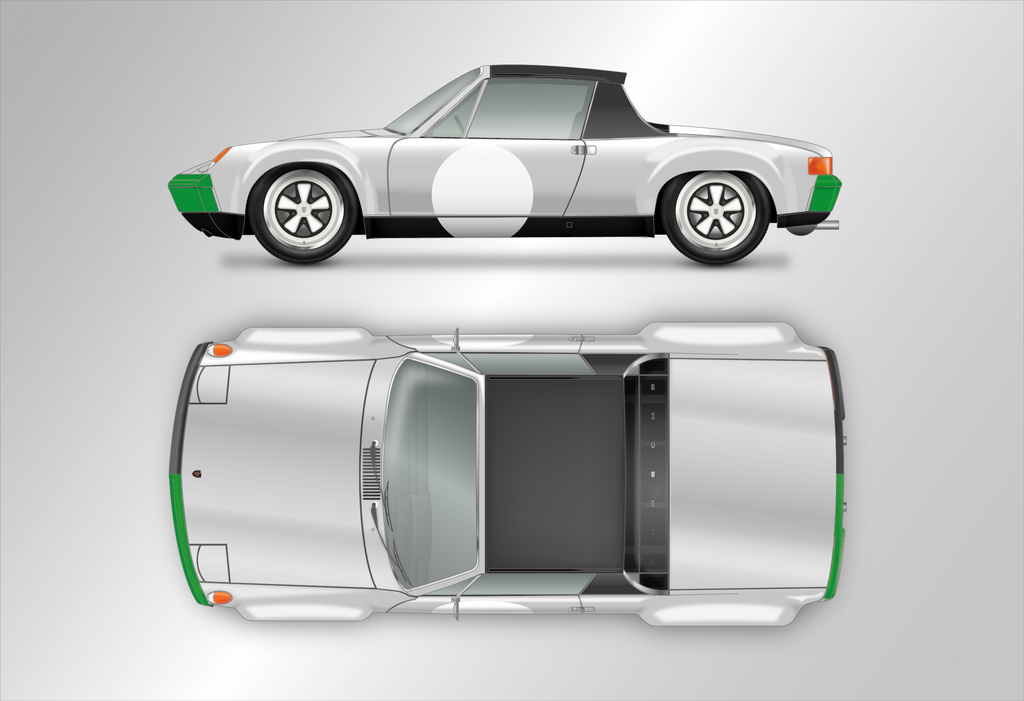
With the build being more of a Hot Rod, I guess, rather than an exact replica GT I wanted a badge to reflect that. Now I’m not the first person to make a custom 914-GT badge but I wanted a hand in making my own - just as I’ve done with the car itself.

So a while back I drew this using my original 914 badge as a template. All measured out perfectly from the original.

IPB Image

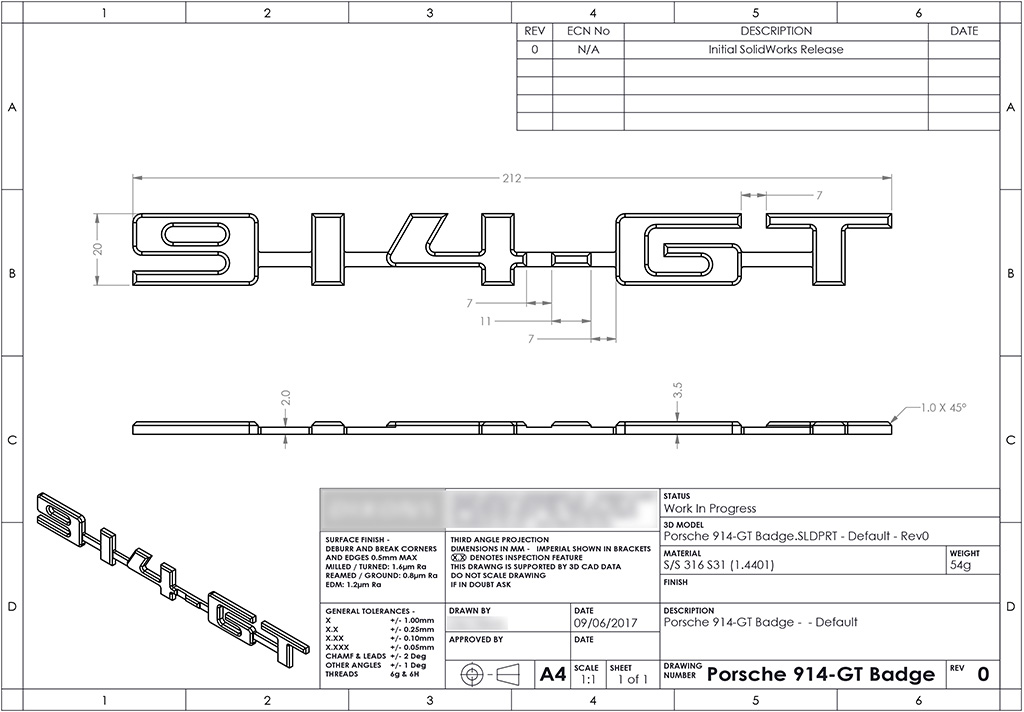
That was simple enough, now it needed to be turned into a file that a CNC mill could read - so the following was created in Solidworks.
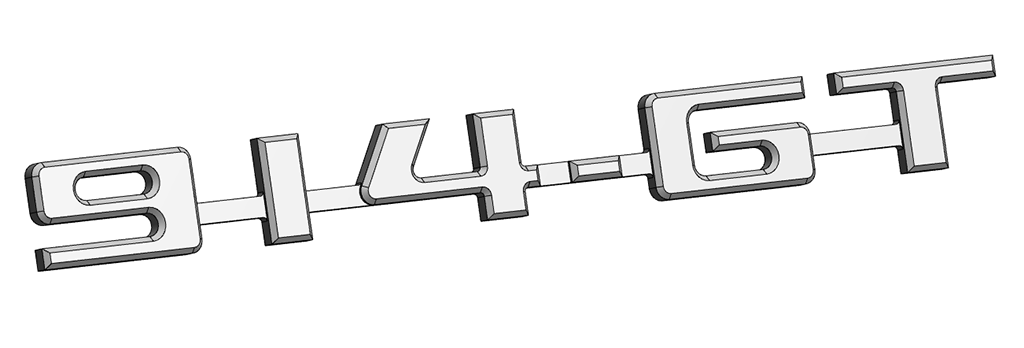
IPB Image

A quick 3D render.

IPB Image

Now I don’t have a CNC mill at home but I have a friend who owns a surgical instruments manufacturing company. Now was the time to take advantage of that laugh.gif

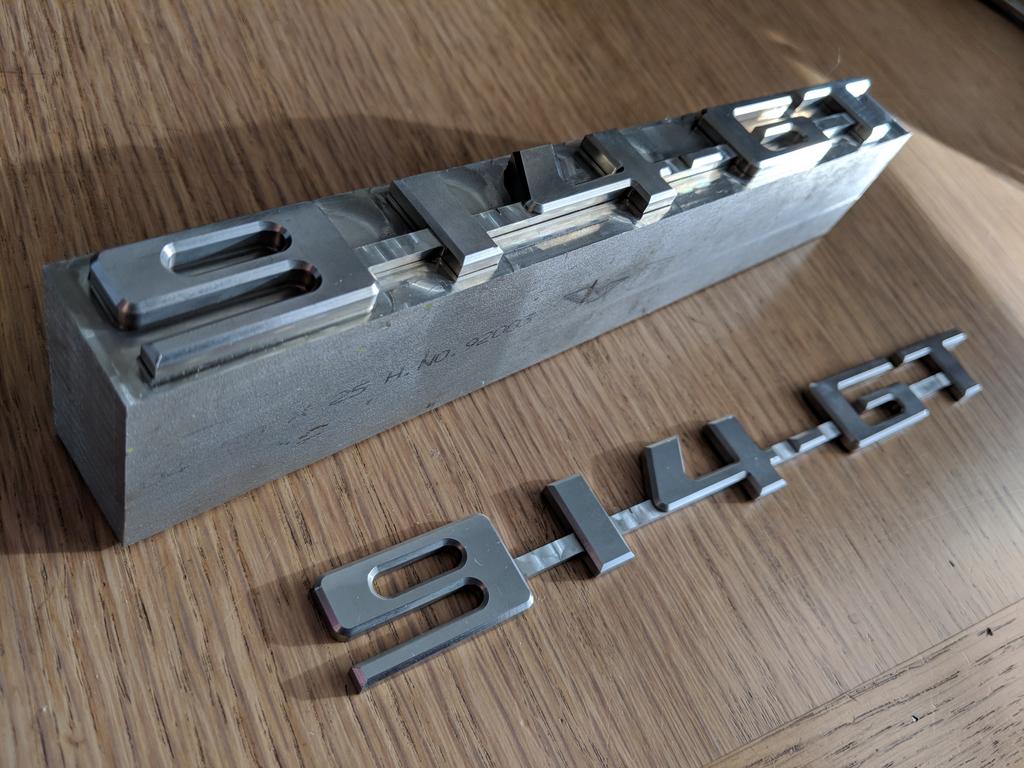
After a while a was presented with this billet of stainless steel and my badge had come to life.

IPB Image

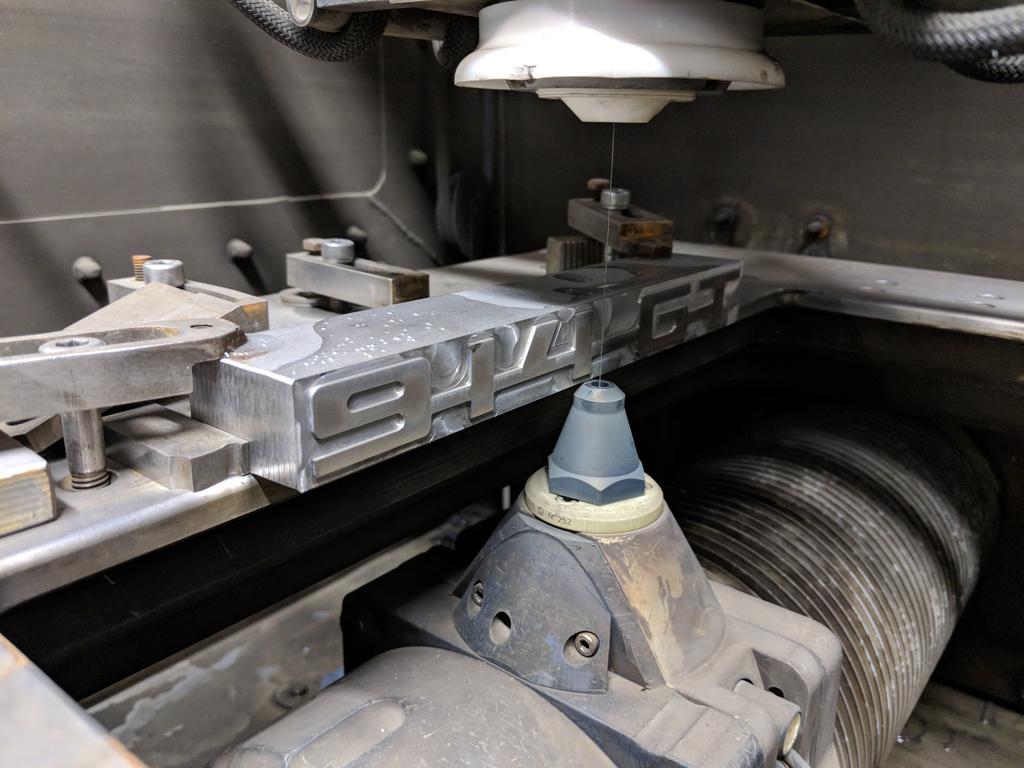
This is the machine that was used to cut the badge from the billet. It uses a process called Wire Erosion. I'd never heard of this process before and found it quite fascinating. It's process actually takes place with everything totally submerged in distilled water.

IPB Image

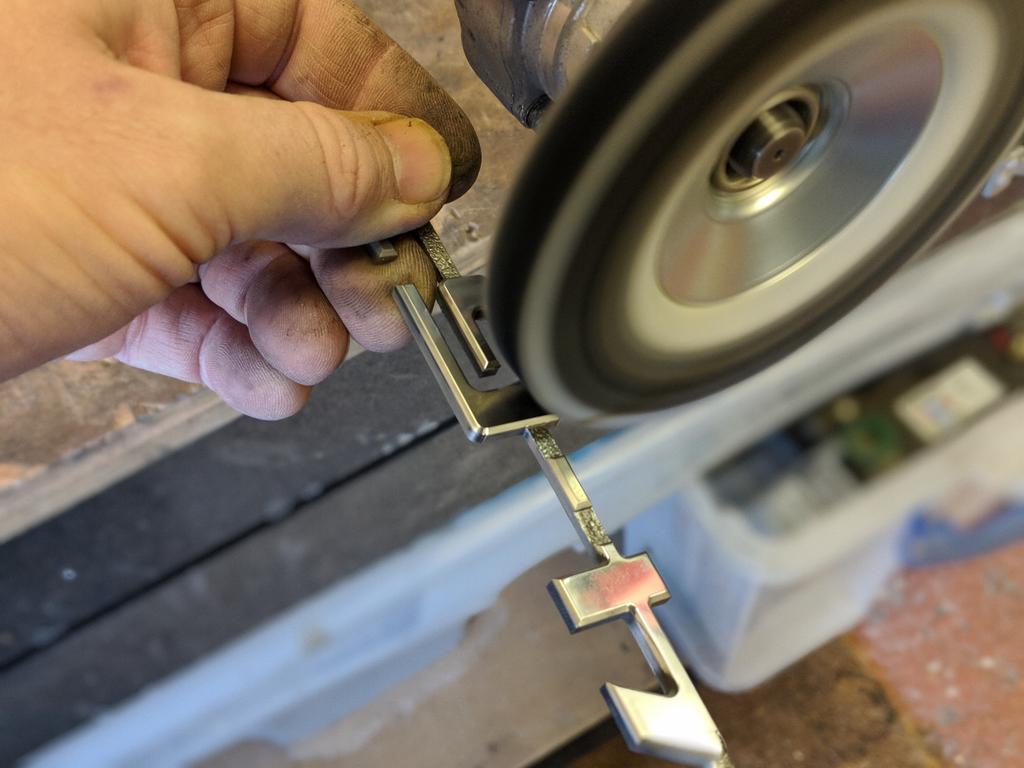
The next step was back with me to clean them up, polish them and add the engraved detail between the digits as per the original badges.

The first step was to get rid of the machine marks. This was done on a granite block with increasing grades of sandpaper. I won’t speak about how long this process took - let’s just say I won’t be doing it again laugh.gif

IPB Image

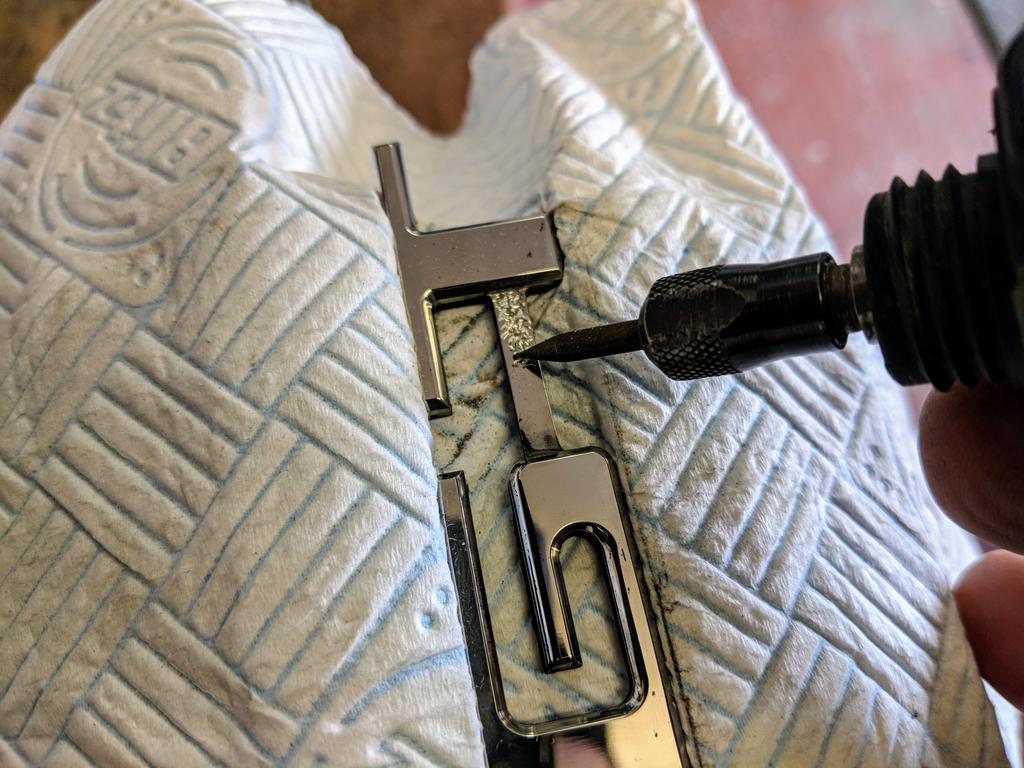
The next step was to add the texture detail and then polish. I did these processes at the same time so these photos are a bit mixed.

Polishing
IPB Image

Engraving
IPB Image

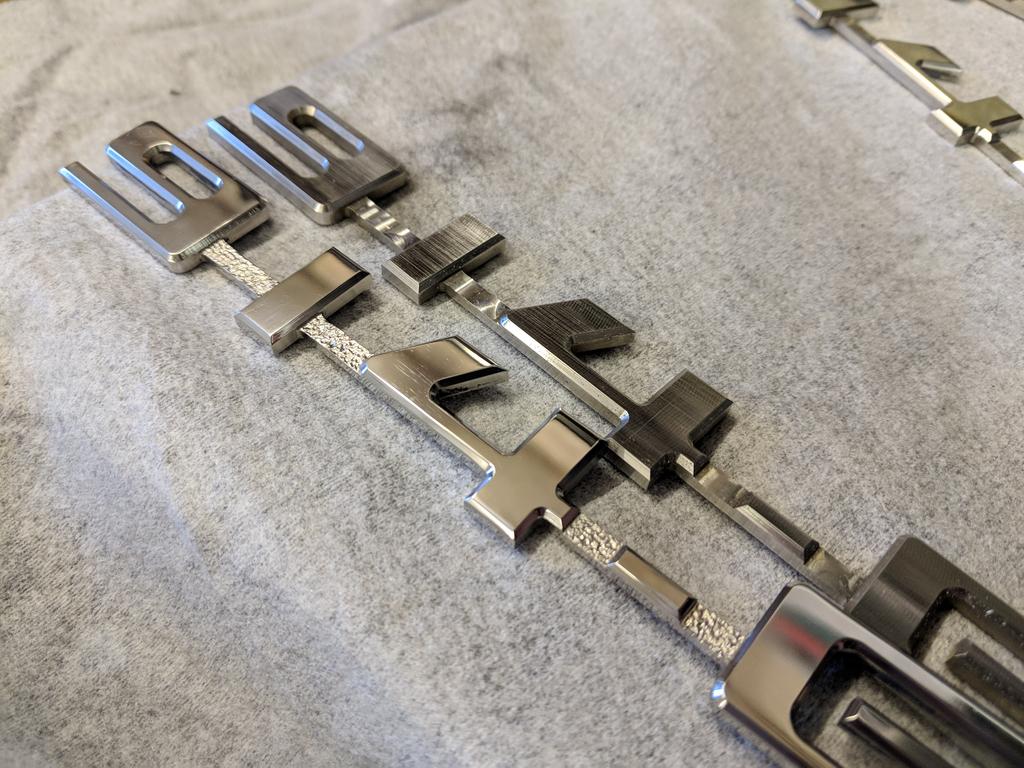
This shot shows the difference from the machined original.
IPB Image

Instead of cleaning them all myself I sent them back to my friend to be ultrasonically cleaned.

IPB Image

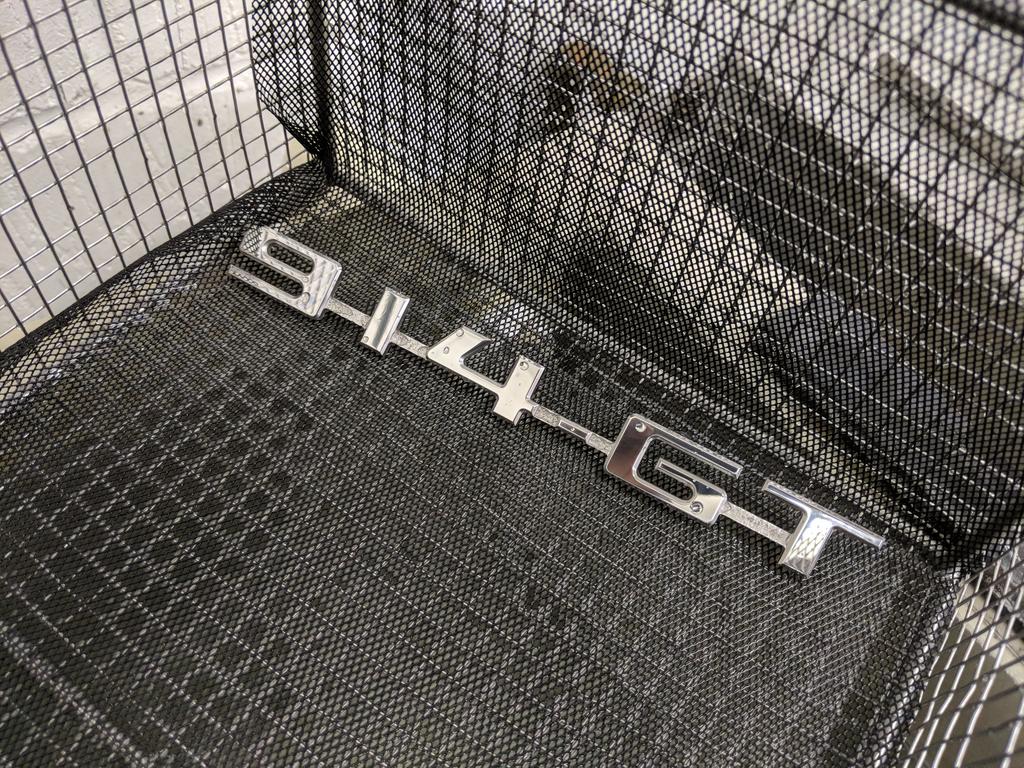
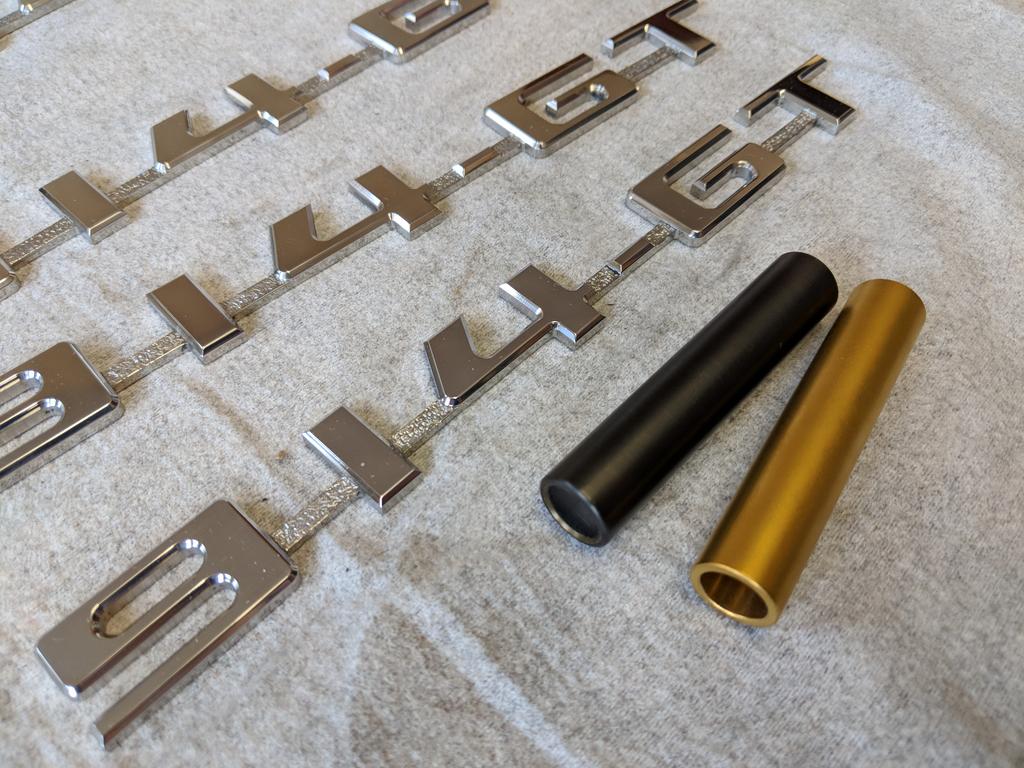
I couldn’t decide what colour finish I wanted for my car so being greedy I elected for one of each colour that the 914 would of had over its production. laugh.gif So one would be silver so I left one uncoated as I had already, Black as the original plastic badge that was on my 73 and Gold as the early cars.

The process used to coat the badges was PVD (Physical Vapour Deposition). The black was Nitron MC coated and the gold, Titanium Nitride.

Here’s the samples of the black and gold. The sample are a matt finish as the base metal was media blasted.
IPB Image

Today I got word that the badges were ready to collect….

IPB Image

IPB Image

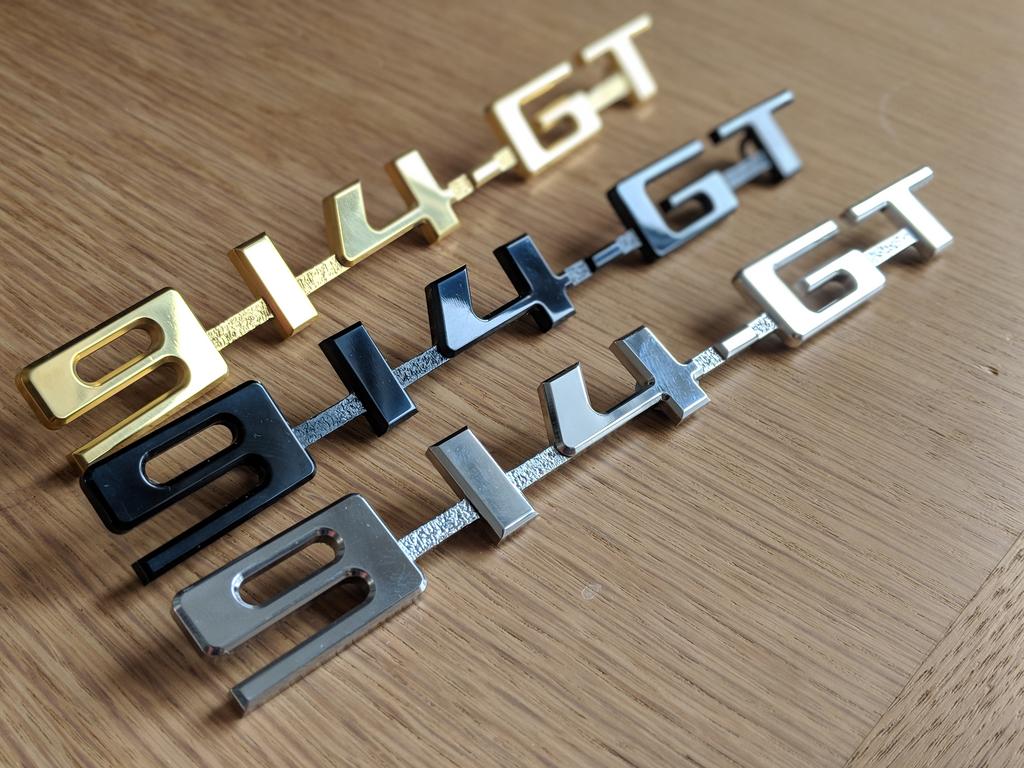
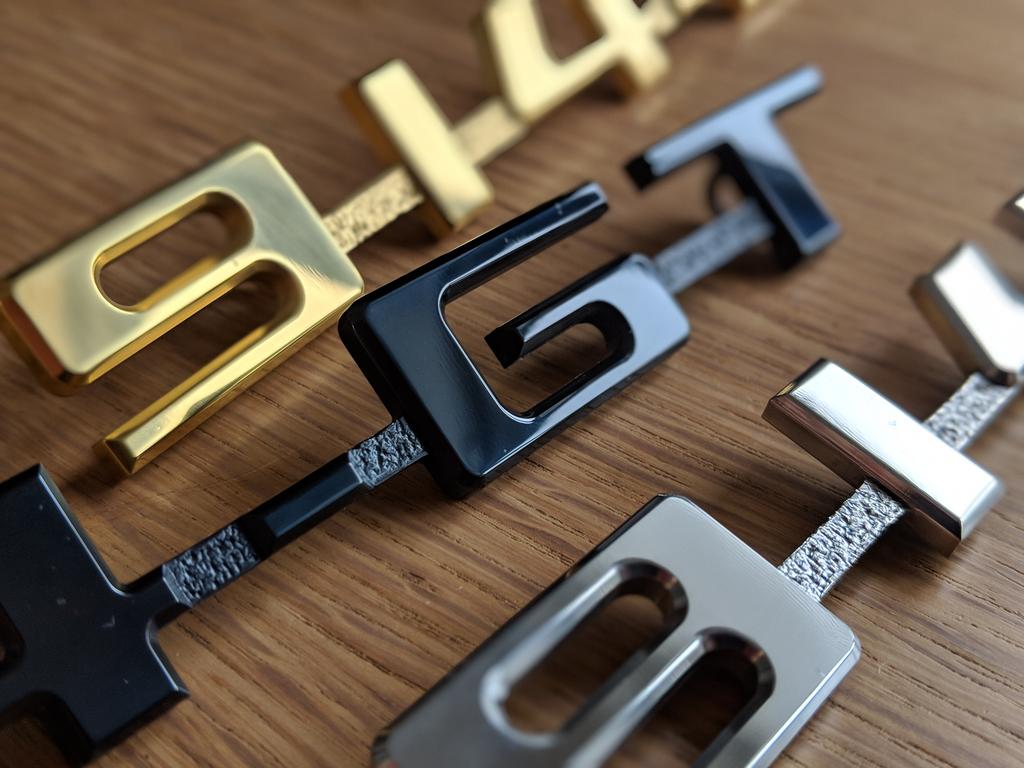
You could say I was rather pleased with them.

Huge thanks goes to my friend for doing these for me and swallowing the entire cost. I could not have done this without his help. Cheers Jay.

This is certainly a process I won’t be repeating and these are certainly one offs! I do however have one spare Gold one and if anyone’s interested I’ve decided to auction it off with 100% of the top bid going to charity, DDK Macmillan of course. I'll send out more information about the auction soon when I work out the best way to do it.
tygaboy
As the Most Interesting Man in the World might say:

I don't usually use curse words in my posts, but when I do, they are:
Get the fuck out of here!


I love how so many of us seem to have friends with crazy jobs and how often we can talk them into helping with our wonderful little cars.

Thanks for posting... that is so f-ing cool!
mepstein
Awesome!

The earlySregistry has a thread labeled - Show me satanic details.

http://www.early911sregistry.org/forums/sh...ghlight=satanic

I thought we should start a similar thread. This certainly qualifies as one.
pete000
You should have 914 Rubber make a mold and make plastic ones. Your metal master is perfect.
bbrock
QUOTE(tygaboy @ Mar 29 2018, 11:36 AM) *

As the Most Interesting Man in the World might say:

I don't usually use curse words in my posts, but when I do, they are:
Get the fuck out of here!


I love how so many of us seem to have friends with crazy jobs and how often we can talk them into helping with our wonderful little cars.

Thanks for posting... that is so f-ing cool!


av-943.gif I'll ask the same question I asked Ben, did you play this music while they were being made?


https://www.youtube.com/watch?v=Vu2T85LNlrQ


Love the satanic details idea and agree this qualifies. To repeat - f-ing cool!
defianty
QUOTE(bbrock @ Mar 29 2018, 07:01 PM) *

av-943.gif I'll ask the same question I asked Ben, did you play this music while they were being made?


I didn't but I wish I had! av-943.gif
mb911
That looks like a wire edm to me but probably called different things based off of what side of the pond your on.. It think they look fantastic great job.. This is what we did today. Click to view attachment
defianty
Yeah I think they're one and the same thing Ben, just different names as you say.

Love the crest!
jd74914
Very cool! Especially cutting it off the block with EDM. I was wondering how you were going to get it off when I saw the big block and was thinking it'd be a white knuckle bandsaw cut. laugh.gif
Phil Plummer
headbang.gif Hello: Im going to have to drop out my 3.0 911 engine out of the 914 /6 conversion run great etc but i didnt have tin i havent driven the car but felt with a good oil cooling system and exhaust wrap id have the engine oil cool enough. So i bought tin out of Porsche restoration design and would like to know where one can get hardware and or instruction to install tin or do I have to Fabricate the harware?
If anyone knows pls help.
Regards Phil Plummer
Cairo94507
Absolutely incredible work on the 914-GT emblems and the Porsche wall art. Just crazy really. smilie_pokal.gif
altitude411
I just want to say thanks for taking the time to post this thread. Your work is fantastic and shows what is possible with some time and dedication to something you want to do. Respect for your self taught skills. beerchug.gif Subscribed.
mepstein
QUOTE(Phil Plummer @ Mar 30 2018, 03:35 PM) *

headbang.gif Hello: Im going to have to drop out my 3.0 911 engine out of the 914 /6 conversion run great etc but i didnt have tin i havent driven the car but felt with a good oil cooling system and exhaust wrap id have the engine oil cool enough. So i bought tin out of Porsche restoration design and would like to know where one can get hardware and or instruction to install tin or do I have to Fabricate the harware?
If anyone knows pls help.
Regards Phil Plummer

Phil - the tin should just bolt on. I think I used 5mm allen head bolts. Get them in stainless steel when you determine the correct size. Just look on the internet for a picture of a six engine with tin and you will figure it out quickly.

Some race cars forgo the tin but they are always moving air past the engine. For street drivung, you need the tin.

You can bolt in the tin without removing the engine. It’s tricky but very doable. I couldn’t tell you the proper order to assemble but I’m thinking back (engine firewall) to front. The back will be the most difficult since the engine fan obscures some of the view.
defianty
Thanks for the positive comments guys.


I busted out my crayons today and finished off this drawing I started months and months ago. The reason was partly after reading redrobin911's colour dilemma and because I'm getting close to having to make the final choice myself.

In my head the car has been going to be 'boring ol' silver' for quite some time. Now although I'm almost certain this is the case, I wobble on the decision almost daily laugh.gif Part of my reason other than just liking it, I like the fact the various colours can be added to it for alternate looks. I already have a very nice set of chrome bumpers so they will be able to go on in rotation with a fibreglass set I'll be getting soon. The fibreglass ones I'll be able to play around with like the ones below. The green giving a nod to the 914-6 GT number three car that came second at the Marathon De La Route in 1970.

So that's where I am at the moment. I may wake up tomorrow and decide on one of the other half a dozen colours I really like, last night I saw a picture of Dave Lyons GT finished in Alaska Blue Metallic and I almost drooled on my phone!

After being around for a few years now I've followed many great restorations but only now do I really understand the pain in selecting the 'right' colour. I think it's easier to name a child! laugh.gif

IPB Image
bbrock
QUOTE(defianty @ Apr 2 2018, 11:21 AM) *

In my head the car has been going to be 'boring ol' silver' for quite some time.


bootyshake.gif Silver is not boring! It's the best! Fast like a bullet. silver914.jpg Although Alaska Blue metallic and Marathon Blue are way up there in my book.

QUOTE
After being around for a few years now I've followed many great restorations but only now do I really understand the pain in selecting the 'right' colour. I think it's easier to name a child! laugh.gif


That's the beauty of original restorations. No painful color decisions. biggrin.gif

Whatever you decide, it will be epic! cheer.gif
defianty
Some of you may remember this little incident I had with the trolley style axle stands I was using.

IPB Image

This could have been a disaster but luckily the damage was minimal and I wasn't under that car! With paint time approaching I needed something more secure to enable me to roll the car out of the garage, down a long driveway and up on to a trailer. So I set about adapting what I had.

IPB Image

IPB Image

IPB Image

IPB Image

I did all this a few weeks ago with just £35 of steel and a days work. I should have done it sooner really.
Dion
Stephen those GT emblems are epic. Nice rendition.
Of course I’m partial to Marathon Blue but silver & chrome are always
going to be stunning on your fresh metal work.
Whatever your choice, it will be tops. Looks fantastic & looking forward to seeing its completion.
Your patience and attention to detail in this build shows. I do find it helpful to tackling mine.
Again.. well done!
defianty
Thanks Dion, appreciated.
Lucky9146
Good fix on the dolly's, sure to be more stable. I too should have done things in the correct order like finally installing my lift AFTER pretty much finishing my car. biggrin.gif
I will post pics soon on my thread, just finished yesterday.

What ever color you choose will be the best on all your great metal work beerchug.gif first.gif
looking forward to paint pics. Assembly is coming and is fun with clean/new parts.
driving.gif white914.jpg

mobymutt
I love the note on your Solidworks drawing: "If in doubt, ask". I've never seen that before, but I think I should add it to all my title blocks!
Larmo63
Is this car originally Light Ivory?

That's a solid 914 color.........

just saying
Eric_Shea
Great Job Stephen. A true talent. smilie_pokal.gif
914forme
Glad to see you fixed your dolly issue.
Casanoroc
Great work, good to hear I'm not alone in Essex.
defianty
QUOTE(Casanoroc @ Apr 23 2018, 08:50 PM) *

Great work, good to hear I'm not alone in Essex.


Well there was me thinking I was all alone in Essex!
defianty
Right let's get back on track, it’s been a while.

Rewinding back a few months you saw that I replaced the lefthand sail panel but didn't finish off that rear quarter. This was supposed to be the easy side, but it turned out to be a bit of a nightmare.

Here's where we were.
IPB Image

I took my door to a local metal fabricator and asked them if they could bend me a sheet of metal to the same profile. I would then be able to use that to fill in the hole on the rear quarter. Here's what they made for me.

IPB Image

It fitted perfectly.
IPB Image

Welded in and very happy with it.
IPB Image

I just had to weld on the flare and I'd be done with the last corner of the car. But when I stood back to look over my work I realised I'd made a big mistake.
defianty
If you saw my post a few months back you'll remember this.
IPB Image

I remember the bottom of the rear quarter got caught and bent on the axle stand. I thought I'd straightened it, but I obviously didn't do a very good job.

Here's a straight edge up against the bottom of the rear quarter. :shock: Yeah, that won't do.
IPB Image

Try as I might I just couldn't fix this, I made a section to replace the bent edge but then went and proceeded to totally mess it up welding it in place.

IPB Image

Frustrated I closed the garage door and left it for a while. Actually that while turned into a few weeks, but during that time I managed to source a used half rear quarter to replace what I'd messed up and I went on holiday.
defianty
On my return I felt relaxed, motivated and full of enthusiasm. That didn't last long though.

The replacement rear quarter panel had arrived and I intercepted it at the sorting office. Getting home I ripped the box open and lifted out the panel. sad.gif 
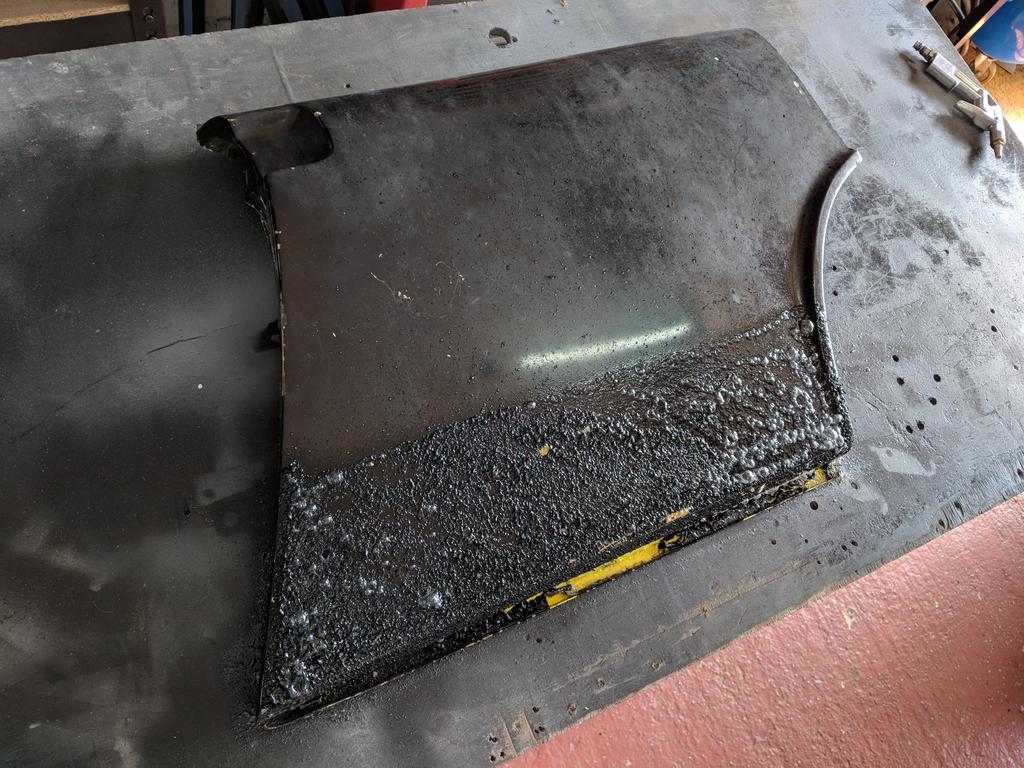
I instantly knew something was wrong. An eighteen inch square piece of metal should not weigh anything near what this piece weighed.

I sprayed it liberally with paint stripper...
IPB Image

That's not metal sad.gif
IPB Image

That's metal sad.gif
IPB Image

Once all that s*&t was removed I ended up with this.
IPB Image

Not the prettiest of panels but most importantly rust free. All that filler was hiding just that dent on the bottom right and most of that I'd be cutting off to install the flare. For the first time since opening the box I was starting to think this may just work.
defianty
It was only now that I noticed something with my new sail panel I’d installed. The indentation for the door handle wasn’t quite the right shape. The more I looked at it the worse it got.

IPB Image

Here it is compared to the original on the replacement piece I got.

IPB Image

Now I know it’s not a million miles off but it’s off enough to warrant replacement. So I cut it out and used all of the used panel I could.

IPB Image

Already looking better
IPB Image

IPB Image

New support fabricated and welded in. Getting this the right shape and size was a little tricky but after measuring multiple times welding in this support made everything measure true to the other side.

IPB Image
defianty
And then finally time to install the last flare.
IPB Image

IPB Image

The arrow drawn on is a reminder to adjust the door gap slightly.

Finally back in one piece!
IPB Image

I’m so pleased to be at this stage now. It’s been way more of a job that I ever imagined. The ‘to do’ list before paint is now finally just a few small things.
mepstein
beerchug.gif
bbrock
I am truly jealous of your skills. I just can't seem to make those welds vanish the way you can. You made the right call on replacing that door pocket. Strange that it was off like that. I've said it before but... pray.gif pray.gif
tygaboy
I hear you on the "not good enough so I redid it..."

I tell you, though, I'm of the mind that when there are little things that are off, even if you don't consciously notice them, it has an impact on the overall "feel" you get when looking at the finished product.

Contrast that to what I'll call a "calm, integrated feel" that comes from all the little things that add up.

That's a long way around to "Awesome job!" aktion035.gif pray.gif wub.gif

You're surely going to have one of the nicest GTs on the planet.
Continued great results with all your work!
autopro
Very nice work, I love seeing the car all put back together. It looks so good.
Dion
Wow what a journey so far. Epic, just epic. pray.gif metalwork
beerchug.gif
BTW thanks for the info on your tach
I sent mine over, returned in beautiful condition .

Cheers,Dion
defianty
Thanks again for all the positive comments guys. The hard work is finally paying off.


QUOTE(Dion @ May 9 2018, 05:58 PM) *

BTW thanks for the info on your tach
I sent mine over, returned in beautiful condition .


Good to hear Dion, he does a great job doesn't he!
Lucky9146
QUOTE(defianty @ May 9 2018, 08:56 AM) *


Finally back in one piece!
IPB Image

I’m so pleased to be at this stage now. It’s been way more of a job that I ever imagined. The ‘to do’ list before paint is now finally just a few small things.


The effort was worth the result. You should be pleased, Looks Great! beerchug.gif
Paint is on the horizon!
driving.gif white914.jpg
defianty
The next stage has been fitting the rocker panels. It was obvious on purchase these would need a fair amount of fettling to fit correctly. I've never fibreglassed anything before so once again I hit up YouTube and sought out a few tutorials. Armed with just about enough knowledge I ordered up the relevant supplies and set to the job.

Whilst the lefthand one fitted well enough to the car the righthand one didn't - the top edge was at the wrong angle and pushed it up into the door. You can see in the pic below, there was no gap at all and bottom of the door scraped on it when opened.

IPB Image

It's difficult to capture but you can just make out that top part slopes down too much.

IPB Image

In the end I decided to cut off the top section and then reattach it at the correct angle. I took several measurements along the length before cutting and decided the edge needed to be 5mm higher to be at the correct angle. These struts held everything in place so I could fibreglass under the lip. Once set I then had both sills ready to fit too the arches.

IPB Image
defianty
So here’s the fit out of box… I guess you could say, not even close!

IPB Image

IPB Image

I scratched my head for a while went to work cutting it up. Then with thin aluminium strips for support I could bend everything to the correct shape.

You can see just how far I needed to move them to fit correctly.

IPB Image

I learnt that fibreglass doesn’t stick to aluminium foil so I used that as a backing in the first instance. I later found using duct tape a stronger method.

IPB Image

Resin starting to harden

IPB Image

Foil removed and offered up to the car for a test fit.

IPB Image

Next stage was bridging filler

IPB Image

Getting closer

IPB Image

After sanding to shape and some body filler I was really pleased with the result.

IPB Image

IPB Image
defianty
The front didn’t need as much work as the rears. This time though they were both a bit big and the profile wasn’t quite right.

IPB Image

IPB Image

Last was to cut the hole for the jack point and test fit the cover.

IPB Image


Next job is the front and rear valance, they both need an equal amount of work to fit perfectly.
tygaboy
Nice! I love how you just jump in to something you've never tried before. You seem to have a knack for quickly mastering every skill you need. Very impressive and you should be very proud of your results! Great, great work! aktion035.gif first.gif
defianty
QUOTE(tygaboy @ May 17 2018, 06:16 PM) *

Nice! I love how you just jump in to something you've never tried before. You seem to have a knack for quickly mastering every skill you need. Very impressive and you should be very proud of your results! Great, great work! aktion035.gif first.gif


Thanks for that, I'll be honest that means a lot to me.

I lost my father a few years ago and I described him as a 'Jack of all trades - master of all'. He really could turn his hand to almost anything. I'll be happy with just being a fraction as skilled.
Lucky9146
QUOTE(defianty @ May 17 2018, 10:00 AM) *


IPB Image


Nicely done! first.gif
Have never done FG myself. You have a lot of skills. Great picture too. I see paint in your future! smile.gif

driving.gif white914.jpg
pete000
Makes me feel better about the amount of work needed to make the GT rocker panels fit the car. I had to do just as much modifying to mine to get them to fit properly. They are so far off to start with its crazy.
defianty
Thanks for posting that pic Pete.

After coming in last night I decided I wasn't happy with the angle of the flare on the rear rocker. So this morning I've decided to revisit it. After seeing Pete's pic I need to shave off the bottom corner and give it a rounder profile. Currently mine is too square. My wife thinks I'm mad to undo my work but I think I've proven before I'm not afraid to redo something if I'm not entirely happy with something. I few hours extra work is nothing compared to that nagging feeling in the back of your mind laugh.gif
914dave
Nice job with the rockers. I spent a lot of time on the rockers and bumpers to get them to fit right. The same things you’re going thru. It will be worth it when you’re done. Get the fit right now. Are you shooting the paint yourself?
defianty
QUOTE(914dave @ May 18 2018, 12:32 PM) *

Nice job with the rockers. I spent a lot of time on the rockers and bumpers to get them to fit right. The same things you’re going thru. It will be worth it when you’re done. Get the fit right now. Are you shooting the paint yourself?


Thanks Dave. No paint all be done by a professional. I want the car to look as close to perfect as i can get.

So here's the result of this mornings redo on the rear section.

IPB Image

I'm much happier with that!
defianty
An update with no updates laugh.gif

Since my last post no much has been done to the car. For reasons I decided I wanted to have the car painted by someone else. However the downside to this is he has a waiting list of a few months so the car won't be leaving here until October. The plus side however is the car will be worked on immediately to a schedule that won't drag on.

In the meantime I've had this to play with.

IPB Image

James dropped the car off to me a few weeks ago with a list as long as your arm of jobs to complete before Le Mans Classic. Being roughly the same spec as my car will be once finished it's been a joy to work on (mostly) laugh.gif and also to drive biggrin.gif

Hopefully I'll have another update in a few weeks.
23e Heure
More working of the working on my car please, Stephen, and less of the driving thank you very much laugh.gif
Lucky9146
Sorry to hear about your paint delay until October. I am sure that was a good reason to change paint shops. Will look forward to updates.
driving.gif white914.jpg
This is a "lo-fi" version of our main content. To view the full version with more information, formatting and images, please click here.
Invision Power Board © 2001-2024 Invision Power Services, Inc.