I can only dream of having a car this nice and developed.
It's really fun and inspiring to watch all of these nice builds going together worldwide.
Full Version: 914 2.0 > 3.0 GT Conversion
QUOTE(bbrock @ Apr 28 2019, 05:03 PM) 
The quality of your work continues to just blow me away. That spare tire cover is awesome. Care to share any details of how you did it?
Cheers Brent.
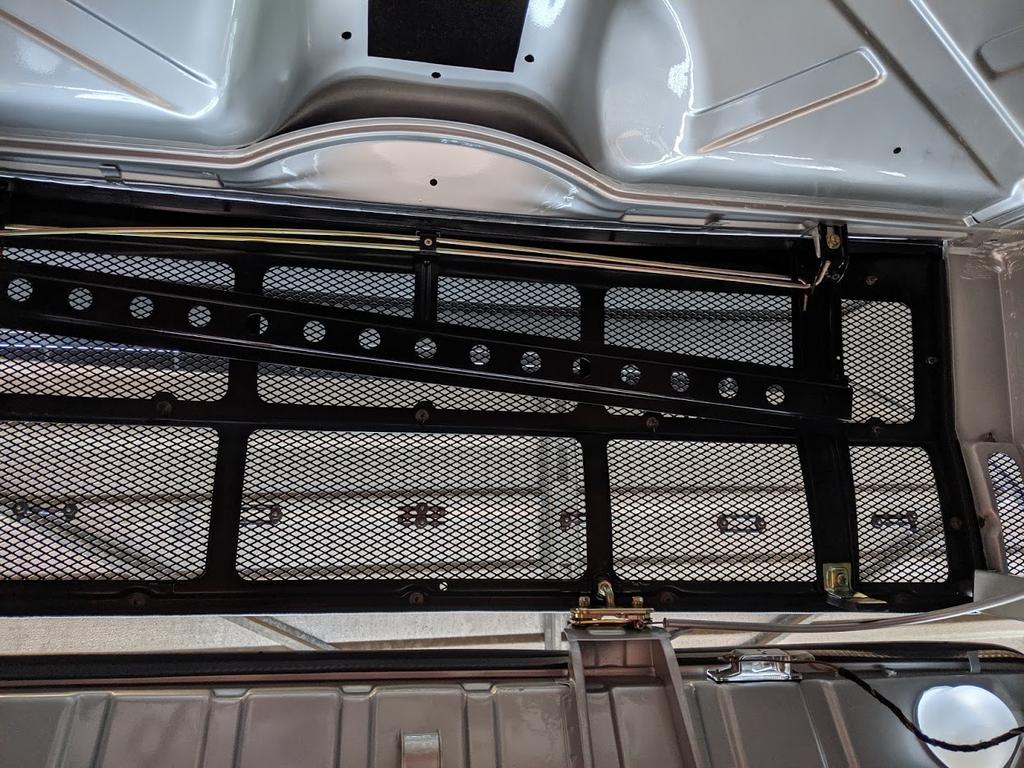
I didn't take any photos unfortunately but it's really easy. A drew around the tyre about half an inch bigger and then cut a long rectangle just over the width of the tyre width and long enough to go about two thirds of the way around. Then just stitched the two together.
Once complete I cut a slit in the front so that after you put the cover over the tyre you can then slide the tyre board through the hole. This helps to keep it all in place.
I'm away for the night tonight but I'll take a couple more photos tomorrow when I return home.
It's maybe worth noting that I didn't use Perlon for any of the front trunk. I ordered a few samples of similar looking van carpet from eBay and got a very close match albeit slightly thicker. Fortunately this stuff doesn't have any Porsche tax on it so it was a fraction of the price. I actually messed up when ordering and ended up with enough to carpet a room with

QUOTE(Larmo63 @ Apr 28 2019, 05:12 PM)
I can only dream of having a car this nice and developed.
It's really fun and inspiring to watch all of these nice builds going together worldwide.
Thanks Lawrence. I've spent a lot of time dreaming too and it's now almost a reality!
Your car is really outstanding. Putting your car back together can be hard on the paint. PMB wraps the cars like mine with a temporary clear plastic cling wrap and it helps on small accidents from leaving marks. They still get some marks but that is fixed at the end. Easier on a straight color and much harder on a metallic
The level of your finish is AAA
Good job, sorry great job
Bob B

The level of your finish is AAA
Good job, sorry great job
Bob B
I've been busy at it this week as I've now set myself a deadline of taking the car to Brooklands on the 20th July to celebrate 50 years of the 914. It's the perfect place to debut the car. So, the clock is ticking... there's a lot to do! :shock:
I finished off the last piece of wiring aside from the engine bay. The rear light part of the harness had been cut previously and modern black and red wire used for the number plate lights. I cut this section out and replaced it with original grey and brown wire and taped it up as original.
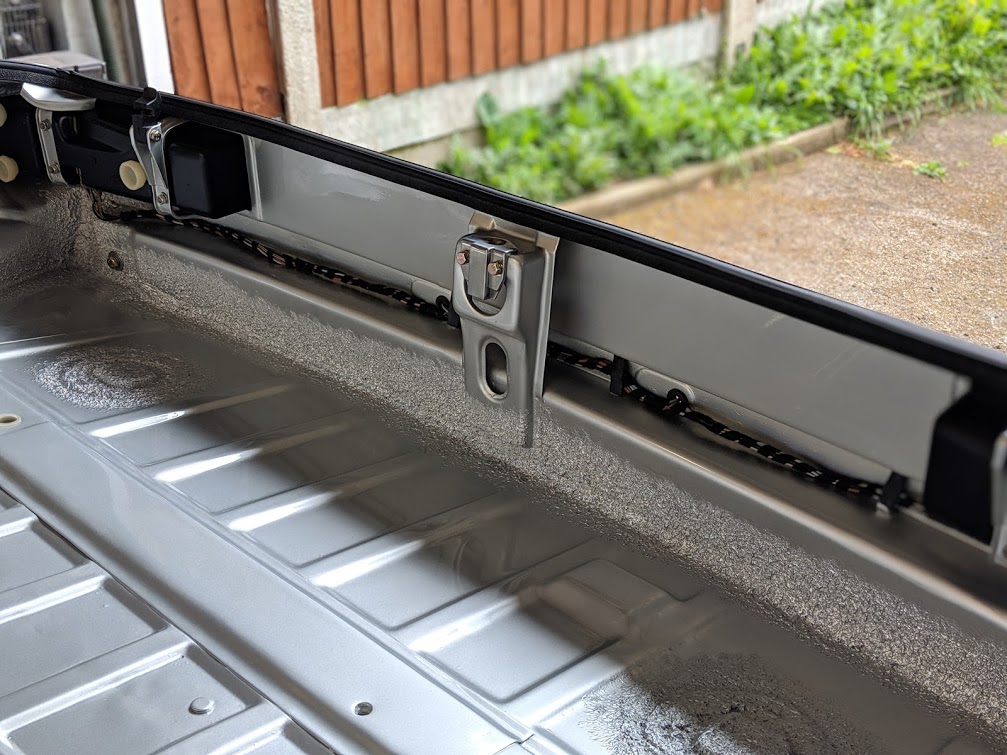
I then moved on to the dash to get that wired and to run the new wires for the 911 oil pressure and temperature gauge and also extend part of the loom for the fuel gauge in its new location. Whilst there I changed out the old screen washer system and installed a switch on the stalk for an electric washer motor.
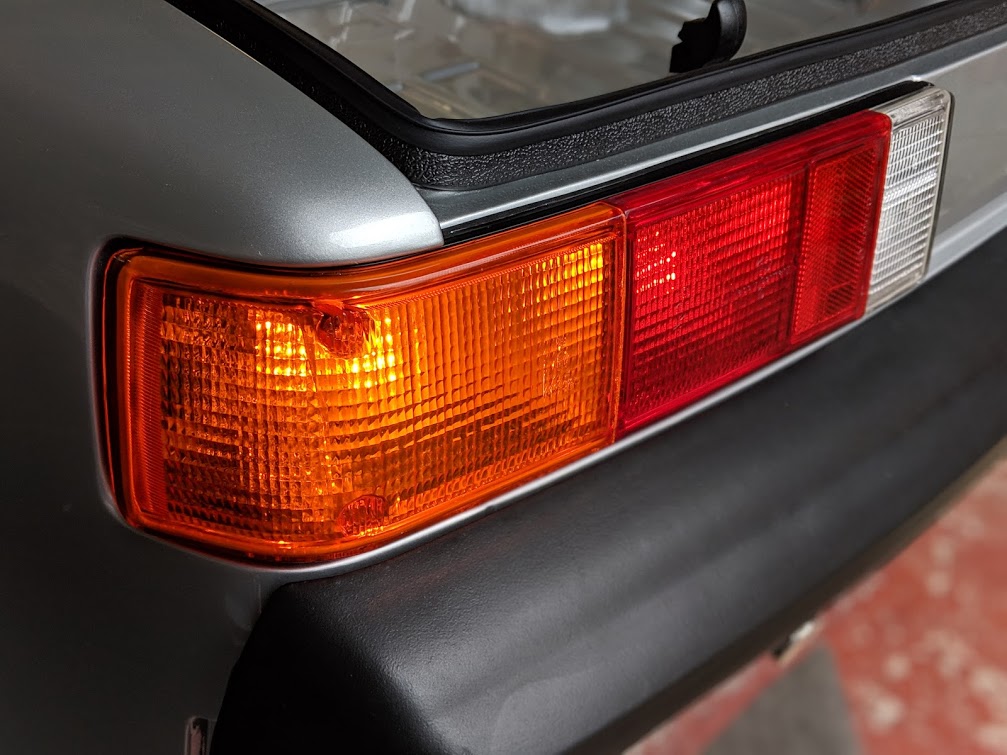
Although I previously had Euro lenses on the front of the car the light buckets only contained the one bulb for the indicator. I sourced a set of Euro buckets with side lights years ago so now it was time to change the loom and wire them up correctly.
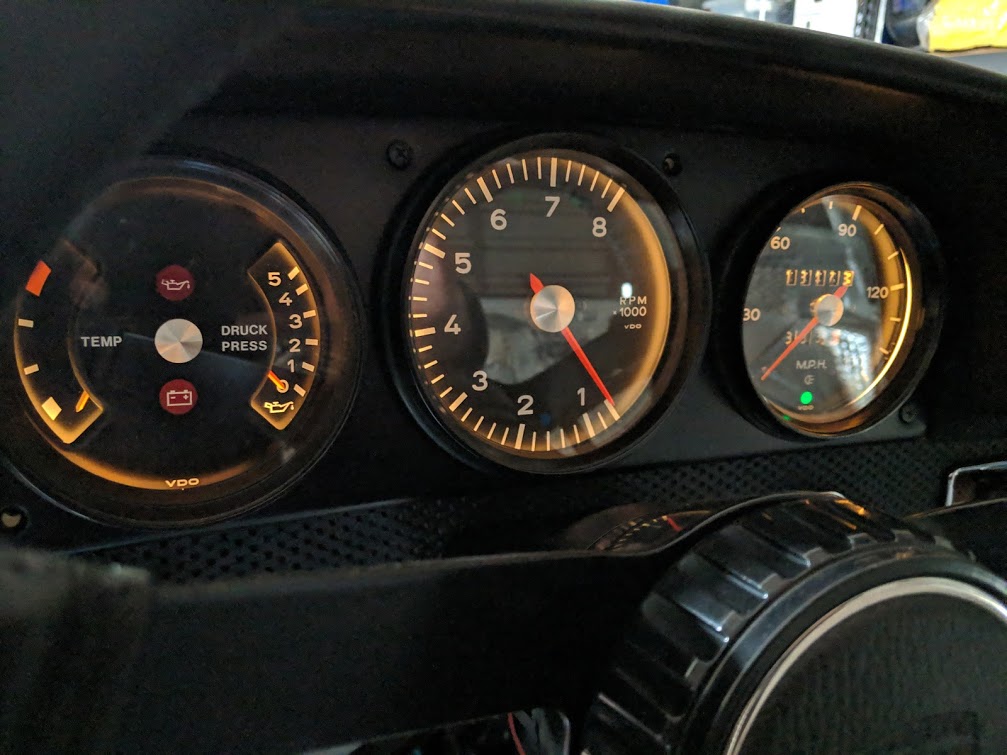
With the loom now mostly installed it was time to connect the battery to see if I'd done it all right

It felt great to see the car start to come back to life.
Seeing the warm glow of the gauges bought back good memories of warm evening drives, something I can't wait to do again this Summer.
I finished off the last piece of wiring aside from the engine bay. The rear light part of the harness had been cut previously and modern black and red wire used for the number plate lights. I cut this section out and replaced it with original grey and brown wire and taped it up as original.
I then moved on to the dash to get that wired and to run the new wires for the 911 oil pressure and temperature gauge and also extend part of the loom for the fuel gauge in its new location. Whilst there I changed out the old screen washer system and installed a switch on the stalk for an electric washer motor.
Although I previously had Euro lenses on the front of the car the light buckets only contained the one bulb for the indicator. I sourced a set of Euro buckets with side lights years ago so now it was time to change the loom and wire them up correctly.
With the loom now mostly installed it was time to connect the battery to see if I'd done it all right
It felt great to see the car start to come back to life.
Seeing the warm glow of the gauges bought back good memories of warm evening drives, something I can't wait to do again this Summer.
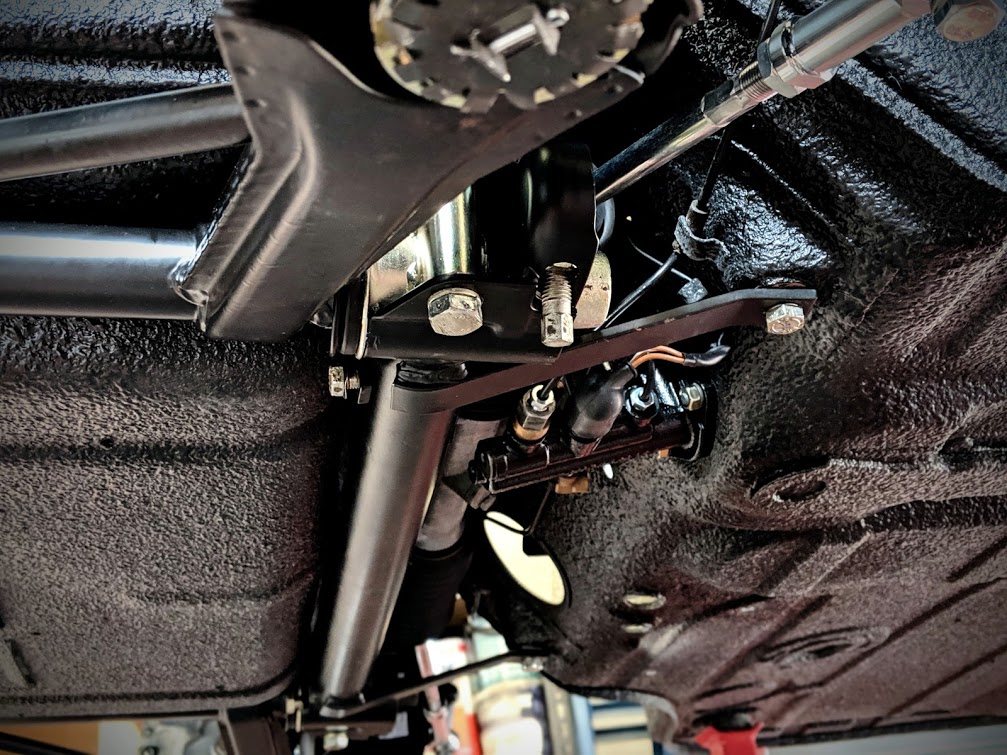
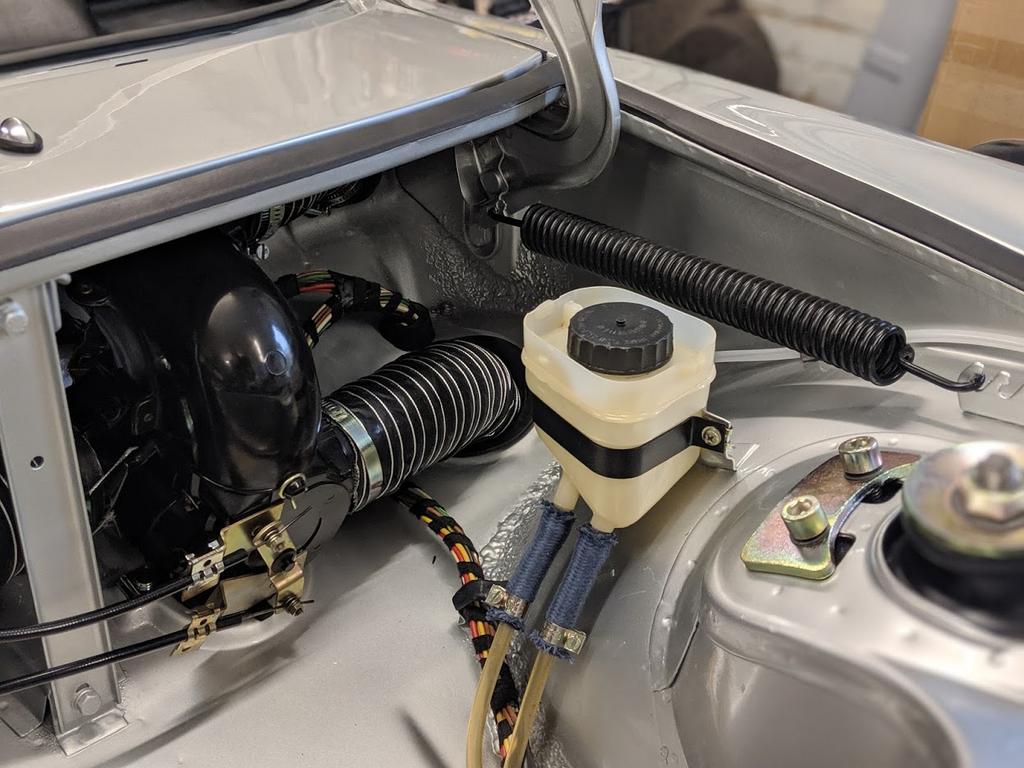
For the last couple of days I've been concentrating on fitting the new 19mm master cylinder and hard brake lines. I'd never bent brake line before but after a couple of bends matching to the old lines became easy.
Nearly there.
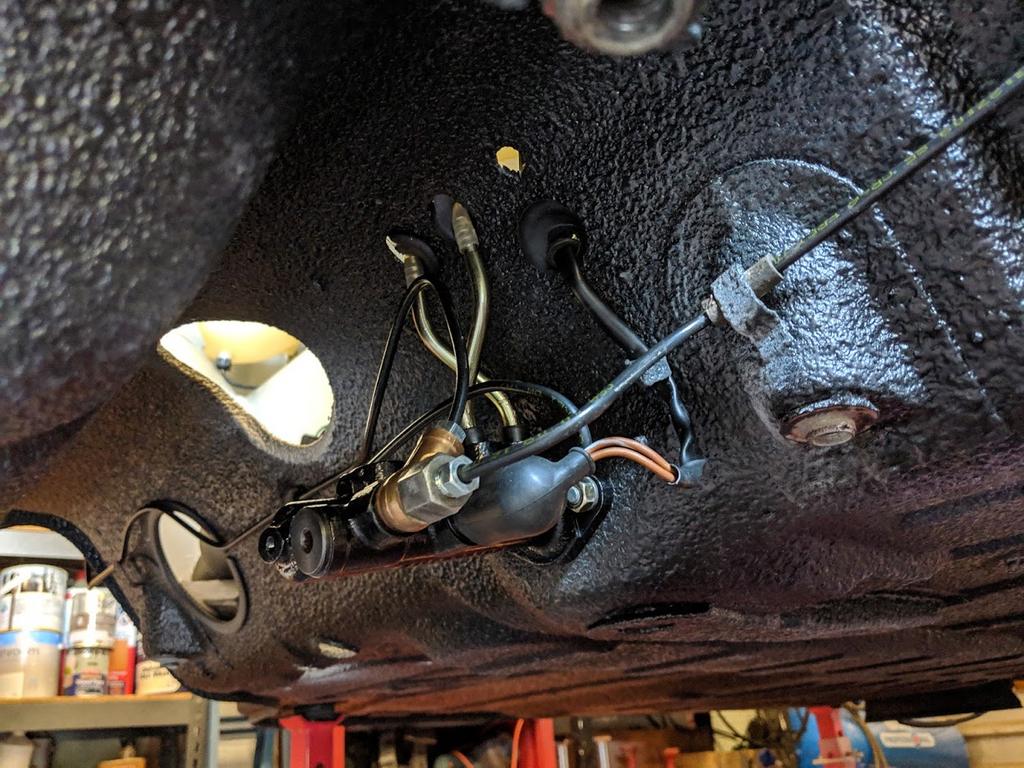
Once I finished off the front brake lines I could get on to fitting the front suspension.
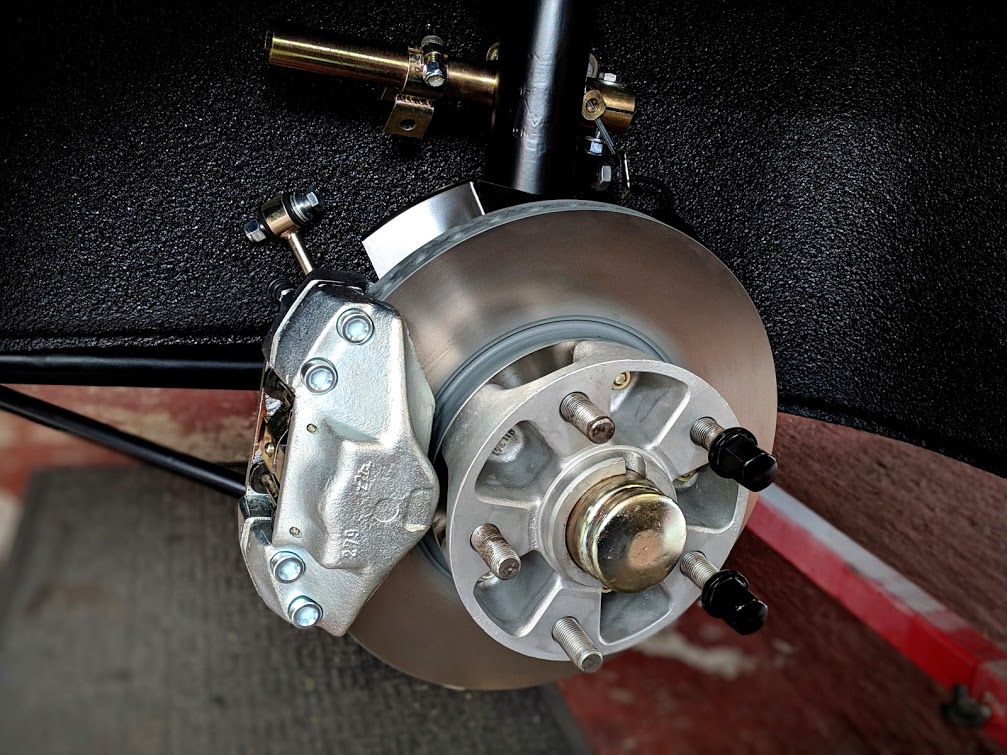
Fortunately I didn't need to do anything to the rack as that job was tackled a few years ago. But this time I fitted turbo tie rods and a rose joint bump steer kit.
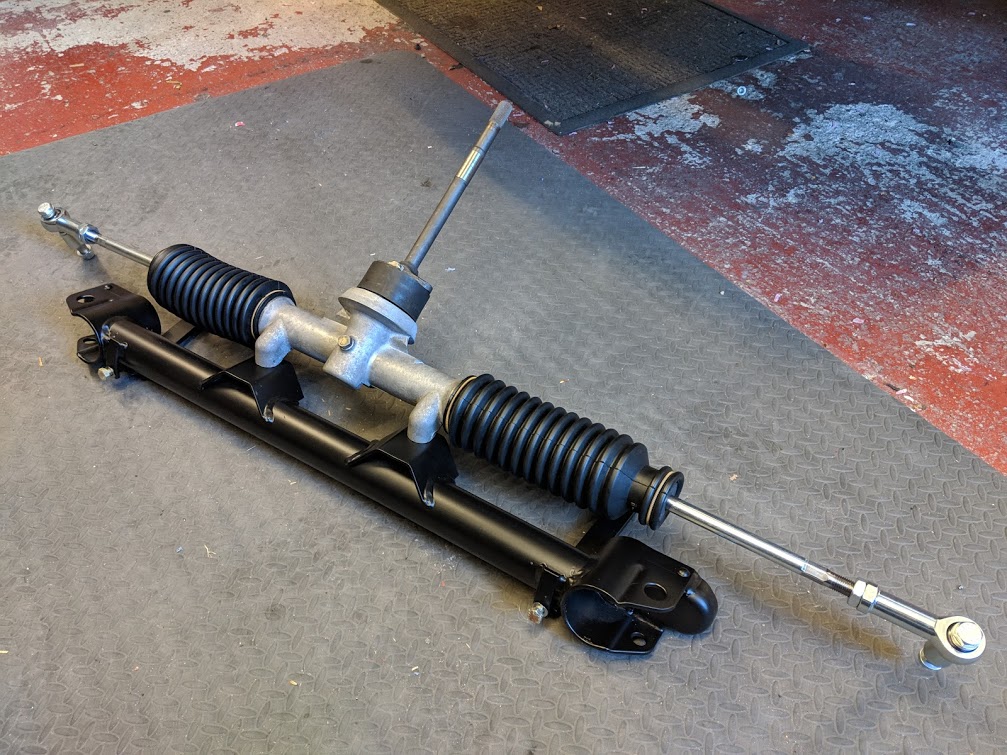
What that photo doesn't show is the hour it took me to find the damn bolts to mount the rack to the auxiliary support! I finally found them in bags for the rear hubs. Put there by me when sorting after zinc coating.
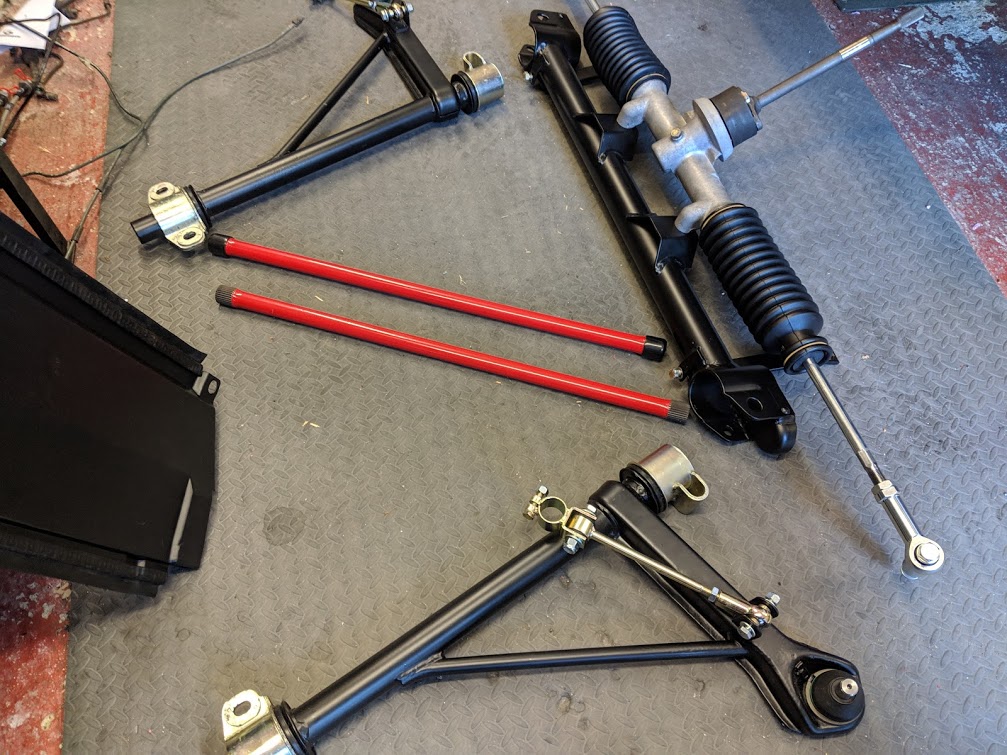
Getting everything together for installation with new 21mm torsion bars.
At this point I realised I wouldn't be able to do this alone and a neighbour was called on for help.
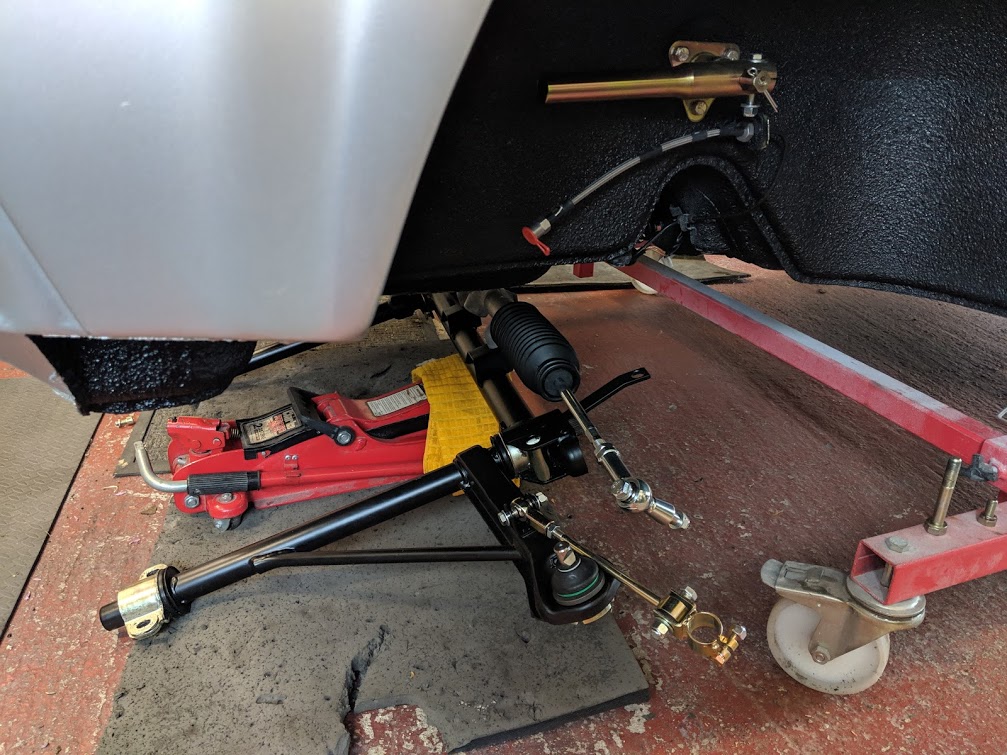
All up and torqued to spec
Sway bar not connected until I get the car on the ground and height adjusted.
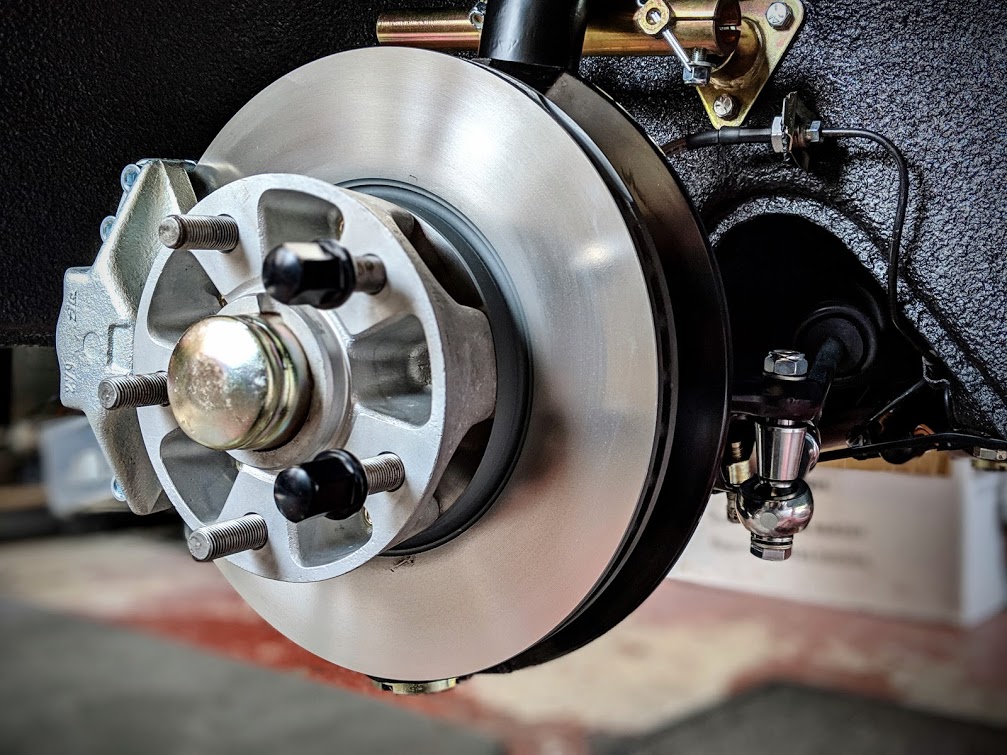
And just because I have to see what a wheel looks like there.
Bank holiday tomorrow and a day off from the car! :cheers:
Nearly there.
Once I finished off the front brake lines I could get on to fitting the front suspension.
Fortunately I didn't need to do anything to the rack as that job was tackled a few years ago. But this time I fitted turbo tie rods and a rose joint bump steer kit.
What that photo doesn't show is the hour it took me to find the damn bolts to mount the rack to the auxiliary support! I finally found them in bags for the rear hubs. Put there by me when sorting after zinc coating.
Getting everything together for installation with new 21mm torsion bars.
At this point I realised I wouldn't be able to do this alone and a neighbour was called on for help.
All up and torqued to spec
Sway bar not connected until I get the car on the ground and height adjusted.
And just because I have to see what a wheel looks like there.
Bank holiday tomorrow and a day off from the car! :cheers:
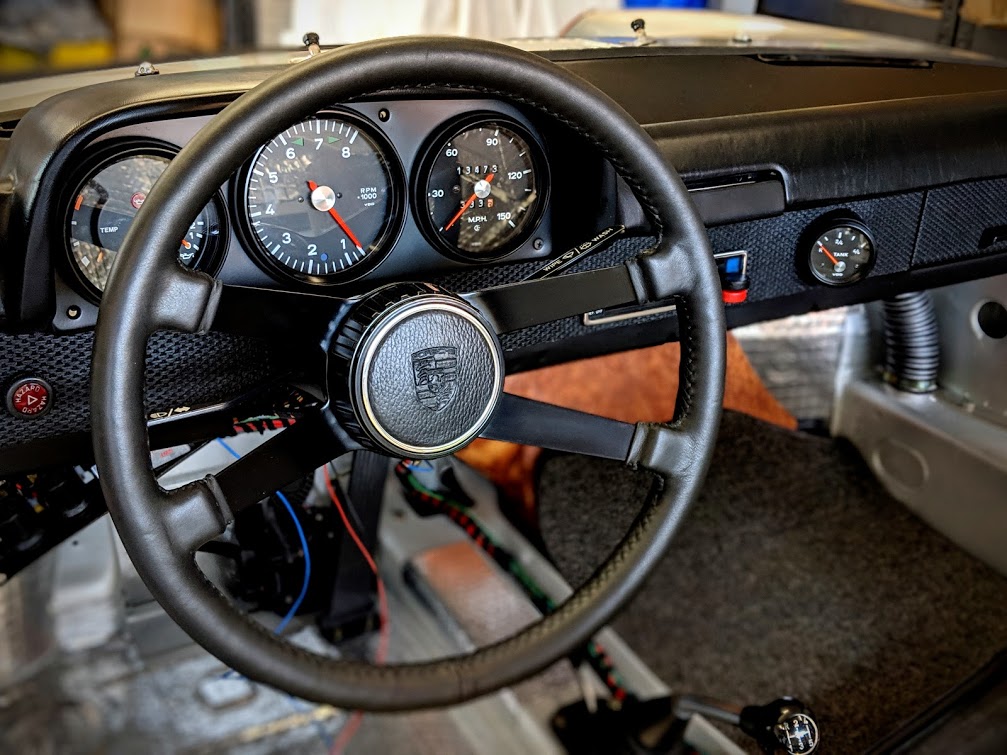
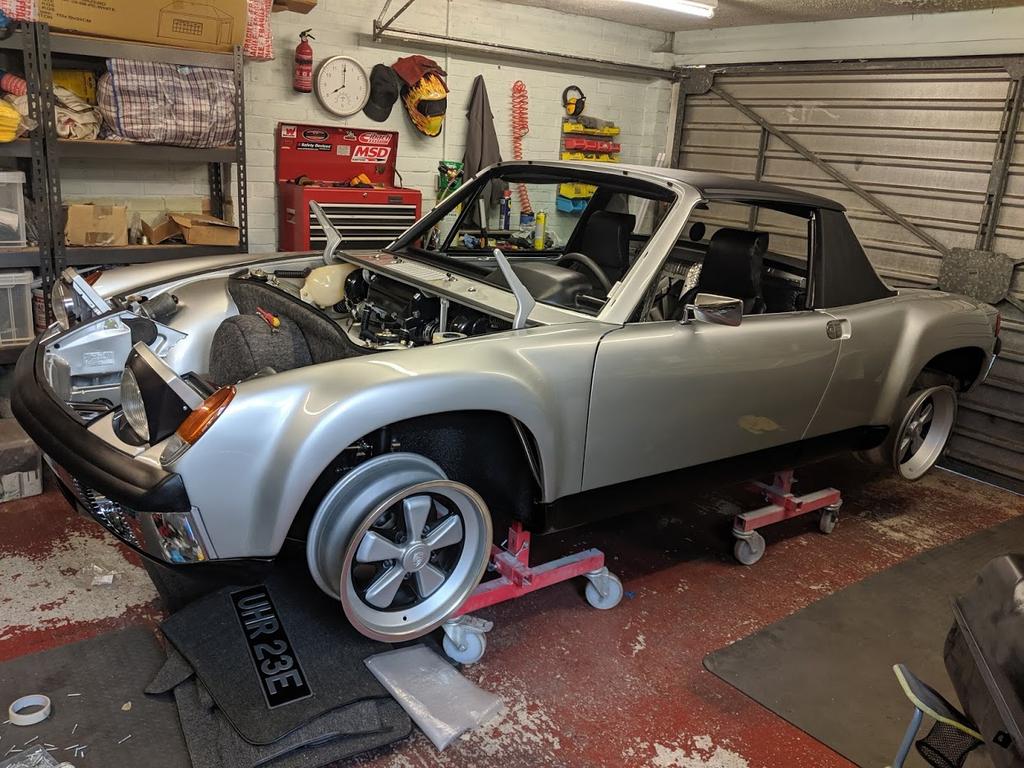
I made a start on the interior this week as I finally had all the wiring complete. First with the vinyl installation and then the carpet. With a bit of luck doing it now will give the glue time enough to gas off so I'm not smashed when I come to drive it :drunken: . Still got fuel lines to run hence the centre carpet missing and I'll keep the lower dash pad off for now to make getting under the dash easier should I need to.
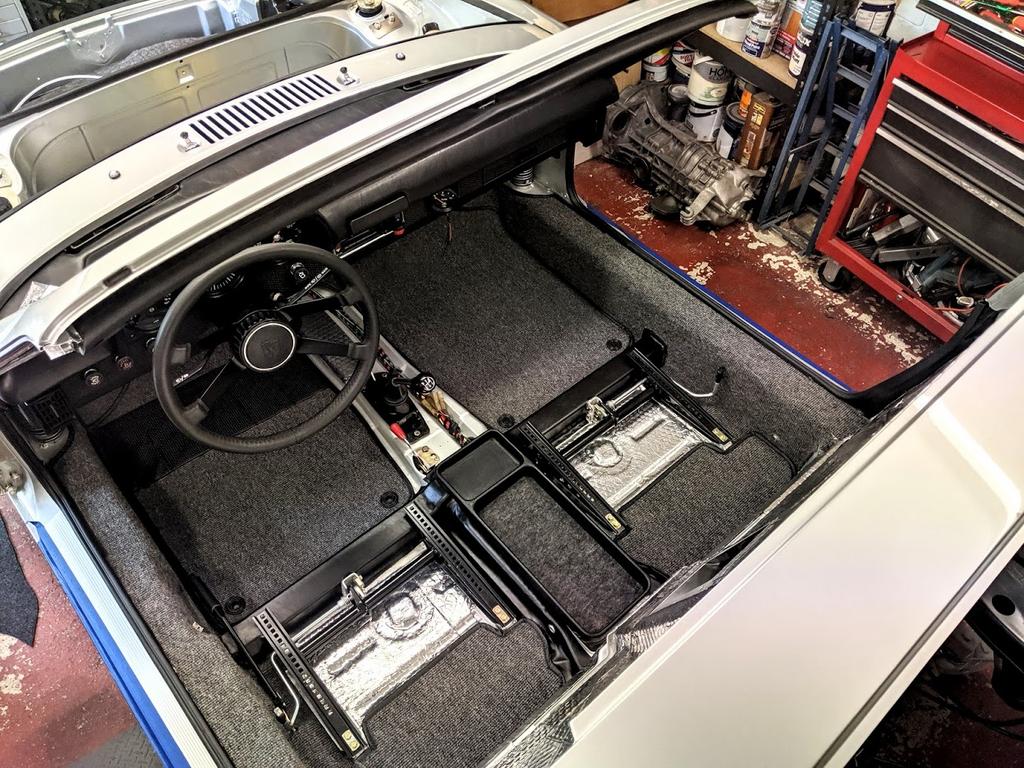
Yes I did sit in it and yes I did go broom broom!
I think it's almost time to get the doors from storage.
Yes I did sit in it and yes I did go broom broom!
I think it's almost time to get the doors from storage.
looks terrific!
Our body guys tape up all the edges when applying body panels. A little extra protection never hurts.
Our body guys tape up all the edges when applying body panels. A little extra protection never hurts.
This is one of my fave builds.
Just lovely Stephen!
Go tear up Brooklands & the rest of Southern England!
Just lovely Stephen!
Go tear up Brooklands & the rest of Southern England!
Wow stunning  ,I think you would be safe to call this a new car...amazing.
Are you able to get an MOT with the bump steer kit ? reason I ask is your MOT is basically the same test as we have in my country but ours is called a WOF (warrant of fitness),with such a modification we need an engineers report.
My car will require a seperate engineers report on each of the following ,brakes engine and wheels, once this is completed I then get a WOF test.
,I think you would be safe to call this a new car...amazing.Are you able to get an MOT with the bump steer kit ? reason I ask is your MOT is basically the same test as we have in my country but ours is called a WOF (warrant of fitness),with such a modification we need an engineers report.
My car will require a seperate engineers report on each of the following ,brakes engine and wheels, once this is completed I then get a WOF test.
QUOTE(mepstein @ May 10 2019, 06:40 PM)
looks terrific!
Our body guys tape up all the edges when applying body panels. A little extra protection never hurts.
Thanks. Yeah its's worth the effort to protect that paint!
QUOTE(Dion @ May 10 2019, 07:47 PM)
This is one of my fave builds.
Just lovely Stephen!
Go tear up Brooklands & the rest of Southern England!
Cheers Dion, looking forward to getting the car out there!
QUOTE(defianty @ May 10 2019, 10:12 AM)
Yes I did sit in it and yes I did go broom broom!


QUOTE(porschetub @ May 10 2019, 09:33 PM)
Wow stunning
,I think you would be safe to call this a new car...amazing.Are you able to get an MOT with the bump steer kit ? reason I ask is your MOT is basically the same test as we have in my country but ours is called a WOF (warrant of fitness),with such a modification we need an engineers report.
My car will require a seperate engineers report on each of the following ,brakes engine and wheels, once this is completed I then get a WOF test.
Thank you.
The bump steer kit won't be a problem but the system regarding MOT's in the UK had changed now. Basically if the car is over 40 years old an MOT is no longer required. However if the car has significant modifications the MOT is still needed. The MOT only really tests as to whether the car is road worthy.
I will have to get a MOT and an engineers report for the engine change. An increase in cubic capacity is allowed but a report is needed if the engine has more cylinders.
Fortunately I'm very friendly with the local MOT tester so there won't be any problems
Your are doing a fantastic job! Really fun to watch. I especially like the top down picture into the interior, very nice. The attention to detail is off the charts! 


QUOTE(Lucky9146 @ May 11 2019, 04:54 AM)
Your are doing a fantastic job! Really fun to watch. I especially like the top down picture into the interior, very nice. The attention to detail is off the charts!
Thanks again Jim. It's really starting to come together now.

QUOTE(defianty @ May 11 2019, 08:52 AM)
QUOTE(porschetub @ May 10 2019, 09:33 PM)
Wow stunning
,I think you would be safe to call this a new car...amazing.Are you able to get an MOT with the bump steer kit ? reason I ask is your MOT is basically the same test as we have in my country but ours is called a WOF (warrant of fitness),with such a modification we need an engineers report.
My car will require a seperate engineers report on each of the following ,brakes engine and wheels, once this is completed I then get a WOF test.
Thank you.
The bump steer kit won't be a problem but the system regarding MOT's in the UK had changed now. Basically if the car is over 40 years old an MOT is no longer required. However if the car has significant modifications the MOT is still needed. The MOT only really tests as to whether the car is road worthy.
I will have to get a MOT and an engineers report for the engine change. An increase in cubic capacity is allowed but a report is needed if the engine has more cylinders.
Fortunately I'm very friendly with the local MOT tester so there won't be any problems
Thanks for the reply Stephen,interesting as we have the similar rule about engine power increase,last time I checked we were allowed 20% which is a bugger when you do anything bigger than the 2.0 six
 ,rules here are made because of fools that do it wrong and REAL car guys suffer.
Keep up the good work

Haven't got much done this week other than trying to wire my alternator
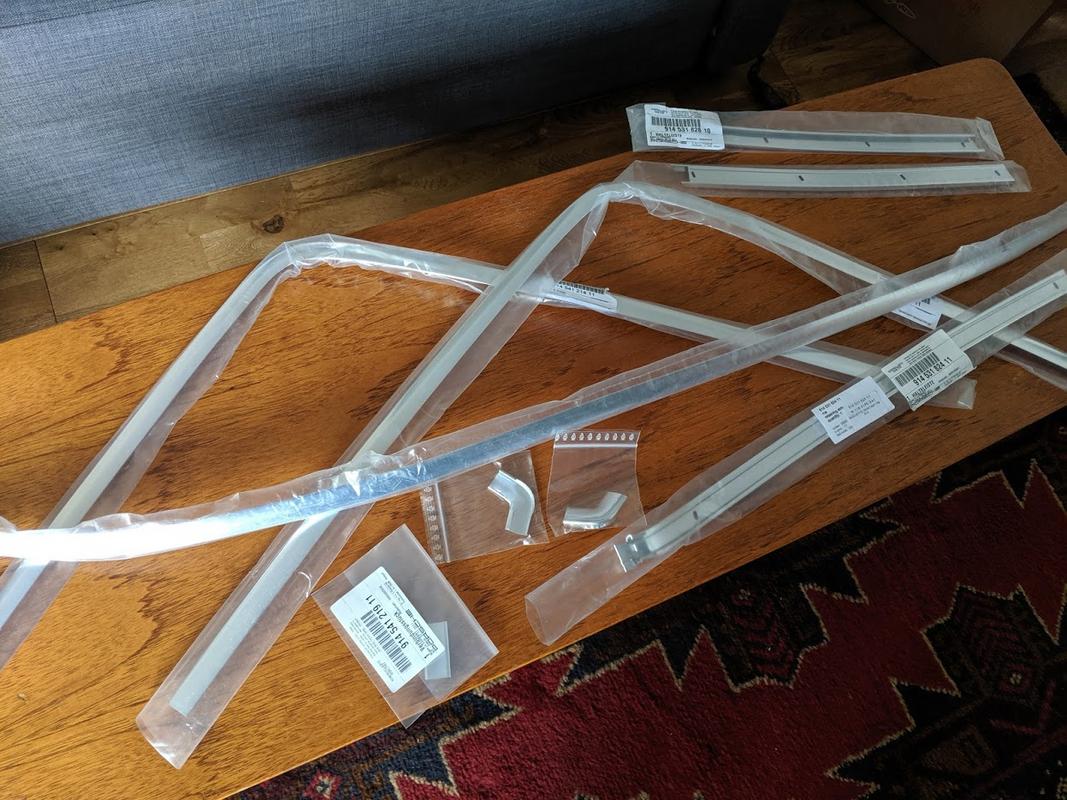
But I did take delivery of this load of shiny bits. I would have loved to use my original trim but they just weren't in quite good enough condition. So I bent over and paid for a new set. It'll be a while before I stop walking like John Wayne that's for sure!! Even the heavily discounted price I told the wife they were she still thought I was mad
Unfortunately the large piece that goes along the bottom of the windscreen didn't travel well and was bent on arrival so that will have to go back.
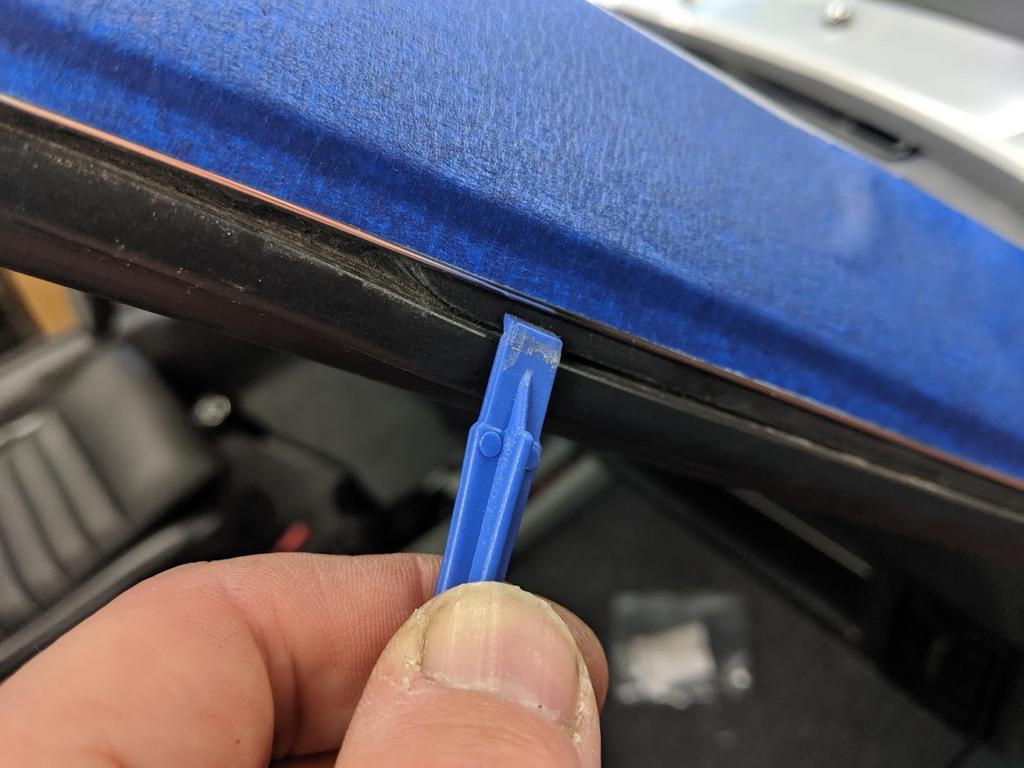
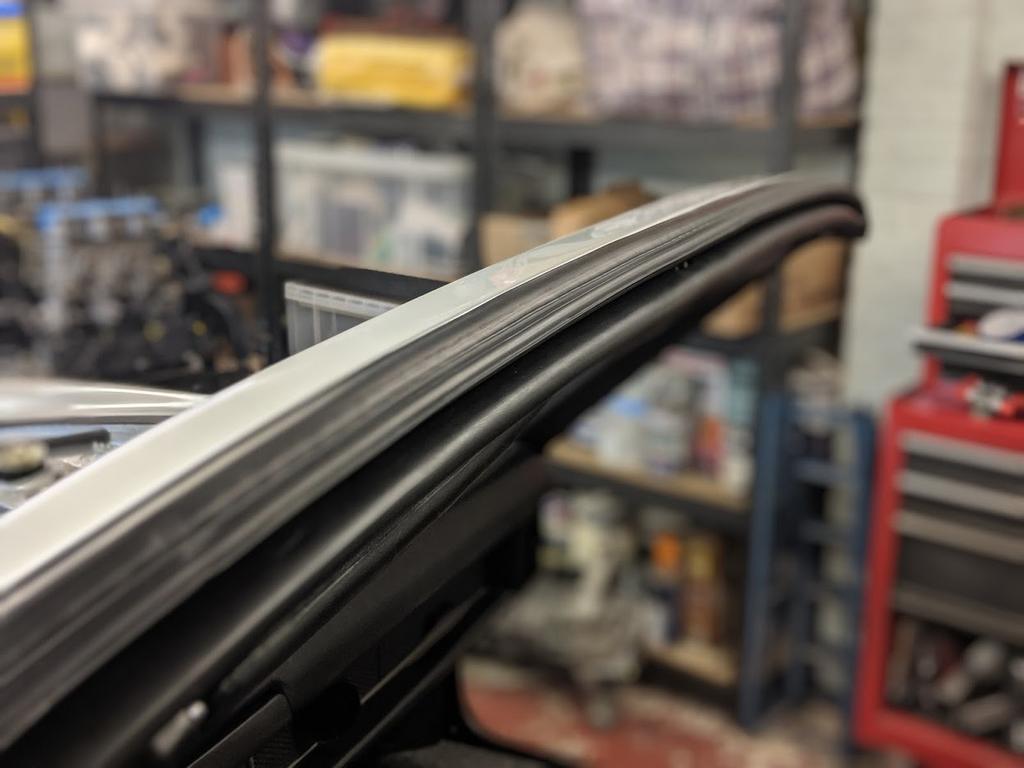
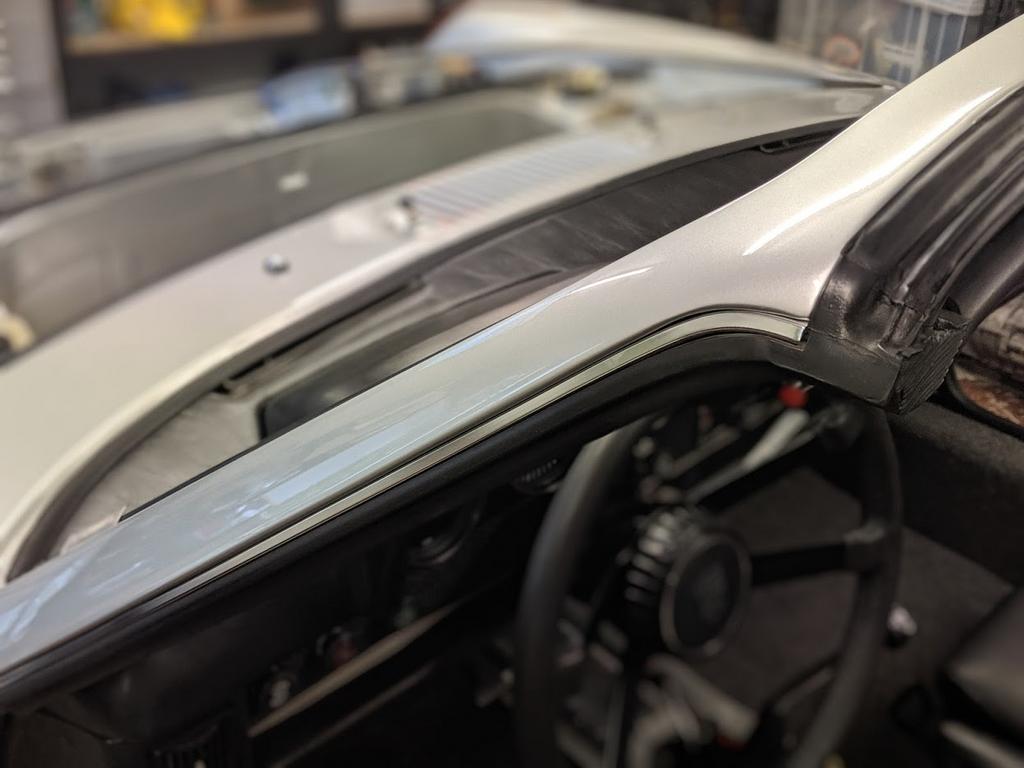
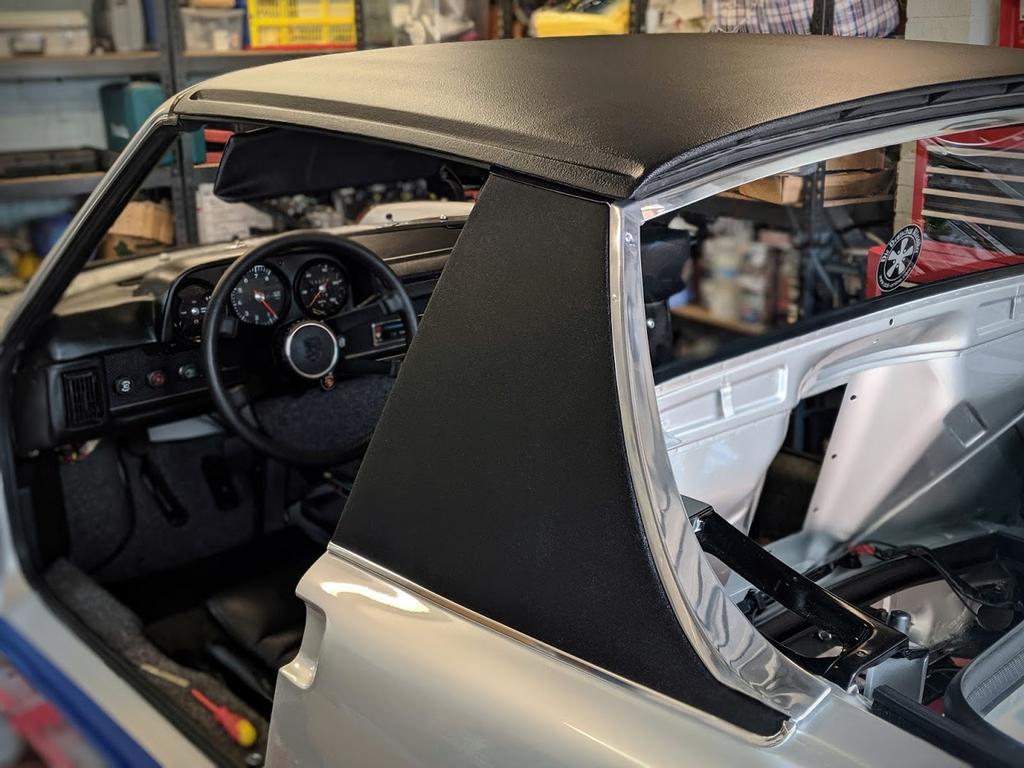
With that delivery I did manage to get the front targa seal installed which was much easier that I thought it would be but I did use a different technique to how I was told to install in.
I fitted the top part of the seal and the corners and then pushed the downward part of the seal into the rear section of the gutter. Then with a plastic mobile phone case opening tool to pushed the front of the seal into place. The whole thing was done in 20 minutes and far far easier than trying to slide the side part all the way down the gutter!
With the rest of the trim pieces I'll get to fitting the vinyl sail panels over the weekend as the painter has agreed the paint is dry enough now.
But I did take delivery of this load of shiny bits. I would have loved to use my original trim but they just weren't in quite good enough condition. So I bent over and paid for a new set.
It'll be a while before I stop walking like John Wayne that's for sure!! Even the heavily discounted price I told the wife they were she still thought I was mad Unfortunately the large piece that goes along the bottom of the windscreen didn't travel well and was bent on arrival so that will have to go back.
With that delivery I did manage to get the front targa seal installed which was much easier that I thought it would be but I did use a different technique to how I was told to install in.
I fitted the top part of the seal and the corners and then pushed the downward part of the seal into the rear section of the gutter. Then with a plastic mobile phone case opening tool to pushed the front of the seal into place. The whole thing was done in 20 minutes and far far easier than trying to slide the side part all the way down the gutter!
With the rest of the trim pieces I'll get to fitting the vinyl sail panels over the weekend as the painter has agreed the paint is dry enough now.
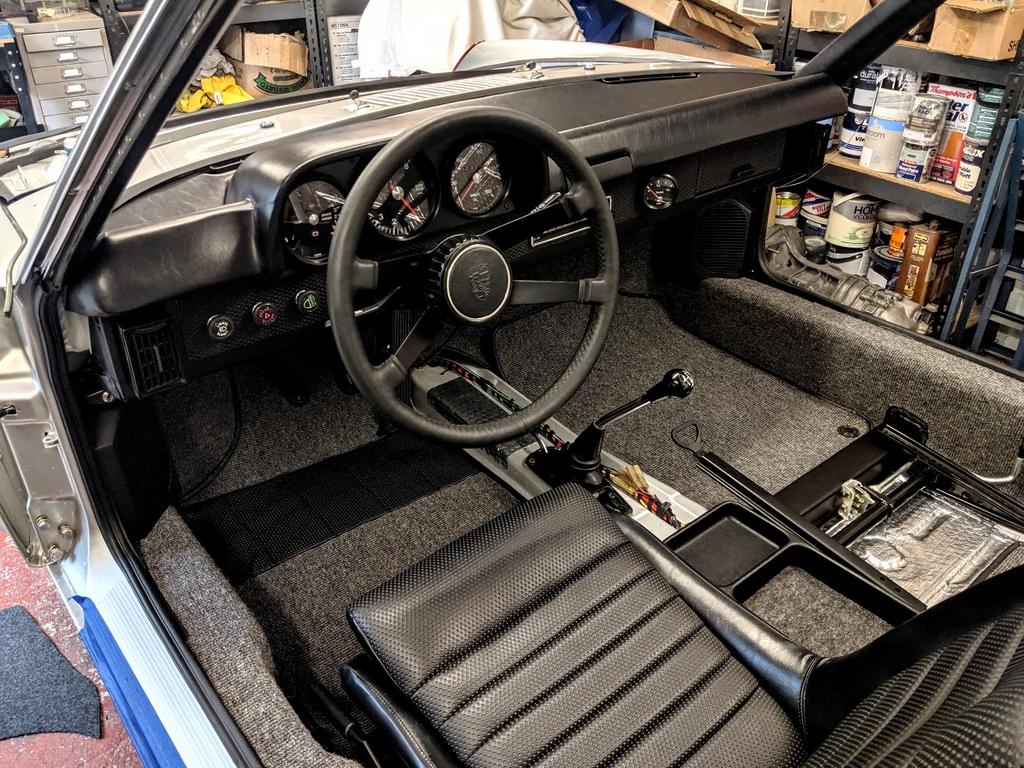
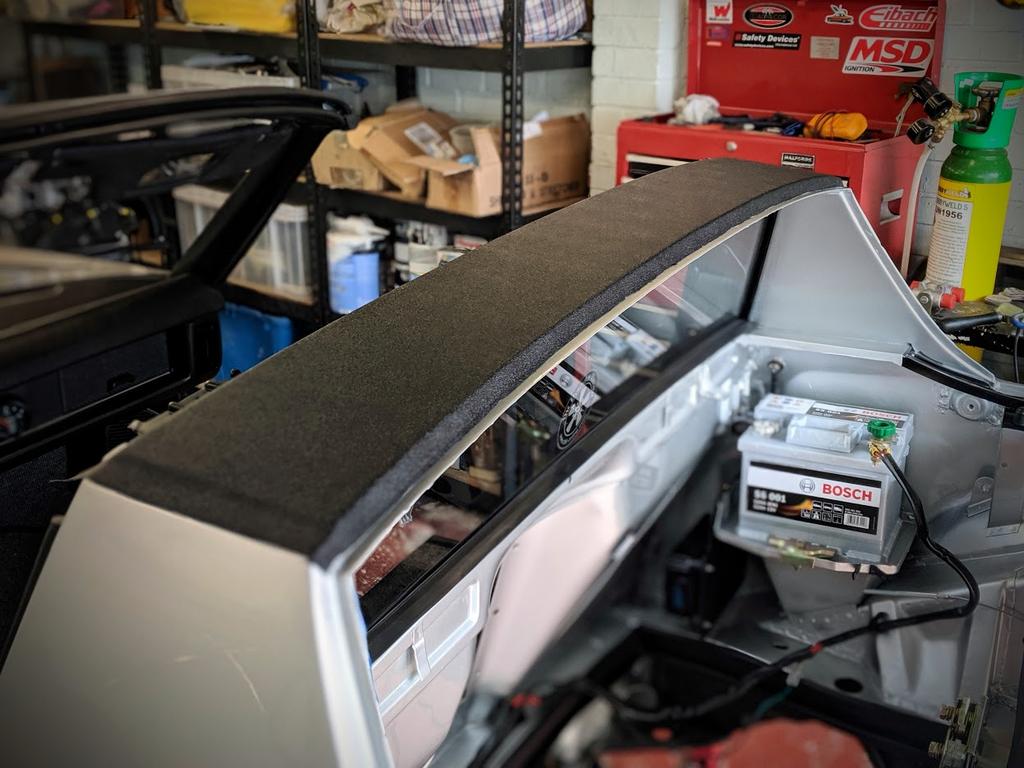
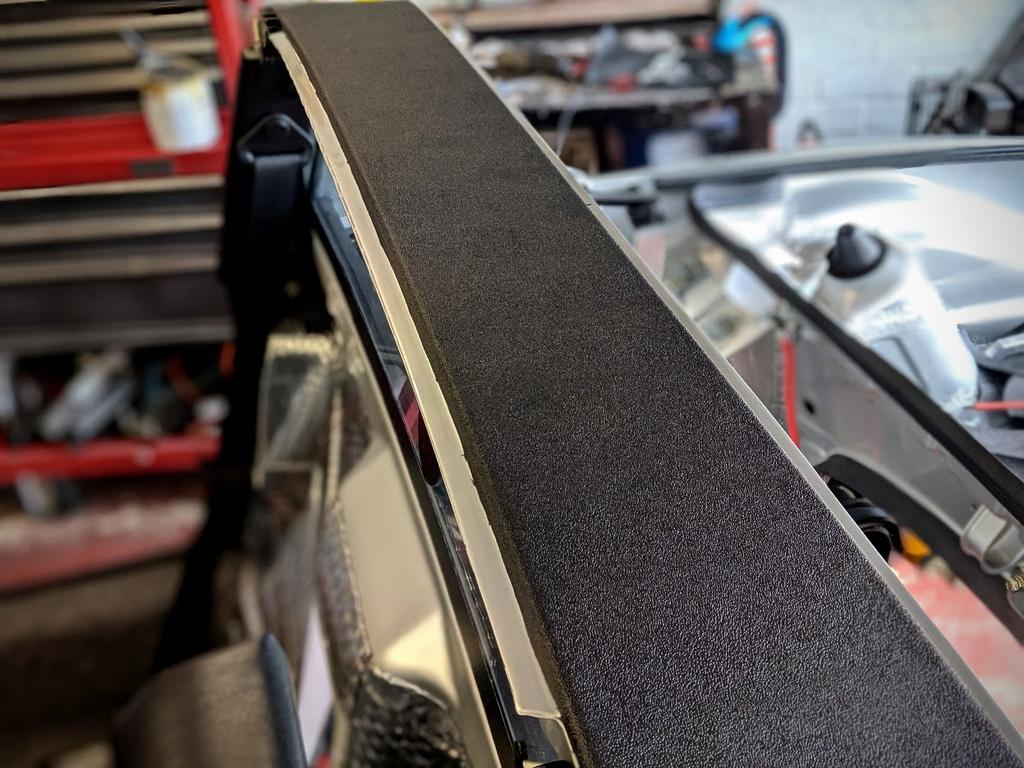
Got the vinyl fitted today and trim, really transforms the look of the car.

yeah....it's all coming together and looking super!
It's going to look great in the final coat of Light Ivory...... 
QUOTE(defianty @ May 10 2019, 09:12 AM)
I made a start on the interior this week as I finally had all the wiring complete. First with the vinyl installation and then the carpet. With a bit of luck doing it now will give the glue time enough to gas off so I'm not smashed when I come to drive it :drunken: . Still got fuel lines to run hence the centre carpet missing and I'll keep the lower dash pad off for now to make getting under the dash easier should I need to.
Yes I did sit in it and yes I did go broom broom!
I think it's almost time to get the doors from storage.
Interior (and whole car) is looking fantastic. May I ask which carpet set you used?
Cheers,
pete
Pete, it's 914rubber's 'Early Charcoal German Loop'
QUOTE(Larmo63 @ May 20 2019, 05:00 AM)
It's going to look great in the final coat of Light Ivory......
You wicked man...
Keep it coming Stephen. It’s inspirational
Luv this car!
Luv this car!
Stephen your car is looking beautiful.
Thanks guys. Spent the afternoon doing a few bits and pieces and finishing off a few small jobs. I also ordered the oil cooler modification and throttle bell crank from Rich Johnson, so looking forward to receiving those as they'er pretty much the last couple of pieces I need!
Just a little update today.
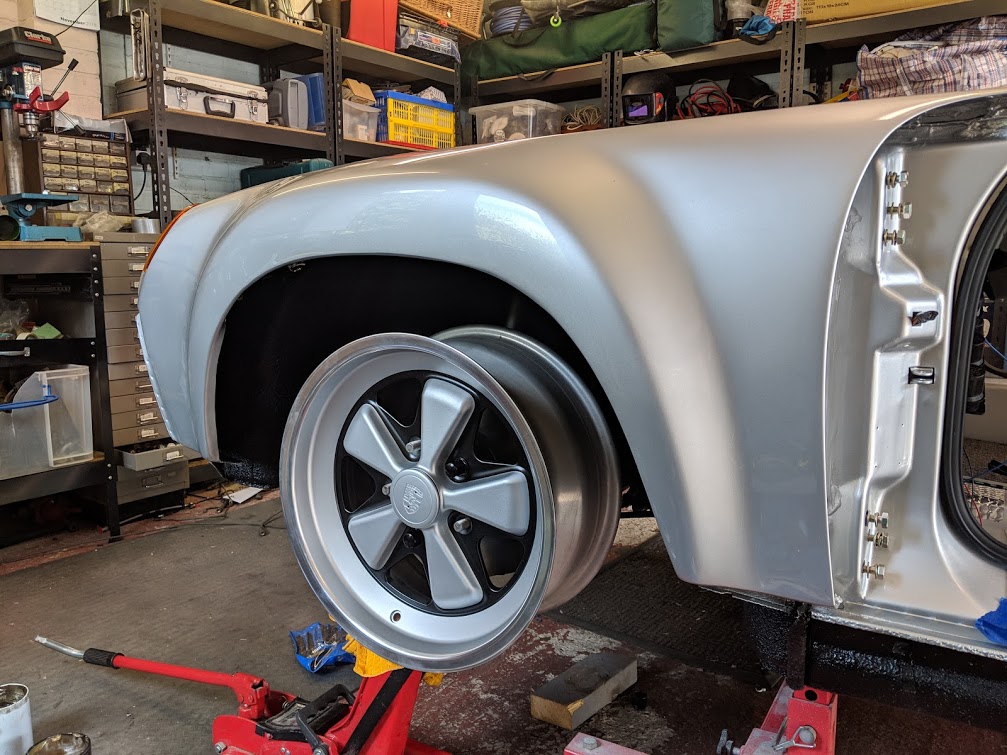
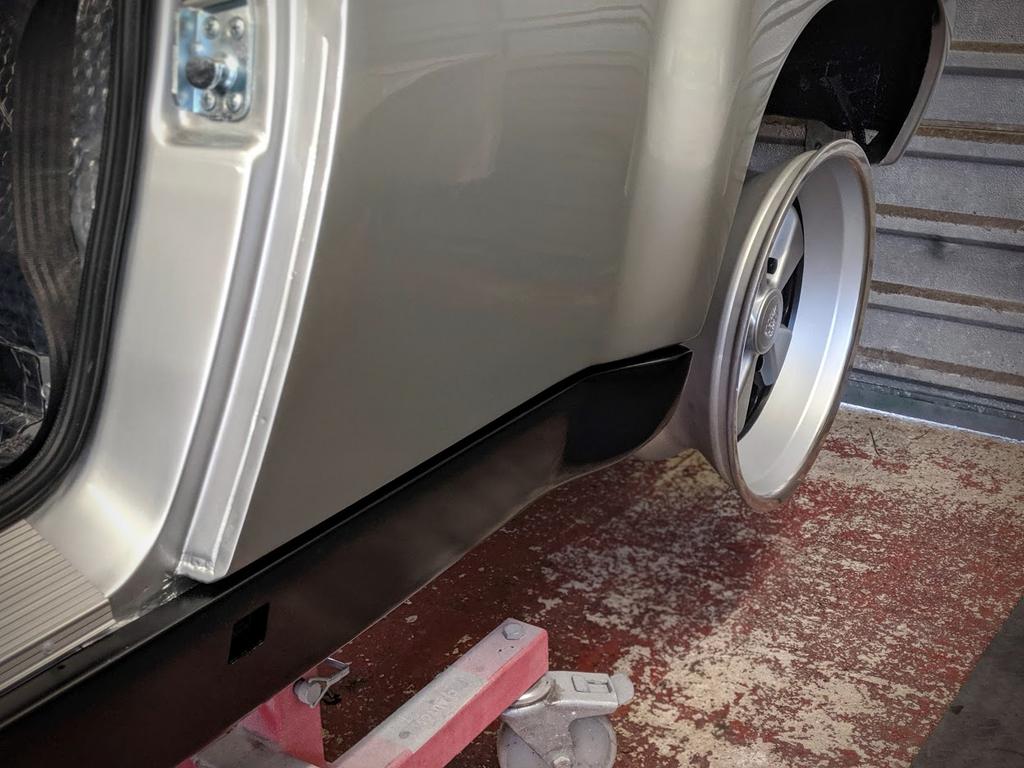
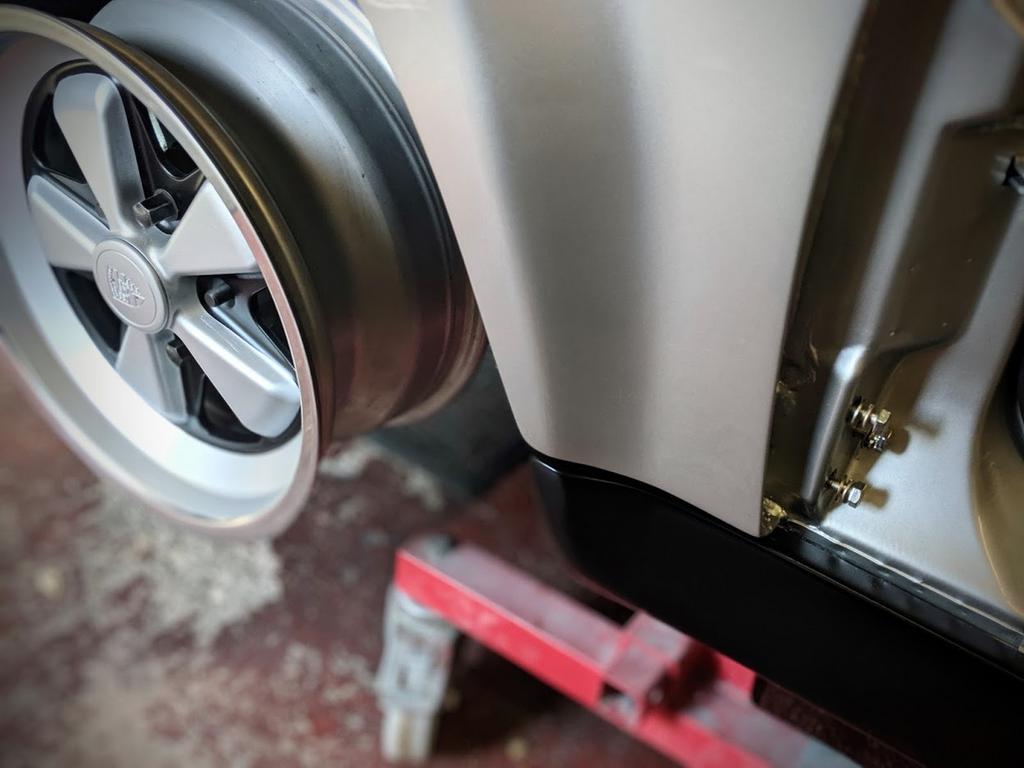
It became apparent that the 7 inch wheels on the front would need spacers but to accommodate those I'd also need longer studs. So I needed to dismantle the front hubs again and press in the new studs. Not the easiest of tasks but I got there in the end.
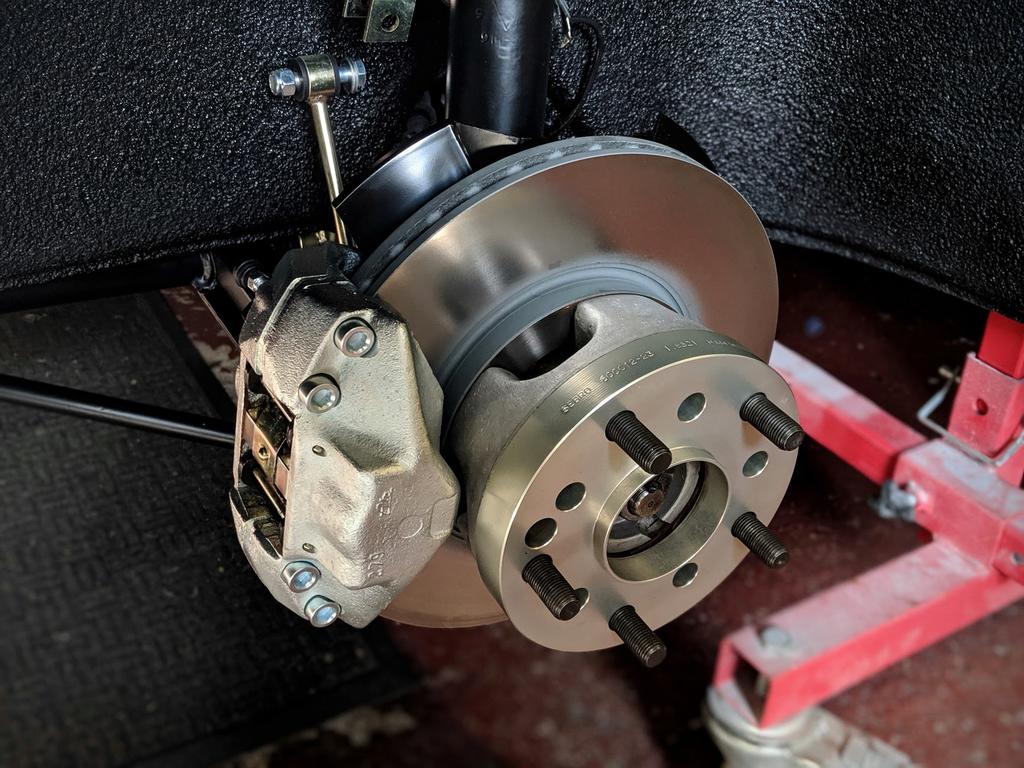
The wheels fill the arches much better now.
This morning I dropped into the paint shop and collected a few more parts. Fortunately the painted offered to store everything for me until I need it which has been a huge help.
Once I've installed the hinges I'll be able to get the trunk lids fitted, which will be delivered soon.
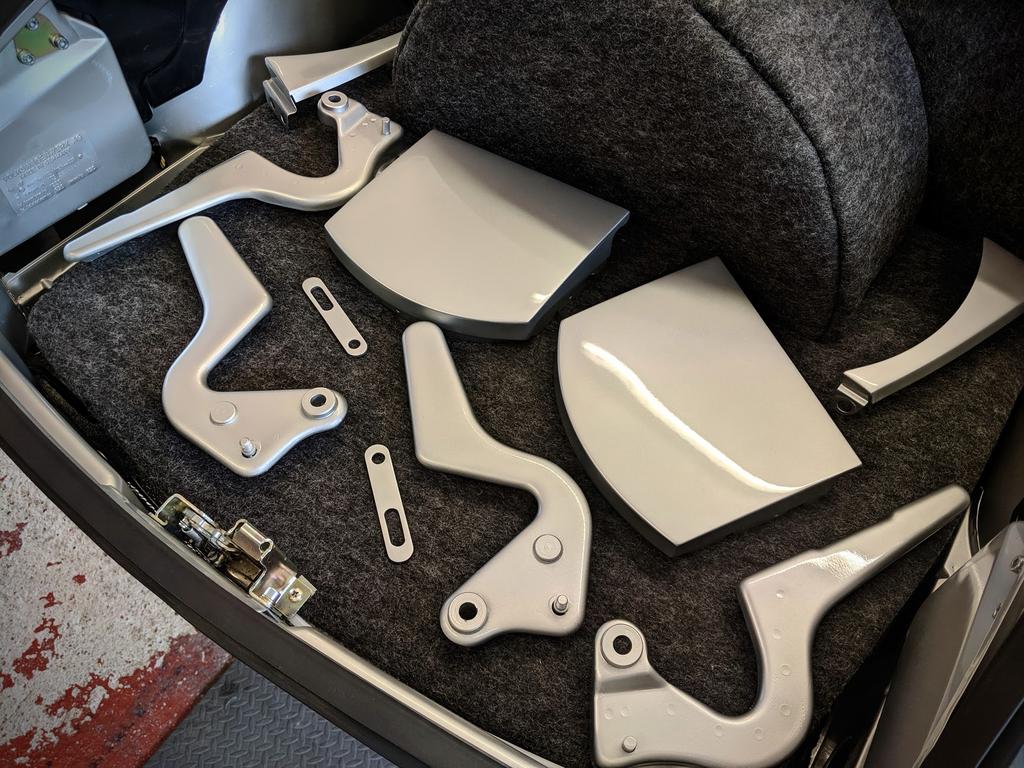
I also picked up all of the GT fibreglass panels.
Really pleased I put in the time getting these to fit perfectly.
I also collected one of the doors and hope to have that fitted and built up in the next few days. However I did ask the painter for the drivers door first but he gave me the passenger door and admitted he forgot it was left hand drive.
It became apparent that the 7 inch wheels on the front would need spacers but to accommodate those I'd also need longer studs. So I needed to dismantle the front hubs again and press in the new studs. Not the easiest of tasks but I got there in the end.
The wheels fill the arches much better now.
This morning I dropped into the paint shop and collected a few more parts. Fortunately the painted offered to store everything for me until I need it which has been a huge help.
Once I've installed the hinges I'll be able to get the trunk lids fitted, which will be delivered soon.
I also picked up all of the GT fibreglass panels.
Really pleased I put in the time getting these to fit perfectly.
I also collected one of the doors and hope to have that fitted and built up in the next few days. However I did ask the painter for the drivers door first but he gave me the passenger door and admitted he forgot it was left hand drive.
car is looking great. The steel flares are about 2" extension front and back so it makes sense that you need a 1" spacer on the front. The spacer should also give you a bit more inner fender clearance when you turn the wheel.
The car is really taking shape now. Last week I collected the doors from storage and got them fitted.
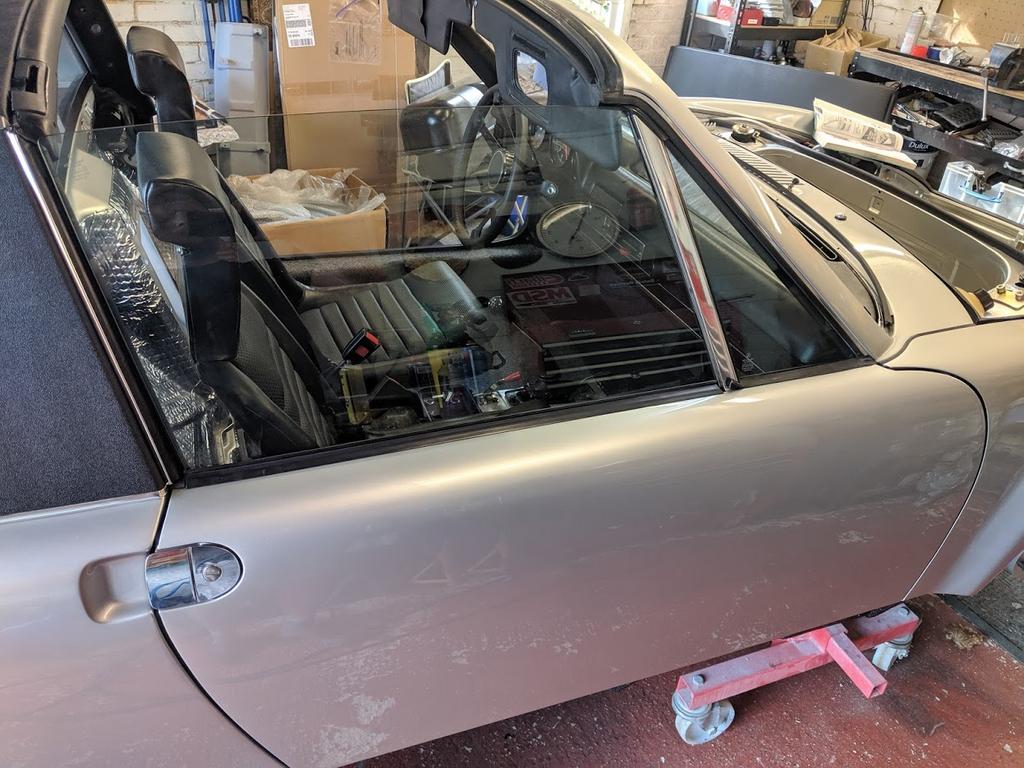
Had a terrible time fitting the widow regulator and getting everything lined up correctly. I'm still not 100% happy with it but after four days of messing around I'm finished with it for a while.
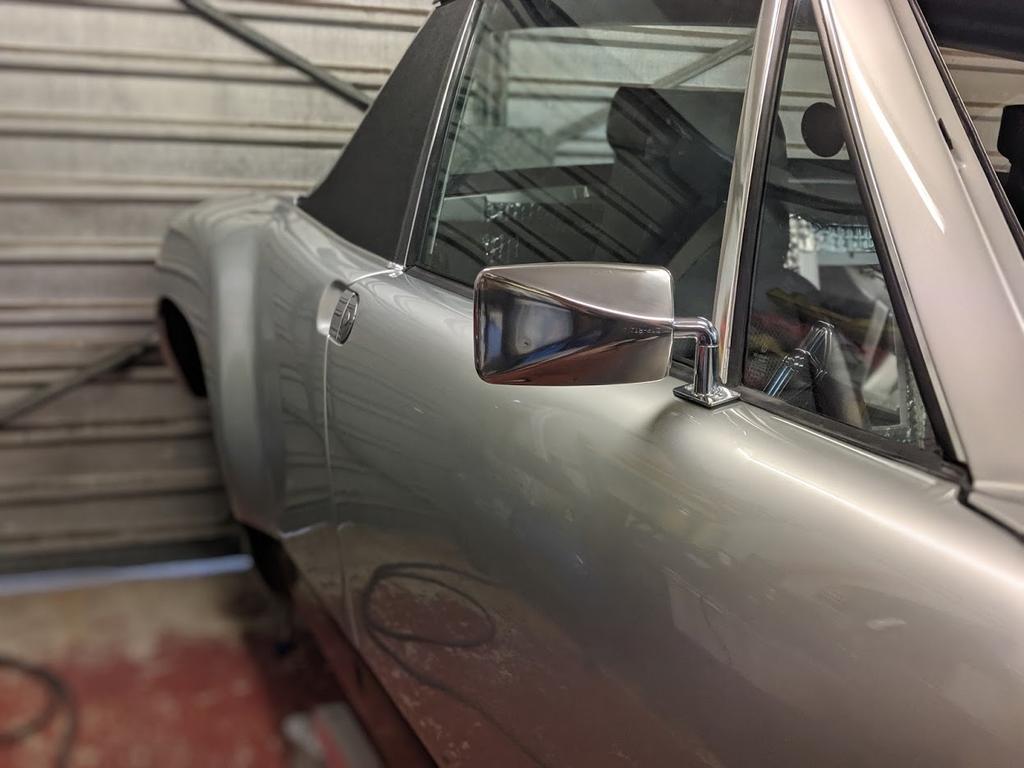
What I didn't notice when I was fitting the passenger door is the painter had unfortunately filled in the wing mirror holes. As if this door hadn't already caused me enough problems I then had to deal with trying to drill though from the inside to be able to fit the mirror again, all with the window regulator in place. :shock:
Had a terrible time fitting the widow regulator and getting everything lined up correctly. I'm still not 100% happy with it but after four days of messing around I'm finished with it for a while.
What I didn't notice when I was fitting the passenger door is the painter had unfortunately filled in the wing mirror holes. As if this door hadn't already caused me enough problems I then had to deal with trying to drill though from the inside to be able to fit the mirror again, all with the window regulator in place. :shock:
Next I went on to install the headlight covers and got lucky first time with the alignment on the drivers side and it when on perfectly.
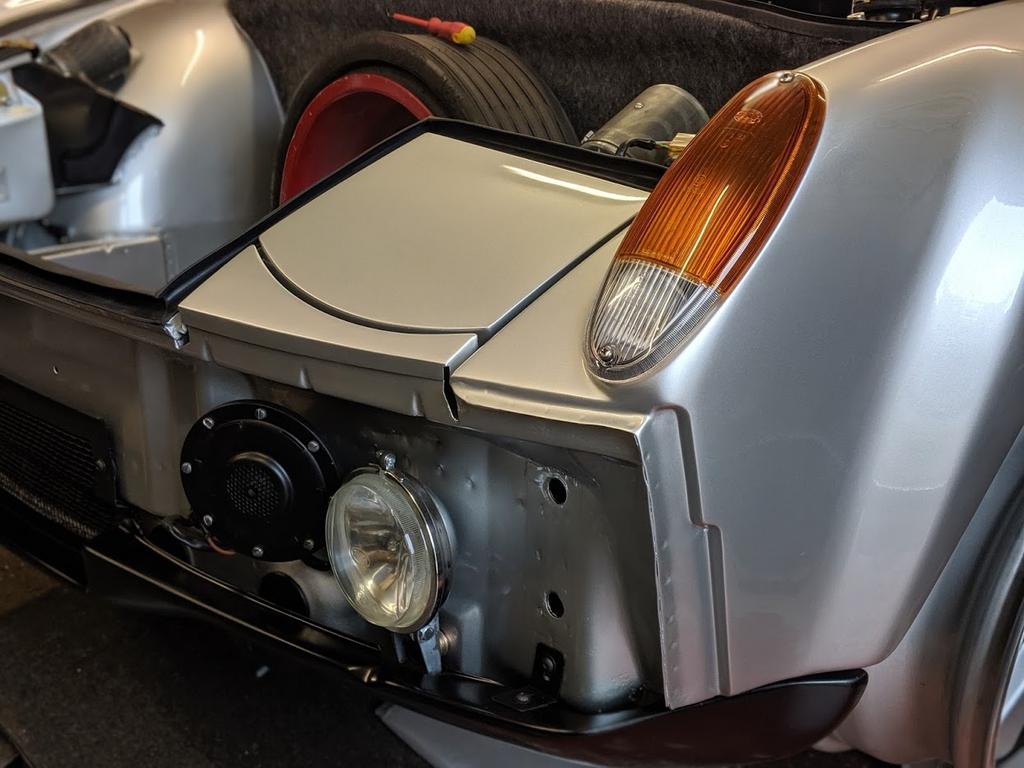
Obviously the other side currently fits like a square peg in a round hole - typical.
The bonnet and boot lid will arrive soon so I fitted the hinges and springs so they can be bolted on as soon as they arrive.
Obviously the other side currently fits like a square peg in a round hole - typical.
The bonnet and boot lid will arrive soon so I fitted the hinges and springs so they can be bolted on as soon as they arrive.
Having also collected the front valance I could put the front together.

And with the drivers door fitted, it's really starting to take shape :cheers:
And with the drivers door fitted, it's really starting to take shape :cheers:
Stunning!
Wonderful build and fun to watch it taking shape.
Looks amazing Stephen!
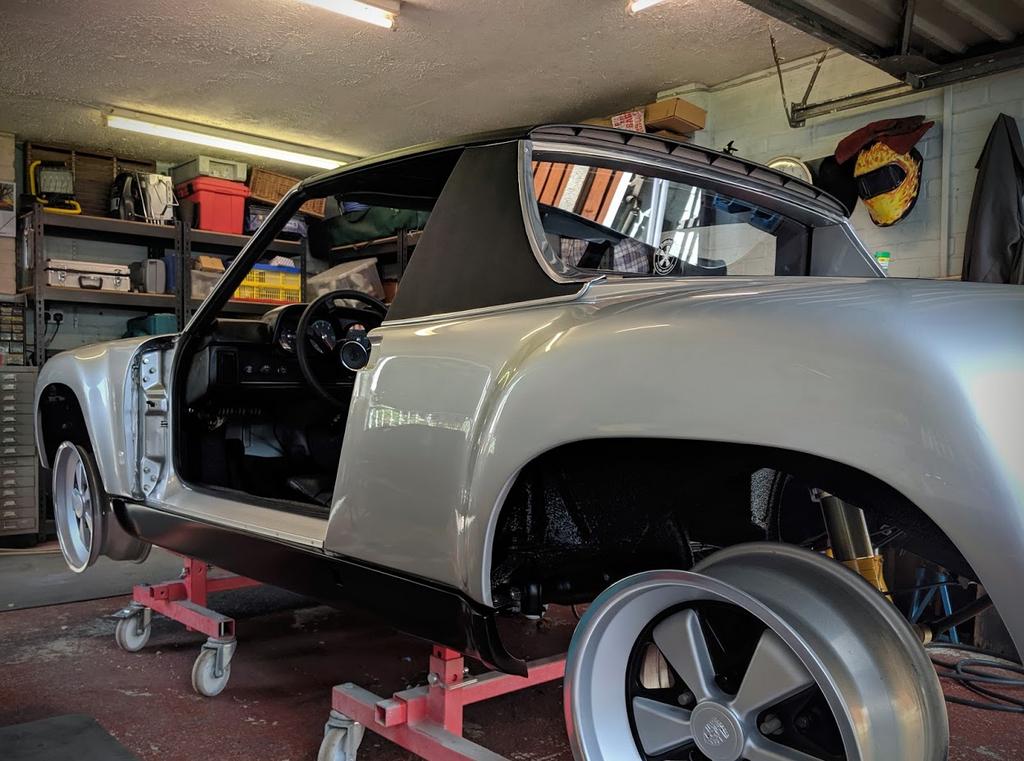
Being the original door to the car the drivers side window regulator went in without a hitch and this time I took a closer look at the height adjuster and concluded that something has to be wrong with the passenger side as no amount of adjustment makes any difference to the height. Looks like I'll have to tear that one down again.
But great to get the drivers side operating perfectly and fitting well.
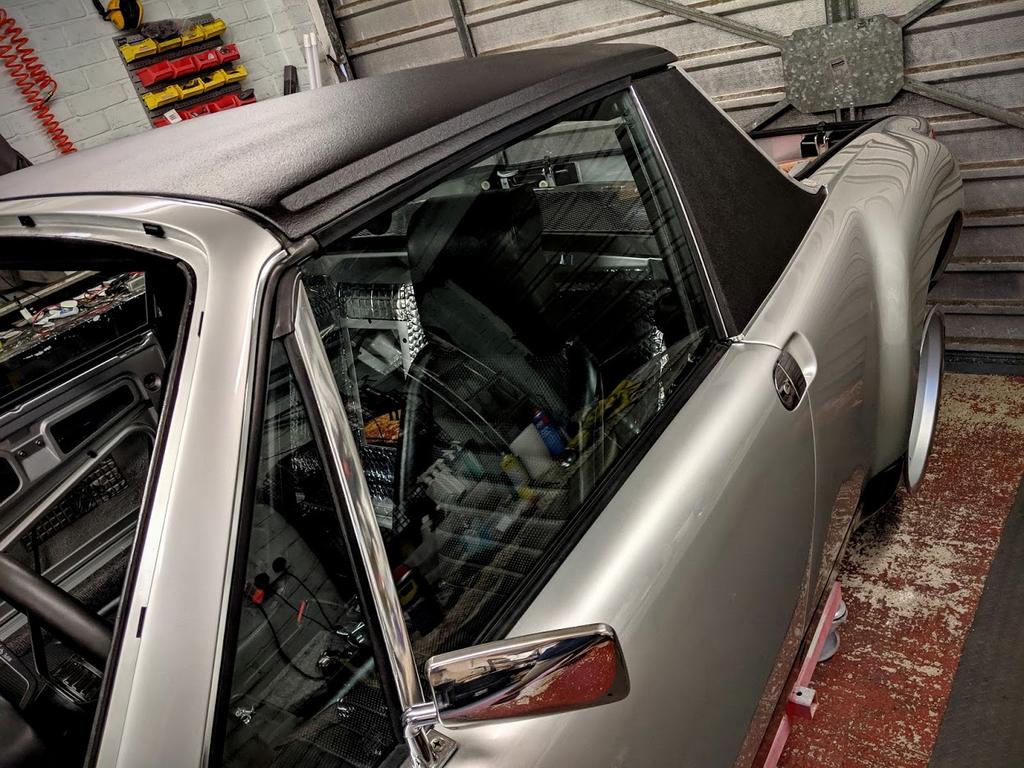
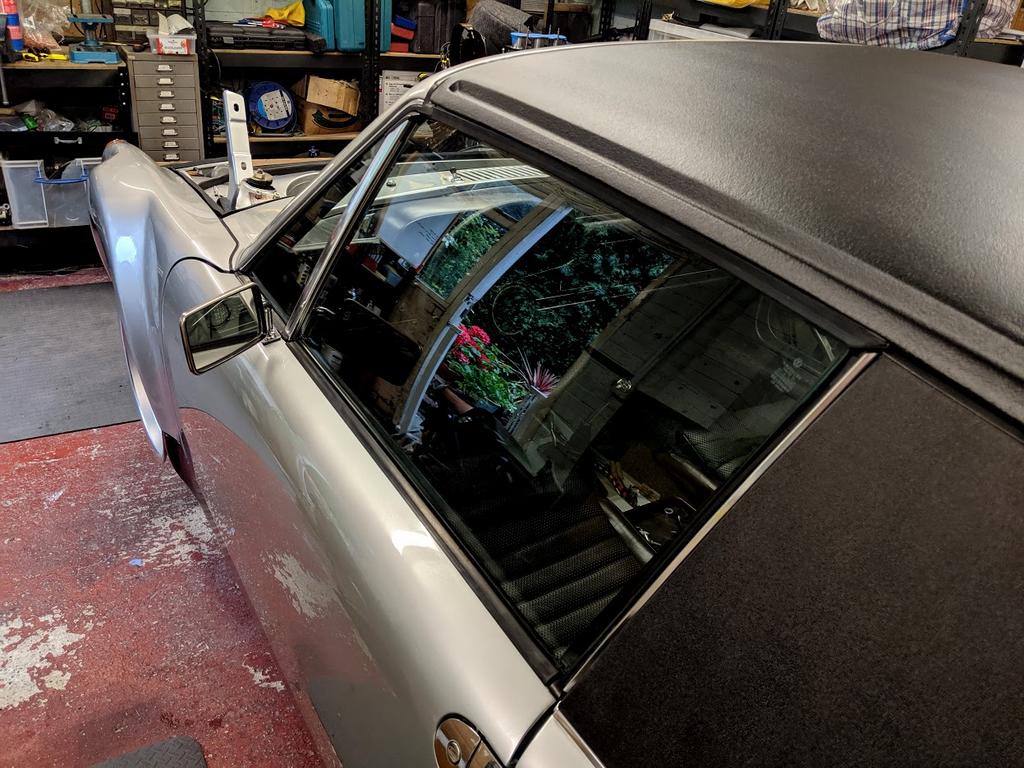
I also had to make an adjustment on the engine lid and couldn't resist this shot whilst I was there.
But great to get the drivers side operating perfectly and fitting well.
I also had to make an adjustment on the engine lid and couldn't resist this shot whilst I was there.
Very nice love the pics....getting close .
.
This is pure porn Can I ask what you are using to light your pics? Your photos are exquisite.
Can I ask what you are using to light your pics? Your photos are exquisite.
QUOTE(bbrock @ Jun 6 2019, 04:31 PM)
This is pure porn
Can I ask what you are using to light your pics? Your photos are exquisite.Thanks Brent.
I don't use anything special. In fact all the photos are taken on my Google Pixel 2 with daylight or garage lights as my only light source. I never use a flash. If I ever want any depth in the photo I'll use the inbuilt 'portrait' feature as it blurs the background slightly which emphasizes the subject.
With a Google phone the photos are automatically uploaded to Google Photos which has basic editing built in. I usually just up the blacks and highlights slightly to add contrast to the images nothing more.
I spent 20+ years as a Graphic Designer, it's programmed into me to make pictures look good
 You have come so far and it it is coming out fantastic!
 Always great to see your progress
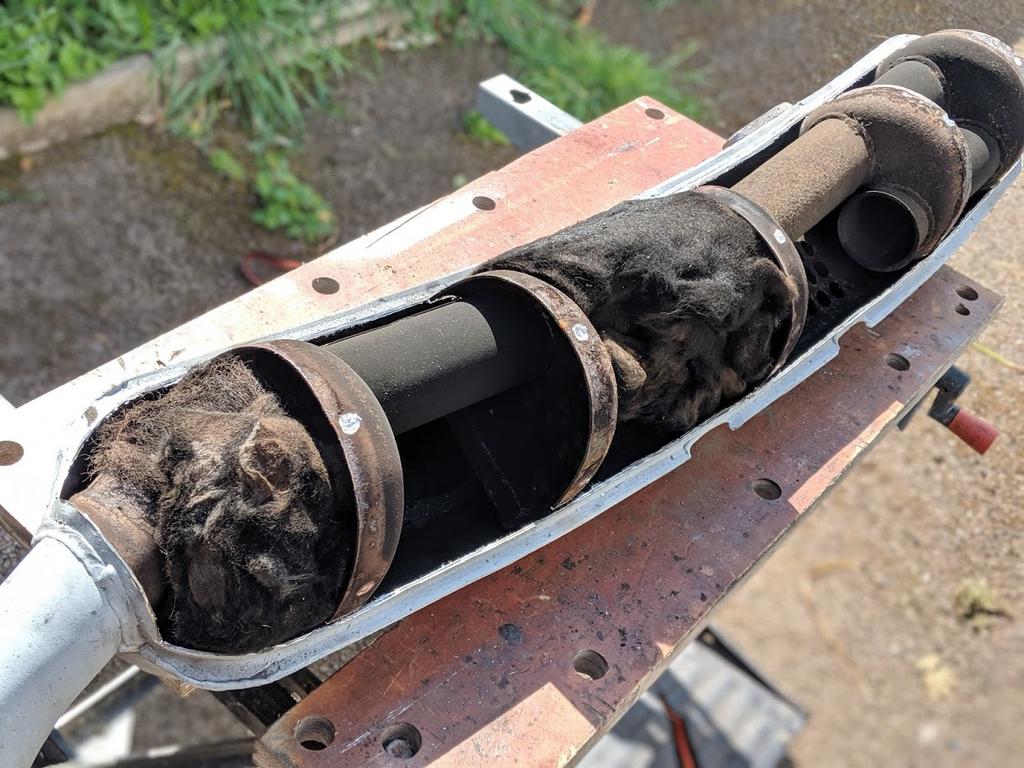
Creating a Sport Muffler.
I picked up a Leistritz muffler a couple of years ago on ebay as it was cheap and thought it would make an excellent candidate to convert into a sport muffler. I'd seen instructions over on Pelican on how to do this and just a few months ago the thread I had bookmarked was updated with a slightly revised design. So with those instructions I set about making the modifications.
Original Pelican Thread. Post 40. http://forums.pelicanparts.com/porsche-911...ml#post10058354
Here's what I started with.
When James' (23e Heure) GT conversion was finished the muffler fitted to the car originally had an awful, ear piercing drone so I swapped it with this one temporarily and it was much quieter for the run down to Le Mans Classic. So that confirmed my £70 ebay purchase was a bargain
I won't go through every step as speedracer54 on Pelican did a great job explaining the process. However here's a few photos of the modifications of mine.
Cutting into the case.
Mask on!
After a bit of cleaning.
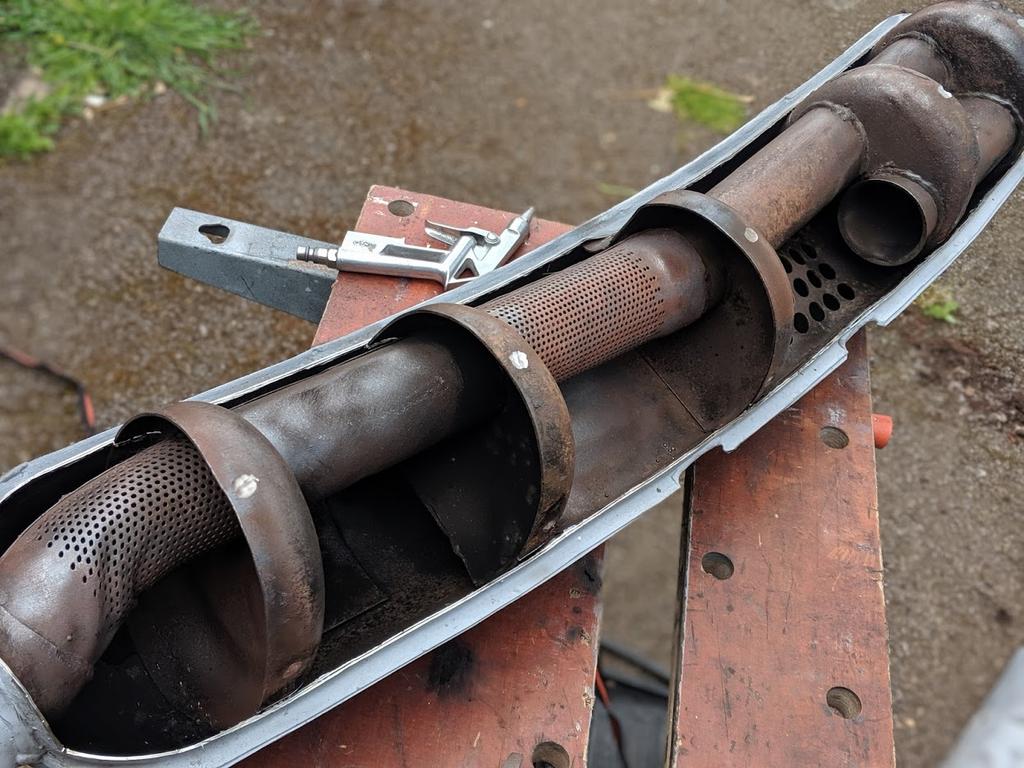
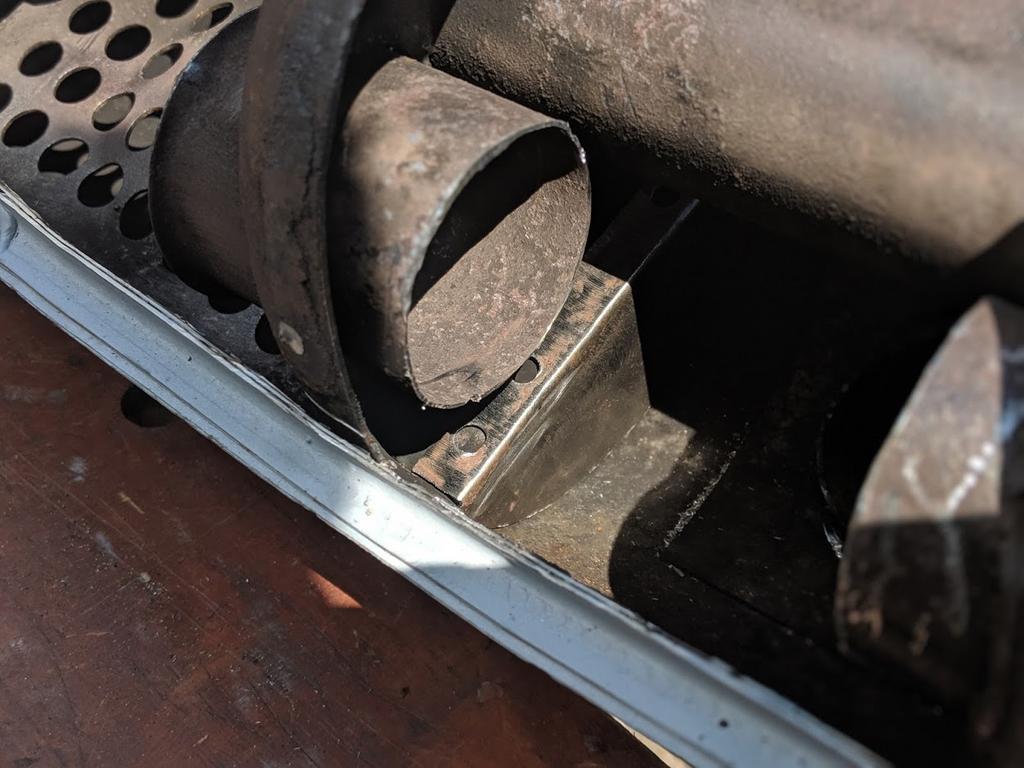
Marking out the parts to be cut out.
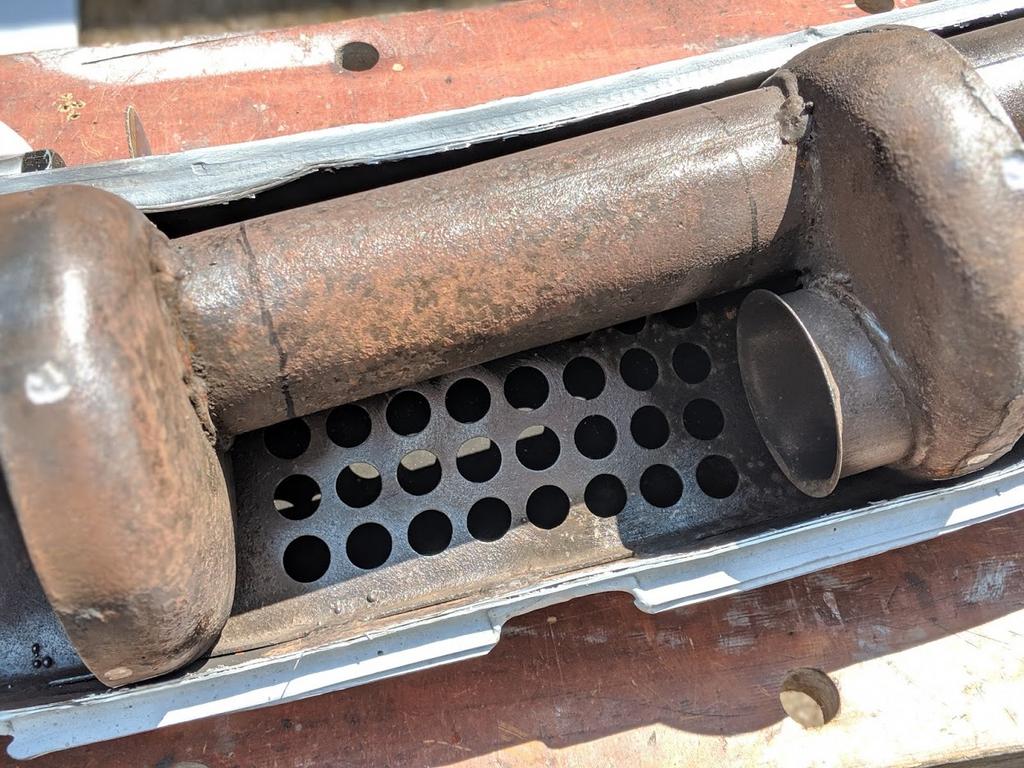
New hole
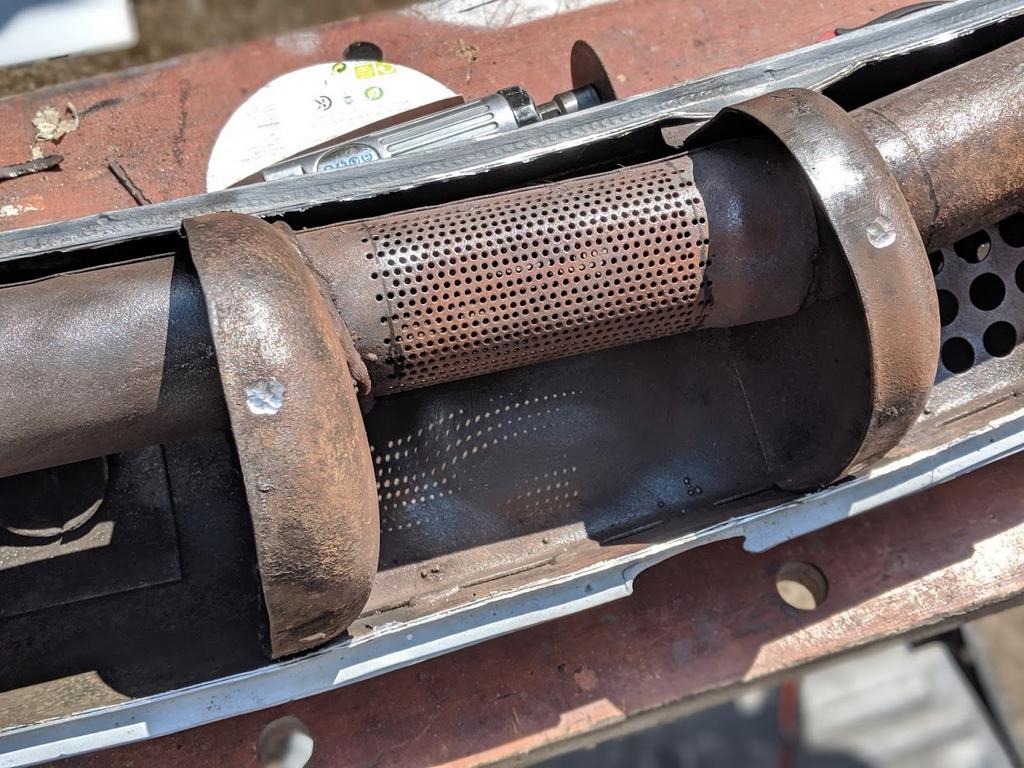
Part of one of the pieces cut out put into the hole so it matches the original at the other end.
Once this part of the pipe was cut I need to add the holes similar to the other section. Just look at how I managed to get them all perfectly in line and the same size :oops:
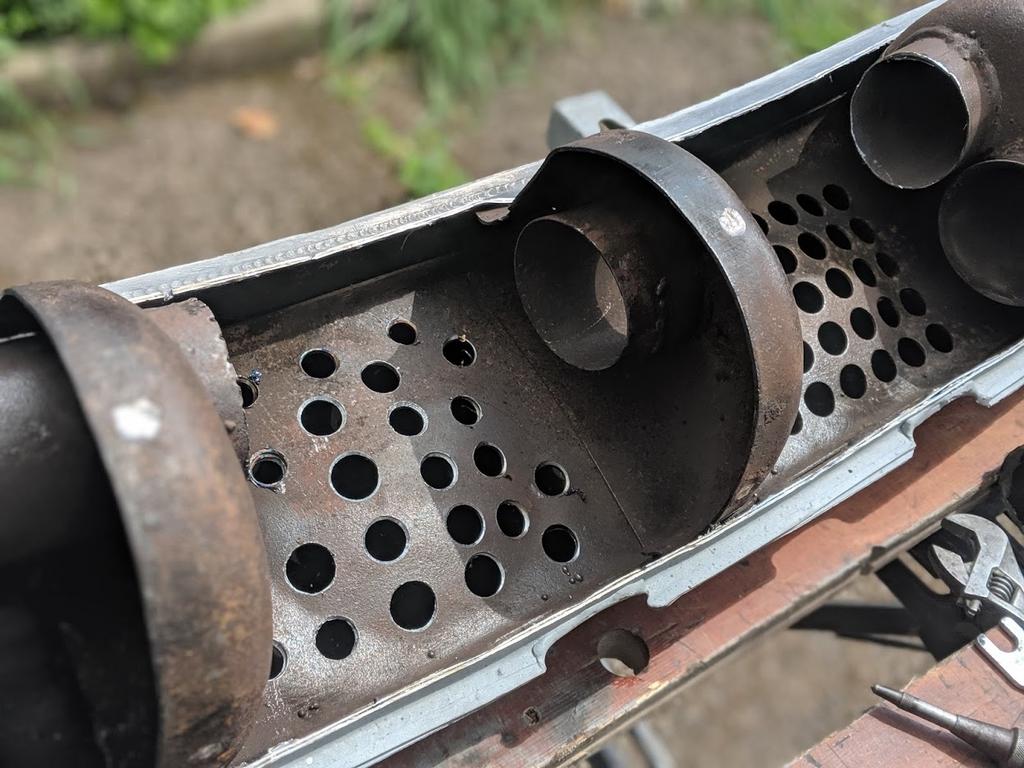
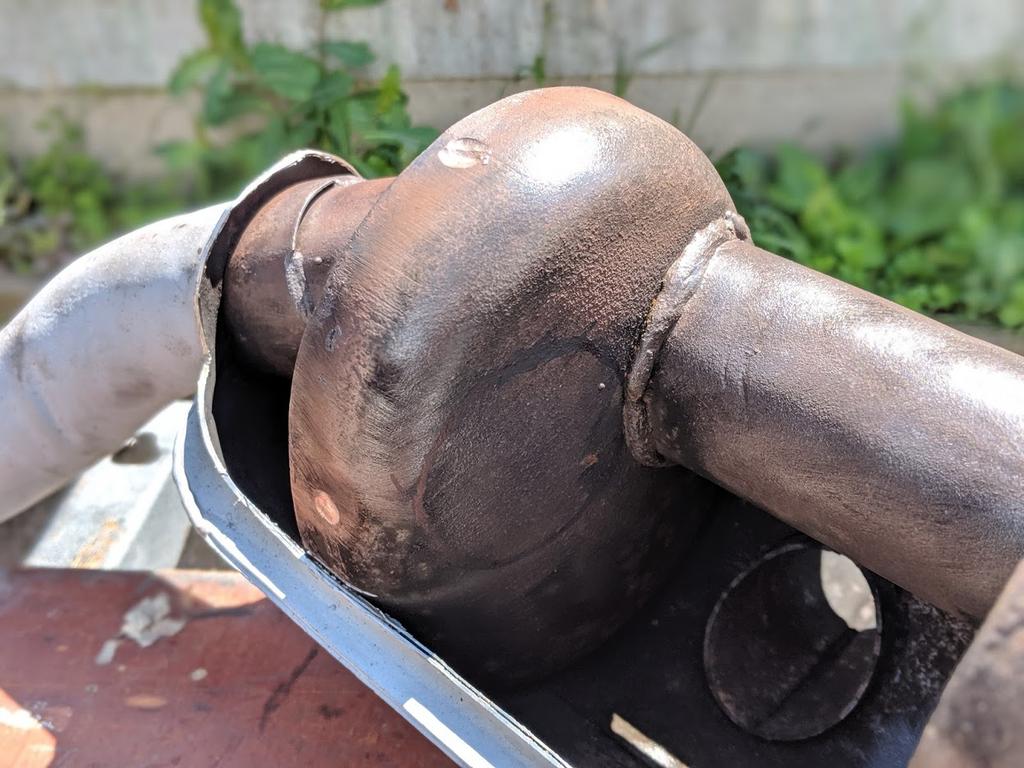
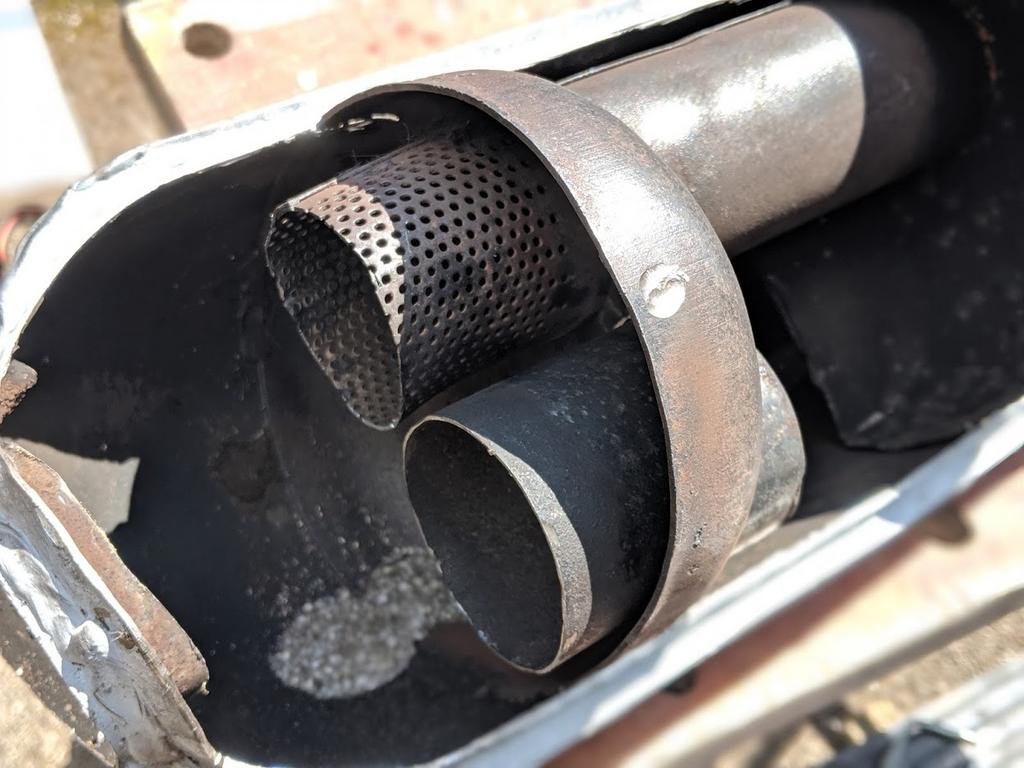
A couple of sections had to be sealed off to redirect the flow so with a cardboard template in place I could make the plates to weld in.

With the internal modifications complete here's how it now flows.
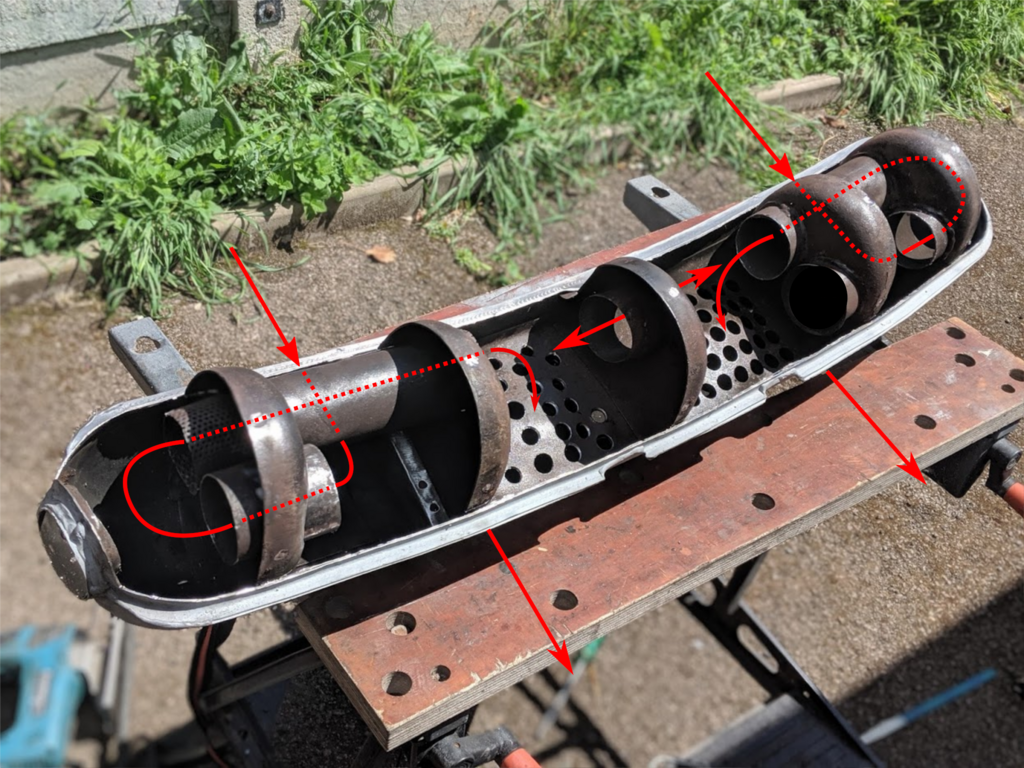
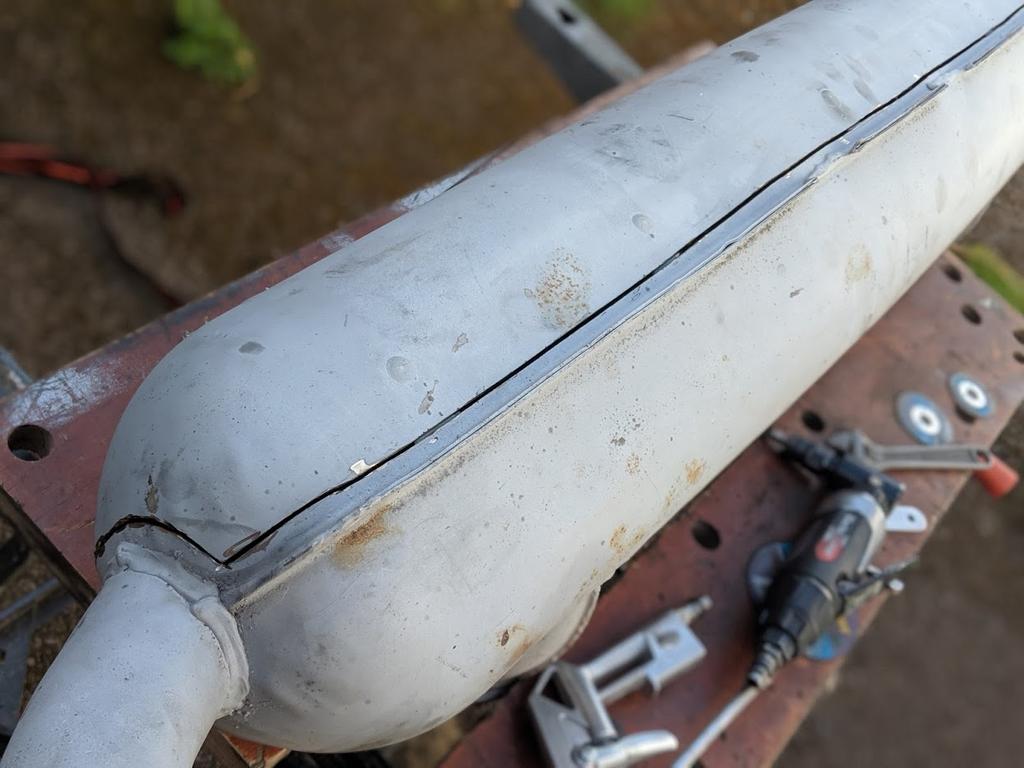
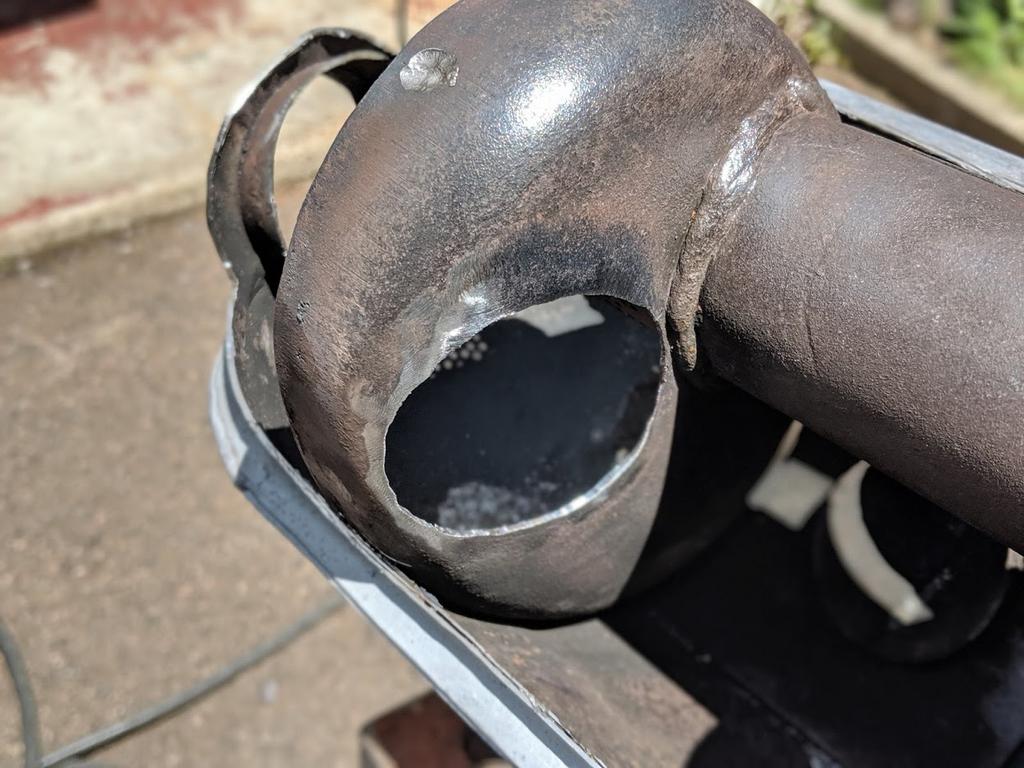
Finally I could add the distinctive twin outlet pipes.
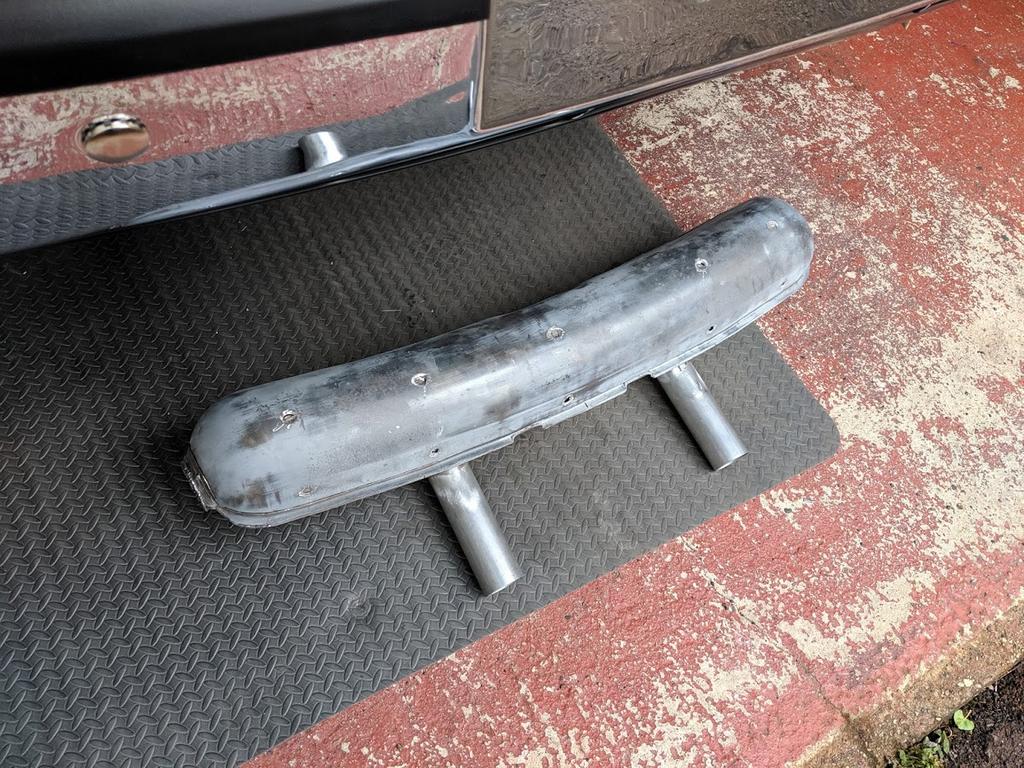
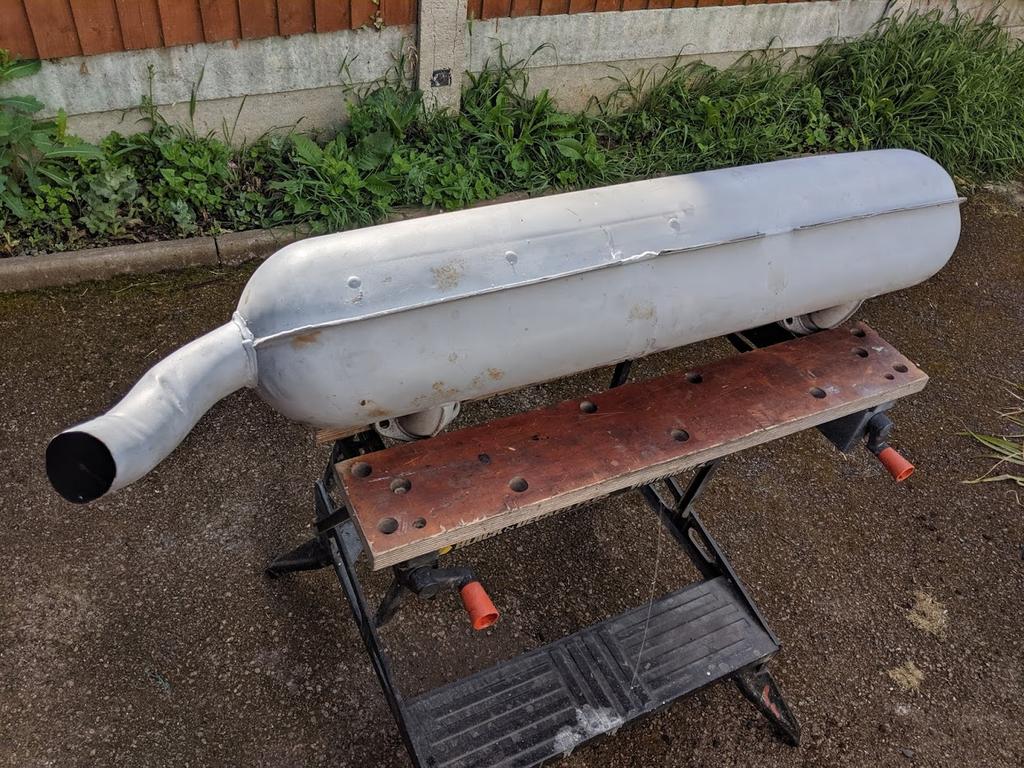
After stitching it all back together and giving it a coat of silver/grey VHT paint here it is ready to fit to the car.
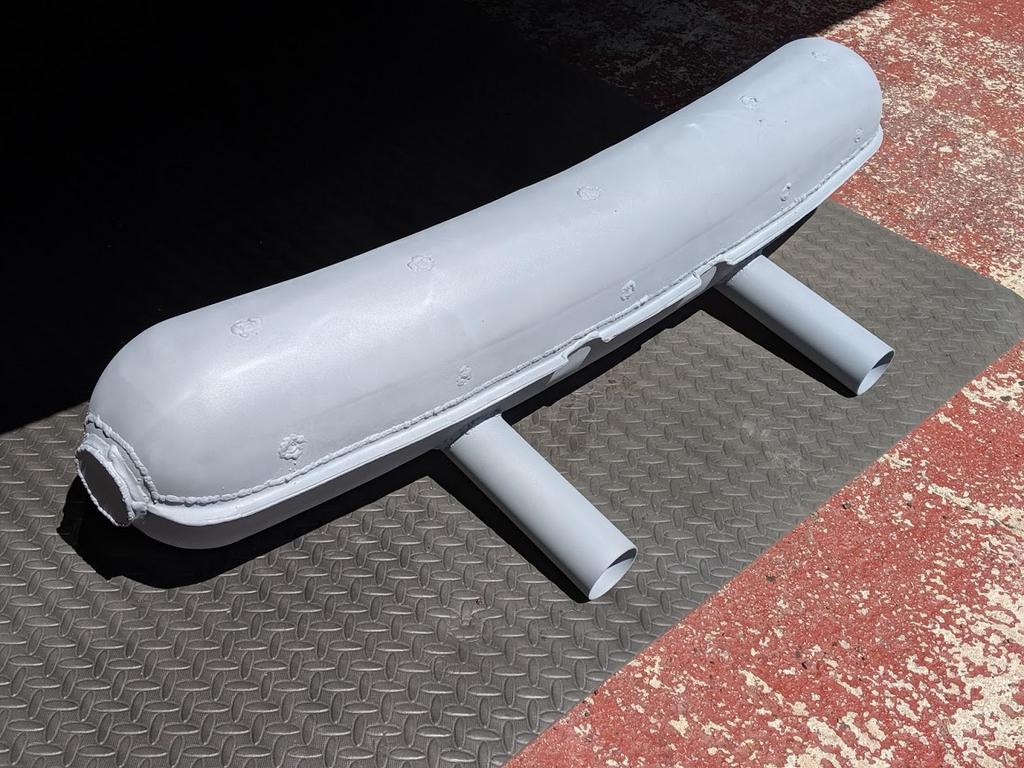
Can't wait to hear what it sounds like now. I've seen a couple of YouTube clips and a couple of first hand accounts say it shouldn't be too obnoxious but I'll have to wait and see. If it's too loud I'll treat myself to a new one and chalk this up as another learning experience.
I picked up a Leistritz muffler a couple of years ago on ebay as it was cheap and thought it would make an excellent candidate to convert into a sport muffler. I'd seen instructions over on Pelican on how to do this and just a few months ago the thread I had bookmarked was updated with a slightly revised design. So with those instructions I set about making the modifications.
Original Pelican Thread. Post 40. http://forums.pelicanparts.com/porsche-911...ml#post10058354
Here's what I started with.
When James' (23e Heure) GT conversion was finished the muffler fitted to the car originally had an awful, ear piercing drone so I swapped it with this one temporarily and it was much quieter for the run down to Le Mans Classic. So that confirmed my £70 ebay purchase was a bargain
I won't go through every step as speedracer54 on Pelican did a great job explaining the process. However here's a few photos of the modifications of mine.
Cutting into the case.
Mask on!
After a bit of cleaning.
Marking out the parts to be cut out.
New hole
Part of one of the pieces cut out put into the hole so it matches the original at the other end.
Once this part of the pipe was cut I need to add the holes similar to the other section. Just look at how I managed to get them all perfectly in line and the same size
:oops:A couple of sections had to be sealed off to redirect the flow so with a cardboard template in place I could make the plates to weld in.
With the internal modifications complete here's how it now flows.
Finally I could add the distinctive twin outlet pipes.
After stitching it all back together and giving it a coat of silver/grey VHT paint here it is ready to fit to the car.
Can't wait to hear what it sounds like now. I've seen a couple of YouTube clips and a couple of first hand accounts say it shouldn't be too obnoxious but I'll have to wait and see. If it's too loud I'll treat myself to a new one and chalk this up as another learning experience.
Very interesting and timely. I too am building a muff for my 2.4 six. I have seen this modded stock muff before in all the various threads. I am going a different route as I am starting with an essentially open tube, two standard inlets and will be going with the two outlets, but will be placing them closer together ala the Boxster look.
My biggest concern is also to control the inherent resonant drone at 2400 - 3500 RPM. I have a couple of ideas on how to do it. One of them concerns the common middle chamber that feeds the two outlets. I wonder if having this chamber common tends to increase the tendency to drone, or if it would be better to separate the two sides, with no common center chamber, see attached sketch.
As I fabricate, I will be able to build the center chamber either way, so When you get it mounted I will be interested to hear your feedback regarding drone.
Hoping Ben might chime in with some trade secrets
You can also keep the stock end pipe on the muffler and create a rally exhaust. Cap off the GT pipes for long drives or driving out of the neighborhood.
Guys I have done 10 of these sport conversion s recently.. I charge 250 for doing the conversion. They are not to difficult.. That said I still have 4 of those GT 3 or sport mufflers that are super cheap @450 and a 2 in 1 out non quiet for $400 not that you are really looking for those but thought it would help you weigh out how hard you want to work on this. 
Defianty/Stephen,
Thanks for the great photos of your work and the Pelican link. I think I finally can understand what the sport muffler modification actually does relative to the stock configuration.
My question is, do these modifications actually increase performance? Or is this a matter of sound, and perhaps appearance? Are there any dyno numbers, before and after, out there?
Louder is always faster.
QUOTE(gereed75 @ Jun 16 2019, 08:54 PM)
Very interesting and timely. I too am building a muff for my 2.4 six. I have seen this modded stock muff before in all the various threads. I am going a different route as I am starting with an essentially open tube, two standard inlets and will be going with the two outlets, but will be placing them closer together ala the Boxster look.
My biggest concern is also to control the inherent resonant drone at 2400 - 3500 RPM. I have a couple of ideas on how to do it. One of them concerns the common middle chamber that feeds the two outlets. I wonder if having this chamber common tends to increase the tendency to drone, or if it would be better to separate the two sides, with no common center chamber, see attached sketch.
As I fabricate, I will be able to build the center chamber either way, so When you get it mounted I will be interested to hear your feedback regarding drone.
Hoping Ben might chime in with some trade secrets
The guy who's method I followed adapted the initial sport muffler modification that was posted at the beginning of the Pelican thread. One of the reasons for change was to eliminate the drone and to quieten it a little. I believe he achieved this although I won't know this for sure until I can test it. That will have to wait for a few weeks yet.
QUOTE(maf914 @ Jun 17 2019, 02:49 PM)
Defianty/Stephen,
Thanks for the great photos of your work and the Pelican link. I think I finally can understand what the sport muffler modification actually does relative to the stock configuration.
My question is, do these modifications actually increase performance? Or is this a matter of sound, and perhaps appearance? Are there any dyno numbers, before and after, out there?
Good question and I can't say I'm sure about the answer. Obviously I'll have no before to benchmark against. I do think the muffler is now less restrictive so there may be a small increase in performance. To be honest I only did it for the looks and hopefully sound. Any performance gain would just be a bonus.
QUOTE(mepstein @ Jun 17 2019, 02:59 PM)
Louder is always faster.
Absolutely
The original 2 in 2 out Dansk Sport is just one step below straight pipes with very little internal baffling. From what I understand, it is LOUD.
This iteration is somewhere between stock and dansk sport in baffle department. Just by looking at it it should be somewhere between a stock muff and a Dansk Sport in both sound and flow. The bigger unknown is probably controlling the resonant drone. I just re-read the Pelican thread and “blee” reported “ no drone” with his shared, open to both out pipe center chamber.
I suspect this is a bit of an in-exact science, so until it’s run it is tough to know exactly. Good luck Stephen! Nice work.
Oh ya .... Louder - faster
Well I've conceded to defeat on getting the car ready for Brooklands 914/50. With a business to run and also now being back working full-time there's just not enough hours in the day. I've enjoyed every part of the project so far and I knew if I carried on with what little spare time I have now I'd start to hurry unnecessarily and end up working on the car whilst tired and that wouldn't be fun and after this much work I didn't want to start cutting corners. I was a little disappointed at first but the few hours I've had on the car over the last couple of weekends were enjoyable and it'll still be done with time to get it on the road before the end of the summer.
Last weekend I finally made up some fuel lines and got them fitted. A nice improvement over the original plastic ones.
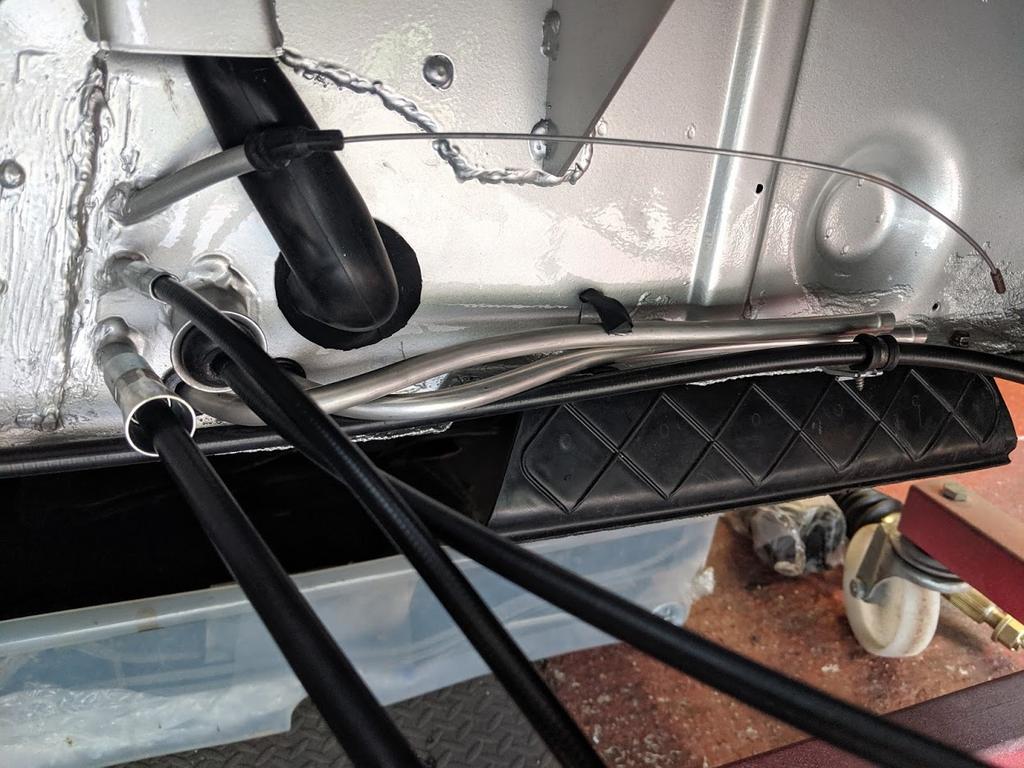
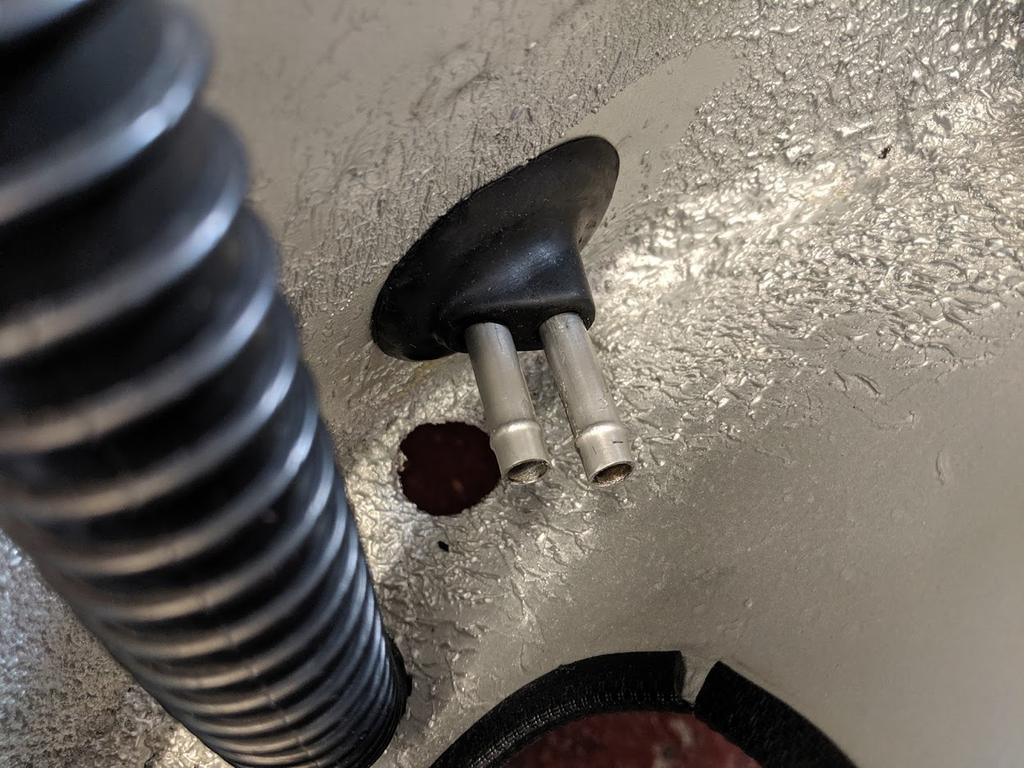
Last weekend I finally made up some fuel lines and got them fitted. A nice improvement over the original plastic ones.
This is a "lo-fi" version of our main content. To view the full version with more information, formatting and images, please click here.