And the more complex tools and fixtures for the chassis.
I actually saw this set back in 1981. The front suspension fixture is also used 911's. Today it it considered priceless. To think some shop owners in the 1990's probably ended up throwing them out of scrapping them because they were old and insurance companies were totalling all the late 60's and 70's Porsches because the market was soft. Ugghhhhhhh!!!!
Full Version: Bringing out the dead
Contd
Technical documentation:
Porsche new early on the 914 was prone to rust.
1) Dealer Bulletin on Corrosion
2) Detailed schematic of where foam, sealant and undercoating locations were along with grommets and hole plugs.
This document is scary! Every where there is foam we now have rust!
Porsche new early on the 914 was prone to rust.
1) Dealer Bulletin on Corrosion
2) Detailed schematic of where foam, sealant and undercoating locations were along with grommets and hole plugs.
This document is scary! Every where there is foam we now have rust!
Jeff,
I am dam glad you posted. As I was considering creating a new post with the byline of "WHERE THE HELL IS HAIL...?????"
And here ya are... !!!! Ya must of heard me.
Jeff, Can ya PM me your phone number? I might be coming up your way next weekend. And hoped I might drop by again and check in with you.
You supply the coffee. I supply the smokes.
You should be shooting video of this build.
Think about it for minute Jeff. We could sell a "HOW TO RE-BUILD A 914 BODY VIDEO" And sell it hand in hand with my soon to be famous and forthcoming, "HOW NOT TO BUILD A TYPE IV ENGINE".
Dude... We could be in the bucks real quick me thinks. I still have to get my video cam repaired, as I was trying to fix the power supply section of my camera. And apparently I did something a bit wrong.
(I thought they plugged into the wall socket... But no.. It takes battery's. Who woulda thunk...????????) (Must be a Chinese thing)
Bottom line.. Good to have ya back.
Cheers,
Clayton
QUOTE(Twystd1 @ Jan 13 2008, 11:05 PM) 
Jeff,
I am dam glad you posted. As I was considering creating a new post with the byline of "WHERE THE HELL IS HAIL...?????"
And here ya are... !!!! Ya must of heard me.
Jeff, Can ya PM me your phone number? I might be coming up your way next weekend. And hoped I might drop by again and check in with you.
You supply the coffee. I supply the smokes.
You should be shooting video of this build.
Think about it for minute Jeff. We could sell a "HOW TO RE-BUILD A 914 BODY VIDEO" And sell it hand in hand with my soon to be famous and forthcoming, "HOW NOT TO BUILD A TYPE IV ENGINE".
Dude... We could be in the bucks real quick me thinks. I still have to get my video cam repaired, as I was trying to fix the power supply section of my camera. And apparently I did something a bit wrong.
(I thought they plugged into the wall socket... But no.. It takes battery's. Who woulda thunk...????????) (Must be a Chinese thing)
Bottom line.. Good to have ya back.
Cheers,
Clayton
Clayton! Whats up dude?
Yeah been kind of quiet on the tub lately. Busy at the day job. Damn cold up in these hills. At least for this California boy. 30-40 degree's is too cold for me. I would never make it on the east coast unless I had a heated garage. Today it crept up to a high of 60 and me with an empty cylinder of C02/Argon. I have been picking up a bunch of parts for the build and getting other things done. Foley has my suspension pickups done. Should be here Tuesday or so. All is not idle. Little things have to get done too. When its done its done. No hurry.
Video of the 914 chassis reconstruction? It would be up there with the greatest story ever told. At least as long! And I have the perfect title! "IT'S ONLY MONEY".
Pm sent
This is what I am going with for shifting the 915. PMS supplied and they also built the trans mount hoop. Lighweight and stout.
The Fedex and UPS guys are beggining to get suspicious. Many large boxes arrived yesterday all at once.
Suspension pickups from Mr. Foley and the Rota's came in.
These are the Rota Fox (Fuchs Repros) in 7-1/2 x 17 and 9x 17. I ordered them unfinished (comes in primer). I will have them powdercoated in mat black on the entire wheel. No shiney stuff on this build!
It's only metal and money. You can't take it with you.
Ooooohhh Pretty 
Kept the Powder Coat and Blaster guy busy for a couple of hours.
Old grungy pedal assembly
and the new and improved model
Why silver? The coater was doing a large job and did it for free. Once they are under the pedal board you won't see much. (RAL Anodized Silver)
Old grungy pedal assembly
and the new and improved model
Why silver? The coater was doing a large job and did it for free. Once they are under the pedal board you won't see much. (RAL Anodized Silver)
Naked trailing arms
A full day to play.
Installed both the new throttle and clutch cable conduits in the tunnel.
The repros I made were pretty accurate. The angle of attack on the front flared ends was perfect.
Welding inside the tunnel is difficult at the same time tense. After all the tacks you just hope you don't burn a hole thru the tubing and end up having to start over.
I didn't get a chance to test fit the cables yet but I think I did not perforate any of the new tubes.
At the front mouth of the clutch tube I welded a sleeve over the tube prior to install. Since the clutch tube has some decent presure on it during usage it needs to be more stout than the throttle cable tube. The sleeve let me get some heat into the remnant of the old bracket still in the tunnel without burning a hole in the tube itself.
Threw some rattle can primer on for now. Still need to grind the welds on the outside of the tunnel to clean it up.
Looks like some rain coming.
Busy few weeks at work. Rain, rain and more rain coming tomorrow.
No time to play..............
Garage time
Boxed the rear trailing arms today.
No time to play..............
Garage time
Boxed the rear trailing arms today.
They look really ugly will all those plug welds.
After grinding all the welds........one down......
I will grind the other one in the morning and send them off to the powdercoater
After grinding all the welds........one down......
I will grind the other one in the morning and send them off to the powdercoater
Completed all the finish grinding today on the trailing arms.
Threw on some primer til they go to the powdercoater.
Came out slick
Threw on some primer til they go to the powdercoater.
Came out slick
Got a lot done this past week.
Stopped in to say hello to Peter at Rennspeed. http://www.rennspd.com/
Ended up leaving with a perfect set of GT Rocker moldings and an Oil presure/ temp gauge I have been hunting. The rocker moldings are perfect side to side length. This seems to be a problem with other suppliers. The flared ends also match the steel flares contour perfect.
Never ever stop in to say hello when you have a wallet full of cash at any Porsche parts establishment.
Sent the transaxle out to flip the R&P on the 915. I added a few modifications "since there in there". A hardened steel bearing carrier. All new syncro rings. G50 speedometer Hall sensor for inverted R&P. How much? Do not ask!
And the week culminated with beautiful weather here in SoCal. One full day to work on the car and finish some things up.
I hated to cut the quarter panel but no way to access the inner wheelhouse replacement. It will end up cleaner in the end. Managed to save the pillar in the process. Reminds me of Milchelko's "diggi'n into hell".
No rust left here. All new steel.
Made another fixture to keep the longs in check. Threaded rod with plates on each end. Tack welded to the inner longs. Keeps the dimensions in check and the longs won't splay in process.
Remember to take measurements before you begin cutting off stuff. Especially the suspension consoles
Made another fixture to keep the longs in check. Threaded rod with plates on each end. Tack welded to the inner longs. Keeps the dimensions in check and the longs won't splay in process.
Remember to take measurements before you begin cutting off stuff. Especially the suspension consoles
More on measuring.
Do not proceed without measuring before you cut. This is vital to returning a chassis to dimensional tolerance. You do not have to high tech equipment. A tape measure will get by if on a budget. Pre- measure both sides before you cut any suspension consoles off.
Do not proceed without measuring before you cut. This is vital to returning a chassis to dimensional tolerance. You do not have to high tech equipment. A tape measure will get by if on a budget. Pre- measure both sides before you cut any suspension consoles off.
Finished the long connection at the rear rail. Added a sleeve at the joint. This will strengthen the connection and eliminate the flex at this area that 914's at notorious for.
Notice I punched holes in the sleeve. Since this is a area known for corrosion I did the work from inside the long. No leaks from pin holes in any welds will happen here. Also less finish work required since it is all inside once the long is closed up.
Work smart -not hard!
Notice I punched holes in the sleeve. Since this is a area known for corrosion I did the work from inside the long. No leaks from pin holes in any welds will happen here. Also less finish work required since it is all inside once the long is closed up.
Work smart -not hard!
Twice as strong as the factory design in this area. No welds from the outside except the outside butt joint equals no water leaks in this area.
I rough fit the new outer wheelhouse ( oops didn't take a pic)
I little more trimming needed but should be installed next weekend.
I am actually considering modifying a shelf where the rear diagonal long meets
the inner long at the firewall. An angled addition of sheetmetal to make water run off and down away from the long. Easy to do and hardly noticeable. More on that later.
Value in scribbled notes:
I am sure this will help someone one day!
Measurements...........
Seat hinge mounting
I am sure this will help someone one day!
Measurements...........
Seat hinge mounting
More value in scribbled notes:
I am sure this will help someone one day!
Measurements...........
Outer suspension console specs...............
I am sure this will help someone one day!
Measurements...........
Outer suspension console specs...............
More value in scribbled notes:
Measurements...........
Inner suspension console specs...............
Measurements...........
Inner suspension console specs...............
More scribbled notes:
Measurements...........
Jack post tube............... if you want your rocker moldings to fit correctly (tube centered in the rocker molding cutout hole)
Measurements...........
Jack post tube............... if you want your rocker moldings to fit correctly (tube centered in the rocker molding cutout hole)
Looks familiar . . . just much nicer!
-Chris
-Chris

Two weeks! Isn't that what all shops say?
Eric, I have seen Jeff's work first hand.
Your rock crusher should be done in 9 days if I read it right.
C
Your rock crusher should be done in 9 days if I read it right.
C
Might as well add this to the thread  too:
too:
The design make's everything a one man operation. The width of the upper bed is 32 inches wide which fits between the rear inner console ears that are the lowest part of the car. The height from the ground up was based on the maximum height of the common floor jack +2 inches (adding 2x2x 6 foot) cross bars that sat on jackstands and the bench rolled right underneath with a hair to spare? Of course easy access to gain access and roll around underneath on a creeper was taken into account.
too:The design make's everything a one man operation. The width of the upper bed is 32 inches wide which fits between the rear inner console ears that are the lowest part of the car. The height from the ground up was based on the maximum height of the common floor jack +2 inches (adding 2x2x 6 foot) cross bars that sat on jackstands and the bench rolled right underneath with a hair to spare? Of course easy access to gain access and roll around underneath on a creeper was taken into account.
This is my favorite thread on this site so far. I LOVE THIS STUFF.
Clayton
Clayton
 Thanks for posting all of the sketches. I am going to be starting something similar this summer.
Lets make some Sill Triangles
Made 2 templates. The first one is actual size after the bends (silhouette) of the mounted original. The second is 3/8 larger all the way around.
Cut out the sheetmetal using the larger template and then trace the smaller (silhouette) template onto the cutouts. Then drill the holes. I am making right and left sides.
Make some relief cuts so the bends don't buckle the flat area's. I tacked some really small welds where the sill plate doglegs over the bracket for strength.
These were the tools used in the process and a metal scroll saw to make the cutouts .
Finished triangle next to the original.
Primed set of 4 right and left side triangles.......
Jeff, very nice job on the triangles. BTW, what gauge metal did you use?
-- Rob
-- Rob
QUOTE(watsonrx13 @ Feb 18 2008, 03:58 AM)
Jeff, very nice job on the triangles. BTW, what gauge metal did you use?
-- Rob
18 gauge - Factory used a metric equivalent of 17.
Jeff;
I just wanted to say thanks again for the sketch of your working platform.
I just had 60 feet of steel delivered so I can build my own.
Wes
I just wanted to say thanks again for the sketch of your working platform.
I just had 60 feet of steel delivered so I can build my own.
Wes
QUOTE(Wes V @ Feb 18 2008, 05:35 PM)
Jeff;
I just wanted to say thanks again for the sketch of your working platform.
I just had 60 feet of steel delivered so I can build my own.
Wes
Even know its thick metal weld slow. Start square -end square. Tack the four sides of the frame together first then weld the seams and corners. This way if it goes sideways you can break one of the tacks to adjust. If you have a couple of buddys doing nothing have them stand on the frame with backs to you while you are welding to keep if from distorting. If not sandbags work. If the main frame starts lifting a corner stop welding, flip the frame over and let it cool. Then weld the legs and crossbars. The diagonal leg supports will need to welded very slow in one or two inch bursts. If you weld too fast it will draw the crossbars up under heat and the rack will rock on 3 legs.
You will have enough left over to use as crossbeams between the rack and car body. The three fixtures I made are secured at the front suspension crossmember mounting, rear just in front of the rear bumper and under the rear suspension ears. The ones under the passenger compartment are loose and can be removed for access as needed or slid forward/ backward as the floor for the most part is flat.
Good luck
Here is a better pictured unloaded
What you may find interesting is that I plan on using a contractors lazer level that throws a 360 degree line to ensure the main frame is true. (they cost something like 5 grand, but can be rented) I can set it in the middle of the main frame during set-up and welding to ensure it's in a true flat plane.
Once that's done, I'll weld on the legs and lower out-rigger (with wheels).
When all is done and sitting on the garage floor, it will not be level (due to the slope of the garage floor, but will be a true flat plane to work off of.
(hopefully I can do the main frame this week-end and will post up photos)
Wes
Here is a photo that shows how I ensured that the main platform frame is "true".
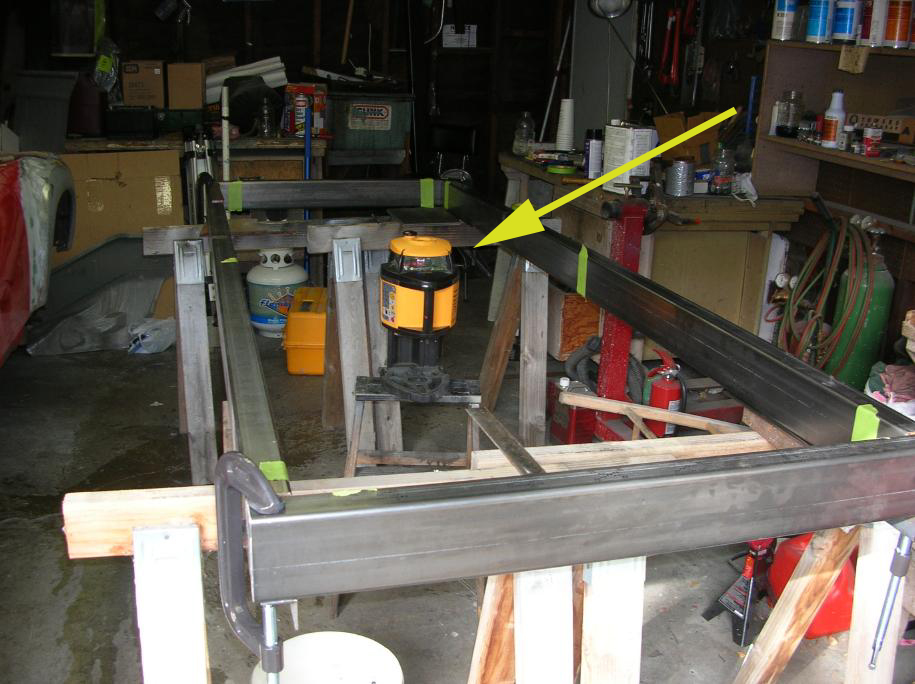
The item that is pointed at is a laser level that I borrowed from a contractor friend. When first turned on, it levels it's self and then throws out a level laser light (red) a full 360 degrees.
The read line doesn't show in the photos, but having it hit the inside edge of the 2X4 tube, you can shim it up as required to make it level. I used a small framing square and put a piece of tape on it. You go to the "high" corner and place a mark on the tape where the laser light hits it. Then go to each other corner and shim it up to match.
Once the frame is moved, it will not be level, but it will be "true".
Wes
Good start Wes.
Lets see a new thread on the car to the left. I spy a AA outer wheelhouse in the background..You do know you are going to need a bigger garage?
Lets see a new thread on the car to the left. I spy a AA outer wheelhouse in the background..You do know you are going to need a bigger garage?
QUOTE(Jeff Hail @ Feb 22 2008, 06:03 PM)
Good start Wes.
Lets see a new thread on the car to the left. I spy a AA outer wheelhouse in the background..You do know you are going to need a bigger garage?
The "clutter" shown in the photo is proof that a bigger garage would be nice.
I've resisted doing a thread due to jumping around a lot on the project. I do have my own site where I'm documenting stuff. There isn't a lot there yet, but here is a link to the "flare-diary" that covers the front flares (I can't do the rears until rust repair is addressed.
My flare-diary
Wes
Another day with rain.
Cut and fitted the outer wheel house. Still need to do some cleanup grinding on the rear inner long (rail) before I can weld up the wheelhouse.
In the last photo you will notice a hole on the wheelhouse (right center) above the two larger holes. This is the location of the factory pilot hole for placement of the outer suspension console. The AA part does not come with the hole and it needed to be transfered from the old part. If you are using stock consoles that hole is critical.
Interior brace to keep the longs in check. It is adjustable and held with a few tacks on each inner long. Most projects would not require this.
Inner wheelhouse all the way to the door opening. Replacing it all the way forward is actually easier and reduces the chance of leaks in the future.
Last photo from below. The contour of the new part fits the original area pretty good.
You might notice the new panel is fitted behind the original sheetmetal? The reason for this any water spray from spinning tires will of course find its way down via gravity. With no outside seam there will be no place for water to enter. Make sense? This will require more work inside the engine compartment but I am not building a show car.
Checked the fitment of the outer rocker and sill plate. It was nice to see these parts get some daylight.
Before I weld the wheelhouse up I need to install the J-Tube for the air delivery system and also the C-clamp for the silencer.
Then I pulled it all apart again and sanded the wheelhouse for a coat of epoxy primer. Much easier to put some primer on the area's now that will be soon be a closed box.
Before I weld the wheelhouse up I need to install the J-Tube for the air delivery system and also the C-clamp for the silencer.
Then I pulled it all apart again and sanded the wheelhouse for a coat of epoxy primer. Much easier to put some primer on the area's now that will be soon be a closed box.
I've been hanging out here for quite a while but for some reason never saw this thread.
I bow to you for the work and effort you have put into the car...
I
bow to you for the work and effort you have put into the car...
Trans is done
915, flipped ring gear for mid engine use. Aftermarket steel bearing retainer installed. G50 speedometer pickup (Hall sensor) installed on the right side plate.
Gears:
1st AZ (11:35)
2nd HW (18:32)
3rd NT (23:29)
4th QQ (26:26)
5th ZD (38:30)
Ring and pinion (8:31)
915, flipped ring gear for mid engine use. Aftermarket steel bearing retainer installed. G50 speedometer pickup (Hall sensor) installed on the right side plate.
Gears:
1st AZ (11:35)
2nd HW (18:32)
3rd NT (23:29)
4th QQ (26:26)
5th ZD (38:30)
Ring and pinion (8:31)
Completed the metal prep on the outer rocker panels, inner firewall halves and floor.
Nice when everything is within arms reach.
Have a thing for body hammers. Can you tell which one's get used the most?
(50 year old Proto, all the rest are Martins)
Time to prime. 2K epoxy primer, gotta have fresh air!
Some of the primer will get ground off and/ or burned away on installation of these panels. It's a lot easier to have corrosion protection on before than trying to get it into little crevices and closed areas. Spray guns do not like curves and corners. Work smart not hard!
Good day to burn some metal
Finished the metal work on the right rear rail/ long......Rt inner long prepped and epoxy primered last week.
Sprayed some Wurth sprayable sealer inside before I close it all up. Put some extra sealer around the sleeves inside the long. Water creeps!
Finished the metal work on the right rear rail/ long......Rt inner long prepped and epoxy primered last week.
Sprayed some Wurth sprayable sealer inside before I close it all up. Put some extra sealer around the sleeves inside the long. Water creeps!
Rt rear wheelhouse installed and welded!
The area at the inner rail joint is all plug welded. Various plug welds around the perimeter where the original wheelhouse meets the new then seam welded where the panels overlap.
I discourage butt welding the inner wheelhouse for safety, structural and strength issues.
The area at the inner rail joint is all plug welded. Various plug welds around the perimeter where the original wheelhouse meets the new then seam welded where the panels overlap.
I discourage butt welding the inner wheelhouse for safety, structural and strength issues.
All exterior welds ground down and finished.........
A coat of etching primer until tomorrow when I can grind/ finish the inside
of the wheelhouse in the engine compartment.
A coat of etching primer until tomorrow when I can grind/ finish the inside
of the wheelhouse in the engine compartment.
This is a "lo-fi" version of our main content. To view the full version with more information, formatting and images, please click here.