Full Version: Bringing out the dead
Toys in the Attic
Eric?? Eric?? Leave me alone I am busy.
The right side with qtr cut for the fat ass.
The right side with qtr cut for the fat ass.
The left side (un cut wheelwell).
Big difference!!
Eric?
Big difference!!
Eric?
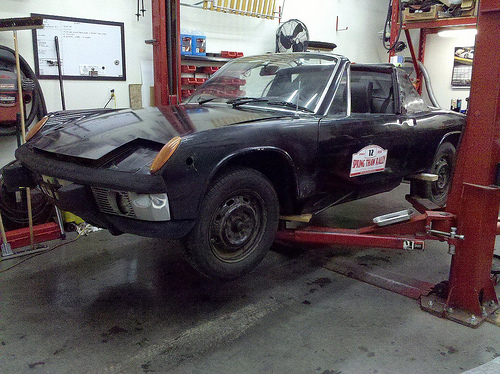
Temporary fit.
I am happy and still have room to spare at the flare and inner wheelhouse.
Only means one thing... GO WIDER!!!!!!!!!!!!!!!!!!!! That's already a 17X9 wheel..
I am happy and still have room to spare at the flare and inner wheelhouse.
Only means one thing... GO WIDER!!!!!!!!!!!!!!!!!!!! That's already a 17X9 wheel..
QUOTE(kg6dxn @ Nov 2 2010, 06:02 PM) 
Maybe I missed something. Why are you moving the trailing arms out? Great work by the way.
Yup!
That even looks like her!!!!!!!!!!
Cute! The girl Eric, the girl.
Cute! The girl Eric, the girl.
QUOTE(Jeff Hail @ Nov 2 2010, 10:45 PM)
QUOTE(kg6dxn @ Nov 2 2010, 06:02 PM)
Maybe I missed something. Why are you moving the trailing arms out? Great work by the way.
Yup!
That did not answer my question. Why?
I am only pushing the track width out 12mm per side at the suspension control points but in a nutshell…
A wider track on semi trailing geometry will increase the roll center at that end of the car, thus making it softer in roll (less body roll). This is because the car's CG will not change, and thus the vertical distance between the CG and the roll center at that end of the car will increase, kind of like using a torque-wrench with a longer handle that pivots at the roll center. A wider track will tend to reduce the load transfer to the outside when cornering, which in general will increase cornering ability since more traction is gained from the inside tires. It is important to maintain an optimum ratio between the front and rear tracks as a means to managing the load transfer from the front to the back with resulting balance between the two ends of the car. Wider track width can achieve a result similar to lowering the center of gravity height, less weight transfer allows the inside to carry more of the load, generate more total traction for the car. Notice I said similar because CG is another aspect. Multiply tire vertical load by the tire performance curve, = available cornering traction generated by the tire. The outer tire is heavily loaded and gains less traction per pound of load added; the inner tire will generate more traction per pound of vertical load. Effectively gaining more total cornering force.
Other ways to increase track width that I am not a fan of.
Wider than optimal wheel and tires:
Additional weight. Too much tire is not an effective gain. Suspension and body limitations.
Wider wheels with low offset:
Moving the wheel-tire centerline out will not change the suspension geometry, but it does change the relationship between the tire and the suspension. Moving the wheels out will reduce the effective rate of springs. Increased loading of the wheel bearings since the load will be cantilevered further out which increases the possibility of deflection/ twisting of the trailing arm under high loading.
Wheel spacers: (very thick ones)
Rear:
Same increased loading of the wheel bearings since the load will be cantilevered further out. Additional weight of the spacers and longer wheel studs.
Front:
Widening the front track using spacers increases the front scrub radius, which can increase the steering effort and cause kickback. It also increases the load on the bearings.
Other:
A smidgen extra access to the valve covers on the six.
I had to stop in this thread to say you rule. This is excellent, and a lot of work.
Question about the new rear suspension pickup setup you're putting in....
Would this setup be " worth the effort " for anyone that has to do the rear long, wheel house repairs that you had to do on your car ?
The reason I ask is because I am going to be replacing the rear wheel house and rear long on my car and if I have to remove the outer suspension console anyways.. upgrading the whole setup might be worth a look..
I'm undecided weather I'm going to put on the fender fares or not and I most likely wont go over 150 ish HP with mostly daily driving with a few track days for fun..
Cheers and keep up the good work.. its been a informative read for sure. !
Would this be worth the effort? Absolutley it would be BUT if you are not raising the pickups there might not be enough meat at the bottom of the long to support the custom pickup from a factory control point perspective.
You could still use the 2inch raised pickup and keep the stock ride height without any issues.
The benefits of Chris's pickups: No flex, no rust, no worrying whats inside the existing pickups (rusts from the inside out), adjustability to lower the ride height while keeping the original geometry. Ability to add track width. No deflection between the OEM inner and outer console as the pickups are one integral unit. No cracking of inner ears.
So far it is the only alternative on the market that is simple and straight forward this side of of tube frameing.
Ive looked at Keith's setup and it's a lot more work with more room for error if you ask me.
http://www.vehiclecraft.com/pictures/Cust_...Peare/index.htm
I looked at the link you posted.. You're right.. it does sound like a lot more tricky setup than Chris' one... hmm You mention you could still have the pickups welded in 2 in' up and still have stock ride height.. It might just be early to wrap my head around this but how would that be possible... while keeping the propper geometry ?
QUOTE(Eric_Shea @ Nov 3 2010, 07:25 AM)
Still haunts me Eric

Busy with holiday cheer and other peoples stuff.
A few minutes to play.
The pickups are where they need to be. Lets perform some more alchemy.
Started installing the reinforcements. Left side outer first... because if its going to shrink I'd rather the camber go more negative than the other way. Then the inner.
I still have to trim some more at the bottom and fit those reinforcements.
Ran out of C02/Argon. No gas stations open this time of night.
RT side in!!!
Good feeling when the pickup fixture just drops out and doesnt have to be wrestled.
Good feeling when the pickup fixture just drops out and doesnt have to be wrestled.
This is my favorite thread, I just spent the last 4 hours reading it all from page one!! Truly excellent !!! I wish I had you working on my car. Please keep up the incredible work. I learned a lot reading through the entire thread, thank you

Non stop!
Finishing up the pickups. Lots of weld grinding and fitment of the closing plates. This is where I wish I had a TIG instead if a MIG.
By the way the price Chris Foley charges to install these is a bargain considering the labor. I think he should get twice as much based on the fitment, welding, grinding etc.
I am just about done. One last piece to weld in. I buddy of mine shows up in his brand spanking new 2011 German Turbo P-Car and wants me to install an aftermarket muffler. I turn him down! He asks why? I respond because if I keep doing stuff for other people my stuff doesnt get done!!!!!!!!!!!!!!!!!!!!!!!!!!!!!!!!!!!!!!!!!!!!!!!!!!!!!!!!!He gets it and understands.
I am fitting pieces to weld and he says DONT DO THAT. By the way he is a real honest rocket scientist. He makes bus's fly. He then grabs a piece of cardboard and traces out a template. DO IT LIKE THIS.I hate it when he does this. He doesnt know jack about cars except how to write the check when he buys the latest German Hot Rod. This guy plays with things that fly fast and well he makes me think in a challenging way because he's smart...really smart because he is a airframe engineer and has more degree's than a thermometer.
He says "car doesnt have a roof... it flex's a lot. Flexing is not good". Why not tie this reinforcement into the torque box? Ding, ding light bulb goes off and I have to admit he is right. So I make the change.
So a little product improvement "why I am in here". Fab a modified piece.
The original closing plate on top of the "improvement piece". Extends forward into the long. Makes sense.
Eric,
I really have been working. The other side.
I really have been working. The other side.
Chris,
My friend really admired your pickups. He (quote) said..." simple, structurally sound design, robust and well thought out" after looking at the old factory stamped sheetmetal pickups. Like Mikey he hates everything BUT to get a compliment like that from him is real.
My friend really admired your pickups. He (quote) said..." simple, structurally sound design, robust and well thought out" after looking at the old factory stamped sheetmetal pickups. Like Mikey he hates everything BUT to get a compliment like that from him is real.
For us old guys who wear reader/ progressive len's. I am really a young 45 years old.
Safety glass's with magnifiers. I swiped these from the rocket scientist in exchange for installing his exhaust. Took me thirty minutes to install the silencer that was really throaty (cool facter).
I put these on and WOW. Great for welding when your eyes are old and you have to lift your welding helmet to inspect your welds. They are available in 1.0, 2.0 and 3.0 power. I felt like Eddie Murphy... "I can see, I can see".
Goverment Services Pricing: $100.00 (sorry no toilet seat)
Granger/ AutoBody Toolmart $10.00
"There are Some Things Money Can't Buy. For Everything Else, there's stealing your rocket scientist pal's safety glass's". PRICELESS!!! He ain't getting them back!
And if you are working on something close just above your line of sight....wear them upside down. Yeah, I'm old too!

QUOTE(Eric_Shea @ Jan 20 2011, 11:18 PM)
I'm trying Eric.

A few hours spent today installing the outer reinforcement, finish grinding and tidying up the left side. I didn't like the condition of the pinch weld just forward of the pickup soooooooo I flat bottomed the entire rail. One big piece of 16 gauge steel shaped like a "C" , plugged, seamed welded from inside to underside to outside. Look's clean and stout. I will duplicate the same on the right side.
Nice solution! pickups not only look way better than stock!
This thread is briliant!
Very well documented.
A very useful tool for what I have in store.
My 15yo son and I just rolled the 73 914 into the shop last weekend, to lift it up on the hoist and have a look around to assess the extent of rust and poor previous repairs. Wow this will be one big project, for sure . Like I said to my son, atleast you'll know how to weld when we're done.
Thanks for the quality information.
Very well documented.
A very useful tool for what I have in store.
My 15yo son and I just rolled the 73 914 into the shop last weekend, to lift it up on the hoist and have a look around to assess the extent of rust and poor previous repairs. Wow this will be one big project, for sure
. Like I said to my son, atleast you'll know how to weld when we're done. Thanks for the quality information.
While waiting for my date to arrive to go out for a bite I got bored.
Installed a backer plate behind the pillar. Then butt welded the lower lock pillar in.
The bottom is loose at the sill so I can shift it as needed when the sill goes in.
Didn't even get dirty!
Bon Appétit

Installed a backer plate behind the pillar. Then butt welded the lower lock pillar in.
The bottom is loose at the sill so I can shift it as needed when the sill goes in.
Didn't even get dirty!
Bon Appétit
date "oh jeff you smell great ,what cologne do you have on ?"
"Metal Man"
"Metal Man"
QUOTE(sixnotfour @ Feb 5 2011, 09:26 AM)
date "oh jeff you smell great ,what cologne do you have on ?"
"Metal Man"
Hugo Boss -Dark Blue
Accents my Miller 180

Repeat of a previous hat trick except in reverse. A few tiny pin holes in the butt weld to fix later. I will have to stretch the bead area via hammer form a little as it sucked in from the heat. It happens.
Bottom of the lock pillar still left loose for wiggle room when I install the sill and final fitment.
Bottom of the lock pillar still left loose for wiggle room when I install the sill and final fitment.


You make it look Soooo easy!
Driver side sill in. Need to finish grind the plugs and pillar joint, then install the triangles.
Thats a floor Eric. Say ahh!
Chipping away one piece at a time. Metal finishing on the sill and lock pillar done. Sill triangles installed. Deleted the dome light switch holes.
Thought I had some epoxy primer left (It's somewhere or maybe I am out) Sucks because I hate using etching primer on an area thats done and wont need to come back to until final prep for paint. Oh well it will sand off easily later.
Thought I had some epoxy primer left (It's somewhere or maybe I am out) Sucks because I hate using etching primer on an area thats done and wont need to come back to until final prep for paint. Oh well it will sand off easily later.
I am doing alot of metal work myself and have etching primer that I used on my trunk what are the benefits of using the epoxy ?
My good friend Victor Van Tress (1987 SCCA Nationals SSB champion winning 505 Turbo) snapped this photo a while back.
Awesome tow vehicle. Priceless pic. Makes you smile because you wonder what else does the owner have in his garage?
Awesome tow vehicle. Priceless pic. Makes you smile because you wonder what else does the owner have in his garage?
QUOTE(ONTHEGRIND @ Feb 13 2011, 08:15 PM)
I am doing alot of metal work myself and have etching primer that I used on my trunk what are the benefits of using the epoxy ?
Etching primer is good for bare metal. Its comprised of acid, zinc and binders. SEP will fend of surface rusting but it does not seal metal as epoxy does. Being my project sits sometimes I would rather not worry whats going on under the surface over time so I use epoxy primer. Personally I think epoxy has a better bite also.
Refinishing products are meant to be applied with time limits.. and not long intervals between application of say primer's and basecoats. In my experience etching primers and 2K primers are not and do not hold up unless colorcoat/ clear applications are done in short order as moisture can penetrate if let to sit. SEP and 2K primers have good adhesion properties if top coats are applied very soon.
Additionally if filler is being applied they can be done under or on top of epoxy primer. (this one is always open to debate). I personally would never apply filler over or under etching primer... as acid can get into and soften filler.
For me I prefer metal conditioning as a separate process.
Bottom line every paint manufacturer has a system with products and the order to be used in.
Installed some new metal on the left side of the tunnel where the flange/ floor meet.
Trim, trim, trim and drill a bazillion spot welds. The left side floor crossmember has twice as many resistance welds as the passenger side. Some rust under the crossmember flange actually "rust welded" the floor together.
I might make new crossmember overlays if it doesnt come apart at the flanges easily. An air chisel will tear the flanges up and a hand spot weld buster is already doing that.
QUOTE(Jeff Hail @ Feb 23 2011, 09:21 PM)
"rust welded"
Don't cut out the rust welds. Those are original from the factory!

Konrad
A few more modifications to the early firewall. Closed off the heater cable tube holes and airtube exits from the inside.
Early/ Late lower firewall:
The brake presure regulator and brake line exit sits farther to the left on the early firewall. I think I will leave them where the early panel locates them. Not sure if the later location will interfere with the 3.2 but I don't want to find out later.
Lower firewall final fit up done. Held with Cleco's. Inner reinforcement (AA) halves welded together to create a single panel...easier to assemble.
Next I will fit the floor and trim as needed. Take it all apart and punch the holes for the plugs.
QUOTE(krazykonrad @ Feb 24 2011, 08:48 AM)
QUOTE(Jeff Hail @ Feb 23 2011, 09:21 PM)
"rust welded"
Don't cut out the rust welds. Those are original from the factory!
Konrad
I missed that Konrad. You're a funny guy! I wonder if "Rustone" was a factory color code option?
Bunch of little things to tidy up, fabricate... before I button the floor up....
1)FABRICATE THE PASSENGER SIDE TUNNEL REPAIR PART.
Fabrication is easy. Doing it twice with opposites is a challenge. Even know the parts are dimensionally symetrical they are not the same. ( Cutouts, notches etc)
Came out a beautiful piece of metal !!!
1)FABRICATE THE PASSENGER SIDE TUNNEL REPAIR PART.
Fabrication is easy. Doing it twice with opposites is a challenge. Even know the parts are dimensionally symetrical they are not the same. ( Cutouts, notches etc)
Came out a beautiful piece of metal !!!
Now thats a SHIFT knob !!
Whatcha think?
Whatcha think?
QUOTE(Jeff Hail @ Mar 21 2011, 09:56 PM)
Now thats a SHIFT knob !!
Whatcha think?
I can get behind that.
I just read your topic and maybe I read over it, but the lower part of the firewall on the engine side, who makes that panel? AA or restoration design or did you manage to get an original one?
Thanks and I love the way you're doing this, extremely nice work!!!
Thanks and I love the way you're doing this, extremely nice work!!!
QUOTE(Jeff Hail @ Mar 22 2011, 01:55 AM)
Bunch of little things to tidy up, fabricate... before I button the floor up....
1)FABRICATE THE PASSENGER SIDE TUNNEL REPAIR PART.
Fabrication is easy. Doing it twice with opposites is a challenge. Even know the parts are dimensionally symetrical they are not the same. ( Cutouts, notches etc)
Came out a beautiful piece of metal !!!
Nice work Jeff. What gauge steel did you use by the way?
This is a "lo-fi" version of our main content. To view the full version with more information, formatting and images, please click here.