Full Version: 914RS4 Tube Chassis 996 Suspension Audi 2.7TT Stage 3
Rudy and I discussed the header plan. At first I was going too make us both a set and go equal length and relocate the turbo's to a better location for our needs but then in the interest of speeding up the process we decided to go cheap to get it running. We were aware of the cracking issue but Hell, at $135 they are disposable. We will most likely chop and modify them at least once. So consider them mock up.
I went through a similar issue with my 1.8T. I bought several headers/manifolds trying to find the right location for my turbo. I had a nice SS equal length header that I cut up trying to realign the turbo housing to no avail. A $79 ebay special ended up being perfect. I still have about $1,200 in exhaust manifolds collecting dust in my garage...
cheapy's will work for testing but a little more money and these ones made from 1 1/4" schedule 10 stainless pipe would be better when time to finalize things. For what they cost I can't buy the flanges, elbows and pipe and then weld them up.
http://www.ebay.com/itm/3mm-thick-MANIFOLD...XL0&vxp=mtr
Ideally I want to delete the pig tail curl they have and lower the turbo with the outlet angled up slightly to clear the axels. We'll see if that is what works on Rudy's first.
Edit: They are XSPower. With some research on XSPower turbo headers I found
"XS Power is proud to be partnering with Stainless Works"
"Stainless Works manufactures them on-site, right here in the United States"
OK Rudy's lets see if with all the emission and things we don't need if you can get rats nest of wires to look like this?
Hahahaha. Seems to me like that car does not run. We're getting rid of the evap, the secondary air and pcv. It cleans up quite a bit. Getting it to look like that may be difficult. We will come close though. The problem that we have is that al of the wiring is along the firewall of the Audi which can hid the wiring. In our case all of our wiring is visible since it's mid engine. We will have to come up with some fancy way of hiding the wiring.
For me the biggest thing was there was so much stuff to fit in the engine compartment something like this was no way a possibility. I mean the piping for the intercooler take up a considerable amount of room and you'll have two turbos to pipe to either one A/W IC or run twin side mounts.
I agree Andrew the piping for the intercoolers will take up space. However, I have the luxury of not having a rear trunk and rear firewall. Therefore, since I am going to create a side vent into the engine compartment at each quarter panel, I will be able to fit the intercooler in such a way as to simplify the plumbing. The side vents will fold into the quarter panel rather than protrude like a scoop. They will follow the angle of the tube chassis as it tapers from the B pillar rollbar to the where it pinches at the rear suspension. I'm toying with the idea of making the vent, as it folds in, out of carbon fiber. I set the intercooler in place and it fits perfectly. The intercoolers wil be set in such a way that when the rear hood and rear fenders tilt back, the intercoolers will be exposed. See attached for a preview.
Wow it's been a while. Was out on vaca and had to dig out of a ton of work. Back on the project now. Had to make a lifting cradle since I need to lift the engine out of the car often. This contraption worked out perfectly. The next step is to fab the engine supports and finish the last chevron brace in the rear. I'm ordering a new floor pan since that is the next order of business once the engine is tied into the frame.
Rudy - Good to see you back at it. 
I'm still weeks away from working on mine...
I'm still weeks away from working on mine...
It's nice to be back. Hope you get better soon and are able to get your project going again. The time off has been good to get the creative juices flowing again.
Well I got the car back on the chassis table to level everything up and place engine where it needs to be. I like its final position. The oil pan is 1/2" above the floor and the engine sits almost level. The engine and transaxle are shoved forward as much as possible. This will give me a more balanced car in conjunction with extending the wheelbase 3". The next step is to weld the engine mount s. After that it will be floor pan and finish buttoning up all of the welds and covering up all access holes.
QUOTE
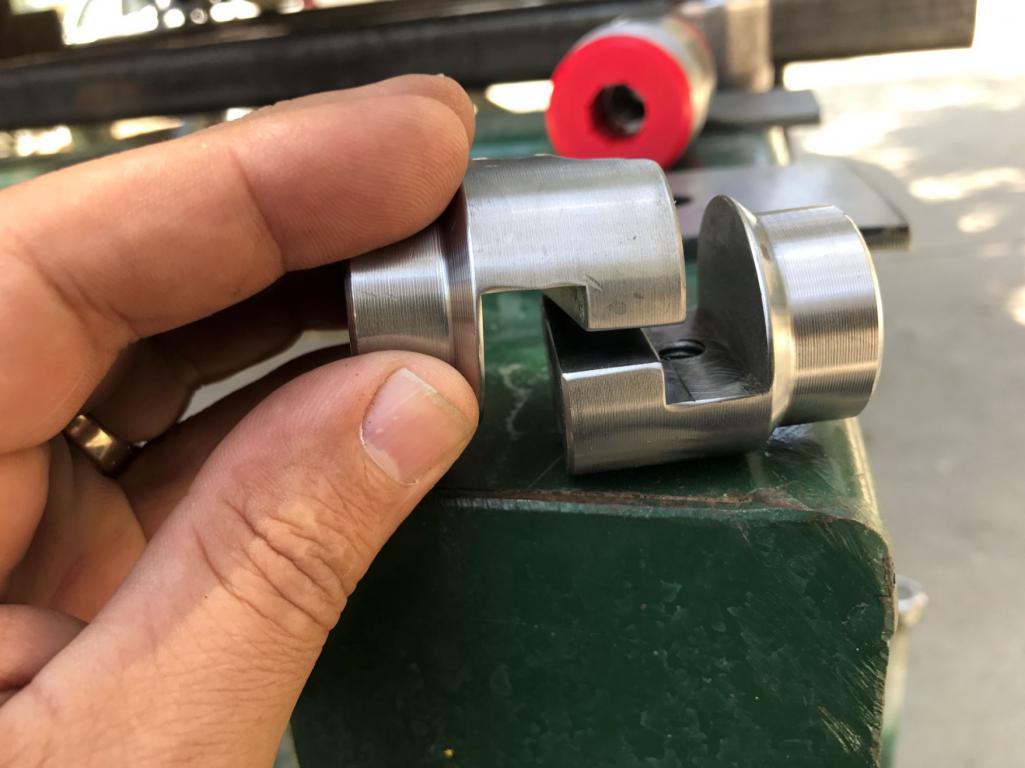
What am I looking at here?
Love the progress as always

It's a bolt-together joint. I used a couple sets on a 911 rear cage. They're fantastic.
 Exactly. Andrew they will be used for the couple of cross bars that will go over the engine/transmission bay. That way when I need to remove the engine and trans, the y come out as a unit over the top. This car is being set up to be able to remove the engine and transaxle easily for servicing.
Some more progress on the transaxle mount. It ended up being very tricky since I did not want the transaxle mounting bolts to have any tension on them. The factory was designed with tension, but since I am adding a much longer ecentricity to the new brace it will add too much tension on the factory bolts. I cam up with a way to tie them together so that there will be zero tension on the bolts. They will only see shear forces. Almost done tying the back end up.
Here is the how I'm doing the front engine mounts. After this weekend I'll be move to the front struts. I need to lower front end 3 inches. I have a solution that keeps the 996 struts and coilovers. If it works out, then the car will have 3 inches of ground clearance but with the stock suspension travel. More on that later.
QUOTE(Curbandgutter @ May 24 2017, 08:31 AM) 
Here is the how I'm doing the front engine mounts. After this weekend I'll be move to the front struts. I need to lower front end 3 inches. I have a solution that keeps the 996 struts and coilovers. If it works out, then the car will have 3 inches of ground clearance but with the stock suspension travel. More on that later.
Custom lower control arm?
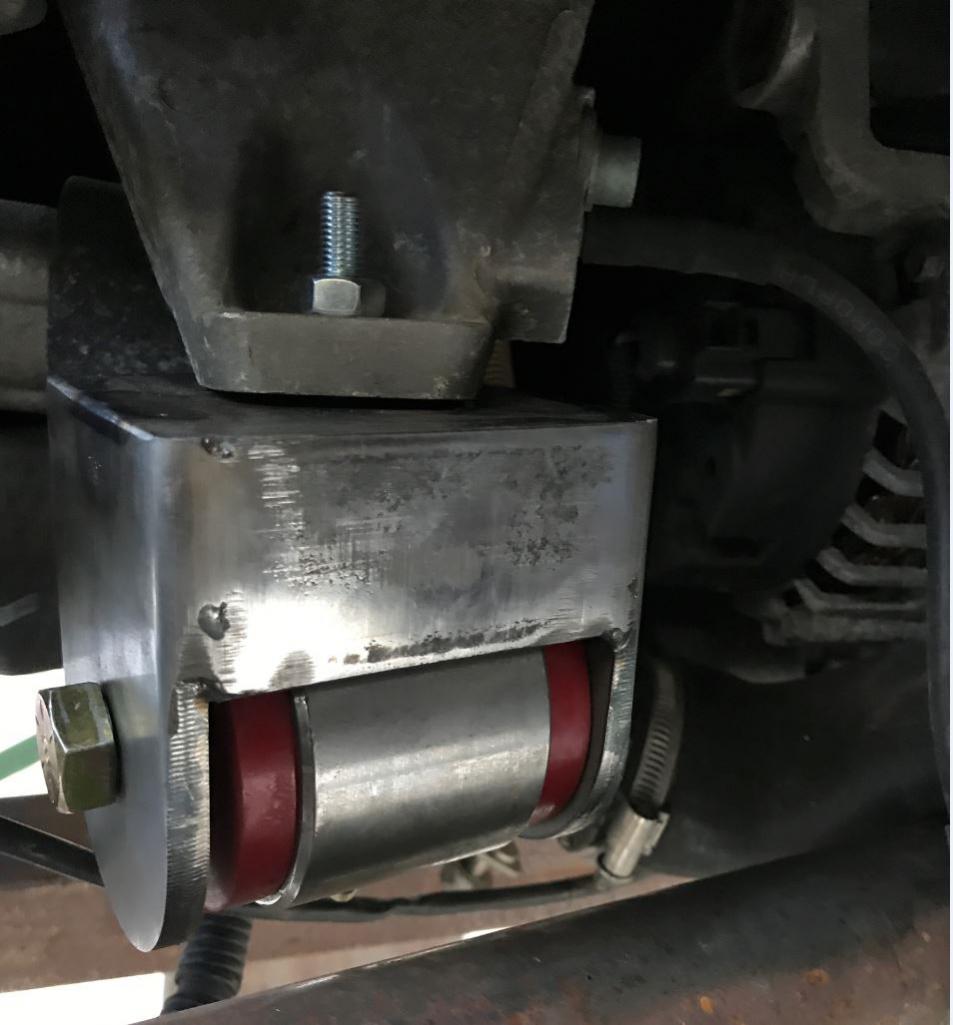
Be sure to drill your hole for the nipple in the stock cast mounting piece. Thats why its not sitting flush
It's not sitting flush cause i haven't tightened the nut. It will sit flush then. You have a good eye Andrew.
OK the engine is finally sitting in its custom engine and transaxle mounts. Took way longer than expected. I still have to complete welding but I have to remove the engine and transaxle for that. Next step is to work on the front struts. I need to lower the ride height 3 inches in the front.
This is the front engine mount.Click to view attachment
This is the way I tied the transaxle mounts to each other Click to view attachmentClick to view attachment
1/2" clearance from the floor pan on both engine and transaxle. They are on the same plane and the motor and transaxle are almost dead level. I will tie the entire bottom of the engine/transaxle bay together with one single aluminum plate across the entire engine/transxle bay opening. It will be tied to the factory suspension bolts and to the tube steel chassis. This will completely tie the opening together and take out any flex in the truss system. The load will then transfer into the floorpan thereby removing any lateral deflection in the chassis. I will also take the opportunity and blend the structural element into a diffuser. Click to view attachmentClick to view attachment
Look at what I picked up. Click to view attachment
flatbar under trans ...looks so ...you finish the sentence....
awesome jiob
awesome jiob
QUOTE(sixnotfour @ May 29 2017, 01:40 PM)
flatbar under trans ...looks so ...you finish the sentence....
awesome jiob
efficient? I don't know how would you end it? Seems like you have something in mind.
Seems like a nice place to mount the diffuser to me
QUOTE(Andyrew @ May 30 2017, 04:39 PM)
Seems like a nice place to mount the diffuser to me
Close but not low enough. The diffuser will be about a 1/4" lower.
Well now that I'm moving on to the front struts, I know that I need to lower the ride height 3" in the front. So I started to think how I can determine how much I can raise the strut tower up into the hood while using the 996 coil overs and thereby having a lowered car while retaining the stock ride and adjust ability. I'm shooting for 4" of clearance to the pinch weld of the longs.
Well I went to a hobby store and bought some foam that they use in flower shops. Then I cut and sandwiched the foam in between the strut tower and the hood. Then I closed the hood and I got the mold that I needed. Kind of like pressing a panini.
Here is the mold after pressing it. Click to view attachment Click to view attachment
Here is the bottom view Click to view attachment
Then slice at the bolt locations and get the clearance dimensions from the hood. Looks like I will be able to shove the struts up into the trunk another 2 inches. Click to view attachment Click to view attachment Click to view attachment
And that's how you slice it.
Now I need CSDilligaf to machine the shoulder of the lower strut to be able slide into lower strut mounting point another 1 inch. Then I'll have my 4" of clearance "unloaded".
Tomorrow I'm going to Chips place and he is going to put the lower coilover in his lathe and cut out enough meat to lower the base of the strut 1 1/4" into the aluminum 996 upright. I'll be finishing this portion of the build this weekend and will post pictures of it sitting at the correct ride height. It will have 4" of clearance on the front and 4 1/2 on the rear without lowering from its stock position.
This is where the strut installs into the aluminum upright Click to view attachment
This is where we are machining the strut to be able to lower it Click to view attachment
This is what the center console will look like. I'll be able to
run all of my wiring and piping through here. It will be covered
in carbon fiber and will be removable for access. This will add
extra rigidity to the frame as well. Click to view attachment
I'll post pics once it's sitting on it's own weight. Next step will be to remove engine and suspension and finish welding everything up, add the center console. Will be ordering floor after the 4th and then install that as well.
Nice! You're inspiring me to get back working on mine. I, too, have a custom center tunnel to fabricate... Great minds, eh?
QUOTE(tygaboy @ Jun 29 2017, 06:43 PM)
Nice! You're inspiring me to get back working on mine. I, too, have a custom center tunnel to fabricate... Great minds, eh?
Yes that center tunnel is going to be very effective in torsion and very useful for the shifter console support and to serve as a conduit for all hoses i.e. fuel, radiator, brake, AC and electric.
Glad to see yo back on your project. I know how it is when you hurt your shoulder. Last year in May I destroyed my right shoulder due to a fall on concrete while pulling some hoses tripping backwards. I did everything I could with that one shoulder to keep me form falling on the 996 front suspension that was on the ground. I tore all kinds of stuff on my shoulder. I had to use my left hand to move my right arm so that I could work on ACAD. I still worked on the car since all of the work was below the waist. I'm about 70% now one year later.
STANCE........CHECK
Front Click to view attachment
Rear Click to view attachment
Side Shot Before Click to view attachment
Side Shot After Click to view attachment
Shot of strut after Chip machined it.Click to view attachment
Clearance at front Click to view attachment
Front Click to view attachment
Rear Click to view attachment
Side Shot Before Click to view attachment
Side Shot After Click to view attachment
Shot of strut after Chip machined it.Click to view attachment
Clearance at front Click to view attachment
These two pics show a little bit better how much the car was lowered. All measurements are to the doughnuts
BEFORE 7 1/2"Front, 7" rear Click to view attachment
AFTER 4" Front, 4 1/2" rear Click to view attachment
BEFORE 7 1/2"Front, 7" rear Click to view attachment
AFTER 4" Front, 4 1/2" rear Click to view attachment
Significant! Thats right where it needs to be. With the longer wheelbase it will look even lower!
Looks good with that flare on, Rudy. Will the flare work on the rear or will you need to add some steel to extend the rear flare out a bit? How much will a set of tires that can handle that speed cost you?
That does look good Rudy. Now on to buttoning up some area's that need welding and fill in some sheet metal and you'll sitting pretty good.
QUOTE(Andyrew @ Jul 7 2017, 10:40 AM)
Significant! Thats right where it needs to be. With the longer wheelbase it will look even lower!
Thanks Andrew. Yes it is significant.
QUOTE(76-914 @ Jul 7 2017, 11:12 AM)
Looks good with that flare on, Rudy. Will the flare work on the rear or will you need to add some steel to extend the rear flare out a bit? How much will a set of tires that can handle that speed cost you?
Kent, I will need to add two inches to the front fender and then weld the 916 fender to the expanded front fender. The rear will need to be widened 3 inches before adding the rear 916 flares.
Im picking up 19x9" front rim and 19X13' rear rim. The rolling diameter will be less than a stock 914. I've got a deal worked out on modular 3 piece forged wheels. Tires will be around $1,200.
Chip you have first dibs on my 997 hollow spokes.
Very nice! It looks awesome Rudy!!
QUOTE(csdilligaf @ Jul 7 2017, 11:44 AM)
That does look good Rudy. Now on to buttoning up some area's that need welding and fill in some sheet metal and you'll sitting pretty good.
Yep i just added the removable strut across the transaxle and will now take everything apart, put on rotisserie, replace floor, add center tunnel and finish welding the chassis as well as plugging up all of the "access" holes. Then I will do the final TWIST test. I'll be sandblasting all of the tube steel and epoxy them as well. Then install radiator, fuel tank, pedal assembly and electrical. I've got alot of work still ahead, but the major labor portion is almost out of the way.
Rudy-
I'm in awe...
Just amazing progress thus far.
It already looks scary fast.
Keep going my friend....

Oscar
I'm in awe...
Just amazing progress thus far.
It already looks scary fast.
Keep going my friend....
Oscar
QUOTE(Curbandgutter @ Jul 7 2017, 12:09 PM)
QUOTE(76-914 @ Jul 7 2017, 11:12 AM)
Looks good with that flare on, Rudy. Will the flare work on the rear or will you need to add some steel to extend the rear flare out a bit? How much will a set of tires that can handle that speed cost you?
Kent, I will need to add two inches to the front fender and then weld the 916 fender to the expanded front fender. The rear will need to be widened 3 inches before adding the rear 916 flares.
Im picking up 19x9" front rim and 19X13' rear rim. The rolling diameter will be less than a stock 914. I've got a deal worked out on modular 3 piece forged wheels. Tires will be around $1,200.
Chip you have first dibs on my 997 hollow spokes.
13's??? Damn. Making me look bad!!

I wish I had more rear rubber than my 10's, 13" would be very nice. run some 335's. This chassis really needs the extra mechanical grip as it doesnt have the weight to put the necessary force on the tires.
QUOTE(Andyrew @ Jul 7 2017, 01:26 PM)
QUOTE(Curbandgutter @ Jul 7 2017, 12:09 PM)
QUOTE(76-914 @ Jul 7 2017, 11:12 AM)
Looks good with that flare on, Rudy. Will the flare work on the rear or will you need to add some steel to extend the rear flare out a bit? How much will a set of tires that can handle that speed cost you?
Kent, I will need to add two inches to the front fender and then weld the 916 fender to the expanded front fender. The rear will need to be widened 3 inches before adding the rear 916 flares.
Im picking up 19x9" front rim and 19X13' rear rim. The rolling diameter will be less than a stock 914. I've got a deal worked out on modular 3 piece forged wheels. Tires will be around $1,200.
Chip you have first dibs on my 997 hollow spokes.
13's??? Damn. Making me look bad!!
I wish I had more rear rubber than my 10's, 13" would be very nice. run some 335's. This chassis really needs the extra mechanical grip as it doesnt have the weight to put the necessary force on the tires.
Andrew you hit the nail on the head.
Mechanical grip is what I'm after cause pure friction is just a function of weight. And I this car won't have that much weight to transfer.
Ok, I just finished binge reading this build story and am in awe of the vision, skill, and perseverance to make this happen. But, come on! You can't leave it hanging... must have an update on progress.
QUOTE(plays with cars @ Dec 30 2017, 02:51 PM)
Ok, I just finished binge reading this build story and am in awe of the vision, skill, and perseverance to make this happen. But, come on! You can't leave it hanging... must have an update on progress.
Sorry for the long delay but I am happy to say that I've been back at it after a slight break and will have an update shortly. I've also had some time to think over some design elements and decided to remove the air scoops over the roof. I decided to stick with the hollow spoke turbo twists and I'm looking into placing the twin 996 radiators in the quarter panel. As you may know, I lengthened the wheelbase 3" and that will hopefully give me room to fit the radiators. I'm trying to not have to have radiators in the front hood.
Nice...welcome back
We missed you

Oscar
We missed you
Oscar
Glad to hear your back Rudy! Hope everything's going well!
He's BAAAAAaaaaak! 
OK, enough with the celebrating. Let's see some progress and pics.
OK, enough with the celebrating. Let's see some progress and pics.
Good to hear, Rudy. I was going to stop by last week but figured if you didn't have enough time to work on your car then you sure didn't have enough time to chew the fat!
OK back on FINALLY! I started work on the floor. I removed it and now am waiting to get the replacements. I will be working on closing up the holes that I needed to put the struts through. Also, it's easier with the floor off. Should be getting a new set of shoes. 10.5 x 18 F, 15mm offset with 265/35/18 and 12.5x 18 rear, 0 mm offset with 335/35/18 Toyo R888R's. Track is 62.5" Front, Rear is 63.0".
Awesome! Whats the plan with the floor pan? Going to lower it some for headroom?
What up Rudy?
Are you working on it Saturday. I'll stop by if so.
A big welcome back Rudy!!!!


This is a "lo-fi" version of our main content. To view the full version with more information, formatting and images, please click here.