QUOTE(Chris H. @ Jun 3 2013, 03:16 PM)

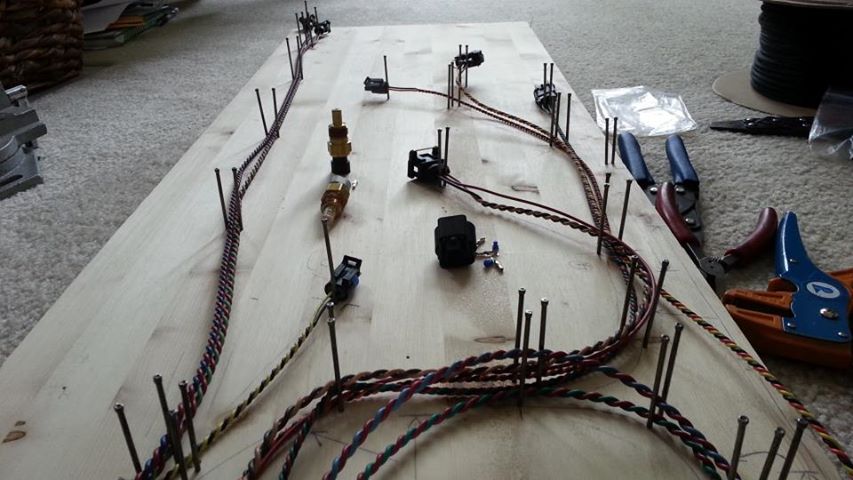
You're doing great Kent! I failed to mark many of the interior wires which is really biting me in the arse right now. Label every flipping wire man. It's worth it in the end. If you end up cutting them later that's OK. Still worth the investment. Otherwise you lose your "bearings" on what part of the wiring harness is what...if it's all labeled you can confidently trim it down bit by bit til you end up with only what you need.
You read my mind Chris. And this car had incandescent bulbs originally so shouldn't be any weird surprises. I'm using the Suby rear view which has an auto dimming feature for the headlights in the mirror syndrome.

I am using the suby sun visors which can swivel to the side. If the side mirrors weren't so big I'd use those. Going in for the bun warmers too. My wife's one request.

QUOTE(Jon H. @ Jun 3 2013, 04:13 PM)
I have an eg33 that will be going into my westfalia and there is a company called
Small car that has wiring harness modification directions. I know this is for westfalias but it should work for what your doing too.
From the website-
"This kit enables a person with some wiring ability and lots of time to take a Subaru "bulkhead" wiring harness, remove a large number of connectors and wires, splice and add some wiring and end up with just what is necessary to run the engine in another vehicle. These wiring kits are unique to each Subaru year and model. Please note that this kit is a guide for harness modification and not a step by step manual. The expected time commitment to convert a harness is 20-40 hours for the first timer."
Jon
Yea. I considered that route but I've read too many threads where people like me stumble and fall on their face when trying to program the ECU, which you didn't mention. Add $1500 for the ECU. The wiring should be tedious but doable.
QUOTE(BIGKAT_83 @ Jun 3 2013, 04:34 PM)
Got a friend that is selling a 99k 2003 EZ30D with the wiring harness and computer for $1000. I told him that was a hell of a deal. I would not pull the harness for that price.
I think the best thing to do would just use the connectors. Make your own from scratch.
Bob

Thx for that info that you sent, Bob. BTW, what is the proper sequence for removing the bolys from that 58 bolt cover?

If I lived close to you I would attempt that but I don't know shit from apple butter when it comes to any FI other than DJet. I'd just end up having someone hold my hand through the whole process.

I may end up going that route but I hope this works. I'd feel better knowing that some 40 yr old wire is being replaced with something newer, too.

 done so I ended up on page 3.
  Got to hit it again yesterday so I did a final fit then welded in the side pieces that should mostly seal the gaps between the radiator and sides. There will be strips of felt or Armorflex between the metal and plastic radiator, eventually.
 I thought of you last week when my Triton engine blew the spark plug out of #3.
  I hope that I don't have to run the lines beneath the car but I would if necessary. BTW, I'm going beneath the fuel tank. This might be SOT but I read about these high spots causing a problem because of the air that gets trapped and wondered if this might be a solution in some cases. For 50+ years the Heating and AC trades have used a Hoffman #89 Air Vent to correct this. Most boiler systems and all chill water systems employee these valves. Installed on the high point of any system it will vent out any air in the system, always and automatically. (I might be off one digit on the Hoffman #. It might be a #88. Senility
  ) Sent some more $$$$ to Eric Shea's retirement fund yesterday.
![popcorn[1].gif](http://www.914world.com/bbs2/style_emoticons/default/popcorn[1].gif)


 awesome, glad you found what you wanted. That's the same motor, and car I just finished tearing apart for my conversion. A 10mm socket, and a Phillips screwdriver will take most of the interior apart, the computer is under the passenger side carpet.
 Any other tips to share or pitfalls that you discovered?


 The timing chain cover appears to have a small leak, too.

 Just trying to visualize.
 , I thought about that so I will pick up the collector from Outfront and fit it to the engine before fabbing that part. I also need to check the cradle for clearance of the 1/2 shafts as well as ground clearance of the exhaust. The jack stands get in the way with what I am doing just now. It is very stable as it sits now. I had a crazy idea last nite. I think I will look at modifying the cradle to accept casters that would drop in/out. It would be nice to slap on the casters, lower the cradle onto the floor and roll in/out. How's your project coming along?
 so I took a break from the engine cradle to attack this.