Help - Search - Members - Calendar
Full Version: My 3.3L Subie Conversion Thread
914World.com > The 914 Forums > 914World Garage
Pages: 1, 2, 3, 4, 5, 6, 7, 8, 9, 10, 11, 12, 13, 14, 15, 16, 17, 18
Mike Bellis
QUOTE(Dr Evil @ Jan 26 2013, 03:03 PM) *

I would like to make a two radiator system like the 911s. If there was a way to intake behind the doors and exhaust some place aft of that in a way that keeps the looks and functionality, then I would be all over that.

Porsche uses both a 2 and 3 radiator setup but it's not in the engine compartment. it's in the front bumper and exits air into the fender wells. Not unlike a water cooled 914.

Click to view attachment

Click to view attachment
a914622
Yes the intake can be flipped around, but the injector wiring needs to stay the same. Thats what im working on now. I think a thin toyota or mazda alt will do the trick in place of the power steering pump. Still working on it. The coolant hoses to the throtle body need to be in place for proper cold start.


I am going to try to use the stock intake hoses out to the air sensor. I have seen the 2.2 of the same year react to the shortening the intakes on the vanagons. But i was just reading about the hack for the ecus so injector timing could be shortened if needed.


Iv eyeballed the 2 radiator idea but with out hacking up the front body lines i cant see it. FYI the audi 4000 radiator fits almost perfect in the front.


jcl
Chris H.
Thanks for the insight jcl... the alternator setup is going to be key...

Hey carrying over my hijack of strawman's thread (sorry man) ... been looking at stock Subie gauge clusters... does anyone know if the tach needs calibration like a 914's? How about compatibility?

The reason I ask is that the bone yards and e-bay show compatibility with either 4 cylinder or 6 cylinder cars. Example:

Legacy Cluster

Note how it says either 2.5L or 3.0L...Could be a mistake...

my ideal setup would be something like this:

2004 WRX

Or this:

05 STI

Just not sure if it would be possible without more $$$$ than the Speedhut setup.

Any insight would be appreciated.
76-914
Hey Chris, what's that cluster from the SVX look like. Any possibility of grafting that one in?
Chris H.
SVX's are all automatics...the cluster is a little large and squareish..

Here it is:


Click to view attachment

I don't mind the gauges themselves too much but no need for the other stuff and the PRND321. Maybe I could Frankenstein these into a new cluster...I thought about transplanting the guts into the VDO's but they don't line up at all...

strawman
QUOTE(Chris H. @ Jan 27 2013, 09:06 AM) *

... been looking at stock Subie gauge clusters... does anyone know if the tach needs calibration like a 914's? How about compatibility?


IMHO, the easiest solution is to match the cluster's native number of cylinders with the sixer in your car. But I'm sure there's a way to use resistors, amps or clamps (or some other techie solution!) in-line between the ECU and Suby cluster if you choose to go with a WRX cluster. All of the Legacy gauges I looked at were too wide for my liking, but if you're gonna hack up the 914 dash anyway (like I did!), I guess it really doesn't matter.

904svo (Larry) is an electrical whiz and REALLY helped me build a converter to use the 914 tach. beerchug.gif I've still got the converter (see below) and could pass-it-forward if you can use it, though you'd need to convert it to work with the six-cylinder signal. PM me if you're interested (and be sure to thank Larry!).

Click to view attachment

You'd still be challenged with the speedo, since the Suby uses a VSS signal versus the cable-driven 914 speedo. I looked at using a VSS-based 911 speedo, but my cheap-ass couldn't stomach paying ~$100 for a questionable used one and prolly need to send it in for a $350 rebuild... most of the cheap ones are 85mph, too. barf.gif

Keep up the great work!

Geoff
904svo
QUOTE(strawman @ Jan 27 2013, 11:58 AM) *

QUOTE(Chris H. @ Jan 27 2013, 09:06 AM) *

... been looking at stock Subie gauge clusters... does anyone know if the tach needs calibration like a 914's? How about compatibility?


IMHO, the easiest solution is to match the cluster's native number of cylinders with the sixer in your car. But I'm sure there's a way to use resistors, amps or clamps (or some other techie solution!) in-line between the ECU and Suby cluster if you choose to go with a WRX cluster. All of the Legacy gauges I looked at were too wide for my liking, but if you're gonna hack up the 914 dash anyway (like I did!), I guess it really doesn't matter.

904svo (Larry) is an electrical whiz and REALLY helped me build a converter to use the 914 tach. beerchug.gif I've still got the converter (see below) and could pass-it-forward if you can use it, though you'd need to convert it to work with the six-cylinder signal. PM me if you're interested (and be sure to thank Larry!).

Click to view attachment

You'd still be challenged with the speedo, since the Suby uses a VSS signal versus the cable-driven 914 speedo. I looked at using a VSS-based 911 speedo, but my cheap-ass couldn't stomach paying ~$100 for a questionable used one and prolly need to send it in for a $350 rebuild... most of the cheap ones are 85mph, too. barf.gif

Keep up the great work!

Geoff


That tach adapter will drive a 911 tach off a 6 cylinder engine also.
The trouble with using the Subaru Speedo is that it will only read the correct speed if you use the same tire size as the Subaru, also there is no way to fix it as it control by the speedo chip in the gauge panel.
Chris H.
Thanks guys.... Geoff if I end up using the stock tach I will definitely let you know. Appreciate the offer. Larry, thanks for the info on the speedo... the stock wheel size for the SVX is 205/55/16. Have to check that against our wheel calculator.
strawman
QUOTE(904svo @ Jan 27 2013, 02:33 PM) *
The trouble with using the Subaru Speedo is that it will only read the correct speed if you use the same tire size as the Subaru, also there is no way to fix it as it control by the speedo chip in the gauge panel.


Guys on NASOIC have had success with the SpeedoHealer. Cost is about $120, but it can be used with any VSS-equipped motorcycle or automobile. I was planning on using one of these...
DBCooper
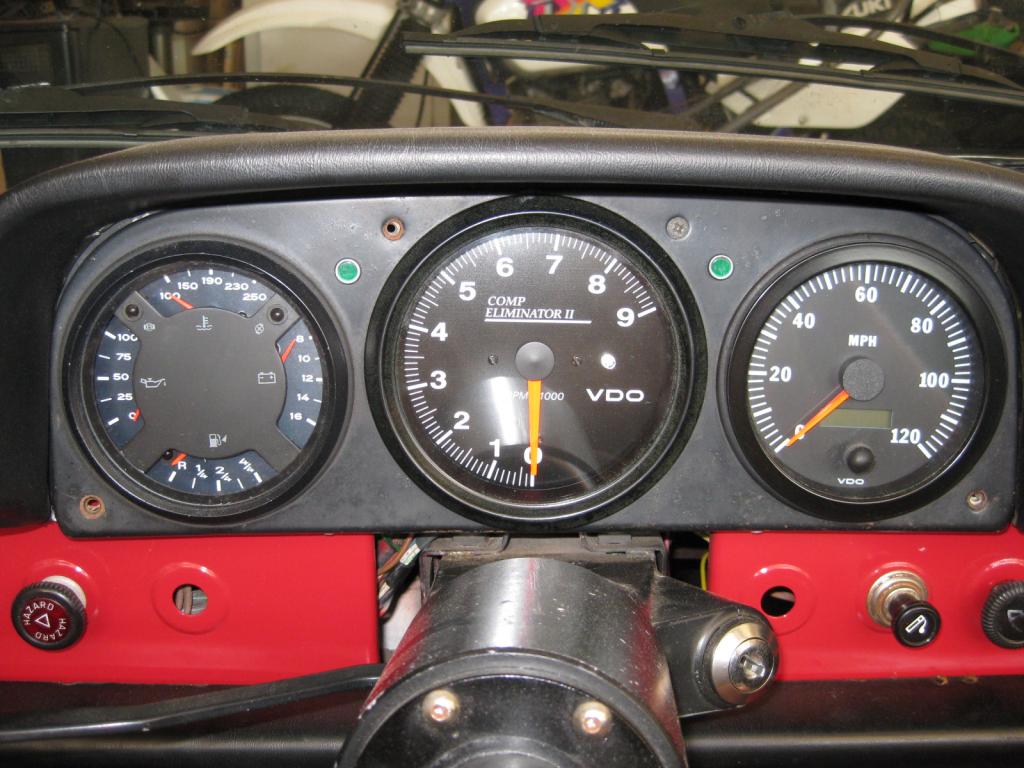
There's an aftermarket VDO electrical speedometer that works with the Subaru sender. it has an LCD odometer, but the size, color, bezel and fonts match the original 914 style. It was about $100. I have a photo somewhere if any interest.
Chris H.
Is it this one?

Click to view attachment

Certainly a good option. Fits right in the slot... says it has "auto-calibration" so that must make it compatible with multiple senders.

I might be heading back to the SpeedHut setup....a little pricey but all the gauges I want.
DBCooper
Yup, that's it. Found a photo:

IPB Image

Fully programmable so you can change tire height and correct the speedo. The tach is also VDO, with a programmable shift light (that LED just above the VDO logo). The shift light looks small but it's pretty bright, without looking like a drag racer. And it goes up to 9K, appropriate for a Subaru engine that spins higher than a T4. It was about $100 from e-bay new in the box. The fonts and style are the same so it leaves the dash looking "in the style of" the original, but with modern instruments. The tach and speedo needles have absolutely no bounce, are perfectly steady. They work well and are simple to install. Important to note that I use an aftermarket EMS, so no need to retain any Subaru compatibility for ECU function.

They're great, the only real problem is lighting at night, they're all a little different. I still haven't changed the bulbs in all so they match. That photo makes the needle colors look different, which is odd, but in real life I can't tell the difference.
.
904svo
It's answer like these that take the scare out of doing a transplant!!
Chris H.
Wow, it's been a long time since update! Sorry about that.

Spent the last several weeks doing cleanup and re-seal of the engine, timing belt, getting rid of various SVX parts, collecting parts, and just finished converting the 2006 WRX trans to 2wd and installing the stub axles. Not very exciting visually but I'll throw a few pics up anyway.

The engine was extremely dirty and grimy. The oil that eventually leaked out of the seals turned to tar over time and it took several days to get it all off.

Before:

Click to view attachment

Click to view attachment

After:

Click to view attachment


High pressure car wash would have been great, but unfortunately I don’t know these engines well enough to know what to spray and what not to so it was the old slow method of smear and wipe. Tried several different products including brake cleaner, Goo Gone, Simple Green, but the best results came from Goop. A big tub can be had for about $8 at Harbor Freight.

Click to view attachment

Put it on, it turns from white to clear, wipe/rinse it with warm water. Repeat, repeat.

Bought the full engine reseal kit from Subaruparts.com.

Click to view attachment

It has some seals you won’t need but pricing the stuff piece by piece it’s still a good deal. Not doing the head gaskets at this point but have them for later. It’s amazing how unfamiliar the seals look.

Click to view attachment

If these were 914 seals it would be easier to tell what the heck they all are. Just compare the old ones with the new ones. Should be an exact fit.
Chris H.
Never done a timing belt before so I wasted a lot of time re-doing it because I thought it was incorrect. Lined up the marks perfectly…cranked the engine one revolution…and the dang belt marks never realigned with the marks on the engine. Apparently they don't have to. The marks are for the initial alignment, so as long as the arrows on the engine line up with the ones on the belt wheels it’s all good. Hope that saves someone a couple hours. And if you screw it up, no worries. The EG33 is a non-interference engine. Didn’t expect that but it’s true. The car won’t run, but you won’t bang the valves against the piston tops.

Left side:

Click to view attachment

Center:

Click to view attachment

Right Side:

Click to view attachment

Note how after one revolution the arrows on the wheel line up with the ones on the engine but the timing belt marks do not.
Chris H.
Don’t have any pics of this, but I did try flipping the intake…I’m not confident enough in my skills to do it this time. Too many variables if it doesn’t start once I get it done. When I flipped both the FI runner section and the top section there was interference with the AC unit. Found a company called Outlaw Engineering who will do a ¼” phenolic spacer for the SVX, but even with that it would still interfere. When I flipped just the top piece the fuel lines underneath didn’t cooperate. It can be done though, maybe version 2.0.

So on to the trans…mine is 2006 WRX unit, so it is a “turbo” trans (2.5T). Bought Ian’s kit to lock the diff and change to the older stub axle style. Ian is assembling a very concise set of photos to explain the process so I won’t outline all the steps since his will be better.

First, the when you take off the center diff, which is the tail section of the trans it’s not immediately obvious what to do next.

Just pull out this stuff:

Click to view attachment

The center diff is worth between $150 and $300 depending on the year and how many people need it at the time you want to sell it.

Here's the diff lock installed:

Click to view attachment

To get the nut off for the diff lock you need to take the next section of trans cover off. You'll probably need a new gasket or some gasket maker. Mine tore into several pieces. It's made of a paper-ish material.

New stubs in...ready to go.

Click to view attachment

Tail end...the stock bolts are way too long for the cover. Shorter ones are provided in the kit.

Click to view attachment

Some "gotchas":

1. If you are installing stub axles be very careful with the axle seals. I bent one by slightly tapping it with a wrench. They should sit flush with the axle holes. I also pushed one in a bit too far but was able to get it out.

This is "way too far" in:

Click to view attachment

Not quite German quality engineering we're dealing with so things don't all fit with a crisp snap like we are used to.

2. When you remove the middle section of the trans cover to get at the differential nut the gear selector shaft will just fall out onto the floor which is alarming. Don't worry, you did not break it.



Chris H.
Also bought a very inexpensive 2006 Impreza gauge cluster from e-bay. Thought I could take it apart and not feel bad if I break it for $36. I'd like to see if I can separate the cluster into three separate gauges similar to the stock 914 look....not sure if it's possible but we'll see. I'm torn between this and using an electronic Porsche VDO speedo.

Front:

Click to view attachment


Back:

Click to view attachment

Since the gauge is from a 2006 as is the trans the speedo should work. The tach will need an adapter like this one:

Tach Adapt

Temp will be directionally correct and I plan to use an Impreza fuel pump per BIGKAT's recommendation.


Chris H.
Next step is the engine wiring. I hear that's A LOT OF FUN.

Here are a few links that were helpful so far:

H6 swap thread

Bremar 2WD conversion directions


SVX Engine PDF


SVX Engine Reseal Thread

Questions and comments are welcome as always.
a914622
Sweet. I just started on a second harness cut down. If you run into problems I could send some pics your way. I found a good deal on a hole swap set up. (Maybe turbo ver 2.0)

You will want to change most of those seals in that box pic.

The top manifold can be flipped but it is a PITAss. It took 2 days to figure relocations of needed stuff and removal of the exahust gas regurgitater system. I would stay stock if you can, But done forget the vacuum lines. They will be hard and brittle.


Keep up the good work. beer3.gif
Chris H.
Thanks jcl. Yes most of those seals are on the engine. I have a list of them all if anyone needs it.

JCL when you removed the EGR stuff did you just block off the connection at the intake? Was planning to do that but just making sure I'm not overlooking anything.

Pic:

Click to view attachment
a914622
Yep. I plan on making long tube headers. A lot of the vanagon guys yake it off.
Chris H.
Nice. Picked these up from Bob (BIGKAT) along with a custom built exhaust. One less thing to mess up for me!

Click to view attachment
a914622
sweet. And it looks like they dont have the "gas regurgitator" bung.


Hey and its way off topic but the Goop is also great for cleaning Granite counter tops if they havent been sealed. Goop keeps from drying and cracking the granite. I didnt even think about using it to clean engines. I have always used Jacobs paint stripper and a power washer.

All right back to building...
Chris H.
QUOTE(a914622 @ Mar 23 2013, 08:33 AM) *

sweet. And it looks like they dont have the "gas regurgitator" bung.


Hey and its way off topic but the Goop is also great for cleaning Granite counter tops if they havent been sealed. Goop keeps from drying and cracking the granite. I didnt even think about using it to clean engines. I have always used Jacobs paint stripper and a power washer.

All right back to building...


No bung. That thing is impossible to get off of the stock header....it's baked on. By the way I found a really good resource for the vacuum line info. Spellis it out very well in terms of what is needed, diagrams, etc.

Vacuum Lines

Hope it helps someone....
Chris H.
Time to start reinstalling the accessories onto the engine. The AC/alternator bracket had a lot of surface rust so I had to clean it up a bit:

Before:

Click to view attachment

Click to view attachment

Click to view attachment

Ground off the chunky rust:

Click to view attachment

Click to view attachment

Painted with high temp paint:

Click to view attachment

Chris H.
I heard the knock sensors were one of the keys to a smooth running Subie engine. On the subaru-svx site the experts say if there are ANY cracks at all replace them. Just checked mine and both are cracked. You can find them cheap, just ordered two for $12.99 ea on e-bay. Free shipping.

Badly cracked:

Click to view attachment

One crack:

Click to view attachment

Link to the e-bay site:

Sensors

76-914
QUOTE(Chris H. @ Mar 22 2013, 08:04 AM) *

Nice. Picked these up from Bob (BIGKAT) along with a custom built exhaust. One less thing to mess up for me!

Click to view attachment


Nice snag Chris. Did Bob make those?
Chris H.
He special ordered them from somewhere...I THINK Outfront Motorsports but could be wrong on that.

Here's a link to something similar...


Outfront

He did make the exhaust system that mounts to it. It's jammed in the corner of my garage or I would post some pics. There are some in his blog if anyone wants to check it out.
Chris H.
Tackled the engine wiring harnesses....

Because there was a gathering of nesting materials under the intake the wiring needed to be checked pretty closely. Mice love to chew through 914 wires as we know, but it looks like Subie wires don't taste quite as good.

Before:

Click to view attachment

Click to view attachment

Click to view attachment

Nothing was chewed, but there were some nicked wires, which likely explained the blinky lights on the dash. It was raining when I bought the car and every time I started it a different set of warning lights lit up. The engine ran great so I figured it was a wiring issue...

Click to view attachment


Click to view attachment

A little liquid tape..then regular electrical tape

Click to view attachment

Click to view attachment

And the end result:

Click to view attachment

The OEM covering was plastic tubing that can be found at Harbor Freight. It held up surprisingly well so that's what I replaced it with. The wiring underneath was very healthy and pliable. Of course I covered every last one even though it was not necessary... biggrin.gif

Next up are the vacuum hoses, reinstall intake, alternator, etc. Then the main wiring harness. I want to test fire the engine before I put it in the car so that it will be easy to troubleshoot if there is something not connected right, etc.
wingnut86
Subd:-)
Chris H.
Well things have slowed down a LOT but they are about to get back on pace. Been working on the main wiring harness...FUN!

This is below "Andy's camera" quality...did I even point it at the harness?

Click to view attachment

A laundry basket full of electrical tape...from unwrapping the main harness...probably a couple miles of it there.

Click to view attachment

Got the engine harness back in

Click to view attachment

Refinished the flywheel even though it might have been OK - looks much better.

Click to view attachment

Hydraulic clutch bits...still need to decide whether to use metal or poly lines...leaning towards poly.

Click to view attachment
Chris H.
Couple of notes....

1. Be very careful to choose the right clutch kit. For example, my trans is a 2006 WRX, which supported a 2,5T. Although many sites and ebay sellers will say that the cheaper KSB03 or KSB04 clutch kit works, they DO NOT. The one you need is the FJK1001. It's $100 more but if you use the cheaper one it won't engage properly and will chew up the clutch disc...search NASIOC for cross-reference for the clutch that works with your trans.

Click to view attachment

2. Apparently Subaru changed the oil separator that is under the flywheel from metal to plastic in the '90's...and it wasn't a good idea. Then they went to aluminum...still bad. Now the replacement is steel. If your engine has one made of plastic or aluminum change it. Both leak like crazy.

Good thing I poked a hole in mine trying to lock the flywheel! YEAH! Meant to do that!

Click to view attachment

Here's the old one and new one...universal and fits several models. The new part # is 11831AA210

Click to view attachment

Click to view attachment
Chris H.
Here's what the oil separator plate looks like installed:

Click to view attachment

Lately it's been a game of hurry up and wait...I failed to realize that the bolts that hold the flex plate on the 3.3 are shorter than what is needed for the flywheel...now I had to order the bolts! No Subie dealer has them:

Click to view attachment

Attached the engine mount (fits great so far) and got the engine down off the stand. I made this boxed wood frame so that the weight is evenly distributed and the engine and trans will be in the positions they will be in the car. It was VERY easy. Plus it keeps the oil pan off the ground.

Click to view attachment

Click to view attachment

Click to view attachment

Once my bolts come in (and a couple of other issues come up and get resolved) we'll mount the engine to the trans and test fire it. Still have a lot of wiring work to sort through...
euro911
What supports the front of the engine, Chris?

Looking good popcorn[1].gif
nsyr
nothing. the engine mounts are towards the back of the engine. the transmission keeps it from leaning foward.
Chris H.
QUOTE(nsyr @ Jun 5 2013, 07:32 AM) *

nothing. the engine mounts are towards the back of the engine. the transmission keeps it from leaning forward.


You are correct sir, nothing up front. Without the trans it is very "front heavy" but that's why I tied everything together with the wood frame.
jimkelly
but in your pic there is no trans on the motor. I assume the motor is resting on a wooden cross member of your stand?

jim
Chris H.
Hey Jim,

Believe it or not the engine is being held in place almost entirely by the mounts coming up from the engine bar. They are VERY strong:

Click to view attachment

Click to view attachment

Although the front wood piece does provide a small amount of support it's barely touching the pan. It does stop forward movement at some point though and I think that is critical until the trans is hooked up. We're talking 80/20 weight distribution here....

Click to view attachment

Click to view attachment

The initial idea behind the wood frame was to keep the oil pan above ground when I lowered the engine down from the stand. Then I realized it could be extended back to the trans mounts and slightly change the weight distribution so that the engine doesn't flop forward onto the floor. If it wasn't for my novice mistake of forgetting the flywheel bolts the trans would already be in and the lump would be pretty evenly weighted. I want to get it running before I put it in so that will be next. Hopefully Ian will make some cable kits so I don't have to fab my own.

Are you done with your conversion Jim?
nsyr
I would be careful with those mounts. They are fluid filled and known to come apart. Both of mine have come apart. The replacement cost I believe is around 200 each! I will be replacing mine with sti mounts which have to be retrofitted.
Chris H.
QUOTE(nsyr @ Jun 5 2013, 06:33 PM) *

I would be careful with those mounts. They are fluid filled and known to come apart. Both of mine have come apart. The replacement cost I believe is around 200 each! I will be replacing mine with sti mounts which have to be retrofitted.


Thanks Andrew, very good point. Yes they are vulnerable and pricey ($271 each at last check). I literally have not moved that thing an inch to keep stress at a minimum. Didn't plan to leave it like that for this long but they seem fine. Seems like this is not the first set for the engine... The bolts arrive tomorrow.
Chris H.
Look what came today....flywheel bolts...

Click to view attachment

These work great for the SVX. Part # is 800610740.

Comparison of the flex plate bolts vs. flywheel bolts. There's a joke in here, but it's too obvious...

Click to view attachment

Hey do you guys recommend using a small amount of blue loctite for these or is it not necessary? Unless someone HATES the idea I think I will.
Chris H.
It's one of those weeks where you get a surprise every day in the mail...here's today's:

Click to view attachment

Thanks to SpeedMetalArmy for the heads-up. Apparently this thing will not only translate a 6 or 8 cylinder pulse onto your stock tack but will stop the "tach bounce" that many of us get with 4 cylinder engines. Haven't tried it yet. It's pretty compact..

Click to view attachment
Mike Bellis
QUOTE(Chris H. @ Jun 4 2013, 04:44 PM) *


Hydraulic clutch bits...still need to decide whether to use metal or poly lines...leaning towards poly.

Click to view attachment

I ran a -3AN stainless braided PTFE line in mine. Worked great! I did buy some extra fittings and leave some slack in the line. This came in handy when the transmission side leaked during bleeding. I ran the line inside the factory clutch tube, slid in without effort.
76-914
That's a good tip Mike. Wow Chris, your moving right along. Can't wait to see your post/video of it running. beerchug.gif I like your wooden engine stand. Clever! Just looking for good ideas to steal. biggrin.gif
Chris H.
Thanks Mike. Definitely looking to copy a good idea on the clutch. If yours works well I will do the same. Your conversion turned out awesome BTW. You always finish your projects.

Kent, I would give you my "stand" if you lived closer. It's literally just a few pieces of 2X4 though. I'll post the measurements. It can be constructed in about 20 minutes. Are you using Ian's mount or fabbing one?


76-914
I'm building my own because he is out of commission for a while. I really just used this as an excuse to icon_bump.gif this. Anything lately?
Chris H.
Kent, I'm just about to pull the engine! Planning for this weekend.

Also think I figured out what to do for a water temp gauge. The 924 combo gauge is allegedly the same diameter as the 914 (100mm). It has water temp, fuel level, plus all the warning lights we need (oil pressure, alternator, low fuel, brake). It has a pointed plastic bezel, but I'll either swap that out for a flat piece of glass or swap the guts into the 914 combo gauge. Not sure if the fuel gauge will work well, but I can cannibalize my current one if need be. For $25 you can't go wrong.

Pic of a similar gauge from the interweb:

Click to view attachment
76-914
Very nice! Keep the pic's coming and the build going on. piratenanner.gif I should talk! So damned busy with work I have to steal time to work on mine. Plenty of spare time = no work, which = no $$. No spare time = lots of work, which = plenty of $$. Vicious cycle.
euro911
I got tired of living that 'vicious' cycle, so I retired.

... and still don't have enough time to get everything done blink.gif
Chris H.
Got the old engine out! I'm feeling a little bad about the engine swap but I think I'll get over it. The 1.8l is so original and unmolested... (but dusty)

Amazingly similar....

Click to view attachment

Click to view attachment

What do these numbers mean?

Click to view attachment

a 1.0L!?

Click to view attachment

All the heater tube clamps are the original VW embossed ones...

Click to view attachment

Back pad is awesome - just some paint on it but otherwise very good.

Click to view attachment

When I got back from my last drive of 2012 it was running a little rough....this MIGHT by why....#2 plug wire ripped out of its sheath. Ran pretty good on three cylinders for a few miles!

Click to view attachment

Got the rear hubs pressed

Click to view attachment

Engine hole - anyone know how to remove the glue that holds the back pad on? The paint under it is pristine!!!

Click to view attachment
This is a "lo-fi" version of our main content. To view the full version with more information, formatting and images, please click here.
Invision Power Board © 2001-2024 Invision Power Services, Inc.