Full Version: CptTripps' Restoration 2 - The Grey Matter Build
Be safe!
QUOTE(Qarl @ Apr 16 2014, 01:46 PM) 
Be safe!
...which is exactly why I'm not going to try to make Hershey with the car.
If I rush it, I'll overlook something important...and may end up killing myself, or someone else. It's just not worth it.
So, I've decided to take the night off of wrenching and spend it with my kids. I've been in the garage every day for 3 weeks whenever I'm in town, and I miss hanging out with them.
Plus, it'll be a LOT less stressful driving 5.5hrs to Hershey in my DD.
 (And faster!)
Wise man! Enjoy your kids!

Doug, great idea on the longer bolts (and spending time w/family). I have a unit here that I was about to ship but will modify it before releasing it.
Last night's progress: Watched MIB-2 with the family and consumed a pizza.
Tonight: Get a box of stuff ready to sell in Hershey. Maybe clean the car too?
Tonight: Get a box of stuff ready to sell in Hershey. Maybe clean the car too?
Good call. Safe travels.
QUOTE(CptTripps @ Apr 16 2014, 07:02 AM)
Ok...more updates.
Spent the remainder of the evening working on the brakes, exhaust, and axels.
The pedal cluster bolts weren't really long enough for me to get a good grip on everything after the Raptor Liner was sprayed on, and the plate for the clutch slave plate was installed, so I needed to make a few adjustments. I tool a cut-wheel and got rid of the captive bolts that were in place. Then welded up the cuts, ground them down, and re-painted it. I just left the 2 holes. I'll use bolts that are about 1cm longer so I can get the threads on and feel comfortable with the safety of it all.
I also forgot to add the CV joint gaskets, so I had to pull everything off and re-do those too. After buttoning everything up...again...I realized that I may need spacers between the trans and the magic flanges. HOPEFULLY I can just pull the flanges, but I may not have enough travel available for that, so I'll need to pull the drive-half of the CVs off again before I get on the road. It's starting to look like a proper car from behind though!
The exhaust is going to be trickier. The divorced down-pipe I have drops just a LITTLE too low for me to weld the can directly to. There's also the question of how I'm going to orient it. The thinking right now is that I'll cut a 2" section out where the bung for an O2 sensor was, and use that for my wideband, and then weld the exhaust to that. I'll have to curve around the engine cradle and leave myself enough room to still get to the cradle bolts if needed. In reality though, I shouldn't need to pull the engine without taking the exhaust off. It's only 3 bolts and it'll come out in one piece.
can you send me some measurements on how far the shifting stuff sticks out behind the transmission? I need to get some data to start fab work.
You need to fab something? I thought you bought Ian's kit? I can't imagine anyone's set-up extending further than the end of the shift rod, though!
I believe he's thinking for exhaust work.
I'll look at it tonight. I agree that it's not much past the Trans rod.
Pics in a bit. Stay tuned.
I'll look at it tonight. I agree that it's not much past the Trans rod.
Pics in a bit. Stay tuned.
So after seeing people DRIVING their 914s, I'm motivated to get mine on the road!
Picked up a few goodies this weekend in Hershey. Headed out to the garage to put them to good use!
I'm out if town until Thurs morn, but plan on working hard Thurs afternoon, and then all day Fri and Sat. Hopefully I really can drive it on Sunday. Even just around the block would be nice.
Picked up a few goodies this weekend in Hershey. Headed out to the garage to put them to good use!
I'm out if town until Thurs morn, but plan on working hard Thurs afternoon, and then all day Fri and Sat. Hopefully I really can drive it on Sunday. Even just around the block would be nice.
Looking forward to the drive report!
Oh you tease, no pictures of the swap meet loot?
Swap meet loot for the 914 consisted of a 5-lug space-saver spare (that only ended up costing me $15), some 1" spacers, and stainless kick-panel plates. I'll take pics as they're installed. :-)
I'm on a plane to ATL right now and them head to SFO tomorrow. I'll be back in the garage Thursday to start on the home stretch.
I DID get the brake lines made up for the Boxster conversion last night...so that was cool. Now all I need is the set I ordered from Eric to show up, and I'll be stopping like a boss!
I did a ton of work this afternoon...but only took a few pics.
Made and bent the clutch line from the master to the slave. Needed to use 3 different thread ends and 2 flare types, but it's all good.
Made the double flares on the brake lines I made for the Boxster brakes to the soft lines. Those are good to go now.
Blasted and painted the seat rails, battery tray, and the gas tank. Those will all go in tomorrow.
The radiator tube was more flexible than I was expecting, spin was able to go through the longs there. I'll close up the hole I made to get them into the tunnel tomorrow.
I also filled in the exhaust cut-outs that the PO made in the bumpers. My exhaust will be very different. I'll work on that tomorrow too.
Picked up the dash plates today from the "The Metal Shop" in Maple Heights.
1/16" brushed stainless. I MAY paint these, or cover them in suede or vinyl. Haven't decided just yet. (photo of a quick test below.)
I made a couple of the holes just a smidge too small, so I need to open a few of them up, but that's not a bog deal at all. Especially considering that the other 100" holes are perfect.
I emailed a CAD file and picked this up a few days later. A+ in my book!
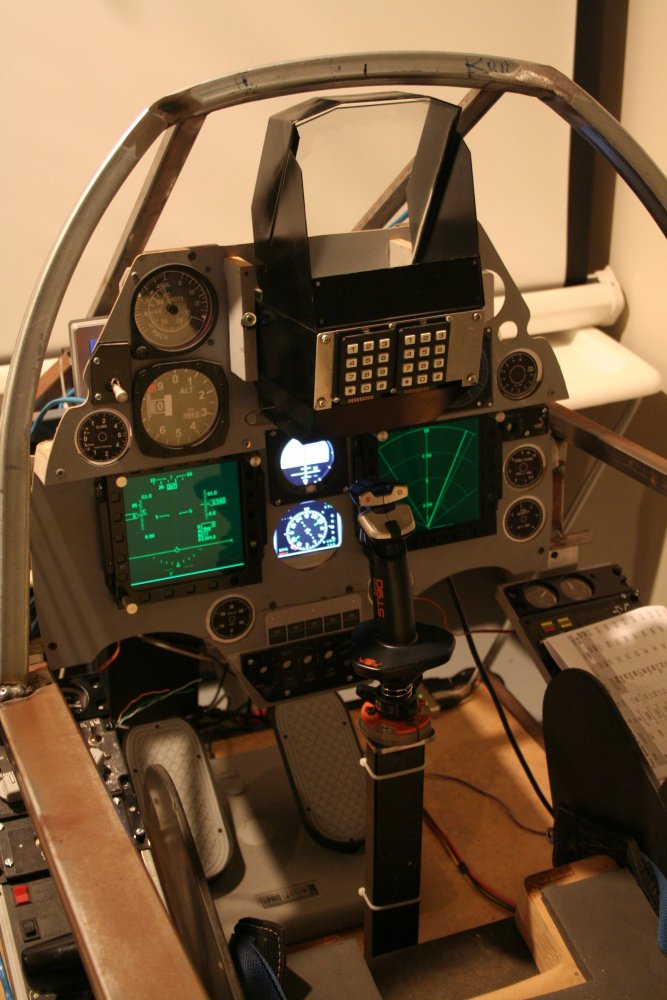
Here's a refresher of what I mocked up for the center console. The only difference is that I'll have an 8" sub in the back of it. I need to get in there to see where it'll fit and how I'm gong to seal it up. Other than that, the plates are the same.
Since you where going for the aircraft theme I would paint them car color. Most fighters are painted the same base color inside and out. Or a matte black. But that is just me,
QUOTE(CptTripps @ Apr 25 2014, 09:23 AM)
Here's a refresher of what I mocked up for the center console. The only difference is that I'll have an 8" sub in the back of it. I need to get in there to see where it'll fit and how I'm gong to seal it up. Other than that, the plates are the same.
Really digging the aircraft theme, especially the gauges! You literally beat me to what was rattling around in my brain about 10 years ago before I went in. I wish you could find an old radar or Radar Warning Receiver (RWR) screen to mod, if you could rig a radar or MFD surround with your GPS it would really complete the look!
Here's an example based off someone's home flight sim cockpit:
Doug, what gauges are those? I like them a lot. 
I am also considering suede for my /6 (someday).
I am also considering suede for my /6 (someday).
If you go suede, make sure it's an automotive grade that can handle the heat/sunlight.
I've seen too many guys on my Lotus forums spend $$$$ on custom suede interiors only to have them deteriorate within a year.
I've seen too many guys on my Lotus forums spend $$$$ on custom suede interiors only to have them deteriorate within a year.
QUOTE(Dr Evil @ Apr 25 2014, 12:13 PM)
Doug, what gauges are those? I like them a lot.
http://www.newvintageusa.com/1940.html
He did a custom tach for me that's 1/3 larger than the normal gauges. I also had green LED lighting done, so it matches the bulbs I have in the other parts of the car.
QUOTE(Qarl @ Apr 25 2014, 12:15 PM)
If you go suede, make sure it's an automotive grade that can handle the heat/sunlight.
I bought 4-yards of charcoal Alcantara. I'm using it in a lot of other parts of the car. (Check out the pics of my seats.) It wasn't cheap AT ALL but I think it'll be worth it in the long run.
How did you contact the gauge folks? All of there "contact us" links are dead. I need to find a place to make a custom gauge for my bike projects. I found a few places I liked, but they were not interested in motorcycle gauges due to weather proofing.
Never mind....one of their links on home page worked 

I flat out cranked today.
Spent some time cleaning the garage and getting organized, then started on the painting that needs to get done. Also did quite a bit of sandblasting of parts.
Painted almost all the trim a darker version of my dove grey. Painted all the plates that color too, and built a few of them up.
I'll start on reassembling the doors and windows tomorrow.
Not much visible progress to report. Just a lot of wiring work and getting the interior measured out to install starting tonight.
The dash has been cut up and glassed in so I can cover it in vinyl. I still need to work out how I'm going to cover the tup of the gauges...that part can wait though. I'll clean up the tack welds soon. I'm planning on using some Bondo to make those transitions a lot nicer before I cover it in vinyl or Alcantara.
I (finally) got the steering wheel back from Alan Gun in Plantation Florida. I think he did an "OK" job on it. Not worth the money I paid to have it done, it looks decent, and is a better job than I'd have done.
I'll just leave this F4 Phantom ejection seat handle here, because you could totally mod this into an e-brake lever...
F4 Ejection Handle
Or you could get a pair of full Ejection Seats for like $2200 a pop. Really complete the look!
F4 Ejection Handle
Or you could get a pair of full Ejection Seats for like $2200 a pop. Really complete the look!
Doug, it looks like you are 90% done with 90% to go. Looking nice!
Looking nice!
90%: totally agree! That's what it feels like too.
I've had a lot of personal stuff to deal with this week, but I'm going to start hitting it hard tomorrow.
That ejector handle is awesome. That's how I already have my e-brake and seat movers painted up.
I've had a lot of personal stuff to deal with this week, but I'm going to start hitting it hard tomorrow.
That ejector handle is awesome. That's how I already have my e-brake and seat movers painted up.
QUOTE(CptTripps @ Apr 30 2014, 08:49 PM)
90%: totally agree! That's what it feels like too.
I've had a lot of personal stuff to deal with this week, but I'm going to start hitting it hard tomorrow.
That ejector handle is awesome. That's how I already have my e-brake and seat movers painted up.
Like I said, the same site apparently sells legit Ejector Seats from F4's, F16s, and other stuff. Way more than a Recaro, but damn if that wouldn't look HOT!
Really dig your aircraft theme man, I used to dream of a layout like this in High School. Later I shifted gears towards a more 917/904/90x series racer interior.
I actually looked at aircraft seats. Everything I could find was way too wide, or way too tall. They'd be awesome for racing though. Real high bolsters.
The interior is important, but right now I need to concentrate on all the little crap that needs to get done. Wiring. Radiators. Intercooler. Those are the top priorities.
The interior is important, but right now I need to concentrate on all the little crap that needs to get done. Wiring. Radiators. Intercooler. Those are the top priorities.
QUOTE(Moneypit @ Apr 30 2014, 12:52 PM)
I'll just leave this F4 Phantom ejection seat handle here, because you could totally mod this into an e-brake lever...
F4 Ejection Handle
Or you could get a pair of full Ejection Seats for like $2200 a pop. Really complete the look!
Oh yeah this brings up a old topic on this thread. Flight stick control handle for your gear shift
Thats really a decent deal for a metal control stick grip with buttons.
They have a few others also.
QUOTE(CptTripps @ May 1 2014, 08:29 AM)
I actually looked at aircraft seats. Everything I could find was way too wide, or way too tall. They'd be awesome for racing though. Real high bolsters.
The interior is important, but right now I need to concentrate on all the little crap that needs to get done. Wiring. Radiators. Intercooler. Those are the top priorities.
Pffff.... Look at you trying to be all practical. "It'd be too tall!" - Sounds like you need a Carrera GT style double bubble targa roof

Have you already done your seats? If not there might be a way to re-cover them, build up side bolsters, maybe using some exposed strip aluminum to give that ejector seat look. You could probably score some fabrics that mimic the colors with more OD green and black, but in suede or something more comfortable. You could also paint your seat adjuster handle either red or black/yellow. I think you should fly me up there so I can consult on the interior while you deal with trivial things like wiring and intercoolers.
Ha. Yeah, look back a few pages. The seats are re-covered...and awesome. I'm hoping the Alcantara keeps me stuck in the middle.
QUOTE(CptTripps @ May 1 2014, 03:46 PM)
Ha. Yeah, look back a few pages. The seats are re-covered...and awesome. I'm hoping the Alcantara keeps me stuck in the middle.
Forgot about that! So many pages, I got lost at one point. They look great, before the 2.0 died my mom had started to redo our seats, using some faux-alcantara style stuff and some kind of heavy duty blak "sport" fabric, can't figure out how to describe it. At the time the idea was an inexpensive way to fix them up, since she's been sewing for a long time. Did some home contract work once sewing sound deadening material for helicopters or something!
I'm still trying to convince my mom to let go of the reins of the 914, all this time it's been in her name, and hers alone. She keeps bringing that point up every time I start talking about nefarious plans...
Ok. Lots to talk about.
I need to add more pics later...
I got the pedal clister and masters installed. Them moved to wiring.
Since I didn't have the connection to the wheel any more, I soldered leads on the I can connect up to the harness I have. Should be all set, as I've toned everything out.
Finished adding dynamat to the entire interior and doors. Dead as dirt now. Going to be great.
Painted a the trim, and drilled out the holes for the LED holders I have. There will be 5 lights in the targa bar trim that should keep people off my ass.
Got goodies from Eric today. :-)
QUOTE(CptTripps @ Apr 30 2014, 06:49 PM)
90%: totally agree! That's what it feels like too.
I've had a lot of personal stuff to deal with this week, but I'm going to start hitting it hard tomorrow.
That ejector handle is awesome. That's how I already have my e-brake and seat movers painted up.
Love the green theme running with your build. I have taken a liking to the Porsche acid green for details in the livery on our current v8 build. Your aircraft theme is well executed + unique.
I have an airframe id plate that I salvaged from one of these F4s that was downed in combat. I might stick this in the race car somewhere
Awsome build on your 914 !
MartyClick to view attachment
Took a day off to be with my family, and then hit the garage yesterday.
Realized that for the 2nd time, I'd built the proportioning valve wrong. So...back apart again. I'm getting good at this! The trick is to replace 2 bolts first with real long ones, then back it out that way. Installation is the reverse. No muss no fuss.
Click to view attachment
Then I started on door seals and working towards getting the windows back in. The new triangle seals from 914rubber.com are really pretty awesome. Took lots of stretching and prodding but I'm locked in place now.
Click to view attachmentClick to view attachment
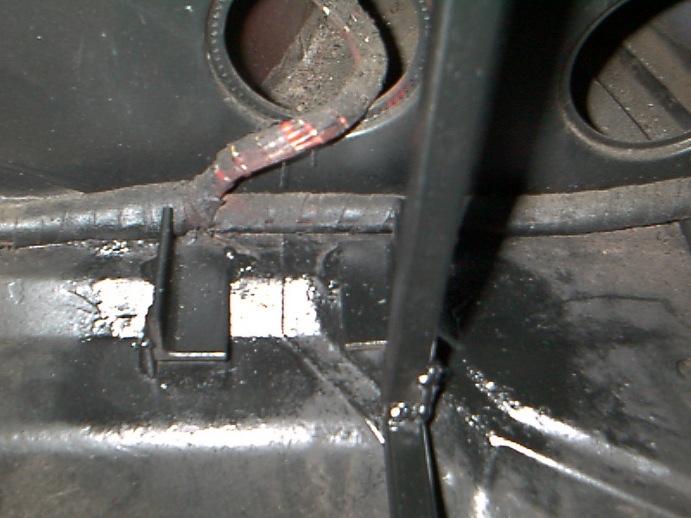
One thing I'm stuck on is the vertical targa seal. 1: Is this installed correctly. 2: should I cut the rest off?
Click to view attachment Click to view attachment
I got the rear brakes all set, and am missing a fitting that'll let me complete the front. Need to call Eric on that today.
Today I'm going to finish the radiator and get that started. I can start the thing without an intercooler...but not without water.
Realized that for the 2nd time, I'd built the proportioning valve wrong. So...back apart again. I'm getting good at this! The trick is to replace 2 bolts first with real long ones, then back it out that way. Installation is the reverse. No muss no fuss.
Click to view attachment
Then I started on door seals and working towards getting the windows back in. The new triangle seals from 914rubber.com are really pretty awesome. Took lots of stretching and prodding but I'm locked in place now.
Click to view attachmentClick to view attachment
One thing I'm stuck on is the vertical targa seal. 1: Is this installed correctly. 2: should I cut the rest off?
Click to view attachment Click to view attachment
I got the rear brakes all set, and am missing a fitting that'll let me complete the front. Need to call Eric on that today.
Today I'm going to finish the radiator and get that started. I can start the thing without an intercooler...but not without water.
The end of the vertical seal at the top (your picture) is incorrect.
Porsche Panorama had an article on this , and I do remember that the instructions were to carefully trim an angle to match the angle where there Targa top window seal meets it. In essence: both edges may require a careful trim ( at their meeting point) and would look like a 45° joint. Since the top clamps down with pressure, allow enough extra material to ensure air+water tight sealing and should help eliminate Targa top rattles as well.
Marty
So I need to push it down further than I have it now? If there's a "finished" end like that, I'm assuming that it would go on top so water wouldn't leak down inside of it and become trapped.
Get the top on and inspect how the two seal interact before you cut anything.
QUOTE(CptTripps @ May 5 2014, 09:33 AM)
So I need to push it down further than I have it now? If there's a "finished" end like that, I'm assuming that it would go on top so water wouldn't leak down inside of it and become trapped.
Some of the rubber Targa seals I've installed come with a slight squared off edge. This is a candidate for trimming. I like a snug fit. With age the fit gets loose, causing top rattling. This also starts to chaffe the soft aluminum Targa top edge trim.
YES always premount + check before cutting !
Marty
Yeah...I need to get the top on sooner or later. Now I just need to find it. :-)
QUOTE(McMark @ May 5 2014, 08:51 AM)
Get the top on and inspect how the two seal interact before you cut anything.
This
I'll be back in the garage later today and the first thing I'll be doing is checking the top out. I want to get the seals done so I'll have one less thing to worry about at the end of the build. The body work is all done now, so the seals are just one more thing I can do now to feel like I'm making progress.
My hope is to have the seals in, and the doors full of windows and electronics by the end of the day.
My hope is to have the seals in, and the doors full of windows and electronics by the end of the day.
So I didn't touch the doors today. I focused on the exhaust and radiator. Can't start the car without either of those!
The exhaust wasn't all that hard after I started in on it. I needed to cut the Crucial down-pipe to make it a little shorter, and bent out to move away from the engine cradle. After welding those up, I ground it all down and welded it to the exhaust.
But I didn't end up doing that great of a job. I'm askew just a little bit. No biggie, I'll just rotate it later and re-weld the pipe.
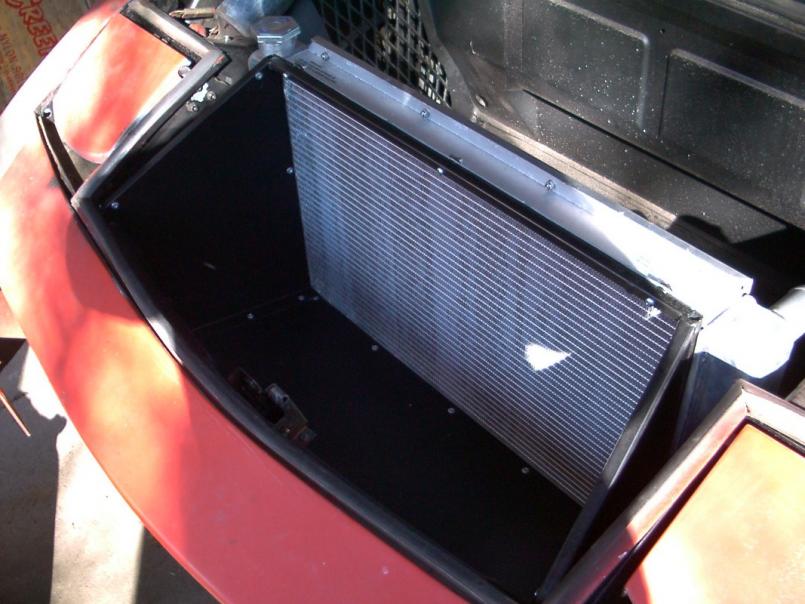
With the radiator, I changed the size of the holes, and made way for rubber grommets. After welding it into place, I feel good about the fit. The grommets give me enough "wiggle" so it's not solid on the chassis. I'll make up a shroud later after I get the tubing run.
Those grommets might come back to bite ya, Doug.
What would be a better idea?
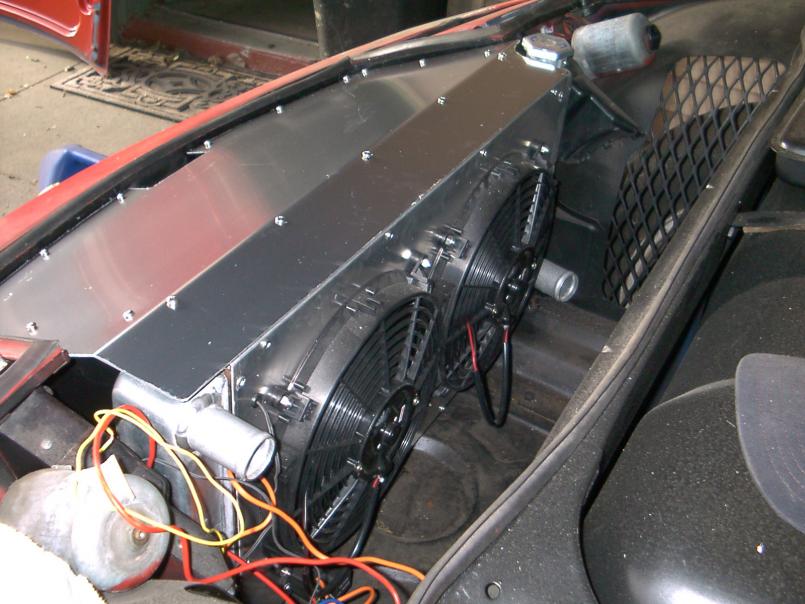
Here is a very clean Install, and the frame makes attaching the shroud easy.
From a post by joefri187
The radiator is floating, not bolted directly to the frame as I've heard that bolting directly to the frame can cause the radiator to crack as there is a lot of expansion when hot...
It sits on rubber mounts on the bottom and bolted on through rubber grommets along the top edge.
And yes, it works great and everything stays cool!!!
This is a "lo-fi" version of our main content. To view the full version with more information, formatting and images, please click here.