Help - Search - Members - Calendar
Full Version: Andyrews Progress Thread
914World.com > The 914 Forums > 914World Garage
Pages: 1, 2, 3, 4, 5, 6, 7, 8, 9, 10, 11, 12, 13, 14, 15, 16, 17, 18
Andyrew
Progress from this weekend.

Click to view attachment
Triangulated the rear shock tower against the frame with 14ga steel. Also seam welded the frame to shock tower joint (not pictured).

Click to view attachment
Reinforced the suspension ear with a Tangerine Racing reinforcement kit, and then my sheet of 14ga for mounting the brace to.

Click to view attachment
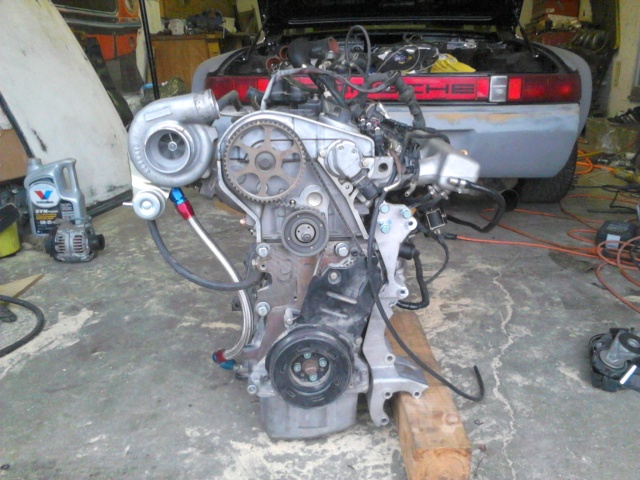
Engine with turbo mounted. smile.gif


Click to view attachment
Brace mounted to the firewall and suspension ear. You can see the turbo mounted (Bolted in all the way). Plenty of room! This is with the engine in place. I didnt mount it up because I wasnt happy with the height of the engine/trani. I move the front of the engine up 3/4" and the rear of the trani up 1 1/2". I'll get that in place this week and hopefully that will be where I want it to sit.
Andyrew
Progress from this extended weekend. There wont be any more progress until after christmas and maybe not even this year.. But I hope I can put a couple more hours in and finally mount the engine in place.

Click to view attachment
This may seem overkill but this seemed to be the most solid way to mount this. Instead of coming off the engine bar I made that goes under the engine I decided to come off the front of the motor mount. I am currently debading if I want to cut off the crossmember alltogether to save 4lbs, but I am leaning towards no.

Click to view attachment
Great pic showing the relationship to the mounts. You can see 4 really easy to get to bolts and the front is out.

Click to view attachment

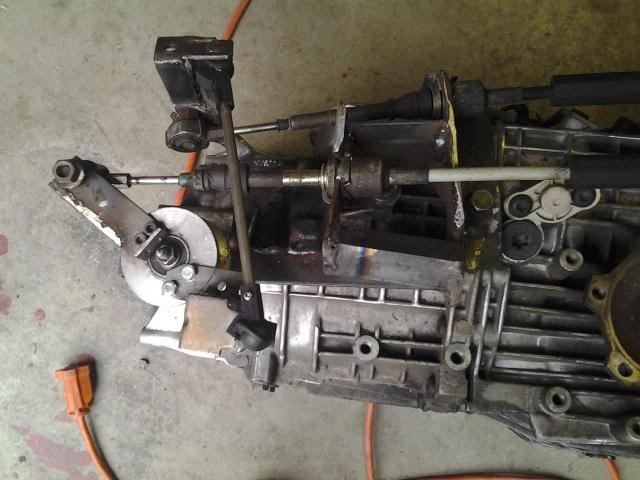
Put the shift linkage on the test trani (Audi a4 1.8t fwd) only difference was I had to remove about 1/4" from a bolt mount to match the other trani.

Click to view attachment

And then came the issue I was not expecting. My shift linkage was touching the trans mount. This is without the cable being attached to the linkage which adds 3/4"... At this point I wasnt sure how to proceed.
Andyrew
Click to view attachment

You can see its pretty much touching. You can also see in this the bar mounted to the trans mount. Its currently facing right but it will be facing forward and joined to the two pipes you can see jutting out from the trans.

So what to do?

Click to view attachment

Well move the mount over of course! This took longer than I had anticipated... the spot welds were a PITA and I broke my spot weld remover as well.. (still had 5 bits left too mad.gif )


Click to view attachment
And finally A really cool temp controller. Tested on the bench and it works great. Audible relay click when it hits the set temp, and there is a 2 deg buffer. Its got provisions for keeping the temp both hot and cold which is really cool! With all these screens I have I am debating the "stockish" dash display I have. I have an idea that could work well for hiding these.
76-914
Incorporate a hinged face plate onto the dash face that folds up to reveal digi's? confused24.gif Good to see you working on your build again, Andrew. One thing about fabbing shit up. Be prepared to do, re-do and then re-do again. headbang.gif
Andyrew
Yup a hinged face trim on the pass side is my first idea. Second is a magnetic or snap in trim that I can remove/install. I dont have a glove box figured in my install but I could make it a large glove box that hinges or slides down.
76-914
QUOTE(Andyrew @ Dec 16 2015, 04:38 PM) *

Yup a hinged face trim on the pass side is my first idea. Second is a magnetic or snap in trim that I can remove/install. I dont have a glove box figured in my install but I could make it a large glove box that hinges or slides down.

HF has some small (appx 8mm rd. x 2mm) rare earth magnets for < $5.
Andyrew
Yup. Thought about putting that behind the fiberglass trim. I would be worried about noise/vibration though.
It also doesnt allow me to quickly check the displays so Im leaning towards hinged.
Andyrew
Quick present recap. Amazon wish lists are awesome smile.gif

Click to view attachment

From left to right.

6" sub, Water injection pump, 1000w Amp, 5.5" speakers, Valve train bits, Amp volume controller, "8ga" amp install kit, Tubing flare, Tubing bender, Media button, Tweeters, 914mug/stickers, Flexible ruler.


The only thing left for my Stereo is the actual tablet. But I'll wait till it gets closer for that. I can run my phone till I get something that will work for a long time.
76-914
Cool presents. Hopefully we can all get kitchen pass' to work on our cars this weekend. beerchug.gif
Andyrew
I got a pass to go for a drive with my cousin which was really nice so I call that a win smile.gif

I think I will be able to find some time this week to finally weld in the mounts for the engine/trani. Thats my goal, Not sure if I can get it done but it will be a HUGE step forward if I can get it mounted.
Andyrew
My final update for December 2015 is below smile.gif

Guess who welded up the engine/trani mounts for their final position?

Click to view attachment

Click to view attachment

Click to view attachment

Click to view attachment

Click to view attachment
I'll add one support to this, I dont have any bolts on the trani closer up top that will triangulate this for load so I am going to use the hoist hole for one.

Click to view attachment


This is immediately after tack welds, They are all 90% welded now, but will finish that up in January. I was able to remove the 8 bolts holding it all together (4 up front and the 4 trani bolts for the oem mounts) and raise the car up in a couple minutes. Really happy with how that turned out smile.gif
76-914
Muy congrats, Andrew. Question. In your last pic, I see you cut out the piece adjacent to the trunk light and then welded a piece back in the same spot? Re-enforcement or change of plans? More pics, pls. beerchug.gif
Andyrew
That 1' cutout is for the distributor on a SBC conversion. Different clearancing is needed for the Audi engine.
dan10101
Looking good. Progress!

Mike Bellis
piratenanner.gif
Andyrew
Click to view attachment
From yesterday, Finished off the welding on the body and the mounts, added the support, cutoff the excess and welded plugs to prevent rusting.

Click to view attachment
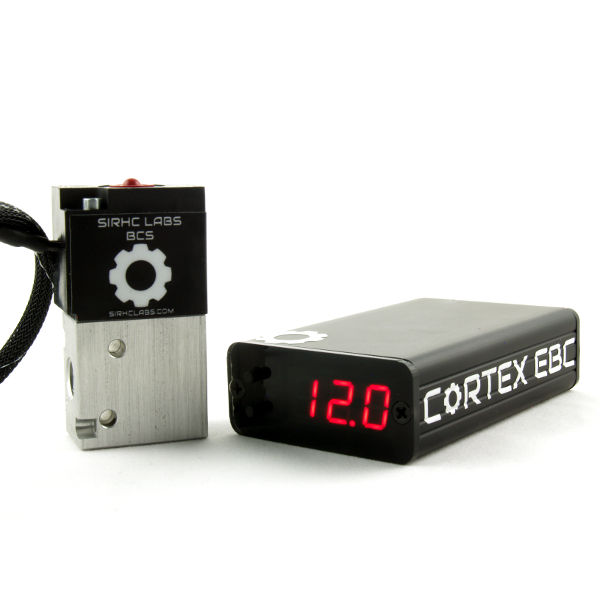
Bench tested my boost controller finally and its bad.... headbang.gif Trying to get a refund from ebay but the guy that sold it to me didnt sell me the wiring harness (he played stupid in his auction, stating it was something else...) so I had to wait for a harness from China to come in and when I tested it well... ya. Dead LCD.


IPB Image
So there happens to be a sale going on right now for another EBC that I am interested in. 6 settings (Which I like....) and its programed via computer. Gear based, RPM based, speed based, and can control my water injection as well (awesome!) Its very small so it would fit with my dash layout much better than the other one as well which I like.

http://www.usrallyteam.com/index.php?main_...roducts_id=2017
paroxysm
Not trying to hijack your thread

It looks very similar to my build, but for my rear tranny mount I just built an adapter.
I certainly need to upgrade my shifter assembly to be more rugged like yours mine was just some spare VW mk3 parts I had laying around.
IPB Image
IPB Image
IPB Image
I hope to just finish this car enough to drive the bugs out of it this year. Anyone know if I can drive on a base stage 3 big turbo tune? Or should I try and dyno tune this thing without any of the bugs worked out?
Andyrew
Awesome!

Do you have an active build thread on here? If not you should really make one, your build looks interesting! I think you have your engine about 2" forward of mine, do you have any cv issues and what cvs are you using?

What turbo are you using and what turbo is your stage 3 file for? I ran my turbo on my apr stage 3 file(made for a gr28rs) and didnt have any issues at 10psi but I was getting stuttering above that. You can get it tuned by some online tuners that give you a base tune and then fine tune it from logs you run.
paroxysm
QUOTE(Andyrew @ Jan 2 2016, 08:51 PM) *

Awesome!

Do you have an active build thread on here? If not you should really make one, your build looks interesting! I think you have your engine about 2" forward of mine, do you have any cv issues and what cvs are you using?

What turbo are you using and what turbo is your stage 3 file for? I ran my turbo on my apr stage 3 file(made for a gr28rs) and didnt have any issues at 10psi but I was getting stuttering above that. You can get it tuned by some online tuners that give you a base tune and then fine tune it from logs you run.

http://www.914world.com/bbs2/index.php?sho...0stuka&st=0
This should be my build thread.
The turbo is a gt28rs, my program is revo stage 3 for the turbo. My motor is an AWW 2001 with only 7000 kilometers on it, I paid $1200 for it.
The motor came with a electronic boost controller(not hooked up yet), walboro fuel pump, wideband O2 sensor, genesis 500cc fuel injectors, all new never used.
Now for the CV passenger side is a stock 911 with a empty CV case from a passat B5 used as a spacer, drivers side is a bmw 540i that was the correct length. Don't know how long they last but I had to go cheap for now and that setup only cost $10.
Only problem I've been experiencing is sometimes the car refuses to shut off, place the key in the off position car tries to shut down but then it revs up and continues running, also if I put the car in reverse with the ignition off the backup lights are on.
Andyrew
Ill continue this post on your thread smile.gif
Justinp71
aktion035.gif
Andyrew
Separated the engine from the trans last night and removed the intake and cylinder head

Click to view attachment

Click to view attachment

Click to view attachment

It appears as if the valves have been in contact with the pistons, you can see the mark on the piston in the center and 4 small nicks on the corners (think a square)


The engine builders are telling me to grind off the nicks and use the pistons but the valves need to be gone through.

Im going to take the cams off and do a leakdown on the valves then determine how much valvework I want to do. I have a line on titanium valves and springs that will help me push up the rev limiter to 9k but the turbo will die off after 8k(unless I put a larger exhaust housing on it..)

Trying to keep my engine work under 1500, but I am not sure if I will make it.
Andyrew
Finalized the disassembly of the engine and dropped off the engine at the engine shop.

Click to view attachment

Work to be done by the engine shop:
Clean block/head
Surface block/head
Hone cylinders
Install H beam rods on factory forged pistons
Balance Rotating assembly
Polish crank

Should be done in about 2-3 weeks. I will assemble the engine at that point.


Also BIG thanks to Mike Bellis for stopping by today and dropping off these MUCH NEEDED 100mm stub axles!

Click to view attachment
Dion
Andrew, wow! Just wow. Impressive project. Keep going, baby.
Having seen what goes into bodywork in person with 914Daves project,
I've a new appreciation for anyone who tackles bodywork that doesn't do it for a living
and does it properly. Very nice.
Andyrew
Progress:

Click to view attachment
Mounted my intercooler and one of my tanks.

Machine shop kicked it up a notch and pushed the engine assembly out in a week!
Click to view attachment
Got it back today and everything looks so clean! biggrin.gif

Andyrew
More of all the bits.

Click to view attachment

Click to view attachment
Removed the valves and cleaned up all the carbon deposits the hot tank didnt take off.


Click to view attachment
Removed the casting marks from the exhaust side, I'll hit the intake side this weekend.

Click to view attachment
Mmm looks so nice!
Andyrew
All the casting marks are removed from both intake/exhaust side smile.gif

Not sure it'll do anything but its at least a step forward on the head build. In a couple years when I build a full stroker motor I'll do a full blown port + polish head.

My Supertech high spring pressure valves and nitrite coated exhaust valves came in! However I had one hickup. I picked up this set new in bag from a Audi community member, apparently it had swapped hands quite a bit and the original owner back in ~08-09 was going to put it in his race car 914 1.8T swap! I have a feeling it was the white race car that was in Excellence mag.

I lapped all the valves just for safety and everything seemed just perfect. Then I replaced all the valve guide seals and started to install all the valve springs.

So onto the valve spring hiccup. I went to install all the springs (If you've done this on an OHV head you'll notice the TINY amount of room on the intake valves... This task took me hours.... Ugh, tiniest of screwdrivers and ~ 1/4" room to work in at a severe angle) and when I got to the exhaust side I noticed that one of the exhaust inner springs was sitting a bit taller than the rest, took it out and I think the manufacturer packaged it wrong and put an intake spring instead of an exhaust inner spring dry.gif.

Click to view attachment

Quick email to Supertech and after $12 for the spring and shipping I had it the next day! cheer.gif

Click to view attachment

Finalized the install on the valves and springs and went to put in the stock hydraulic lifters but noticed that a few of the lifters wouldnt spring very well even though they had been sitting for a week. I let them sit in some ATF to try and loosen them but no luck. So a quick youtube search lead me here.
https://www.youtube.com/watch?v=ySf0r8GGMOY

So I went and disassembled all my problem lifters and any I thought were not perfect, Labeled them in a bag per lifter hole and let them soak for 6 hours in some Purple Power.

Click to view attachment

After 6 hours the lifters themselves were very clean and I could see gunk floating at the top of the bags. Cleaned everything up and lubed them with some ATF and sunk them back in the holes they are for.
Andyrew
Oh and the tool I made for the valve guide seals.

Click to view attachment
dan10101
QUOTE(Andyrew @ Jan 24 2016, 02:45 PM) *

Oh and the tool I made for the valve guide seals.

Click to view attachment


I love to make tools from tools, tools into parts, parts into tools and of course, parts into parts.

Hey, make sure you didn't swap springs with another cylinder. I'm sure you checked, but that's what I would have done...
Andyrew
All the springs were new high strength, intake and exhaust, so no worries there (That said I still have them in line in a box).

I looked up a couple of valve guide seal removers and couldnt find what I wanted so this seemed like the best idea. Which was good because I really didnt have a lot of room to work with. Tape was there to prevent marring of the lifter walls.
Andyrew
Finished up the cylinder head with new cam seals, a new cam chain timed correctly, new cam chain tensioner gaskets and new bolts torqued down the exhaust cam gear and intake cam. Didnt have any means of holding the cam in place so I used the old timing belt and screwed it down to the bench.

Click to view attachment

Im still waiting for my rings to show up from Germany mad.gif or else the engine would have been assembled this weekend. In the mean time I took some time and plastiguaged the crank bearings, all came to be the exact same on the far side of the spec .038 which I think should help keep the bearings lubed up for the high RPM's and HP this motor will see.

Also I should note this engine will be receiving coated crank and rod bearings which will also help maintain the bottom end.

Click to view attachment

Threw in the oil pump drive with new seals.

I have the oil pump itself cleaning in some purple power for all of today and tomorrow. I'll put it back together and check the service limit of the pump before I throw it back on the engine.
Click to view attachment

Click to view attachment
veekry9
I am liking the longitudinal four layout,traditional with an F1 sting ('80's).
Still considering a version of my own starring the 944's S2,that I may get started on in a few years*.
I am watching closely,knowing a stretch is needed for the big four,being so long.
Have you any idea how many successful installs have been done?
I had a look around and could find no reference to the type.
You're gonna have a screamer,sounding like a champ car running the Drake and Offys..hmmm,methanol injection.
Found one,a Honda S2000 I think,I'll look some more.
I recall a thread about engine swap types,haven't found it though.

As you're working on a new dash and console,a quick perusal of the work Amida is doing should generate some ideas.
The methods he uses are straightforward and effective,beautiful.
http://www.fiero.nl/forum/Forum3/HTML/000091-50.html

Good for wiring diagrams,pcbs,chassis layouts,etc.
http://www.gimp.org/

Chris H.
Looking good! That's a lot of progress. Nice thing is you won't have to worry that anything is wrong with it internally when you BOOOOOSSSTTT it.

Have to agree the inline 4 is such a smooth, balanced engine. Every time I get in my DD (old) TSX I think...hmmmm.... idea.gif .... 2.4L, 200 ish hp... Am I the only one who looks at random cars on the road and assesses it's potential as a donor?
rick 918-S
Nice! Power on!
Andyrew
I agree certain inline 4's are really well balanced. I was suprized when I picked up the rotating assembly, they only took a tiny amount off the crank and added a small weld to the harmonic balancer. I didnt notice anything done to the piston assemblys either, but I had already weighed the rods to be exactly the same, didnt know about the pistons but they are generally pretty light.
Andyrew
Got some wrinkle black paint on the valve cover and some black paint on the block last week smile.gif

Click to view attachment

Got the rings Friday!

Click to view attachment

I spent some time and gapped them Friday evening.
Click to view attachment

Click to view attachment

Click to view attachment


#4 is not shown, it is the same as #3. My goal was .019in top ring, .020 ring bottom ring and the oil ring was fine with any gap (Shown is in MM). The bottom ring needed to be .001in wider gap than the top. The top will expand with heat and similar builds have put .018in for the top ring, but since I am going to use water/meth on my higher boost 91 file and E85 for my max boost file, the cylinder temps should be relatively low. and therefore wont need so excessive gap differences.
Andyrew


I also cleaned and started installing the crankshaft bearings caps. However when torquing the stretch bolts I had a very bad sound coming from the 3rd bolt I started stretching. The consensus so far is that I did not lube the heads of the bolts and it was binding on the bearing, also I had to much oil on the bolt itself and the oil was creating a physical barrier to stop the bolt from turning. I will be removing the bolts that I havent stretched yet, blow out the holes and reinstall the bolts. I will do this tonight when I get home..

Also, parts parts parts parts...
Click to view attachment
Andyrew
Valve cover
dan10101
QUOTE(Andyrew @ Feb 8 2016, 01:32 PM) *

Valve cover


Did you see the Audi commercial where the old Astronaut was bored and depressed until his son took him out for a ride in his new Audi?

It's not like I'm hinting or anything.
Andyrew
Your welcome to the keys for as long as you want smile.gif
Andyrew
Since I am not likely to post any progress from this weekend wub.gif I'll post the current progress today.

I finished the installation of the crank without a hitch. I cleaned up the piston ring groves since they were not cleaned properly from the machine shop. Also removing the caps on the rods was a PITA! I installed the rods/pistons and crank 100% with assembly lube and dipped the piston rings in oil.
Click to view attachment

I also put the cylinder head on with new stretch bolts and lightly lubed the bolts and bolt heads with assembly lube. No issues on install of those smile.gif Finally I installed the intake manifold. I am however missing a couple of nuts for the ends of the intake manifold so I need to grab some.
Click to view attachment


I tried installing my manual timing belt tensioner, but my grade 8.8 M6 bolts were stretching as I tried tightening them down to 20lb. Im going to go to the bolt store Friday to see if they have any grade 10.9 bolts and maybe those nuts I need.

Click to view attachment
So I opened up and modified my water pump so it wont be a resistance for my electric water pump. I think it was the easiest option, maybe some day down the road I'll weld up a custom fitting but this wasnt in the cards at this point.


Andyrew
Progress has been slow due to the holiday and I was away all last weekend for a guys weekend. Hopefully I can spend some time this weekend on it.

I bought some new M6 grade 8.8 bolts for the tensioner as I couldnt get any 10.9. Installed the tensioner and tried adjusting and noticed it wasnt tightening..... Apparently this is a common issue for this aftermarket $150 tensioner... mad.gif The manufacturer has yet to comment on my warranty claim.

Click to view attachment

However I figured out how to make their $150 kit with the factory components, which makes me pretty angry. Its solid metal so I can tighten it down as many times as I want...
Click to view attachment

After this I tried turning the engine all the way around and it came to a hard stop. I checked all the valves and engine position and didnt find anything in the way. After a couple days of research I found out the problem was related to the oil pump shaft. The gear at the end of the shaft is near cylinder 4, my performance rods aparently require the gear to be clearanced 6mm or they hit.
Click to view attachment
IPB Image
I have the shaft at the machine shop, they are machining it down and are going to balance the shaft when they are done (the shaft apparently is very unbalanced from the factory). It wont be lightened and polished like this one, but at least itll be balanced.
IPB Image

Andyrew
And some more small updates. I didnt have a crank lock so I built one for the front and rear of the crank. Rear for the crank gear (not pictures) and front for the flywheel/clutch.
Click to view attachment

Click to view attachment


And I threw on the injectors/fuel rail/regulator.
Click to view attachment
76-914
Great progress!
Andyrew
Final update for February.

Click to view attachment

Click to view attachment
Got my oil pump shaft back and installed it in the engine. The guys mentioned that it was extremely out of balance, makes me feel really good that I got it balanced smile.gif

Click to view attachment
Removed the axle flanges and installed the new 100mm axle flanges with new C clips and flange seals (Oh and old crank bolts worked really well to thread through the 108mm flanges to pry against the trans and work the flange out). I had to use a hammer and dowel to drive the flanges in place, but they are in now and seem to be OK. If something happens then oh well, luckily these are all readily available parts so no real worries.

Click to view attachment
Mounted the engine to the trans, I didnt have the upper dust cover so I just shimmed the engine to the trans with a washer and moved the oil pan accordingly (according to the manual) since the trans has 3 bolts on the bottom that go to the pan. Took 3 trips to Home depot to get some bolts... All grade 10.9 vs the stock 8.8 which is nice. All torqued to 45ft lbs on the motor and 35ftlbs on the trans.
914forme
Making great progress here!
Justinp71

Looking Good!
Andyrew
Test fit the engine with the trans/flanges so I could test fit other components for fitment.

Click to view attachment


Click to view attachment
Turbo outlet and DV pipe test fit. Great clearance smile.gif

Click to view attachment
2' of aluminum pipe will be great here. I'll weld in the blow throught MAF fitting on this pipe.

Click to view attachment
3" cone filter will work here for now. It will be located in the Pass fender after 3 month test period.

Click to view attachment
But the big news is the super locally available bus axles will work right now of the box smile.gif I let the wheel hang and I still had ~1 1/2 total play in the axle. smile.gif So if I blow an axle I should be able to go to any NAPA and get a replacement.
Remember this is 100mm trans flange, Bus 100mm axles w/ stock 18 3/4" clip to clip length and renegade hybrids 100mm flange adapters on the stub axle to the stock 914 axle. This leaves me with two spare adapters smile.gif
cheer.gif
I can also help this with a grease fitting spacer or maybe my ABS rings that I am going to build later in the future.


Been buying misc bits and pieces I find I am needing. I should be 100% on fuel fittings and lines now. AN stuff is expensive especially when you have to deal with E85... I think I have ~ 400 just in fuel lines/filters/fittings..
matthepcat
Nice work. This thread is nearing the fun stage for us observing...where cool noises happen.
Mueller
Great progress....looks good in there!
This is a "lo-fi" version of our main content. To view the full version with more information, formatting and images, please click here.
Invision Power Board © 2001-2024 Invision Power Services, Inc.