Yeah it may be time to separate that setup if no one wants to pay up. It's a damn good engine. Needs a wider audience.
BTW why does every car comment remind me of a movie?
https://www.youtube.com/watch?v=tWTjf0-GBQQ
This was my 2am college move go-to. Hollywood Knights.
Full Version: Andyrews Progress Thread
QUOTE(Chris H. @ Aug 5 2015, 05:28 PM) 
Yeah it may be time to separate that setup if no one wants to pay up. It's a damn good engine. Needs a wider audience.
BTW why does every car comment remind me of a movie?
https://www.youtube.com/watch?v=tWTjf0-GBQQ
This was my 2am college move go-to. Hollywood Knights.
 "this punch does have a little WHANG to it..."
"Good though...."
Remember this Cobra in the movie?
The only way they could get it into the scenes was to allow its actual owner to do the driving. So the owner/driver picks my friend and body+paint man Jack Kimoto to sit shotgun during the street race scenes.
How cool is that ? Click to view attachment
The only way they could get it into the scenes was to allow its actual owner to do the driving. So the owner/driver picks my friend and body+paint man Jack Kimoto to sit shotgun during the street race scenes.
How cool is that ?
Click to view attachment
QUOTE(Maltese Falcon @ Aug 6 2015, 12:01 AM)
Remember this Cobra in the movie?
The only way they could get it into the scenes was to allow its actual owner to do the driving. So the owner/driver picks my friend and body+paint man Jack Kimoto to sit shotgun during the street race scenes.
How cool is that ?
Click to view attachmentAnd going up against someones "rail job", basically a slightly lengthened frame with a '23 t-bucket dropped on it. I'd take the Cobra anyday...
If you need a good example of a real Cobra accelerating, check out the Gumball Rally sequence toward the end when the Cobra and the Daytona Ferrari exit the LA river and hit the surface streets- the Daytona moves out fast but the Cobra literally LEAPS from gear to gear as the exhaust sound explodes from the pipes. The sound may have been file audio but it's one of the greatest examples of power to weight ratios in film IMHO...

Well... Lots of little things have been happening. Nothing Huge BUT lets to a rundown.
Interior is stripped, and I finally threw some galvanized paint on my longitudinal reinforcements since they were bare.
Click to view attachment
Next big thing to figure out on the interior is the steering column. It looks like I need to cut the dash up to mount the column. Then I need to find some way of adapting the column to the 914 shaft.
Click to view attachment
In the mean time I have been acquiring quite the parts collection.
Steering column and wheel
Click to view attachment
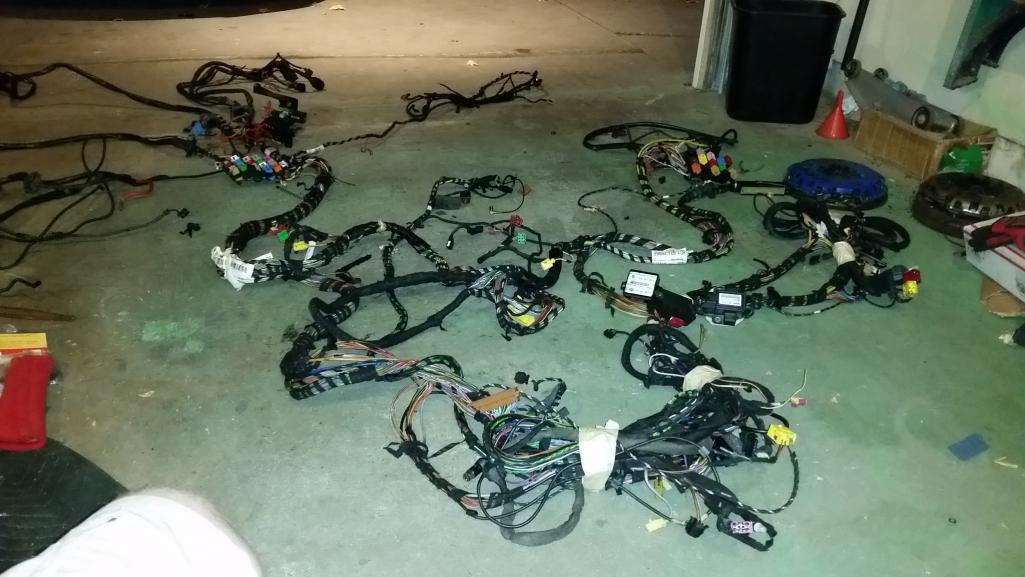
Body wiring harness
Click to view attachment
Interior is stripped, and I finally threw some galvanized paint on my longitudinal reinforcements since they were bare.
Click to view attachment
Next big thing to figure out on the interior is the steering column. It looks like I need to cut the dash up to mount the column. Then I need to find some way of adapting the column to the 914 shaft.
Click to view attachment
In the mean time I have been acquiring quite the parts collection.
Steering column and wheel
Click to view attachment
Body wiring harness
Click to view attachment
Dash wiring harness (There are 2 dash wiring harnesses in the picture)
Click to view attachment
Engine harness (Bought it a while ago, but here it is laid out on plywood for storage and sorting)
Click to view attachment
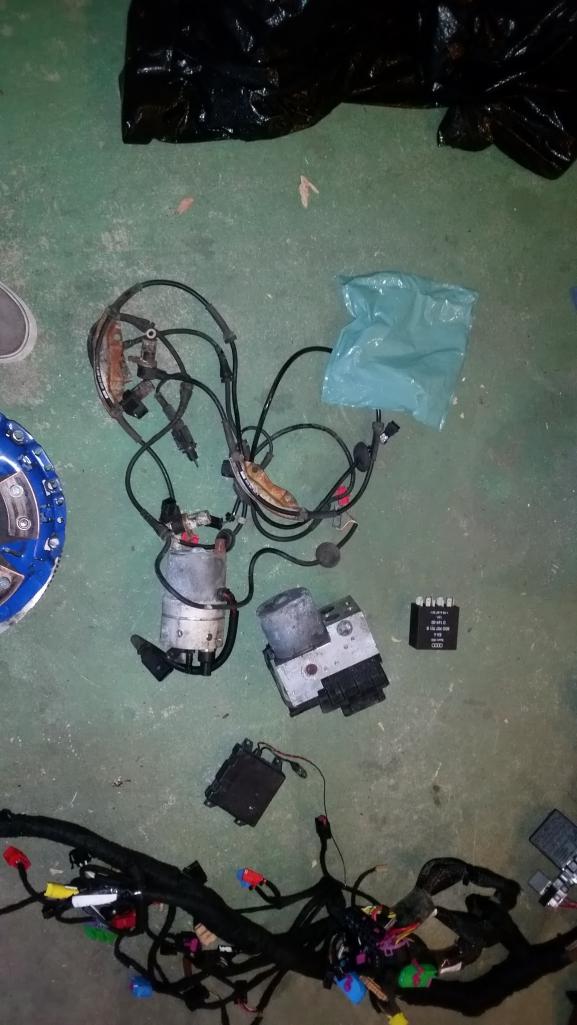
ABS module/block/sensors and pump for stability control (brake assisted)
Click to view attachment
240MM 12lb flywheel for the 1.8T engine, 6 puck disk and standard pressure plate.
Click to view attachment
Click to view attachment
Engine harness (Bought it a while ago, but here it is laid out on plywood for storage and sorting)
Click to view attachment
ABS module/block/sensors and pump for stability control (brake assisted)
Click to view attachment
240MM 12lb flywheel for the 1.8T engine, 6 puck disk and standard pressure plate.
Click to view attachment
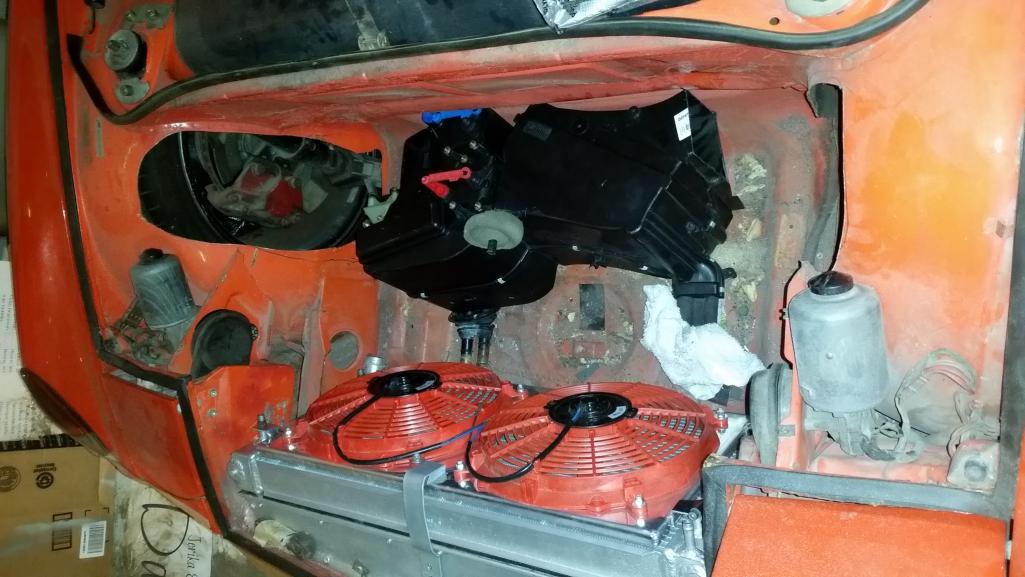
Ac/Heater box complete
Click to view attachment
AC Heater box cut in half (removed fan) and opened up.
Click to view attachment
Fan in mock up position
Click to view attachment
Ac/Heater box in mock up position. Yes this will kill half the front trunk but I still have plenty of space for a medium sized suitcase up front and this gives me much more legroom in the cabin. This position was suggested by my Jerika (my wife) and after looking at it, it make a lot of sense! And yes it is upside down, I dont have a good photo of the mock up position. The heater core connection lines will be cut short and the AC lines might get bent just to get a bit more room. And yes I will cut some holes to run the ducting to the cabin.
Click to view attachment
Click to view attachment
AC Heater box cut in half (removed fan) and opened up.
Click to view attachment
Fan in mock up position
Click to view attachment
Ac/Heater box in mock up position. Yes this will kill half the front trunk but I still have plenty of space for a medium sized suitcase up front and this gives me much more legroom in the cabin. This position was suggested by my Jerika (my wife) and after looking at it, it make a lot of sense! And yes it is upside down, I dont have a good photo of the mock up position. The heater core connection lines will be cut short and the AC lines might get bent just to get a bit more room. And yes I will cut some holes to run the ducting to the cabin.
Click to view attachment
Steering column is mounted and moved back.
Unlike Mike my steering column was not surrounded with steel it was surrounded with aluminum . So I first had to build a steel enclosure for that and then mount that to the 914 body. I decided to weld it and bolt the Audi column to it. (Secured with 8 1/4x20 bolts and an extremely tight fitting enclosure, Hammer required)
Click to view attachment
Click to view attachment
Click to view attachment
Unlike Mike my steering column was not surrounded with steel it was surrounded with aluminum
. So I first had to build a steel enclosure for that and then mount that to the 914 body. I decided to weld it and bolt the Audi column to it. (Secured with 8 1/4x20 bolts and an extremely tight fitting enclosure, Hammer required)Click to view attachment
Click to view attachment
Click to view attachment
However the position was not good enough for me... So I modified it, essentially twisted the assembly in and down (then back up). More bracing will follow later when everything gets fully welded and braced where needed.
Click to view attachment
Before, All the way up and tilted up.
Click to view attachment
After, All the way up and tilted up.
Click to view attachment
Click to view attachment
Before, All the way up and tilted up.
Click to view attachment
After, All the way up and tilted up.
Click to view attachment
Before all the way up and tilted down.
Click to view attachment
After all the way up and tilted down.
Click to view attachment
It only moved it away from the driver maybe 1/2 an inch, but I think it made a big difference in the driving position. I am very happy with it where it is. Now I will modify the steering shaft and get all that squared away!
Click to view attachment
After all the way up and tilted down.
Click to view attachment
It only moved it away from the driver maybe 1/2 an inch, but I think it made a big difference in the driving position. I am very happy with it where it is. Now I will modify the steering shaft and get all that squared away!
So are you going to have a fixed seat or adjustable like stock? I agree that getting the column just right is essential for any mods- I'm planning on that using the stock SVX steering column but I've got tilt and telescopic, however not much in the latter. I'm getting all kinds of ideas from your last few pictures and getting antsy sitting in this frickn' wheelchair- I want to start working on stuff!! 
Drivers seat is on forward and back rails as low as possible. Passenger seat is on stock 914 rail.
I am 6'0 with a lot of mid body height.
The Audi steering wheel is quite a lot bigger than the Momo I had in there previously. I'll keep looking around for a factory Audi wheel that is smaller and possibly pushed back , if I can find something then I think it'll help quite a bit as well.
I am 6'0 with a lot of mid body height.
The Audi steering wheel is quite a lot bigger than the Momo I had in there previously. I'll keep looking around for a factory Audi wheel that is smaller and possibly pushed back , if I can find something then I think it'll help quite a bit as well.
I might have found a solution that will push the steering wheel back some more.
The Audi steering wheel is VERY profiled. It is a good 4" in profile. This NRG adapter is low profile, say 1 1/2", Combine that with a nice flat steering wheel and not only do I get to actually use the telescoping feature, I can get a smaller steering wheel. Need to measure to ensure that the stalks are not going to get in the way.
http://thmotorsports.com/nrg-innovations/n...h/i-286499.aspx
Steering column is done 
Lots of mods to the steering linkage, but its very solid and seems smooth enough. Its also in the original position that the 914 steering knuckle was so that's a plus. Click to view attachment
Click to view attachment
Modifications to the steering knuckle and column moved the knuckle assembly forward almost an inch.
Gotta love those Germans....
Audi apparently individually wraps and connects all their different wiring harnesses separately.. They also have white ID tags on all their harnesses with part numbers that I can look up (most of the time) and ID what exactly they are for!
So I took the big chassis wiring harness (You remember, this one..)
And I removed all the wiring harness looms that I will not be using in the car.. And we made... Note I did remove one harness after this pic, and I havent touched the engine side (Note not engine harness, just all the wires on the engine side you can see they all have black plastic shrouding) So it will likely be a bit smaller all said and done.
Click to view attachment
And we got this left over! Total weight of the removed wiring was ~ 20lbs!
Click to view attachment
If I ever need to I can add the harnesses back relatively easy!
Next is to go through the dash harness and remove the similar wires that I dont need.
I only have 2 harnesses left interior side of the chassis harness. the "body" which is basically all the lights, and "ABS" which houses all the stability control stuff and the abs stuff.
My OG plan was to do as you have done Andrew, albeit Subaru. Then I realized that I may not live long enough to see it to completion,  . You however, have time on your side and I like your approach. WORD: don't drink or smoke anything when messing with the electrical. Your brain is left scrambled after a few hours of re-wiring anyway so there is no sense in starting out that way.
 I notice you try to work on it a little every day. Smart, if only for 1/2 hour at a time! At this rate you will be back on the road before Christmas.
  Kent
Kent
. You however, have time on your side and I like your approach. WORD: don't drink or smoke anything when messing with the electrical. Your brain is left scrambled after a few hours of re-wiring anyway so there is no sense in starting out that way. I notice you try to work on it a little every day. Smart, if only for 1/2 hour at a time! At this rate you will be back on the road before Christmas. Kent
My wife is currently busy with her masters degree schoolwork, so I get to spend ~ an hour or two on it 2-3 nights a week and then about 4 hours on it on the weekend (More if I get up early).
I dont think Christmas is in the cards at all... If I can make it by Christmas of NEXT year I will be happy.
The good thing about the wiring that I am doing right now is that the more I do the more sense everything makes. Im taking quite a bunch of pictures that are not posted, but I try to post everything that could be helpful to the next build (I might just do another Audi build... This is really starting to make sense... Probably not another one with ESP or power brakes, but maybe ABS...)
I dont think Christmas is in the cards at all...
If I can make it by Christmas of NEXT year I will be happy. The good thing about the wiring that I am doing right now is that the more I do the more sense everything makes. Im taking quite a bunch of pictures that are not posted, but I try to post everything that could be helpful to the next build (I might just do another Audi build... This is really starting to make sense... Probably not another one with ESP or power brakes, but maybe ABS...)
Take it from me my friend... Once you start on wiring keep going. Do not take time off the project. No vacations. No long weekends away. No breaks! Not until you have it sorted out.
Once it's in your head, keep it there. A month off the car will be a real PITA to get back to.
Once it's in your head, keep it there. A month off the car will be a real PITA to get back to.

It appears as if I need to do an intro for the "Build Off Challenge" So here are the details
Andrew Dalen
Andyrew
Modesto, Ca
73 914 1.7 (Previously 5.7 SBC swap)
New engine: Audi 1.8 Turbo (Low boost: 275hp, Daily boost: 400hp, Race boost: 500+HP)
Exterior Color: Orange (Hugger Orange)
Interior color: Cinnamon Whisp/ Black Suede, Silver Paint
Wiring: Audi wiring 100%
Engine management: Modified OEM Audi ECU
ABS: Yes
Traction control and Stability control: Yes
Launch control: Yes
Cruise control: Yes
Climate control: Yes
OBD2 full control: Yes
Front and rear trunk: Yes!
Anticipated total budget required: $6500 less sold parts
The 5 large obstacles that I need to overcome are below.
1. Wiring layout/strip and integration into 914 wiring(Lights and wipers)
A. Finish ID'ing every plug
B. Finish stripping wiring (Dash harness, body harness, and engine harness)
C. Finish removing 914 wiring as well as existing wire identification
D. Install Audi harnesses
- 1. Locate and test install engine harness in body.
- 2. Locate and install dash harness in body.
- 3. Locate and install body harness in body.
- 4. Install engine harness in body.
E. Run power lines to the battery
F. Install battery and check for any shorts
G. Wire up lights and wipers
(This was just one of three harnesses required)
2. ABS Module integration (replumb all brake lines, abs sensor and pickup integration, revised pedal box)
A.
B.
C.
D.
E.
3. Audi engine/trans install
A. Remove v8 and cut out all non essential brackets and shelving in the engine bay.
B. Mount the mock up engine/trans together and locate it in the engine bay.
C. Cut out sections of the trunk for clearance
D. Create motor and trans mounts and mount engine/trans
E. Mount turbo and route plumbing for intercooler
F. Mock up and measure cv joints for order
G. Mount new fuel pump and run lines
H. Rebuild engine and install forged rods
I. Locate water pump, water reservor and lines
J. Plum intercooler pump, reservor, lines and radiator
K. Plumb oil cooler lines and run turbo lines
L. Run transmission shifter cables to the cabin, bleed clutch
M. Fabricate exhaust system
N. Oil and water in engine, hood up electrical connections except spark plugs, crank engine for 2 minutes to generate oil pressure and check for leaks.
O. Check ECU for error codes and address as needed.
P. Finalize connections and fire engine.
Q. Figure out what went wrong, fix it, and actually start the engine
R.


4. Audi a/c and heater box mounted and plumbed in the front trunk, factory Audi climate control integration.
A.
B.
C.
D.
E.
5. Full custom interior build from scratch (custom dash, doors,center,back,ect. Tablet install for radio/nav/onboard diagnostics)
A.
B.
C.
D.
E.
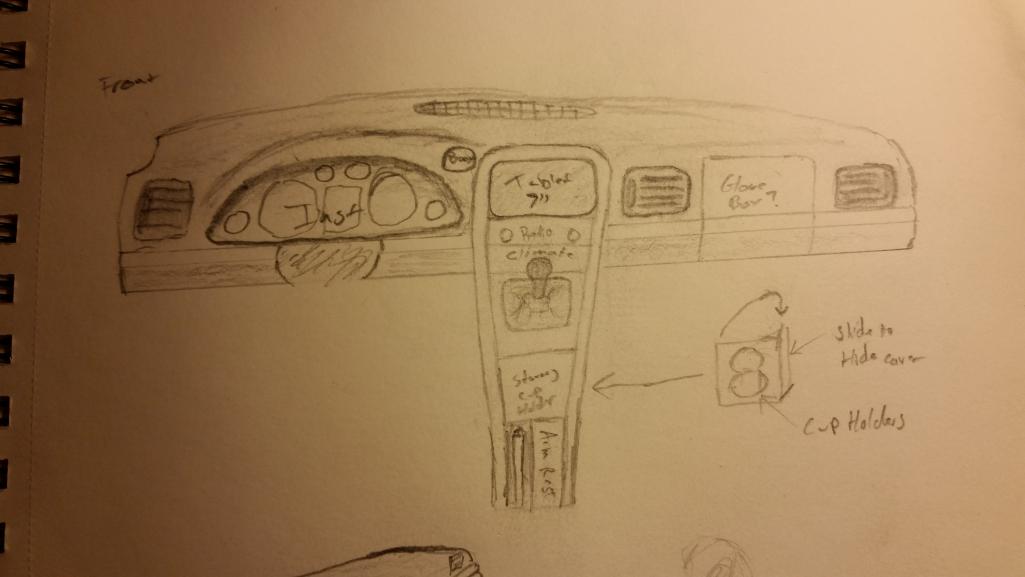
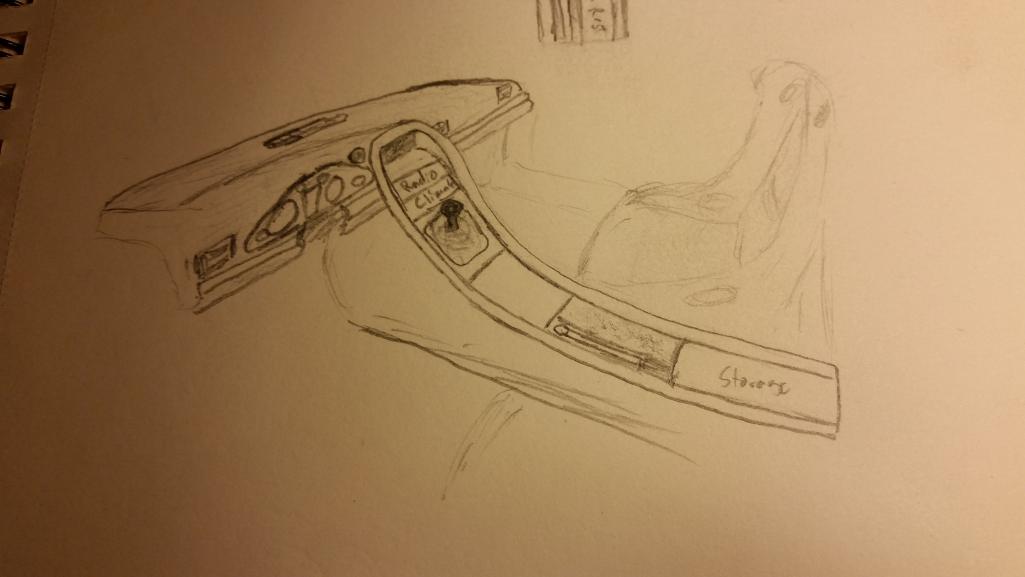
(Note, this is draft one, I already have a new concept in mind for the interior that I have been drawing up)
You can see from the pics earlier in the thread that the bodywork is done and painted. Trunks will be painted in the build as well as probably a repaint of the engine bay. I also will redo the bumpers, but this may not make it into the build.
I'm suffering from turbo envy! This will be an awesome build. I've been watching this for several months now, that 1.8L motor is impressive!
Click to view attachment
Figured out my front end wiring 914 side. I was waiting for a friend to come by and help me figure out some of the audi wiring and I have been waisting a lot of time thinking about wiring but it didnt happen, so.....
Click to view attachment
Click to view attachment
I pulled the v8 engine (buyer found), Ill be putting this in a members 914 in a couple of weeks.
Looks like it takes about 4 hours to pull the engine myself with breaks and figuring out how to lift the car up.
Ordered some spot weld cutting bits so the next thing is cleaning up the engine bay and removing the shelf. Once that is all done I can mock the engine and trans up and work on mounts, then when its all mounted I can switch back to finishing up the wiring
What is it about wiring? The easiest part of a rebuild; physically speaking. Mentally; the most demanding part. I can see an entire build in my mind except the electrical.  It's like entering a swamp.
It's like entering a swamp.
The biggest thing for me is that since I am simply using the Audi wiring harness I need to keep all the major components. I have about 30 plugs that I can not identify yet and I have yet to completely label the engine harness (However I have a full diagram that is labeled). I had a buddy that has stripped a couple of Audi's that knows most of the plugs in the car so I wanted him to come and help me ID the plugs I couldnt identify yet so I can determine if there are any more harnesses I could remove, or at least so I can place the harness in the correct place. Once that is all done I can work down the list of my TO DO's on my wiring.
NOTE: I updated post 422 to reflect my wiring to do's and my engine related to do's.
NOTE: I updated post 422 to reflect my wiring to do's and my engine related to do's.
Neat drawing...looking forward to seeing this in person when you finish it.
I'm looking forward to Andrew actually driving his car...
Would be nice for sure I doubt I have more than 5k miles on the car in total
I doubt I have more than 5k miles on the car in total
There Multiplying...
Delay in progress due to mini build on members car.
http://www.914world.com/bbs2/index.php?showtopic=267385
Delay in progress due to mini build on members car.
http://www.914world.com/bbs2/index.php?showtopic=267385
Happy Birthday to me! 
I received my new fuel setup in the mail. Very excited about this.
Click to view attachment
Bosch 1000CC EV fuel injectors (Can run up to a 93% duty cycle reliably) This puts me right at 545HP max at E85 with 43.5psi.
Fuel pump is the outstanding Bosch O44 which is one of the strongest and linear in the industry and can change the fuel pressure if I find that being required.
Now here is the fun bit
http://store.034motorsport.com/fully-enclo...-bosch-044.html
Fuel surge tank. This encloses the Bosch 044 fuel pump and allows for it to be submerged constantly(Less noise and cooler running). The surge tank is primed by a carb low pressure fuel pump and remains full constantly effectively preventing any possibility of fuel starvation in corners. This also has the added benefit of allowing me to use the stock style fuel lines since they will be under zero pressure and allow for 100% flow of the lines. I will put this surge tank in the engine bay and it will keep my expensive high pressure lines very short and allow for no line pressure loss due to length
Its a win win win!
Presents from my wife.
Click to view attachment
Ironically my wife checked out my amazon wish list and grabbed a couple items.
1.Low pressure fuel pump
2. Roller and corner roller tools for building the interior
3. Shades (Because you have to look cool)
4. Candy
5. Beer chiller
Finally had some friendly competition between my car and her car with her driving on Forza! Very proud that she actually beat me when I was using a stock 914!
Click to view attachment
turn up the pressure and turn down the duty cycle. I'm running at 4 bar (58.8 psi). 034 recommended my 330cc injectors at that pressure for my hp goal.
Really 330CC's? Im really surprised that your able to push those injectors that much... I had 440's that I maxed out and IIRC I was running a 4bar FPR, mind you I was making similar power that you are now. You sure your only on 330's?
And yes I don't plan on running my duty cycle that high, I'm just showing where the injectors currently are at the standard pressure. I am probably going to tune for 4bar FPR. Whatever my tuner thinks is the best for my needs
And yes I don't plan on running my duty cycle that high, I'm just showing where the injectors currently are at the standard pressure. I am probably going to tune for 4bar FPR. Whatever my tuner thinks is the best for my needs
![popcorn[1].gif](http://www.914world.com/bbs2/style_emoticons/default/popcorn[1].gif)
With being a recent vw/audi owner (GTI), I am excited to watch this build.
Andrew are you pulling the motor out of the A4?
QUOTE(Justinp71 @ Nov 16 2015, 12:57 PM)
With being a recent vw/audi owner (GTI), I am excited to watch this build.
Andrew are you pulling the motor out of the A4?
A4 has been sold as a driver. My daily being my Fiesta ST has given me no need for the quattro...
Motor I have is out of the junkyard. Im going to open it up to see if I want to built it. But I am keeping an eye out for a good usable motor. Maybe one with VVT so I can get some more low end.
End goal is to build a motor with cams, ported, oversized titanium valves and springs, rods/ stroker/pistons. Build it to rev to 8500 and put a larger hot side if I feel it needs to breath better up top. That would give me well over 4k rpms of usable power.
OT: Just saw your car in the calendar. Great shot! 
Last years calendar right? I specifically didnt enter this year as I was already in it last year and wanted to give more people an opportunity to pop in..
Besides I voted for the hillside shot of the "multiple" cars, my Fiesta ST is actually hiding in the back
Besides I voted for the hillside shot of the "multiple" cars, my Fiesta ST is actually hiding in the back
Gotta get back on the horse!
Engine shelf removed/trimmed.
Click to view attachment
Click to view attachment
Test mounted the engine/trans then test set it in the engine bay. Looks like to make the axles level the pass side needs to be 1/2" higher than the drivers side when its on the movers dolly. Simple enough
Click to view attachment
Click to view attachment
Im still positioning the setup left,right, up, down, tilt, back. In my head the setup needs to come back an inch and up 2-3, or tilted forward about 5-10 deg to get the trans tucked up a bit more and the axles more level with the suspension. I'd like to get the axles almost level when the car is in its resting position.
Click to view attachment
Click to view attachment
Click to view attachment
Hard to see in this photo, but the trans is about 1" forward of the axles when the engine is touching the firewall.
And finally, started reinforcing the rear shock tower for my brace. I am going to remove the firewall where the blue tape is (did get a full pic of it) and rebuild/box it about 6" back where the shocks are. I'm going to have a local metal shop bend up some steel similar to the 914 humps for strength and weld it in to the 1" bar brace I weld in between the towers. I am going for a near factory look when done.
Click to view attachment
Click to view attachment
Click to view attachment
Click to view attachment
Click to view attachment
Hard to see in this photo, but the trans is about 1" forward of the axles when the engine is touching the firewall.
And finally, started reinforcing the rear shock tower for my brace. I am going to remove the firewall where the blue tape is (did get a full pic of it) and rebuild/box it about 6" back where the shocks are. I'm going to have a local metal shop bend up some steel similar to the 914 humps for strength and weld it in to the 1" bar brace I weld in between the towers. I am going for a near factory look when done.
Click to view attachment
Click to view attachment
Are you going to add more support in the front corners of the engine bay? I ask because we were looking at my build car (cut out engine tray) and the parts car (tray intact) thinking that's a fair amount of triangulation/support. Just looking to what others are doing in that arena.
Steve
Steve
Its a fair amount of triangulation to the firewall which is essentially non structural.
That being said yes there is some additional reinforcements to come in the rear suspension console. Specifically the typical firewall to rear suspension ear. I am debating how exactly I am going to do my engine bar at this point, so I want to make sure everything is as strong as possible.
That being said yes there is some additional reinforcements to come in the rear suspension console. Specifically the typical firewall to rear suspension ear. I am debating how exactly I am going to do my engine bar at this point, so I want to make sure everything is as strong as possible.
I think you will end up cutting out the battery tray. There is very little room once you get everything bolted on. My turbo is smaller than yours... 
My manifold is more compact
Ill test mount it after I cut the firewall and see.
Ill test mount it after I cut the firewall and see.
QUOTE(Andyrew @ Nov 23 2015, 09:50 PM)
My manifold is more compact
Ill test mount it after I cut the firewall and see.
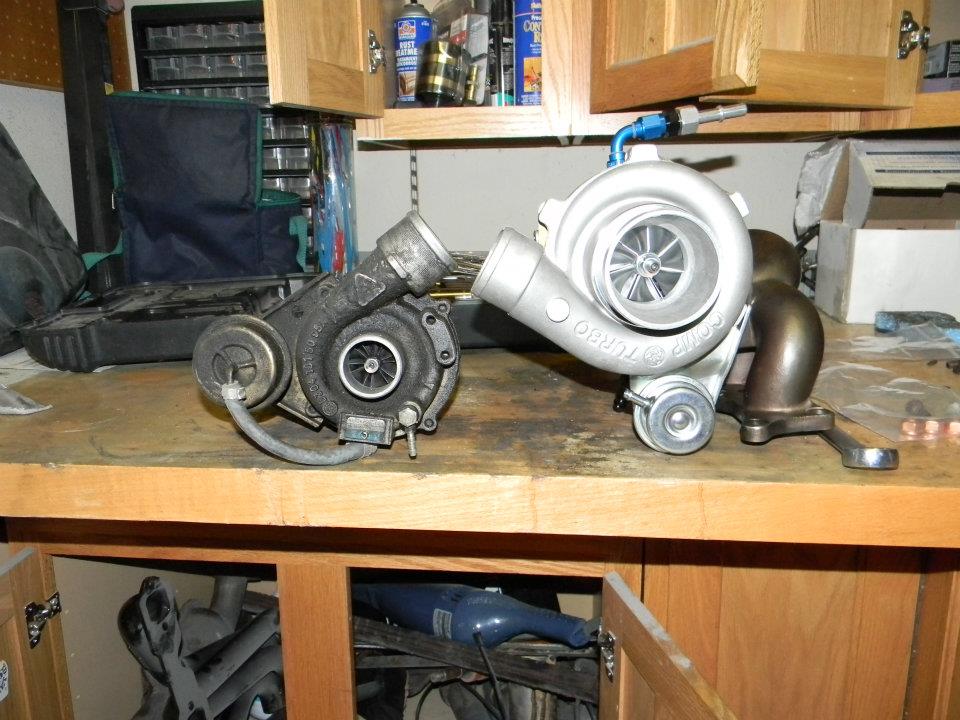
I'm running the smallest T3 manifold I could find. Ended up being the cheapest too.
It fits just fine in fact the manifold is about an inch away from the head so itll suck in more.
Click to view attachment
Also I got my water to air intercooler. Big hunking thing, a full 20lbs.
Click to view attachment
in fact the manifold is about an inch away from the head so itll suck in more. Click to view attachment
Also I got my water to air intercooler. Big hunking thing, a full 20lbs.
Click to view attachment
QUOTE(Andyrew @ Nov 25 2015, 11:34 PM)
It fits just fine
in fact the manifold is about an inch away from the head so itll suck in more. Click to view attachment
Also I got my water to air intercooler. Big hunking thing, a full 20lbs.
Click to view attachment
That turbo sites nice and low! More pics please...
Click to view attachment
Overnight Parts from Japan! left is radiator tank for the water injecton (might not use this), middle is gold foil heat shielding, and right is turbo blanket.
Click to view attachment
YZ85 radiator. Should make a nice water to air intercooler radiator. Shown in the dr side fenderwell.
Click to view attachment
Electronic boost controller. Best on the market for features. Used this one many times.
Click to view attachment
Davies Craig EWP130 water pump with LCD controller. Really happy about this one
Overnight Parts from Japan!
left is radiator tank for the water injecton (might not use this), middle is gold foil heat shielding, and right is turbo blanket. Click to view attachment
YZ85 radiator. Should make a nice water to air intercooler radiator. Shown in the dr side fenderwell.
Click to view attachment
Electronic boost controller. Best on the market for features. Used this one many times.
Click to view attachment
Davies Craig EWP130 water pump with LCD controller. Really happy about this one
Click to view attachment
I did a thing... welded in a reinforcement to the shock towers prior to making the cut. Im going to cover the hole in ribbed 16ga steel. But before I do that ill box in a reinforcement to the shock tower from the rear long and seam weld all the joints for strength.
Not pictured but I got the injectors back from cleaning. Apparently they are 1300cc injectors not 1000cc, so lots of headroom for e85, should keep the injectors nice and efficient.
Looking Good! What turbo are you running?
Justin,
Comp Turbo triple ball bearing CTB5356 About the size of a GT3071R.
Comp Turbo triple ball bearing CTB5356 About the size of a GT3071R.
This is a "lo-fi" version of our main content. To view the full version with more information, formatting and images, please click here.